

- Add an Airflow provider to your Airflow environment.
- Create and use an Airflow connection.
- Create and use an Airflow variable.
Time to complete
This tutorial takes approximately 30 minutes to complete.Assumed knowledge
To complete this tutorial, you’ll need to know:- How to write DAGs and run Airflow. See Part 1: Write your first DAG.
- The basics of git. See the tutorial on Git’s official webpage.
Prerequisites
- The Astro CLI version 1.25.0 or later.
- The completed project from Part 1: Write your first DAG. To jump directly into this tutorial, create a new Astro project and copy the code at the end of Step 6 into your project as a new DAG.
- A GitHub account with a personal access token and at least one repository. If you don’t have a GitHub repository you can follow the steps in the GitHub documentation on how to create one.
If you don’t have a GitHub account, you can create one for free on the GitHub website. To create a personal access token, see the official GitHub documentation.
Step 1: Create your DAG
In this second part of Astronomer’s introduction to Airflow, you’ll add a third DAG to your Astro project. Instead of writing the DAG yourself, you’ll copy the DAG code from the Airflow Registry, which contains documentation for Airflow providers and modules as well as many example DAGs. The new DAG interacts with GitHub and two external APIs to print the location of the International Space Station (ISS) to your task logs after a specific commit message is pushed to your GitHub repository.-
Create a new Python file in the
dagsdirectory of your Astro project calledfind_the_iss.py. -
Open the Astronomer Registry page for the
find_the_issexample DAG. Click</>and copy the DAG code that appears.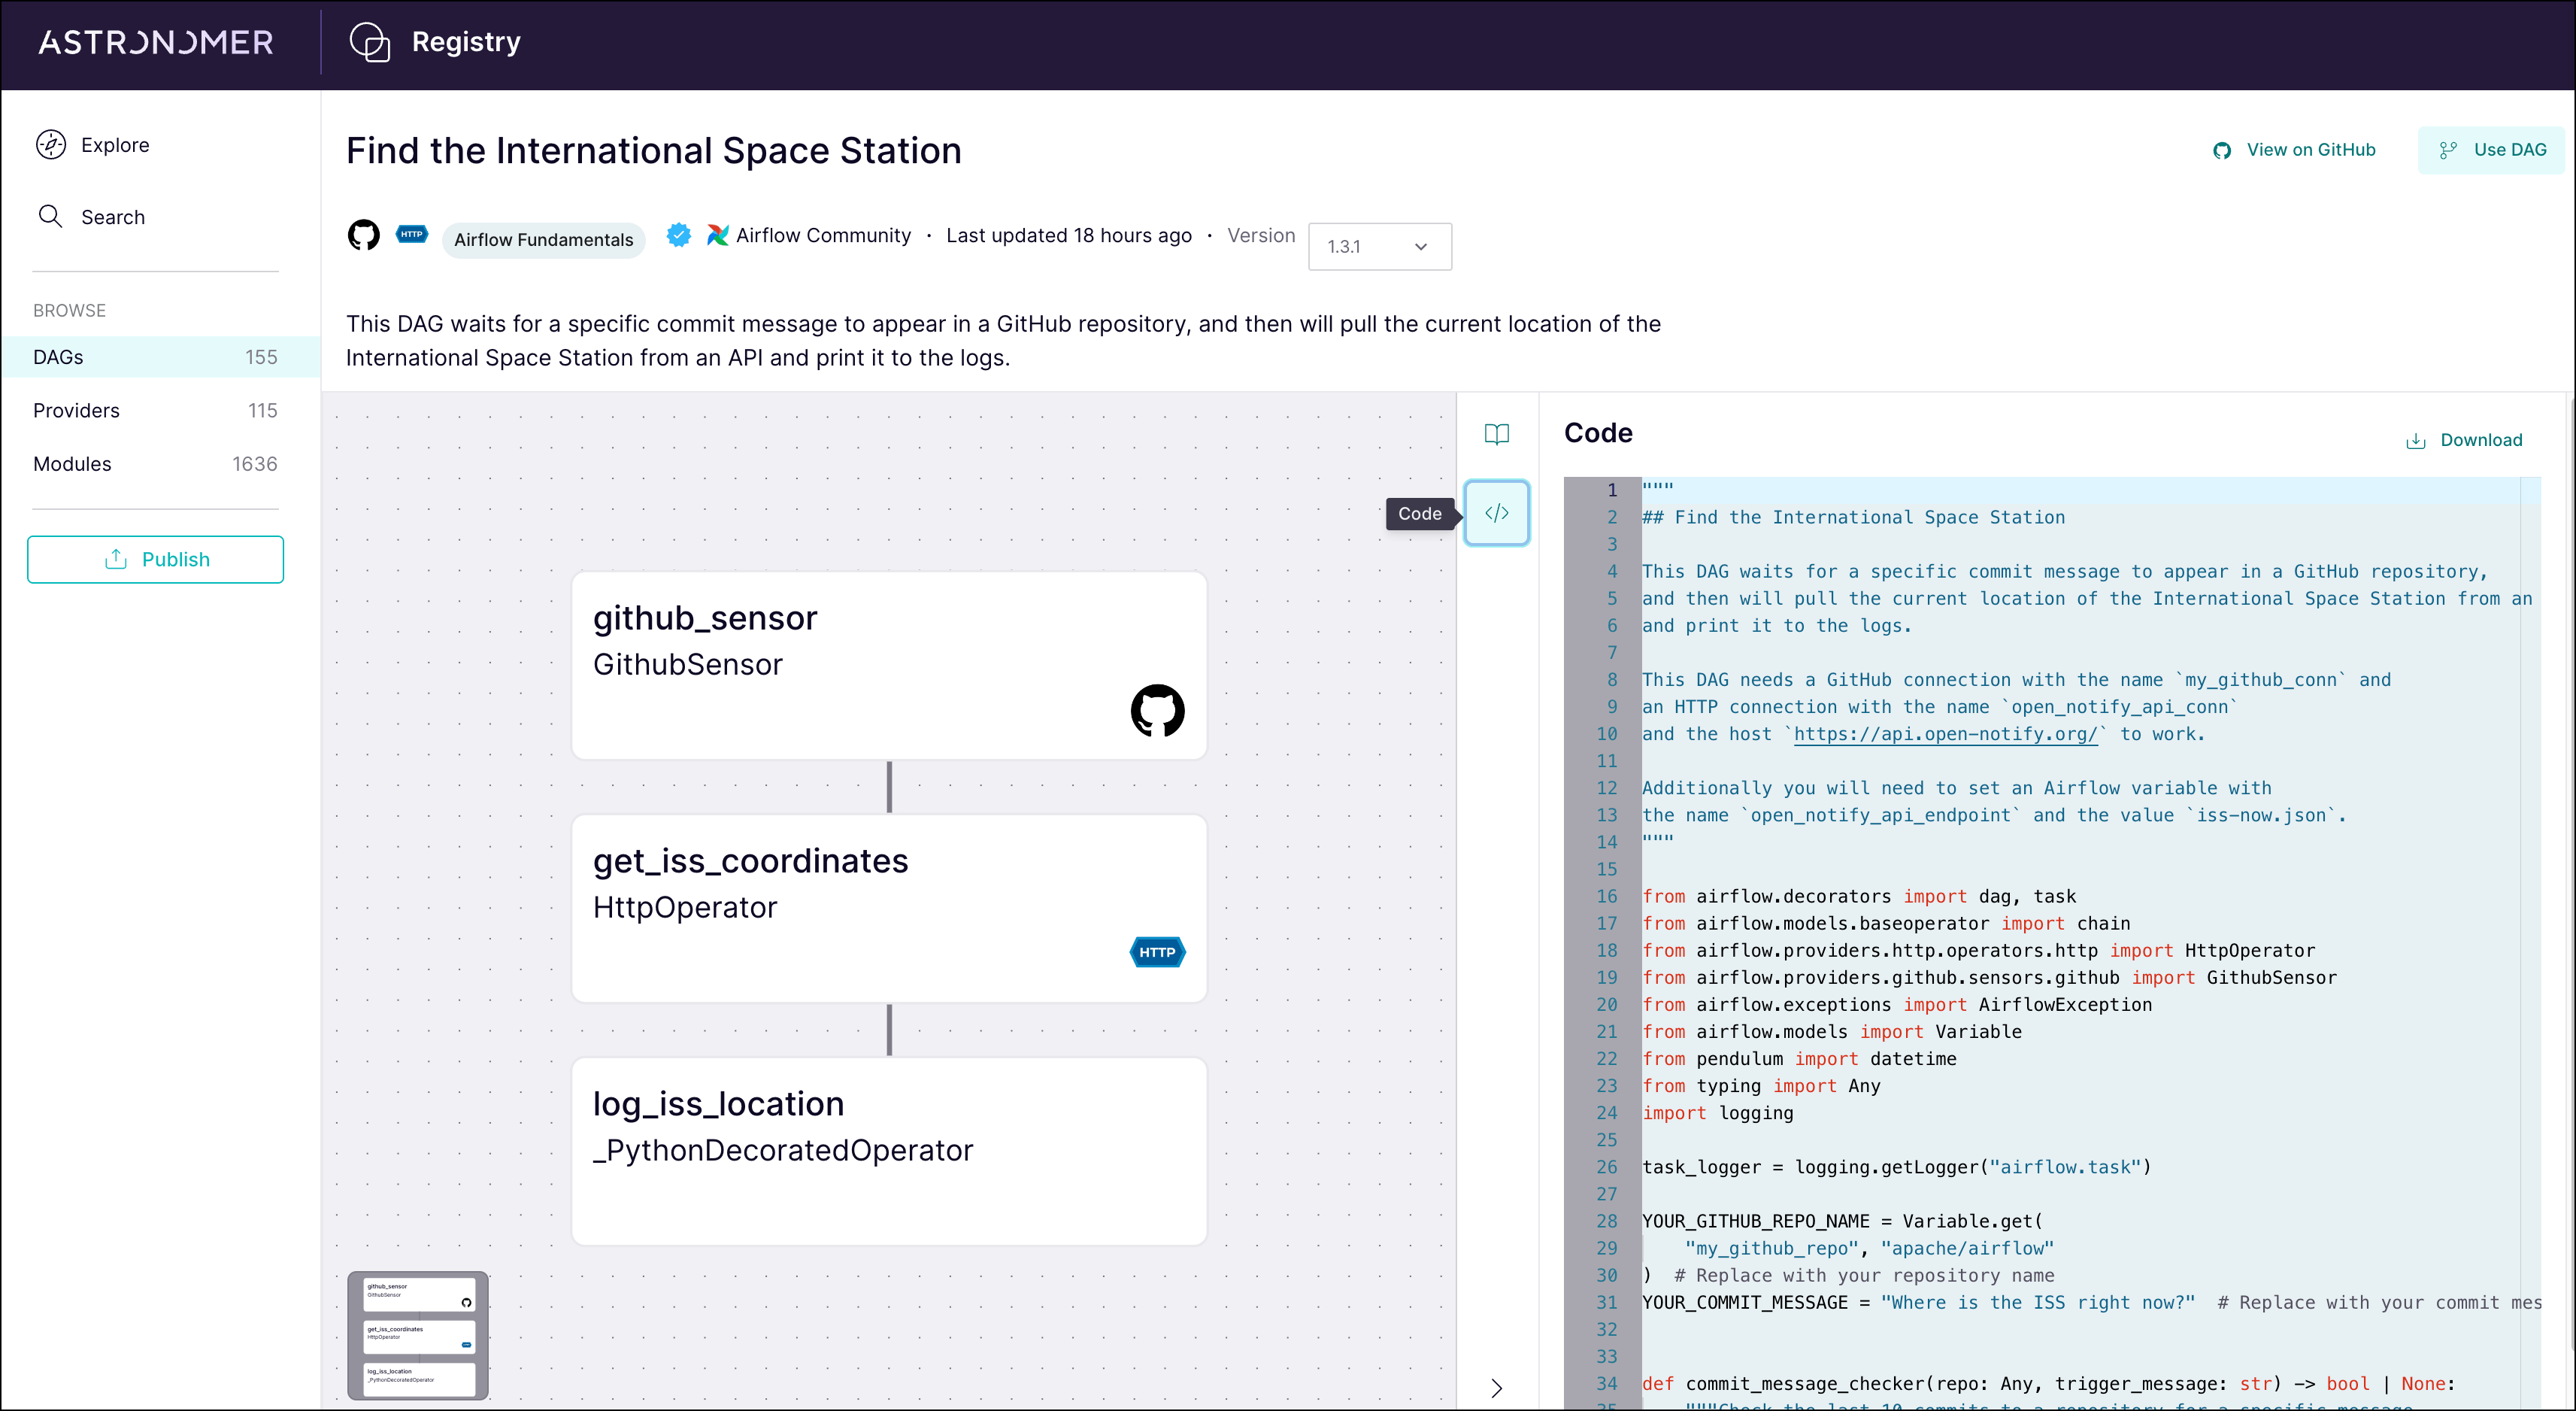
-
Paste the code into
find_the_iss.py. Your code should look like this:
Step 2: Add a provider package
-
If your Airflow project isn’t running locally yet, run
astro dev startin your Astro project directory to start your Airflow environment. -
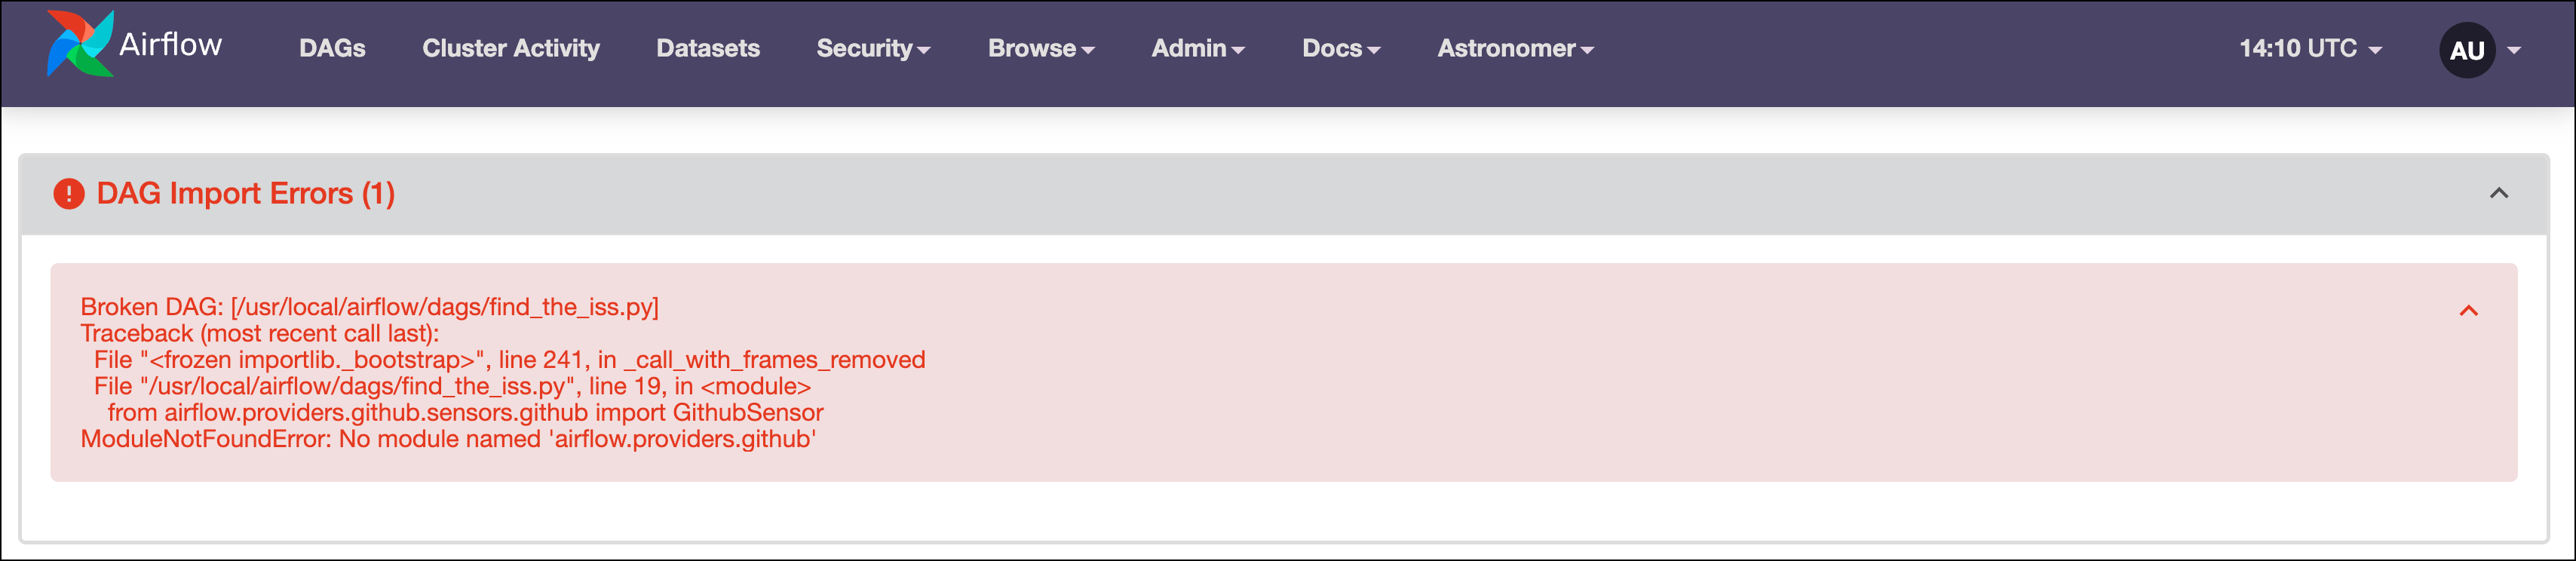
Open the Airflow UI to confirm that your DAG was pushed to your environment. On the DAGs page, you should see a “DAG Import Error” like the one shown here:
This error is due to a missing provider package. Provider packages are Python packages maintained separately from core Airflow that contain hooks and operators for interacting with external services. You can browse all available providers in the Airflow Registry. Your DAG uses operators from two Airflow provider packages: the HTTP provider and the GitHub provider. While the HTTP provider is pre-installed in the Astro Runtime image, the GitHub provider isn’t, which causes the DAG import error.
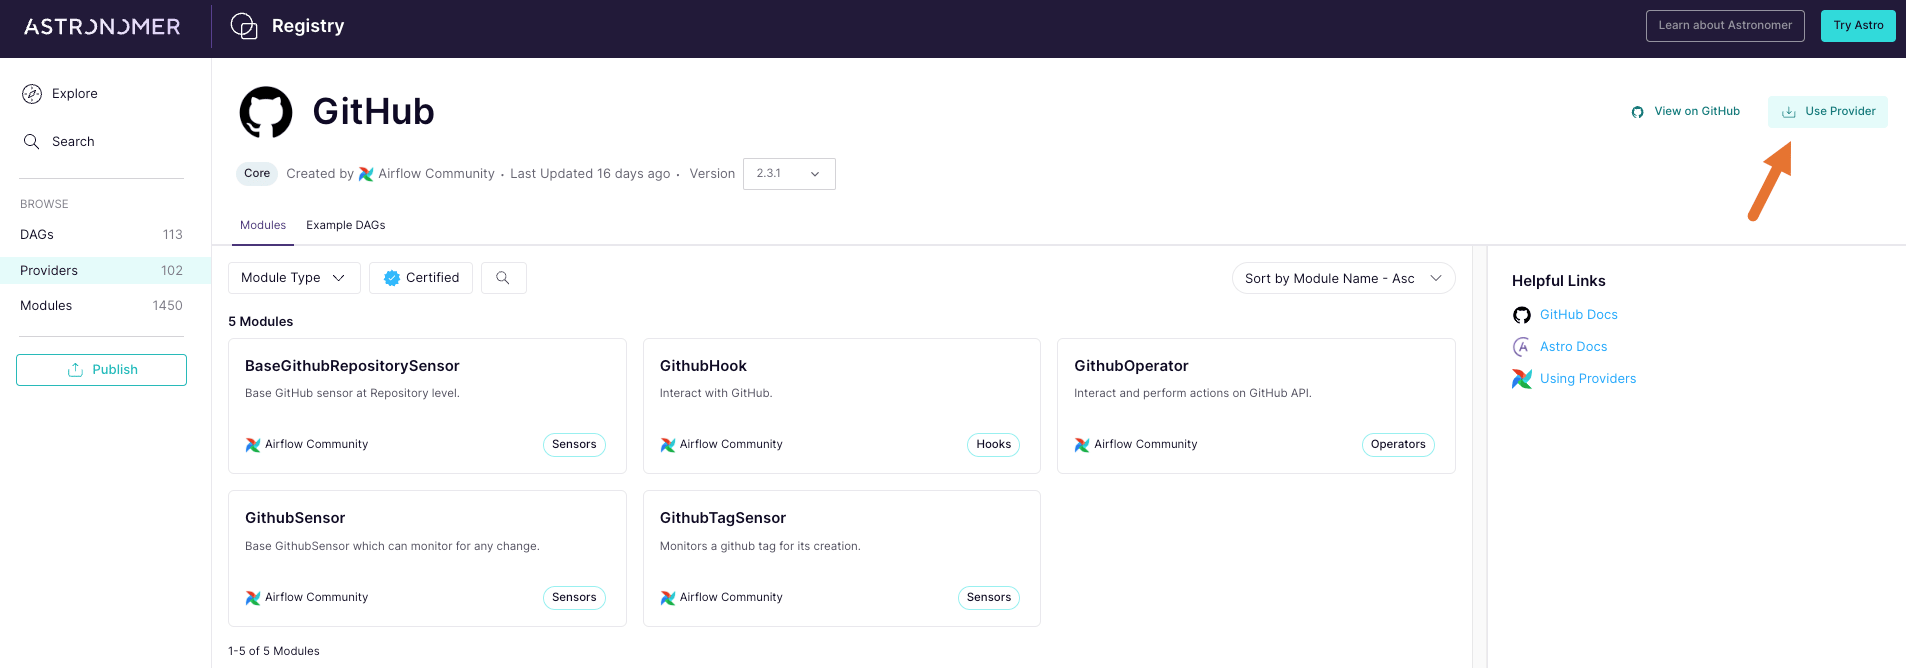
- Open the GitHub provider page in the Airflow Registry.
-
Copy the provider name and version by clicking Use Provider in the top right corner.
-
Paste the provider name and version into the
requirements.txtfile of your Astro project. Make sure to only addapache-airflow-providers-github=<version>withoutpip install. -
Restart your Airflow environment by running
astro dev restart. Unlike DAG code changes, package dependency changes require a complete restart of Airflow.
Step 3: Add an Airflow variable
After restarting your Airflow instance, you shouldn’t see the DAG import error from Step 2. Next, you need to add an Airflow variable to be used in theGithubSensor.
Airflow variables are key value pairs that can be accessed from any DAG in your Airflow environment. Because the variable my_github_repo is used in the DAG code with a default of apache/airflow, you’ll need to create the variable and give it a value in the Airflow UI to wait for a commit in your own repository.
-
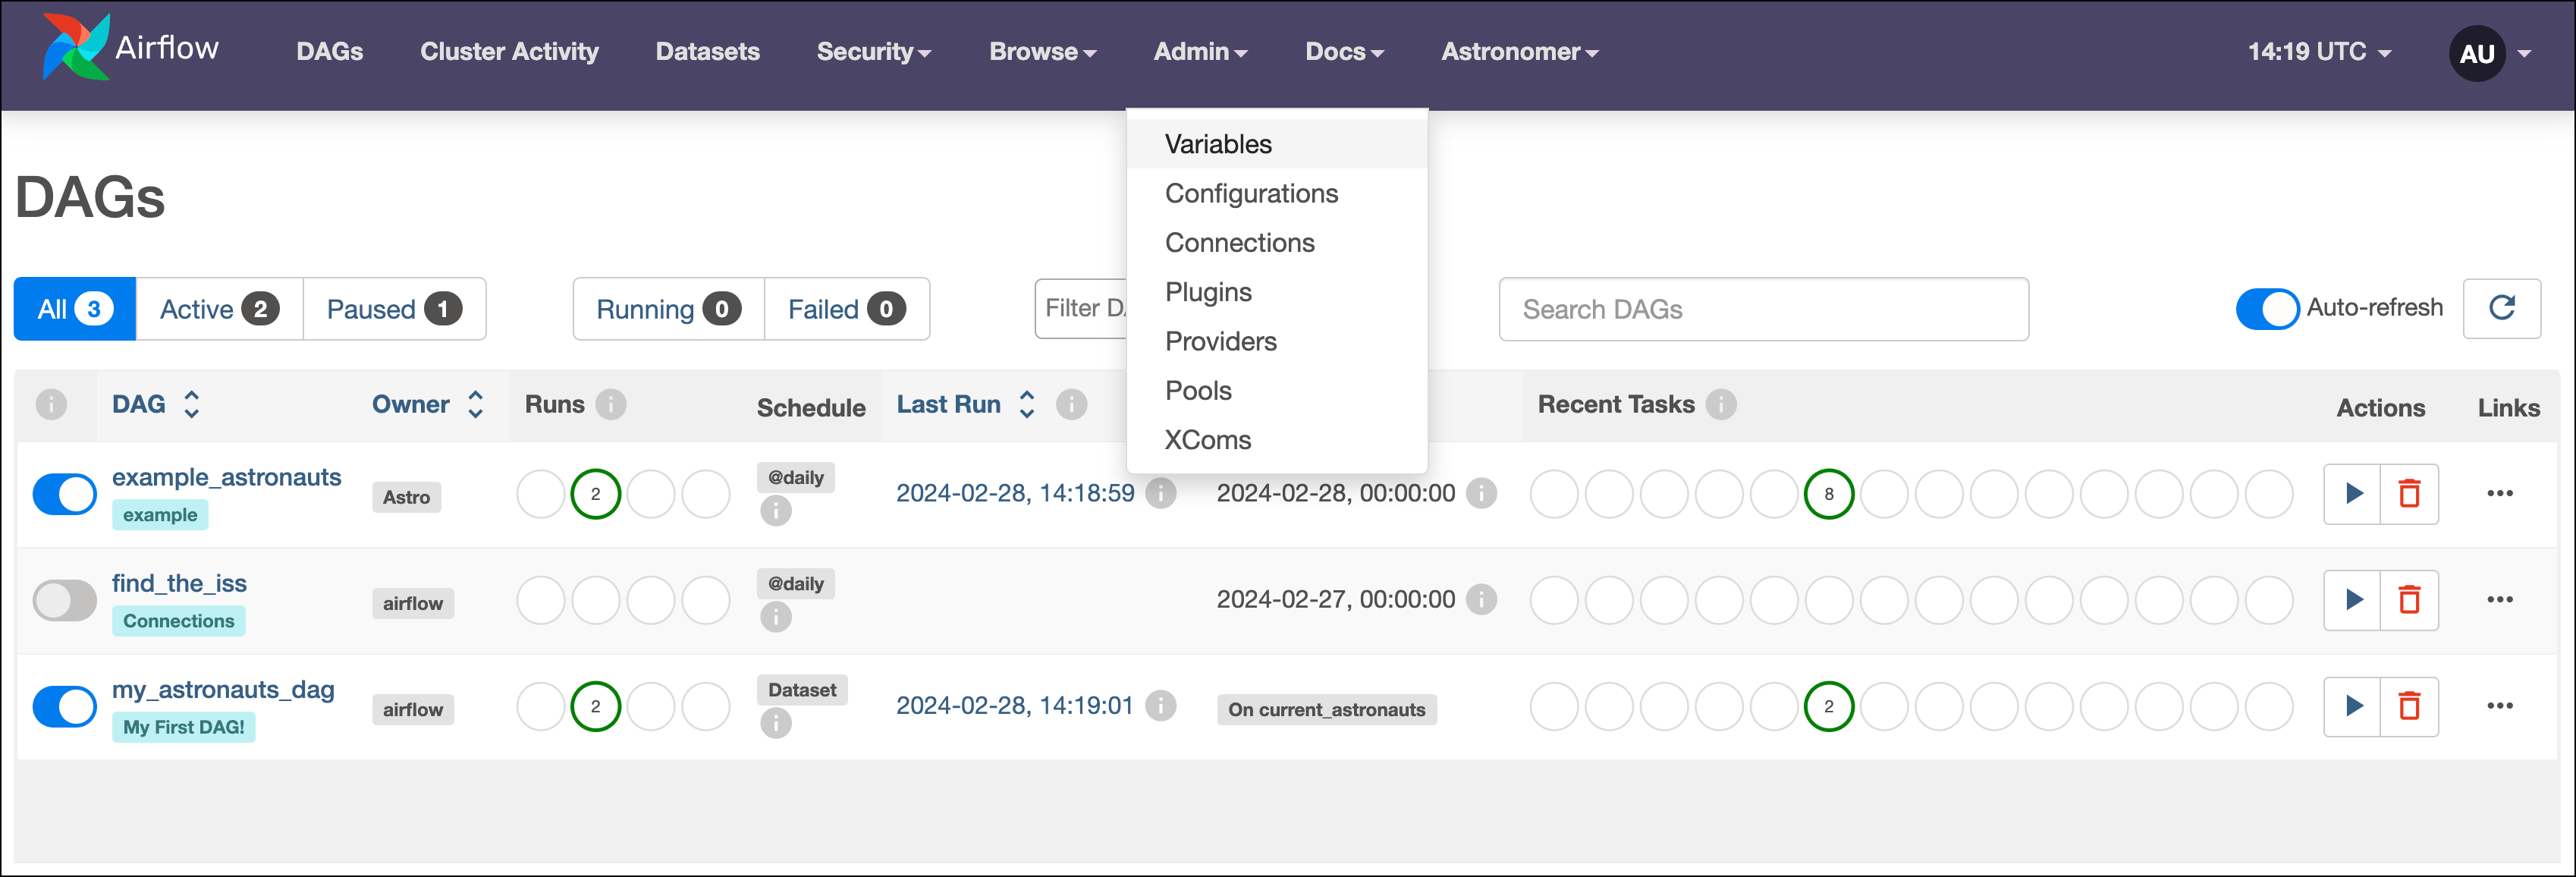
Go to Admin > Variables to open the list of Airflow variables. Since no Airflow variables have been defined yet, it is empty.
-
Click the + sign to open the form for adding a new variable. Set the Key for the variable as
my_github_repoand set the Val as a GitHub repository you have administrator access to. Make sure the Val is in the formatgithub_account_name/repository_name(for exampleapache/airflow). The repository can be private. - Click Save.
Step 4: Create a GitHub connection
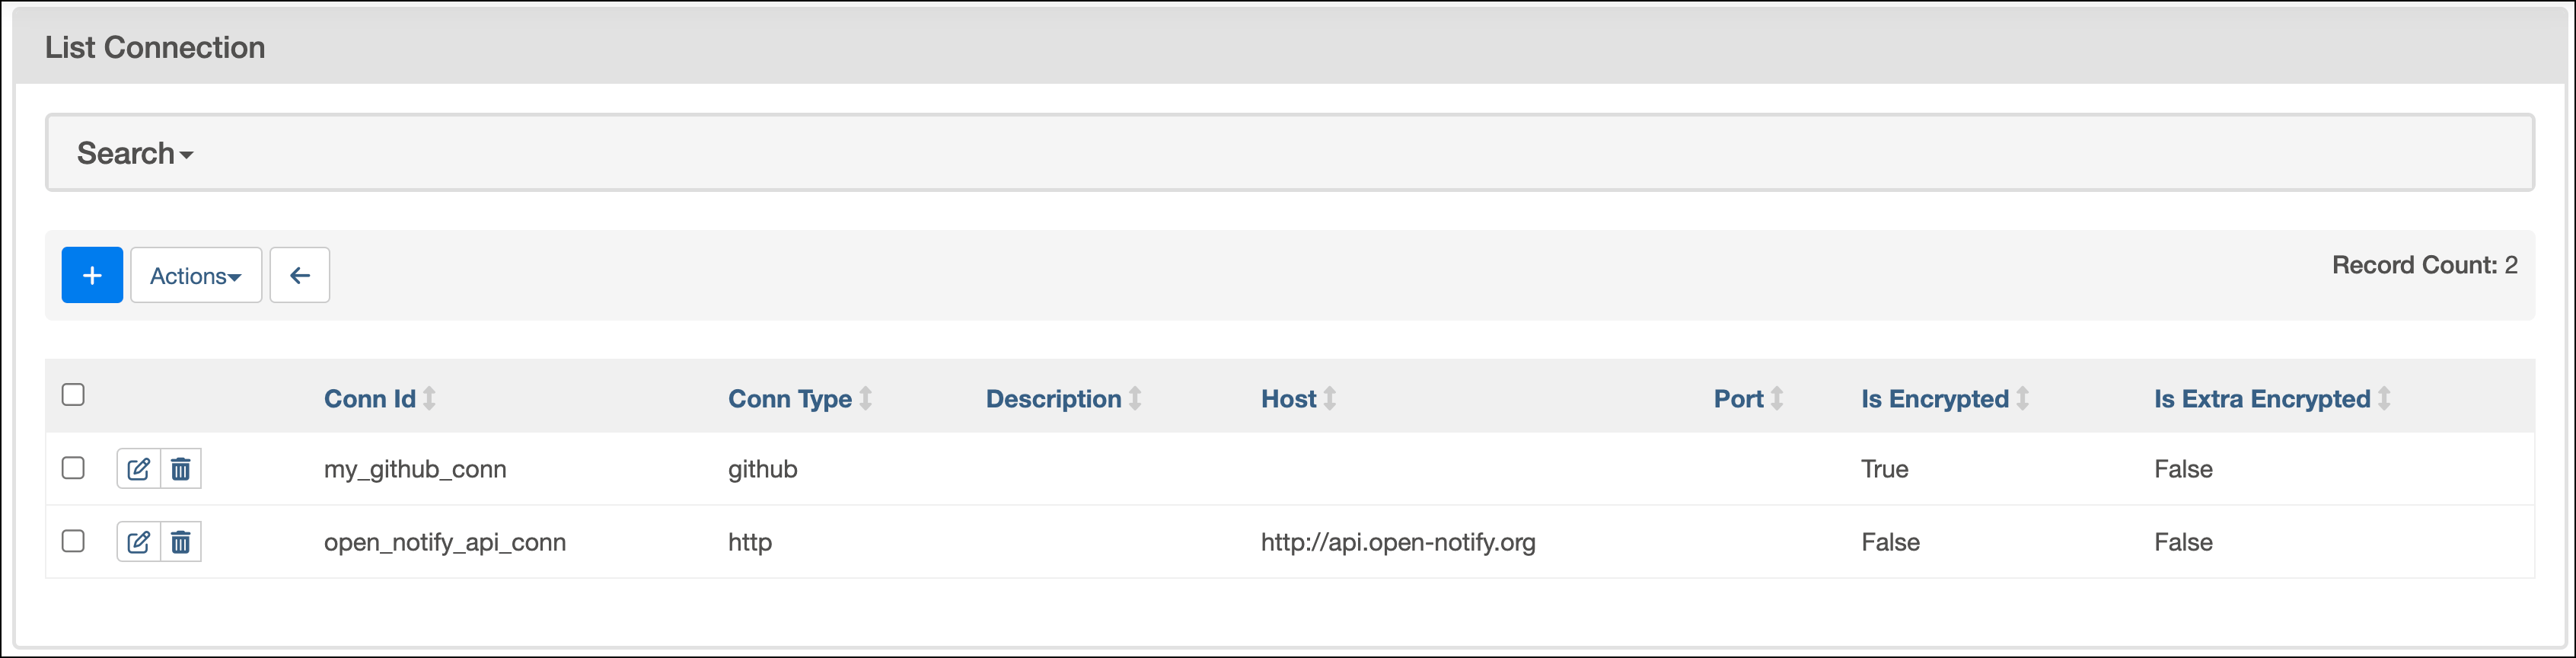
An Airflow connection is a set of configurations for connecting with an external tool in the data ecosystem. If you use a hook or operator that connects to an external system, it likely needs a connection. In your example DAG, you used two operators that interact with two external systems, which means you need to define two different connections.- In the Airflow UI, go to Admin > Connections.
- Click + to open the form for adding a new Airflow connection.
- Name the connection
my_github_connand set its Connection Type to GitHub. Note that you can only select connection types that are available from either core Airflow or an installed provider package. If you are missing the connection type GitHub, double check that you installed the GitHub provider correctly in Step 2. - Enter your GitHub Access Token in the GitHub Access Token field. If you need to create a token, you can follow the official GitHub documentation.
- Save the connection by clicking the Save button.
Step 5: Create an HTTP connection
- In the Connections view, click + to create a new connection.
- Name the connection
open_notify_api_connand select a Connection Type of HTTP. - Enter the host URL for the API you want to query in the Host field. For this tutorial we use the Open Notify API, which has an endpoint returning the current location of the ISS. The host for this API is
http://api.open-notify.org. - Click Save.
Step 6: Review the DAG code
Now that your Airflow environment is configured correctly, look at the DAG code you copied from the repository to see how your new variable and connections are used at the code level. At the top of the file, the DAG is described in a docstring. It’s highly recommended to always document your DAGs and include any additional connections or variables that are required for the DAG to work.HttpOperator as well as the GithubSensor are part of provider packages.
YOUR_GITHUB_REPO_NAME is set to the value of the Airflow variable my_github_repo you defined in Step 3 and the variable YOUR_COMMIT_MESSAGE is set to the commit message that triggers the DAG to run.
GithubSensor. This function processes the repository object returned by the get_repo method of the PyGitHub package, using .get_commits() to retrieve the last 10 commits to the repository and compare them to the commit message defined in YOUR_COMMIT_MESSAGE. If the message is found, the function returns True, otherwise False. Note that the function is defined at the top level of the DAG file for convenience but could also be defined in a separate module, located in the include directory and reused across multiple DAGs.
@dag decorator with the following parameters:
dag_idisn’t set explicitly, so it defaults to the name of the Python function,find_the_iss.start_dateis set to January 1st, 2024, which means the DAG starts to be scheduled after this date.scheduleis set to@daily, which means the DAG runs every day at 0:00 UTC. You can use any CRON string or shorthand for time-based schedules.catchupis set toFalseto prevent DAG runs from between thestart_dateand today from being backfilled automatically.doc_mdis set to the docstring of the DAG file to create DAG Docs you can view in the Airflow UI.default_argsis set to a dictionary with the keyownerset toairflowand the keyretriesset to3. The latter setting gives each task in this DAG 3 retries before failing, which is a common best practice to protect against transient failures.tagsadds theConnectionstag to the DAG in the Airflow UI.
-
The first task uses the
GithubSensorto check whether the commit messageWhere is the ISS right now?has been added to your GitHub repository with the help of thecommit_message_checkerfunction described previously. This task utilizes the Airflow variable (my_github_repo) and the Airflow connection (my_github_connection) to access the correct repository with the appropriate credentials. The sensor checks for the tag every 5 seconds (poke_interval) and times out after one hour (timeout). It is best practice to always set atimeoutbecause the default value is 7 days, which can impact performance if left unchanged in DAGs that run on a higher frequency. -
The second task uses the
HttpOperatorto send aGETrequest to the/iss-now.jsonendpoint of the Open Notify API to retrieve the current location of the ISS. The response is logged to the Airflow task logs and pushed to the XCom table in the Airflow metadata database to be retrieved by downstream tasks. -
The third task uses the TaskFlow API’s
@taskdecorator to run a Python function that processes the coordinates returned by theget_iss_coordinatestask and prints the city and country of the ISS’s location to the task logs. The coordinates are passed to the function as an argument usingget_iss_coordinates.output, which accesses the data returned by theget_iss_coordinatestask from XComs. The second and third task are an example of how you can use a traditional operator (HttpOperator) and a TaskFlow API task to perform similar operations, in this case querying an API. The best way to write tasks depends on your use case and often comes down to personal preference.
get_iss_coordinates task only runs after the github_sensor task is successful and the log_iss_location task only runs after the get_iss_coordinates task is successful. This is done using the chain method. You can learn more about setting dependencies between tasks in the Manage task and task group dependencies in Airflow guide.
The last line of the DAG file calls the find_the_iss function to create the DAG.
Step 7: Test your DAG
-
Go to the DAGs view and unpause the
find_the_issDAG by clicking on the toggle to the left of the DAG name. The last scheduled DAG run automatically starts, and thegithub_sensortask starts waiting for the commit message"Where is the ISS right now?"to be pushed to your GitHub repository. You can see two light green circles in the DAGs view which indicates that the DAG run is in progress and thegithub_sensortask is running.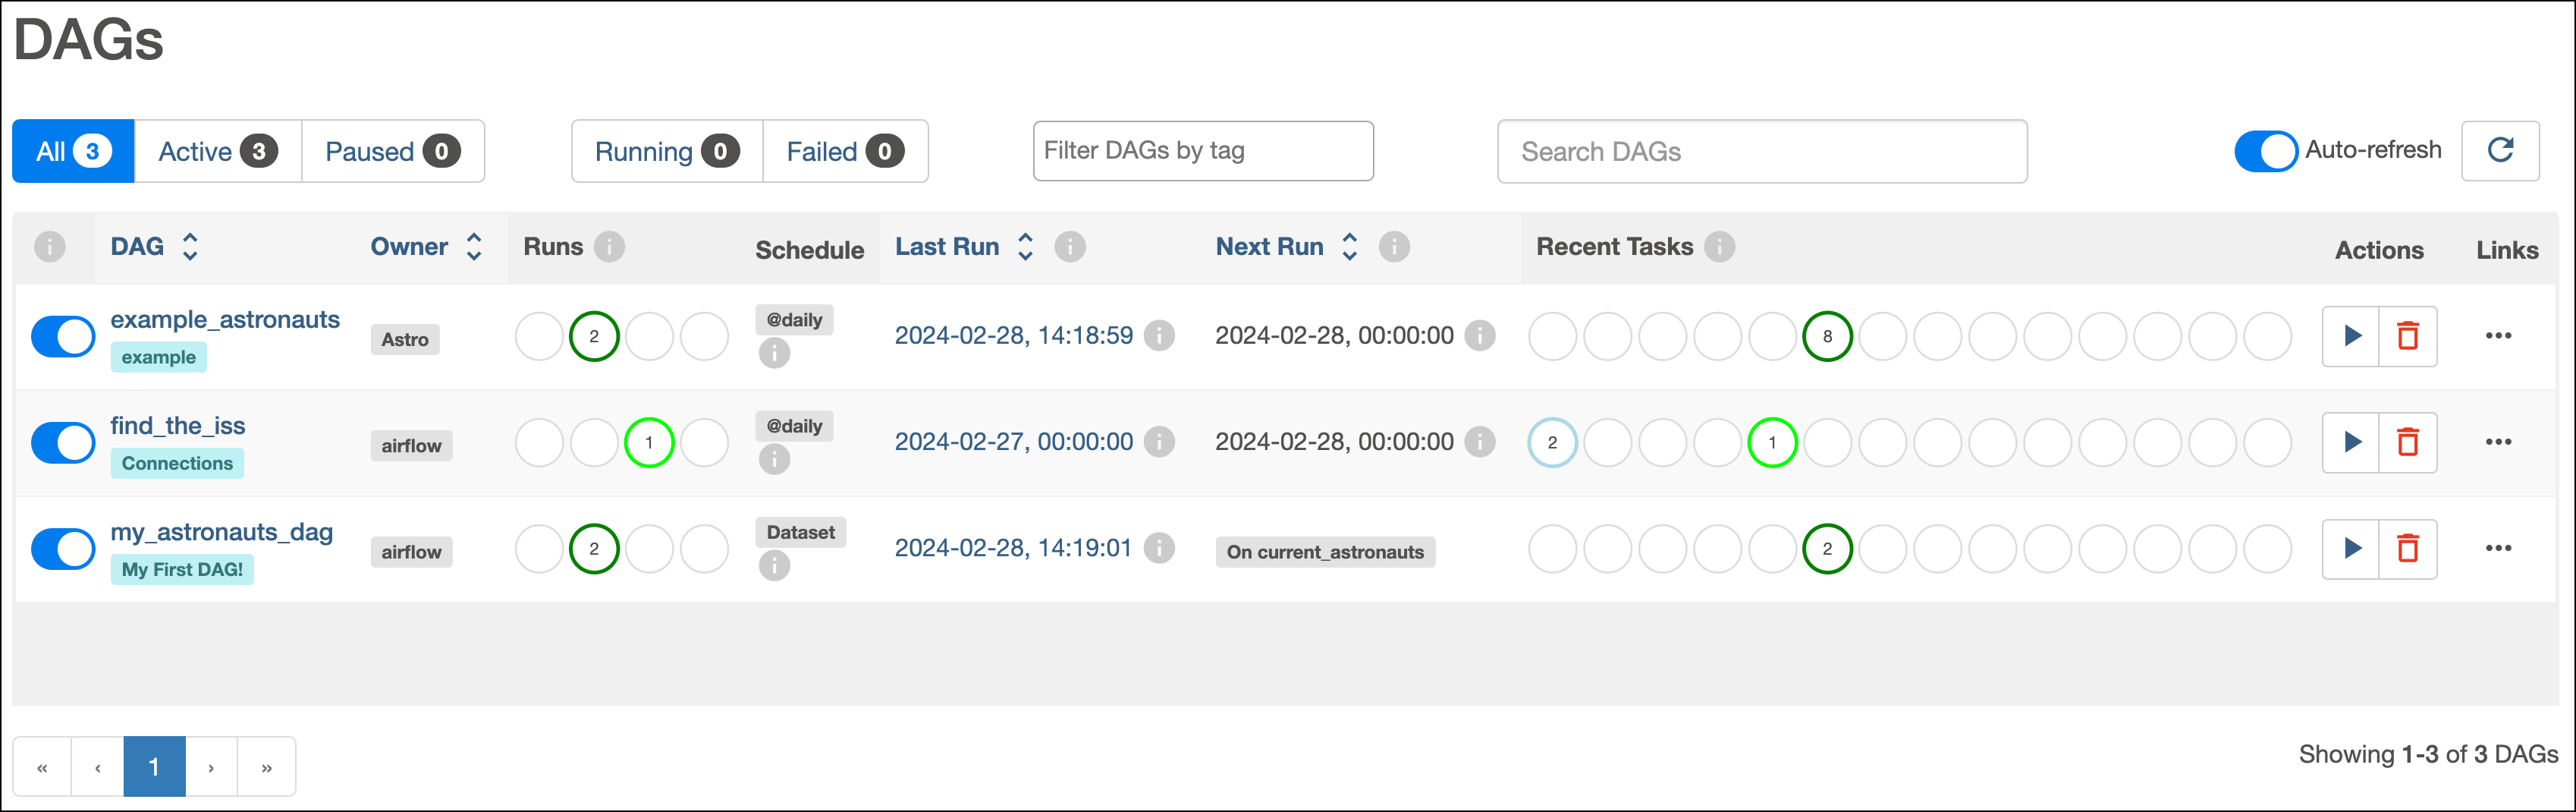
-
Create a new commit in your GitHub repository by changing any file, then running:
-
Watch for the
github_sensortask to finish successfully. Theget_iss_coordinatestask should start right after, and after it completes thelog_iss_locationtask runs. -
In the Grid view, click the green box representing the successful task run for
log_iss_location. Check the Log tab of the task instance to learn where the ISS is right now!
See also
- The Airflow Registry to find information on all providers.
- The Airflow connections guide to learn more about Airflow connections.
- The Airflow variables guide to learn more about Airflow variables.