Apache Airflow® Quickstart
Apache Airflow® Quickstart
It’s easy to get your pipelines up and running with Apache Airflow®.
This quickstart offers three learning paths. Choose between these popular use cases:
- Learning Airflow: an introduction to Airflow’s lean and dynamic pipelines-as-Python-code
- ETL: an introduction to modern, enhanced ETL development with Airflow
- Generative AI: an introduction to generative AI model development with Airflow
Launch your journey with Airflow by signing up for a trial! You’ll be able to deploy your projects to Astro at the end of this tutorial.
Other ways to learn
For more help getting started, also check out our step-by-step Get Started with Airflow tutorial.
Time to complete
This quickstart takes approximately 30 minutes to complete.
Assumed knowledge
To get the most out of this quickstart, you should have an understanding of:
- Basic Airflow concepts. See Introduction to Apache Airflow.
- Basic Python. See the Python documentation.
Prerequisites
- The Astro CLI version 1.25.0 or higher.
- An integrated development environment (IDE) for Python development, such as VS Code, Sublime Text, or PyCharm.
- (Optional) A local installation of Python 3 to improve your Python developer experience.
Step 1: Clone the Astronomer Quickstart repository
Learning Airflow
-
Create a new directory for your project and open it:
-
Clone the repository and open it:
Your directory should have the following structure:
ETL
-
Create a new directory for your project and open it:
-
Clone the repository and open it:
Your directory should have the following structure:
Generative AI
-
Create a new directory for your project and open it:
-
Clone the repository and open it:
Your directory should have the following structure:
Step 2: Start up Airflow and explore the UI
Learning Airflow
-
Start the project using the Astro CLI:
The CLI will let you know when all Airflow services are up and running.
-
In your browser, navigate to
localhost:8080and sign in to the Airflow UI using usernameadminand passwordadmin. -
Unpause the
example_astronautsDAG. -
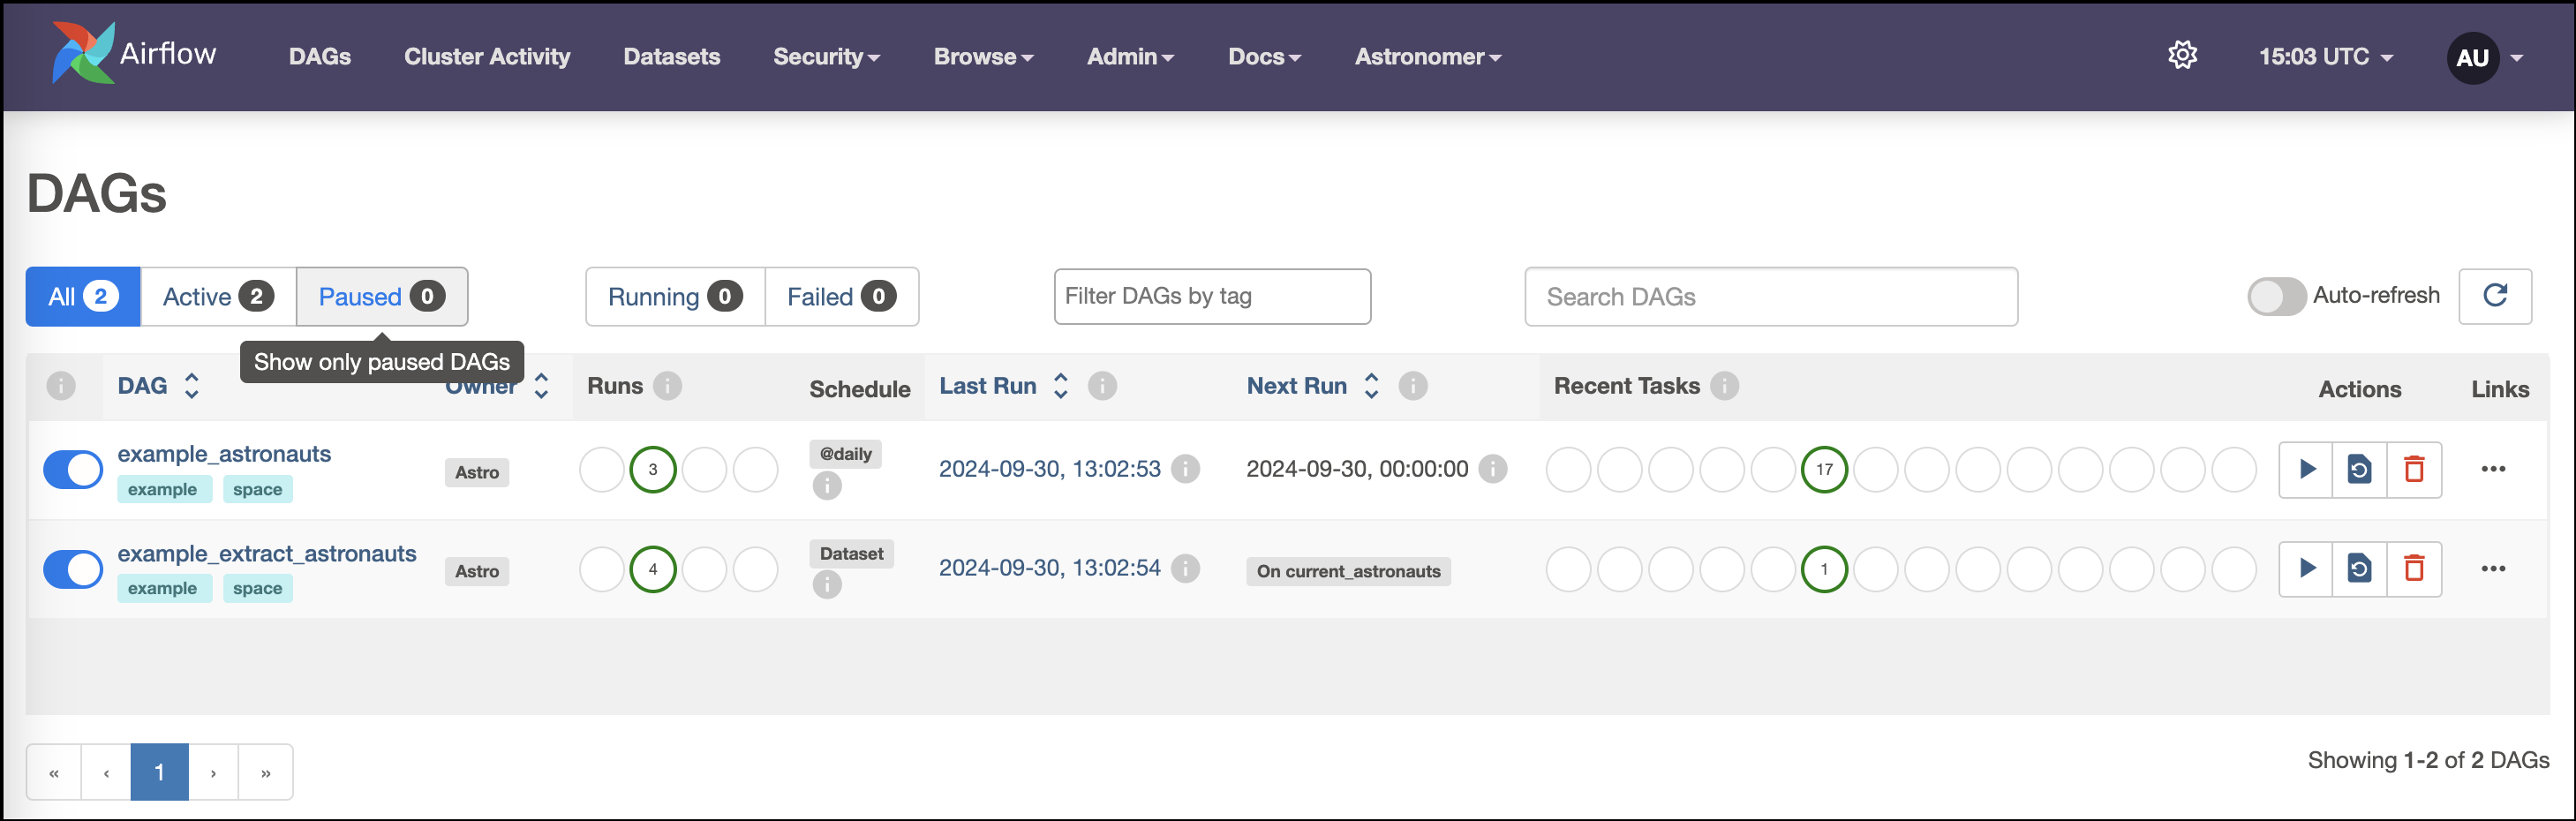
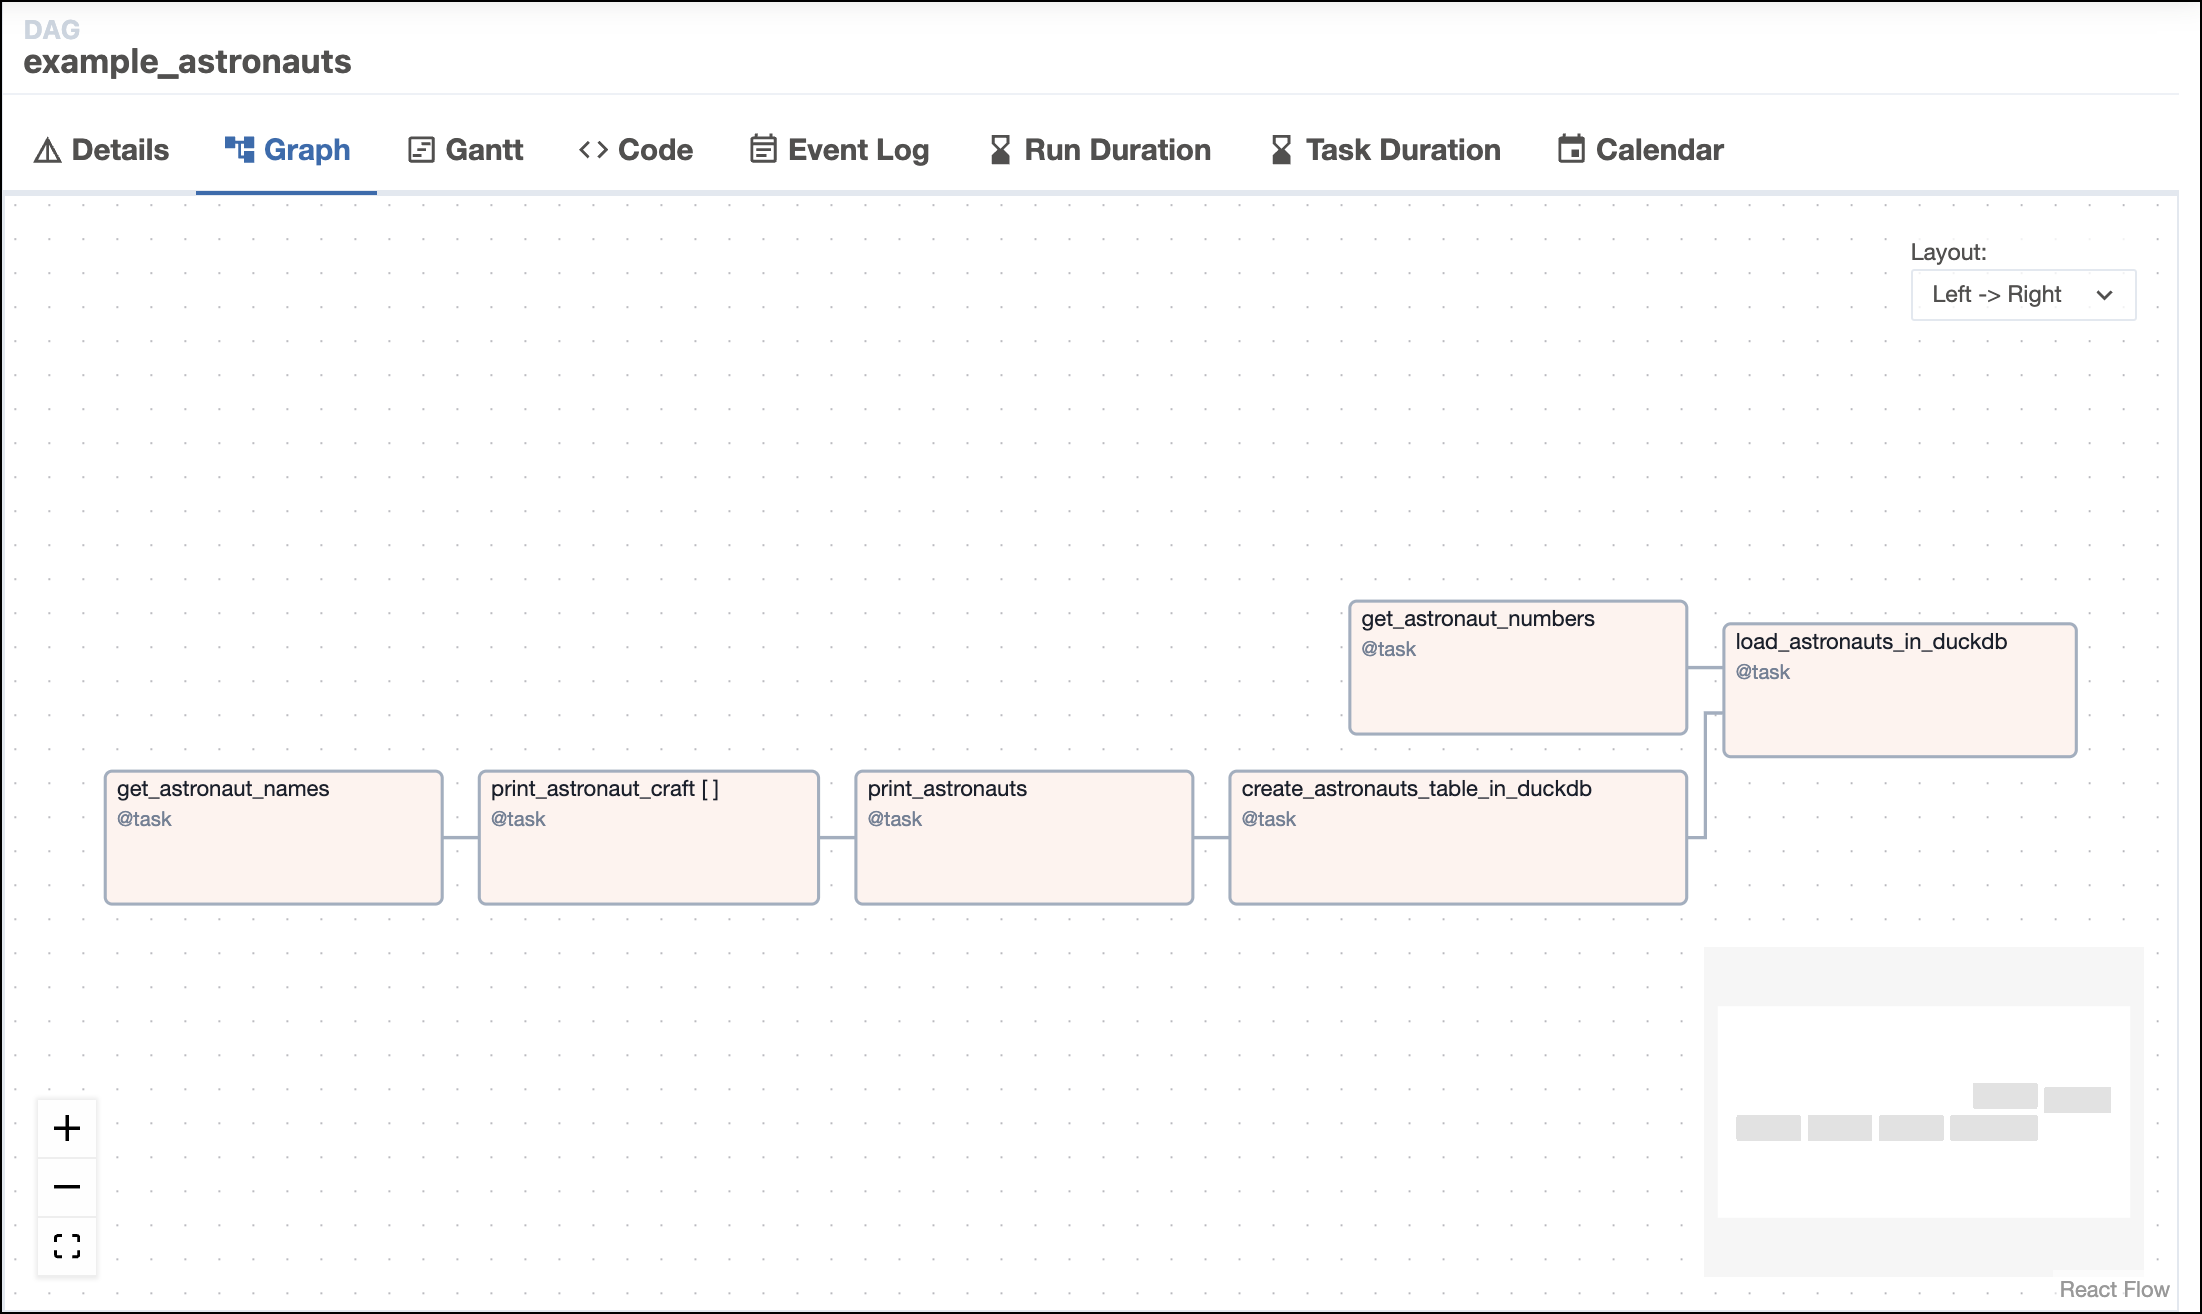
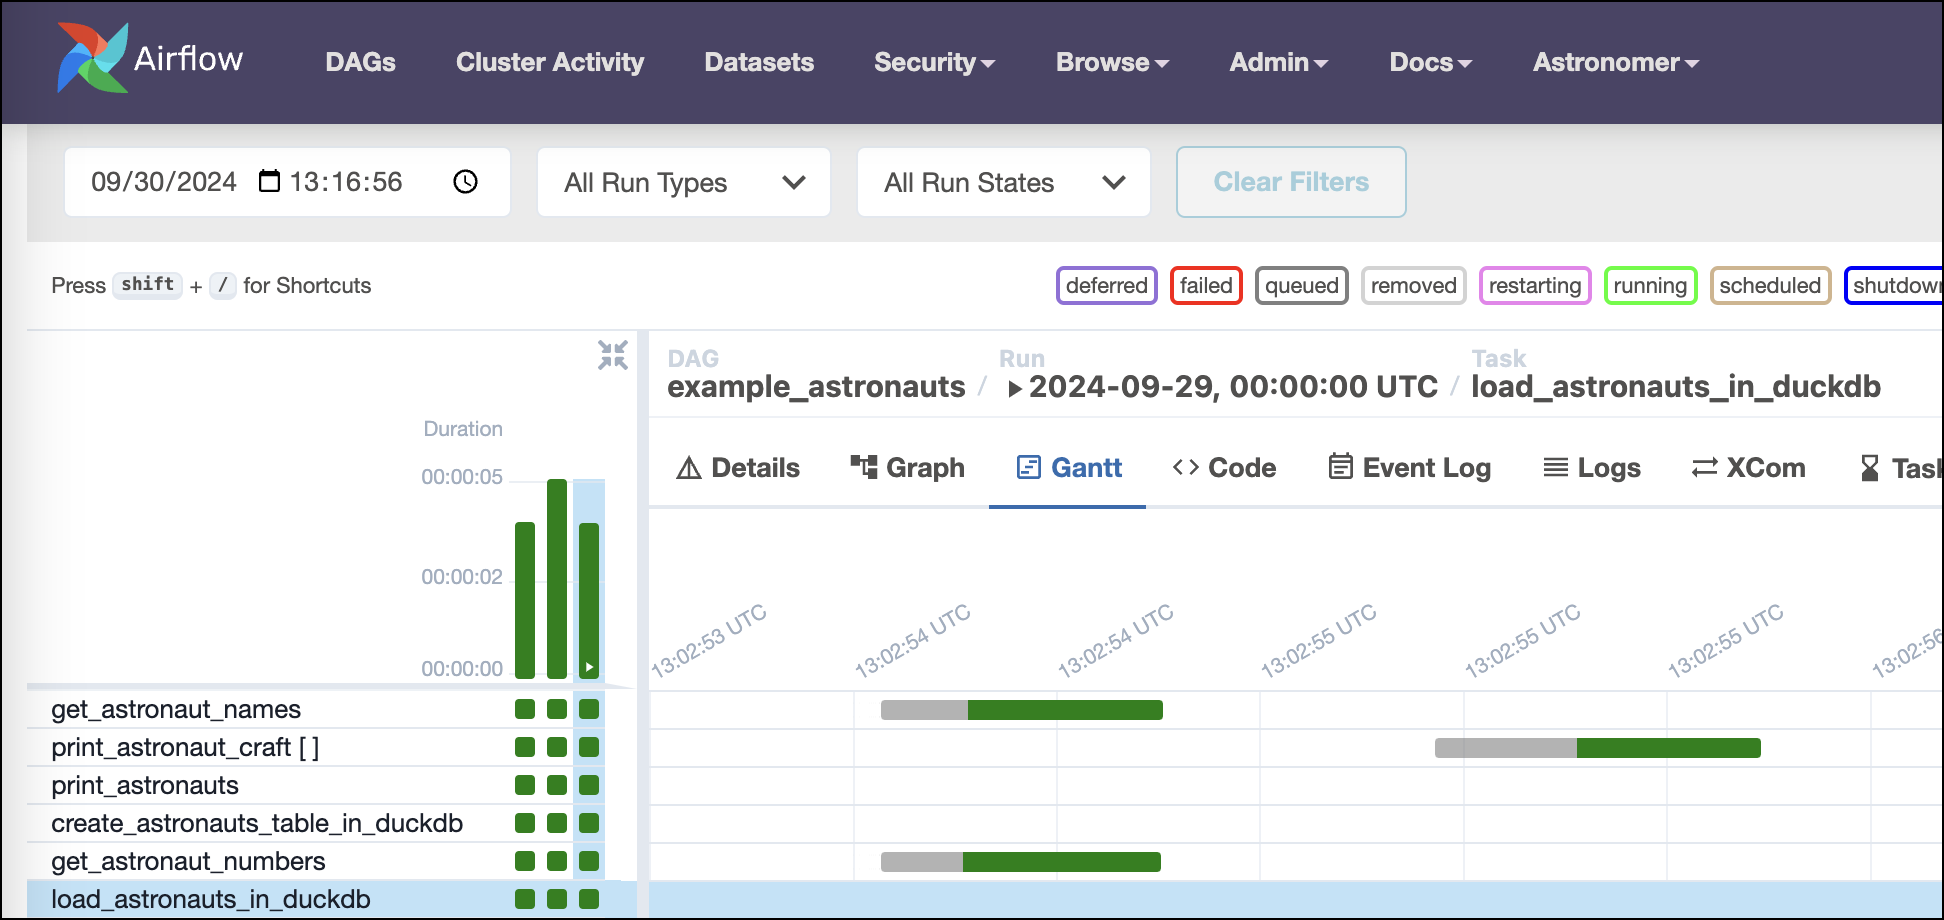
Explore the DAGs view (the landing page) and individual DAG view page to get a sense of the metadata available about the DAG, run, and all task instances. For a deep-dive into the UI’s features, see An introduction to the Airflow UI.
For example, the DAGs view will look like this screenshot:
As you start to trigger DAG runs, the graph view will look like this screenshot:
The Gantt chart will look like this screenshot:
ETL
-
Start the project using the Astro CLI:
The CLI will let you know when all Airflow services are up and running.
-
In your browser, navigate to
localhost:8080and sign in to the Airflow UI using usernameadminand passwordadmin. -
Unpause the
example_astronautsDAG. -
Explore the landing page and individual DAG view page to get a sense of the metadata available about the DAG, run, and all task instances. For a deep-dive into the UI’s features, see An introduction to the Airflow UI.
For example, the DAGs view will look like this screenshot:

As you start to trigger DAG runs, the graph view will look like this screenshot:
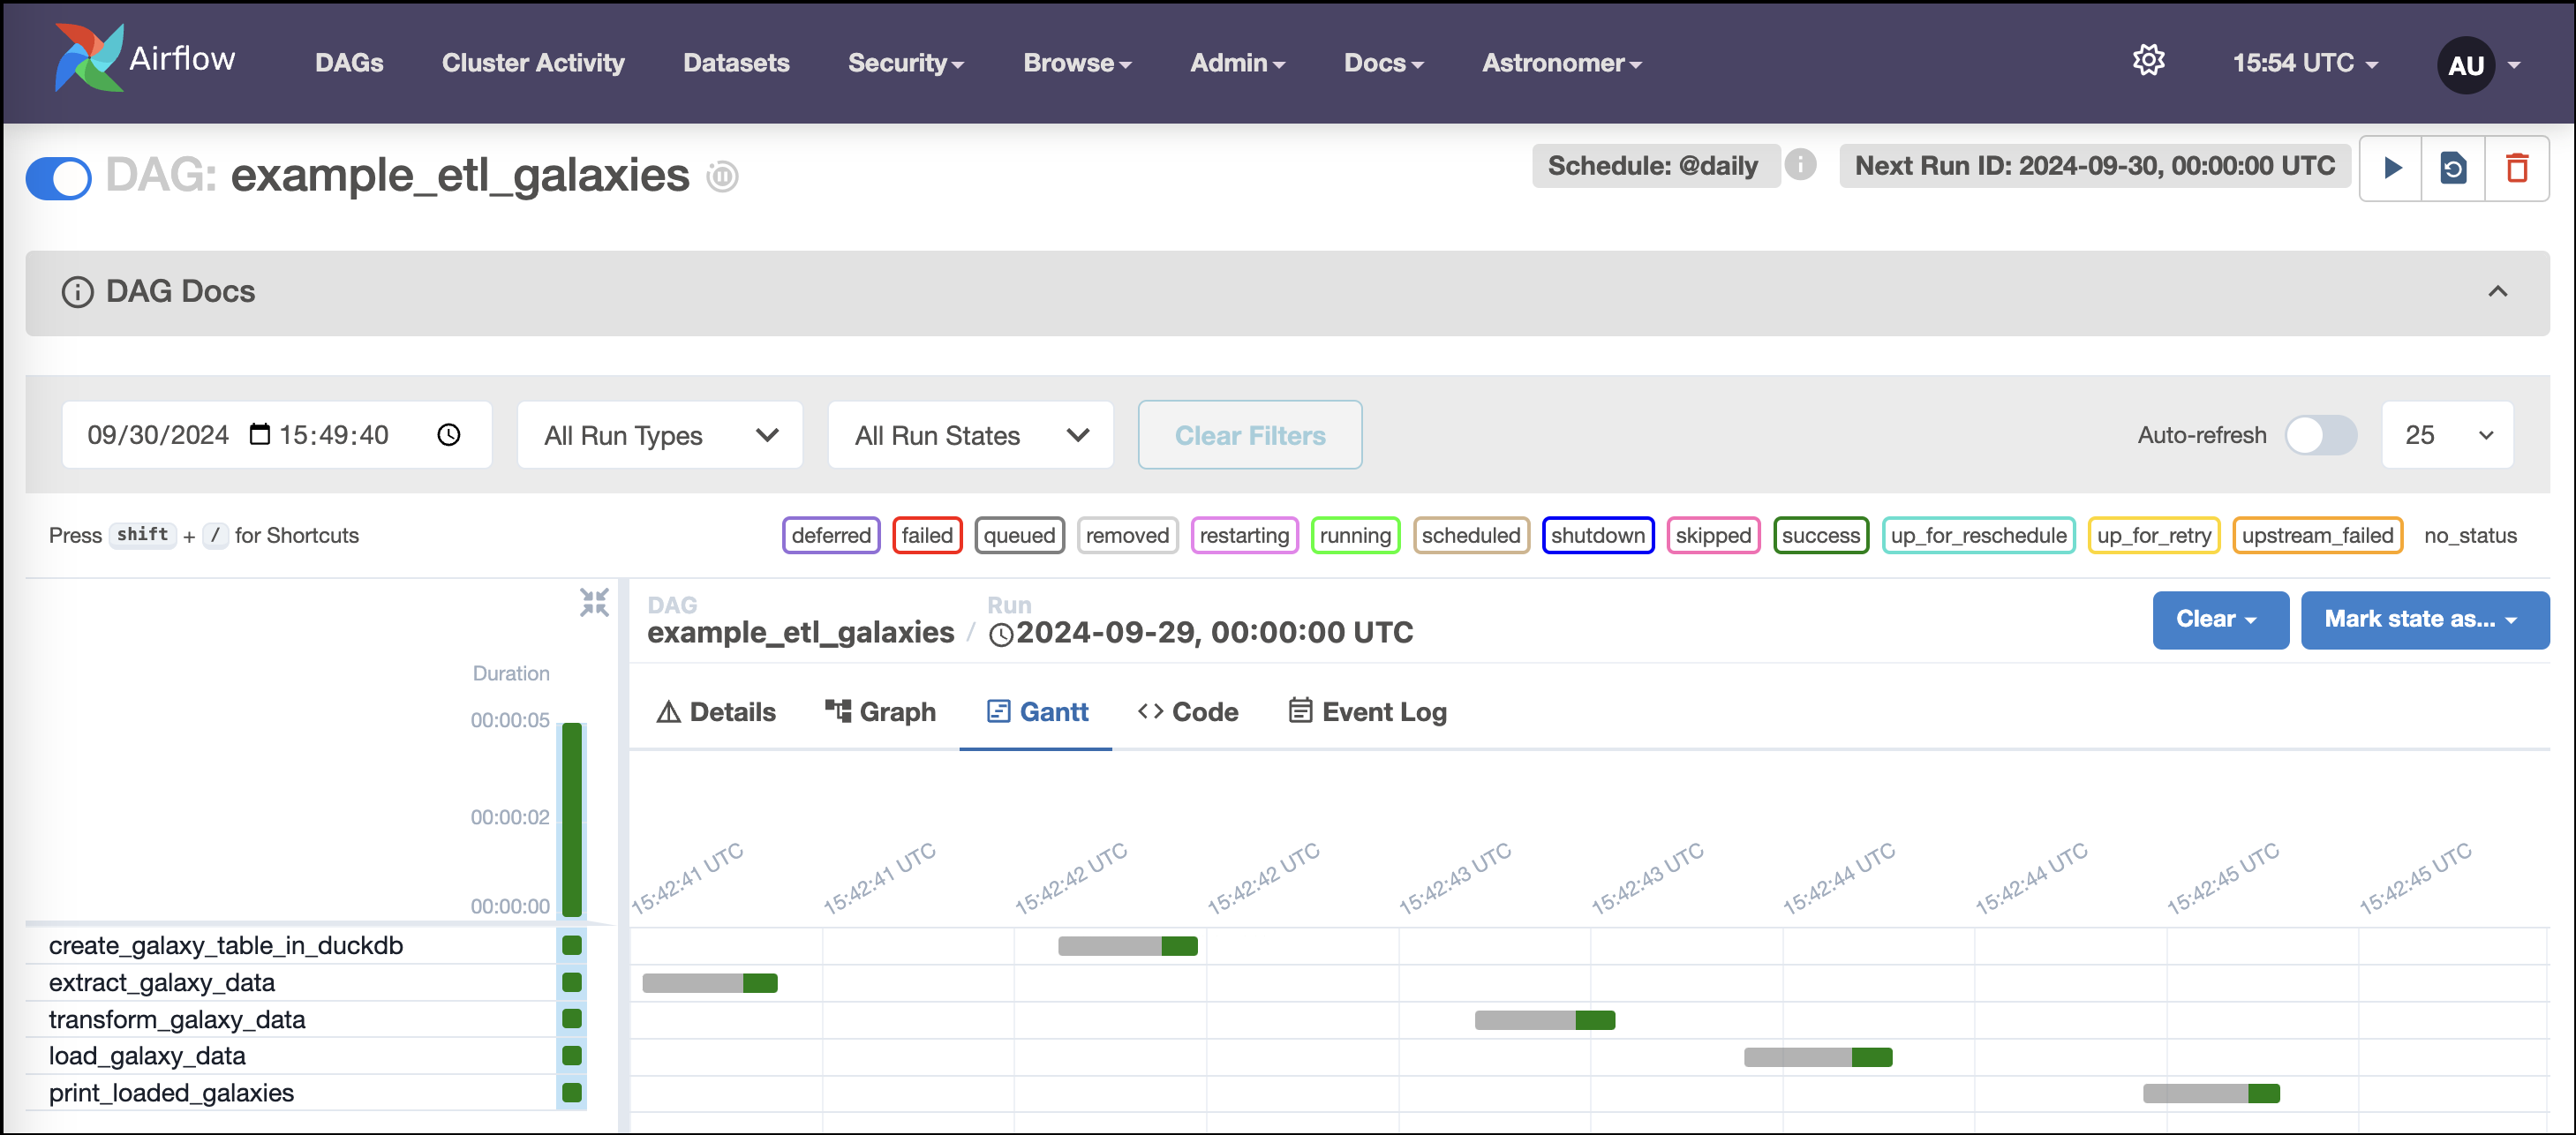
The Gantt chart will look like this screenshot:
Generative AI
-
Start the project using the Astro CLI:
The CLI will let you know when all Airflow services are up and running.
-
In your browser, navigate to
localhost:8080and sign in to the Airflow UI using usernameadminand passwordadmin. -
Unpause the
example_astronautsDAG. -
Explore the DAGs view (landing page) and individual DAG view page to get a sense of the metadata available about the DAG, run, and all task instances. For a deep-dive into the UI’s features, see An introduction to the Airflow UI.
For example, the DAGs view will look like this screenshot:
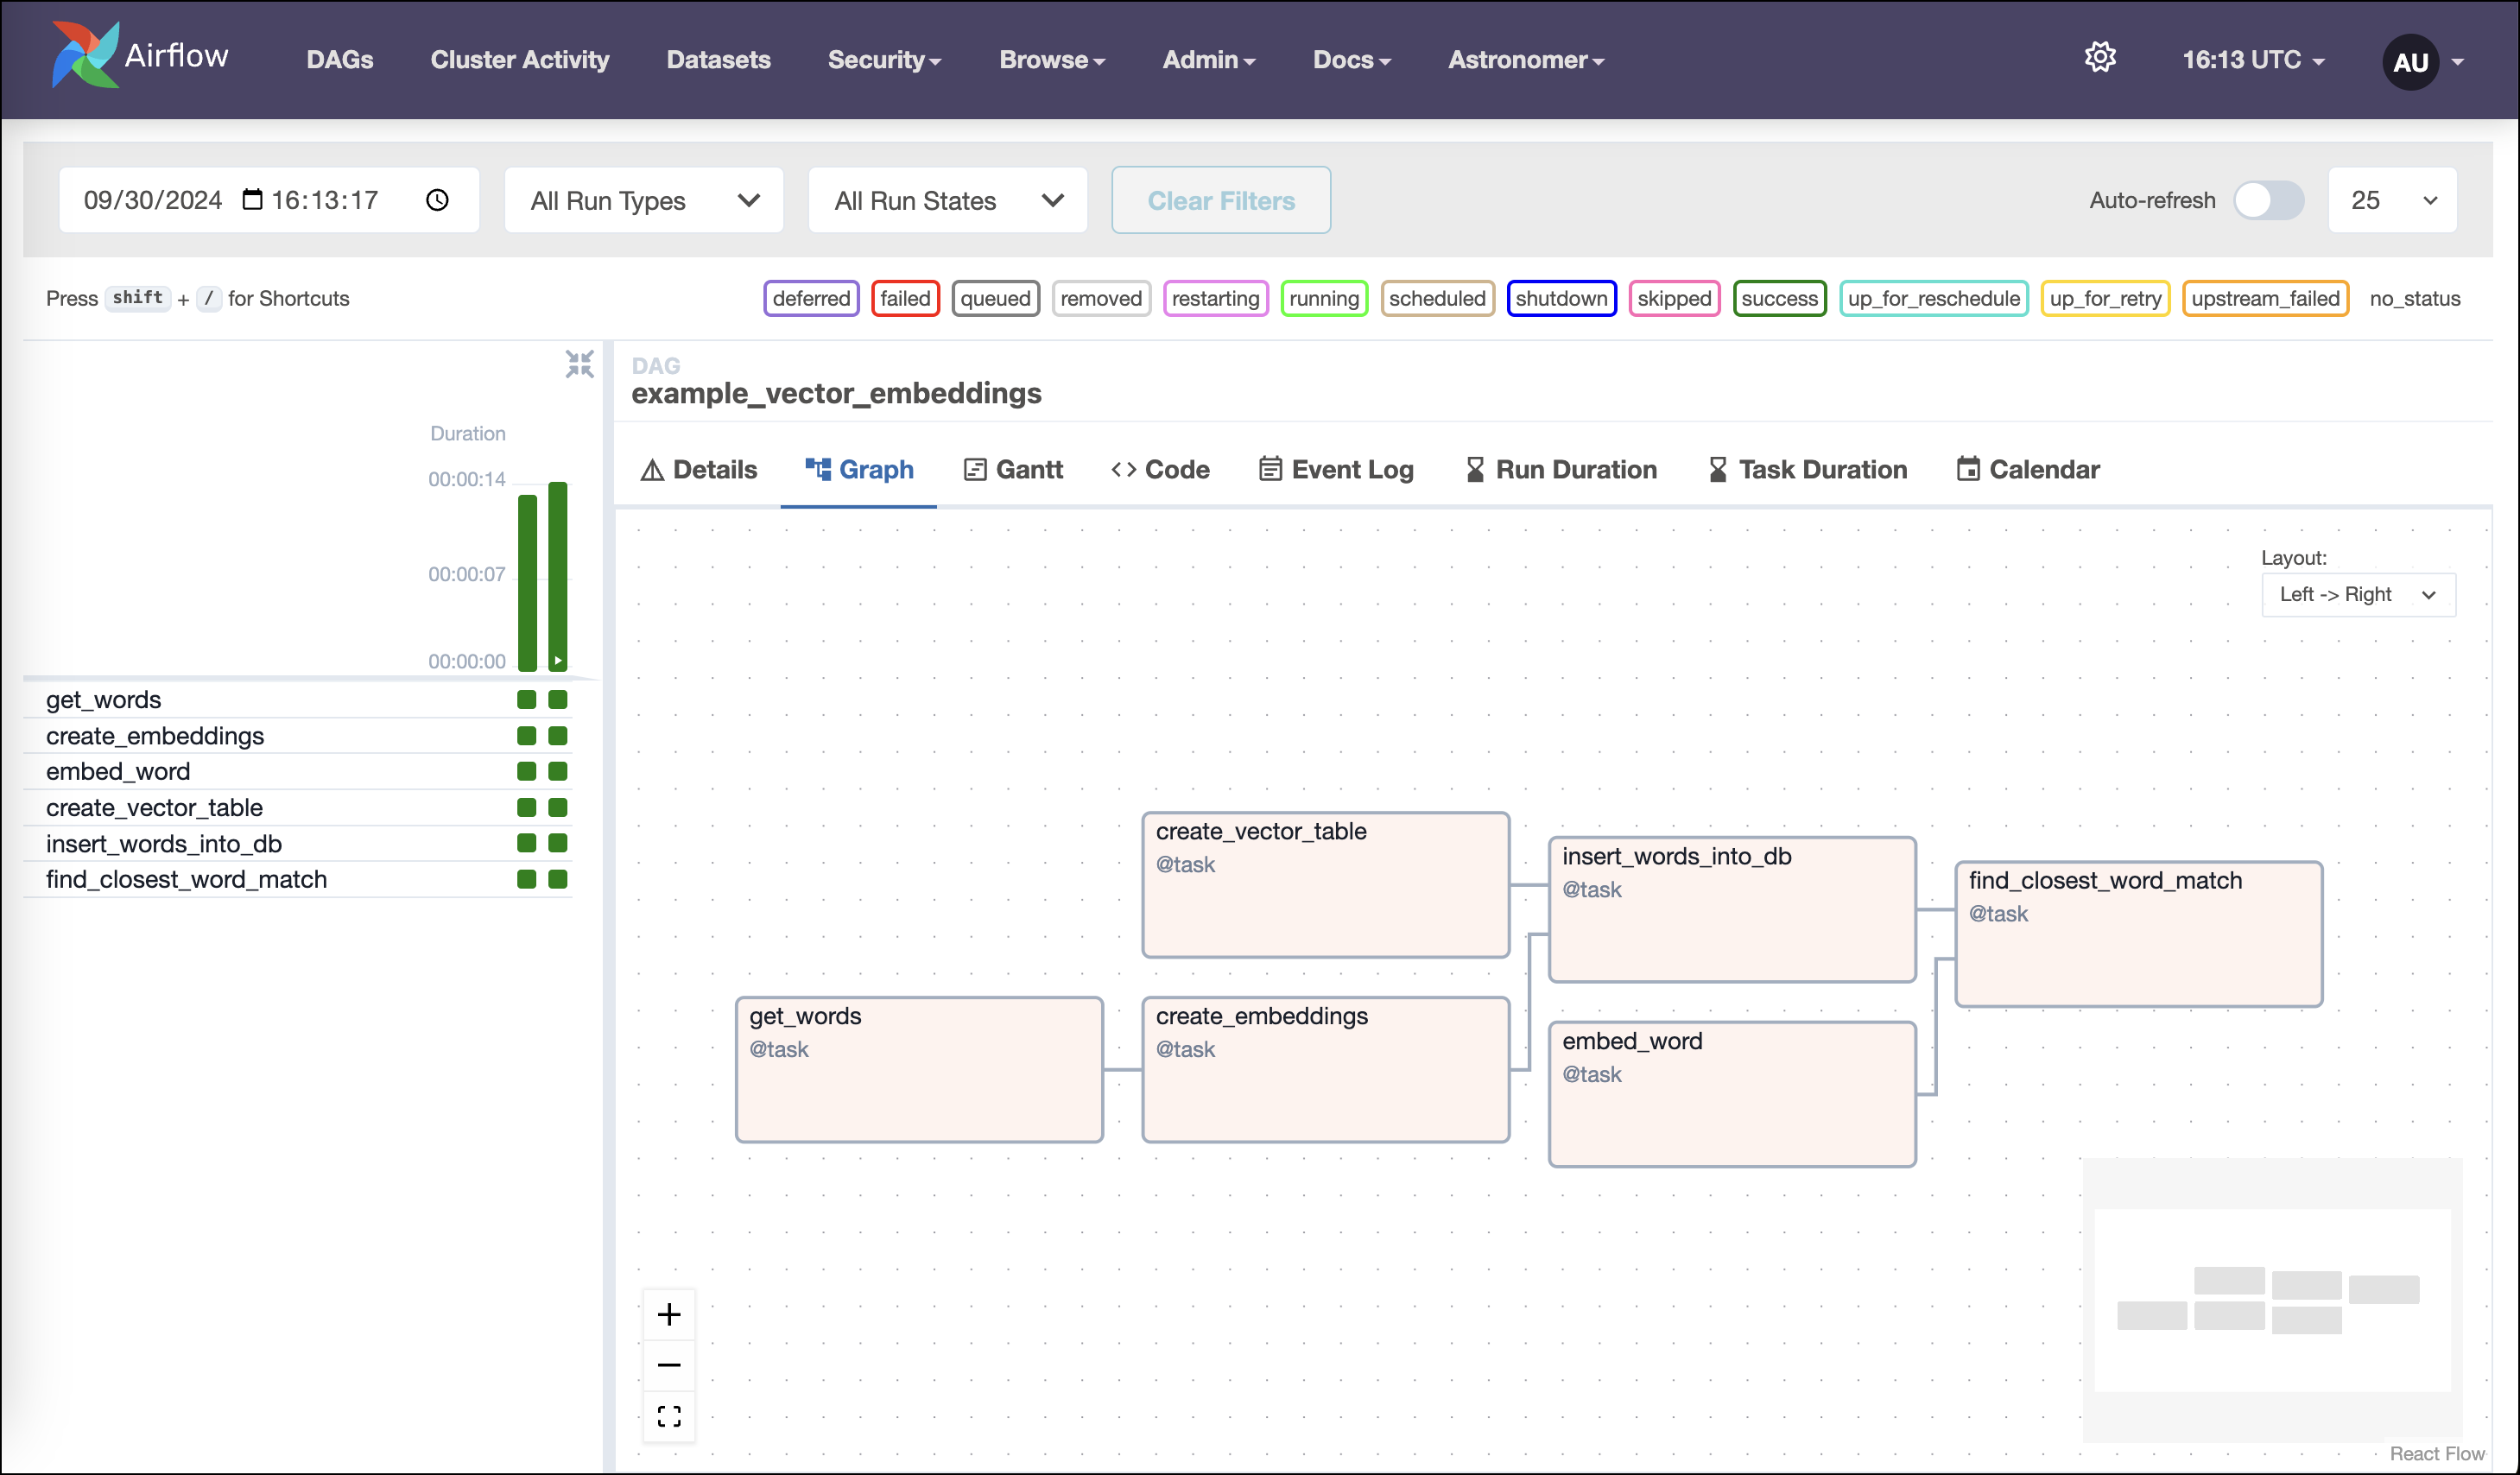
As you start to trigger DAG runs, the graph view will look like this screenshot:
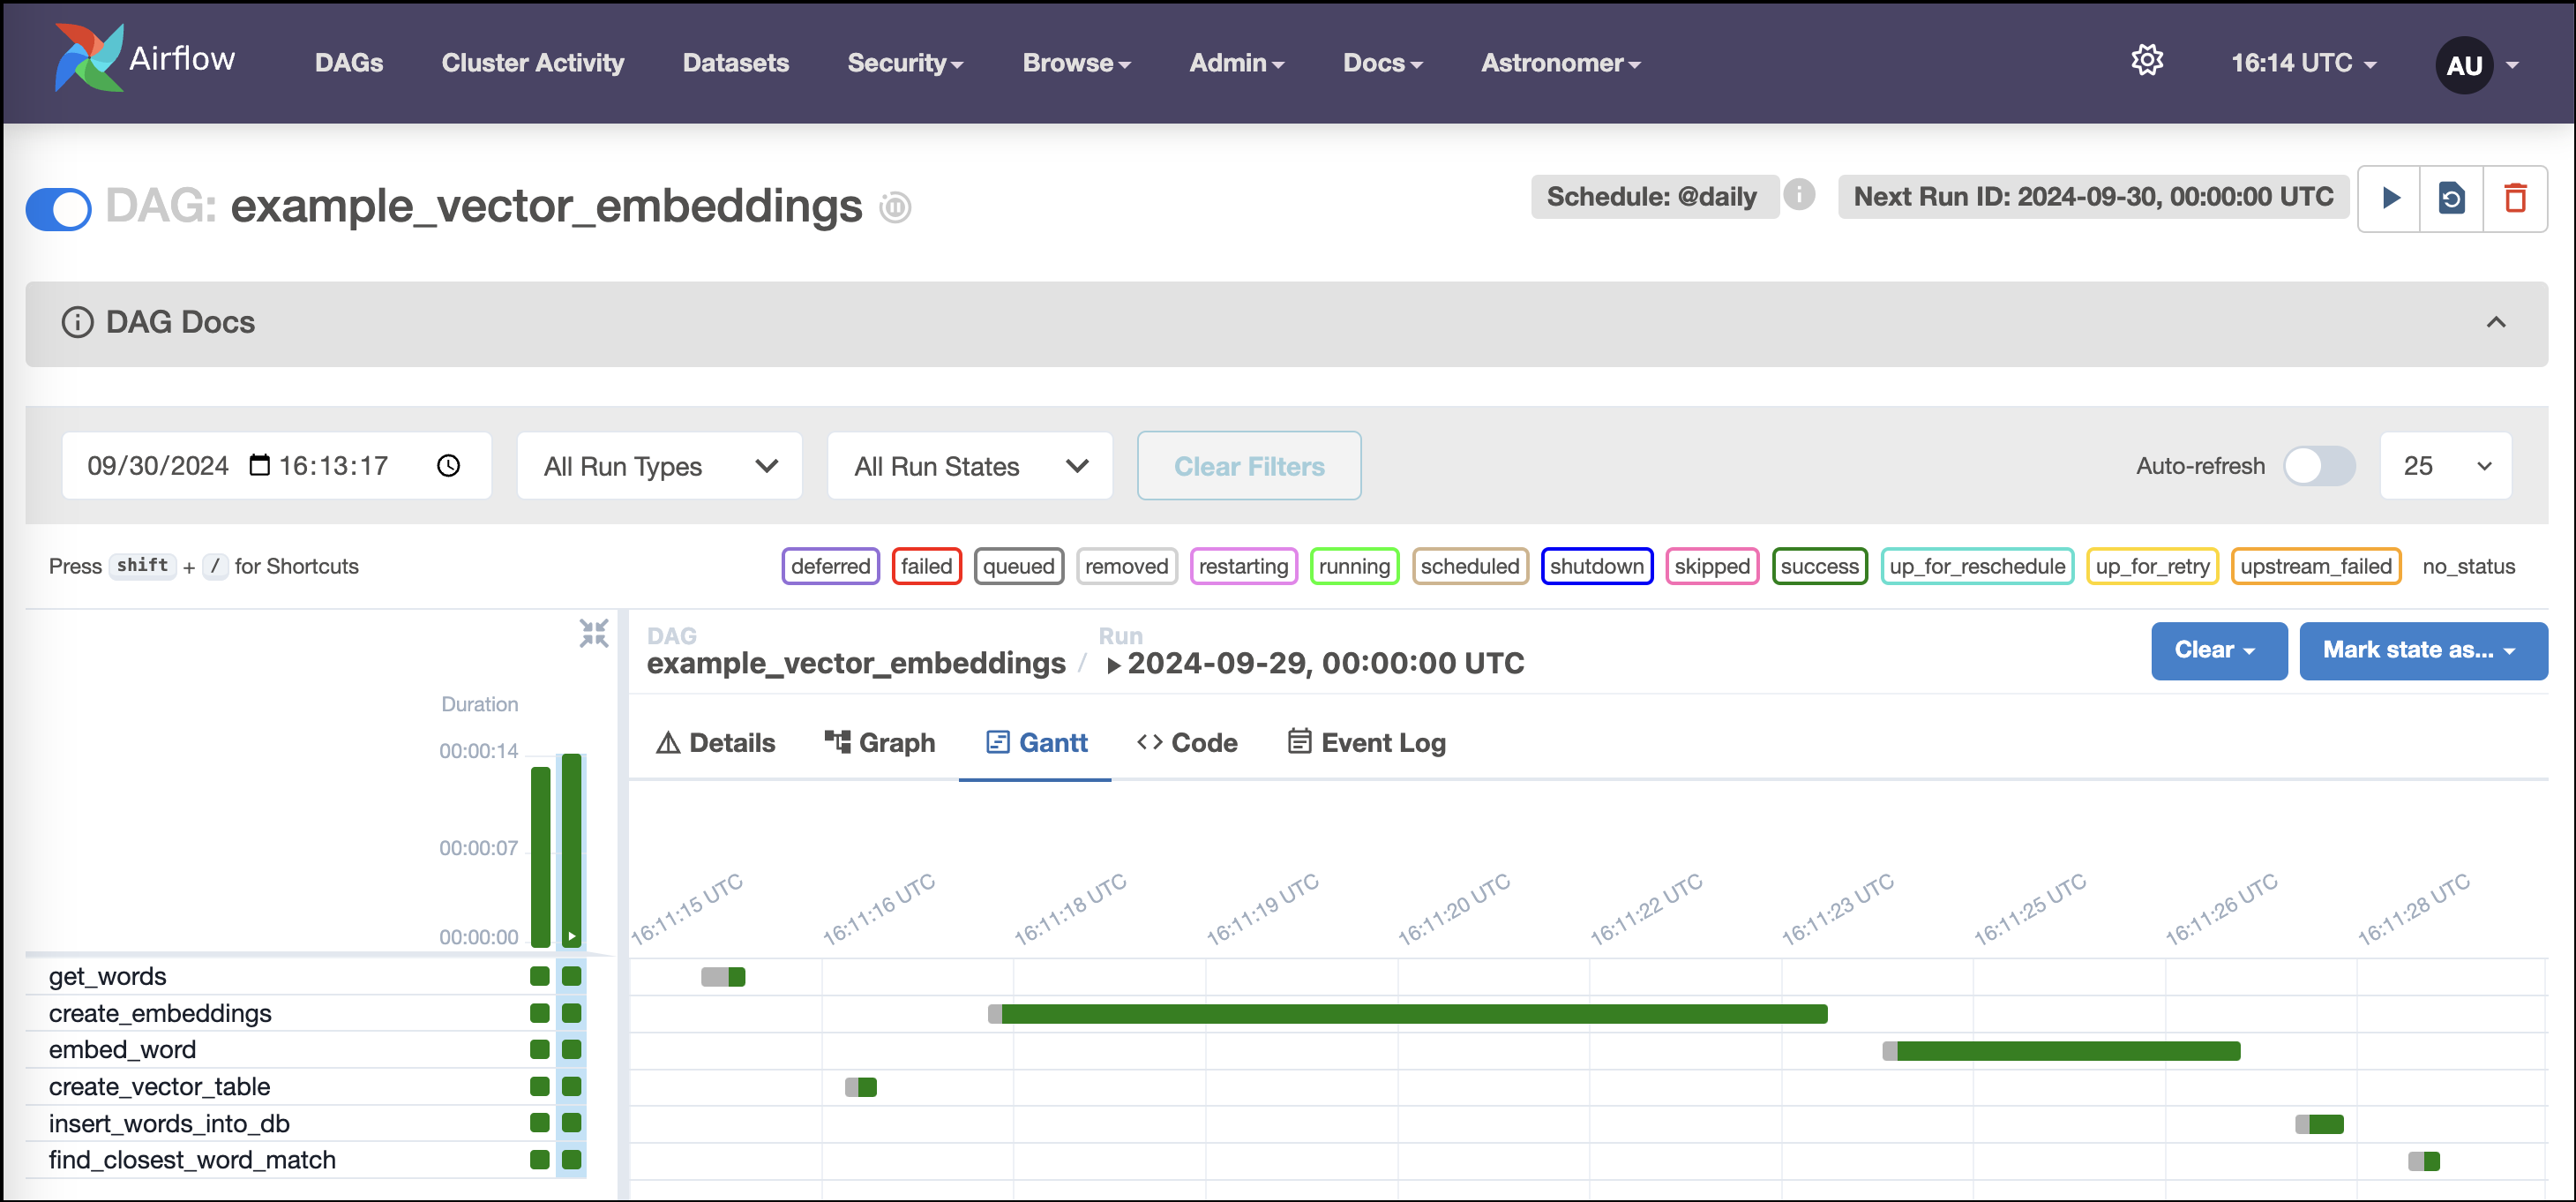
The Gantt chart will look like this screenshot:
Step 3: Explore the project
Learning Airflow
This Astro project introduces you to the basics of orchestrating pipelines with Airflow. You’ll see how easy it is to:
- get data from data sources.
- generate tasks automatically and in parallel.
- trigger downstream workflows automatically.
You’ll build a lean, dynamic pipeline serving a common use case: extracting data from an API and loading it into a database!
This project uses DuckDB, an in-memory database. Although this type of database is great for learning Airflow, your data isn’t guaranteed to persist between executions!
For production applications, use a persistent database instead (consider DuckDB’s hosted option MotherDuck or another database like Postgres, MySQL, or Snowflake).
Pipeline structure
An Airflow instance can have any number of DAGs (directed acyclic graphs), your data pipelines in Airflow. This project has two:
example_astronauts
This DAG queries the list of astronauts currently in space from the Open Notify API, prints assorted data about the astronauts, and loads data into an in-memory database.
Tasks in the DAG are Python functions decorated using Airflow’s TaskFlow API, which makes it easy to turn arbitrary Python code into Airflow tasks, automatically infer dependencies, and pass data between tasks.
-
get_astronaut_namesandget_astronaut_numbersmake a JSON array and an integer available, respectively, to downstream tasks in the DAG. -
print_astronaut_craftandprint_astronautsmake use of this data in different ways. The third task uses dynamic task mapping to create a parallel task for each Astronaut in the list retrieved from the API. Airflow lets you do this with just two lines of code:The key feature is the
expand()function, which makes the DAG automatically adjust the number of tasks each time it runs. -
create_astronauts_table in duckdbandload_astronauts_in_duckdbcreate a DuckDB database table for some of the data and load the data, respectively.
example_extract_astronauts
This DAG queries the database you created for astronaut data in example_astronauts and prints out some of this data. Changing a single line of code in this DAG can make it run automatically when the other DAG completes a run.
ETL
Building Extract, Transform, and Load (ETL) workloads is a common pattern in Apache Airflow. This project shows an example pattern for defining an ETL workload using DuckDB as the data warehouse of choice.
As you try out this project, you’ll see how easy Airflow makes it to:
- write responsive pipelines that change based on user inputs.
- perform database operations using SQL.
- access and extract data from local files.
- execute transformations with Pandas.
You’ll write a lean ETL pipeline in easy-to-read Python code!
This project uses DuckDB, an in-memory database. Although this type of database is great for learning Airflow, your data isn’t guaranteed to persist between executions!
For production applications, use a persistent database instead (consider DuckDB’s hosted option MotherDuck or another database like Postgres, MySQL, or Snowflake).
Pipeline structure
An Airflow project can have any number of DAGs (directed acyclic graphs), the main building blocks of Airflow pipelines. This project has one:
example_etl_galaxies
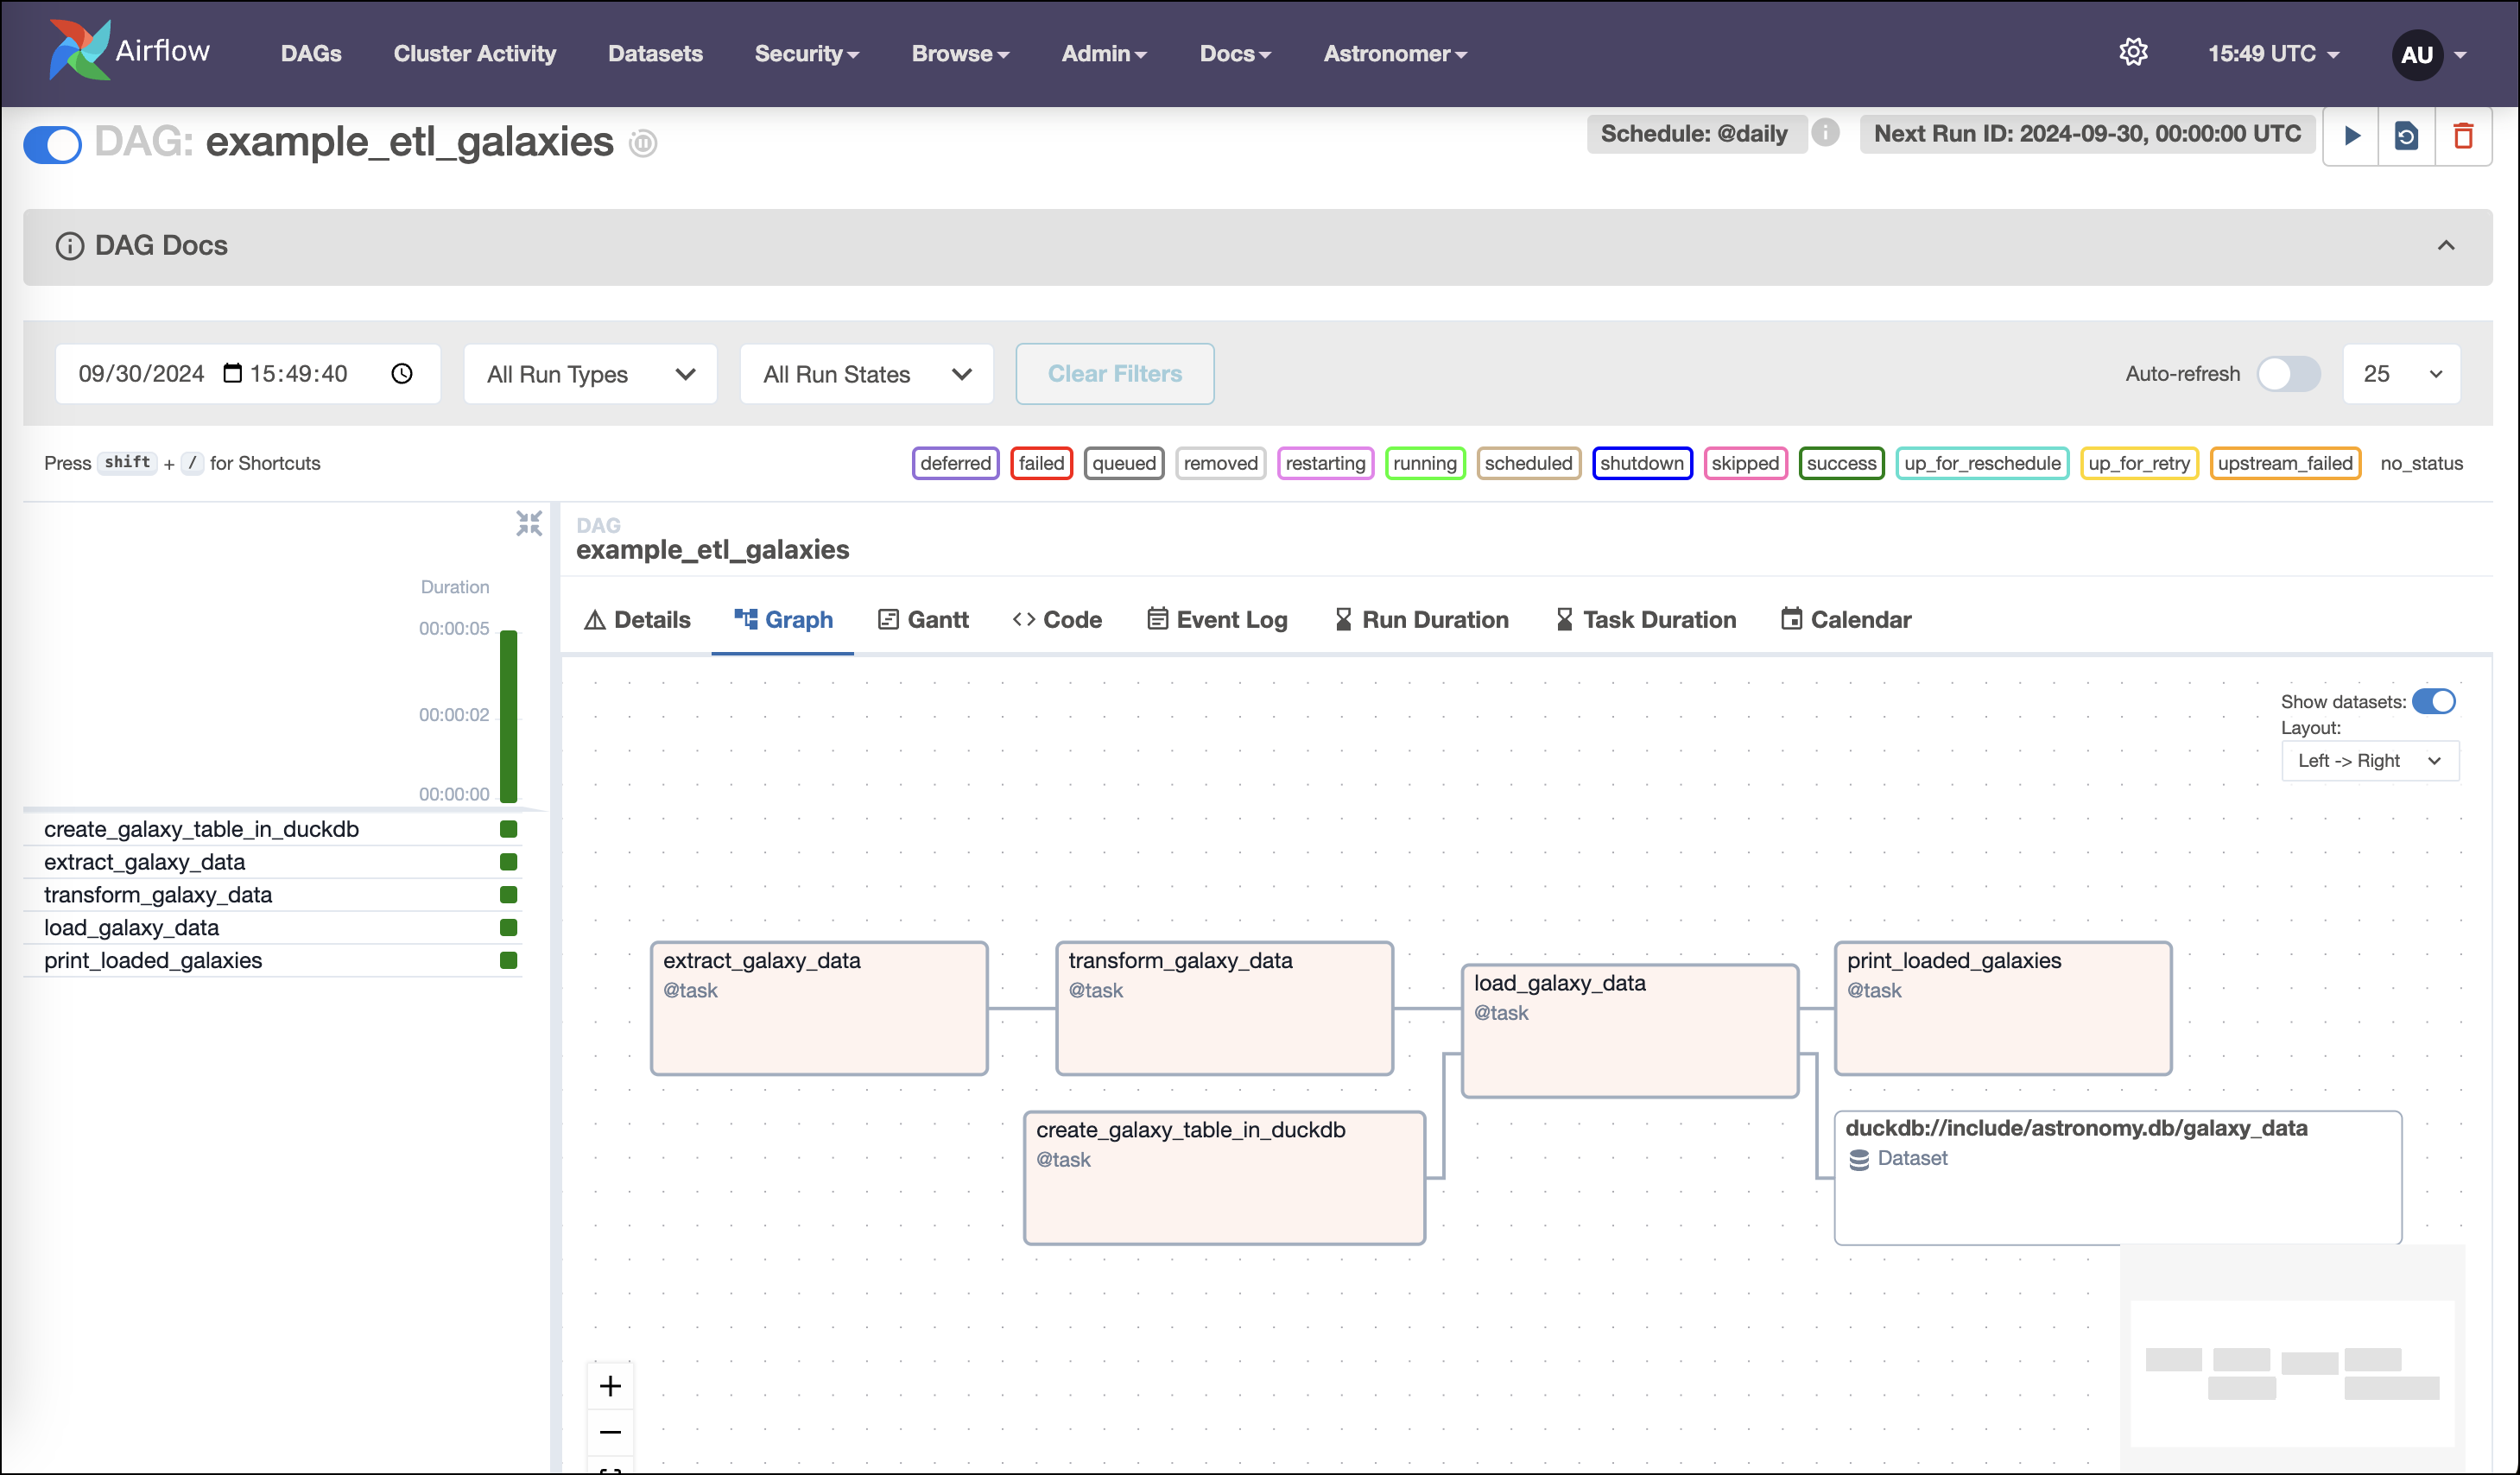
This DAG contains five @task-decorated Python functions:
-
create_galaxy_table_in_duckdbuses a hook to create a database connection and a SQL query to create a database table. -
extract_galaxy_datareturns a dataframe created using a modularized function imported from the project’sincludedirectory. -
transform_galaxy_datagets a user-specified value from the DAG context and uses it to execute a simple data transformation on the dataframe, returning another dataframe. -
load_galaxy_datauses a database hook to load the dataframe into the database. You can load the dataframe directly in the context of a SQL query. No conversion of the dataframe is required. -
print_loaded_galaxiesexecutes aSELECTquery on the database and prints the data to the logs.
Generative AI
Apache Airflow is one of the most common orchestration engines for AI/Machine Learning jobs, especially for retrieval-augmented generation (RAG). This project shows a simple example of building vector embeddings for text and then performing a semantic search on the embeddings.
The DAG (directed acyclic graph) in the project demonstrates how to use Airflow’s automation and orchestration capabilities to:
- orchestrate a generative AI pipeline.
- compute vector embeddings of words using Python’s
SentenceTransformerslibrary. - compare the embeddings of a word of interest to a list of words to find the semantically closest match.
You’ll write a user-customizable generative-AI pipeline in easy-to-read Python code!
This project uses DuckDB, an in-memory database, for running dbt transformations. Although this type of database is great for learning Airflow, your data isn’t guaranteed to persist between executions!
For production applications, use a persistent database instead (consider DuckDB’s hosted option MotherDuck or another database like Postgres, MySQL, or Snowflake).
Pipeline structure
An Airflow project can have any number of DAGs (directed acyclic graphs), the main building blocks of Airflow pipelines. This project has one:
example_vector_embeddings
This DAG contains six tasks:
-
get_wordsgets a list of words from the context to embed. -
create_embeddingscreates embeddings for the list of words. -
create_vector_tablecreates a table in the DuckDB database and an HNSW index on the embedding vector. -
insert_words_into_dbinserts the words and embeddings into the table. -
embed_wordembeds a single word and returns the embeddings. -
find_closest_word_matchfinds the closest match to a word of interest.
Step 4: Get your hands dirty!
Learning Airflow
With Airflow, it’s easy to create cross-workflow dependencies. In this step, you’ll learn how to:
- use Airflow Datasets to create a dependency between DAGs so when one workflow ends another begins. To do this, you’ll modify the
example_extract_astronautsDAG to use a Dataset to trigger a DAG run when theexample_astronautsDAG updates the table that both DAGs query.
Schedule the example_extract_astronauts DAG on an Airflow Dataset
With Datasets, DAGs that access the same data can have explicit, visible relationships, and DAGs can be scheduled based on updates to these datasets. This feature helps make Airflow data-aware and expands Airflow scheduling capabilities beyond time-based methods such as cron. Downstream DAGs can be scheduled based on combinations of Dataset updates coming from tasks in the same Airflow instance or calls to the Airflow API.
-
Define the
get_astronaut_namestask as a producer of a Dataset. To do this, pass a Dataset object, encapsulated in a list, to the task’soutletsparameter:For more information about Airflow Datasets, see: Datasets and data-aware scheduling in Airflow.
-
Schedule a downstream DAG run using an Airflow Dataset:
Now that you have defined the
get_astronautstask in theexample_astronautsDAG as a Dataset producer, you can use that Dataset to schedule downstream DAG runs.Datasets function like an API to communicate when data at a specific location in your ecosystem is ready for use, reducing the code required to create cross-DAG dependencies. For example, with an import and a single line of code, you can schedule a DAG to run when another DAG in the same Airflow environment has updated a Dataset.
To schedule the
example_extract_astronautsDAG to run whenexample_astronautsupdates thecurrent_astronautsDataset, add an import statement to make the Airflow Dataset package available: -
Then, set the DAG’s schedule using the
current_astronautsDataset: -
Rerun the
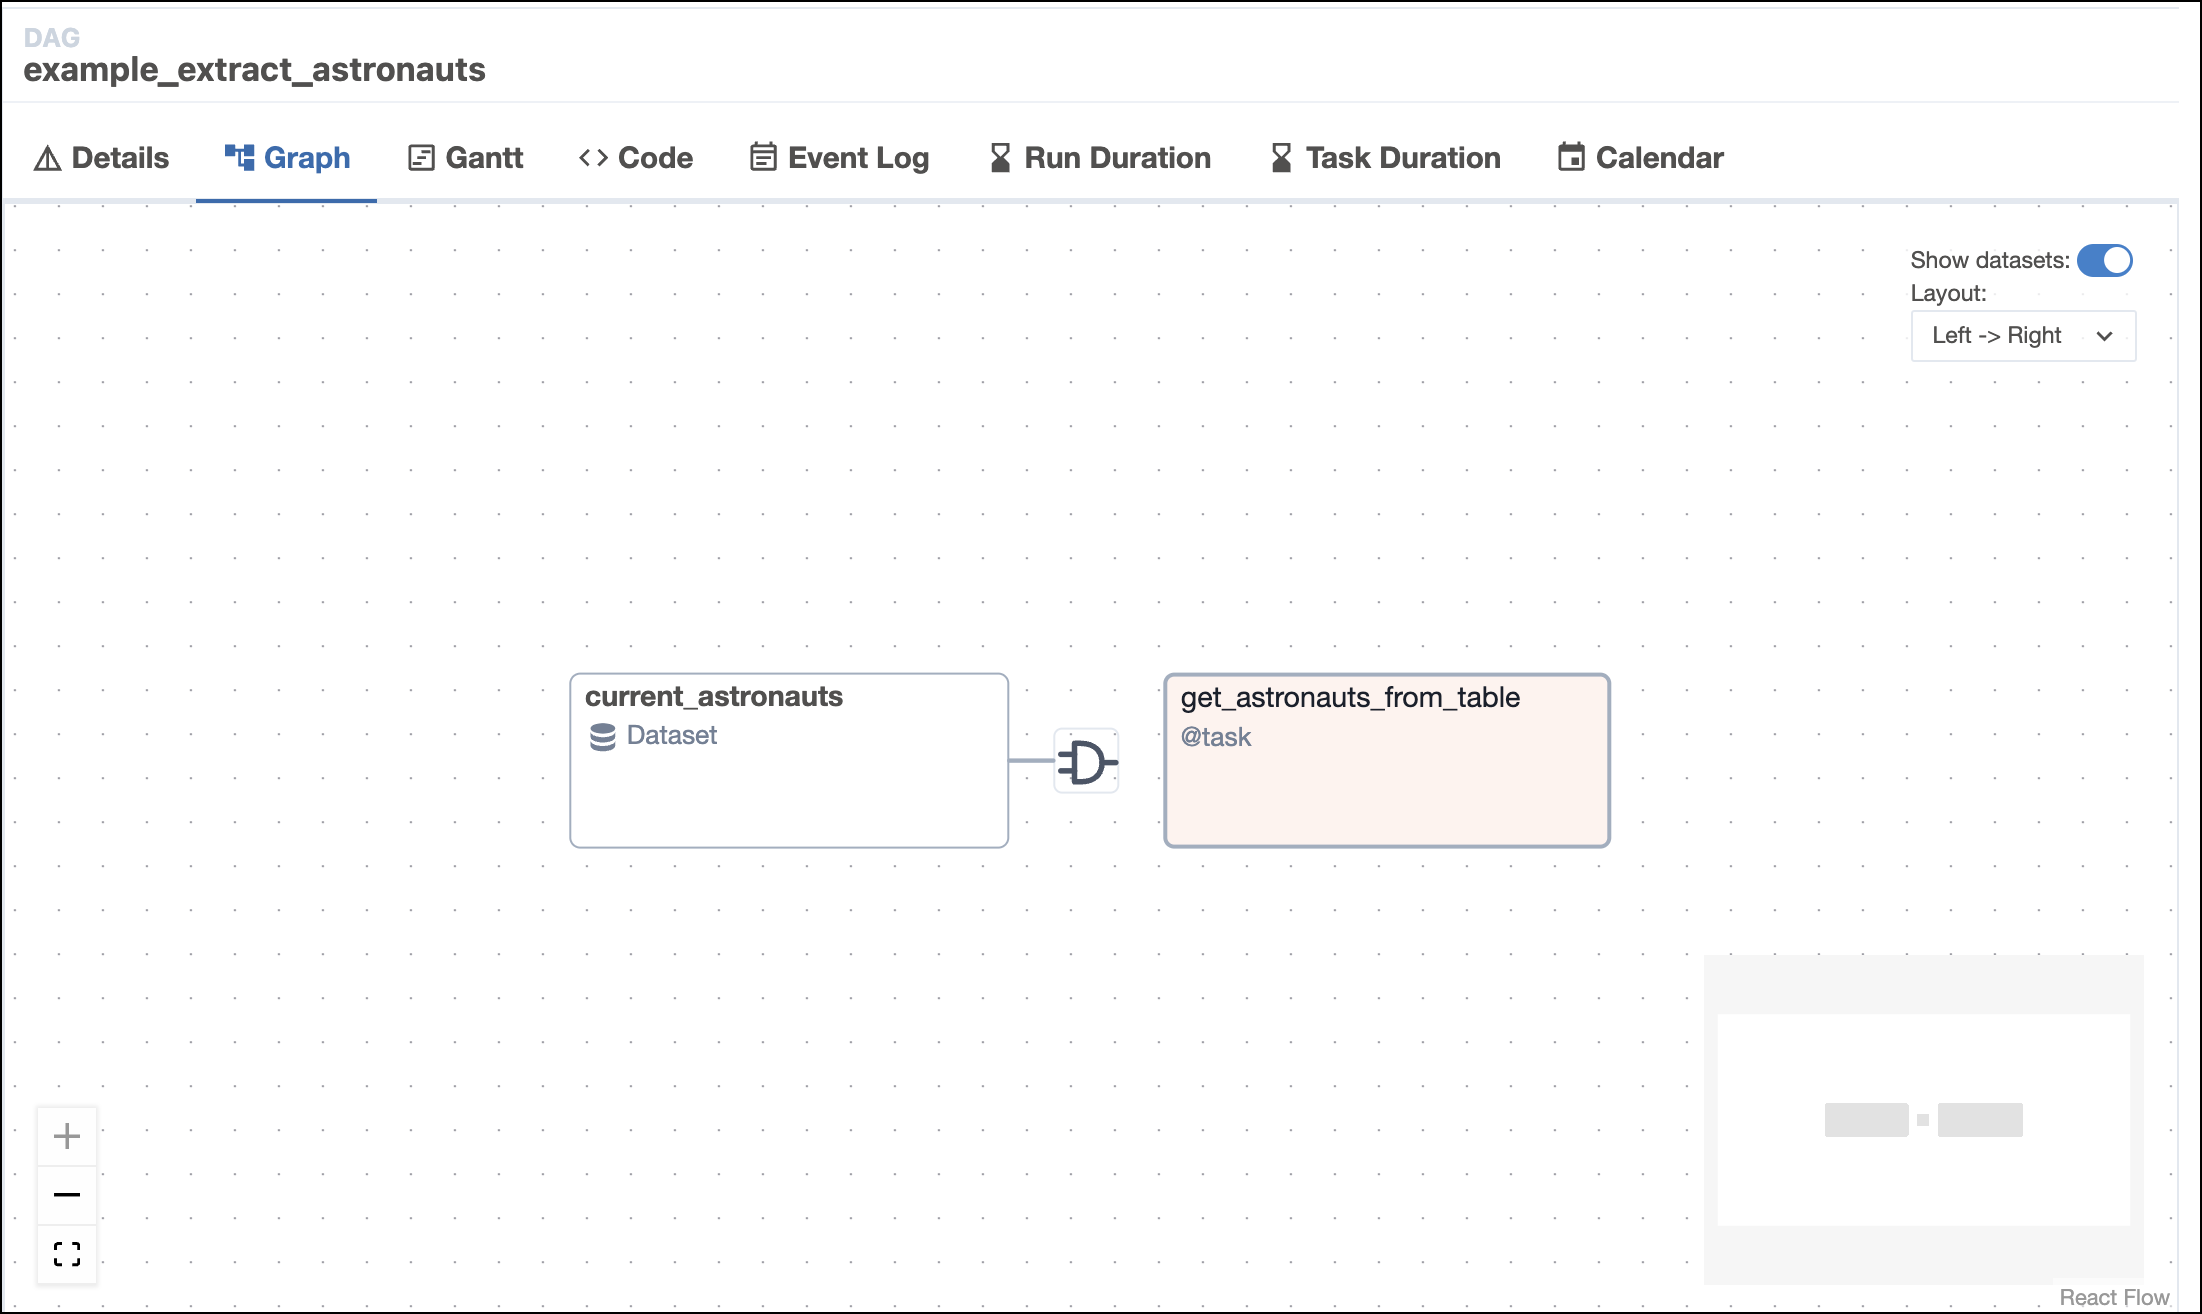
example_astronautsDAG in the UI and check the status of the tasks in the individual DAG view. Watch as theexample_extract_astronautsDAG gets triggered automatically whenexample_astronautsfinishes running.If all goes well, the graph view of the Dataset-triggered DAG run will look like this screenshot:
For more information about Airflow Datasets, see: Datasets and data-aware scheduling in Airflow.
ETL
With Airflow, you can connect to many external systems and create dynamic and responsive workflows. In this step, you’ll learn how to create a connection to an external system.
Create a connection to an external system
Creating connections to interoperate with the many systems Airflow supports is easy.
In the steps that follow, you’ll create a connection in the Airflow UI and use it in a new DAG. You can use your own preferred external system or use Postgres for a local option.
-
A Postgres database has already been added to the project for you. Confirm that port
5432is available, or, if not, modify the external port in the project’sdocker-compose.override.yml: -
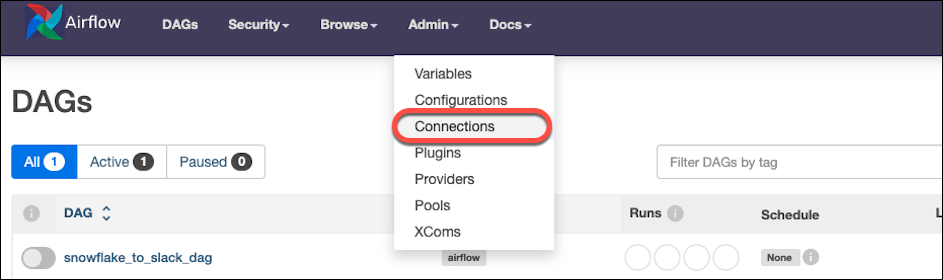
Create a connection in the UI.
Airflow supports a number of ways to create connections, but most users choose the UI.
To create a connection in the UI, go to Admin > Connections.
Your connection should look like this screenshot, with the password being
example: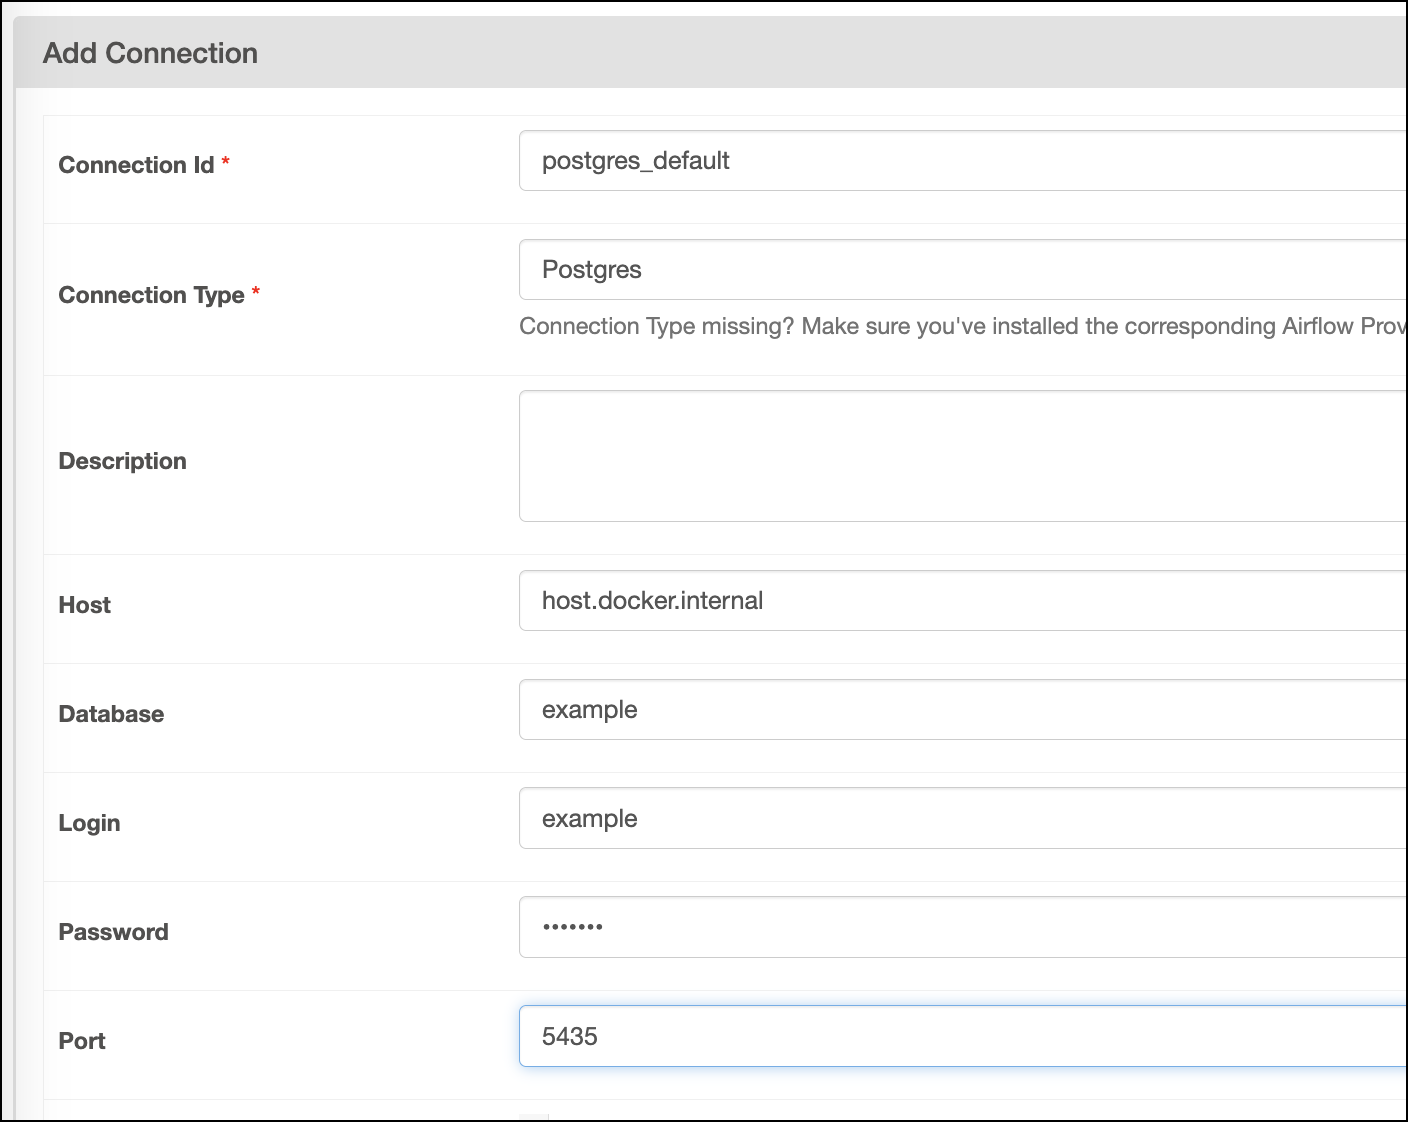
-
Add a DAG to the project.
Create a new Python file in the
dagsdirectory and paste this DAG code there:This DAG extracts data from the project’s DuckDB database, creates a table in the project’s Postgres database, and loads the data into the table. Using an Airflow Dataset trigger, it will run when
example_etl_galaxiesupdates thegalaxy_datadataset.Connection parameters vary between operators. In the case of
SQLExecuteQueryOperator, it isconn_id: -
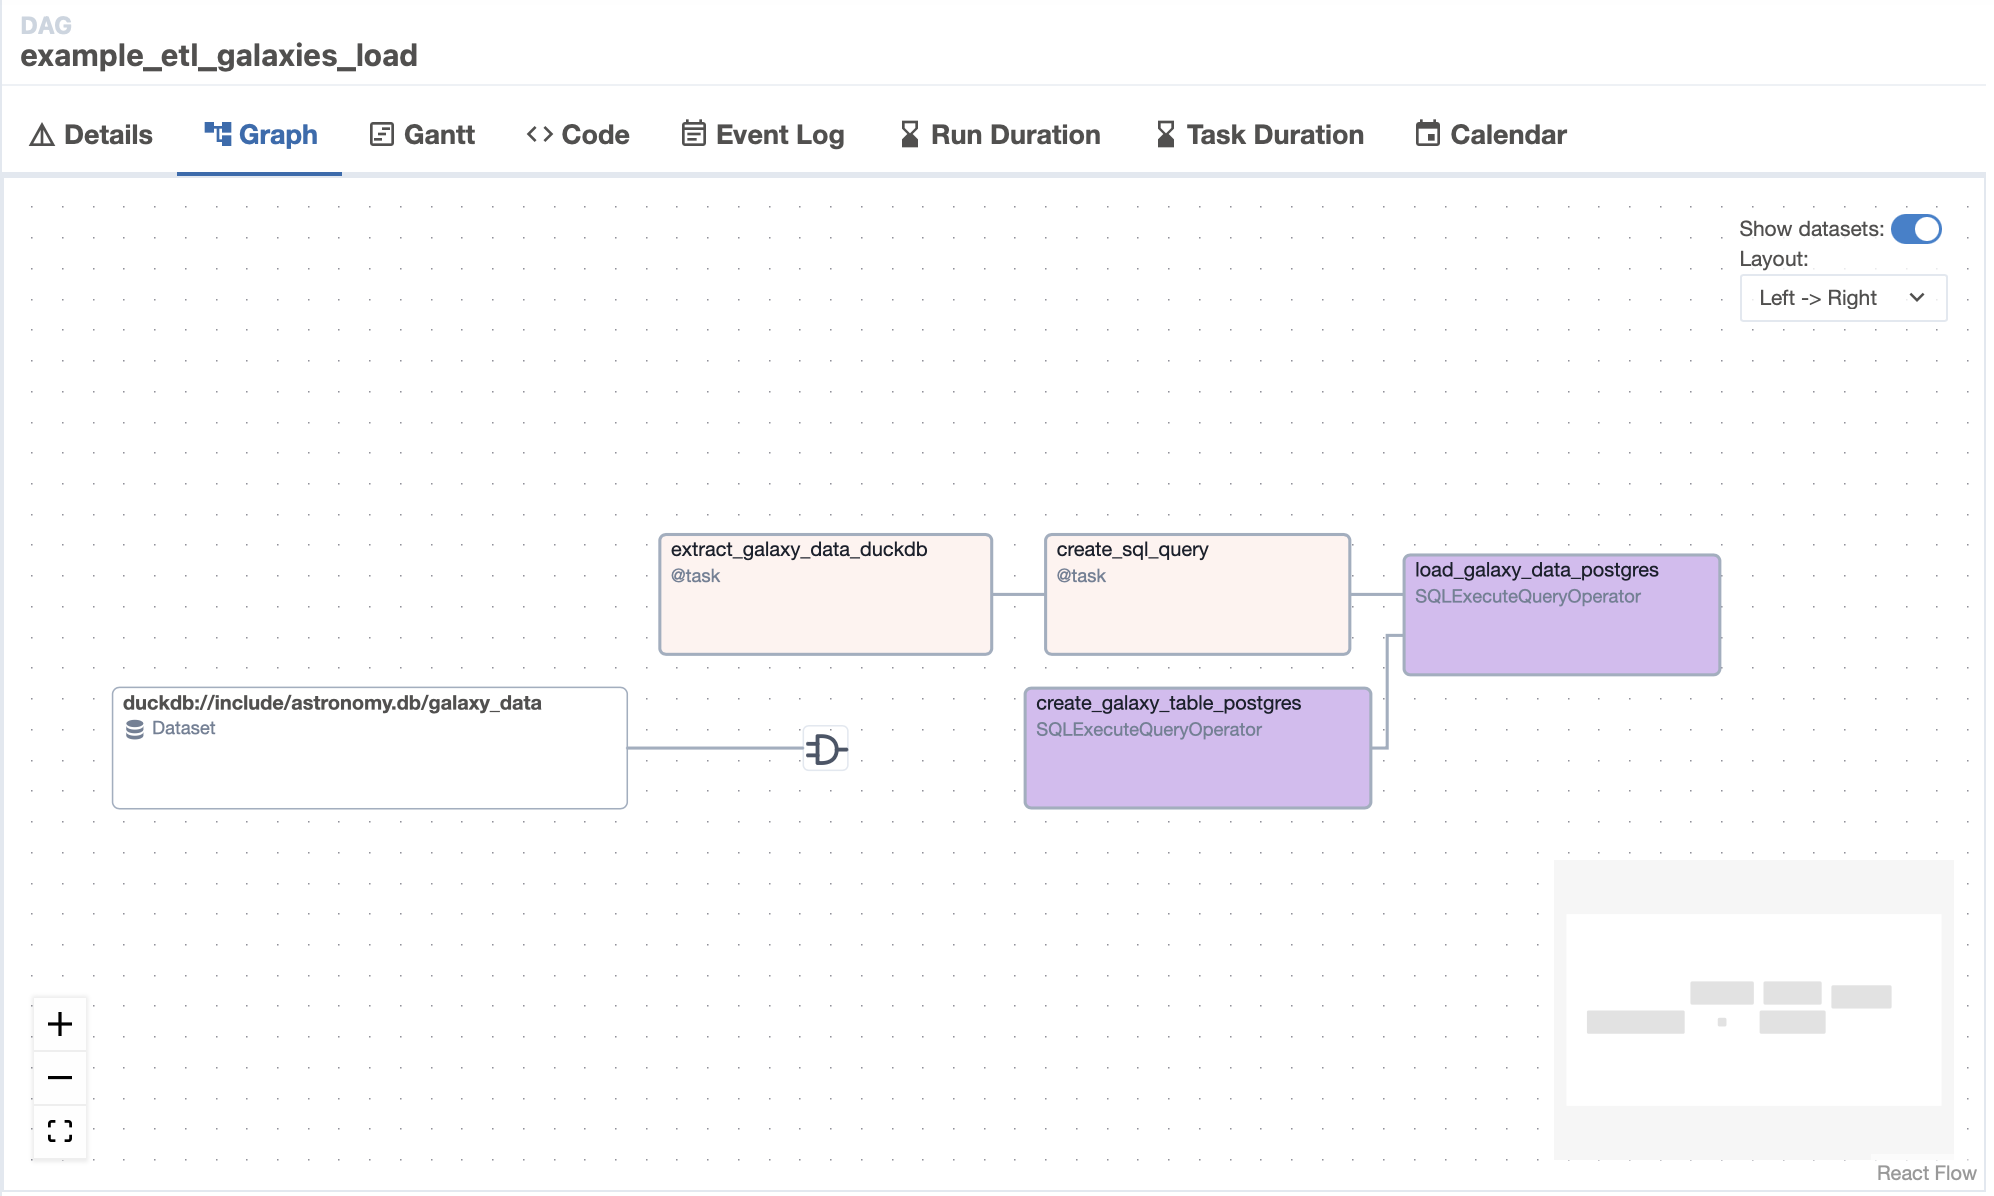
Trigger your new DAG!
Trigger the
example_etl_galaxiesDAG and not the new one you just added. Your new DAG will run after theload_galaxy_taskinexample_etl_galaxiesruns successfully.If all goes well, the graph view will look like this screenshot:
For more guidance on getting started with connections, see: Integrations and connections.
Generative AI
With Airflow, it’s easy to test and compare LMs until you find the right model for your generative AI workflows. In this step, you’ll learn how to:
- configure a DAG to use different LMs.
- use the Airflow UI to compare the performance of the models you select.
Experiment with different LMs to compare performance
Sentence Transformers (AKA SBERT) is a popular Python module for accessing, using, and training text and image embedding models. It enables a wide range of AI applications, including semantic search, semantic textual similarity, and paraphrase mining. SBERT provides various pre-trained language models through the Sentence Transformers Hugging Face organization. Additionally, over 6,000 community Sentence Transformers models have been publicly released on the Hugging Face Hub.
Try using a different language model from among those provided by SBERT in this project’s DAG. Then, explore the metadata in the Airflow UI to compare the performance of the models.
-
Start your experiment by using a different model. Find the
_LMvariable definition in theget_embeddings_one_wordfunction close to the top of theexample_vector_embeddingsDAG and replace the model string withdistiluse-base-multilingual-cased-v2:The default is very fast, but this one is slower and lower-performing overall, so the results should be noticeably different. You could also try a model with higher overall performance, such as
all-mpnet-base-v2. For a list of possible models to choose from, see SBERT’s Pretrained models list. -
Next, find the dimensions of the model in the SBERT docs.
For example, the
distiluse-base-multilingual-cased-v2model has dimensions of 512: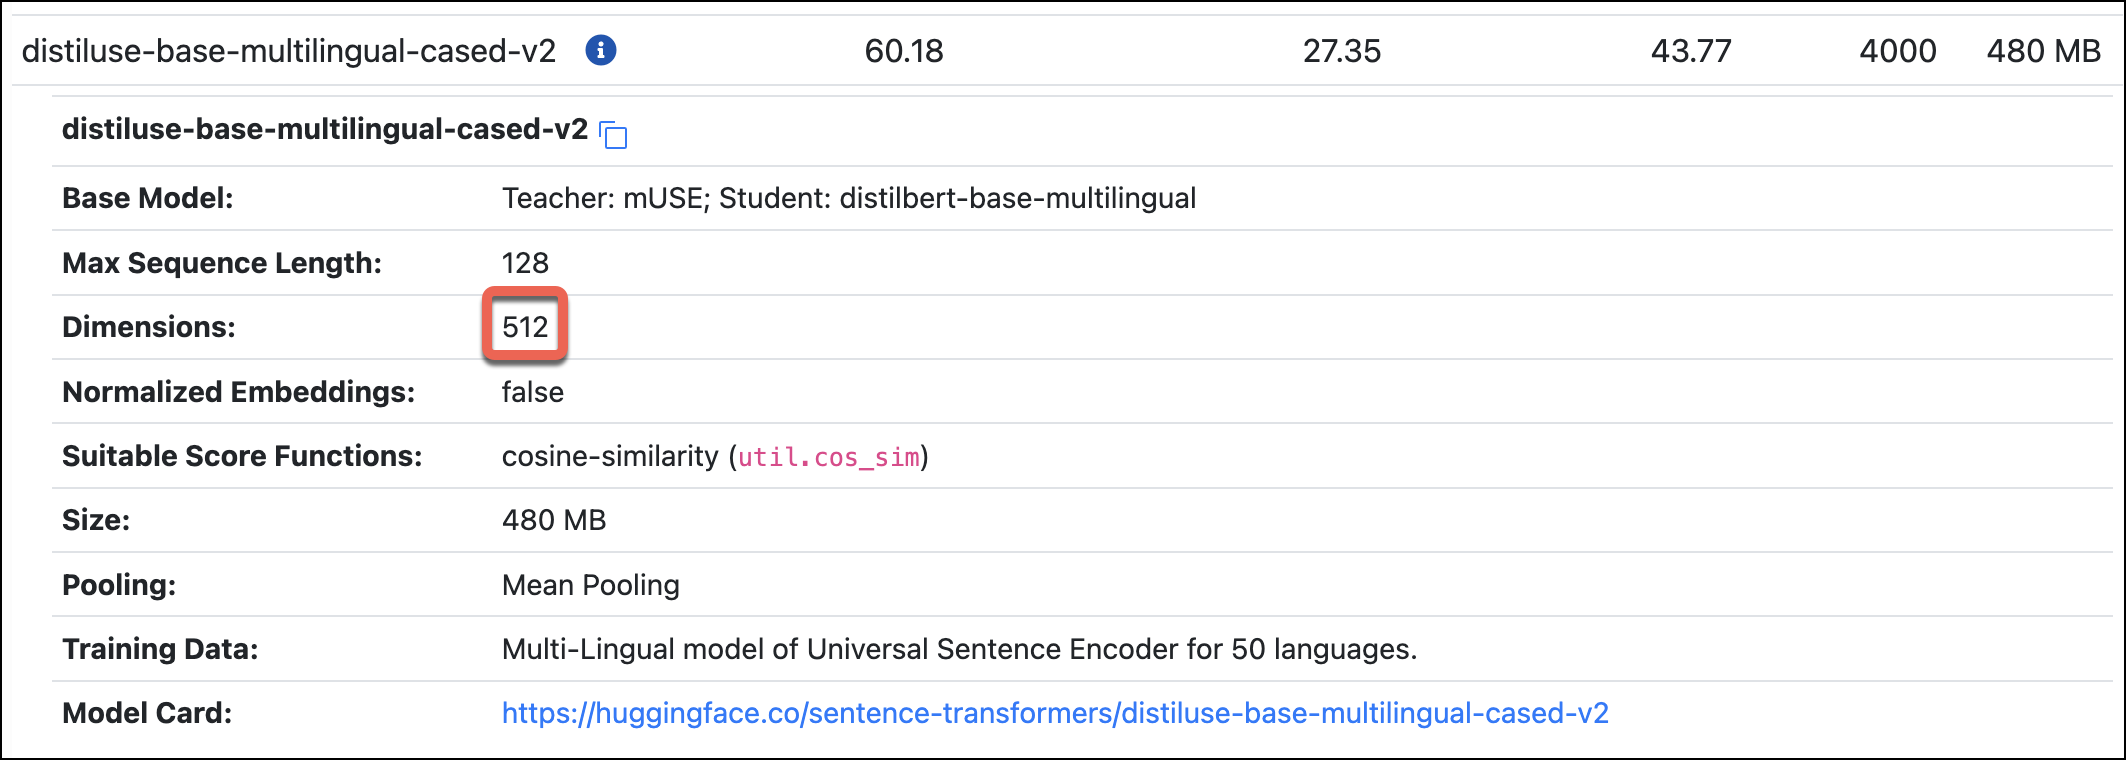
-
Use this number to redefine another top-level variable,
_LM_DIMENSIONS:This value is used in the vector column type definition in the
create_vector_tabletask and the select query in thefind_closest_word_matchtask. -
Rerun the DAG. Depending on the models you choose, you might see large differences in the performance of the
create_embeddingstask.For example, using the default
all-MiniLM-L6-v2model should result in runtimes of around 4 seconds: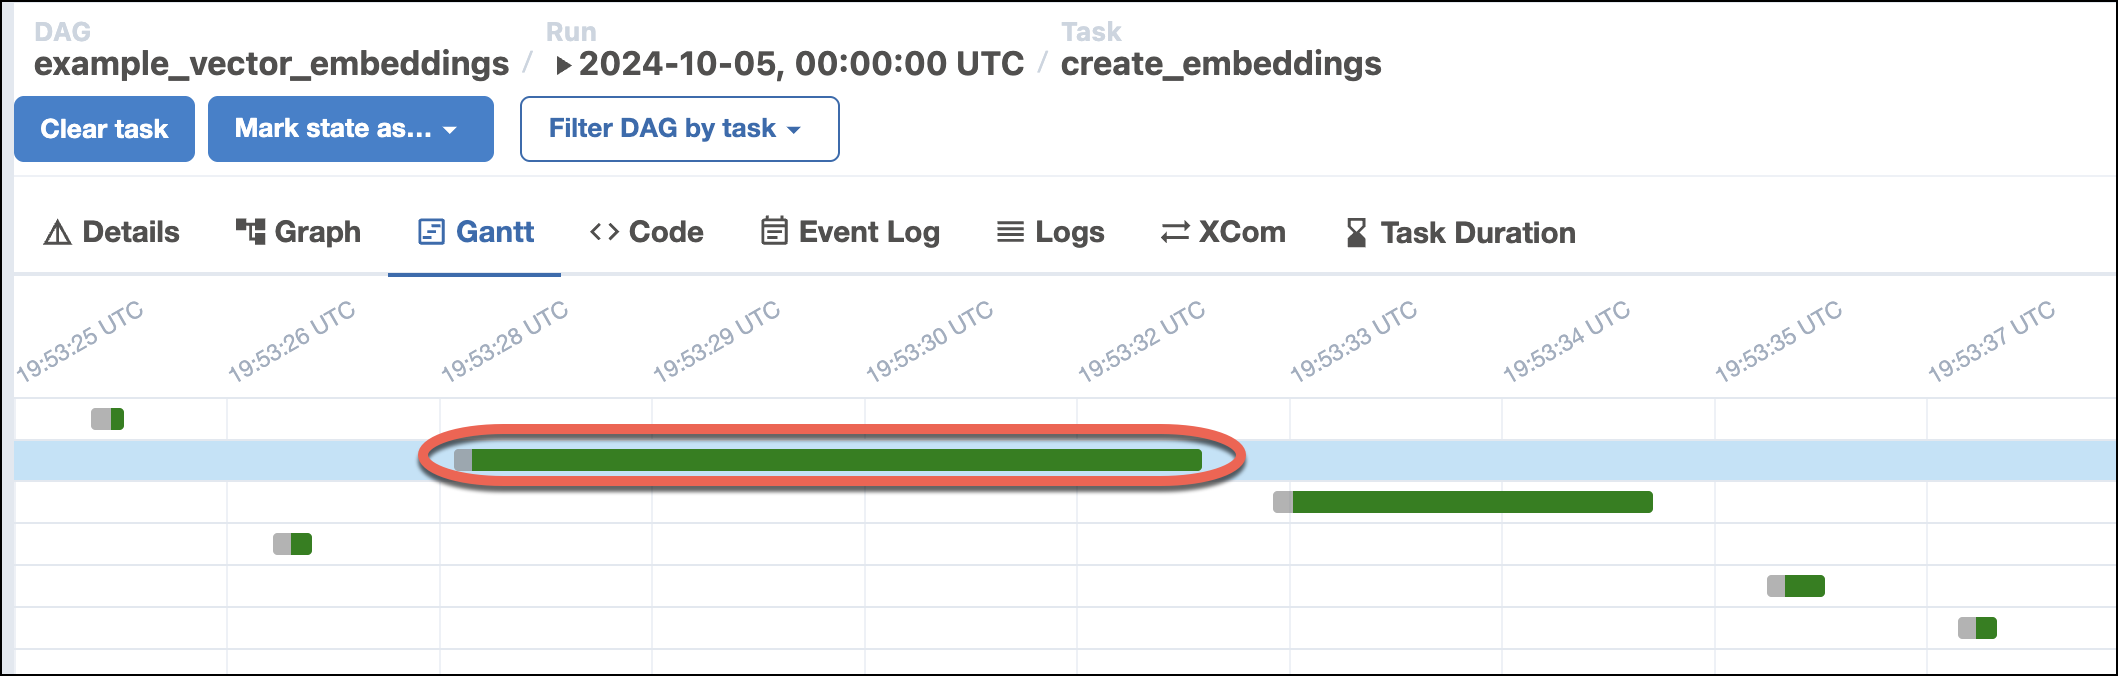
By contrast, using the
distiluse-base-multilingual-cased-v2model might result in runtimes three times as long or longer: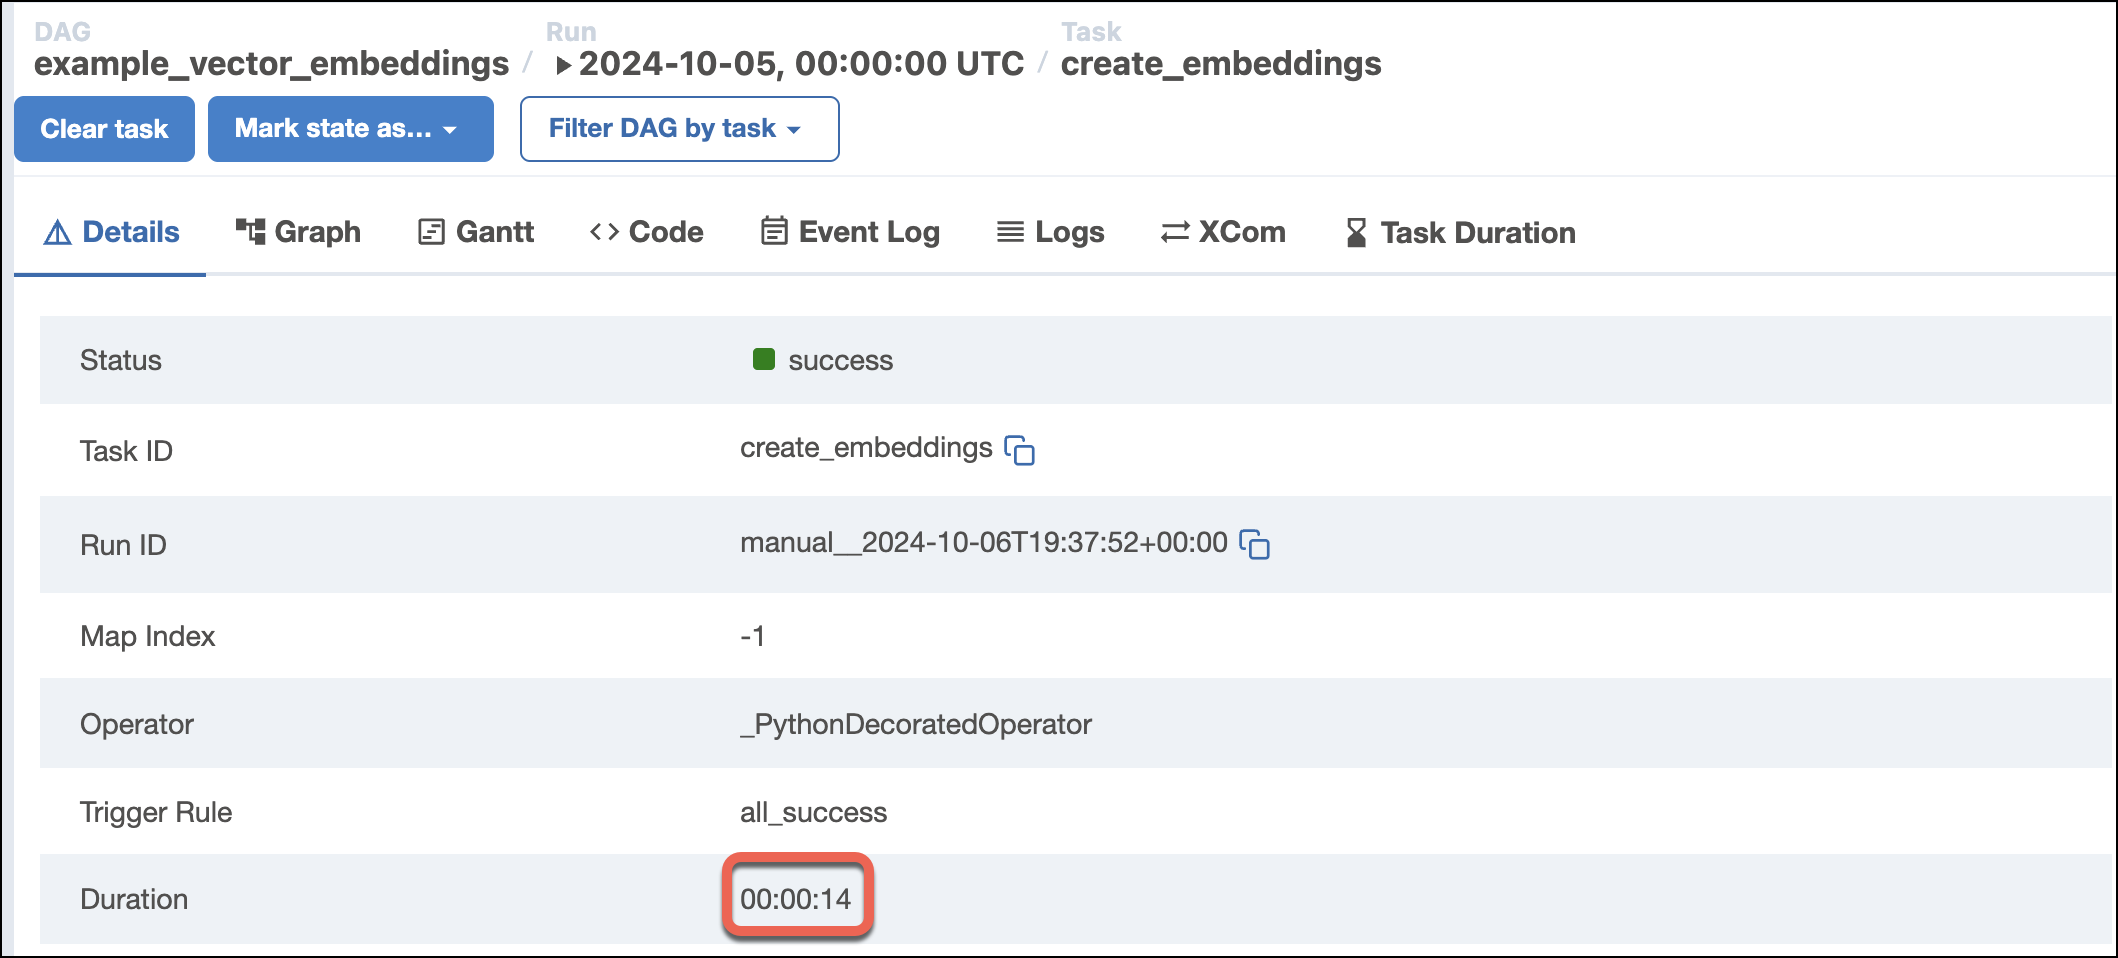
-
Check the log output from the
find_closest_word_matchtask and look for differences between the search result sets.For example, the faster LM
all-MiniLM-L6-v2returnssun, planet, light: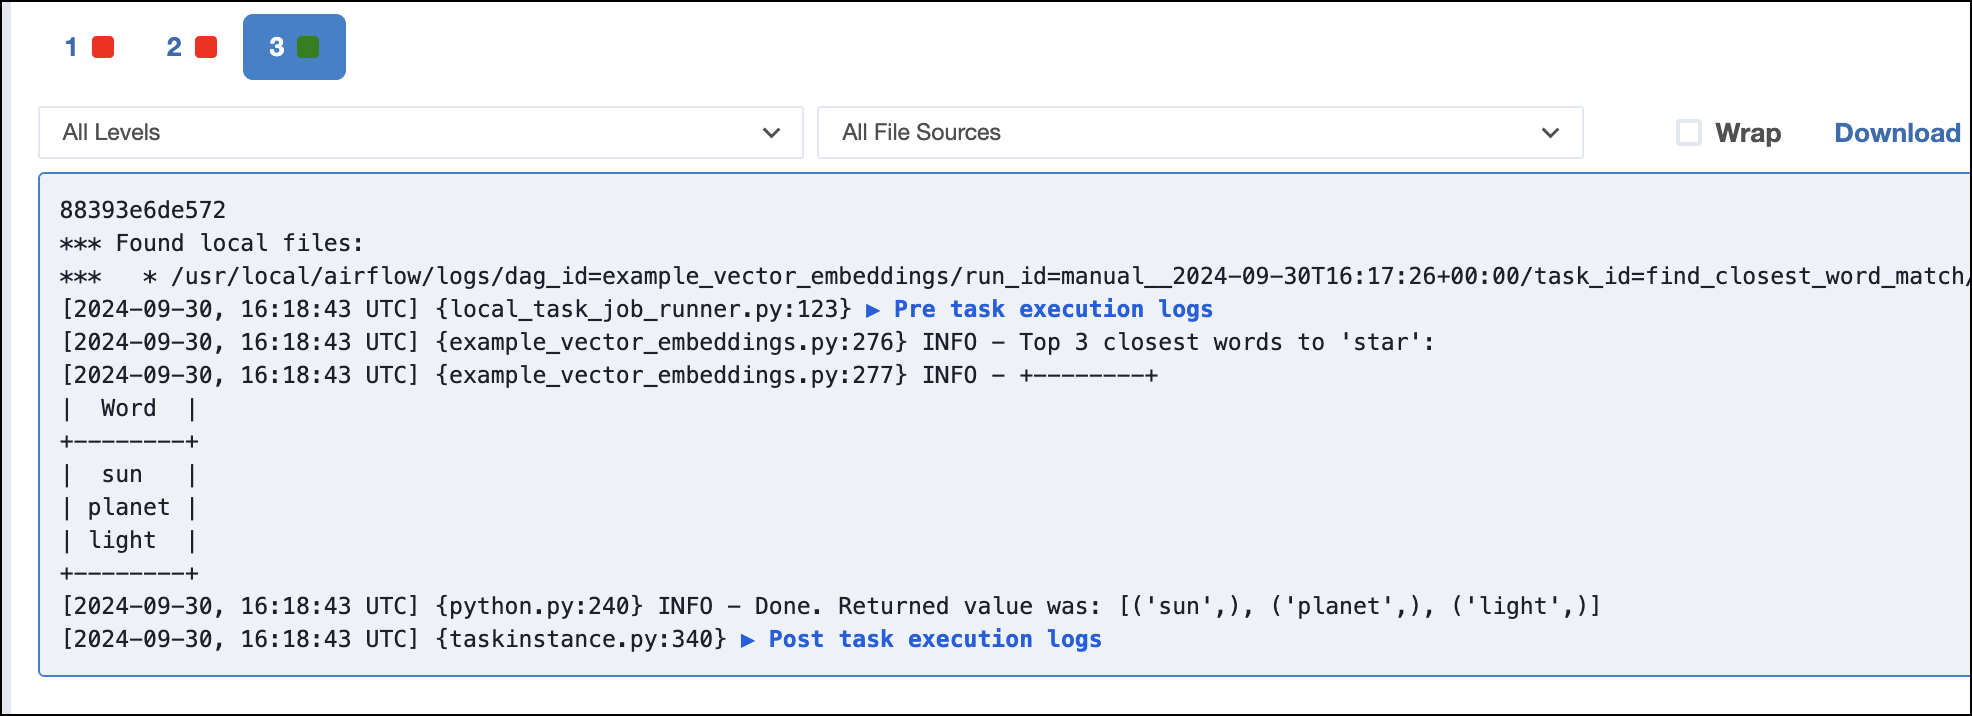
The more performant LM
all-mpnet-base-v2returnssun, rocket, planet: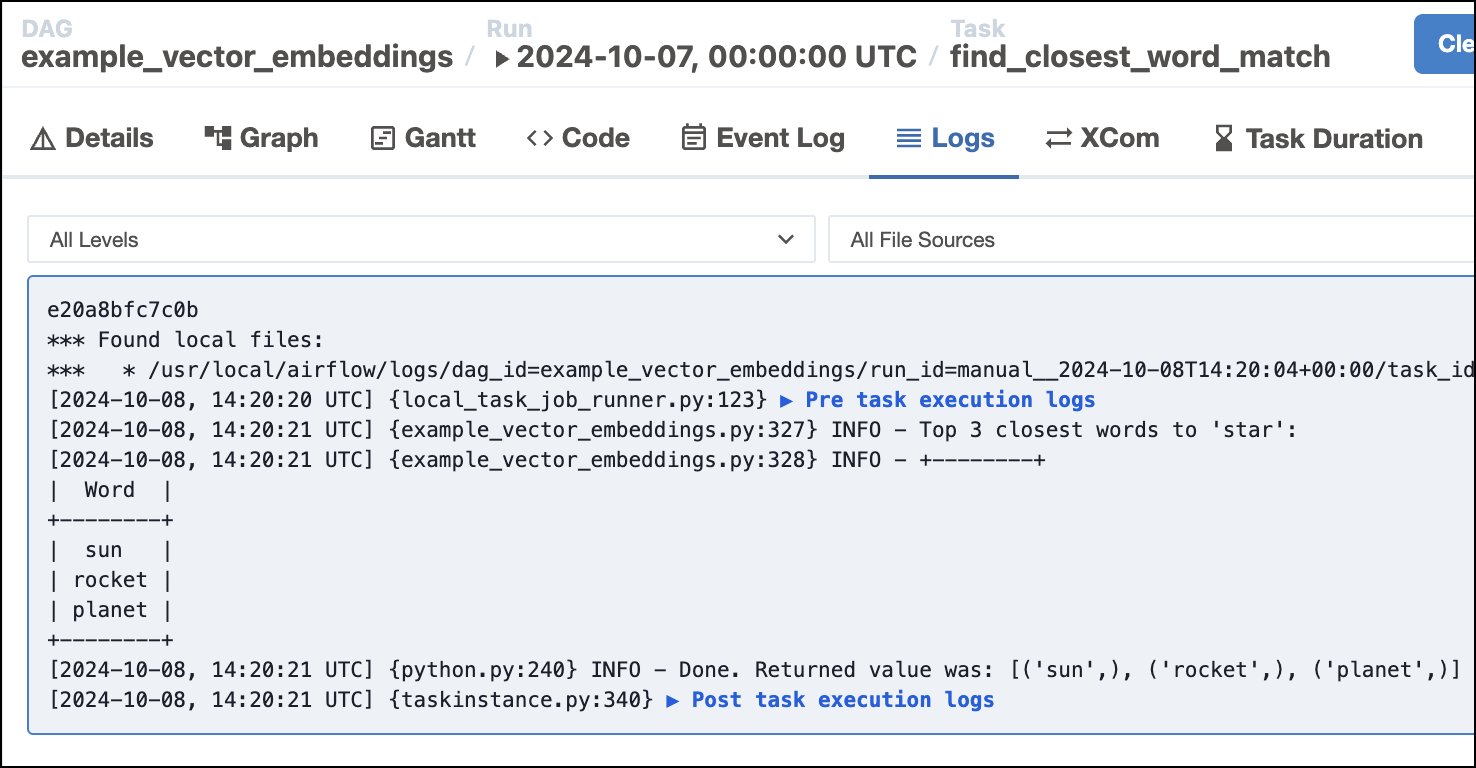
For more information about the SBERT project, library, and models, see the Sentence Transformers Documentation.
Next steps: run Airflow on Astro
The easiest way to run Airflow in production is with Astro. To get started, create an Astro trial. During your trial signup, you will have the option of choosing the same template project you worked with in this quickstart.