

- Create a custom XCom backend in Snowflake.
- Create and use the Snowpark Model Registry in Snowflake.
- Use Airflow decorators to run code in Snowpark, both in a pre-built and custom virtual environment.
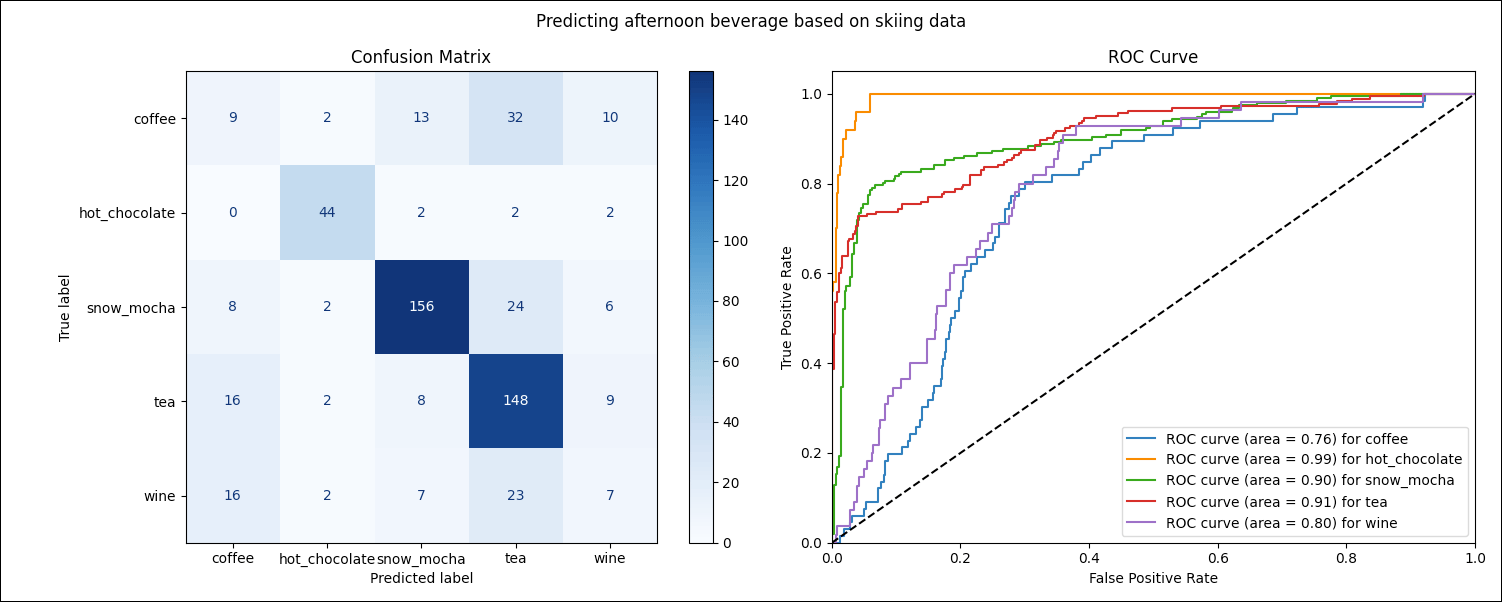
- Run a Logistic Regression model on a synthetic dataset to predict skiers’ afternoon beverage choice.
Why use Airflow with Snowpark?
Snowpark allows you to use Python to perform transformations and machine learning operations on data stored in Snowflake. Integrating Snowpark for Python with Airflow offers the benefits of:- Running machine learning models directly in Snowflake, without having to move data out of Snowflake.
- Expressing data transformations in Snowflake in Python instead of SQL.
- Storing and versioning your machine learning models using the Snowpark Model Registry inside Snowflake.
- Using Snowpark’s compute resources instead of your Airflow cluster resources for machine learning.
- Using Airflow for Snowpark Python orchestration to enable automation, auditing, logging, retry, and complex triggering for powerful workflows.
- Connecting to Snowflake using an Airflow connection, removing the need to directly pass credentials in your DAG.
- Automatically instantiating a Snowpark session.
- Automatically serializing and deserializing Snowpark dataframes passed using Airflow XCom.
- Integrating with OpenLineage.
- Providing a pre-built custom XCom backend for Snowflake.
Time to complete
This tutorial takes approximately 45 minutes to complete.Assumed knowledge
To get the most out of this tutorial, make sure you have an understanding of:- The basics of Snowflake and Snowpark. See Introduction to Snowflake and the Snowpark API documentation.
- Airflow decorators. See Introduction to the TaskFlow API and Airflow decorators.
- Airflow connections. See Managing your Connections in Apache Airflow.
- Setup/ teardown tasks in Airflow. See Use setup and teardown tasks in Airflow.
Prerequisites
- The Astro CLI.
- A Snowflake account. A 30-day free trial is available. You need to have at least one database and one schema created to store the data and models used in this tutorial.
-
(Optional) This tutorial includes instructions on how to use the Snowflake custom XCom backend included in the provider. If you want to use this custom XCom backend you will need to either:
-
Run the DAG using a Snowflake account with
ACCOUNTADMINprivileges to allow the DAG’s first task to create the required database, schema, stage and table. See Step 3.3 for more instructions. The free trial account has the required privileges. -
Ask your Snowflake administrator to:
- Provide you with the name of an existing database, schema, and stage. You need to use these names in Step 1.8 for the
AIRFLOW__CORE__XCOM_SNOWFLAKE_TABLEandAIRFLOW__CORE__XCOM_SNOWFLAKE_STAGEenvironment variables. - Create an
XCOM_TABLEwith the following schema:
- Provide you with the name of an existing database, schema, and stage. You need to use these names in Step 1.8 for the
-
Run the DAG using a Snowflake account with
The example code from this tutorial is also available on GitHub.
Step 1: Configure your Astro project
-
Create a new Astro project:
-
Create a new file in your Astro project’s root directory called
requirements-snowpark.txt. This file contains all Python packages that you install in your reusable Snowpark environment. -
Change the content of the
Dockerfileof your Astro project to the following, which creates a virtual environment by using the Astro venv buildkit. The requirements added in the previous step are installed in that virtual environment. This tutorial includes Snowpark Python tasks that are running in virtual environments, which is a common pattern in production to simplify dependency management. This Dockerfile creates a virtual environment calledsnowparkwith the Python version 3.8 and the packages specified inrequirements-snowpark.txt. -
Add the following package to your
packages.txtfile: -
Add the following packages to your
requirements.txtfile. The Astro Snowflake provider is installed from thewhlfile.
-
To create an Airflow connection to Snowflake and allow serialization of Astro Python SDK objects, add the following to your
.envfile. Make sure to enter your own Snowflake credentials as well as the name of an existing database and schema.
For more information on creating a Snowflake connection, see Create a Snowflake connection in Airflow.
-
(Optional) If you want to use a Snowflake custom XCom backend, add the following additional variables to your
.env. Replace the values with the name of your own database, schema, table, and stage if you aren’t using the suggested values.
Step 2: Add your data
The DAG in this tutorial runs a classification model on synthetic data to predict which afternoon beverage a skier will choose based on attributes like ski color, ski resort, and amount of new snow. The data is generated using this script.-
Create a new directory in your Astro project’s
includedirectory calleddata. -
Download the dataset from Astronomer’s GitHub and save it in
include/data.
Step 3: Create your DAG
-
In your
dagsfolder, create a file calledairflow_with_snowpark_tutorial.py. -
Copy the following code into the file. Make sure to provide your Snowflake database and schema names to
MY_SNOWFLAKE_DATABASEandMY_SNOWFLAKE_SCHEMA.This DAG consists of eight tasks in a simple ML orchestration pipeline.-
(Optional)
create_snowflake_objects: Creates the Snowflake objects required for the Snowflake custom XCom backend. This task uses the@task.snowflake_pythondecorator to run code within Snowpark, automatically instantiating a Snowpark session calledsnowpark_sessionfrom the connection ID provided to thesnowflake_conn_idparameter. This task is a setup task and is only shown in the DAG graph if you setSETUP_TEARDOWN_SNOWFLAKE_CUSTOM_XCOM_BACKENDtoTrue. See also Step 3.3. -
load_file: Loads the data from theski_dataset.csvfile into the Snowflake tableMY_SNOWFLAKE_TABLEusing theload_fileoperator from the Astro Python SDK. -
create_model_registry: Creates a model registry in Snowpark using the Snowpark ML package. Since the task is defined by the@task.snowflake_pythondecorator, the snowpark session is automatically instantiated from provided connection ID. -
transform_table_step_one: Transforms the data in the Snowflake table using Snowpark syntax to filter to only include rows of skiers that ordered the beverages we are interested in. Computation of this task runs within Snowpark. The resulting table is written to XCom as a pandas DataFrame. -
transform_table_step_two: Transforms the pandas DataFrame created by the upstream task to filter only for serious skiers (those who skied at least one hour that day). This task uses the@task.snowpark_ext_pythondecorator, running the code in the Snowpark virtual environment created in Step 1. The binary provided to thepythonparameter of the decorator determines which virtual environment to run a task in. The@task.snowpark_ext_pythondecorator works analogously to the @task.external_pythondecorator, except the code is executed within Snowpark’s compute. -
train_beverage_classifier: Trains a Snowpark Logistic Regression model on the dataset, saves the model to the model registry, and creates predictions from a test dataset. This task uses the@task.snowpark_virtualenvdecorator to run the code in a newly created virtual environment within Snowpark’s compute. Therequirementsparameter of the decorator specifies the packages to install in the virtual environment. The model predictions are saved to XCom as a pandas DataFrame. -
plot_metrics: Creates a plot of the model performance metrics and saves it to theincludedirectory. This task runs in the Airflow environment using the@taskdecorator. -
(Optional)
cleanup_xcom_table: Cleans up the Snowflake custom XCom backend by dropping theXCOM_TABLEandXCOM_STAGE. This task is a teardown task and is only shown in the DAG graph if you setSETUP_TEARDOWN_SNOWFLAKE_CUSTOM_XCOM_BACKENDtoTrue. See also Step 3.3.
-
(Optional)
-
(Optional) This DAG has two optional features you can enable.
-
If you want to use setup/ teardown tasks to create and clean up a Snowflake custom XCom backend for this DAG, set
SETUP_TEARDOWN_SNOWFLAKE_CUSTOM_XCOM_BACKENDtoTrue. This setting adds thecreate_snowflake_objectsandcleanup_xcom_tabletasks to your DAG and creates a setup/ teardown workflow. Note that your Snowflake account needs to haveACCOUNTADMINprivileges to perform the operations in thecreate_snowflake_objectstask and you need to define the environment variables described in Step 1.8 to enable the custom XCom backend. -
If you want to use a Snowpark-optimized warehouse for model training, set the
USE_SNOWPARK_WHvariable toTrueand provide your warehouse names toMY_SNOWPARK_WAREHOUSEandMY_SNOWFLAKE_REGULAR_WAREHOUSE. If thecreate_snowflake_objectstask is enabled, it creates theMY_SNOWPARK_WAREHOUSEwarehouse. Otherwise, you need to create the warehouse manually before running the DAG.
-
If you want to use setup/ teardown tasks to create and clean up a Snowflake custom XCom backend for this DAG, set
While this tutorial DAG uses a small dataset where model training can be accomplished using the standard Snowflake warehouse, Astronomer recommends using a Snowpark-optimized warehouse for model training in production.
Step 4: Run your DAG
-
Run
astro dev startin your Astro project to start up Airflow and open the Airflow UI atlocalhost:8080. -
In the Airflow UI, run the
airflow_with_snowpark_tutorialDAG by clicking the play button.
-
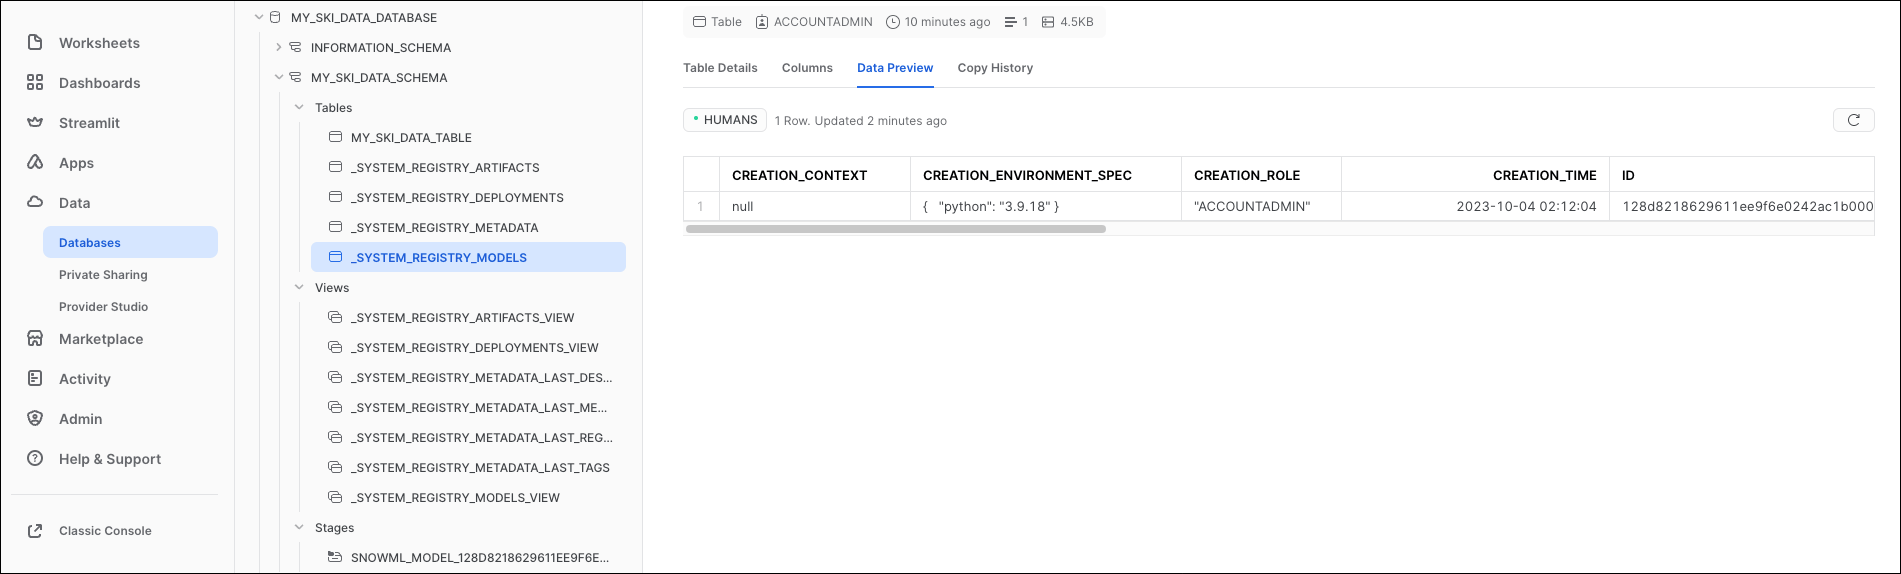
In the Snowflake UI, view the model registry to see the model that was created by the DAG. In a production context, you can pull a specific model from the registry to run predictions on new data.
-
Navigate to your
includedirectory to view themetrics.pngimage, which contains the model performance metrics shown at the start of this tutorial.
Conclusion
Congratulations! You trained a classification model in Snowpark using Airflow. This pipeline shows the three main options to run code in Snowpark using Airflow decorators:@task.snowpark_pythonruns your code in a standard Snowpark environment. Use this decorator if you need to run code in Snowpark that doesn’t require any additional packages that aren’t preinstalled in a standard Snowpark environment. The corresponding traditional operator is theSnowparkPythonOperator.@task.snowpark_ext_pythonruns your code in a pre-existing virtual environment within Snowpark. Use this decorator when you want to reuse virtual environments in different tasks in the same Airflow instances, or your virtual environment takes a long time to build. The corresponding traditional operator is theSnowparkExternalPythonOperator.@task.snowpark_virtualenvruns your code in a virtual environment in Snowpark that is created at runtime for that specific task. Use this decorator when you want to tailor a virtual environment to a task and don’t need to reuse it. The corresponding traditional operator is theSnowparkVirtualenvOperator.
SnowparkPythonOperator, which you can import usingfrom snowpark_provider.operators.snowpark import SnowparkPythonOperator.SnowparkExternalPythonOperator, available usingfrom snowpark_provider.operators.snowpark import SnowparkExternalPythonOperator.SnowparkVirtualenvOperator, with the importfrom snowpark_provider.operators.snowpark import SnowparkVirtualenvOperator.