Upgrading Airflow 2 to Airflow 3 - A Checklist for 2026
13 min read |
Happy 2026! Does your list of new year’s resolutions look similar to mine?

If we share item #1, to upgrade your Airflow Deployments to Airflow 3, this blog will help you achieve that goal!
You’ll learn:
- The 3 big reasons for upgrading to Airflow 3.
- How to plan your Airflow upgrade.
- How to use ruff to automate as much of the upgrading process as possible.
- How to assess your Dag for the impact of key breaking changes.
For a comprehensive in-depth guide to upgrading from Airflow 2 to Airflow 3 download our free eBook: Practical guide: Upgrade from Apache Airflow 2 to Airflow 3.
Should I upgrade to Airflow 3?
Yes! In fact, right now is the best time to upgrade your Airflow 2 environments to Airflow 3 for several reasons:
- Airflow 3.1 has already been released. Many organizations have policies against upgrading to .0 versions of software and prefer to wait for a battle tested .1 version. Airflow 3 delivered with a robust Airflow 3.1 that has already been tested at scale by many enterprises running Airflow on Astro.
- Open-source Airflow 2 reaches its end of life in April 2026. Staying on old software introduces security risk, as CVEs cannot be patched anymore due to old dependencies. Moving to Airflow 3 is not just quality of life improvement for data engineers but also an important strategic decision to keep your data operations secure in the upcoming years.
- Airflow 3 has so many amazing new features. Airflow 3 delivered several long-anticipated features such as automatic Dag versioning, event-driven scheduling, human-in-the-loop functionality and an all new React-based UI that you can easily extend with plugins. All these features center around making data engineers more productive and allowing entirely new use cases to be implemented on top of Airflow.

Figure: Screenshot of the new React-based UI of Airflow 3 in light and dark mode.
To learn more about Airflow 3 features such as Dag versioning, the @asset decorator and event-driven scheduling get the free eBook: Practical Guide to Apache Airflow® 3 published by Manning.
How do I plan an Airflow upgrade?
First, you need to assess the Airflow version you are currently on and to which version you are planning to upgrade. Our recommendation is:
- Upgrade from Airflow 2.11 (Astro Runtime 13.x): While upgrading to Airflow 3 directly is possible from Airflow 2.7 onwards, it is highly recommended to first upgrade to the latest available version of Airflow 2.11 in order to take advantage of deprecation warnings.
- Upgrade directly to 3.1.x (Astro Runtime 3.1): Airflow 3.1 saw many quality of life improvements and bug fixes over Airflow 3.0. You can directly upgrade to the latest patch version of Airflow 3.1.
To upgrade your Astro environment to Airflow 3, switch the Docker image to runtime:3.1 from astrocrpublic.azurecr.io. Note that you cannot import Airflow 3 from our quay.io registry.
FROM astrocrpublic.azurecr.io/runtime:3.1When upgrading from Airflow 2 to Airflow 3 you should fulfill a couple of recommended prerequisites:
- Clean your Airflow metadata database: Upgrading Airflow environments with large tables in the Airflow metadata database can take several hours due to schema changes between versions. We recommend cleaning your Airflow metadata database before upgrading, for example by archiving and deleting old XCom and task run history.
- If you haven’t done so already, pin all Python packages in your environment to avoid upgrading Airflow plus other packages at the same time. For Astro users, note that with Runtime 3+, Python package resolution has switched by default from
piptouv.uvhas a different, safer behavior for packages that exist on multiple indexes, because pip’s behavior is unsafe against dependency confusion attacks. If you rely on the pip behavior, you can add# ASTRO_RUNTIME_USE_PIPto yourrequirements.txtfile to usepipinstead ofuv. - Python 3.11+: Upgrade your code to be compatible with Python 3.11 (preferably 3.12). See the Python changelog for a comprehensive list of changes.
- Assess necessary updates to your Airflow configuration (
airflow.cfg): Some values in the Airflow configuration have changed between Airflow 2 and Airflow 3. If you are running open-source Airflow you will need to update yourairflow.cfgfile to match Airflow 3 config names. On Astro, you only need to update any values you are overriding manually via environment variables. The Airflow CLI contains theairflow config lintandairflow config updatecommands to migrate your Airflow configuration. See Check your Airflow config for more information. - For Astro users: make sure that your Astro CLI is at least on version 1.38.1 and review the Astro Runtime upgrade considerations for your target version.
If you are running open-source Airflow, you’ll also want to backup your environment in case of any issues during the upgrade.
Astro customers can take advantage of Astro deployment rollbacks. This feature allows you to roll back from Astro Runtime 3.1 to any version of the same deployment not older than 3 months that is on Astro Runtime 13 or Astro Runtime 12.
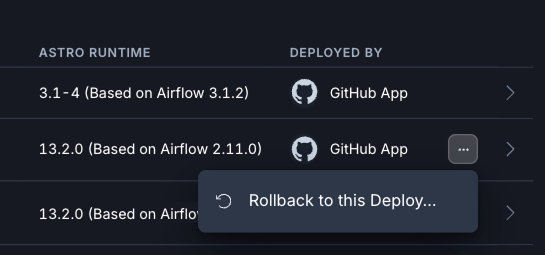
Figure: Screenshot of the Astro UI showing how to roll back from an Airflow 3 to an Airflow 2 version of a Deployment.
How to automatically upgrade Airflow Dags with ruff
After preparing your environment it is time to update your Dag code. To make upgrading as easy as possible the Airflow developers followed two key principles:
- Whenever possible they deprecated older syntax instead of removing it, which means that many Airflow 2 Dags run perfectly fine on Airflow 3 without any code changes.
- Provide tooling that allows you to automatically update Dags in bulk.
This tooling comes in the form of rules for the ruff package. To automatically upgrade your Dags, first install the ruff linter, ideally in a virtual environment.
pip install ruffNow you can lint your Dags using two ruff rules:
- AIR30: contains mandatory changes, like removed parameters or import statements.
- AIR31: contains suggested changes, like deprecated but still working syntax.
AIR3 runs both rules at once with the following command:
ruff check --preview --select AIR3 <path_to_your_dag_code>For many of the changes flagged by ruff, automatic fixing is possible with the --fix flag. Some of these fixes, like changing import statements are considered unsafe by ruff, to apply them you need to add the --unsafe-fixes flag.
ruff check --preview --select AIR3 --fix --unsafe-fixesAstronomer customers can use the Astro CLI astro dev upgrade-test command to run the ruff check (without fixing), while at the same time get a list of dependency version upgrades and check their Dags for import errors against newer Airflow versions.
Would you like the help of a 🤖 to upgrade? The Astro IDE, Astronomer’s in-browser Dag development environment, comes with a specialized AI that has access to all the knowledge in this book and can assist you in upgrading your Dags. Sign up for a free trial of Astro to test the Astro IDE.
Breaking changes between Airflow 2 and Airflow 3
The Airflow developers took great care to have as few breaking changes as possible. Of course, this being a major version upgrade, some breaking changes were inevitable to enable the new features.
The two most impactful breaking changes are:
- Removal of the direct Airflow metadata database access from within all Airflow tasks
Other breaking changes that you should be aware of include:
- Update of the Airflow REST API from v1 to v2, which included a change of the authentication method to JWT, as well as changes to a couple of endpoints.
- Changes to the contents of the Airflow context, for example removing old deprecated keys like
execution_date, which needs to be replaced by the newerlogical_datekey. - Migration of many common operators such as the BashOperator and PythonOperator to the new Airflow standard provider, which needs to be installed in any environment using these operators.
- Removal of the enable_xcom_pickling Airflow configuration due to security concerns. To pass values that are not serializeable by default Airflow between tasks in Airflow 3 you need to configure a custom XCom backend class.
- The long deprecated SubDag feature was removed. Use Airflow task groups instead to visually and logically group tasks within a larger Airflow Dag.
- The SLA feature has been removed. Astro customers can use Astro alerts for simple and Astro Observe for complex alerts. For open-source users the experimental Deadline Alerts have been added in Airflow 3.1.
For a more comprehensive list and code examples for many of the breaking changes see the Breaking Changes chapter of the Practical guide Upgrade from Airflow 2 to Airflow 3.
Removal of direct access from tasks to the Airflow metadata database
In Airflow 2 all tasks automatically had full access to the Airflow metadata database, allowing users to run raw SQL against the brain of Airflow. This posed a significant security risk if a malicious actor or inexperienced developer accidentally ran a destructive query. In a worst case scenario it would have been possible to crash your Airflow instance and permanently delete the entire Airflow history.
Airflow 3’s architecture was rebuilt from the ground up separating user defined task code from the code that executes tasks entirely. This decoupling led to a new secure paradigm in which all requests for metadata information from user-defined code go through the new API server component, instead of directly accessing the Airflow metadata database.
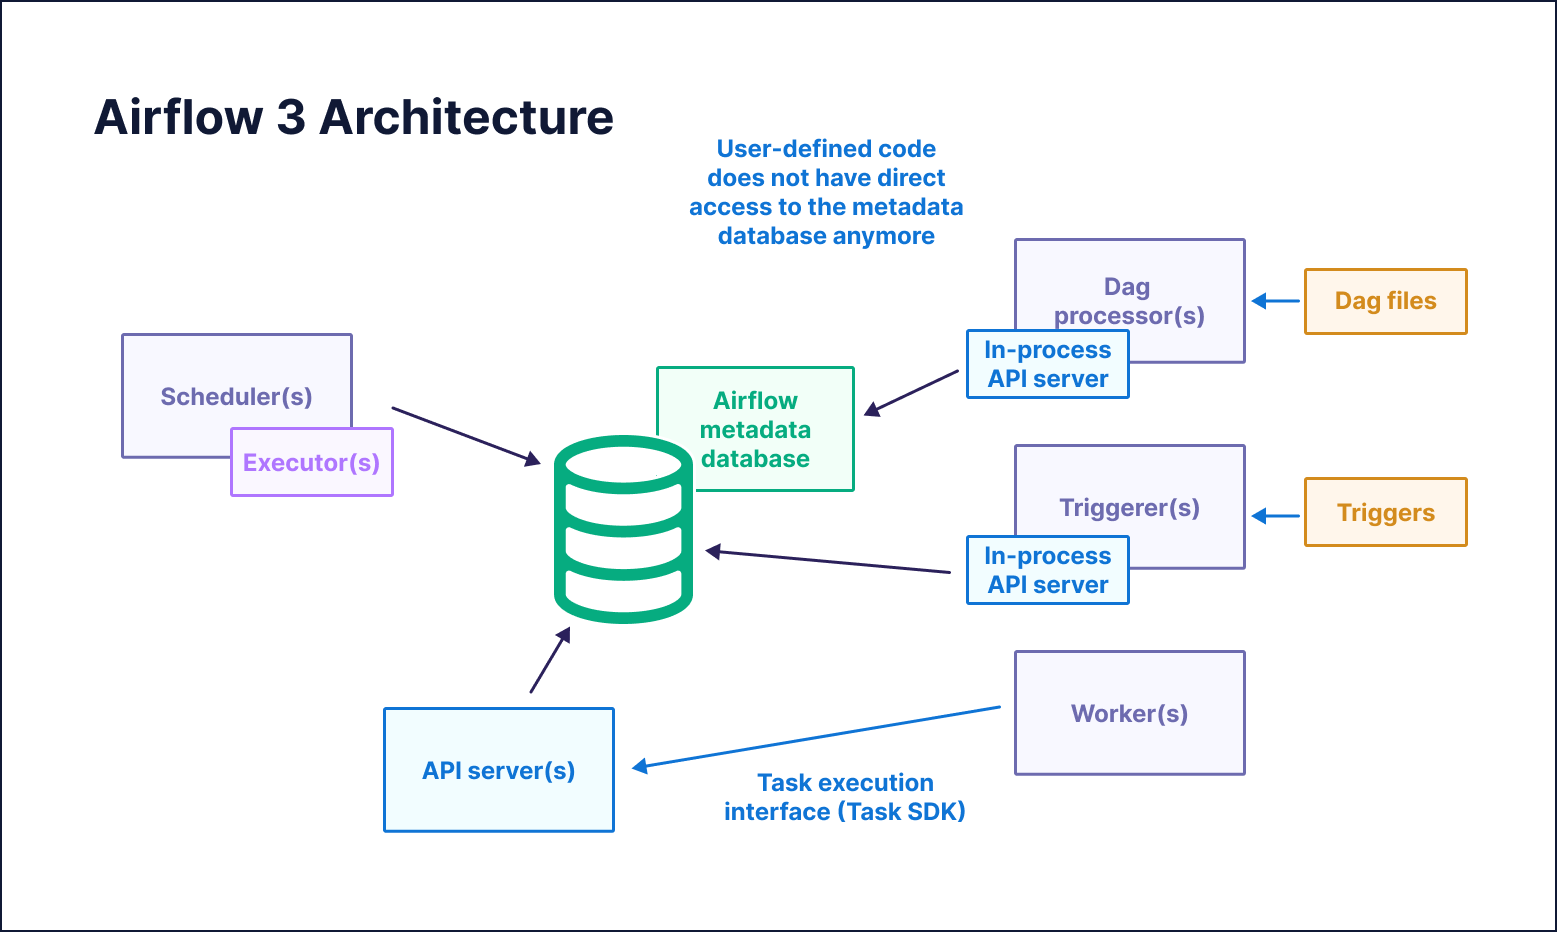
Figure: Diagram of the Airflow 3 architecture where all user-defined task code uses the API server to interact with the Airflow metadata database.
This change means that any code that uses the now removed direct metadata database access will fail its task with the following error:
RuntimeError: Direct database access via the ORM is not allowed in Airflow 3.0To find patterns that need to be refactored look for the following terms in your custom operators, @task decorated functions, and functions passed to the Python operator:
- @provide_session, create_session
- from airflow.settings import Session
- from sqlalchemy.orm.session import Session
- from airflow.settings import engine
- from airflow.models import …
All of these patterns can indicate the usage of direct metadata database access. For example, the following code snippet uses the Session from the Airflow settings to query the Airflow metadata database to get a list of Dags.
# Cave: Bad practice pattern which is dangerous in Airflow 2 and not possible in Airflow 3

@task
def direct_db_access():
    from airflow.settings import Session

    with Session() as session:
        dags = session.execute(text("SELECT * FROM public.dag LIMIT 10")).fetchall()
        print(dags)

direct_db_access()
This code will need to be refactored in one of two ways:
- Use the Apache Airflow Python Client, a Python package that contains classes and methods that interact safely with the Airflow metadata database.
- Use the Airflow REST API directly to query the Airflow metadata database.
Both of these methods are valid. The code snippet below shows how to use the Apache Airflow Python client to retrieve the same information, the name of 10 Dags in the Airflow environment, as the direct database access task shown previously.
# This task shows a general pattern for fetching credentials for the Airflow Python Client. On Astro you can directly pass the DEPLOYMENT_API_TOKEN to the Client, without needing to request a JWT token, see https://www.astronomer.io/docs/astro/airflow-api/

_USERNAME = "admin" # Adjust for your environment
_PASSWORD = "admin" # Adjust for your environment
_HOST = "http://api-server:8080" # Adjust for your environment

@task
def use_the_airflow_client():
    import airflow_client.client
    from airflow_client.client.api.dag_api import DAGApi

    # On OSS Airflow you need to request a JWT token from the API
    # On Astro, you can use a DEPLOYMENT_API_TOKEN directly
    token_url = f"{_HOST}/auth/token"
    payload = {"username": _USERNAME, "password": _PASSWORD}
    headers = {"Content-Type": "application/json"}

    token_response = requests.post(token_url, json=payload, headers=headers)
    access_token = token_response.json().get("access_token")

    configuration = airflow_client.client.Configuration(
        host=_HOST, access_token=access_token  # On Astro, use a DEPLOYMENT_API_TOKEN
    )

    with airflow_client.client.ApiClient(configuration) as api_client:
        dag_api = DAGApi(api_client)
        dags = dag_api.get_dags(limit=10)
        print(dags)

use_the_airflow_client()
Changes relating to scheduling logic
There were a couple of changes to the Airflow scheduling logic.
- The default value for
schedulewas changed fromtimedelta(days=1)toNone. - The default value for
catchupis nowFalseinstead ofTrue, preventing a flurry of Dag runs starting if a user forgets to setcatchup=False. If you depend on Dags catching up by default you can switch back to Airflow 2 behavior by setting the catchup_by_default config toTrue. - Airflow now allows for Dag runs with a
logical_dateexplicitly set toNone, enabling the same Dag to start two or more Dag runs at the exact same time, for example in AI inference use cases. - The timetable used by Airflow to interpret raw cron string schedules (for example
”0 0 * * *”or”@daily”) has changed fromCronDataIntervalTimetabletoCronTriggerTimetable. This means that:- By default the
data_interval_startanddata_interval_endtimestamps are the same as thelogical_date. - By default the
logical_dateis now the moment after which the time actually runs, instead of thedata_interval_startdate, a full schedule interval before the Dag actually runs. This change also affects all timestamps derived from thelogical_date, such asdsorts.
If you are relying on these timestamps in your Dag code following Airflow 2 logic you can switch the default timetable back to the CronDataIntervalTimetable by setting the Airflow configuration create_cron_data_intervals to True. You can learn more about the differences between these two timetables in the Airflow documentation.
To see a full overview of timestamps as they appear in Airflow 2 vs Airflow 3 as well as a full example Dag, check out the Changes relating to scheduling section in the Practical guide: Upgrade from Apache Airflow 2 to Airflow 3 eBook.
Deploying Airflow 3
After fixing all patterns impacted by breaking changes it is time to run your Dags! We recommend first testing all changes in a local environment before deploying to a development or staging environment on Astro.
When updating your production environment there are a couple of considerations to keep in mind:
- If possible, perform your upgrade during a low volume time for your Deployment. This is recommended because Airflow db schema changes might lead to tasks that were in-progress during the update getting stuck and needing to be manually deleted or marked as success/fail. You might need to clean up some Dag runs and tasks after the migration.
- Deploy to Astro using either your existing CICD process or
astro deploy. Deploying the updated Docker image to your Astro deployment will automatically start the process for the Deployment to be updated to Airflow 3. Depending on the size of your metadata database this might take a significant amount of time, in rare cases over 2hrs.
By following these steps diligently and reading through the extensive list of breaking changes in the companion book, you are well on your way to a successful upgrade from Airflow 2 to Airflow 3. If you need more assistance with your upgrade, Astro customers should contact their customer success manager, while open-source Airflow users can contact our professional services team.
Resources
- Comprehensive upgrading eBook: Practical guide: Upgrade from Apache Airflow 2 to Airflow 3

Get started free.
OR
By proceeding you agree to our Privacy Policy, our Website Terms and to receive emails from Astronomer.