Introduction to Apache Airflow® DAGs
Introduction to Apache Airflow® DAGs
Introduction to Apache Airflow® DAGs
In Apache Airflow®, a DAG is a data pipeline or workflow. DAGs are the main organizational unit in Airflow; they contain a collection of tasks and dependencies that you want to execute on a schedule.
A DAG is defined in Python code and visualized in the Airflow UI. DAGs can be as simple as a single task or as complex as hundreds or thousands of tasks with complicated dependencies.
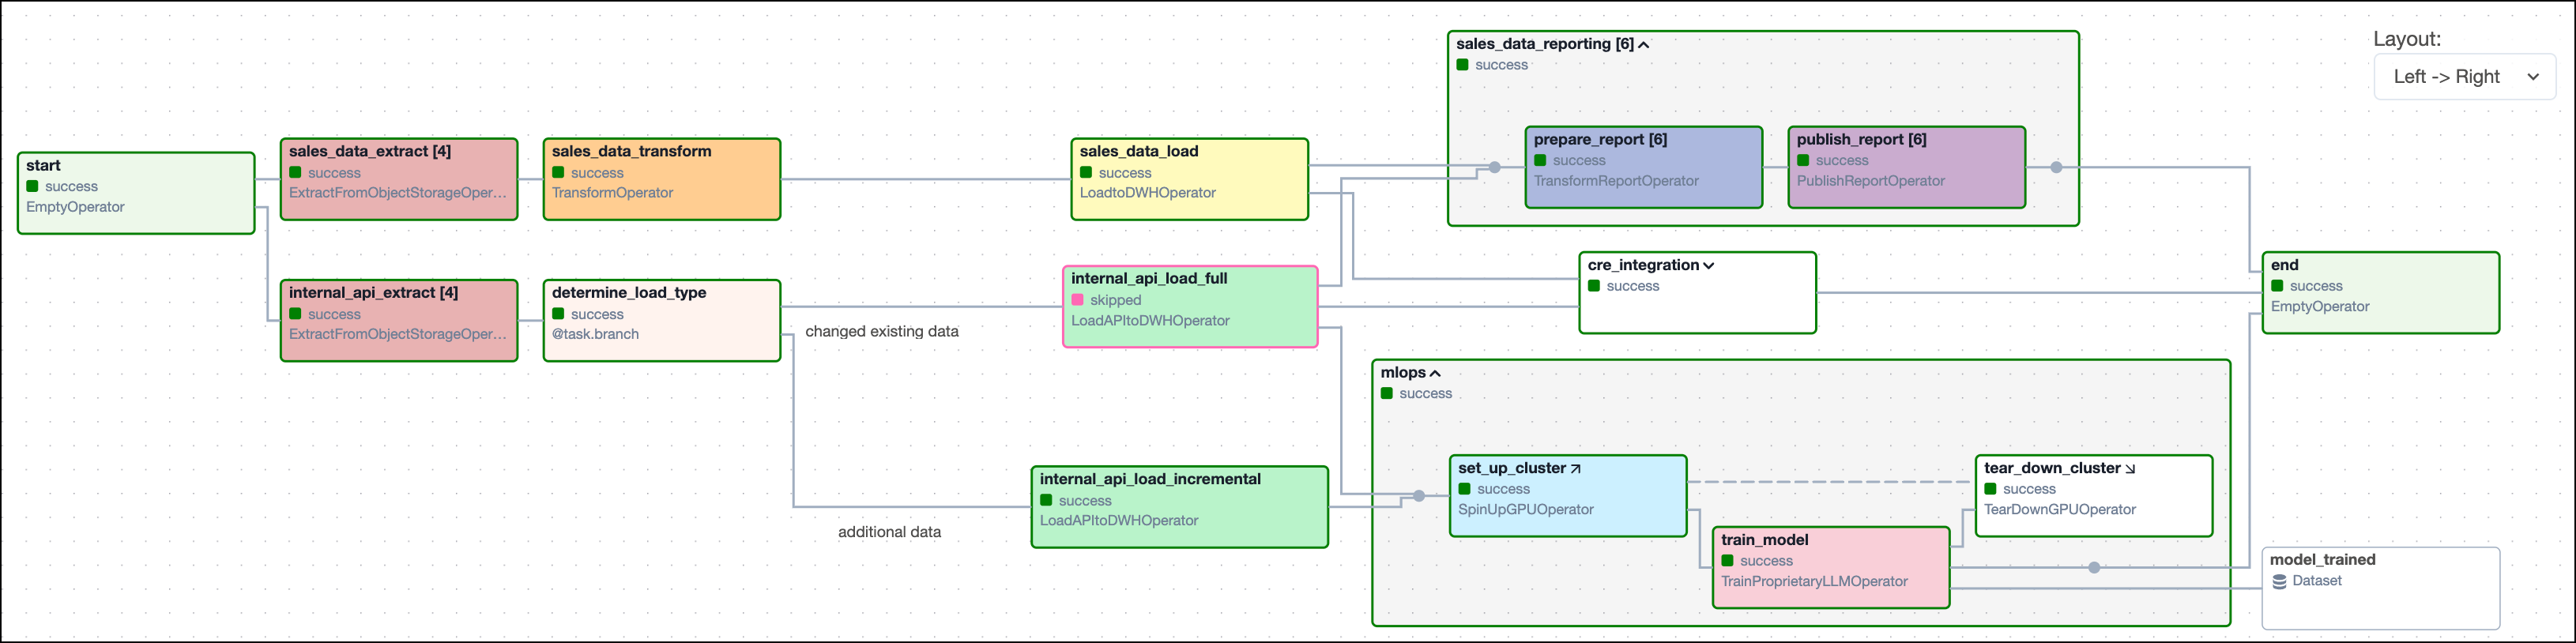
The following screenshot shows a complex DAG graph in the Airflow UI. After reading this guide, you’ll be able to understand the elements in this graph, as well as know how to define DAGs and use DAG parameters.
There are multiple resources for learning about this topic. See also:
To get the most out of this guide, you should have an understanding of:
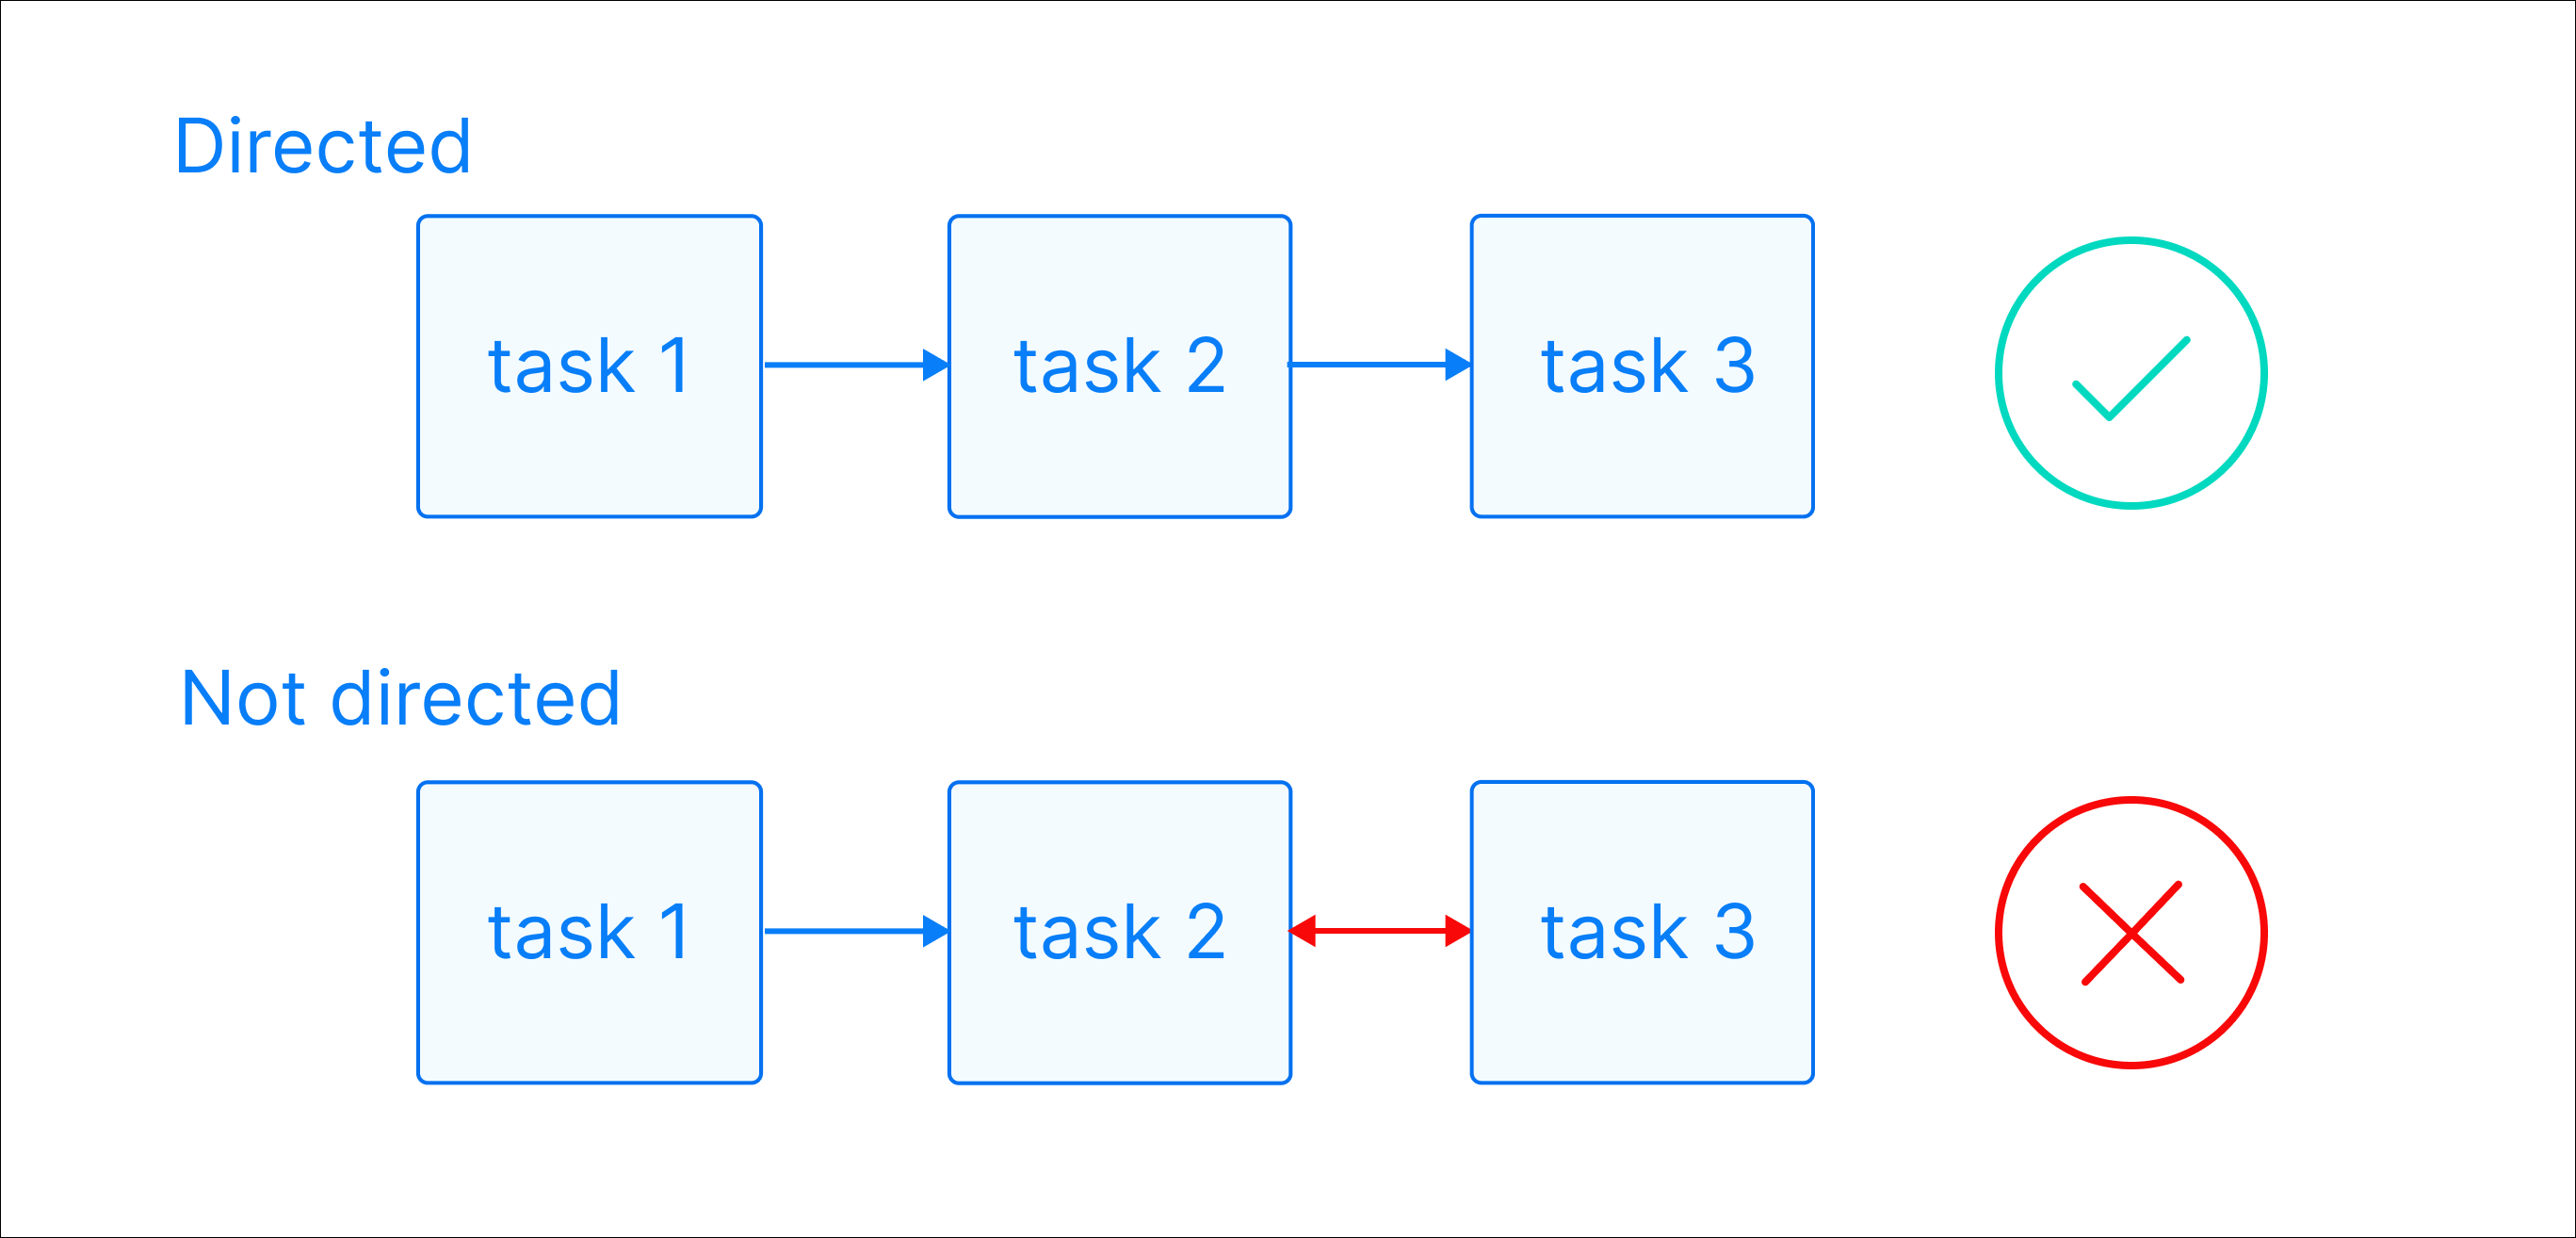
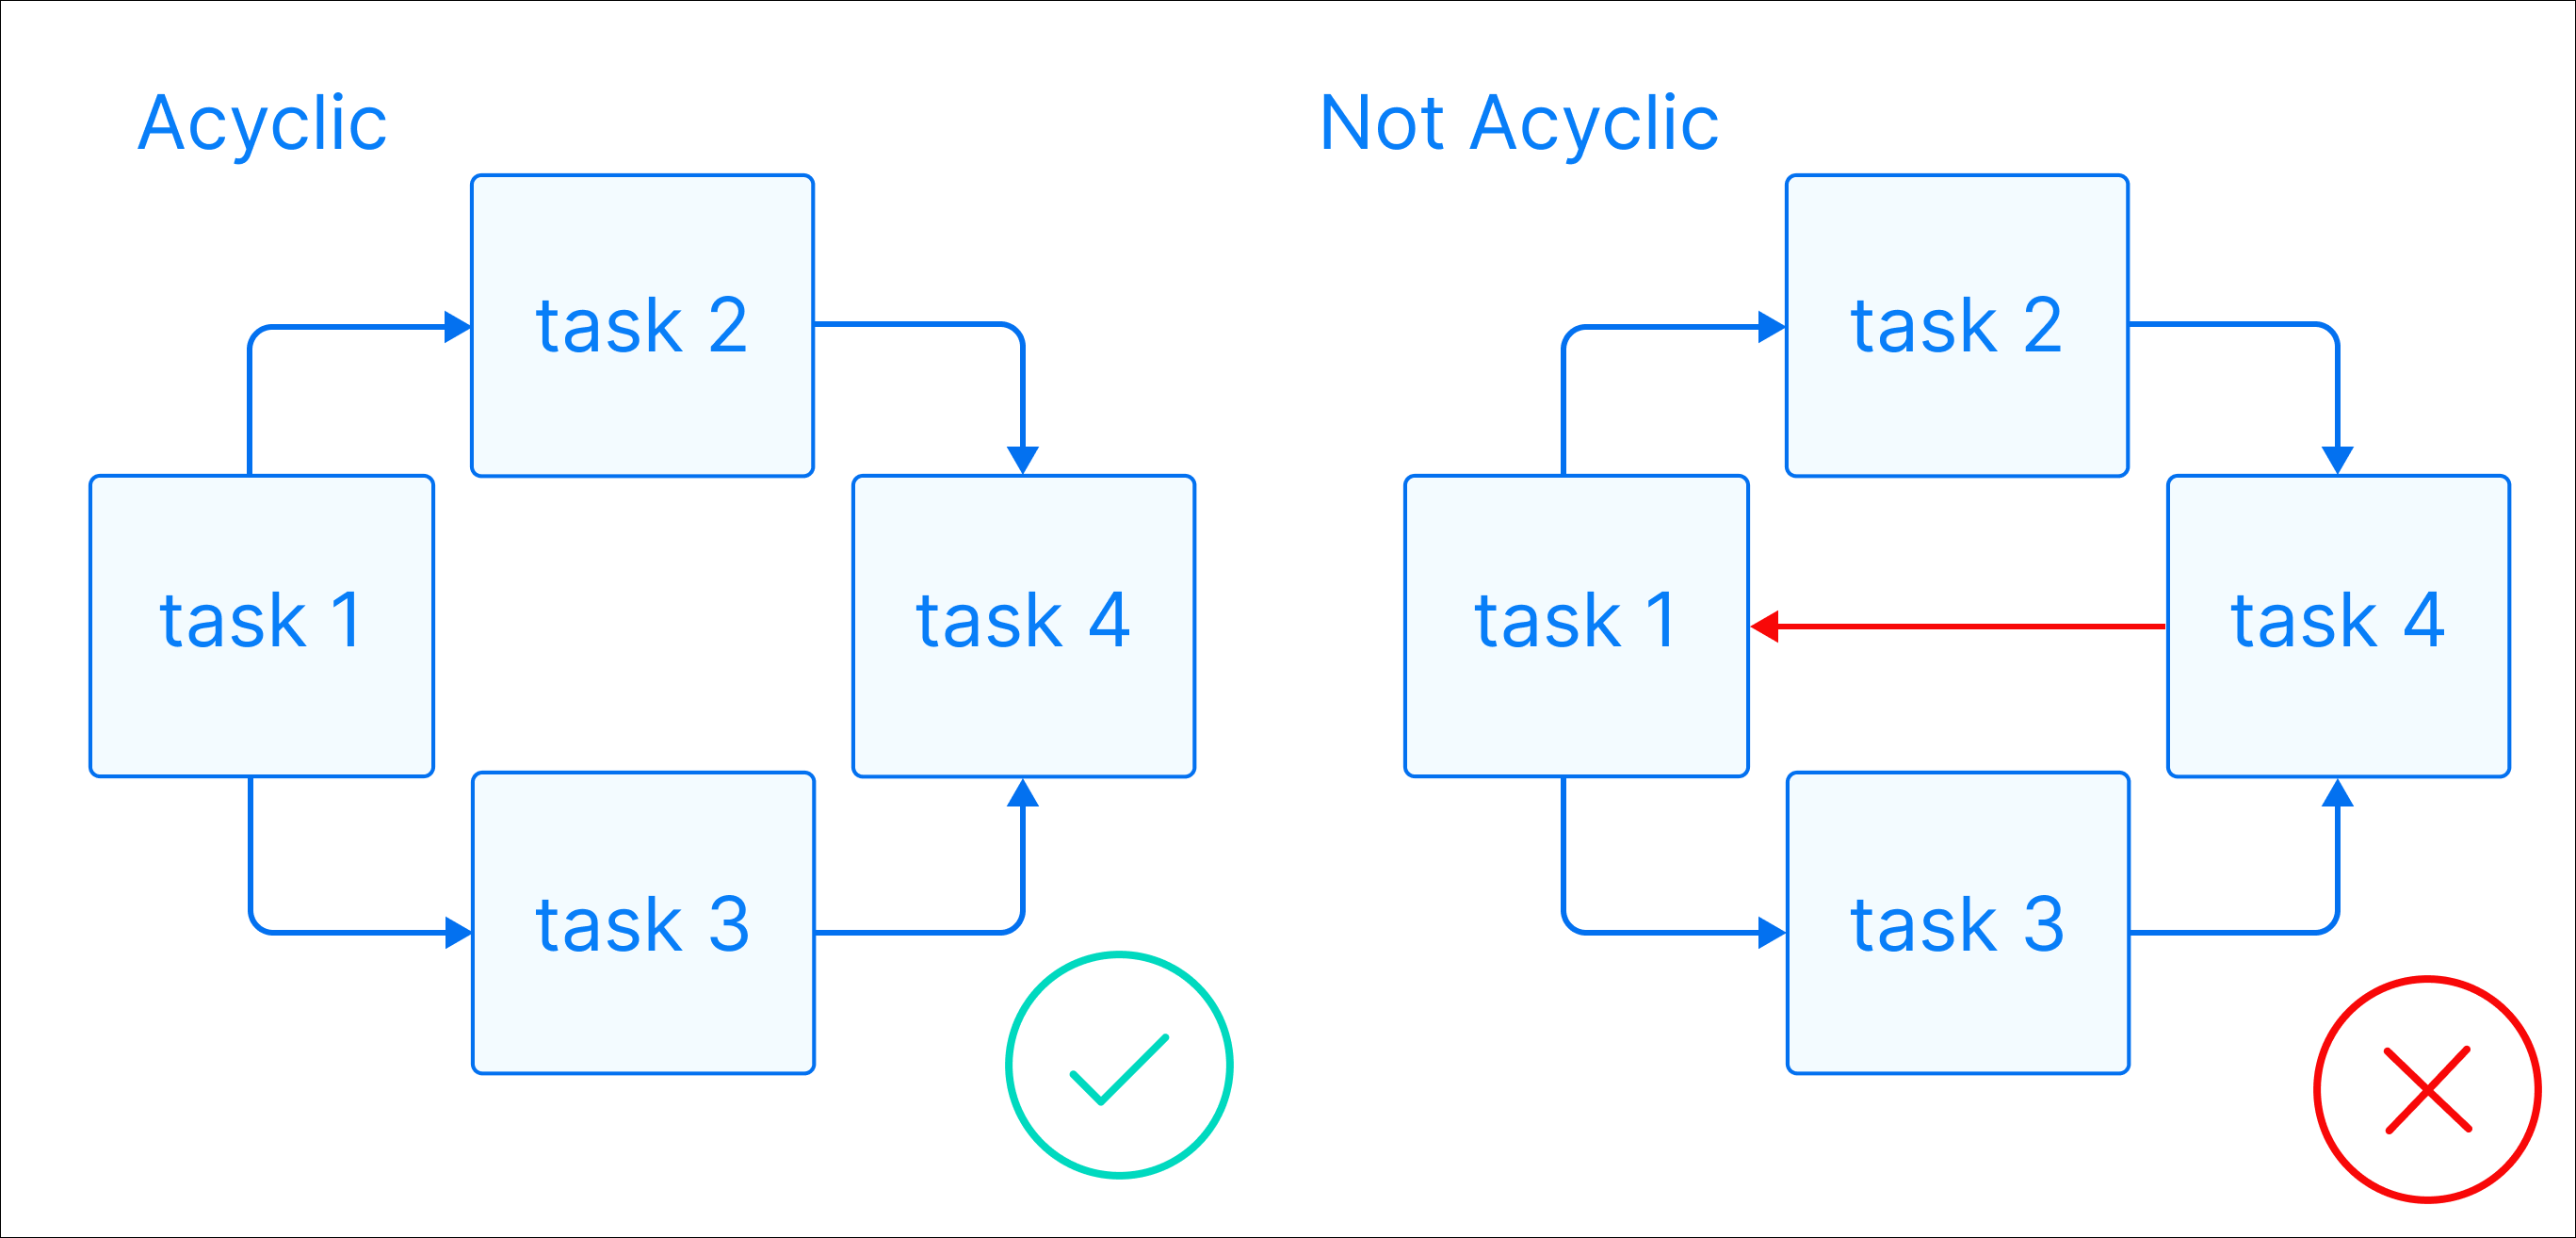
A DAG (directed acyclic graph) is a mathematical structure consisting of nodes and edges. In Airflow, a DAG represents a data pipeline or workflow with a start and an end.
The mathematical properties of DAGs make them useful for building data pipelines:
Directed: There is a clear direction of flow between tasks. A task can be either upstream, downstream, or parallel to another task.
Acyclic: There are no circular dependencies in a DAG. This means that a task cannot depend on itself, nor can it depend on a task that ultimately depends on it.
Graph: A DAG is a graph, which is a structure consisting of nodes and edges. In Airflow, nodes are tasks and edges are dependencies between tasks. Defining workflows as graphs helps you visualize the entire workflow in a way that’s easy to navigate and conceptualize.
Beyond these requirements, a DAG can be as simple or as complicated as you need! You can define tasks that run in parallel or sequentially, implement conditional branches, and visually group tasks together in task groups.
Each task in a DAG performs one unit of work. Tasks can be anything from a simple Python function to a complex data transformation or a call to an external service. They are defined using Airflow operators or Airflow decorators. The dependencies between tasks can be set in different ways (see Managing Dependencies).
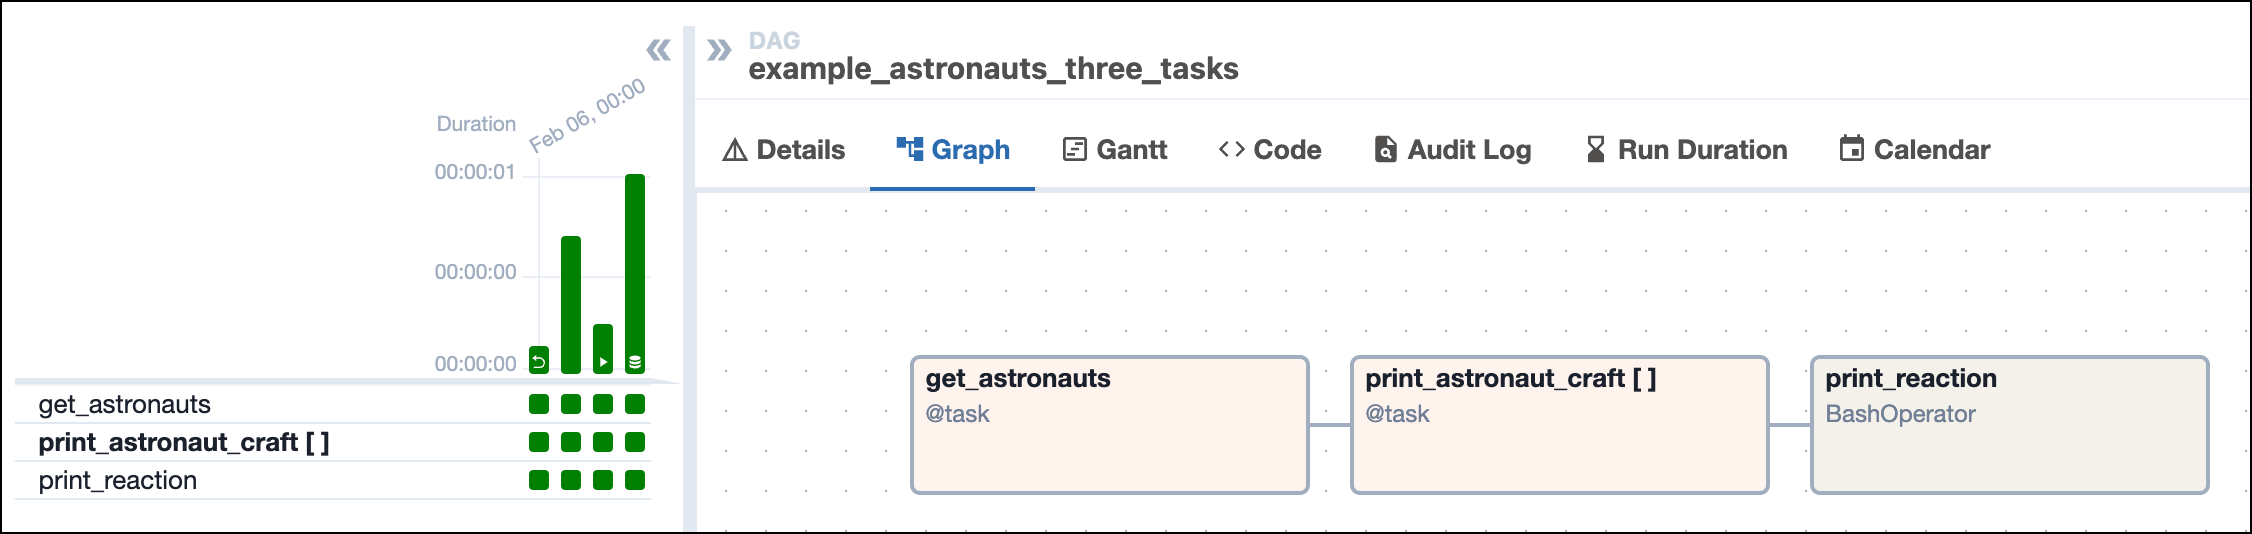
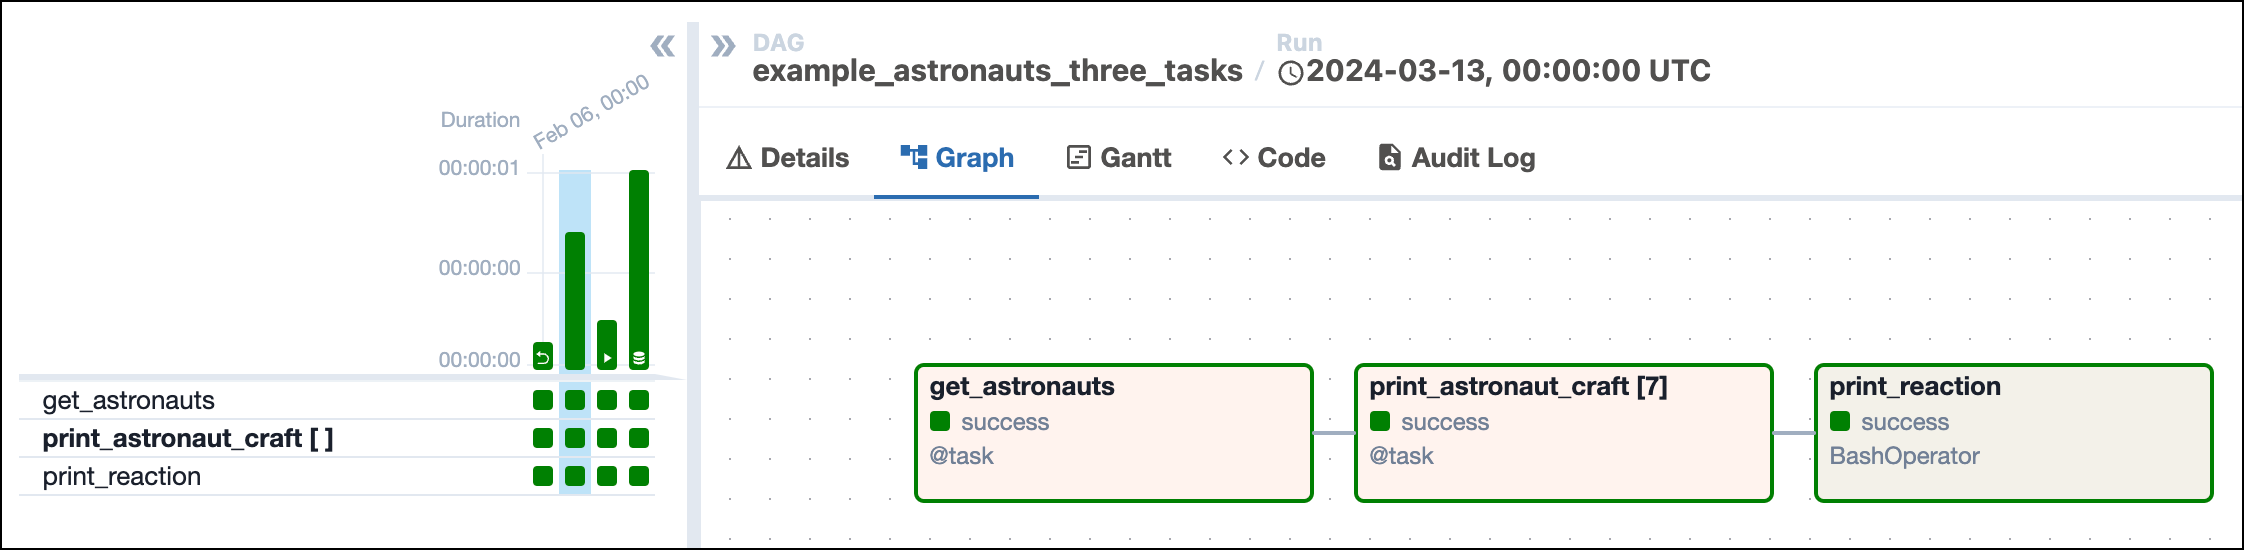
The following screenshot shows a simple DAG graph with 3 sequential tasks.
A DAG run is an instance of a DAG running at a specific point in time. A task instance is an instance of a task running at a specific point in time. Each DAG run has a unique dag_run_id and contains one or more task instances. The history of previous DAG runs is stored in the Airflow metadata database.
In the Airflow UI, you can view previous runs of a DAG in the Grid view and select individual DAG runs by clicking on their respective duration bar. A DAG run graph looks similar to the DAG graph, but includes additional information about the status of each task instance in the DAG run.
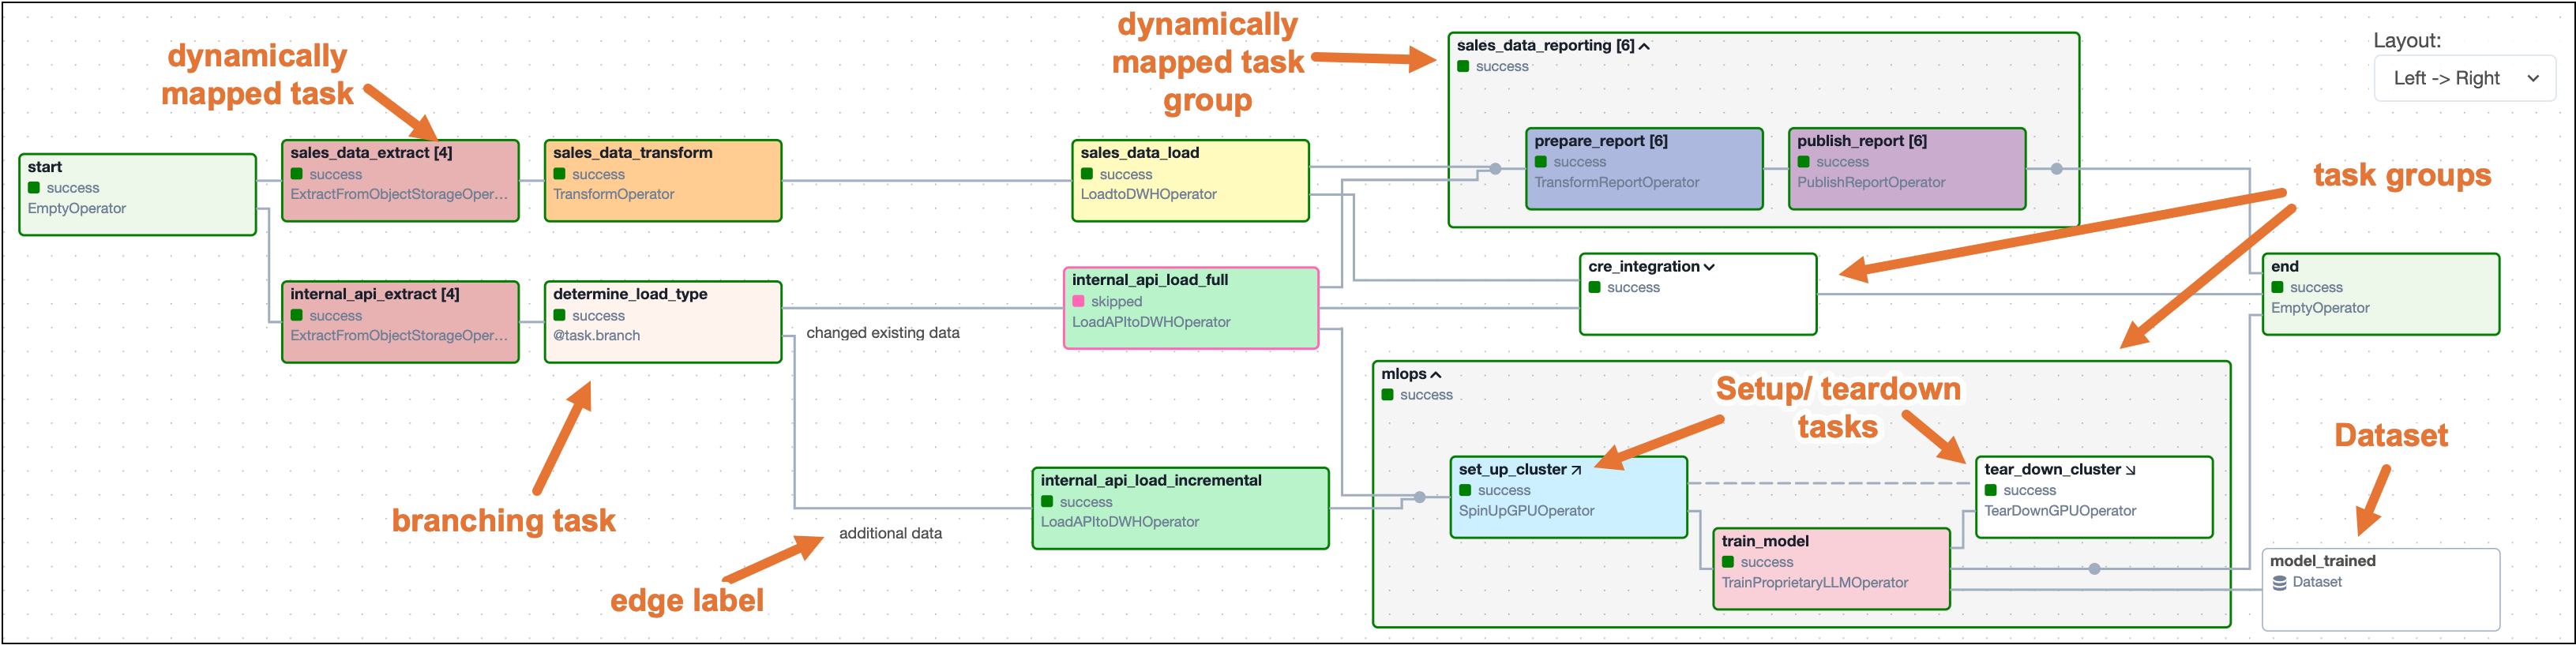
A DAG run graph in the Airflow UI contains information about the DAG run, as well as the status of each task instance in the DAG run. The following screenshot shows the same DAG as in the previous section, but with annotations explaining the different elements of the graph.
![Screenshot of the Airflow UI showing the Grid view with the Graph tab selected. A DAG run with 3 tasks is shown. The annotations show the location of the dag_id and logical date (top of the screenshot), the task_id, task state and operator/decorator used in the nodes of the graph, as well as the number of dynamically mapped task instances in [] behind the task id and the DAG dependency layout to the right of the screen.](https://files.buildwithfern.com/astronomer.docs.buildwithfern.com/docs/a5e5586e1dce95cf8e6ac7260b848b375b4bfa8f7f56c296832fa03c320ebc5f/docs/assets/img/guides/dags_simple_dag_run_graph_annotated.png)
dag_id: The unique identifier of the DAG.logical date: The point in time for which the DAG run is scheduled. This date and time is not necessarily the same as the actual moment the DAG run is executed. See Scheduling for more information.task_id: The unique identifier of the task.task state: The status of the task instance in the DAG run. Possible states are running, success, failed, skipped, restarting, up_for_retry, upstream_failed, queued, scheduled, none, removed, deferred, and up_for_reschedule, they each cause the border of the node to be colored differently. See the OSS documentation on task instances for an explanation of each state.The previous screenshot also shows the four common ways you can trigger a DAG run:
A DAG run can have the following statuses:
success, skipped, failed or upstream_failed) and all leaf tasks (tasks with no downstream tasks) are either in the state success or skipped. In the previous screenshot, all four DAG runs were successful.failed or upstream_failed.When you start writing more complex DAGs, you will see additional Airflow features that are visualized in the DAG run graph. The following screenshot shows the same complex DAG as in the overview but with annotations explaining the different elements of the graph. Don’t worry if you don’t know about all these features yet - you will learn about them as you become more familiar with Airflow.
The following code creates the same DAG structure as shown in the previous screenshot. Note that custom operators have been replaced with the BashOperator and EmptyOperator to make it possible to run the DAG without additional setup.
Some more complex features visible in this DAG graph are:
[]) behind the task ID.You can learn more about how to set complex dependencies between tasks and task groups in the Managing Dependencies guide.
A DAG can be defined with a Python file placed in an Airflow project’s DAG_FOLDER, which is dags when using the Astro CLI. Airflow automatically parses all files in this folder every 5 minutes to check for new DAGs, and it parses existing DAGs for code changes every 30 seconds. You can force a new DAG parse using airflow dags reserialize, or astro dev run dags reserialize using the Astro CLI.
There are two types of syntax you can use to structure your DAG:
@dag decorator. A function decorated with @dag defines a DAG. Note that you need to call the function at the end of the script for Airflow to register the DAG. All tasks are defined within the context of the DAG function.DAG class and defining tasks within that context.TaskFlow API and traditional syntax can be freely mixed. See Mixing TaskFlow decorators with traditional operators for more information.
The following is an example of the same DAG written using each type of syntax.
Astronomer recommends creating one Python file for each DAG and naming it after the dag_id as a best practice for organizing your Airflow project. For certain advanced use cases it may be appropriate to dynamically generate DAGs using Python code, see Dynamically generate DAGs in Airflow for more information.
In Airflow, you can configure when and how your DAG runs by setting parameters in the DAG object. DAG-level parameters affect how the entire DAG behaves, as opposed to task-level parameters which only affect a single task.
The DAGs in the previous section have the following basic parameters defined. It’s best practice to always define these parameters for any DAGs you create:
dag_id: The name of the DAG. This must be unique for each DAG in the Airflow environment. When using the @dag decorator and not providing the dag_id parameter name, the function name is used as the dag_id.start_date: The date and time after which the DAG starts being scheduled.schedule: The schedule for the DAG. There are many different ways to define a schedule, see Scheduling in Airflow for more information.catchup: Whether the scheduler should backfill all missed DAG runs between the current date and the start date when the DAG is unpaused. It is a best practice to always set it to False unless you specifically want to backfill missed DAG runs. By default catchup is set to True.There are many more DAG-level parameters that let you configure anything from resource usage to the DAG’s appearance in the Airflow UI. See DAG-level parameters for a complete list.