ETL and ELT operations are the bread and butter of data engineering. No matter which company you work at and what your data product is, from simple dashboards to elaborate GenAI applications, you need to get data into the right format and right location before you can build on it.
The ETL sequence S3 to Snowflake has become ubiquitous in modern data engineering with almost a third of respondents in the 2023 Airflow survey saying they are using Airflow together with Snowflake and S3 being one of the most commonly chosen object storage solutions.
The popularity of this pattern can be attributed to the maturity of the tools and the availability of easy to use Airflow operators making interacting with both S3 and Snowflake a breeze.
Moving data from an object storage like S3 to a data warehouse like Snowflake is a very common pattern in modern data pipelines. Common use cases include:
- Ingesting and structuring unstructured data delivered to an S3 sink by an external application such as Apache Kafka. This data often includes operational information, like sales records or user interactions with web applications.
- Ingesting text data from S3 for analysis with a Large Language Model (LLM). A typical example is storing logs of customer interactions in S3 and then ingesting them for analysis to uncover product insights.
- Ingesting data from S3 to perform complex transformations using Snowflake’s compute power, whether through SQL queries or leveraging Snowpark, Snowflake’s Python interface, for more intensive processing.
- Ingesting archived data from cost-efficient S3 cold storage on demand to augment existing relational tables in Snowflake.
In this tutorial, we show how you can create a best-practice daily ingestion pipeline to move data from S3 into Snowflake. It can be completed using only free trial versions of the tools mentioned and adapted for your object storage and data warehouse solutions. Only basic Airflow and Python knowledge is required.
Step 1 - Extracting data from S3
In order to be able to extract data from S3 we need to start our Astro Free Trial, which will run the ETL DAG, as well as set up our S3 bucket with the sample data in it. In a real world scenario you would likely have another application deliver the data to S3, such as Apache Kafka.
1(a) Sign up for an Astro Free Trial
Sign up for a free trial of Astro with your business email address to get up to $500 in credits. Follow the onboarding flow, and when you get to the “Deploy Your First Project to Astro” step, select “ETL”. Then follow the instructions to connect Astro with your GitHub account. If you don’t have a GitHub account see the GitHub documentation for instructions on how to create a free one.
The onboarding process will generate an organization with a workspace and one Airflow deployment for you. The code is automatically synchronized with the GitHub repository you linked in the onboarding process, using Astro’s GitHub integration. You can push to the main branch of that GitHub repository to deploy changes to Airflow and we will add our S3 to Snowflake DAG to this deployment.
Note: You can set up the prerequisites outside of the trial flow by creating a new deployment with the Astro’s GitHub integration configured for it.

Tip: If you are familiar with S3 and Snowflake and are looking to use the pattern of the DAG in this blog post for your own data rather than follow the tutorial, skip to Step 3(b) for the instructions on how to set up the Airflow connections and to step 3(d) to get the DAG code.
1(b) Set up your S3 Bucket
Log into the AWS console. If you don’t have an AWS account you can create one for free here.
In your account, create a new S3 bucket using default settings. Inside the bucket create a folder called my_stage with two subfolders of any name, for this tutorial we’ll name them 2023 and 2024.
Next, download the 4 demo data files containing sample data about tea from here and add two each to the 2023 and 2024 directory.

To give Astro and Snowflake access to your data, you need to create an IAM user that has AmazonS3FullAccess for your bucket. See the AWS documentation for instructions. Make sure to save an AWS Access key and AWS secret key for your user in a secure location to use later in this tutorial.
Tip: If you prefer not to use static credentials Astro offers a Managed Workload Identity for AWS for seamless networking. See the Astro documentation for more information.
Step 2 - Transforming the data
In this blog post, we are working with small, curated datasets, but in the real world, data is often messier. Data stored in an S3 bucket may need formatting, cleaning of outliers, or include extraneous information, such as additional metadata pulled from an API, that you don’t want to load into your data warehouse.
In such advanced use cases, additional transformation steps are needed between extracting data from S3 and loading it into Snowflake. This can also apply when you need to combine data from multiple keys in S3 into one dataset to load into a single table in Snowflake or when you want to perform data quality checks along the way. This is typically achieved using SQL and is often managed programmatically with tools like dbt, enabling complex transformations and ensuring only clean, structured data enters your Snowflake tables.
While this blog post demonstrates a simple workflow without transformation, stay tuned for future blog posts in our ETL series, examining patterns involving transformations.
Step 3 - Loading the data into Snowflake
Now that our source data is ready in S3, let's prepare our loading destination - Snowflake, before connecting it all using Apache Airflow!
3(a) Set up Snowflake
Log into your Snowflake account. If you don’t have an account already, you can create a free trial here.
Open a new worksheet and execute the following SQL statements to create a warehouse, your database and schema. You might need to switch your current role to ACCOUNTADMIN to be able to run these statements, see the Snowflake documentation for more information.
CREATE WAREHOUSE MY_WH;
CREATE DATABASE IF NOT EXISTS DEMO_DB;
CREATE SCHEMA IF NOT EXISTS DEMO_DB.DEMO_SCHEMA;
Next, we need to create a new role my_demo_role with permissions to access this database and schema for Airflow to assume when creating the table and loading data from the stage to the table. Execute the following SQL statements:
CREATE ROLE my_demo_role;
GRANT USAGE ON WAREHOUSE MY_WH TO ROLE my_demo_role;
GRANT USAGE ON DATABASE DEMO_DB TO ROLE my_demo_role;
GRANT USAGE ON SCHEMA DEMO_DB.DEMO_SCHEMA TO ROLE my_demo_role;
GRANT ALL PRIVILEGES ON SCHEMA DEMO_DB.DEMO_SCHEMA TO ROLE my_demo_role;
GRANT ALL PRIVILEGES ON ALL TABLES IN SCHEMA DEMO_DB.DEMO_SCHEMA TO ROLE my_demo_role;
GRANT ALL PRIVILEGES ON FUTURE TABLES IN SCHEMA DEMO_DB.DEMO_SCHEMA TO ROLE my_demo_role;
GRANT ALL PRIVILEGES ON ALL STAGES IN SCHEMA DEMO_DB.DEMO_SCHEMA TO ROLE my_demo_role;
GRANT ALL PRIVILEGES ON FUTURE STAGES IN SCHEMA DEMO_DB.DEMO_SCHEMA TO ROLE my_demo_role;
To be able to use this role we need a new user in Snowflake, called my_demo_user that can be accessed by Snowflake using key pair authentication.
First, create a key pair and convert the public key into PEM format by running the following commands in a terminal. For more information see the Snowflake documentation.
openssl genrsa 2048 | openssl pkcs8 -topk8 -v2 des3 -inform PEM -out rsa_key.p8
openssl rsa -in rsa_key.p8 -pubout -out rsa_key.pub
The terminal will prompt you to enter a passphrase. Make sure to save that passphrase in a secure location.
The command above created two files:
rsa_key.p8 this file contains the private key, you will need this in your Airflow connection laterrsa_key.pub this file contains your public key
In Snowflake, run the following SQL statements, using your newly generated public key for <PUBLIC KEY> as well as any password (<PW>) for your user. Make sure to copy the public key without the -----BEGIN PUBLIC KEY----- and -----END PUBLIC KEY----- strings.
CREATE USER my_demo_user    PASSWORD = '<PW>'    DEFAULT_ROLE = my_demo_role    MUST_CHANGE_PASSWORD = FALSE;
GRANT ROLE my_demo_role TO USER my_demo_user;
ALTER USER my_demo_user SET RSA_PUBLIC_KEY='<PUBLIC KEY>';
Note: For quick POVs it is also possible to use your login and password to authenticate Airflow to Snowflake if you don’t have 2FA enabled, but this is not recommended in production for security reasons.
Lastly, you will need to set up a stage in Snowflake called DEMO STAGE. To do so, run the SQL below. Make sure to fill in the blanks with your own bucket name, AWS Access Key and AWS secret key retrieved in Step 3.
USE DATABASE DEMO_DB;
USE SCHEMA DEMO_SCHEMA;
CREATE OR REPLACE STAGE DEMO_STAGE
URL='s3://<YOUR BUCKET NAME>/my_stage/'
CREDENTIALS=(AWS_KEY_ID='<YOUR AWS ACCESS KEY>', AWS_SECRET_KEY='<YOUR AWS SECRET KEY')
FILE_FORMAT = (TYPE = 'CSV');
Awesome, S3 and Snowflake are all set, let’s connect Airflow to both tools!
3(b) Define Airflow Connections on Astro
Astro makes it easy to define Airflow connections using the Astro Environment Manager!
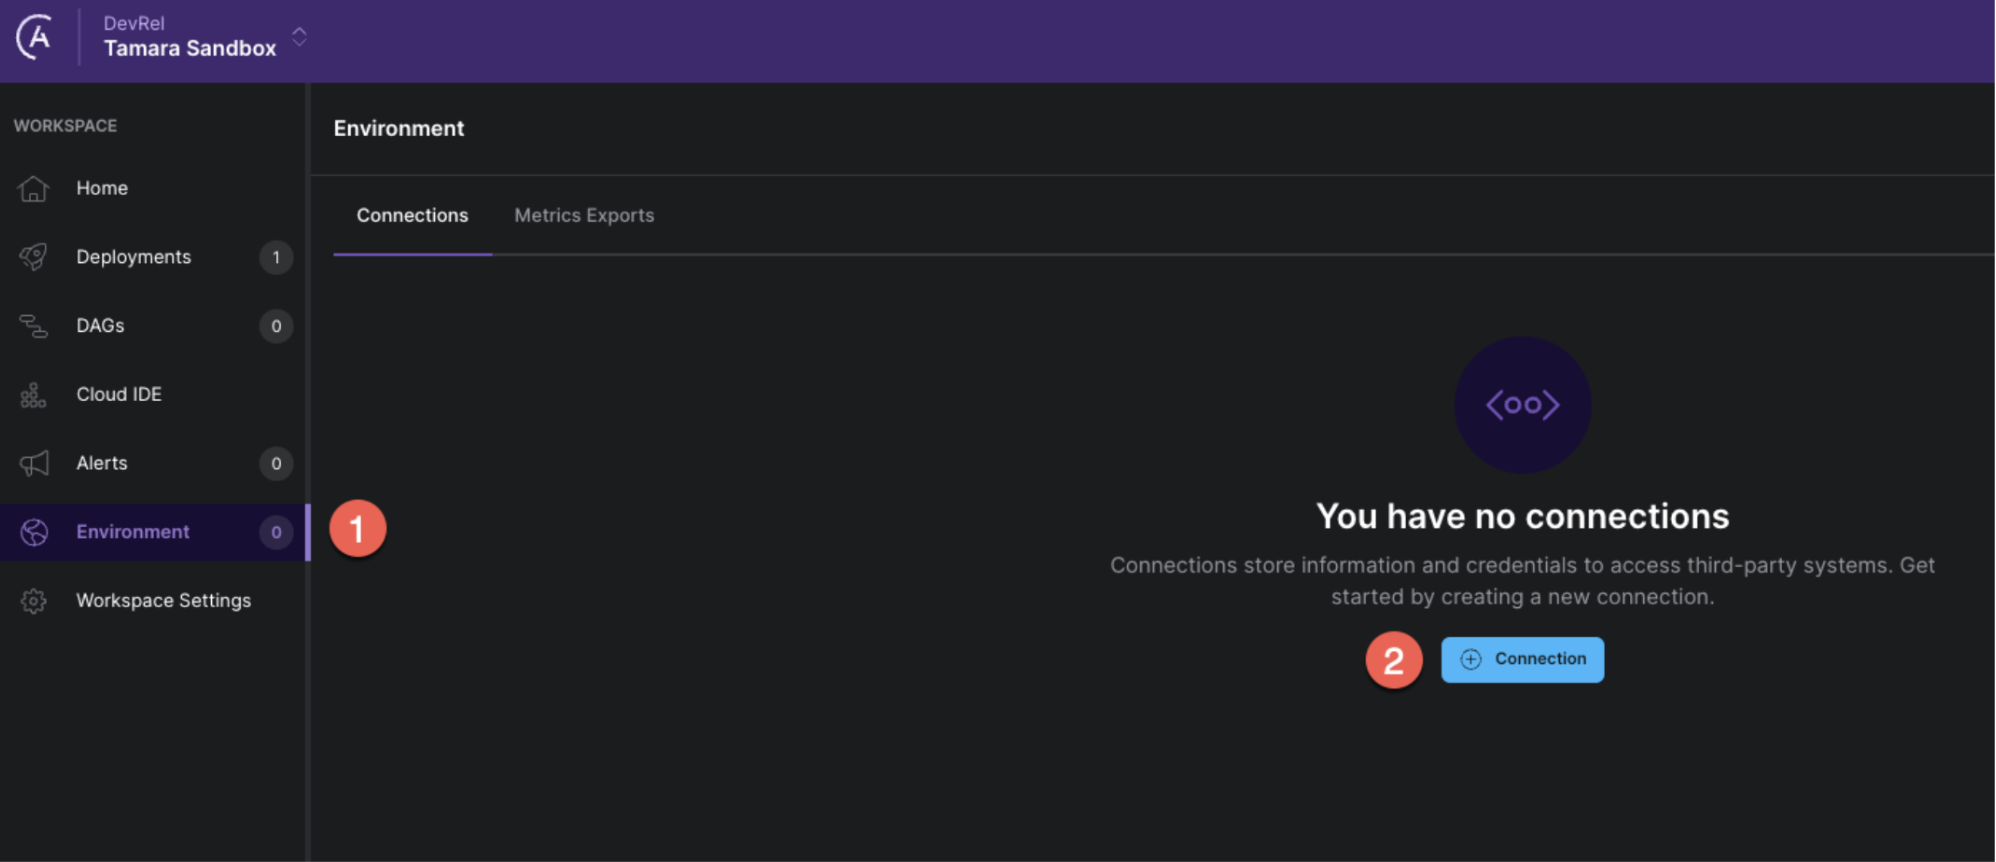
In the Astro UI click on the Environment tab, then on + Connection to add a new connection.

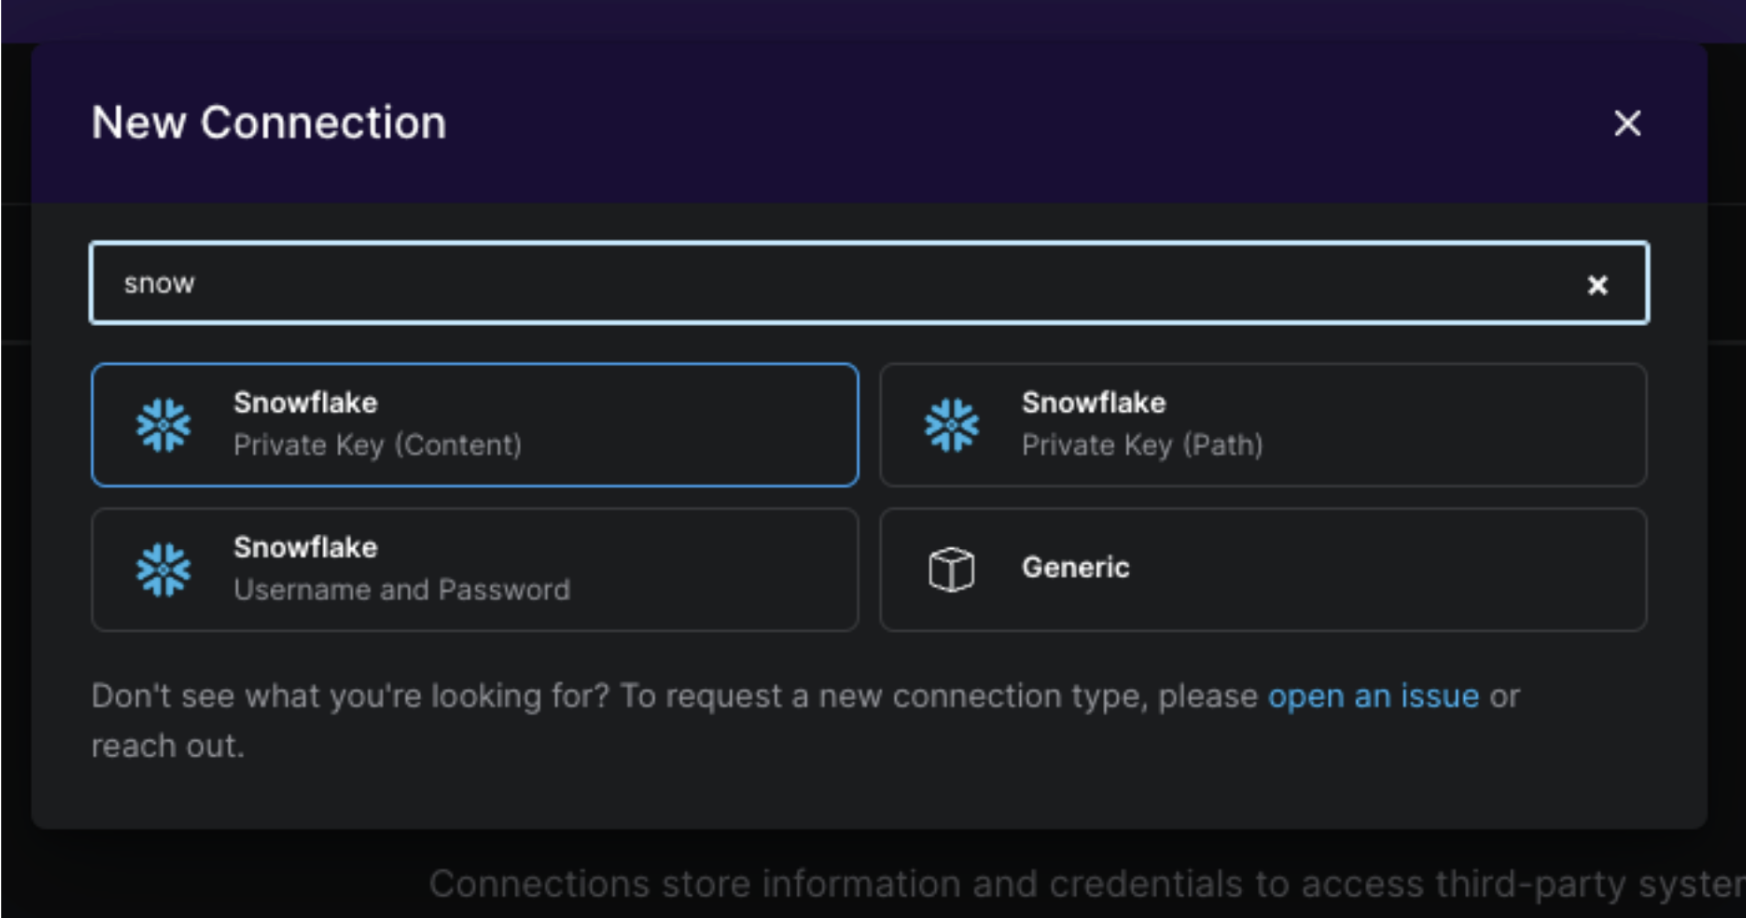
In the connection collection search for Snowflake and select Snowflake Private Key (Content).

Fill out the form with the CONNECTION ID snowflake_default and your connection details. Make sure to turn the toggle AUTOMATICALLY LINK TO ALL DEPLOYMENTS at the top to Yes to make this connection available to all your deployments and set the AUTHENTICATOR to snowflake.
If you don’t know your Snowflake account id and region for the ACCOUNT and REGION fields, see here for instructions on how to retrieve them.
For the field PRIVATE KEY CONTENT copy the contents of the ~/.ssh/snowflake_rsa_key file you created in Step 5 and use the passphrase you set for the key for the field PRIVATE KEY PASSPHRASE.
Click Create Connection.
Lastly we also need to define a connection between Airflow and AWS S3 because we retrieve the list of folders in the S3 bucket in the list_keys task in order to parallelize data ingestion for use cases at scale.
Navigate back to the Astro Environment Manager and add a second connection.

This time select AWS and use the connection ID aws_default together with the same AWS KEY ID and AWS SECRET KEY that you created in Step 1(b). Link this connection to all deployments as well.
Awesome! All tools are set and connected, let’s get the code!
3(c) Clone your GitHub Repository
Clone the GitHub repository you connected to Astro in step 1(a) to your local machine to make code changes. If you cannot use git locally due to organizational constraints, you can also open the repository in a GitHub codespace and edit the code there.
This repository already contains a fully functional Airflow project!
3(d) Add your ETL DAG
Your GitHub repository contains several folders and files, you only need to make changes to a few to create the ETL DAG.
At the root of the repository you will find a file called requirements.txt;AWS this is where you can add any pypi package that needs to be available to your DAGs.
In the requirements.txt file, add the following lines to install the Amazon Airflow provider and the Snowflake Airflow provider. Note that our DAG needs the s3fs extra for the Amazon provider.
apache-airflow-providers-amazon[s3fs]==8.27.0
apache-airflow-providers-snowflake==5.6.1
Next, create a new file in the DAGs folder called s3_to_snowflake.py. Copy the DAG code below DAG the file and then commit the changes to the main branch of the Github repository.
"""
## S3 to Snowflake ETL DAG
This DAG extracts data CSV files stored in an S3 bucket and loads it
into a newly crated Snowflake table using a Snowflake Stage and the
CopyFromExternalStageToSnowflakeOperator.
The DAG parallelizes the loading of the CSV files into the Snowflake table.
Based on the folder structure in the S3 bucket to enable loading at scale.
"""
from airflow.decorators import dag, task
from airflow.datasets import Dataset
from airflow.models.baseoperator import chain
from airflow.io.path import ObjectStoragePath
from airflow.providers.snowflake.transfers.copy_into_snowflake import (
CopyFromExternalStageToSnowflakeOperator,
)
from airflow.providers.common.sql.operators.sql import SQLExecuteQueryOperator
from airflow.operators.empty import EmptyOperator
from pendulum import datetime, duration
import logging
import os
_S3_BUCKET_NAME = os.getenv("S3_BUCKET_NAME", "my-bucket-1234")
t_log = logging.getLogger("airflow.task")
_SNOWFLAKE_CONN_ID = os.getenv("SNOWFLAKE_CONN_ID", "snowflake_default")
_SNOWFLAKE_DB_NAME = os.getenv("SNOWFLAKE_DB_NAME", "DEMO_DB")
_SNOWFLAKE_SCHEMA_NAME = os.getenv("SNOWFLAKE_SCHEMA_NAME", "DEMO_SCHEMA")
_SNOWFLAKE_STAGE_NAME = os.getenv("SNOWFLAKE_STAGE_NAME", "DEMO_STAGE")
_SNOWFLAKE_TABLE_NAME = os.getenv("SNOWFLAKE_TABLE_NAME_SNEAKERS_DATA", "DEMO_TABLE")
OBJECT_STORAGE_SRC = "s3"
CONN_ID_SRC = os.getenv("CONN_ID_AWS", "aws_default")
KEY_SRC = f"{_S3_BUCKET_NAME}/my_stage/"
URI = f"{OBJECT_STORAGE_SRC}://{KEY_SRC}"
base_src = ObjectStoragePath(URI, conn_id=CONN_ID_SRC)
@dag(
dag_display_name="🛠️ Load product info from S3 to Snowflake",
start_date=datetime(2024, 8, 1),
schedule="@daily",
catchup=False,
max_consecutive_failed_dag_runs=10,
default_args={
"owner": "Data Engineering team",
"retries": 3,
"retry_delay": duration(minutes=1),
},
doc_md=__doc__,
description="ETL",
tags=["S3", "Snowflake"],
)
def s3_to_snowflake_example():
start = EmptyOperator(task_id="start")
@task
def list_keys(path: ObjectStoragePath) -> list[ObjectStoragePath]:
"""List all subfolders in a specific S3 location."""
keys = [f.name + "/" for f in path.iterdir() if f.is_dir()]
return keys
key_list = list_keys(path=base_src)
create_table_if_not_exists = SQLExecuteQueryOperator(
task_id="create_table_if_not_exists",
conn_id=_SNOWFLAKE_CONN_ID,
sql=f"""
CREATE TABLE IF NOT EXISTS
{_SNOWFLAKE_DB_NAME}.{_SNOWFLAKE_SCHEMA_NAME}.{_SNOWFLAKE_TABLE_NAME} (
title STRING,
description STRING,
price FLOAT,
category STRING,
file_path STRING,
uuid STRING PRIMARY KEY
);
""",
show_return_value_in_logs=True,
)
copy_into_table = CopyFromExternalStageToSnowflakeOperator.partial(
task_id="copy_into_table",
snowflake_conn_id=_SNOWFLAKE_CONN_ID,
database=_SNOWFLAKE_DB_NAME,
schema=_SNOWFLAKE_SCHEMA_NAME,
table=_SNOWFLAKE_TABLE_NAME,
stage=_SNOWFLAKE_STAGE_NAME,
file_format="(type = 'CSV', field_delimiter = ',', skip_header = 1, field_optionally_enclosed_by = '\"')",
map_index_template="Ingesting files from the year {{ task.prefix }}",
).expand(prefix=key_list)
end = EmptyOperator(
task_id="end",
outlets=[
Dataset(
f"snowflake://{_SNOWFLAKE_DB_NAME}.{_SNOWFLAKE_SCHEMA_NAME}.{_SNOWFLAKE_TABLE_NAME}"
)
],
)
chain(start, [create_table_if_not_exists, key_list], copy_into_table, end)
s3_to_snowflake_example()
3(e) Run the DAG
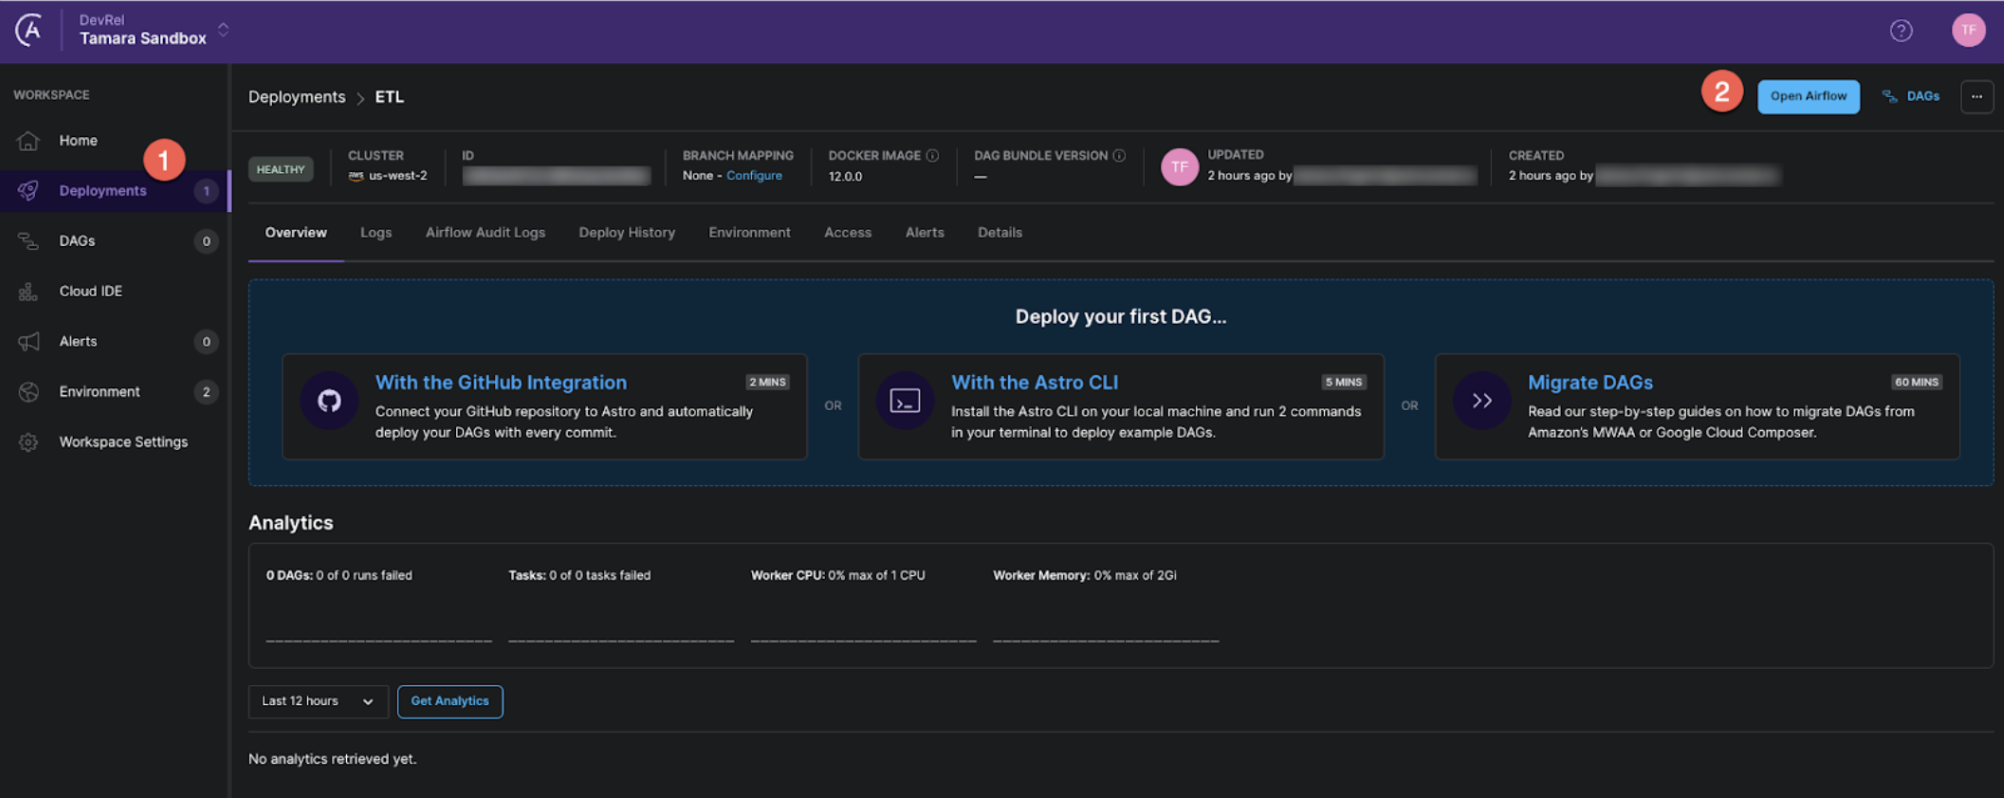
Great, you are all set to turn on your DAG in the Airflow UI! In the Astro UI navigate to your deployment and click Open Airflow to open the Airflow UI.

In the Airflow UI click the toggle to the left of the DAG titled Load product info from S3 to Snowflake Snowflake to unpause it and see it run.

After this first run, if you leave it unpaused, the DAG will run every day at midnight ingesting all information in your S3 location into Snowflake running the ingestion for the CSV files in every subfolder of s3://<your bucket>/my_stage in parallel, no matter how many subfolders or files exist on a given day! For more information on this feature see our documentation on dynamic task mapping.
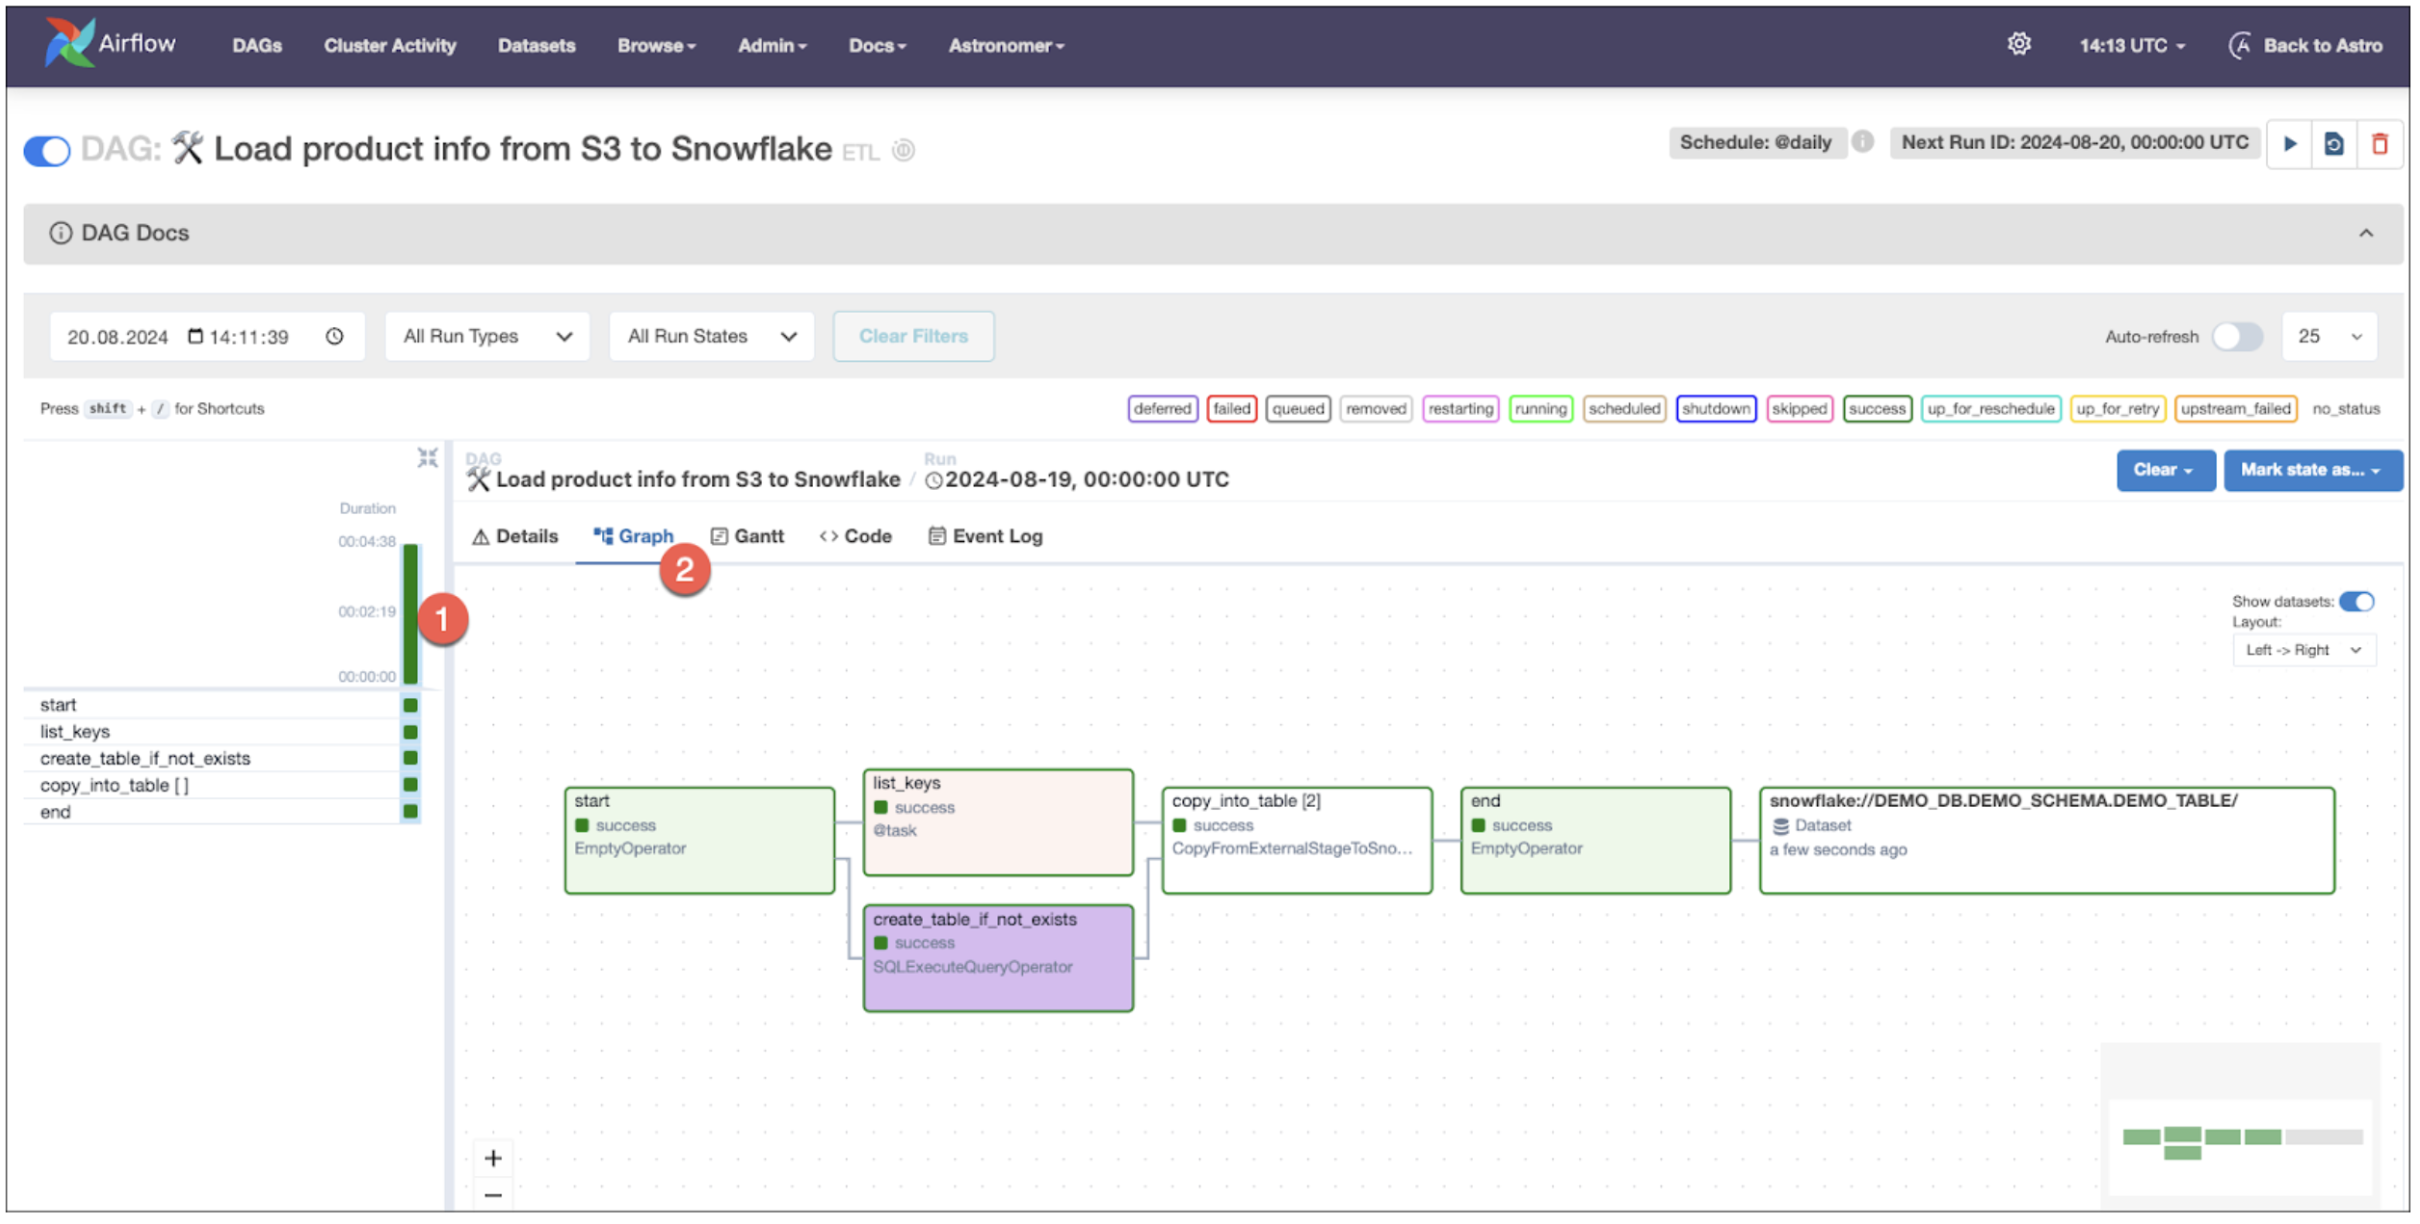
Click on the DAG name, the green bar of the completed DAG run and then on the Graph tab to see the graph of your successful DAG run.

Awesome! You now have an ETL DAG running in production! Next, you can add other ingestion DAGs or DAGs running downstream acting on the data you just loaded into Snowflake.
How to adapt this DAG to your use case
The DAG in this blog post will load all CSVs located in a subfolder of the s3://>YOUR BUCKET NAME>/my_stage/ key to a newly created table in S3, while parallelizing the tasks with one dynamically mapped task instance being created for every subfolder at the stated location.
There are many options to adapt this DAG to fit your data and use case:
- Your target table has a different schema: You likely will want to ingest your own data that is not about teas. To change the schema, adjust the
sql parameter in the create_table_if_not_exists tasks to fit your data.
Important: Make sure that the columns in your table definition are in the same order as the columns in your CSV file for Snowflake to be able to run a COPY INTO statement!
- Your data is in another format than CSV: If your raw data in S3 is in a different format, such as JSON, Parquet or XML, you will need to adjust both, the format in the stage creation in step 3(a) and in the
file_format parameter of the CopyFromExternalStageToSnowflakeOperator. See the Snowflake documentation on creating a stage and the COPY INTO statement for all format options.
- Your data is in a different object storage location: While this blog post deals with extracting data from S3, the DAG shown is easily adaptable to other object storage solutions like GCS or Azure. You will need to adjust the URL and CREDENTIALS in your stage definition inside Snowflake in step 3(a), as well as the define a connection to your storage solution in step 3(b) and lastly adapt the environment variables in your DAG code pertaining to your object storage connection. Note: if your data is structured differently, for example not in subfolders or nested in several subfolders you will need to make changes to the
list_keys task as well. For more information, see Astronomer’s object storage tutorial.
OBJECT_STORAGE_SRC = "s3"
CONN_ID_SRC = os.getenv("CONN_ID_AWS", "aws_default")
KEY_SRC = f"{_S3_BUCKET_NAME}/my_stage/"
Common use cases
You can use this DAG to directly ingest data in any format supported by Snowflake's COPY INTO from any object storage, such as S3, to Snowflake. This pattern is versatile and applicable across various industries:
- FinTech - generate audit reports: Many financial companies store their raw transaction logs in S3. Your DAG can load this data into Snowflake to perform data quality checks, anomaly detection and further prepare the data for regulatory reports.
- E-commerce - add new products: At an e-commerce platform, you could store your product catalog in S3 that includes product descriptions, pricing and categories. The product team drops information on new products into an ingest location every day, and your DAG automatically ingests the files and copies the new data into the product table in Snowflake.
- Customer Support - use GenAI for sentiment analysis: At a SaaS company the Customer Success team might like to know the sentiment of tickets associated with different customers. The tickets are written to S3 from the custom-built ticketing system. Your DAG automatically ingests the information, creating a table with detailed metrics about every customer interaction. A second DAG scheduled to run as soon as your DAG completes using Airflow Datasets, uses the
text field of this table to generate a sentiment score using an LLM. Lastly, the data is transformed and presented to the Customer Success team in internal dashboards.
Next Steps
To learn more about how to use Apache Airflow together with Snowflake, register for the Implementing reliable ETL & ELT pipelines with Airflow and Snowflake webinar on September 26.


