Comparing Data Orchestration: Databricks Workflows vs. Apache Airflow®, Part 1
18 min read |
Databricks and Airflow are two influential tools in the world of big data and workflow management. Databricks, founded by the creators of Apache Spark, offers a unified platform for users to build, run, and manage Spark workflows. Apache Airflow® is an open-source platform designed to programmatically author, schedule, and monitor workflows of any kind, orchestrating the many tools of the modern data stack to work together. While there is much talk online of using Databricks OR Airflow for ETL workflows, these two platforms are very different in how they function and for which use cases they are best suited for.
To help other data engineers out there who are deciding between the two tools, in this blog post I’ll explore how to implement a common ETL use case on each platform. I’ll include the setup process, building out the ETL pipeline, and pipeline execution, to show you what the developer experience is like working with these two tools.
Finally, I’ll explore where Airflow and Databricks can be used together, and how the sum of these two platforms can be even greater than their parts!
Ease of Use: Databricks vs Airflow
| Category | Databricks | Airflow |
| Primary Purpose | Big data analytics and processing using optimized Apache Spark | Workflow orchestration and scheduling |
| Language Support | PySpark/SparkSQL | Python/SQL/PySpark/SparkSQL |
| Dependency Management | Must manage dependencies for each task individually, no environment dependency management system | Manage dependencies at the environment level, import necessary libraries once at DAG level |
| Connecting to External Systems | No connection management system, must set them manually and configure Spark profile to interact with them within each notebook/task that uses them | Create connections in the Airflow UI or programmatically that can be used across environment, use them by referencing connection objects |
| Spark Integration | Natively runs Spark jobs at high efficiency | Must connect to an external Spark cluster to execute Spark jobs |
| Workflow Management | Basic workflow execution leveraging 3rd party tools for scheduling and complex task dependencies. | Dynamic workflow creation, task dependencies, and advanced scheduling with branching, retry, etc. |
| Data Processing | High-performance data processing, optimized for large-scale operations | Limited; best suited for orchestrating tasks rather than performing heavy data processing |
| Integrations | Integrates with Cloud Object Stores and ODBC/JDBC | Integrates with 100’s of providers of various services |
The Use Case: Defining the Problem
For this example, I will collect stock price data on three companies from an API endpoint. I will clean it by selecting only the needed columns and then I’ll transform it to find the highest prices per month for each stock in the past year. Finally, I’ll load those results into an S3 staging bucket before transferring them into a production Snowflake database.

Tasks
While I’ll be using different methods to accomplish each of these tasks, the core function of each task within each pipeline will remain the same. The tasks are as follows:
- Extract Stock Data: Fetches stock data for a given ticker from a public URL and loads it into a pandas DataFrame.
- Clean Stock Data: Cleans the loaded stock data by selecting specific columns, including price, stock ticker, volume, and date.
- Transform Stock Data: Performs transformations on the cleaned data to identify the highest stock price for each month.
- Store Stock Data: Uploads the transformed data to an S3 bucket.
- Load Stock Data: Transfers the data from S3 to a Snowflake table.
The Airflow Solution
1. Set-up
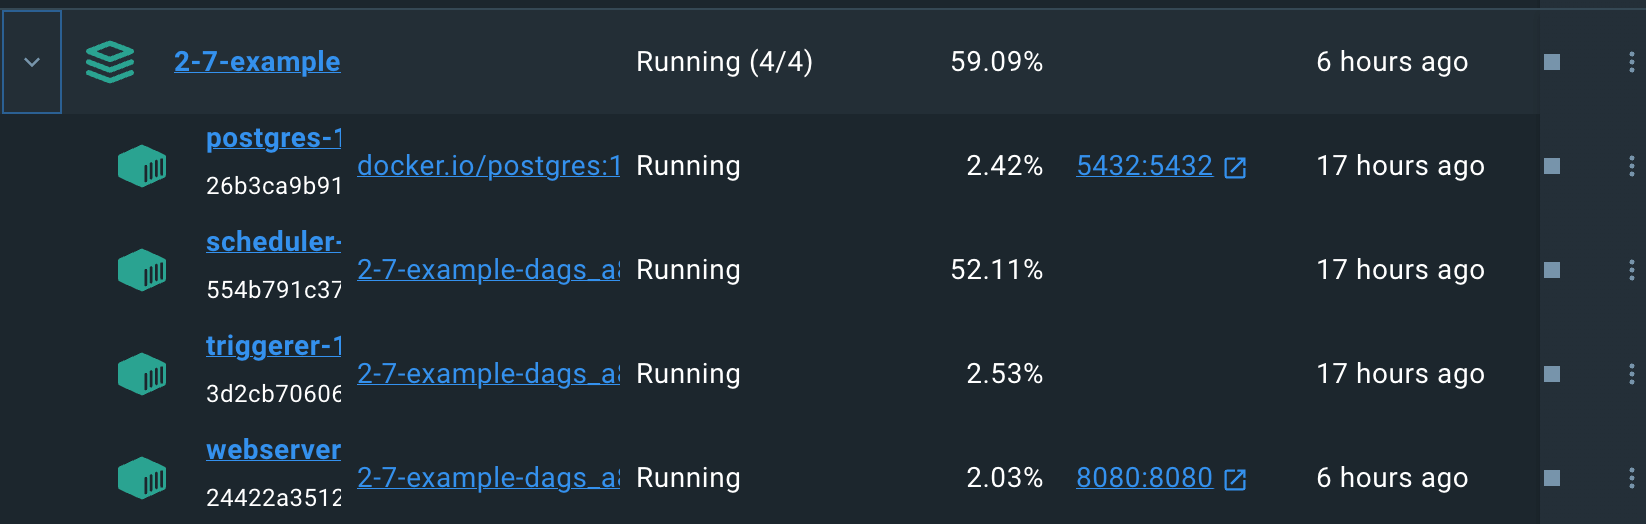
To get started with a fresh Airflow environment, I downloaded and used the Astro CLI to create a local Airflow environment using Docker Desktop. First, I created an empty directory called “DBricksCompare” and then ran “astro dev init” to create a file structure as seen below:
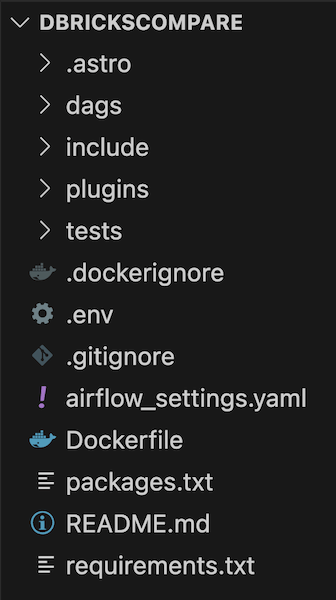
After doing so, I created a new Python file in the dags folder called StockData.py, which is where I started building my DAG. Then, I ran “astro dev start” to build and run a dockerized local Airflow environment.
After that, I fired up VSCode and started building my DAG.
2. Building Process
In Airflow, you define your data pipeline (DAG) as Python code. The code for my stock ETL pipeline looks like this:
from airflow.decorators import dag
from astro import sql as aql
from astro.table import Table, Metadata
import pendulum
import boto3
import pandas as pd
from io import StringIO
from airflow.providers.snowflake.transfers.s3_to_snowflake import S3ToSnowflakeOperator

TickerList = ["AAPL", "CVX", "FOX"]

SNOWFLAKE_CONN_ID = "snowflake_db"
STOCK_S3_BASE_PATH = "dbcompare/StockData"

@aql.dataframe(task_id="load_stock_data")
def load_stock_data_func(ticker: str ):
return pd.read_csv("https://raw.githubusercontent.com/astronautyates/datasourcedb/main/" + ticker + "_data.csv", on_bad_lines='skip', nrows=100)

@aql.run_raw_sql(conn_id="pg_default", task_id="clean_stock_data", results_format="pandas_dataframe")
def clean_stock_data_func(load_stock_data: Table):
return """
SELECT
"date",
"open",
"volume",
"Name"
FROM {{ load_stock_data }};
"""

@aql.dataframe(task_id="transform_stock_data")
def transform_stock_data_func(clean_stock_data: pd.dataframe):
clean_stock_data.set_index('date', inplace=True)

# Group by month, and select the 'open' column
grouped_by_month = clean_stock_data.groupby(clean_stock_data.index.month)['open']

# Initialize an empty dataframe to store the highest "open" values for each month
highest_open_values = pd.dataframe()

# Iterate through the grouped data to find the highest "open" value for each month
for month, group in grouped_by_month:
idx_max_open = group.idxmax()
highest_open_values = highest_open_values.append(clean_stock_data.loc[idx_max_open, ['Name', 'open', 'volume']])

# Reset the index and include the date in the result
highest_open_values.reset_index(inplace=True)

# Print the result
print(highest_open_values)
return(highest_open_values)

@aql.dataframe(task_id="s3_stock_data")
def s3_stock_data_func(transform_stock_data: pd.dataframe):
csv_buffer = StringIO()
tickername = transform_stock_data.iloc[0,1]
print(tickername)
transform_stock_data.to_csv(csv_buffer, header=None, index=False)

# Define your AWS Access Key ID and Secret Access Key
aws_access_key_id = 'aws_access_key_id'
aws_secret_access_key = 'aws_secret_access_key'
aws_session_token = 'aws_session_token'

# Upload CSV to S3
s3_resource = boto3.resource(
's3',
aws_access_key_id=aws_access_key_id,
aws_secret_access_key=aws_secret_access_key,
aws_session_token=aws_session_token
)
s3_resource.Object('dbcompare', 'StockData/price_' + tickername + '.csv').put(Body=csv_buffer.getvalue())

@dag(
schedule="0 0 * * *",
start_date=pendulum.from_format("2023-07-07", "YYYY-MM-DD").in_tz("UTC"),
catchup=False,
def StockData():
load_stock_data = load_stock_data_func.expand(ticker = TickerList)

clean_stock_data = clean_stock_data_func.expand(load_stock_data = load_stock_data)

transform_stock_data = transform_stock_data_func.expand(clean_stock_data = clean_stock_data)

s3_stock_data = s3_stock_data_func.expand(transform_stock_data = transform_stock_data)

copy_from_s3_to_snowflake = S3ToSnowflakeOperator(
task_id="copy_from_s3_to_snowflake",
stage="GY_S3_STAGE",
s3_keys=["price_FOX.csv"],
file_format="(type = 'CSV',field_delimiter = ',')",
snowflake_conn_id=SNOWFLAKE_CONN_ID,
table="STOCK_DATA",
)

s3_stock_data >> copy_from_s3_to_snowflake

dag_obj = StockData(){% endraw %}
Relevant constants are defined in the top-level code and used throughout the DAG:
- TickerList: List of different stock tickers to gather data for
- SNOWFLAKE_CONN_ID: Connection ID referencing a connection made in the Airflow UI to my Snowflake instance
- STOCK_S3_BASE_PATH: Pathway to staging S3 bucket/folder where data would be stored
The tasks described in the use case section are implemented as follows:
Load Stock Data: My first task, “load_stock_data_func”, uses the pandas read_csv function to fetch a CSV stock data for a given ticker from an API endpoint and convert it into a pandas DataFrame. I implemented this task using the @aql.dataframe operator from the Astro SDK because it allows me to return the pandas DataFrame as a task output, which I’ll then use to pass the dataframe to my next task.
Clean Stock Data: My second task, “clean_stock_data_func” takes the loaded stock dataframe and selects the relevant columns ("date", "open", "volume", and "Name") using a SQL statement. The Astro SDK allows me to use a SQL statement to query the pandas DataFrame without an intermediary conversion. Since I specify the results format to be a pandas DataFrame, it will be converted accordingly and returned as a task output to again be used in the next downstream task.
Transform Stock Data:The “transform_stock_data_func” task transforms the clean stock data that's provided from the previous task to find the highest price for each month in the year and returns a transformed pandas DataFrame as the task output. This transformed pandas DataFrame includes the highest opening stock prices and trading volume for each month for the given stock.
Upload to S3:The “s3_stock_data_func” task is responsible for preparing and uploading transformed stock data to an Amazon S3 bucket. The task first extracts the stock's name (ticker) from the dataframe and converts the dataframe into CSV format before storing it in a String.IO csv buffer. The function proceeds to use the AWS SDK (boto3) to establish a connection to S3 and uploads the CSV data to a specified location in the bucket, with the filename constructed dynamically as price_<Ticker>.csv using the stock's name.
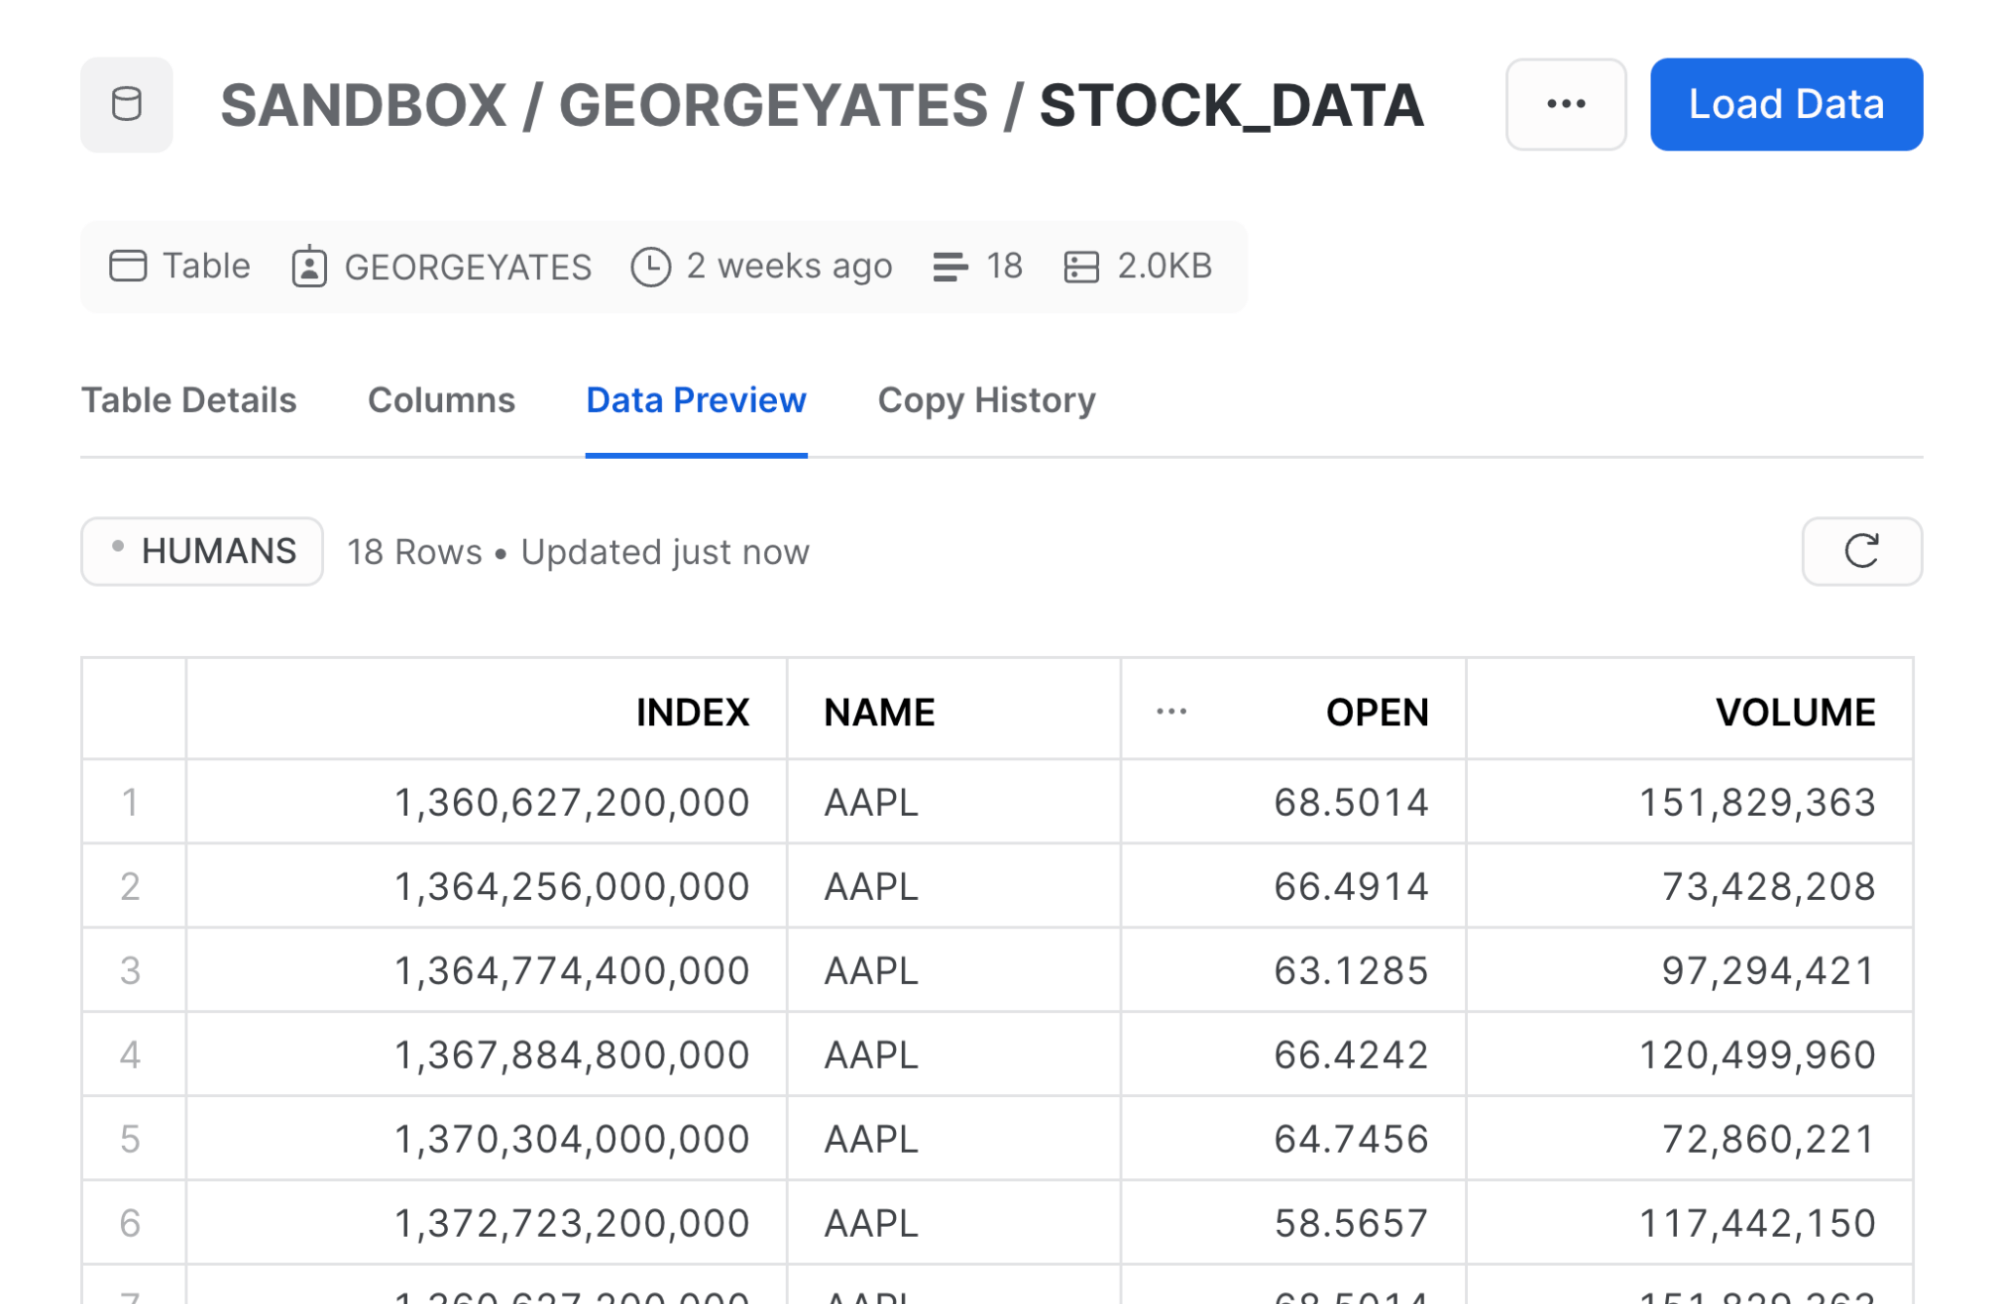
S3 to Snowflake: The “copy_from_s3_to_snowflake” task employs the S3ToSnowflakeOperator to transfer the stock data from an Amazon S3 bucket to a Snowflake table. It will add all the stock data for all three tickets to the same master Stock_Data table. To enable this, I also had to designate my S3 bucket as a staging bucket for Snowflake via the Snowflake UI.
Changes to Process in Parallel
You’ll notice in the code that each task is only designed to take one ticker, but I need to process three stock tickers! That’s why I’ve added the .expand() method to each of these functions except for the last one, to create dynamic Airflow tasks to process each stock's data in parallel.
Dynamic task mapping creates a single mapped task instance for each input, in this case for each stock ticker. Therefore, instead of having to repeat all tasks sequentially for each ticker, there will be three mapped task instances of each task running in parallel, cutting the task execution time by a third and creating better visibility into each dataset's process. The three mapped task instances are represented in the Airflow graph view by the [3] next to each task name.

If you haven’t worked with the TaskFlow API, you might be confused why I’ve only set the relationship between s3_stock_data and copy_from_s3_to_snowflake using the bit-shift operator. This is because every other task uses the previous task’s output as its input variable, which can be seen below where the task “load_stock_data” is passed into the “clean_stock_data_func” by using its task name “load_stock_data” as a parameter. This both passes the data from load_stock_data to clean_stock_data, and links the tasks within the Airflow UI as well.
3. Performance
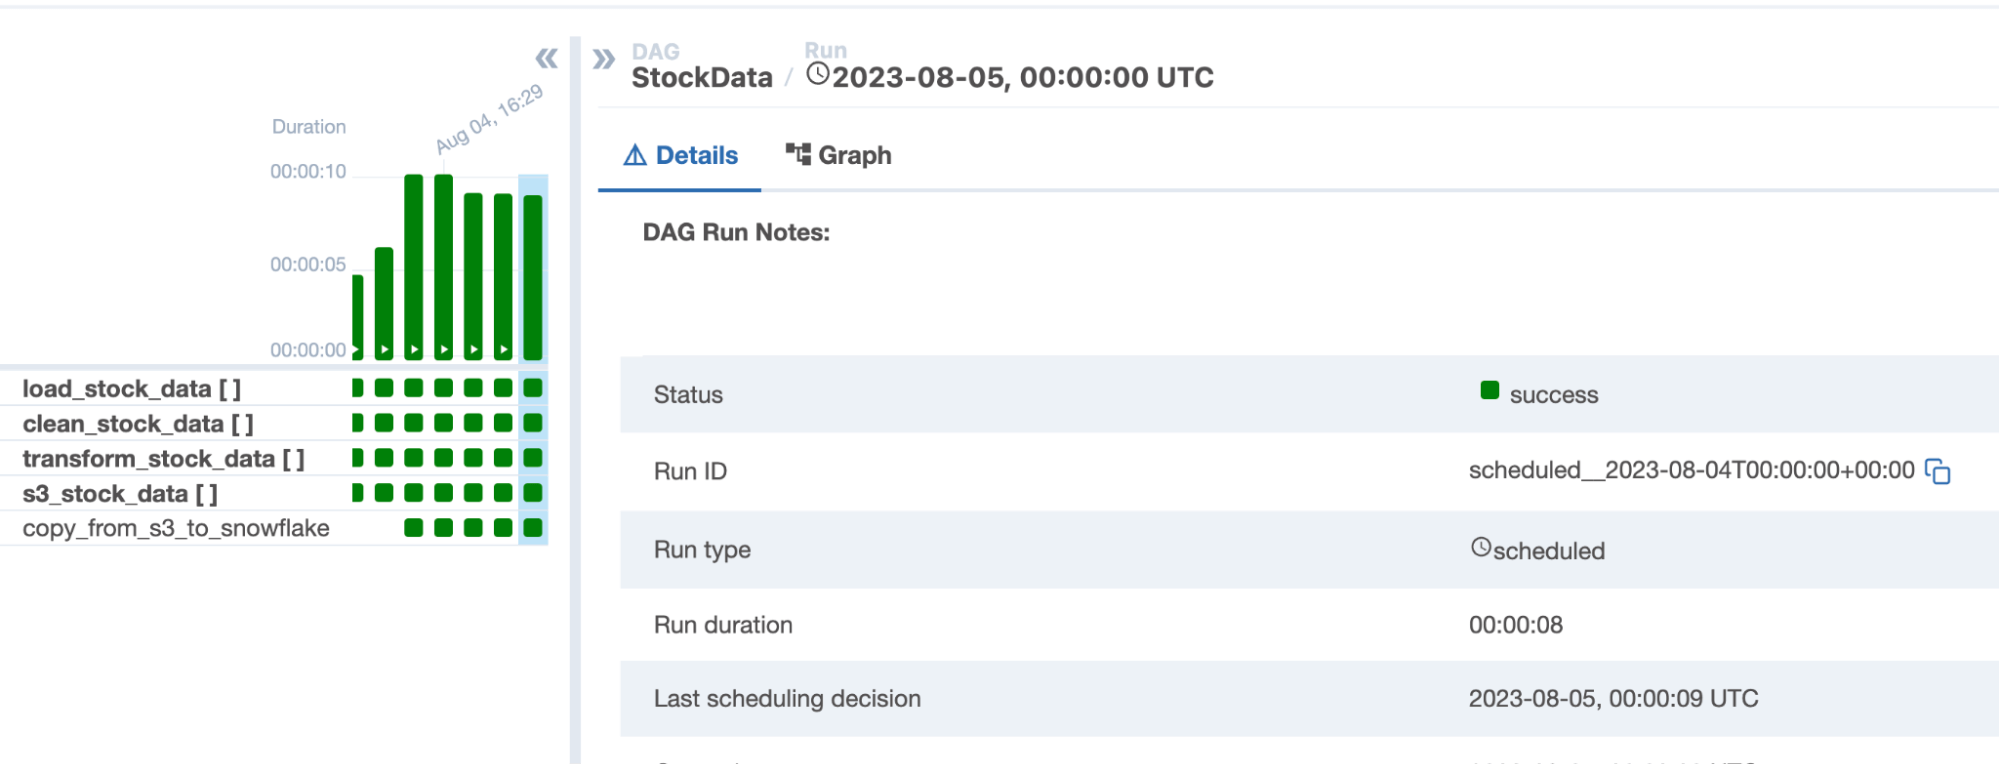
After first testing our DAG to make sure it ran successfully, I ran it three more times to see how quickly Airflow was able to perform this process. The resulting times were 9, 9, and 8 seconds, for an average time to completion of 8.66 seconds. This was running on my MacBook, so it effectively cost nothing to run, but if you wanted to run this in the cloud, you could do it on one node only running for 9 seconds for a pretty negligible cost.
Now that we’ve gotten our solution up and running in Airflow, let's go over to Databricks to see what our solution looks like over there!
The Databricks Solution
1. Set-up
As Databricks doesn’t have a locally installed option, I first attempted to use the Databricks Community Edition but found out it doesn’t support Databricks Workflows. This led me to try to provision a new Databricks trial account. However, this approach required me to link Identity and Access Management (IAM) roles to an AWS account in order to provision the resources for my Databricks environment Since I didn’t have an AWS account accessible via IAM, I turned to Azure Databricks.
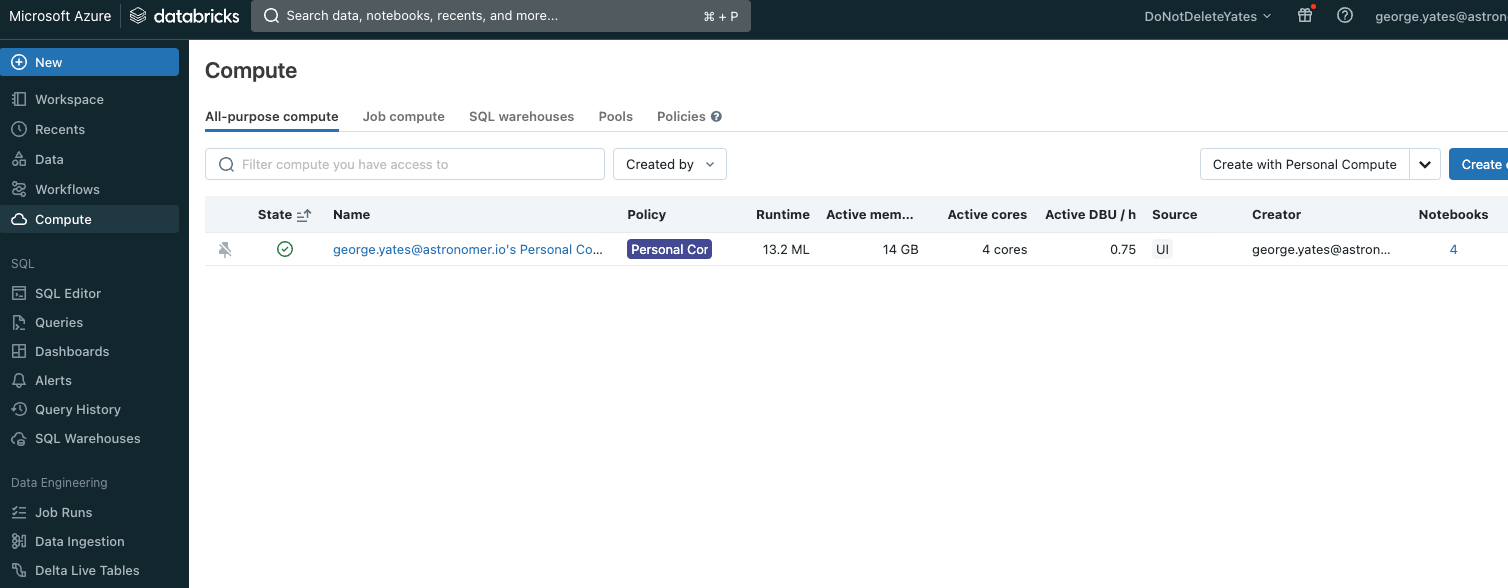
Azure Databricks was a simpler setup as I didn’t have to mess around with networking. I was creating a Databricks instance within my cloud account, and it just created the corresponding resources with no additional setup. Once my environment was created, I then provisioned a Spark cluster to run my Databricks jobs, and created a notebook to start building my first task.
2. Building Process
In order to create a Databricks workflow, I had to create separate notebooks for each task within the workflow instead of just using one script. Databricks workflows do not support task dependencies within the same notebook, so without separating them, there is a high chance that a downstream task would trigger before an upstream one had finished running. By creating them as separate notebooks within a Databricks workflow, I’m able to set those dependencies to make sure that each task only runs if the one before it has completed successfully.
Tasks
Task 1: Load Data
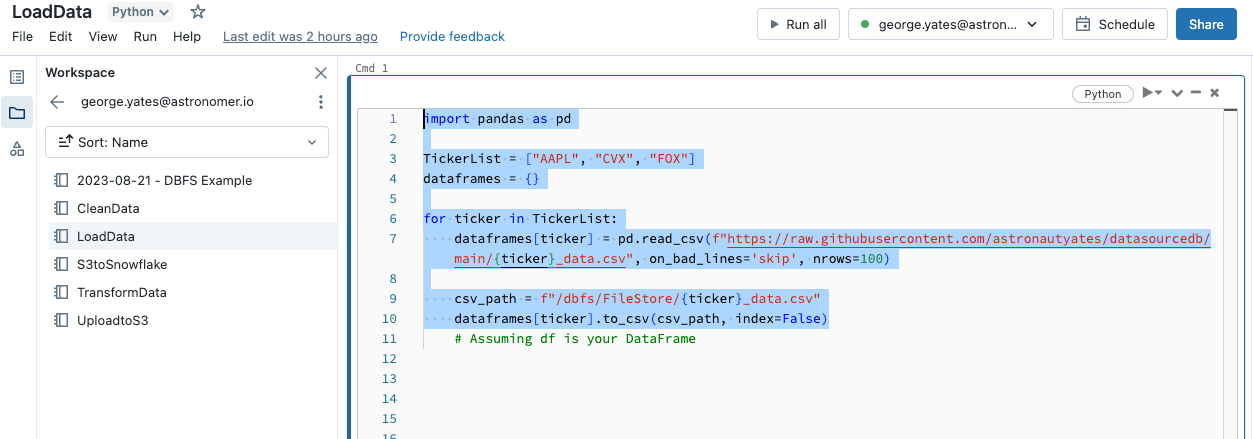
My first task/notebook was the task to load the data on the various stocks from an API. Since I needed to import libraries for each notebook, each one starts by importing the pandas library, defining a list named TickerList with the different stock tickers I wanted to collect information on, and creating an empty dictionary to store the stock data together.
I then used a for-loop to read in each stock’s data and store it as a CSV in the Databricks Filestore. The reason I stored the data in an intermediary location instead of passing it directly to the next task as I did in Airflow is that Databricks doesn’t allow for direct passing of datasets between tasks. To accommodate this, in the beginning all of my subsequent tasks I’ll be reading in the stock data from the Databricks Filestore, and saving my altered stock data back to the Databricks Filestore at the end.
Task 2: Clean Data
import pandas as pd

TickerList = ["AAPL", "CVX", "FOX"]
dirty_dataframes = {}

# Read each ticker's data into the dictionary
for ticker in TickerList:
csv_path = f"/dbfs/FileStore/{ticker}_data.csv"
dirty_dataframes[ticker] = pd.read_csv(csv_path)

# Clean each dataframe in the dictionary
for ticker, df in dirty_dataframes.items():
dirty_dataframes[ticker] = df[["date", "open", "volume", "Name"]]
csv_path = f"/dbfs/FileStore/clean_{ticker}_data.csv"
dirty_dataframes[ticker].to_csv(csv_path, index=False)
For my second task, I read the stock data from the DataBricks Filestore, converted these CSV files into dataframes, and stored these in the dirty_dataframes dictionary, before cleaning the stock data and storing it back in Databricks Filestore.
Instead of using dynamic task mapping to create three task instances for each stock as I did in Airflow, I used for-loops to mimic running the same task for each stock, an approach you’ll see throughout my task implementations in Databricks. While this accomplishes the same objective, it means each stock’s data must be processed sequentially rather than in parallel, which will naturally extend the task execution time.
Task 3: Transform Data
import pandas as pd

TickerList = ["AAPL", "CVX", "FOX"]

transformed_dataframes = {}
clean_dataframes = {}

for ticker in TickerList:
csv_path = f"/dbfs/FileStore/{ticker}_data.csv"
clean_dataframes[ticker] = pd.read_csv(csv_path)

for ticker, df in clean_dataframes.items():
# Ensure 'date' is of datetime type
df['date'] = pd.to_datetime(df['date'])
# Set 'date' as the index
df.set_index('date', inplace=True)
# Group by month and select the 'open' column
grouped_by_month = df.groupby(df.index.month)['open']
# Initialize an empty dataframe to store the highest "open" values for each month
highest_open_values = pd.dataframe()
# Iterate through the grouped data to find the highest "open" value for each month
for month, group in grouped_by_month:
idx_max_open = group.idxmax()
highest_open_values = highest_open_values.append(df.loc[idx_max_open, ['Name', 'open', 'volume']])
# Reset the index and include the date in the result
highest_open_values.reset_index(inplace=True)
# Store the transformed data in the dictionary
transformed_dataframes[ticker] = highest_open_values
csv_path = f"/dbfs/FileStore/transformed_{ticker}_data.csv"
transformed_dataframes[ticker].to_csv(csv_path, index=False)
My third task in Databricks was quite similar to my Airflow implementation, as both are using pandas to power the transformations. The only major difference here is again I’m using for-loops, and using the Databricks Filestore to bring in my data and save it at the end of the task.
Task 4: Upload to S3
import boto3
from io import StringIO
import pandas as pd
TickerList = ["AAPL", "CVX", "FOX"]

transformed_dataframes = {}

for ticker in TickerList:
csv_path = f"/dbfs/FileStore/{ticker}_data.csv"
transformed_dataframes[ticker] = pd.read_csv(csv_path)

# Define AWS credentials and S3 bucket details
aws_access_key_id = 'aws_access_key_id '
aws_secret_access_key = 'aws_secret_access'
aws_session_token = 'session token'
bucket_name = 'dbcompare'
s3_path = 'dbcompare/StockData' # e.g., 'dbcompare/StockData'

# Initialize the S3 client
s3 = boto3.client('s3',
aws_access_key_id=aws_access_key_id,
aws_secret_access_key=aws_secret_access_key,
aws_session_token=aws_session_token
)

# Upload each dataframe to S3
for ticker, df in transformed_dataframes.items():
csv_buffer = StringIO()
df.to_csv(csv_buffer, index=False)
s3.put_object(Bucket=bucket_name,
Key=f"{s3_path}/price_{ticker}.csv",
Body=csv_buffer.getvalue())
For this fourth task/notebook, it is again very similar to my Airflow implementation, using boto3 and StringIO to upload each stock’s data to my staging S3 bucket.
Task 5: Transfer from S3 to Snowflake
import pandas as pd

TickerList = ["AAPL", "CVX", "FOX"]

SNOWFLAKE_SOURCE_NAME = "net.snowflake.spark.snowflake"

sfOptions = {
"sfURL" : "sfurl", # e.g., "account_name.snowflakecomputing.com"
"sfDatabase" : "SANDBOX",
"sfSchema" : "GEORGEYATES",
"sfRole" : "role",
"dbtable" : "STOCK_DATA", # e.g., "STOCK_DATA"
"user" : "user",
"password" : "password",
"preactions" : "USE DATABASE SANDBOX; USE SCHEMA GEORGEYATES;"
}

AWS_ACCESS_KEY = 'AWS_ACCESS_KEY'
AWS_SECRET_KEY = 'AWS_SECRET_KEY'
AWS_SESSION_TOKEN = 'Session Token'

spark._jsc.hadoopConfiguration().set("fs.s3a.access.key", AWS_ACCESS_KEY)
spark._jsc.hadoopConfiguration().set("fs.s3a.secret.key", AWS_SECRET_KEY)
spark._jsc.hadoopConfiguration().set("fs.s3a.session.token", AWS_SESSION_TOKEN)
spark._jsc.hadoopConfiguration().set("fs.s3a.aws.credentials.provider", "org.apache.hadoop.fs.s3a.TemporaryAWSCredentialsProvider")

# Loop through each ticker, read its data from S3, and write to Snowflake
for ticker in TickerList:
s3_path = f"s3a://dbcompare/dbcompare/StockData/price_{ticker}.csv"
df = spark.read.csv(s3_path, header=True, inferSchema=True)
# Set the table name dynamically based on the ticker
table_name = f"SANDBOX.GEORGEYATES.{ticker}_table"
sfOptions["dbtable"] = table_name
df.write.format(SNOWFLAKE_SOURCE_NAME).options(**sfOptions).mode("overwrite").save()
My fifth and final task is where some of the differences between Airflow and Databricks in how they connect to external services surfaced. While Databricks has a set of connectors to services and a UI for data ingestion, it doesn’t have one for exporting data or managing the movement of data between external systems.
This is compounded by the fact that since Databricks runs on a Spark cluster, I also had to configure my Spark cluster to be able to interact with both S3 and Snowflake within my notebook. After some trial and error in this process, I eventually got the connections to both services working.
Instead of being able to just run a copy operation directly from S3 to Snowflake, Databricks required me to actually load my data back from S3 and create a Spark dataframe. Only then could I proceed to load the data from Spark into Snowflake. As you’ll see in the performance section, this increases the time it takes this operation to complete substantially, as it has to do this three times in a row sequentially.
Building the Workflow
Now that I had all my tasks built out in separate notebooks, it was time to add them all to a Databricks workflow so that I could orchestrate them together and create a full data pipeline.

In order to build my data pipeline, I first created a Databricks Workflow called StockData, and then began adding tasks using their GUI. To create each task, I clicked the add task button, added a task name, then set the Path to the corresponding notebook, which you can see in the screenshot above. Each task was automatically linked to the previous task created, so I didn’t need to set any dependencies explicitly.
After creating all my tasks, I then ran the workflow to check that everything was working correctly and monitored it in the Databricks Runs UI, which is very familiar if you’ve worked with the Airflow Grid View before.
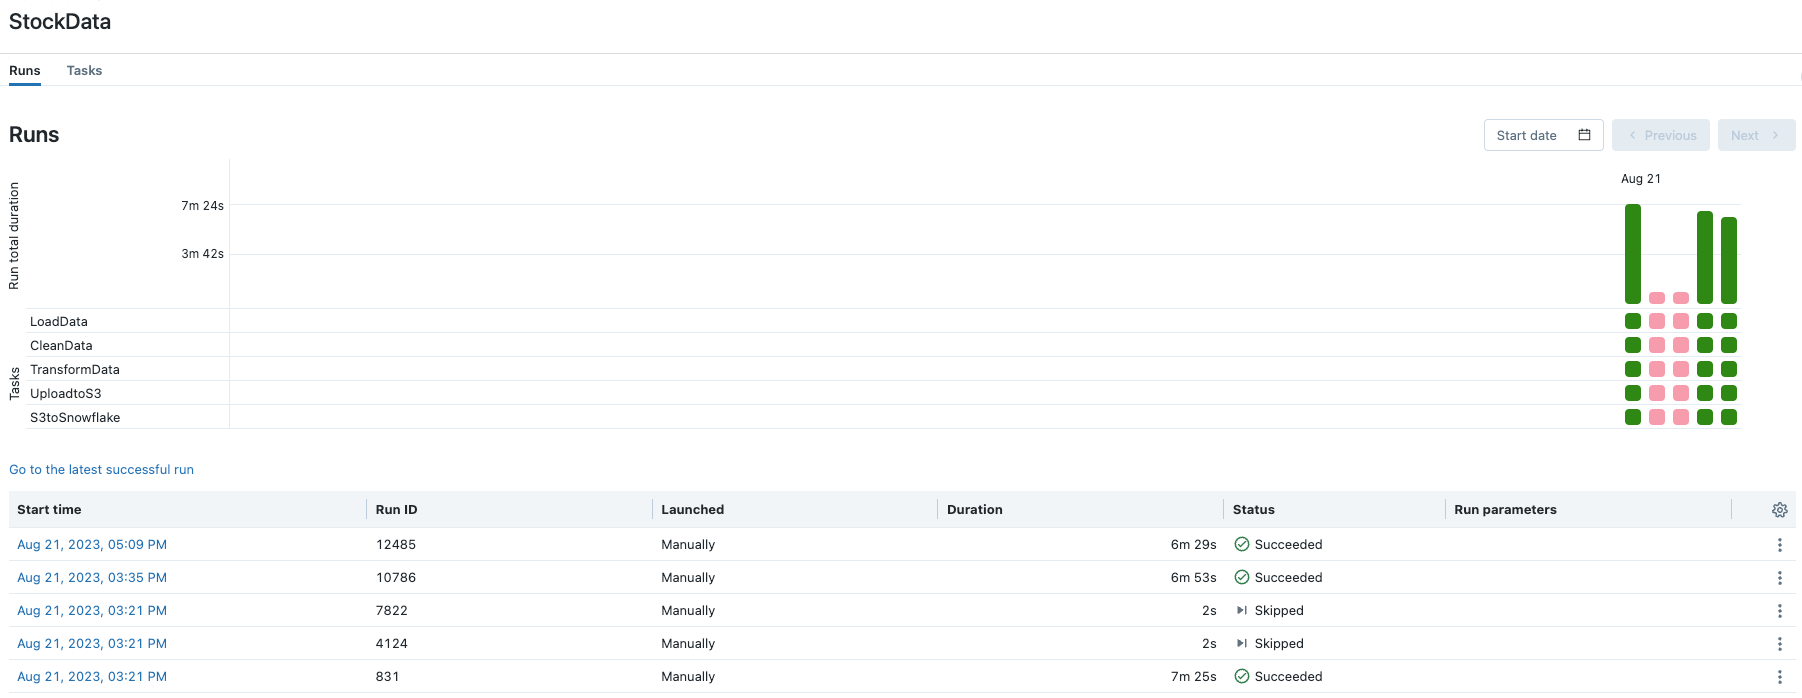
Performance
After running my workflow a few more times to get an average performance similar to the test I ran in Airflow, I got workflow duration times of 07:25, 06:53, and 06:29. This averages out to a completion time of 6 minutes, 55.3 seconds. Since this was hosted in Azure, I had to pay for the compute time for this, which ends up being around 3.5 cents for each pipeline run, plus the cost for your Databricks subscription.
Conclusion
In this exploration of the developer experience on both Databricks and Apache Airflow®, I’ve found that each platform has its own unique strengths and challenges.
Databricks is firmly rooted in Apache Spark, streamlining the process of building, running, and managing Spark-centric workflows. This unification can be an advantage for users that are looking for a consistent and integrated environment to manage Spark-based tasks. However, it is a bit clunky interacting with other services as all data needs to flow through the Spark cluster. As you saw, interacting with Snowflake/S3 required a large amount of setup and configuration of my Databricks Spark cluster for each individual task, which then needs to be duplicated for every task in a workflow.
On the other hand, Apache Airflow® stands out with its open-source nature, allowing for extensive customization. Its ability to author, schedule, and monitor workflows programmatically in Python provides versatility and flexibility, and it can easily integrate with a wide variety of tools in the ecosystem. However, with flexibility comes the need for more hands-on management, requiring users to import necessary packages and handle dependencies, as well as be proficient in Python.
In conclusion, the decision between Databricks and Airflow for ETL tasks hinges on the type of workloads you’re running. If you’re running primarily Spark-based workflows, Databricks is a great choice. However, if your data pipelines involve several different systems working together, Airflow is probably a better fit for your needs.
A beautiful thing about this paradigm is that Airflow is really great at managing Databricks workflows within the context of a larger data pipeline using the Airflow Databricks Provider. To help illustrate this, in the next section, I’ll go over what the Airflow Databricks Provider does, and show you a real-world use case of how the two platforms can work better together!
Databricks + Airflow: Why not use both?
The Databricks provider for Airflow is a set of Python classes that allow you to use Airflow to manage your Databricks jobs. It provides two operators:
- The DatabricksRunNowOperator operator allows you to trigger an existing Databricks job.
- The DatabricksSubmitRunOperator operator allows you to submit a new Databricks job.
To use the Databricks provider for Airflow, you need to create a Databricks connection in Airflow. This connection will store your Databricks credentials. Once you have created the connection, you can use the Databricks operators to trigger or submit Databricks jobs.
Here is an example of how to use the DatabricksRunNowOperator operator to trigger an existing Databricks job:
operator = DatabricksRunNowOperator(
    conn_id=conn_id,
    job_id=job_id,
)
And here is an example of how to use the DatabricksSubmitRunOperator operator to submit a new Databricks job:
notebook_path = '/path/to/my/notebook'

operator = DatabricksSubmitRunOperator(
    conn_id=conn_id,
    notebook_path=notebook_path,
)
The advantage of using this approach is that you can capitalize on the greatest strengths of both platforms, creating a more powerful data orchestration and processing solution than either could provide on their own.
Together, they fill each other's gaps: Airflow can trigger, schedule, and monitor Databricks jobs, ensuring they run in the right sequence and handling any failures, while Databricks can efficiently process vast amounts of data, perform advanced analytics, and deliver insights.
The integrated solution ensures a seamless end-to-end data pipeline, from ingestion and transformation to analytics and reporting, with the reliability of Airflow's orchestration and the horsepower of Databricks' analytics engine.
If you want more information on how to use the two together effectively, check out my colleague Tamara’s guide to Orchestrating Databricks jobs with Airflow.
In Part 2, I compare both of these platforms from a production management perspective, covering aspects such as setup, monitoring, integrations, scalability, and customization.

Get started free.
OR
By proceeding you agree to our Privacy Policy, our Website Terms and to receive emails from Astronomer.