

default worker queue. You can create additional worker queues to enable multiple worker types or configurations for different groups of tasks, and assign tasks to these queues in your Dag code. For more information about Airflow executors on Astro, see Manage Airflow executors on Astro.
Use worker queues to create optimized execution environments for different types of tasks in the same Deployment. You can use worker queues to:
- Separate resource-intensive tasks, such as those that execute machine learning models, from tasks that require minimal resources, such as those that execute SQL queries.
- Separate short-running tasks from long-running tasks.
- Isolate a single task from other tasks in your Deployment.
- Allow some workers to scale to zero but keep a minimum of 1 for other types of workers.
Benefits
Worker queues can enhance performance, decrease cost, and increase the reliability of task execution in your Deployment. Specifically:- Executing a task with dedicated hardware that best fits the needs of that task can result in faster performance. In some cases, this can decrease the duration of a Dag by up to 50%.
- Paying for larger workers only for select tasks means that you can lower your infrastructure cost by not paying for that worker when your tasks don’t need it.
- Separating tasks that have different characteristics often means they’re less likely to result in a failed or zombie state.
Example
By configuring multiple worker queues and assigning tasks to these queues based on the requirements of the tasks, you can enhance the performance, reliability, and throughput of your Deployment. For example, consider the following scenario:- You are running Task A and Task B in a Deployment.
- Task A and Task B are dependent on each other, so they need to run in the same Deployment.
- Task A is a long-running task that uses a lot of CPU and memory, while Task B is a short-running task that uses minimal amounts of CPU and memory.
Default worker queue
Each Deployment requires a worker queue nameddefault to run tasks. Tasks that aren’t assigned to a worker queue in your Dag code are executed by workers in the default worker queue.
You can change all settings of the default worker queue except for its name.
Worker queue settings
You can configure each worker queue on Astro with the following settings:- Name: The name of your worker queue. Use this name to assign tasks to the worker queue in your Dag code. Worker queue names must consist only of lowercase letters and hyphens. For example,
machine-learning-tasksorshort-running-tasksorhigh-cpu. - Concurrency: The maximum number of tasks that a single worker can run at a time. If the number of queued and running tasks exceeds this number, a new worker is added to run the remaining tasks. This value is equivalent to worker concurrency in Apache Airflow. The default for your worker type is suitable for most use cases.
- Min # Workers / Max # Workers: The minimum and maximum number of workers that can run at a time. The number of workers autoscales based on Concurrency and the current number of tasks in a
queuedorrunningstate. - Worker Type: The size of workers in the worker queue, for example A5 or A20. A worker’s total available CPU, memory, and storage is defined by its worker size. For more information, see the following section on worker types.
Hosted Deployment worker types
Each Deployment worker queue has a worker type that determines how many resources are available to your Airflow workers for running tasks. A worker type is a virtualized instance of CPU and memory on your cluster that is specific to the Astro platform. The underlying node instance type running your worker can vary based on how Astro optimizes resource usage on your cluster. Each virtualized instance of your worker type is a worker. Astro and Celery workers can run multiple tasks at once, while Kubernetes workers only scale up and down to run a single task at a time. The following table lists all available worker types on Astro Deployments.
All worker types additionally have 10 GiB of ephemeral storage that your tasks can use when storing small amounts of data within the worker.
Create a worker queue
CLIIf you prefer, you can also run the
astro deployment worker-queue create command in the Astro CLI to create a worker queue. See the CLI Command Reference.- In the Astro UI, click Deployments.
- Click the More actions menu (⋯) on the Deployment you want to edit, then click Edit Deployment.
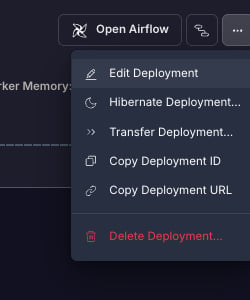
- In the Execution section, click + Add Queue to create a new worker queue, and then configure its related attributes. Note that you can’t change the name of a worker queue after you create it.
- When you’re done creating your worker queue, click Update Deployment to save your changes.
Assign tasks to a worker queue
By default, all tasks run in the default worker queue. To run tasks on a different worker queue, assign the task to the worker queue in your Dag code.Step 1: Copy the name of the worker queue
- In the Astro UI, click Deployments, then click the Deployment you want to use.
- Click the Details tab. Under Execution, the worker queues are listed.
- Copy the name of the worker queue you want to assign a task to.
Step 2: Assign the task in your Dag code
In your Dag code, add aqueue='<worker-queue-name>' argument to the definition of the task. If a task is assigned to a queue that doesn’t exist or isn’t referenced properly, the task might remain in a queued state and fail to execute. Make sure that the name of the queue in your Dag code matches the name of the queue in the Astro UI.
Astronomer recommends using Apache Airflow’s Taskflow API to define your task argument. The Taskflow API is feature in Airflow 2 that includes a task decorator and makes Dags easier to write. In the following examples, all instances of the task will run in the machine-learning-tasks queue. Choose an example based on whether or not you use the Taskflow API.
- Classic Operator Example
- TaskFlow API Example
Update a worker queue
CLIIf you prefer, you can run the
astro deployment worker-queue update command in the Astro CLI to update a worker queue. See the CLI Command Reference.- In the Astro UI, click Deployments.
- Click the More actions menu (⋯) on the Deployment you want to edit, then click Edit Deployment.
- Expand the Execution section if it isn’t already expanded.
- Update the worker queue settings, and then click Update Deployment. The Airflow components of your Deployment automatically restart to apply the updated resource allocations. This action is equivalent to deploying code to your Deployment and doesn’t impact running tasks. If you’re using the Celery or Astro executor, currently running tasks have 24 hours to complete before their running workers are terminated. This grace period doesn’t apply when you change the Deployment executor, which interrupts all running tasks. See What happens during a code deploy and Update the Deployment executor.
Delete a worker queue
CLIIf you prefer, you can also run the
astro deployment worker-queue delete command in the Astro CLI to delete a worker queue. See the CLI Command Reference.queued state indefinitely and won’t execute. To avoid stalled task runs, ensure that you reassign all tasks from a worker queue before deleting it. You can either remove the worker queue argument or assign the task to a different queue.
- In the Astro UI, click Deployments.
- Click the More actions menu (⋯) on the Deployment you want to edit, then click Edit Deployment.
- Expand the Execution section if it isn’t already expanded.
- Click the trash can icon next to the worker queue you want to remove, then click Update Deployment.