Using Astronomer’s new Cosmos to deploy dbt pipelines onto Snowflake
8 min read |
Editor's note: This blog post originally appeared on the Snowflake Medium blog.
The state of deploying pipelines with dbt has changed considerably in the last few months. Over the last few weeks, I was working with Astronomer to test out their new tool, Cosmos, to deploy dbt workflows onto Snowflake.
For those who are wondering, Astronomer created Astro which is a fully managed Airflow service. If you had followed my blog previously which I had posted here, I was using Apache Airflow® to help to orchestrate a simple data pipeline via dbt onto Snowflake.
However, while Airflow is easily one of the most successful open source projects, it may not necessarily be the easiest to set up. Just take a look at the docker compose file here. In addition, we had to adjust our docker-compose file for Airflow. For instance, we needed to mount the dbt DAGs onto the Airflow container. While it is not necessarily hard to do this, you can see that it does require a bit of knowledge about Docker-compose and Docker to get around. The Astro CLI simplifies this process down to two bash commands, greatly improving the user experience, especially for people new to Airflow. Now, a user can run ‘astro dev init’ to download all the components to create all the files to run a local Airflow environment, and then run ‘astro dev start’ to start that environment.
Through the Astro CLI, I met Astronomer, and was later introduced to Cosmos by George, Lead Developer Advocate at Astronomer. After playing around with Astronomer and Cosmos, we managed to get the working guide I wrote previously down to a more simplified version.
Why Cosmos
Cosmos is the best way to run dbt workflows for several key reasons. It provides a powerful, easy-to-use, and flexible solution to running dbt projects in Airflow. Cosmos expands your dbt project into a Task Group or a full DAG, with each step of a model rendered as an Airflow task, giving users visibility into what they’re executing. This allows for individual task tracking, troubleshooting, and rerunning if a dbt model fails. Additionally, Cosmos is designed to be a drop-in replacement for your current dbt Airflow tasks, making setup quick and straightforward. Instead of needing to replicate your dbt workflows with bash commands, you can just point Cosmos to your dbt project directory and it will automatically re-create them as Airflow DAGs.
Let us explore how to get this going.
Installing Astronomer
Installing the Astronomer CLI is pretty straightforward. All we need to do is to refer to this guide here to install Astronomer CLI. In my case, I have a Macbook and hence I just used the brew command to install Astronomer:
brew install astro
Once it has been done, you can perform a verification to check if it has been installed by doing a astro version. If all is good you should see the version being shown as below:

Initializing an Astro project
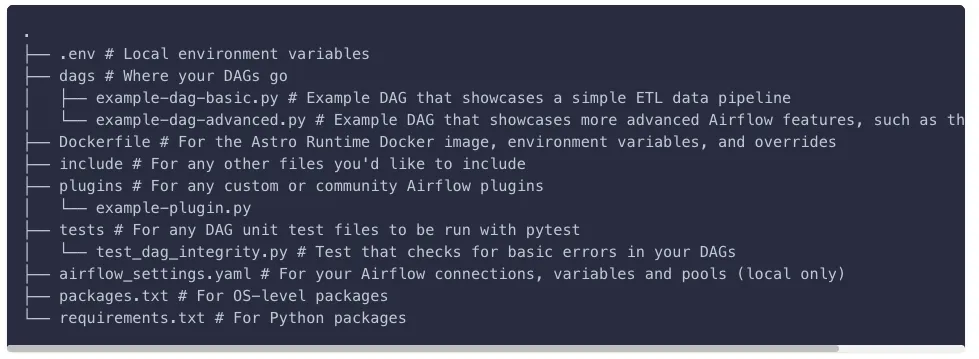
Once done we will create a folder called astronomer-snowflake-dbt and cd into folder. We will initiate an Astro project by doing a astro dev init. *** *** The command generates the following files:
From here you actually have a fully working airflow which you can initiate by doing an astro dev start.
It’s that simple.
However, this isn’t the end of the guide :) We will now be moving on to configure our Dockerfile and DAGs.
Configuring our Dockerfile and requirements.txt

Inside our Dockerfile, we will reate a virtual environment. In this case we will be installing dbt-snowflake adaptor.
We will also be installing cosmos. To do so add Cosmos to your project’s requirements.txt.
astronomer-cosmos
Making some slight changes to our dbt project
If you have followed my previous guide here, you can move your dags folder over.
To do so make a new folder, dbt, inside your local project’s dags folder. Then, copy/paste your dbt project into the directory.
Now that we’ve got our dbt project set up, we’ll need to create a dbtDag and point it to the dbt project directory so that it can read in the profile and configuration details it needs to recreate it within the Airflow UI.
To do this, we’ll create a fresh python file called my_cosmos_dag.py and import our the cosmos packages. If all is good the directory should look as below:
Writing our Cosmos.py file
In our newly created Python file, my_cosmos_dag.py let’s quickly walk through what is happening.
In our my_cosmos_dag.pywe will import our cosmos packages and use the ProfileConfig class to define the configuration for the Snowflake connection. This is using the SnowflakeUserPasswordProfileMapping class from Cosmos to map the Snowflake connection in Airflow to a dbt profile.
The purpose of this is so we can leverage the Airflow connection UI instead of needing to add the connection via dbt, enabling us to manage all of our credentials from a single UI, instead of duplicating them.
We also add additional profile args to point our dbtDag to the public schema in a demo_dbtdatabase, instead of adding the details to the base connection, giving us the flexibility to use the same connection to connect to different databases for different models.
The Cosmos profile mapper will then convert them into dbt compatible connection details and use them to connect to the desired database. You can also opt to use your own existing dbt profiles.yml file instead by pointing the ProfileConfig to your profiles.yml file instead.
After establishing our connection profile, we’ll use a Cosmos dbtDag class to create an Airflow DAG from the dbt project. The project_config parameter is used to specify the path to our dbt project. The operator_args parameter then is used to pass arguments to the dbt operator.
Following this, we will pass in the profile configuration defined earlier to our profile_config parameter to execute our models in Snowflake. The execution_config parameter then is used to specify the path to the dbt executable files.
Finally, since this is being turned into an Airflow DAG, we can set Standard Airflow DAG parameters, including:
- schedule_interval
- start_date
- catchup and
- dag_id
Cosmos will read from your dbt project and use it to create an Airflow DAG, without us needing to define individual tasks or relationships to replicate our dbt project.
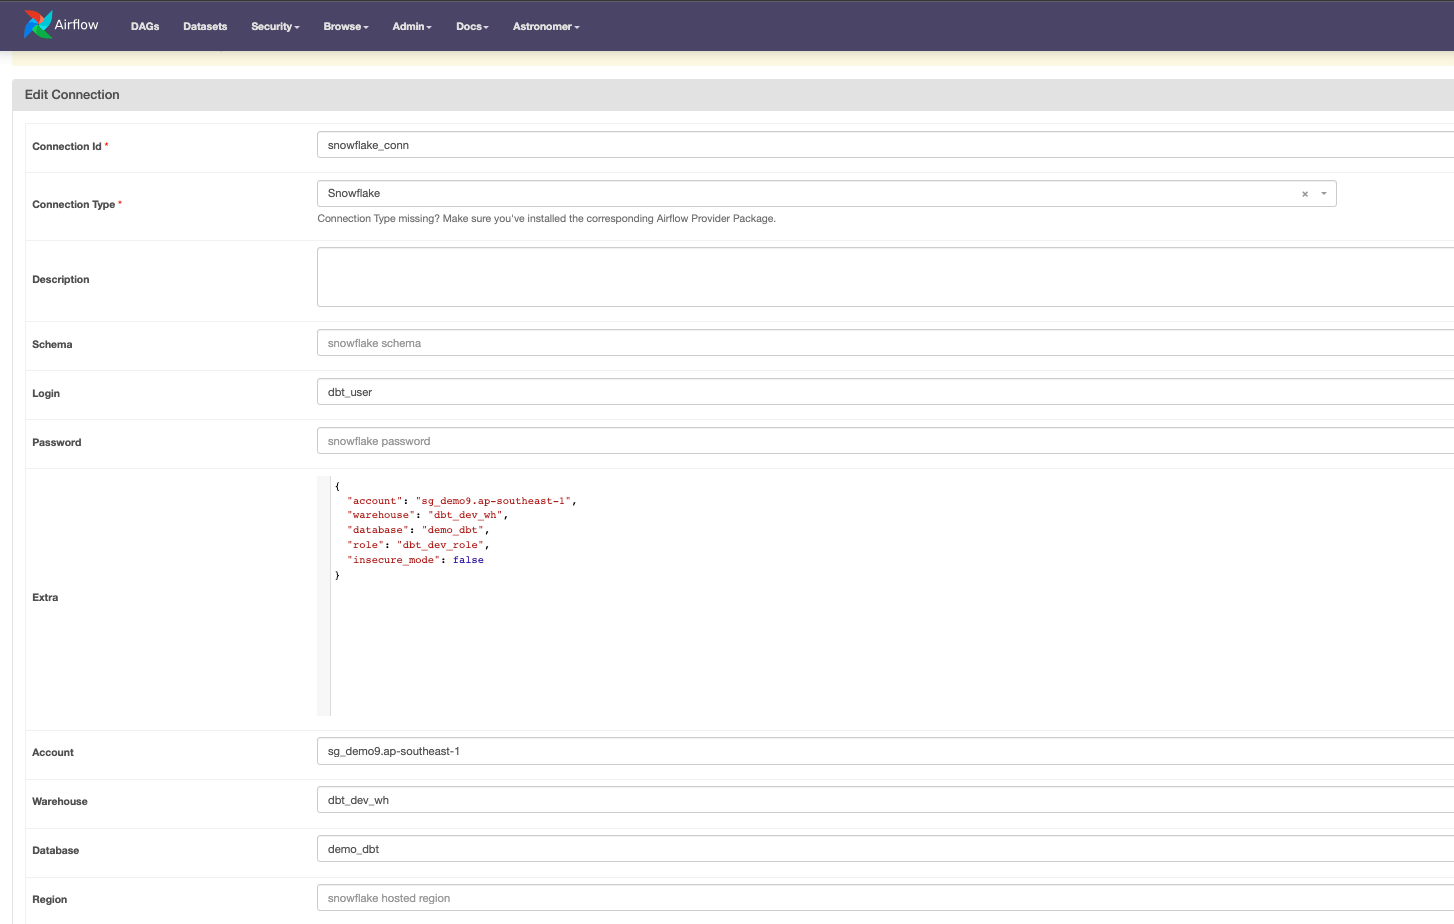
Setting connections in Astronomer
In order to run our dbtDag, we’ll need to first add a connection to our Snowflake environment in the example format shown below. You’ll need to fill out the following fields:
- Schema: The default schema to be used in Snowflake
- Login: The username to connect to Snowflake
- Password: The password to connect to Snowflake
- Account: The name of your Snowflake account
- Database: The default database to be used in Snowflake
- Role: The user role in Snowflake
Deploying our Airflow DAG
Now that we have our connection set, and our dbtDag written, we can open and run our dbtDag!
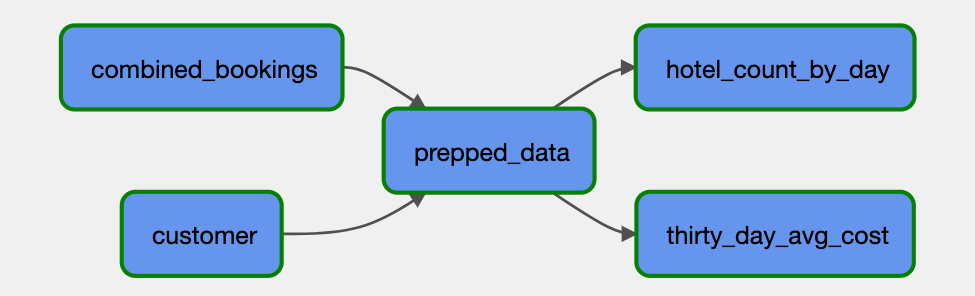
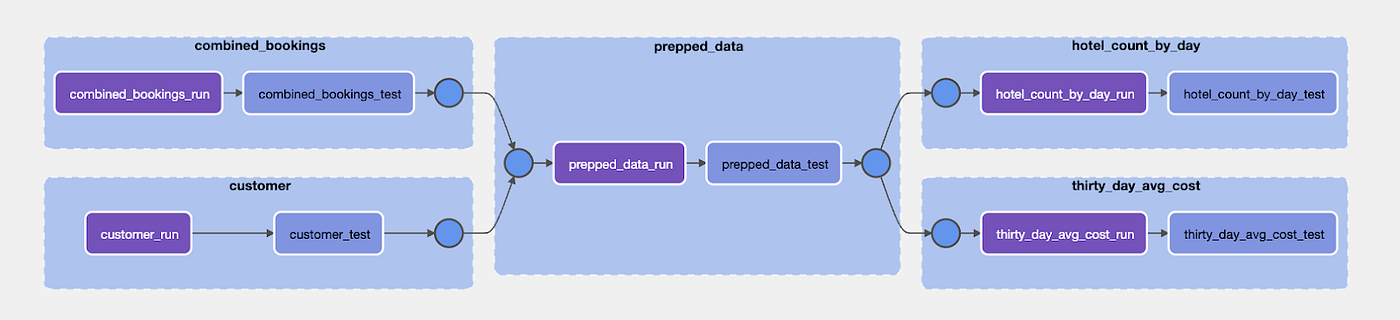
If you open the dbt_snowflake_dag in the airflow UI and hit play, you’ll see your five dbt models represented as Airflow Task Groups. By expanding them, you can see each model is made up of two tasks, a dbt run and then a dbt test.
If you had additional steps in an Airflow model, they would also be rendered as tasks, giving you full visibility into the success of each step of your dbt pipelines. This is in contrast to the previous approach, in which each model would be triggered by a bash operator, with no visibility into the progress of the model after it was triggered.
Some of the other benefits of this approach is that if a dbt model fails, you can immediately identify the specific task that corresponds to the model, troubleshoot the issue, and retry the model directly from the UI without needing to rerun your full dbt workflow.
The tight integration of Cosmos with Airflow’s connection management functionality means you can manage your dbt profiles directly in the Airflow UI, further simplifying the operational overhead.

Next Steps
Now that you’ve gotten the basics of Cosmos down, you can extend Cosmos to better manage your dbt workflows in several other ways.
If you’re using Snowflake’s Snowpark, you can integrate it with your dbt projects managed by Cosmos, helping to ensure smoother, more efficient data transformations. For a more granular control over your workflows, you can use Cosmos to split your dbt project into multiple DAGs based on tags, allowing you to handle different parts of your project independently. This can be particularly useful for large projects or when different teams are responsible for different parts of the project.
Additionally, Cosmos provides native support for dbt model lineage, enabling you to trace the dependencies and relationships between your dbt models. This can greatly enhance the visibility and understanding of your data transformation processes.
Conclusion
In conclusion, we have seen how we can easily use Airflow and Cosmos to deploy dbt DAGs. With the Cosmos integration, we can see the visualization of the DAG simply as well, which is pretty neat!
All in all, the development experience of using Airflow with Snowflake is quite seamless and I am eagerly waiting to see the next few capabilities of Cosmos which includes task generator functions and support for versioned dbt models.
Cosmos currently generates all tasks for users, but it has limitations in terms of individual task customization and subclassing, so the team is exploring the use of generation functions to provide more flexibility and granularity. Model versioning will allow you to easily track changes to dbt models and make rollbacks easier in case of a breaking change.
[https://astronomer.github.io/astronomer-cosmos/index.html](https://astronomer.github.io/astronomer-cosmos/index.html)
/docs/learn/airflow-dbt
[https://github.com/astronomer/cosmos-demo](https://github.com/astronomer/cosmos-demo)
/docs/learn/airflow-snowflake#time-to-complete
/cosmos/
/blog/introducing-cosmos-1-0/

Get started free.
OR
By proceeding you agree to our Privacy Policy, our Website Terms and to receive emails from Astronomer.