

Note: This webinar was recorded in August 2021 and discusses Smart Sensors, an experimental feature that was deprecated in Airflow 2.2 and removed in Airflow 2.4. We recommend using deferrable operators instead. Get more up-to-date information on Airflow sensorsin our guide and the Airflow: Sensors academymodule.
Webinar agenda:
- What is a sensor? A reminder
- Use cases
- Sensor types
- Implementing a sensor + best practices
- Smart sensors
Important links: Marc’s github repository with all the code from the webinar Astronomer registry with all the info on every kind of sensor Sensors 101 guide on Astronomer
Discount code for the certification: earlybird
1. What is a sensor?
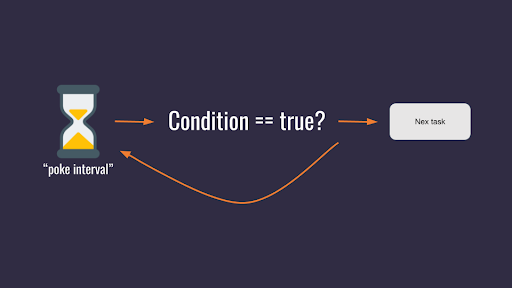
A sensor is a kind of operator waiting for something to happen before moving to the next task. How a sensor works:
- Checks if a given condition is true
- If it is true - then the next task is being executed
- Otherwise - it will wait for a time interval you have defined and check the condition again
It’s crucial if, for example, you’re waiting for a file or SQL entry.
2. Use cases
It’s always good to know WHY you need something!
Use case #1

If:
- You have different data pipelines because the way you extract data from your partners is different, too
- One DAG is in charge of extracting data from partner A, while the other DAG is in charge of extracting data from partner B
- What these DAGs have in common is how you store the collected data
- You want to have one DAG in charge of storing the data
This is something that you can solve with sensors!
Use case #2 (really common!)
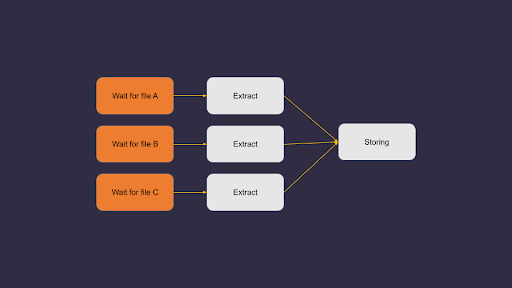
If:
- You’re waiting for files to land at a specific location
- You don’t know precisely when those files will arrive
- These files might even have different locations
With sensors, you can wait for file A until it arrives at that location, then wait for file B, etc. Sensors are vital if you’re waiting for files.
Use case #3
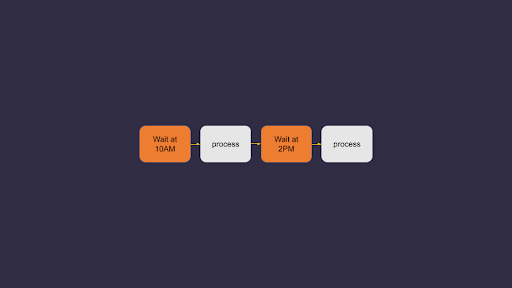
If:
- You have a DAG triggered daily, every day.
- For some reasons, you want to execute one task at 10:00 PM and then another task at 2:00 PM.
With sensors, you can have multiple intervals within the same DAG.
3. Sensor types
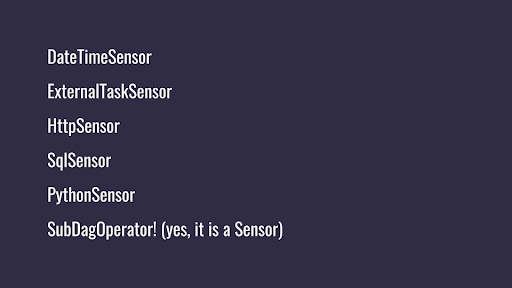
- DateTime sensor One task at 10:00 PM, then another task at 2:00 PM within the same DAG (use case #3).
- ExternalTaskSensor Creating dependencies between DAGs - waiting for tasks to get completed in another DAG.
- Http sensor Making sure that an API is available.
- SQL sensor Waiting for an entry in an SQL table.
- Python sensor When the condition is a Python function (and within that function there can be anything you want). For complex conditions.
- SubDagOperator Waiting for tasks to get executed within a SubDAG to avoid deadlocks.
4. Additional sensor info
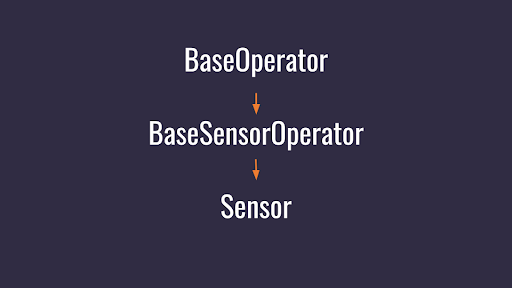
The sensor inherits from the BaseSensorOperator, which can have a lot of different arguments. The BaseSensorOperator inherits from the BaseOperator.
Your sensor has many arguments corresponding to your sensors and your operators.
5. Implementing the first sensor and noting the best practices
All the code from the webinar is available at Marc’s github repository.
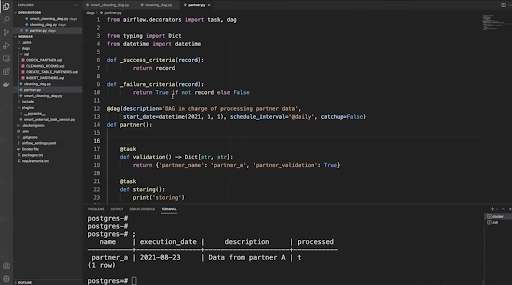
See Above:
- A DAG is in charge of processing partner data
- As soon as the partner data is processed, it creates a new entry in the SQL table: processed field gets set to True (t).
- As soon as this entry exists in the SQL table, a new task will be executed. For example: storing the data.
It requires the SQL sensor. Go to Astronomer repository to get information about this sensor, required parameters, how to install it, and how to import it within your DAG.
Defining and specifying the waiting for partner function: 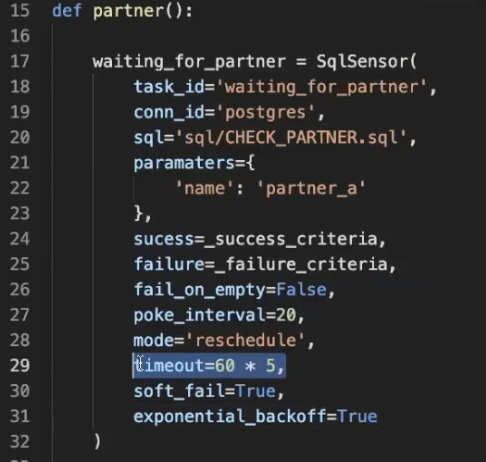
Important!
- Mode = ‘reschedule’ allows to free the worker slot during the interval of time the sensor is waiting, thus avoiding deadlock from having all the worker slots taken by sensors (see example below). The sensor will take a worker slot only to check if the condition is true, not for waiting for the time interval.
Best practice: if you have a very short poke interval, like 2-3 minutes, don’t set the mode to reschedule, as it will overload your scheduler. Set the mode to poke.

- Timeout. By default, timeout is set to seven days! If you don’t define the timeout and your condition is not true, your sensor will wait seven days before timing out and failing.
Best practice: ALWAYS define your timeout. If you expect that your sensor will get completed within 10 minutes, set it to 12 minutes, for example.
6. Smart sensors
Drawbacks of classic sensors:
- Most of the time, sensors do nothing - just wait for a condition to be true to move forward. Still, they will constantly be using resources and working slots. That’s not optimal.
- Each time a task is running with Airflow, that task emits heartbeats. If many sensors are running, there’s also a lot of heartbeats sent to the scheduler, which puts it under pressure.
- Duplicates. One sensor in one DAG waiting for something, and another sensor in another DAG waiting for the exact same thing.
- Asking yourself a lot of questions when creating a sensor (are the parameters correct, do I need a sensor at all, how long does it take for the task to get completed etc).
Solution: smart sensors!
The idea behind the smart sensors: instead of having one process for one sensor, there are centralized processes that execute sensors in batches within those processes.
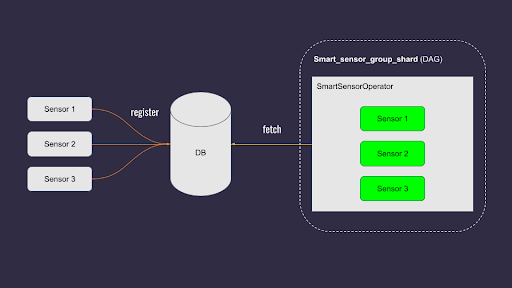
- Registering sensors within a database
- Smart sensor group shard = a classic DAG that triggers sensors from the database in batches
However, this feature is still in the beta phase, and it’s not that easy to use (see code example in the video and github repo).
Thank you for your attention!
See More Resources