Orchestrate MongoDB operations with Apache Airflow
MongoDB is a general-purpose document database that supports high-dimensional embeddings for text data and complex search queries. With the Mongo DB Airflow provider, you can orchestrate interactions with MongoDB from your Airflow DAGs.
In this tutorial, you’ll use Apache Airflow, MongoDB, and OpenAI to create a pipeline to ingest, embed, store, and query video game descriptions in MongoDB.
Why use Airflow with MongoDB?
MongoDB can store and query high-dimensional embeddings for text data, which is useful for applications like recommendation systems. You can orchestrate all steps of the process with Airflow, from ingesting data to querying it.
By integrating MongoDB with Airflow, you can:
- Use Airflow’s assets and data-aware scheduling capabilities to trigger operations in MongoDB based on other events in your data ecosystem, like the training of a new model having completed or the successful ingestion of new text data.
- Create pipelines interacting with MongoDB that adapt to changes in your data at runtime using dynamic Airflow tasks.
- Add Airflow features such as retries, branching, and alerts to MongoDB operations for handling complex task dependencies or task failures.
Time to complete
This tutorial takes approximately 30 minutes to complete.
Assumed knowledge
To get the most out of this tutorial, make sure you have an understanding of:
- The basics of MongoDB. See Getting started.
- Airflow fundamentals, such as writing DAGs and defining tasks. See Get started with Apache Airflow.
- Airflow decorators. See Introduction to the TaskFlow API and Airflow decorators.
- Airflow connections. See Managing your connections in Apache Airflow.
Prerequisites
- A MongoDB cluster. Astronomer recommends using MongoDB Atlas, a hosted MongoDB cluster with integrated data services that offers a free trial. See Getting started with MongoDB Atlas.
- The Astro CLI.
- An OpenAI API key of at least tier 1. If you do not want to use OpenAI, you will have to adjust the code in the embedding functions to use a different embedding service.
Step 1: Configure your MongoDB Atlas cluster
First you will need to configure your MongoDB Atlas cluster so Airflow can connect to it.
-
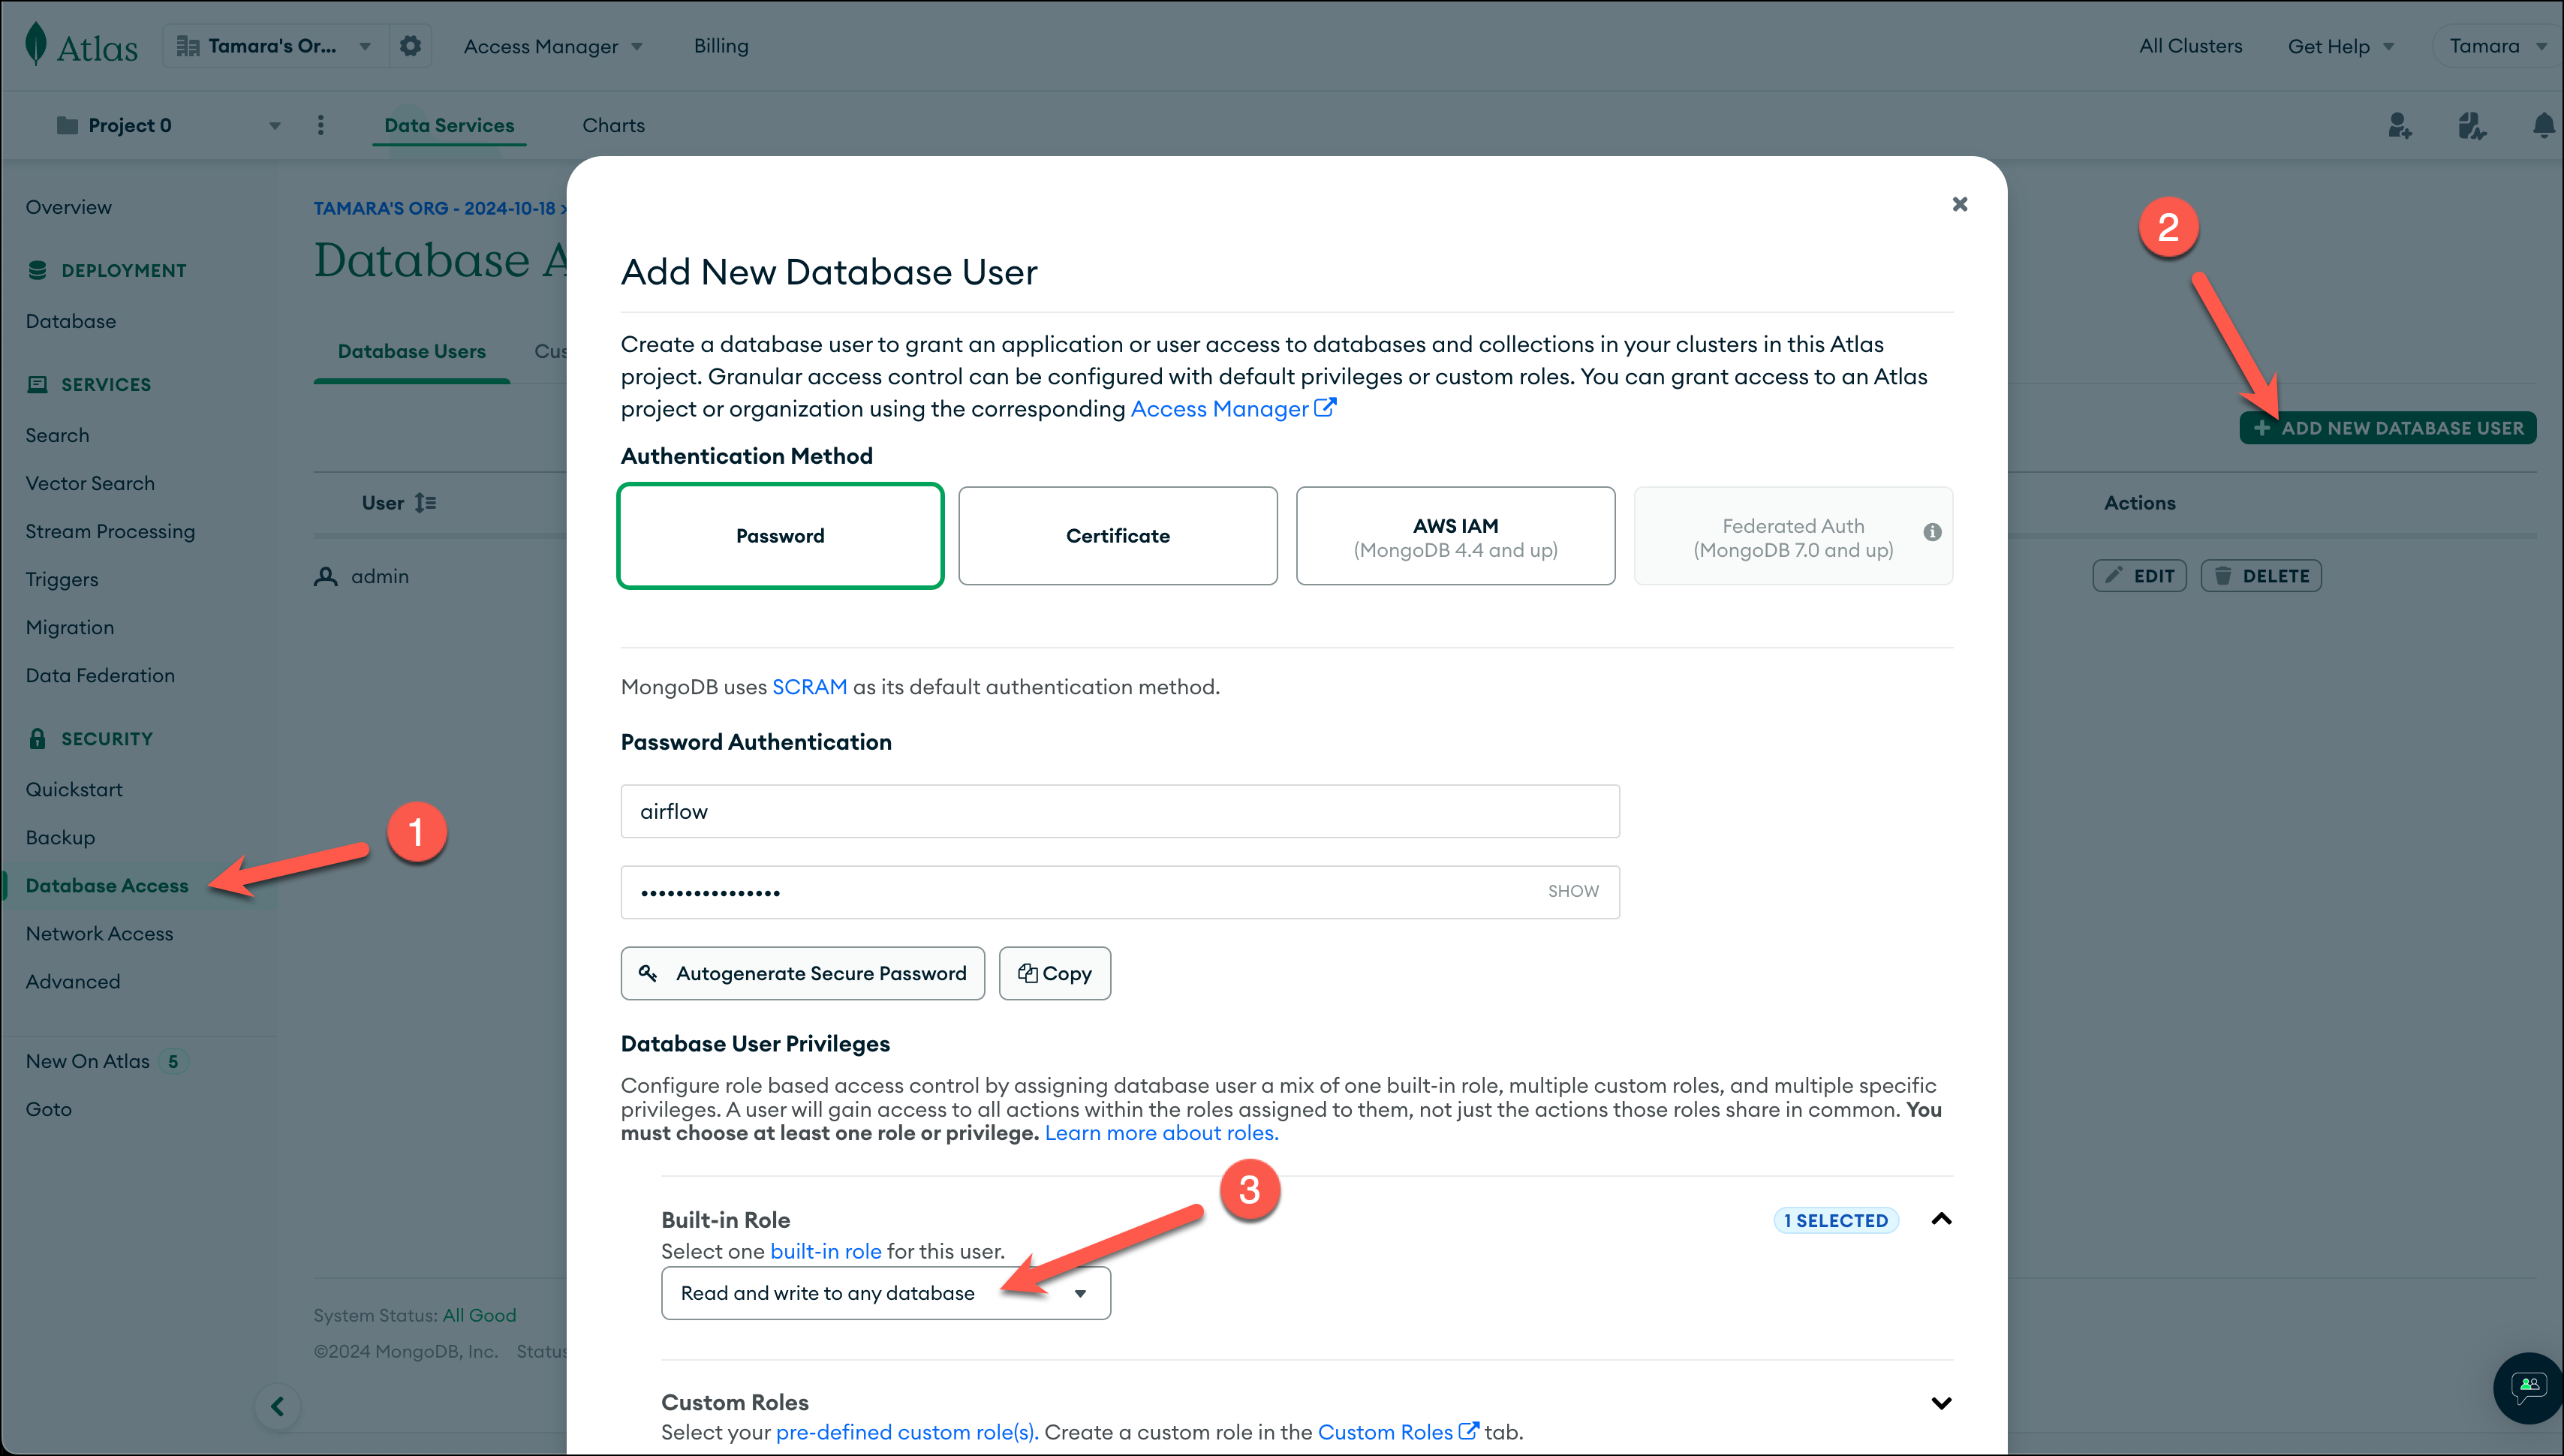
In your MongoDB Atlas account under Security, go to Database Access and create a database user with a password. Make sure the user has privileges to write data to the database and to save the password in a secure location, as you will need it later.

-
If you haven’t already done so during your MongoDB setup, go to Security -> Network Access and add your public IP address to the IP access list. You can find your public IP address on Mac and Linux by running
curl ifconfig.co/, or on Windows by runningipconfig /all.
Step 2: Configure your Astro project
Use the Astro CLI to create and run an Airflow project locally.
-
Create a new Astro project:
-
Add the following lines to the
requirements.txtfile of your Astro project:This installs the Mongo provider package that contains all of the relevant MongoDB modules for Airflow, as well as the OpenAI package for embedding text data.
-
In the
.envfile add the following environment variables:Replace
<your openai api key>with your OpenAI API key and<your_cluster>,<your_user>, and<your_password>with your MongoDB Atlas cluster name, database user, and database user password created in Step 1. You can find your MongoDB Atlas cluster name in the Atlas UI by clicking on Connect in your cluster overview.
Info
The
AIRFLOW_CONN_MONGODB_DEFAULTenvironment variable is used to create a connection to your MongoDB cluster in Airflow with the connection IDmongodb_default. In the MongoDB Airflow provider version 4.2.2 and later, it is also possible to set the connection in the Airflow UI. To do so, provide the following connection details:
- Connection Id:
mongodb_default- Connection Type:
MongoDB- Host:
<your_cluster>.<identifier>.mongodb.net(for example:mycluster.abcde.mogodb.net)- Login:
<your_user>- Password:
<your_password>- Extra Fields JSON:
{"srv": "true", "ssl": "true"}While leaving all other fields blank.
Step 3: Add your data
The DAG in this tutorial runs a query on vectorized game descriptions.
Create a new file called games.txt in the include directory, then copy and paste the following information:
Step 4: Create your DAG
In your Astro project dags folder, create a new file called query_game_vectors.py. Paste the following code into the file:
This DAG consists of thirteen tasks to make a simple ML orchestration pipeline.
- First, the
check_for_collectiontask checks if thegames_nostalgiacollection already exists in thegamesdatabase. If it does, the collection creation is skipped, if not, the collection is created by thecreate_collectiontask. - Once the collection is ready, a similar pattern is used to create a search index
find_me_a_gameif it does not already exist. - Simultaneously, the game descriptions are being ingested in an ETL pipeline where the transformation includes the creating of vector embeddings using OpenAI’s
text-embedding-3-smallmodel. The embeddings are then stored in thegames_nostalgiacollection alongside the game data. - After the search index is ready and the data is ingested, the custom sensor
wait_for_full_indexingmakes sure the search index is fully built before thequerytask is triggered. - Finally, the
querytask queries thegames_nostalgiacollection for the game with the most similar description to the concepts provided in the Airflow params dictionary.

Step 5: Run the DAG and review the data
Now you can run the DAG manually to find a game to play!
-
Run
astro dev startin your Astro project to start Airflow and open the Airflow UI atlocalhost:8080. Log in withadminas the username and password. -
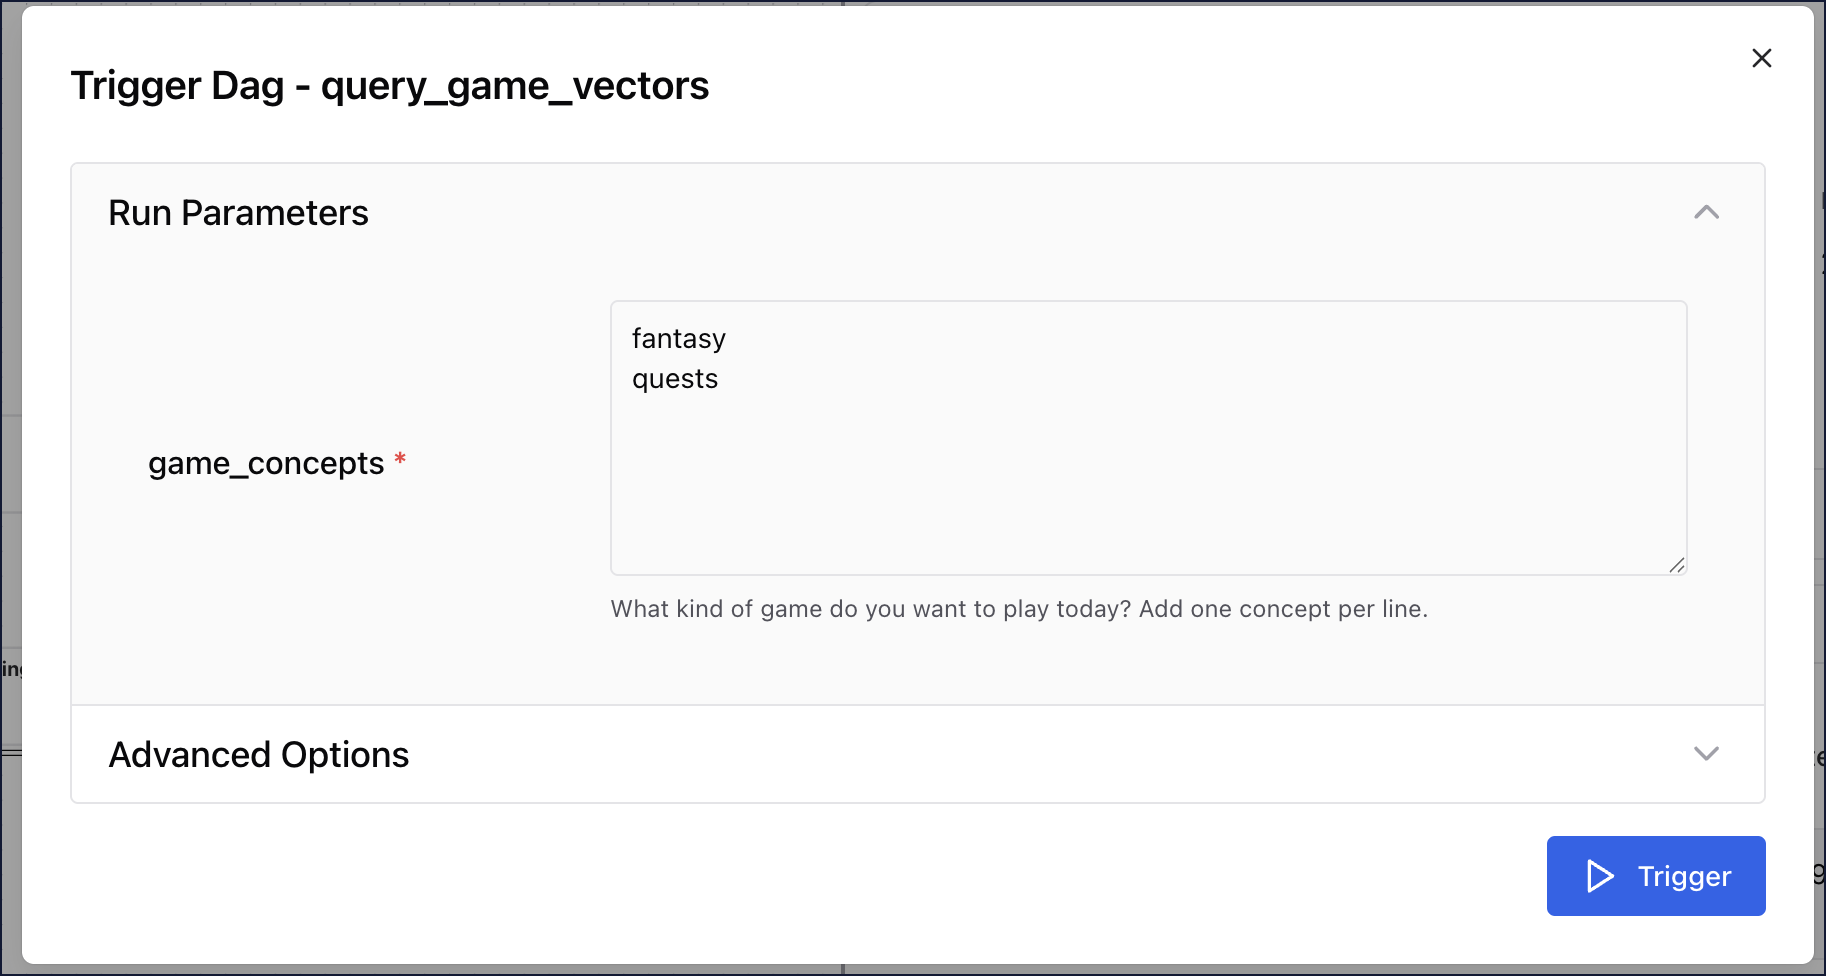
In the Airflow UI, run the
query_game_vectorsDAG by clicking the play button. Then, provide Airflow params forgame_concepts.
-
After the DAG completes successfully, go to the task logs of the
querytask to see the game with the most similar description to the concepts you provided.
Conclusion
Congratulations! You used Airflow and MongoDB to get a game suggestion! You can now use Airflow to orchestrate MongoDB operations in your own pipelines.