Apache Airflow® components
Apache Airflow® components
When working with Apache Airflow®, understanding the underlying infrastructure components and how they function can help you develop and run your DAGs, troubleshoot issues, and successfully run Airflow.
In this guide, you’ll learn about the core components of Airflow.
There were significant changes to the Airflow architecture between Airflow 2 and Airflow 3, greatly improving Airflow’s security posture and enabling new features such as remote execution. The most important impact of those changes for DAG authors is that directly accessing the metadata database from within Airflow tasks isn’t possible anymore. See the Upgrade from Apache Airflow® 2 to 3 guide and the Airflow release notes for more information.
Assumed knowledge
To get the most out of this guide, you should have an understanding of:
- Basic Airflow concepts. See Introduction to Apache Airflow.
Core components
The following are the core components of Airflow:
- Scheduler: The scheduler is the heart of Airflow. It monitors all tasks and DAGs and schedules task instances to run as soon as their dependencies are fulfilled. When creating a new DAG run, the scheduler always picks the latest version of that DAG. When a task is ready to run, the scheduler uses its configured executor to run the task on a worker.
- API server: A FastAPI server that serves the Airflow UI, as well as three APIs:
- An API for workers to interact with when running task instances.
- An internal API for the Airflow UI that provides updates on dynamic UI components such as the state of task instances and DAG runs.
- The public Airflow REST API that users can interact with.
- DAG processor: The DAG processor is responsible for retrieving and parsing the files from the location determined by the configured DAG bundle(s).
- Metadata database: The Airflow metadata database stores information vital to Airflow’s functioning, such as Airflow connections, serialized DAGs, and XCom information. It also contains the history of previous DAG runs and task instances alongside metadata about their states. The most common backend used for the Airflow metadata database is PostgreSQL. See the Airflow documentation for supported versions.
- Triggerer: A separate process which supports running asynchronous Python functions as part of trigger classes. The triggerer is needed to use deferrable operators and event-driven scheduling.
If you run Airflow locally using the Astro CLI, you’ll notice that when you start Airflow using astro dev start, it will spin up five containers, one for each of the core components.
In addition to these core components, one or more workers can be spun up. The type of workers used depends on the configured executor of the scheduler.
Component interaction
The following diagram shows how the core components interact with each other:
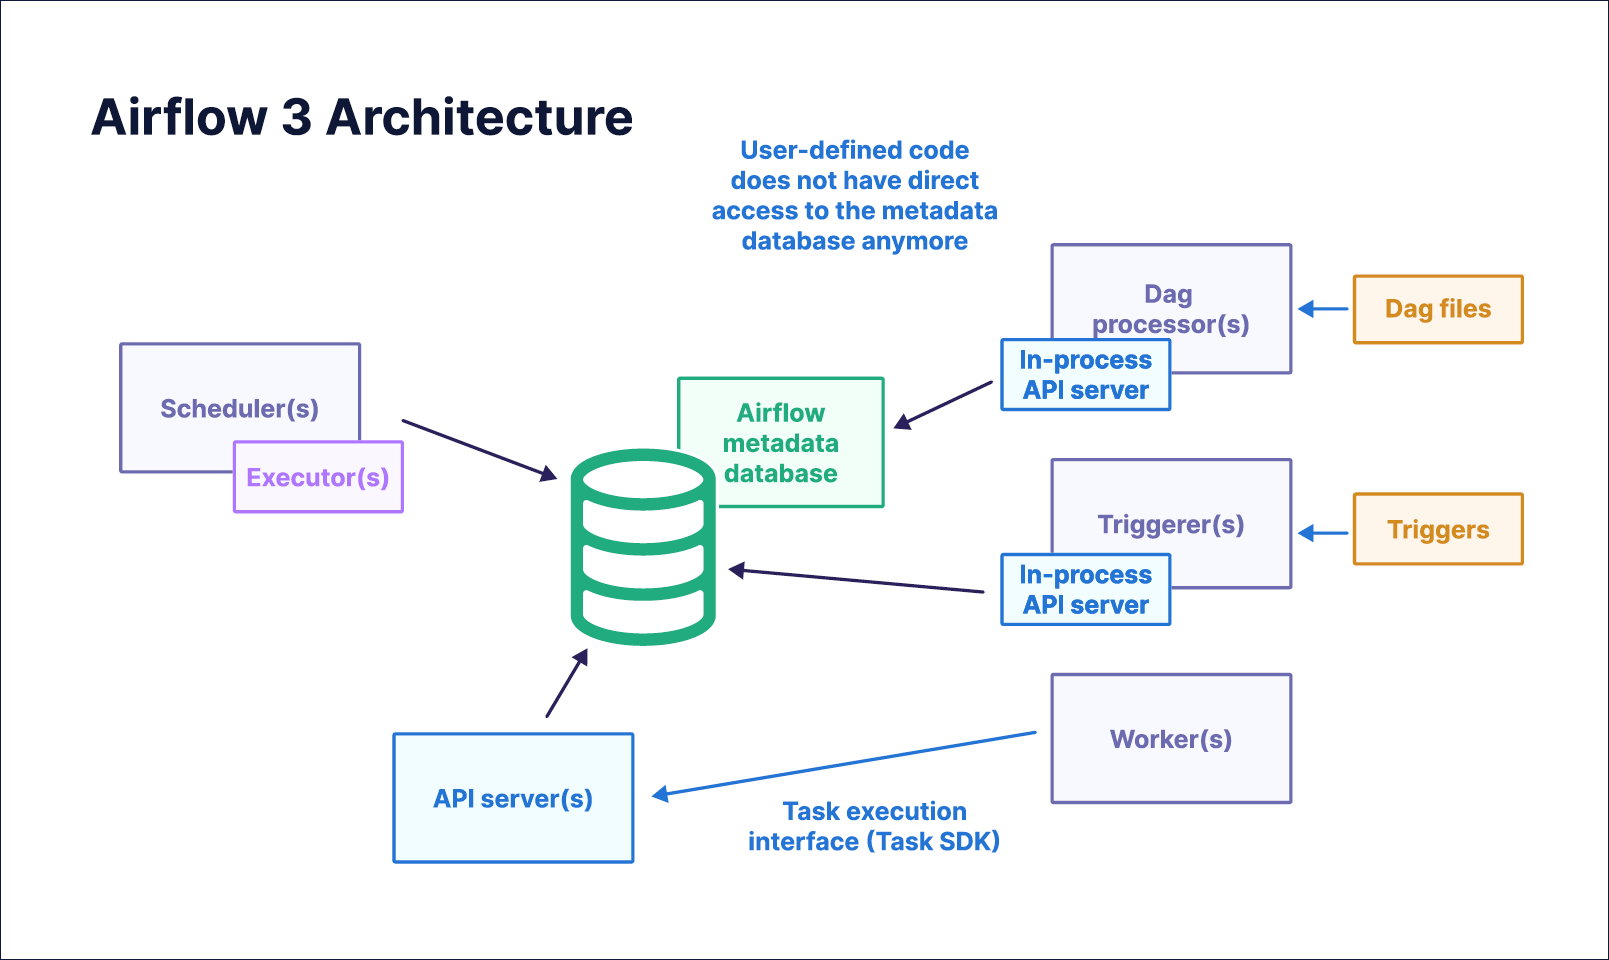
On a high level, this is what happens when you add a simple new DAG to your Airflow environment:
- The DAG is parsed by the DAG processor, which stores a serialized version of it in the Airflow metadata database.
- The scheduler checks the serialized DAGs to determine whether any DAG is eligible for execution based on its defined schedule. This process includes checking the schedules against the current time and checking for information such as updates to assets or events fired by AssetWatchers.
- When the scheduler determines that a DAG is ready for its next run, its configured executor decides how and where to run the first task instance(s) of the DAG run.
- Next, the task instance(s) are scheduled and subsequently queued. The workers poll the queue for any queued task instances they can run.
- The worker who picked up the task instance runs it, and metadata such as the task instance status or XCom is sent from the worker via the API server to be stored in the Airflow metadata database. If the task needs any information, such as an Airflow connection, the worker sends a request to the API server for this information. The API server retrieves the details from the Airflow metadata database and hands them back to the worker. As the task instance is running, the worker writes task instance logs directly to the defined log storage location.
- Some of this information, such as the task instance status, is in turn important for the scheduler. It monitors all DAGs and, as soon as their dependencies are fulfilled, schedules task instances to run.
- The scheduler needs the status of the task instances in the DAG to determine which other task instances now fulfill their dependencies and can be scheduled to run. While this process is going on in the background, the Airflow UI, served by the API server, displays information about the current DAG and task statuses that it retrieves from the Airflow metadata database.
Manage Airflow infrastructure
All Airflow components should be run on an infrastructure that is appropriate for the requirements of your organization. For example, using the Astro CLI to run Airflow on a local computer can be helpful when testing and for DAG development, but it is insufficient to support running DAGs in production.
The following resources can help you manage Airflow components:
- OSS Production Docker Images
- OSS Official Helm Chart
- Managed Airflow on Astro. A free trial of Astro is available.
Scalability is also an important consideration when setting up your production Airflow environment. See Scaling out Airflow.
High availability
Airflow can be made highly available, which makes it suitable for large organizations with critical production workloads. Running multiple Scheduler replicas in an active-active model makes Airflow more performant and resilient, eliminating a single point of failure within your Airflow environment.
In Astro, you can configure high availability when creating a new deployment by enabling the High Availability toggle switch in the UI or by setting isHighAvailability to true using the API or Terraform.