

Intro to Airflow tutorial: Get started and run your first pipeline
Intro to Airflow tutorial: Get started and run your first pipeline
This tutorial will get you started as quickly as possible while explaining the core concepts of Apache Airflow. You will explore galaxies 🌌 while extending an existing workflow with modern Airflow features, setting you up for diving into the world of data orchestration with Apache Airflow.
No matter if you are an absolute Airflow beginner or already know about certain concepts, in 5 minutes from now, you will have your first data pipeline (a Dag) running in a fully functional Airflow environment.
Get a fully functional Airflow environment running in your browser with zero local setup using Astro IDE.
Create and run an ETL pipeline that processes galaxy data with extraction, transformation, and loading steps.
Learn Dags, tasks, operators, dependencies, and asset-aware scheduling through hands-on practice.
Step 1: Set up your Astro trial and Astro IDE
-
The first step is to start a free Astro trial.
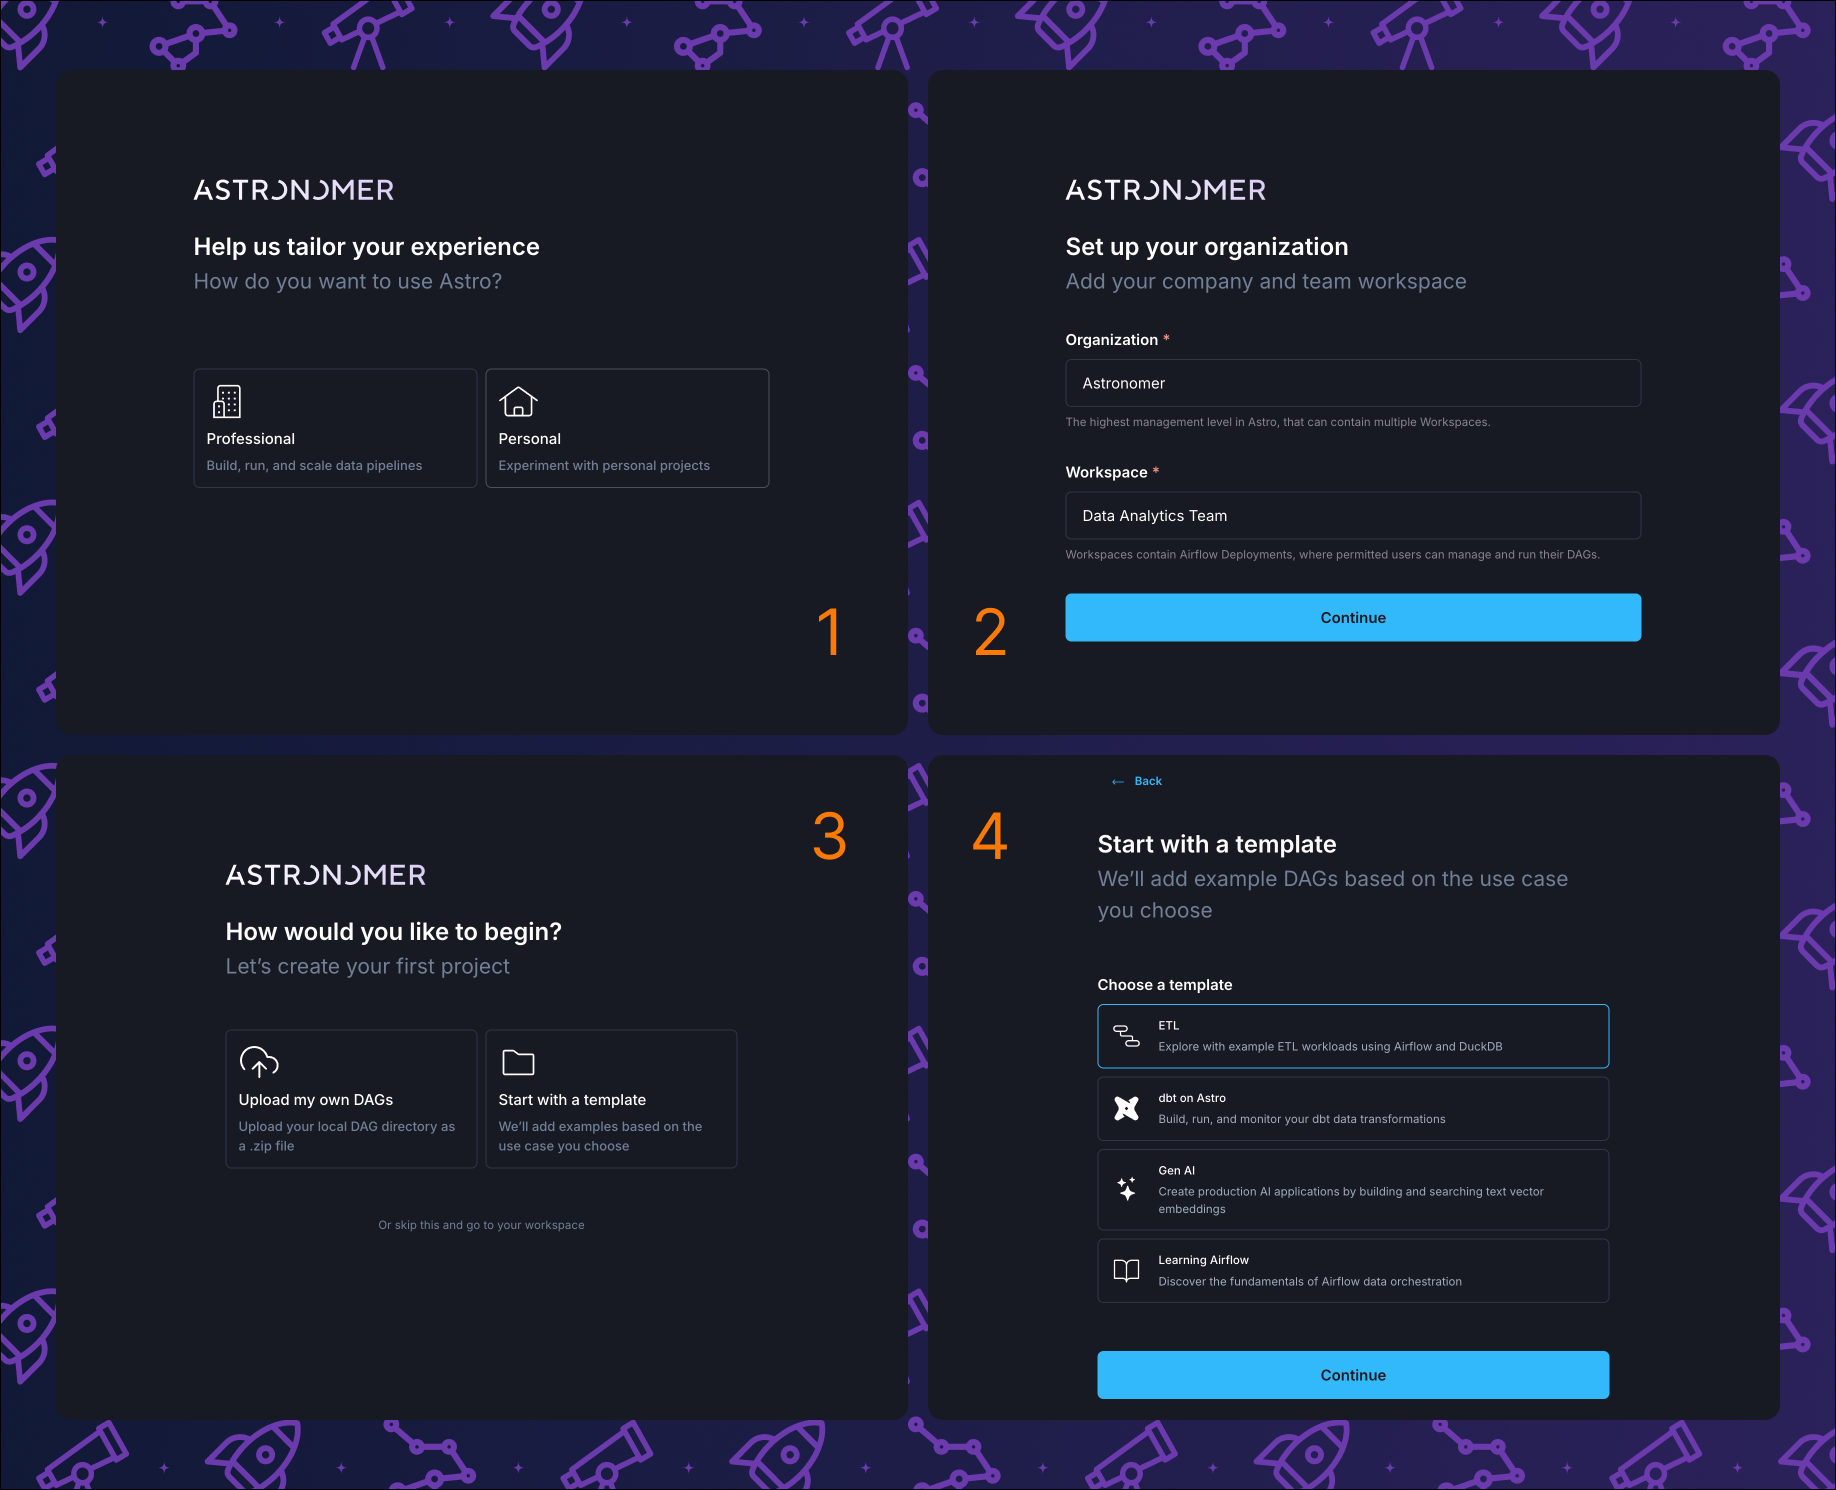
All Astro accounts have access to the Astro IDE, which is the easiest way to develop Airflow Dags right in your browser. You can directly deploy your Dags from the Astro IDE to an Astro Deployment, an Airflow environment running in the cloud. After entering your email address, starting the trial includes 4 steps:
- Choose between professional and personal. The choice has no impact on this tutorial.
- Enter an organization and workspace name. Each customer has a dedicated organization on Astro. Each team or project has a workspace, which is a collection of deployments. A deployment is an Airflow environment hosted on Astro. For this tutorial, you can use any names.
- You can choose to upload Dags, use a template, or start with an empty workspace. For this tutorial, choose Start with a template.
- Choose the ETL template.
Astro Concepts
- Astro: Fully-managed platform that helps teams write and run data pipelines with Airflow at any scale.
- Astro IDE: In-browser IDE with context-aware AI and zero local setup.
- Organization: Each customer has a dedicated org on Astro.
- Workspace: Each team or project has a dedicated workspace, containing a collection of deployments.
- Deployment: Airflow environment hosted on Astro.
- Summary: 1 Organization → n Workspace → n Deployment → 1 Airflow instance.
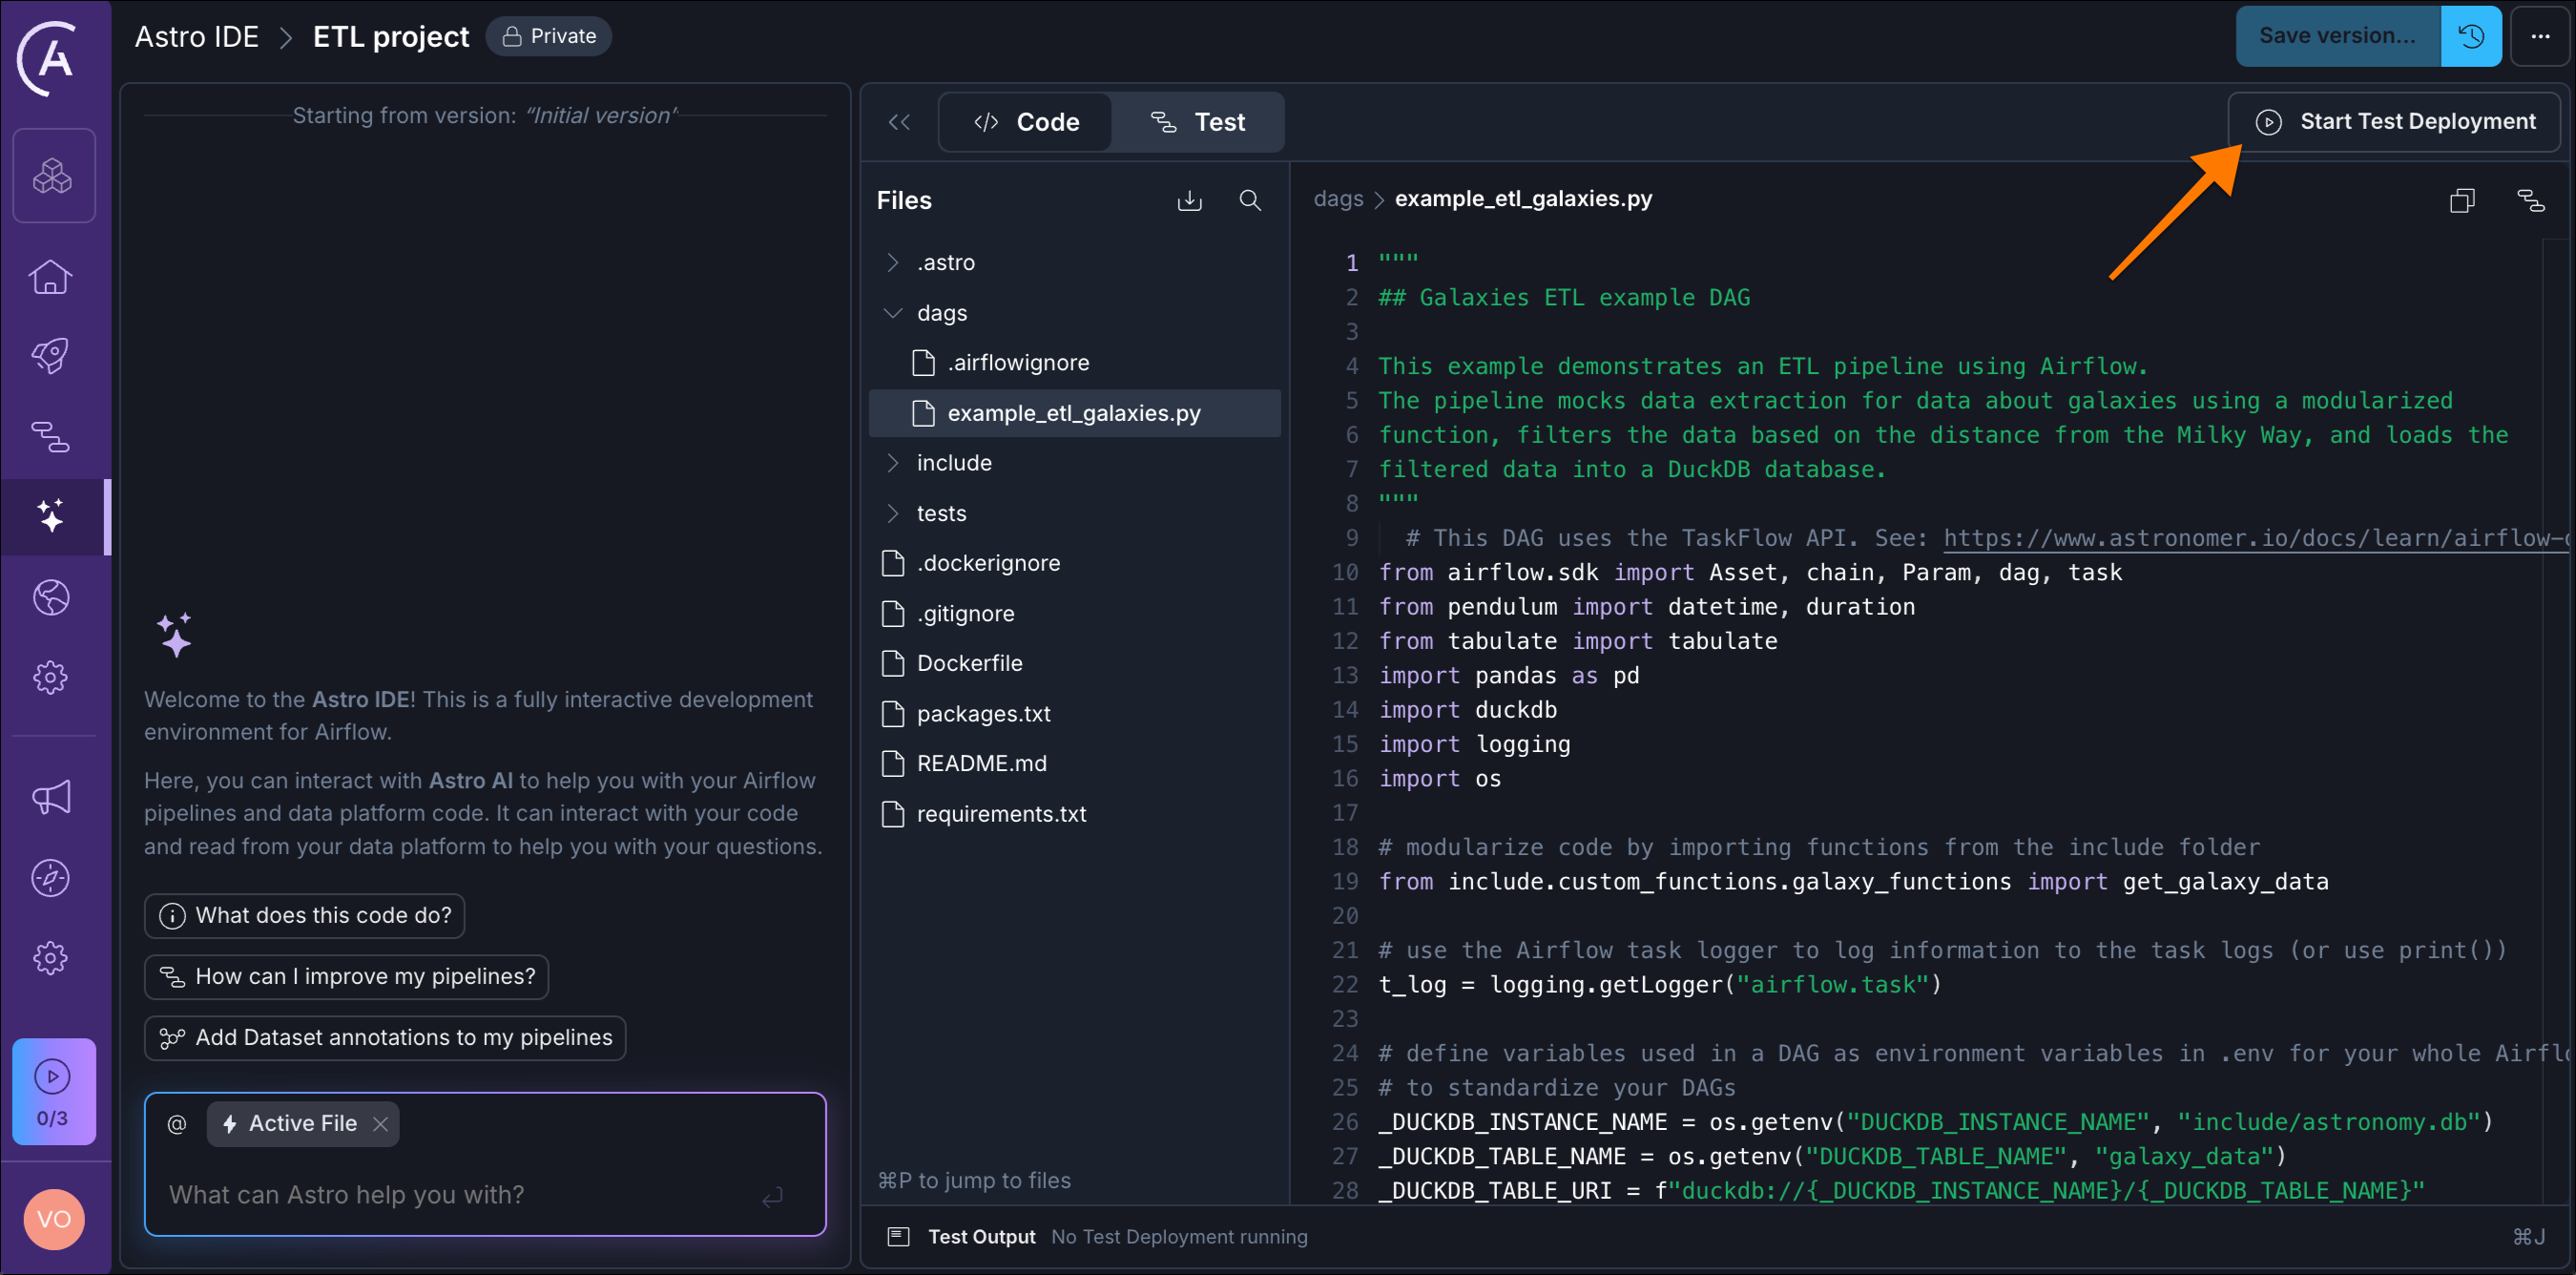
After your environment is created, you’ll find yourself in the Astro IDE with your very first ETL Dag, ready to be deployed. The Python code is a programmatic representation of your workflow. Clicking Start Test Deployment in the top right starts a fully functional Airflow environment and deploys your code.
-
Click Start Test Deployment and wait for the deployment to finish.
-
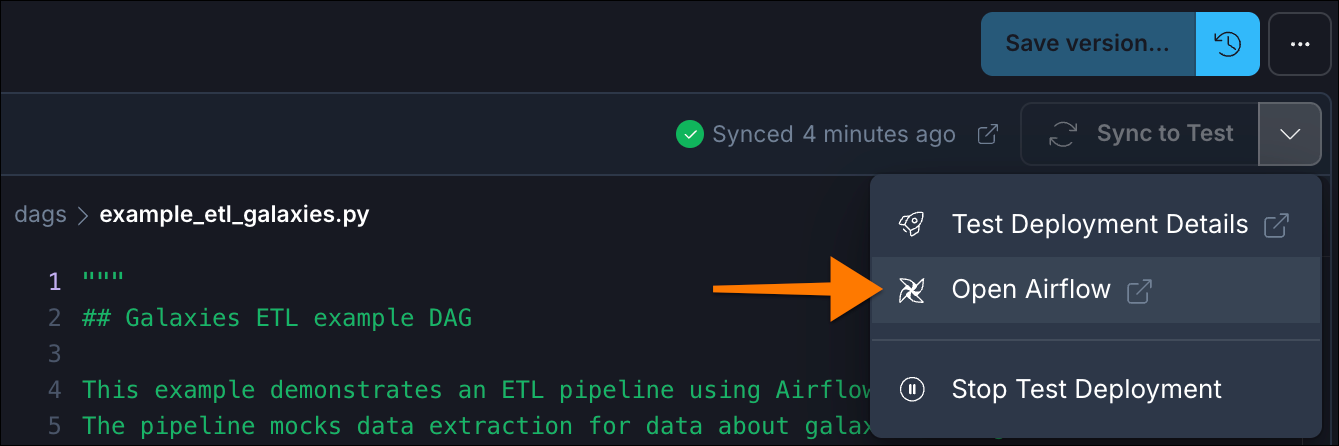
Your first Airflow Dag is deployed and ready to be executed. Click the dropdown menu next to Sync to Test and select Open Airflow.
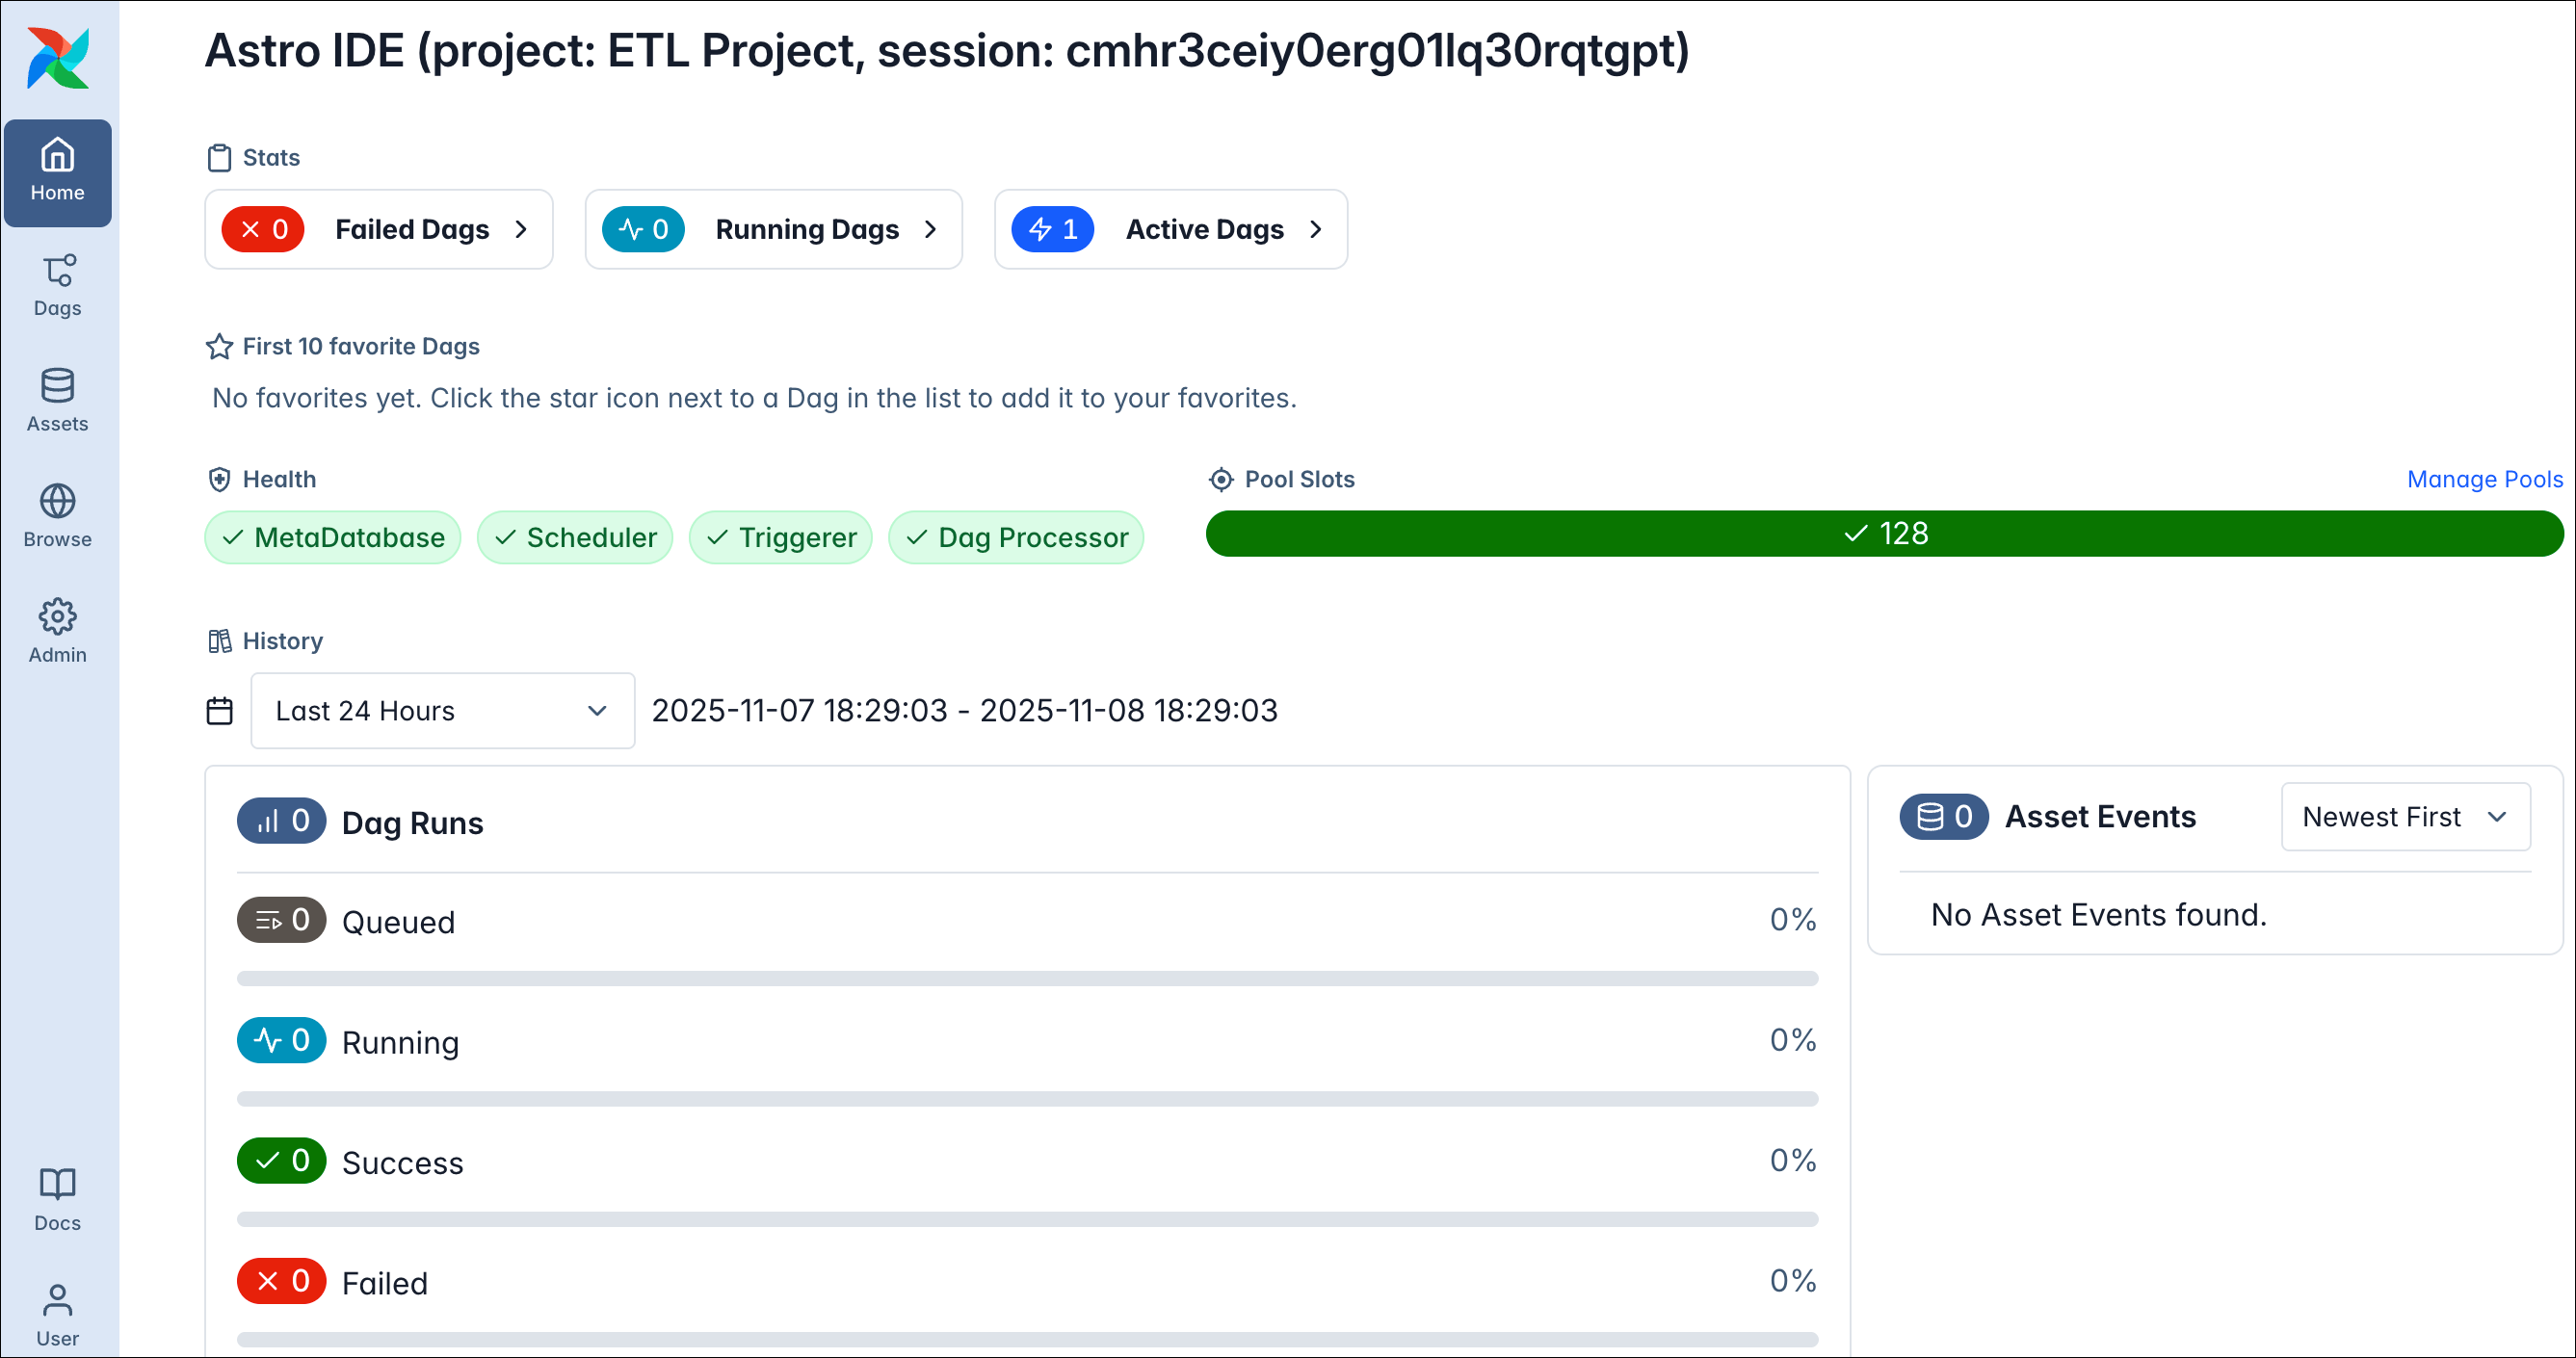
The Airflow UI home dashboard of your Airflow instance will open in a new browser tab.
Step 2: Run your first Dag
-
Within the navbar on the left, click Dags.
This view shows all your Dags defined in your Python code. The ETL template comes with one Dag named
example_etl_galaxies.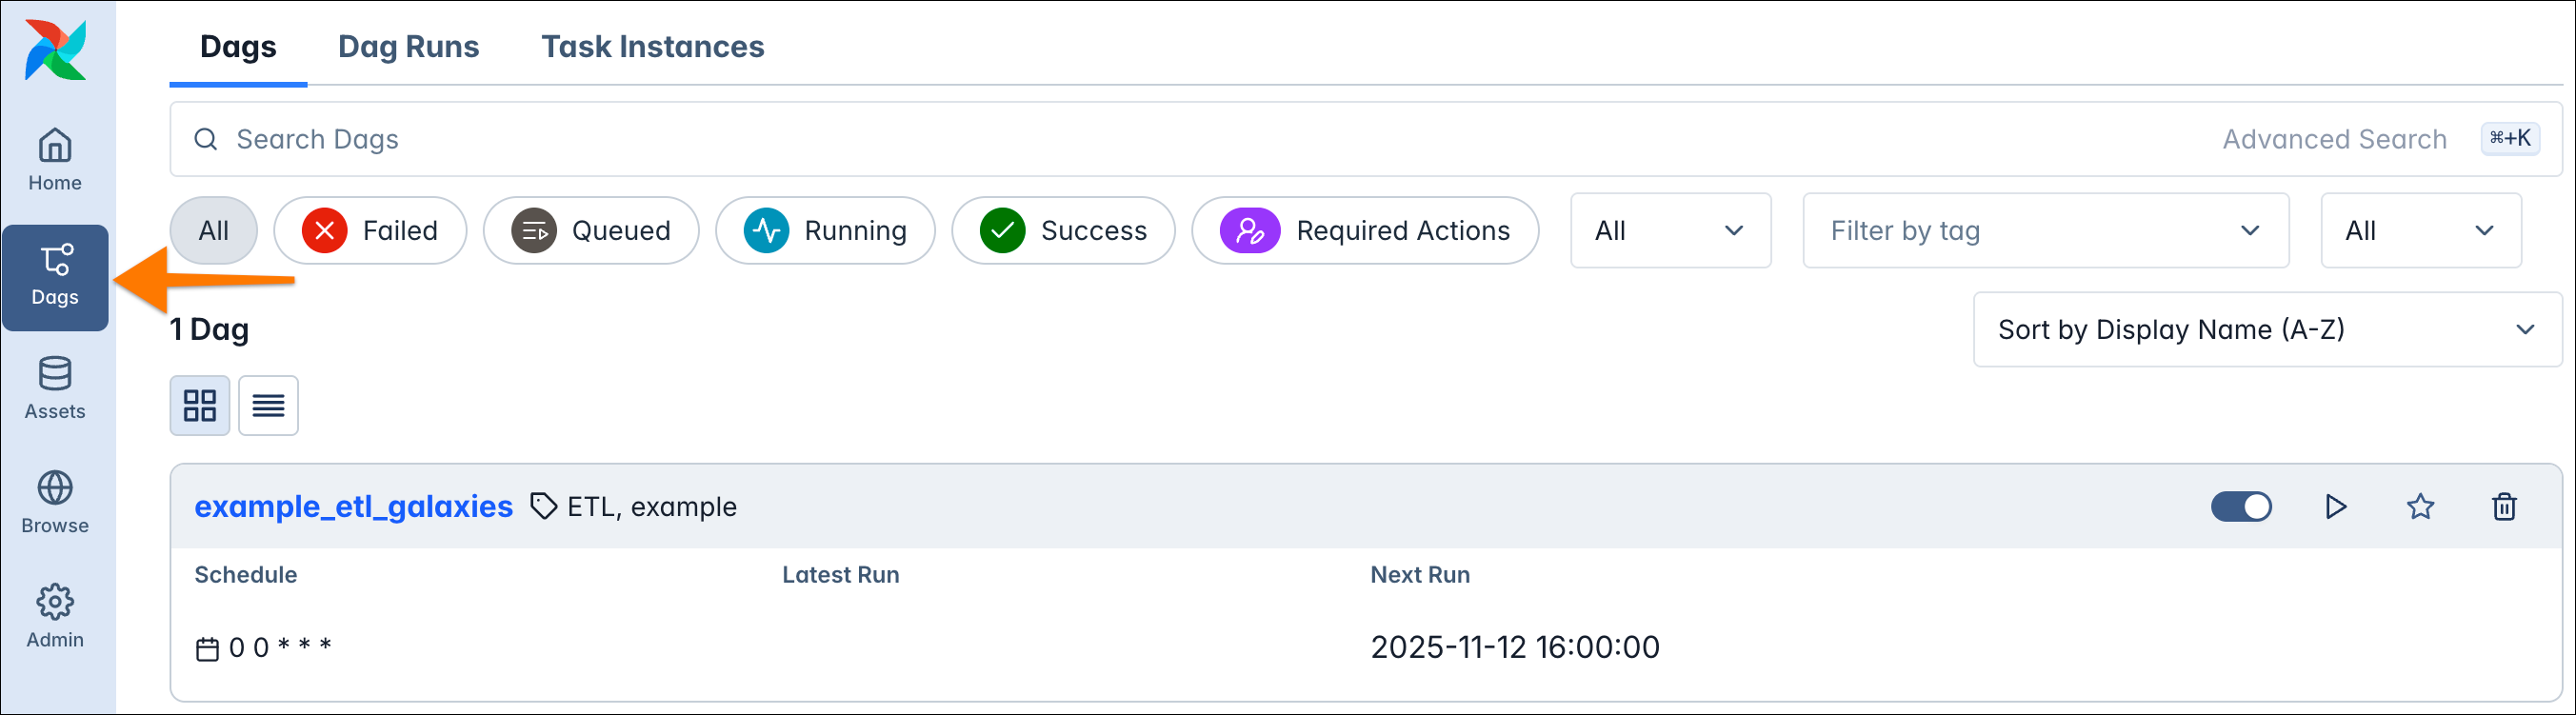
This ETL (Extract, Transform, Load) pipeline retrieves data about galaxies, filters them based on their distance from the Milky Way, and stores the results in a DuckDB database.
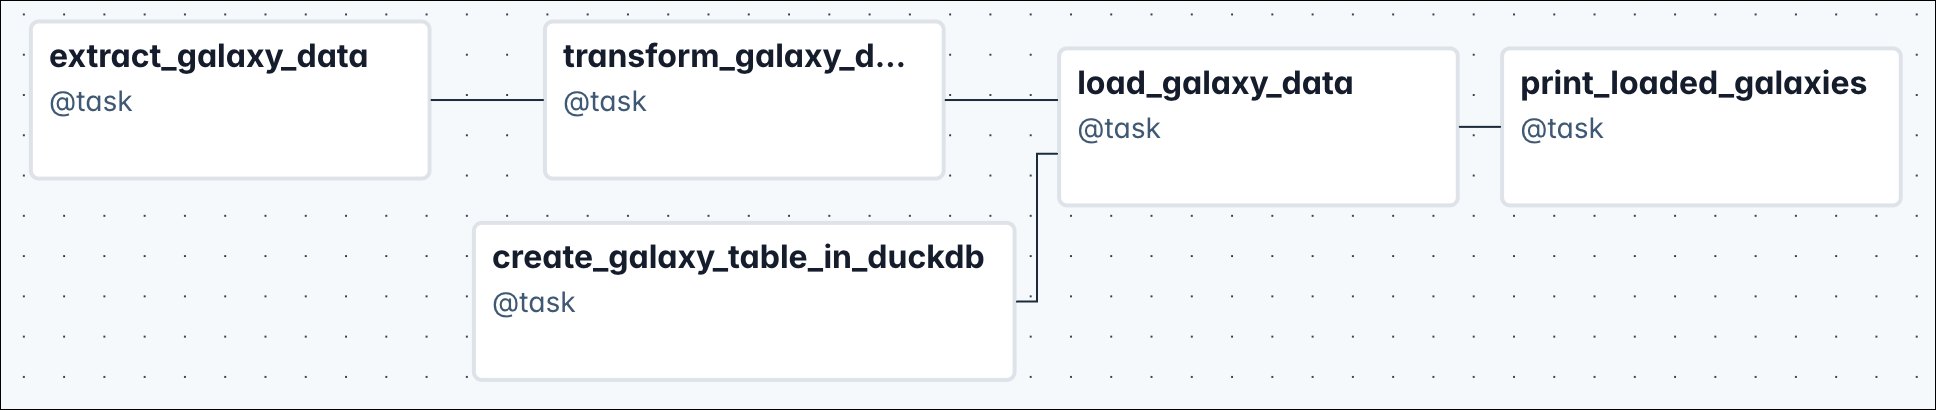
The Dag has these tasks:
create_galaxy_table_in_duckdb: Creates a table in DuckDB with columns for galaxy name, distances, type, and characteristics.extract_galaxy_data: Retrieves raw data about 20 galaxies and returns it as a pandas DataFrame.transform_galaxy_data: Filters the galaxy data to keep only galaxies within a specified distance from the Milky Way (default: 500,000 light years).load_galaxy_data: Inserts the filtered galaxy data into the DuckDB table and produces an Airflow Asset update.print_loaded_galaxies: Queries and prints all stored galaxies from DuckDB, sorted by distance from the Milky Way.
The tasks have these dependencies:
create_galaxy_table_in_duckdb→load_galaxy_data(table must exist before loading)extract_galaxy_data→transform_galaxy_data(raw data is needed for filtering)transform_galaxy_data→load_galaxy_data(filtered data is needed for loading)load_galaxy_data→print_loaded_galaxies(data must be loaded before printing)
-
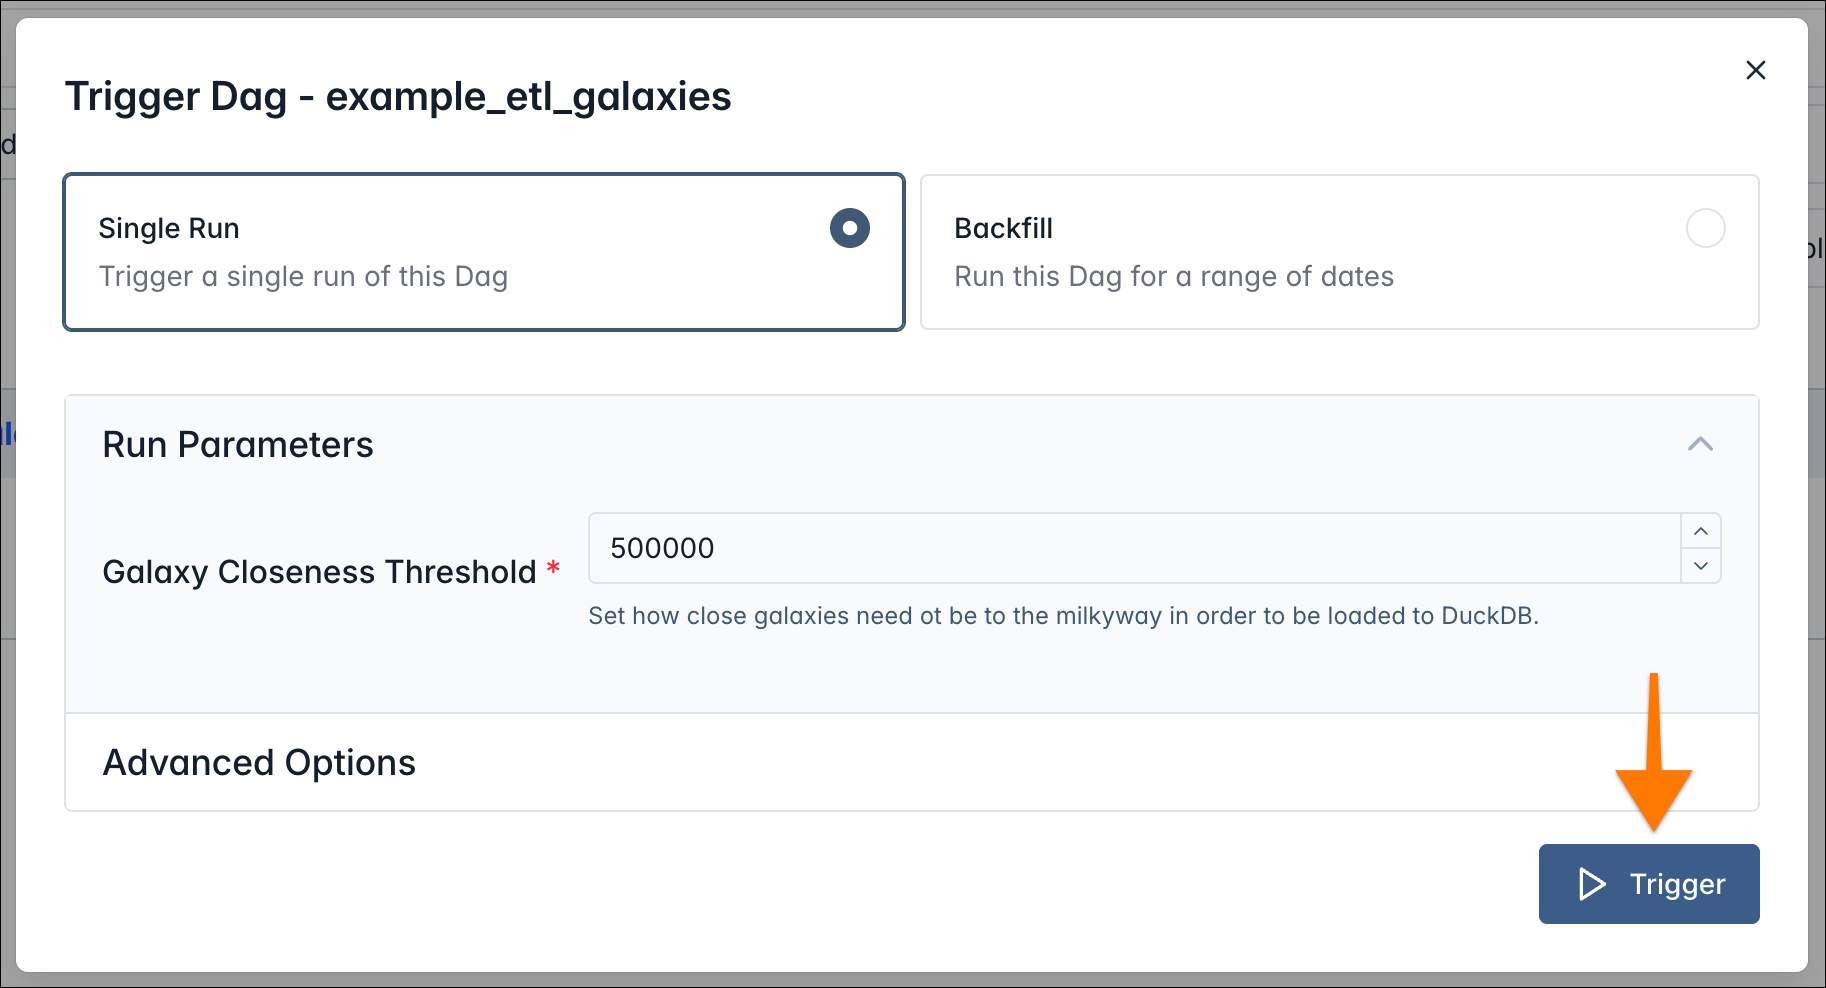
Run the pipeline by clicking Play next to the Dag.

This opens a trigger dialog, allowing you to trigger a single run or a backfill to process a range of dates right from the UI. Dags can also have parameters that can be used within the implementation to keep certain parts of your pipeline configurable.
-
Select Single Run, keep the parameters at their defaults, and click Trigger.
Your Dag starts, and under Latest Run in the Dags view you’ll see the current running instance of it.
-
Click that run date to go to the individual Dag run view.
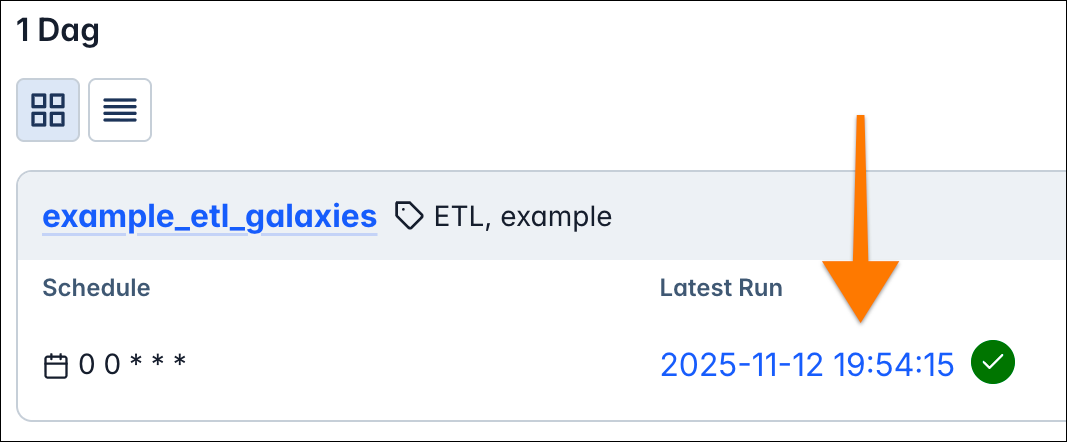
Watch how the Dag run finishes and explore the grid and graph views (buttons on the top left), two different representations of your pipeline.
-
After all tasks have finished successfully, open the grid view and click the
print_loaded_galaxiestask, the last step in your pipeline graph.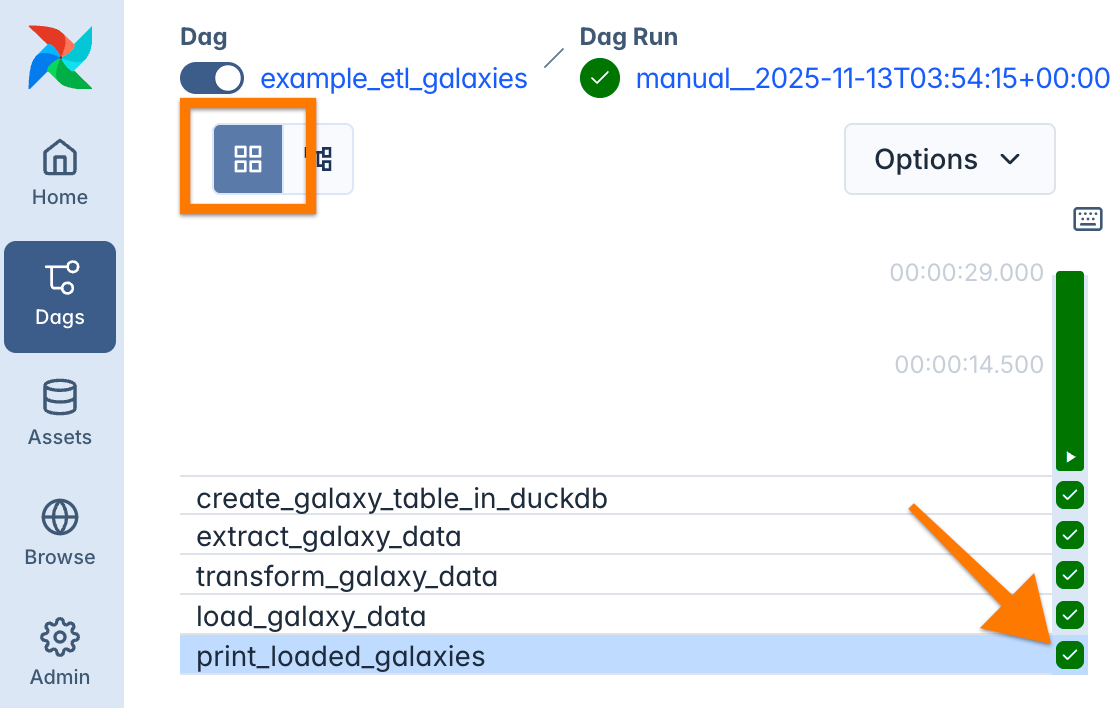
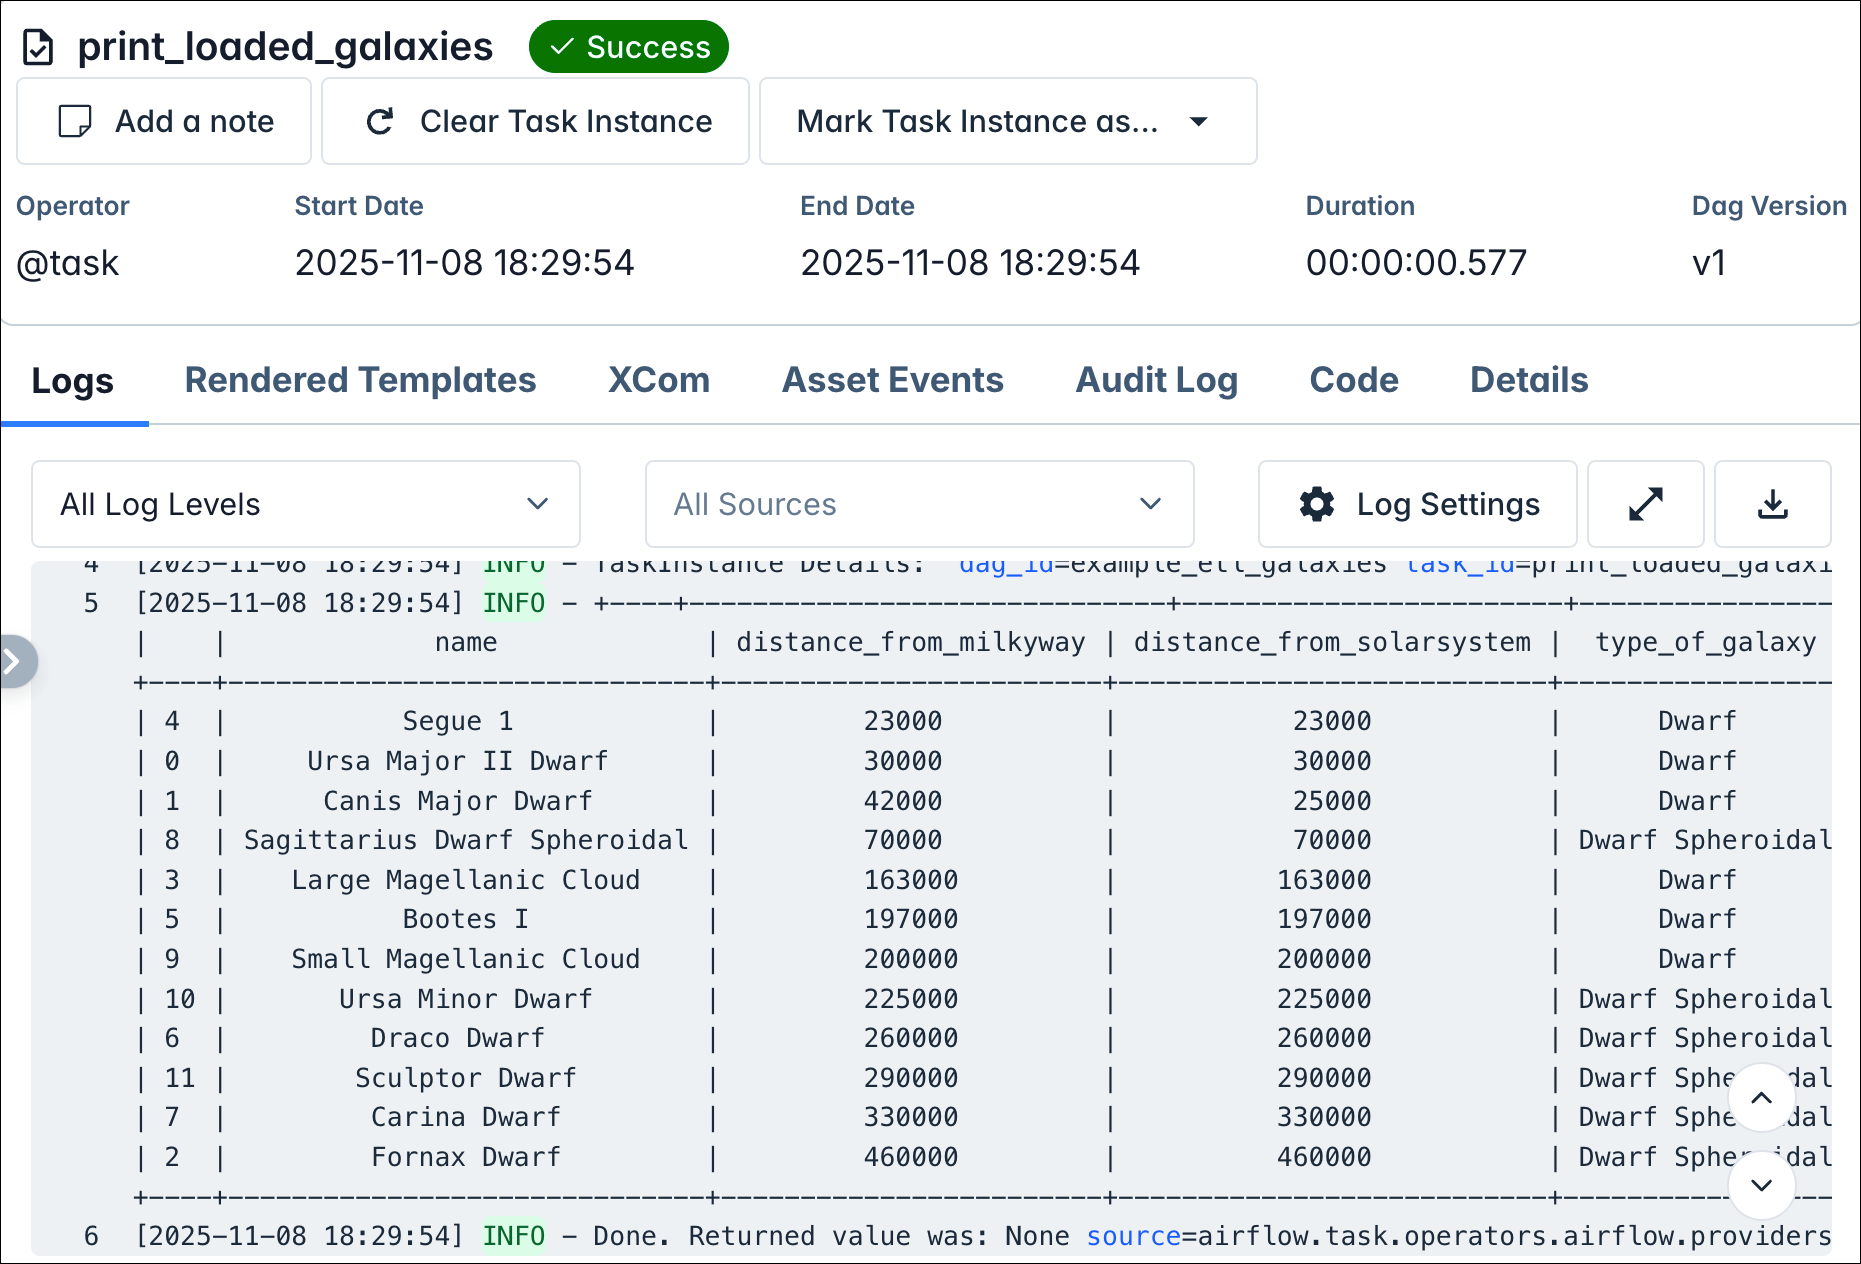
This opens the logs of this task instance, showing a table of galaxies with their distance from the Milky Way and from the solar system, as well as the type of galaxy.
You just set up your Airflow development environment, started your first Airflow environment, and deployed and ran your first Dag. Take a moment to check the time and see how quickly you got there.
Take your time to explore the UI, trigger more runs, check the logs of other tasks, and make yourself familiar with the interface. Feel free to read the Airflow UI guide for a deep dive into its different views and functionality.
Step 3: Understand the basic concepts
After you’ve finished your exploration, switch back to the Astro IDE and have a look at the Python code inside example_etl_galaxies.py. The code contains a lot of comments explaining each step in detail. Here’s an overview before you dive into details.
The Python file contains the following key elements:
- Imports: All modules, classes, and functions needed for your implementation. Always use the Airflow Task SDK by importing from
airflow.sdk, as this is the user-facing SDK. - Constants: Any constants, like the connection string for the DuckDB instance.
- Dag definition: The data pipeline together with settings like its
schedule. - Tasks: The units of work. Tasks should be atomic and idempotent (producing the same result when run multiple times with the same inputs).
- Dependencies: How the tasks are connected, so Airflow knows how to construct the graph.
Airflow Concepts
- Dag: Your entire pipeline from start to finish, consisting of one or more tasks.
- Task: A unit of work within your pipeline.
- Operator/Decorator: The template/class that defines what work a task does, serving as the building blocks of pipelines.
- Traditional:
task = PythonOperator(...)→ returns operator directly. - TaskFlow API:
@task def my_task(): ...→ creates operator, wrapped inXComArg. - Many decorators available:
@task,@task.bash,@task.docker,@task.kubernetes, etc. XComArg: Wrapper enabling automatic data passing and dependency inference.
- Traditional:
Step 4: Extend the demo project
Now that you’ve run your first Dag, extend the project by adding a second Dag that builds on top of the first one.
You’ll create a galaxy_maintenance Dag that allows you to manually enter new galaxy data through an interactive form. The data is automatically added to the database and validated with automated quality checks.
What you’ll learn:
Add provider packages to extend Airflow with new operators and integrations for databases and external systems.
Set up proper Airflow connections to manage credentials and configurations for external tools.
Implement human-in-the-loop workflows that pause for manual data entry and human decision-making.
Use common SQL operators to run parameterized queries across different database systems.
Add automated data quality checks to ensure data integrity throughout your pipelines.
Trigger Dags based on asset-aware scheduling rather than time schedules for data-driven workflows.
By the end of this section, you’ll have a powerful toolbox of concepts to explore Airflow further and confidently jump into your first real-world ETL/ELT project!
Step 4.1: Add provider packages
The example_etl_galaxies Dag currently connects directly to the DuckDB database using:
While this works, Airflow offers a better approach: common SQL operators that execute queries using Airflow connections. This unifies and simplifies SQL workloads across your pipelines. The following steps set this up.
Airflow’s core functionality can be extended with provider packages for specific use cases. This tutorial uses two providers for the DuckDB connection.
-
Open the
requirements.txtfile in the Astro IDE. -
Add the following lines at the bottom:
-
Since you added new dependencies, sync the changes. Click Sync to Test and wait for the changes to be deployed.
Step 4.2: Set up a connection
An Airflow connection stores configuration details for connecting to external tools in your data ecosystem. Most hooks (what is a hook?) and operators that interact with external systems require a connection.
To create the connection:
-
Open Airflow and click Admin in the left navbar
-
Select Connections
-
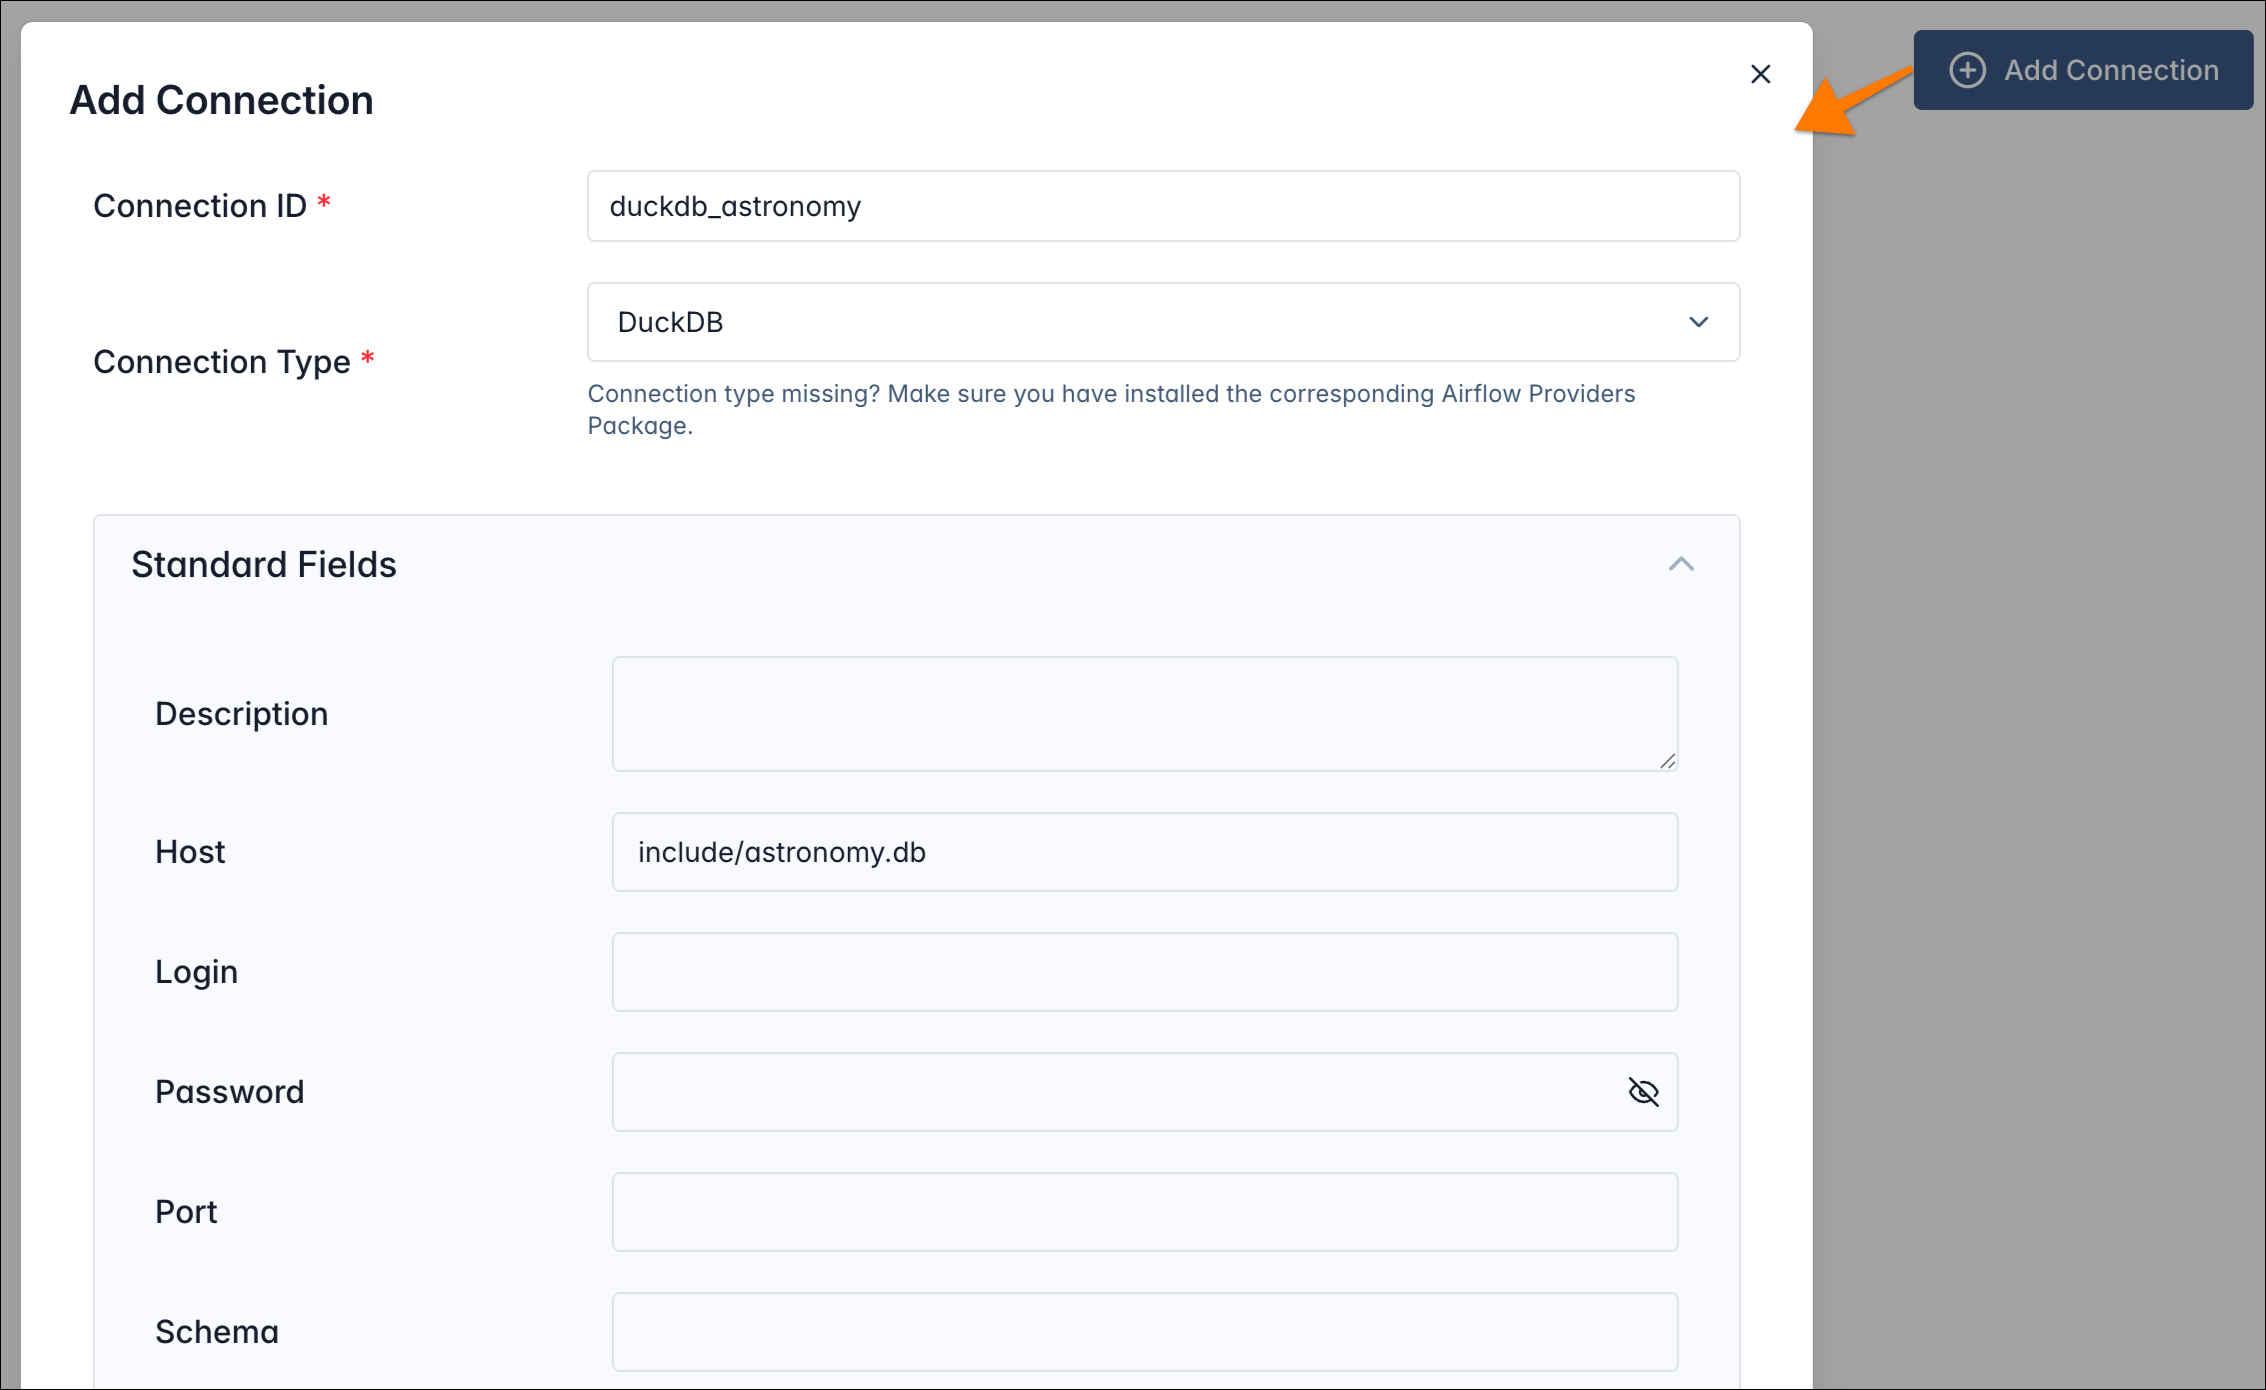
Click Add Connection (top right)
-
Enter the following details:
- Connection ID:
duckdb_astronomy - Connection Type: DuckDB
- Host:
include/astronomy.db - Leave the remaining fields empty.
- Connection ID:
-
Save the connection and you’re now ready to connect! You can find the Airflow task that uses this connection in the example code in Step 4.4.
Astro Concepts
You just added a connection to this deployment (a single Airflow instance). If you deployed your Dags to another environment or recreated the test deployment, you’d need to add the connection again. Astro offers a helpful solution: under Environment → Connections in the Astro platform, you can set up workspace-wide connections that are available across all your Airflow instances. See Manage Airflow connections and variables in the Astro documentation.
Airflow Concepts
- Provider package: Provider packages are installable modules that contain pre-built decorators, operators, hooks, and sensors for integrating with external services and extending Airflow functionality.
- Connection: Connections in Airflow are sets of configurations used to connect with other tools in the data ecosystem.
Step 4.3: Prepare test deployment for advanced usage
The test deployment is a fully functional but minimal Airflow setup. To enable advanced features like asset-aware scheduling (explained later), you need to apply a quick configuration change.
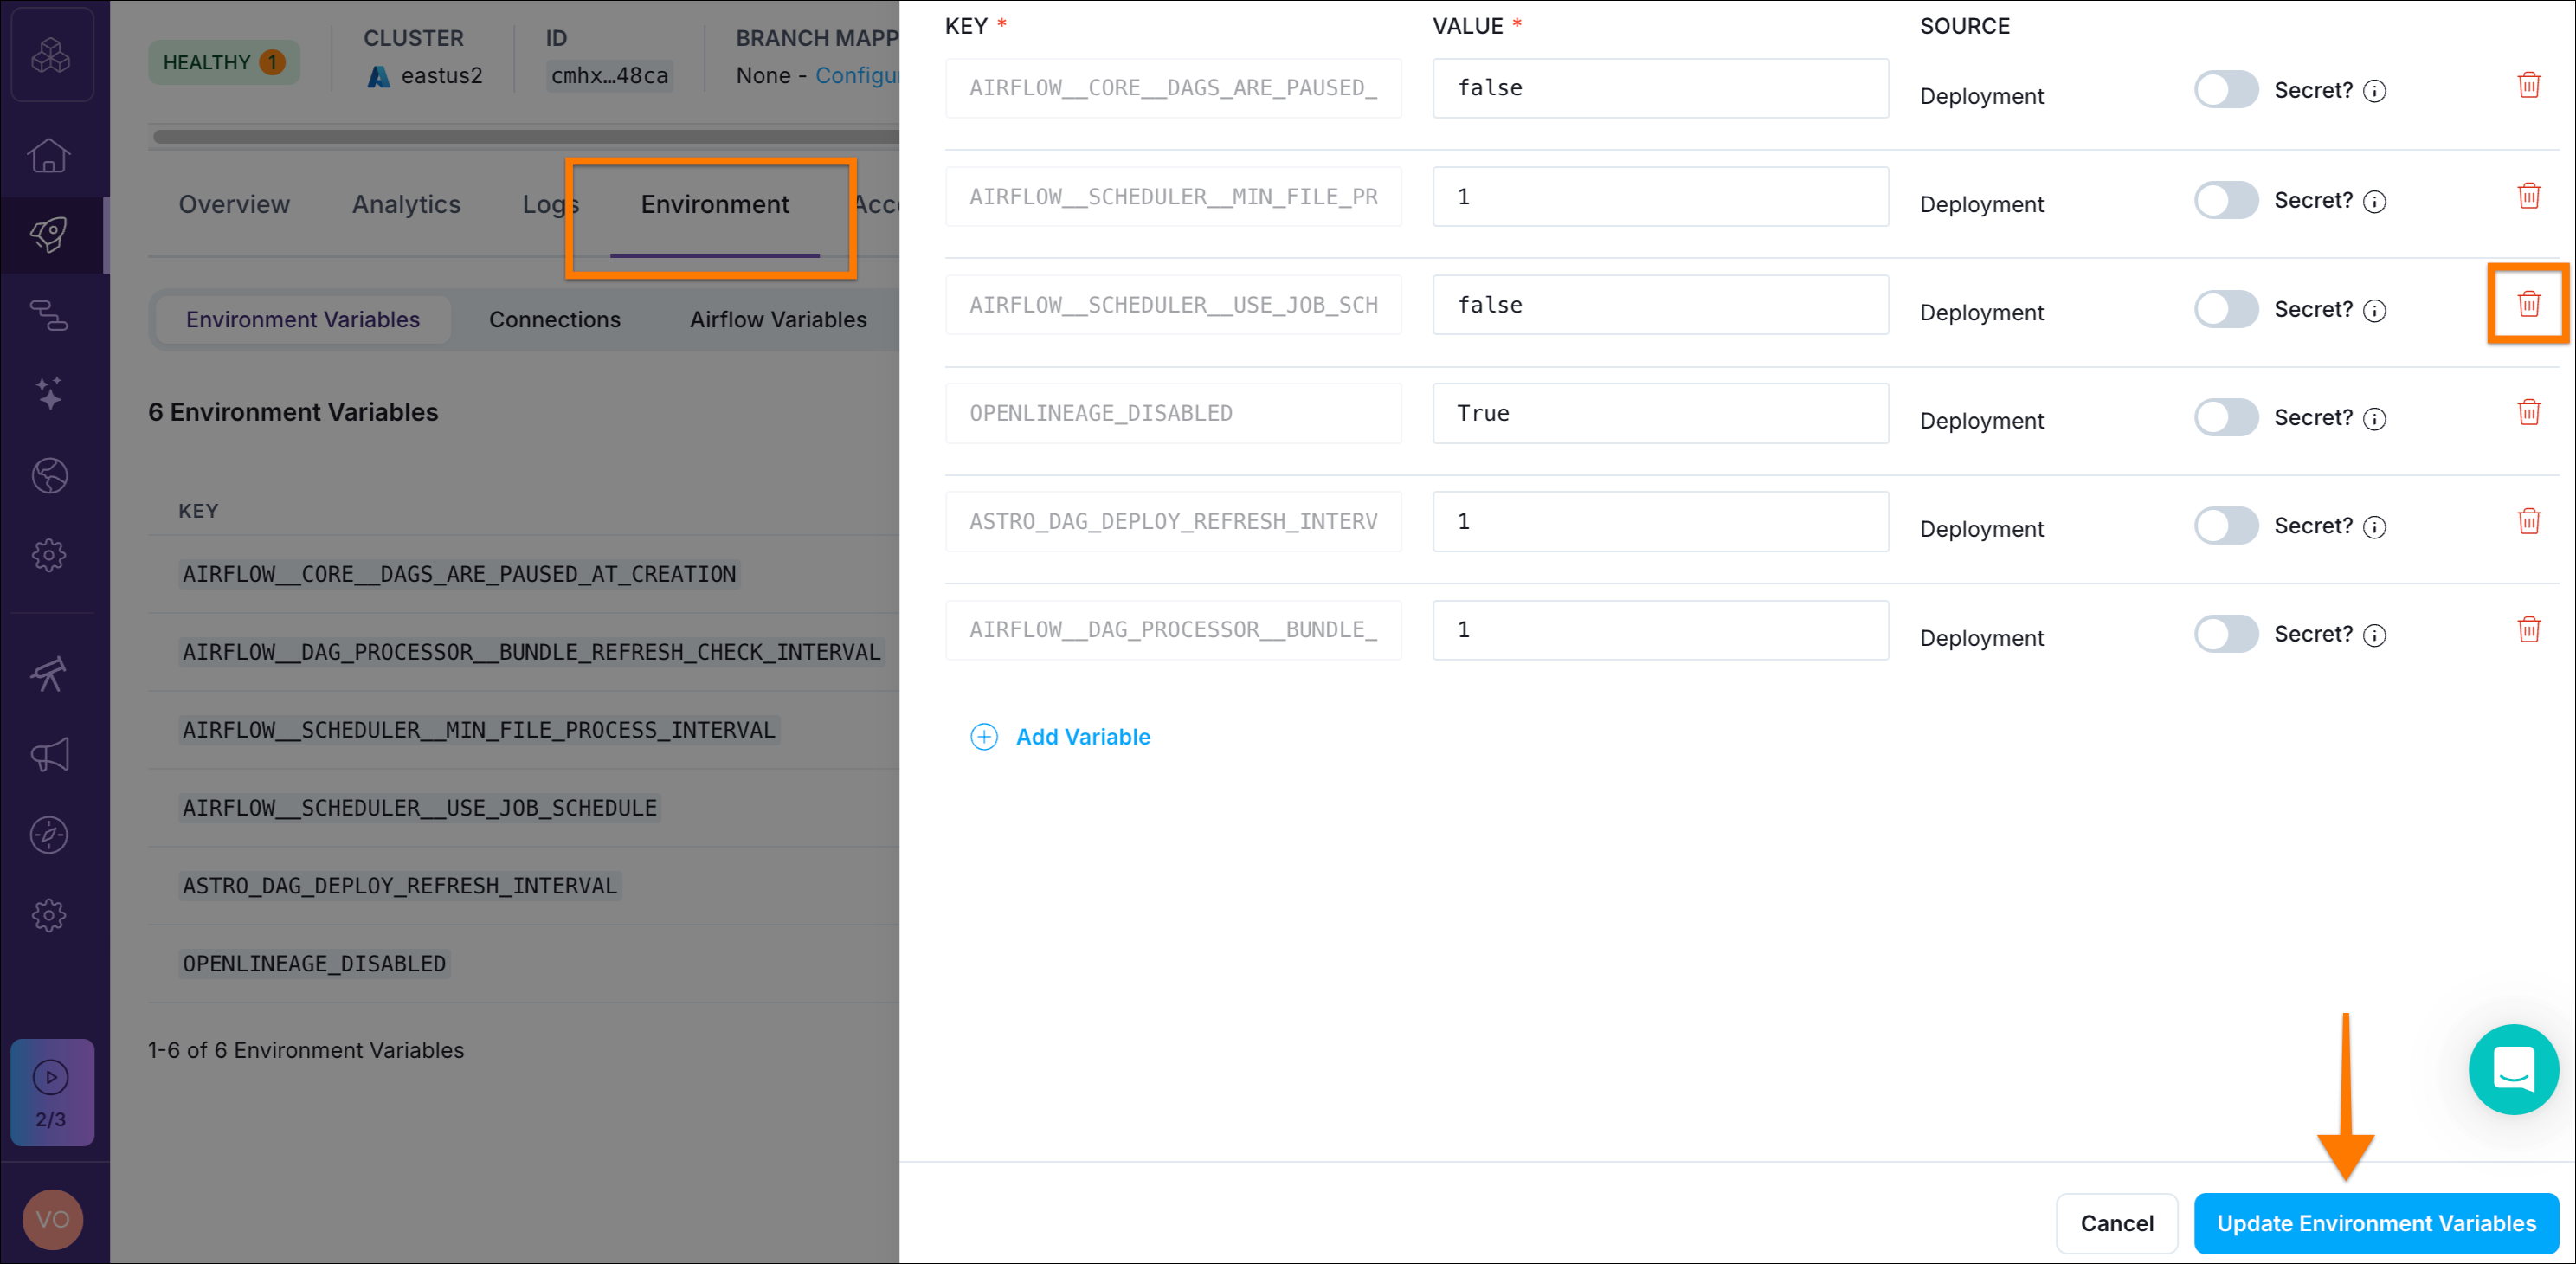
- In the Astro IDE, click the dropdown menu next to Sync to Test (top right).
- Select Test Deployment Details.
- Navigate to the Environment tab, click Edit Deployment Variables, and remove
AIRFLOW__SCHEDULER__USE_JOB_SCHEDULEby clicking the trash bin icon next to it. - Click Update Environment Variables (bottom right) and you’re ready to go! Head back to the Astro IDE.
Step 4.4: Implement Dag with human-in-the-loop
-
Within the Astro IDE, create a new file by right-clicking on the
dagsfolder → New File… and name itgalaxy_maintenance.py. -
Paste the following content:
This maintenance pipeline is triggered automatically whenever the galaxy data table is updated. It allows manual entry of new galaxy data through a human-in-the-loop interface, inserts the data into DuckDB, and runs data quality checks to ensure the values are within acceptable ranges.

The Dag has these tasks:
enter_galaxy_details: Pauses the pipeline and prompts a user to manually enter galaxy information (name, distances, type, and characteristics) through a form interface.insert_galaxy_details: Inserts the user-provided galaxy data into the DuckDB table using the values collected from the previous task.dq_checks: Validates the data quality by checking that distance values are within acceptable ranges (between 10,000 and 900,000 light years).
The tasks have these dependencies:
enter_galaxy_details→insert_galaxy_details(user input needed before insertion)insert_galaxy_details→dq_checks(data must be inserted before validation)
Airflow Concepts
- Human-in-the-loop: Human-in-the-loop workflows are processes that require human intervention, for example, to approve or reject an AI generated output, or choose a branch in a Dag depending on the result of an upstream task.
- SQL operators: The common SQL provider is a great place to start when looking for SQL-related operators. It includes the SQLExecuteQueryOperator operator, which is a generic operator that can be used with a variety of databases, including Snowflake and Postgres. It also comes with data quality related operators, like the SQLColumnCheckOperator.
- Parameters: You can use
parametersto have dynamic queries with placeholders. These will be handled on database-driver level.
-
Click Sync to Test (top right) to sync your changes to the test deployment.
-
After the sync process finishes, head back to the Airflow UI.
-
Open the Dags view, and a new Dag should appear in the list.
Notice how the schedule is set to be triggered whenever the asset named duckdb://include/astronomy.db/galaxy_data is updated.

The first Dag updates this asset when data is loaded to DuckDB by using the outlets parameter:
Airflow Concepts
- Asset (object): Logical representation of data (table, model, file) used to establish dependencies. Can be used imperatively (code-based) or declaratively (implicit definition via the
@assetdecorator). It is an abstract representation of data. - Asset event: Each time an asset is updated, the system creates an asset event object. This object includes the ID of the Dag that produced the update, the update timestamp, and optional custom information.
- Asset-aware scheduling: Set the
scheduleof a Dag to one or more assets, optionally with a logical expression using AND (&) and OR (|) operators, so that the Dag is triggered when these assets receive asset update events. - Producer task: a task that produces updates to one or more assets provided to its
outletsparameter, creating asset events when it completes successfully. - Materialize: Running a producer task, which updates an asset.
- @asset: Declarative shortcut (Dag + task + asset(s) in one).
Step 4.5: Try your advanced Dag
Time to see asset-aware scheduling and your new Dag in action.
This tutorial stores the DuckDB database in a project file (include/astronomy.db). The example_etl_galaxies Dag creates a table in this database, but the file isn’t included in the auto-generated project repository. As a result, each time you sync changes to the deployment, the database file disappears. To handle this, the insert_galaxy_details task in the second Dag uses CREATE TABLE IF NOT EXISTS in case the database file was removed between runs. To improve this, you could use a persistent database service, for example Snowflake or BigQuery.
-
Trigger
example_etl_galaxiesand observe what happens.You’ll notice that
galaxy_maintenancestarts whenexample_etl_galaxiesfinishes. More precisely, when it updates the asset that triggers the other Dag. -
While
galaxy_maintenanceis running, open the latest run and you’ll notice there’s a required action. This is part of the human-in-the-loop feature: your task is waiting for user input.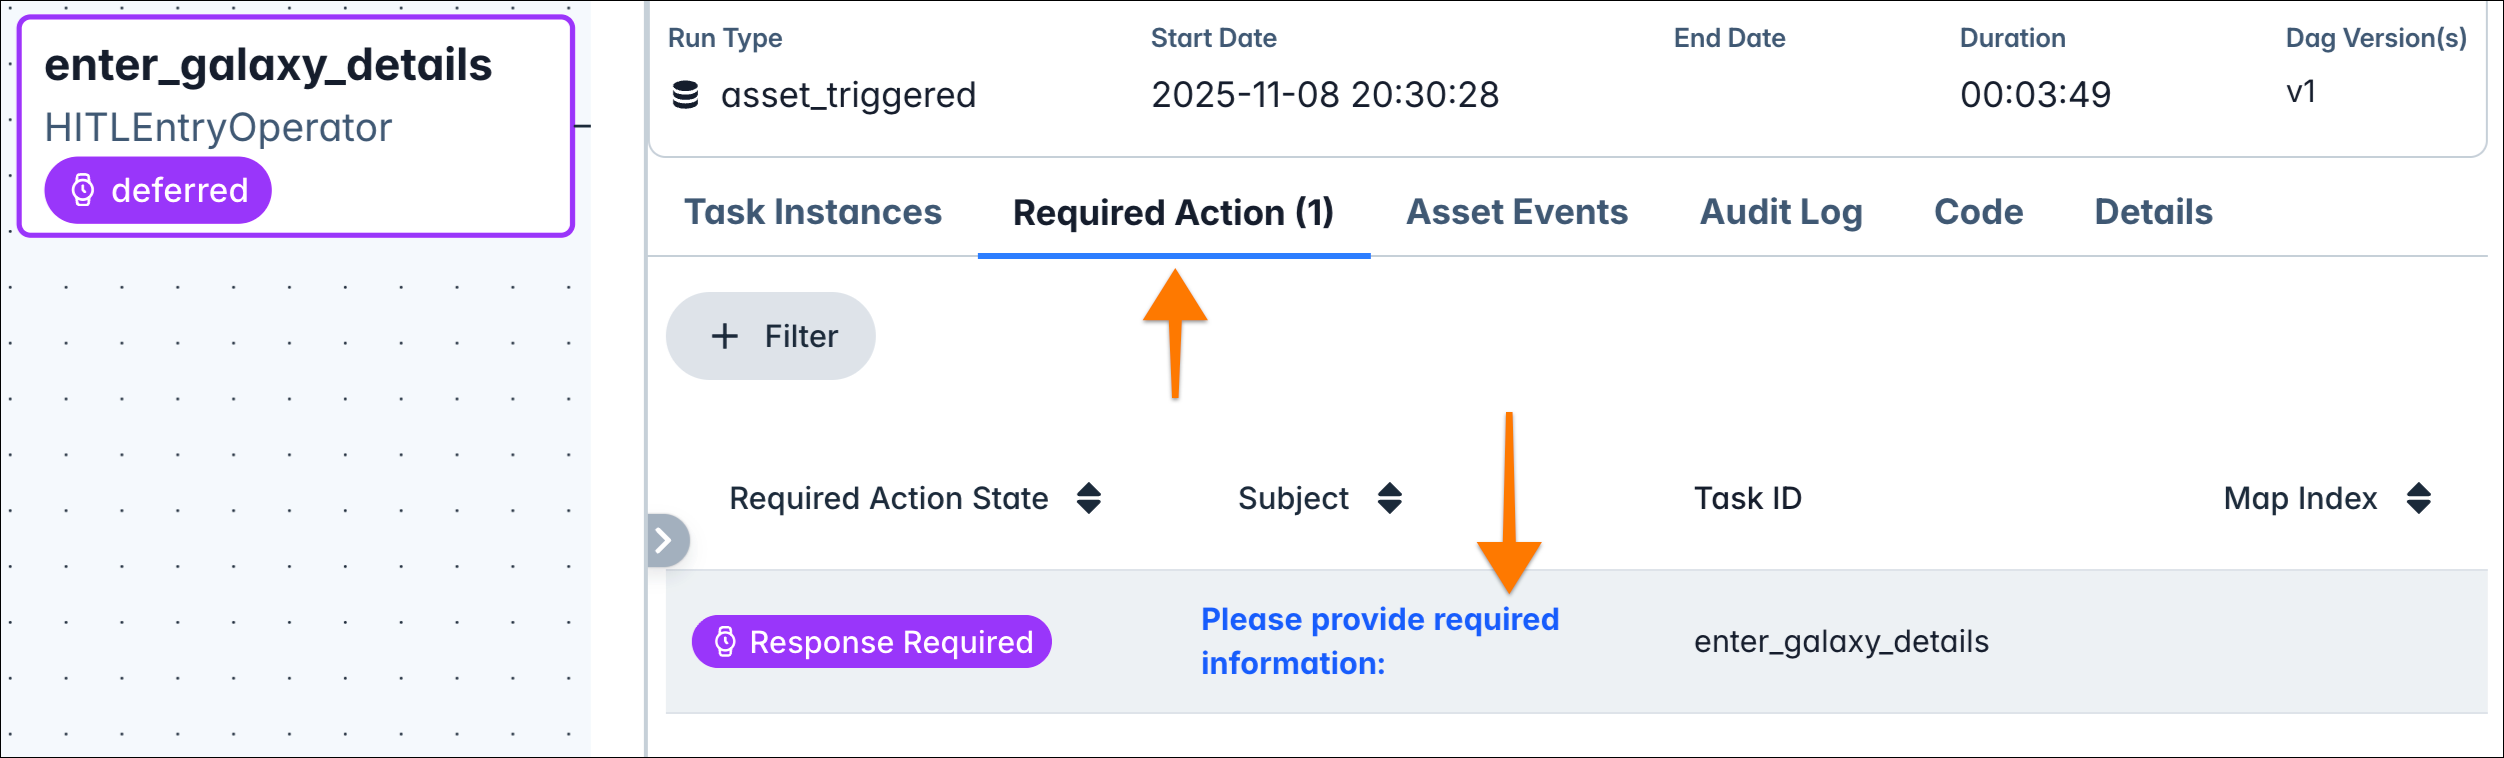
-
Take time to explore the Airflow UI and see where these required actions are visible!
-
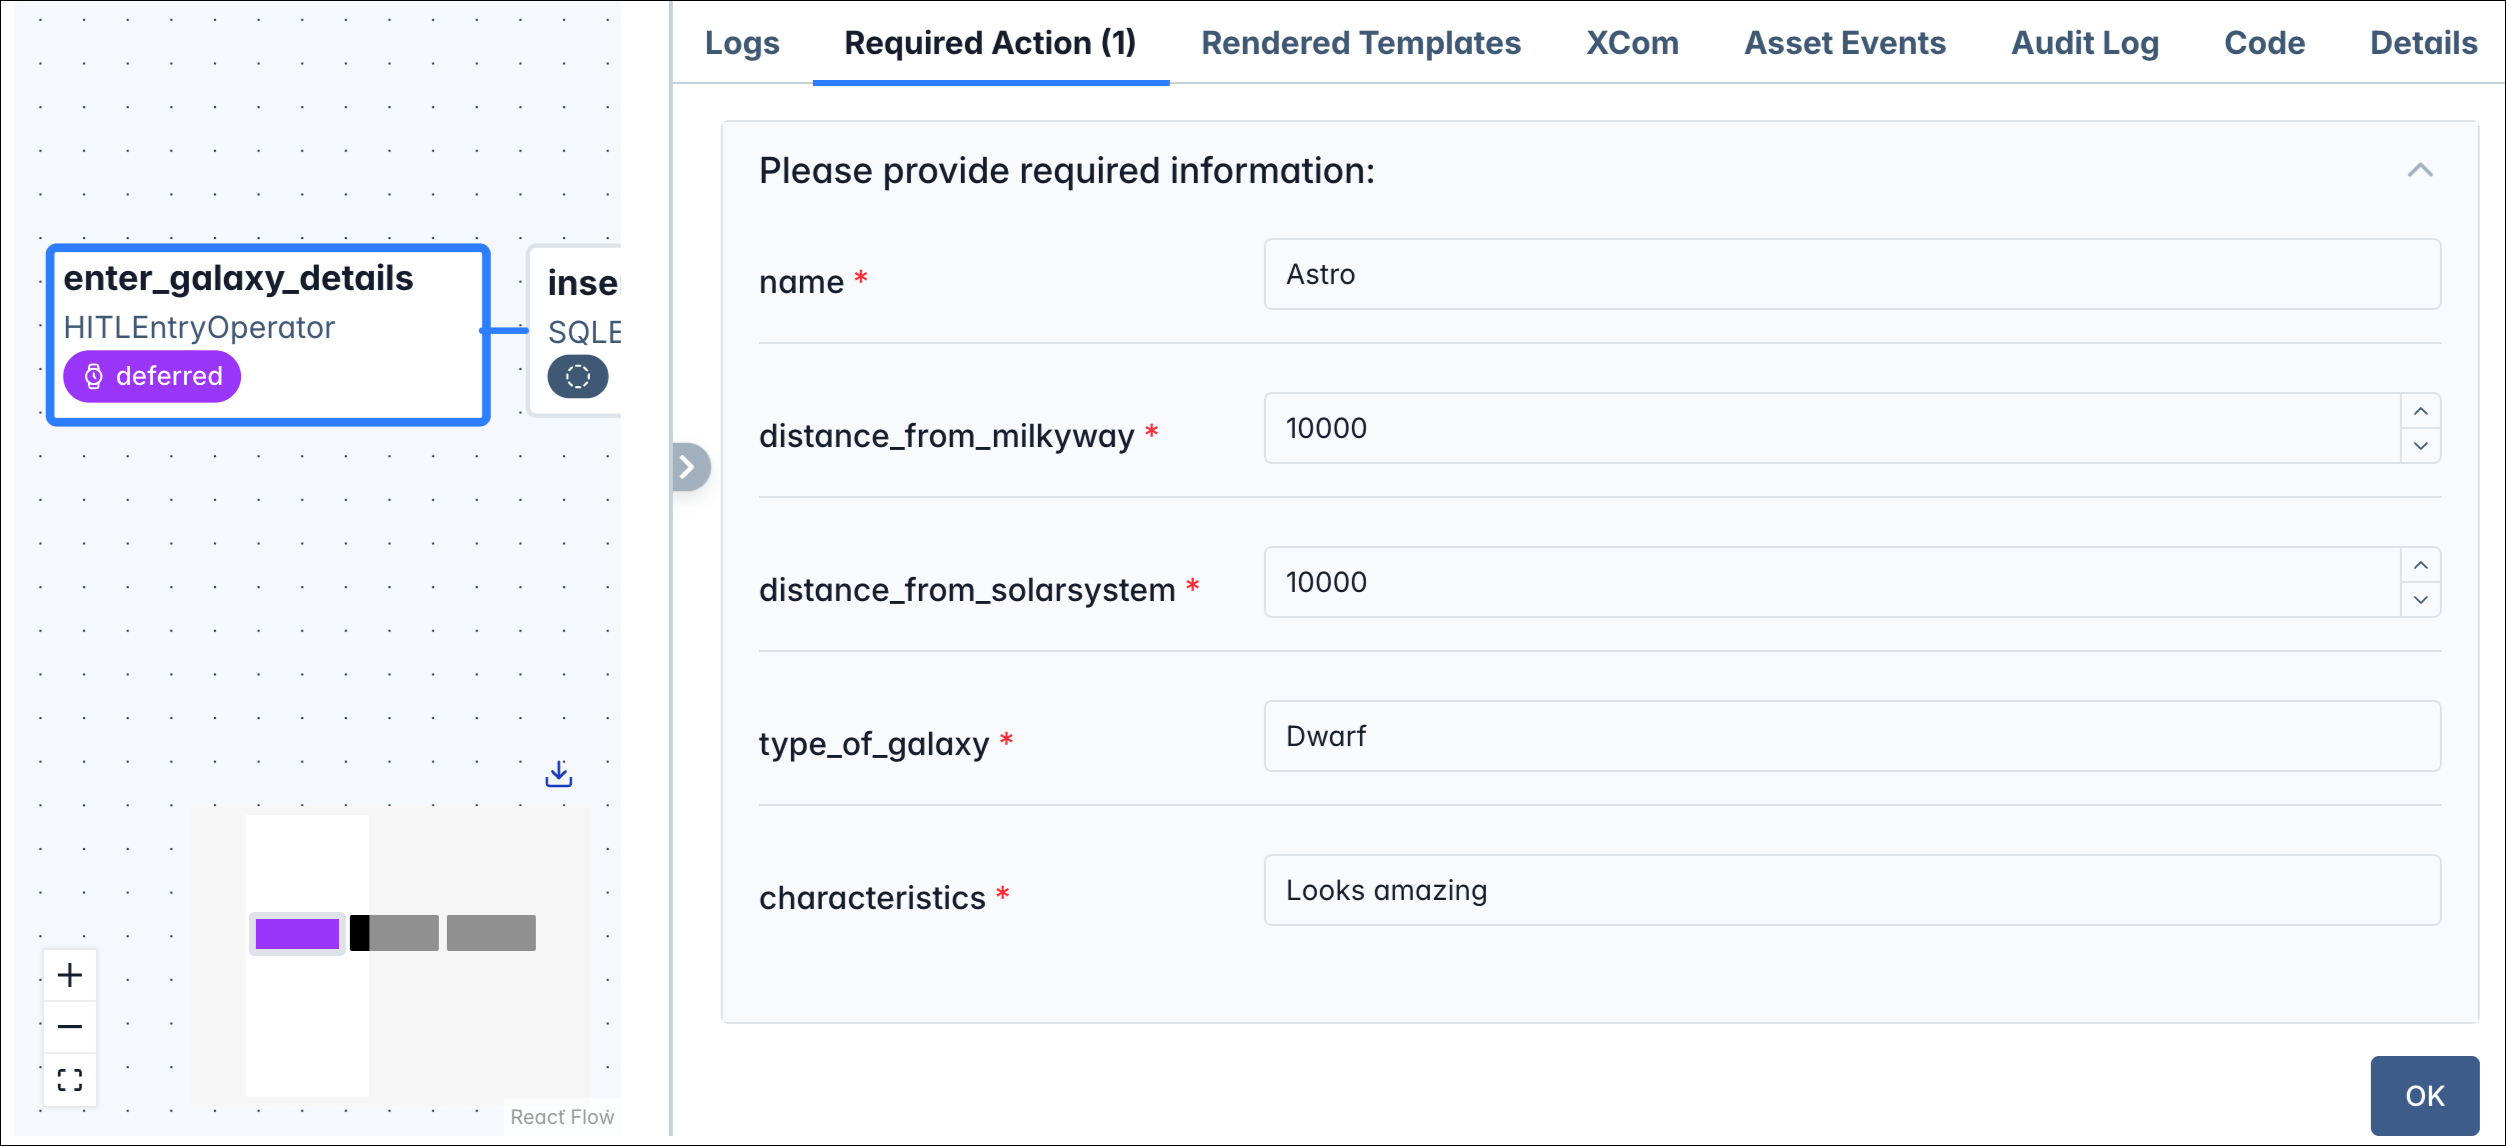
Open the required action to see the form defined in the code, and enter the following details:
- name: Astro
distance_from_milkyway: 10000distance_from_solarsystem: 10000type_of_galaxy: Dwarf- characteristics: Looks amazing
-
Click OK and observe how the pipeline proceeds. Pay close attention to the
dq_checkstask, which successfully validates the data. -
Try it again by running
galaxy_maintenanceonce more. This time, enter 42 as the distance and observe how thedq_checkstask fails because the data quality check detected an issue with your galaxy data.
Conclusion and next steps
Congratulations 🎉! You’ve just built two interconnected data pipelines using Apache Airflow, and along the way you’ve learned the fundamental concepts that power modern data orchestration.
In this tutorial, you:
- Set up a complete Airflow development environment in minutes using Astro IDE.
- Built and ran your first ETL pipeline with extraction, transformation, and loading steps.
- Mastered core Airflow concepts: Dags, tasks, operators, and dependencies.
- Extended your project with provider packages and database connections.
- Implemented human-in-the-loop workflows for manual data entry.
- Added automated data quality checks to ensure data integrity.
- Used asset-aware scheduling to create a dependency between two Dags.
Ready to dive deeper?
Explore more guides:
- An introduction to Apache Airflow®
- Introduction to Dags
- An introduction to the Airflow UI
- Using Airflow to Execute SQL
- Assets and data-aware scheduling in Airflow
- Get started with Airflow using the Astro CLI
- Apache Airflow® GenAI Quickstart
Join the academy and get certified: