Building on our learnings from SnowPatrol, we’ve integrated warehouse spend visibility directly into Astro as part of Astro Observe. Now, teams can track spend by data product or team, connect costs to business priorities, and optimize for impact—all in a single control plane.
To learn more and see the latest enhancements in Astro Observe, book a demo today.
SnowPatrol is an application for anomaly detection and alerting for Snowflake usage, powered by Machine Learning. It’s also an MLOps reference implementation, an example of how to use Airflow as a way to manage the training, testing, deployment, and monitoring of predictive models.
In this three-part blog post series, we explore how the Astronomer team built SnowPatrol to help us proactively identify abnormal Snowflake usage (and cost) and simplify overage root-cause analysis and remediation.
Part 1, available here, introduced SnowPatrol, detailed our motivations, and explained how Snowflake pricing works and how anomaly detection can be used to detect unexpected cost overages. It also demonstrated how data scientists can adopt Airflow for anomaly detection without significant changes to the existing Notebook code.
Part 2 focuses on making SnowPatrol a complete, user-friendly solution to monitor and reduce costs. It covers how we, at Astronomer, use these anomalies to track down problematic DAGs and remediate issues.
In Part 3 of the SnowPatrol series, we'll discuss optimizing SnowPatrol, including model monitoring, champion-challenger deployment, and exploring new architectures to enhance performance and effectiveness.
If you want to skip directly to the part where we show you how to install SnowPatrol, you can jump directly into Installing SnowPatrol in your Astro environment here.
Following the release of Part 1, we exchanged ideas with and received feedback from many Airflow users and Astronomer customers on improving the anomaly detection model, effectively monitoring Snowflake queries and costs, and generally making the tool more useful to all. I would like to thank everyone who took the time to provide feedback and suggestions; your contributions are much appreciated.
I had productive conversations with Matt Shancer, Staff Data Engineer at Grindr about the importance of cost management. Matt shared the monitoring dashboards and alerts that notify his team when costs increase on a weekly and monthly basis, all powered by Airflow.
The data engineering organization at Grindr has saved $600,000 in Snowflake costs by monitoring their Snowflake usage across the organization with Airflow.
What’s more, Grindr adds query tags to their Airflow SQL Tasks to understand the origin and context of SQL queries running in Grindr’s Snowflake accounts. Working with the Grindr team, we have incorporated some of their work into SnowPatrol so that it will benefit the Airflow community at large.
Tracking down the root cause of usage anomalies
At the end of the previous blog post, we built a production-ready anomaly detection model to send notifications when abnormal Snowflake usage is detected. So far, our anomaly detection model is useful for figuring out which warehouses have unusual activity and when it happened. It uses a top-down method that helps us quickly spot any issues and send notifications. Once an anomaly is found, we can let the platform admins know right away so they can investigate. One thing the model doesn't do yet is tell us directly what caused the anomaly, which would help prevent future problems. But even without that, it's still a super useful tool that lets us know when and where usage spikes, and to track down indirectly the queries and usage that changed at that time.
For this second part of the blog series, we aim to provide context for anomaly detection to be useful for admins to address the underlying issue. We want to know what tools, processes, or users caused the anomalies and what happened moments before the anomaly was detected. It is time to do some investigation. Chase is on the case!
The manual and time-consuming approach
A simple solution to get more context is to look at the most expensive queries run on the warehouse and the time where and when an anomaly is detected. This can be achieved by querying the snowflake.account_usage.query_history view.
As its name implies, this Snowflake SQL view encapsulates metadata spanning the last 365 days. It provides detailed information for various dimensions such as time range, session, user, role, warehouse, query tags, etc.
The following query lists the queries that ran on the date an anomaly was detected for a given warehouse.
SELECT
query_id,
query_text,
database_name,
schema_name,
warehouse_name,
warehouse_size,
warehouse_type,
user_name,
role_name,
DATE(start_time) as execution_date,
error_code,
execution_status,
execution_time/(1000) AS execution_time_sec,
total_elapsed_time/(1000) AS total_elapsed_time_sec,
rows_deleted,
rows_inserted,
rows_produced,
rows_unloaded,
rows_updated,
execution_time/(1000*60*60) AS execution_time_hours
FROM snowflake.account_usage.query_history WHERE warehouse_name = 'ROBOTS' AND execution_date BETWEEN '2024-04-01' AND '2024-04-02' ORDER BY execution_time_hours DESC
This query helps pinpoint the queries contributing to an anomaly but has many things that could be improved. First, it does not scale if we are investigating multiple anomalies. Second, aside from the user_name and role_name columns, it doesn’t provide much information on the source of the query. Surely we can do better.
For more advanced investigation, Snowflake also offers many ready-made queries that can used to explore costs. You can find them in their documentation here.
Since we are looking for a more scalable solution, let’s explore an alternative approach recommended by Snowflake for data governance: Object Tagging, and more specifically Query Tagging.
Query tags are a feature in Snowflake that allows users to attach metadata to SQL queries. These tags can be used to categorize, track, and manage queries for better organization and management. They can include keywords, project names, or any other relevant information to help identify the purpose and context of a particular query. Query tags can be particularly useful in large, complex Snowflake environments where numerous users are running various queries across multiple databases and tables. You can tag an individual query by setting the session query tag as follows.
ALTER SESSION SET QUERY_TAG = 'my_project'; SELECT * FROM my_table;
You can read more about object tagging by reading Snowflake’s documentation page.
Our ultimate goal with query tagging is to inject the missing business context into Snowflake so we can better understand the origin of anomalies. Once we have implemented query tags for most queries, we can also build dashboards to group Snowflake costs by different dimensions using Airflow metadata, such as DAGs and Tasks.
For query tagging to give a meaningful context to our anomalies, it's crucial to tag the majority of queries executed by our users and workloads in our Snowflake account. Let’s start by adding tags to user queries, then explore how we can add tags to every Airflow Task automatically.
To tag all the queries run by a user, we can alter the User object and set default tags. Let’s first add query tags to some of our most active users, this way when they run a query the tags will be automatically associated and will be visible in the query_history view.
alter user gary_lightbody set query_tag = '{"team": "engineering", "user": "gary_lightbody"}';
alter user nathan_connolly set query_tag = '{"team": "engineering", "user": "nathan_connolly"}';
alter user johnny_mcdaid set query_tag = '{"team": "engineering", "user": "johnny_mcdaid"}';
Notice I am passing tags as a JSON object. Doing so allows us to provide multiple fields at once and will make it easy for us to parse the tags later on when querying the snowflake.account_usage.query_history view.
In Airflow, just as we did before, we could add the desired tags by manually altering the session. Using query parameters and Jinja templating we could even manually insert metadata at runtime.
ALTER SESSION SET QUERY_TAG = '{"dag_id":"my_dag", "task_id":"my_task_id", "ds":"2024-04-21 12:00:00"}';
However, as was said before, we are looking for a scalable approach to automatically add query tags to all Tasks at once. Fortunately, in Airflow, connections to external systems are always made through Hooks.
A Hook is a high-level interface to an external platform that lets you quickly and easily talk to them without having to write low-level code. They’re also often the building blocks that Operators are built out of and they integrate with Connections to gather credentials.
In our specific case, the Snowflake Hook handles all interactions with Snowflake. It is built as a wrapper on top of the Snowflake Connector for Python library.
Conveniently, it also has a session_parameters parameter we can use to push, you guessed it, session parameters, and query tags to Snowflake.
You can read more about the Snowflake Hook in the Airflow documentation here.
In most cases, DAG authors don’t interact with the Snowflake Hook directly. They use Operators to define tasks. Operators such as the SnowflakeOperator and SQLExecuteQueryOperator all rely internally on the Snowflake Hook, though indirectly through the BaseSQLOperator. This BaseSQLOperator implements a hook_params attribute we can leverage to pass query tags to the Snowflake Hook.
For a list of Operators using the BaseSQLOperator, see the documentation pages.
After a few detours through Airflow and Snowflake’s layers of abstractions, we are finally getting to the finish line. Here is what that looks like with a simple DAG.
{% raw %}with DAG(dag_id="example_hook_params", schedule=None, start_date=days_ago(1)):
sql_execute_query_operator = SQLExecuteQueryOperator(
task_id="example_sql_execute_query_operator_task",
conn_id="snowflake_conn",
sql="...",
hook_params={
"session_parameters": {
"query_tag": (
"{"
"'dag_id': '{{ dag.dag_id }}', "
"'task_id': '{{ task.task_id }}', "
"'run_id': '{{ run_id }}', "
"'logical_date': '{{ logical_date }}', "
"'started': '{{ ti.start_date }}', "
"'operator': '{{ ti.operator }}'"
"}"
)
}
}
)
template_fields = sql_execute_query_operator.template_fields
sql_execute_query_operator.template_fields = (*template_fields, "hook_params"){% endraw %}
Notice how we have to override the task’s template_fields attribute to add “hook_params”. Without it, the Jinja templating would not be rendered and the text would show up as-is in the query_history view. Ask me how I know…
Fortunately for you, by the time you read this, the patch will have made its way into the latest Airflow release and you won’t need to worry about it. I have created a PR(#38724) to add hook_params to the templated fields of every relevant Operator and Sensor.
To automate adding query tags to every DAG and every Task, we can leverage advanced Airflow features designed to simplify the management of Airflow Deployments.
Airflow Features
As illustrated in Part 1 of this blog series, Apache Airflow® is indispensable for today's data-driven businesses, serving as a cornerstone for orchestrating intricate data workflows and diverse data architectures with ease. Its ability to integrate various data sources and handle complex transformations makes it a powerful choice for any data stack.
Airflow is built from the ground up with flexibility and extensibility in mind. It offers a built-in plugin manager that allows developers to build features to extend its core functionality.
A very useful feature we will leverage in SnowPatrol is Cluster Policies. Policies can be added to Airflow through Plugins.
Plugins
Plugins offer a flexible way to customize your Airflow experience by building on top of existing Airflow components. Plugins can be used to add extra functionalities to Airflow by adding custom operators, hooks, executors, macros, web views, and more into your Airflow instance, tailoring it to your specific requirements.
You can read more on plugins in the Airflow documentation.
The first functionality we will add to our Airflow Deployment is Cluster Policies.
Cluster Policies
Cluster Policies are an advanced Airflow feature that enables administrators to implement checks and modifications on core Airflow constructs such as DAGs, Tasks, Task Instances, and Pods. Policies can be used to enforce naming conventions and validate DAG configurations and resource management.
They are implemented using hooks, which are functions that intercept and modify the behavior of these constructs.
To know more about Cluster Policies, you can read Airflow’s documentation here: https://airflow.apache.org/docs/apache-airflow/stable/administration-and-deployment/cluster-policies.html
For SnowPatrol, we have built a custom cluster policy to attach query tags to all Snowflake-related Tasks. This way, every single DAG and Task deployed to an Airflow Deployment will automatically get query tags.
Here is the Cluster Policy source code.
{% raw %}from airflow.models import BaseOperator
from airflow.policies import hookimpl
from dataclasses import dataclass, asdict
@dataclass
class QueryTag:
dag_id: str = "{{ dag.dag_id }}"
task_id: str = "{{ task.task_id }}"
run_id: str = "{{ run_id }}"
logical_date: str = "{{ logical_date }}"
started: str = "{{ ti.start_date }}"
operator: str = "{{ ti.operator }}"
def __str__(self):
return str(asdict(self))
SNOWFLAKE_HOOK_PARAMS = {"session_parameters": {"query_tag": str(QueryTag())}}
@hookimpl
def task_policy(task: BaseOperator):
task.template_fields = (*task.template_fields, "hook_params")
task.hook_params = (
{**task.hook_params, **SNOWFLAKE_HOOK_PARAMS}
if task.hook_params
else SNOWFLAKE_HOOK_PARAMS
){% endraw %}
The Cluster Policy Plugin has been packaged as a standalone Python library named astronomer-snowpatrol-plugin available on PyPI, allowing you to install it in every Airflow Deployment managed by your organization.
If you are using Astro, you can install it in your Airflow Deployments by adding astronomer-snowpatrol-plugin to your requirements.txt
Caveat This Plugin will only add query tags to Operators making direct use of the hook_params field and snowflake_hook. If you are using DBT or other frameworks to query Snowflake, you will need to add query tags manually as shown above.
And there we have it, a scalable solution to tag all the Snowflake queries in any Airflow Deployment with a simple dependency added to the requirements.
Now let’s take a look at the dashboards we can build once we add the Airflow Metadata to every query.
Snowflake Dashboards
We leverage Snowflake's Snowsight to build Dashboards and explore Airflow Dags and query tags.
To ensure SnowPatrol is easy to use and works with a wide range of data stacks, we have built all the visualizations directly in Snowflake. All the datasets produced by SnowPatrol’s DAGs are available in your Snowflake environment if you or your organization prefer to use other data visualization software such as Looker, Power BI, Qlik, Sigma, Superset, or Tableau.
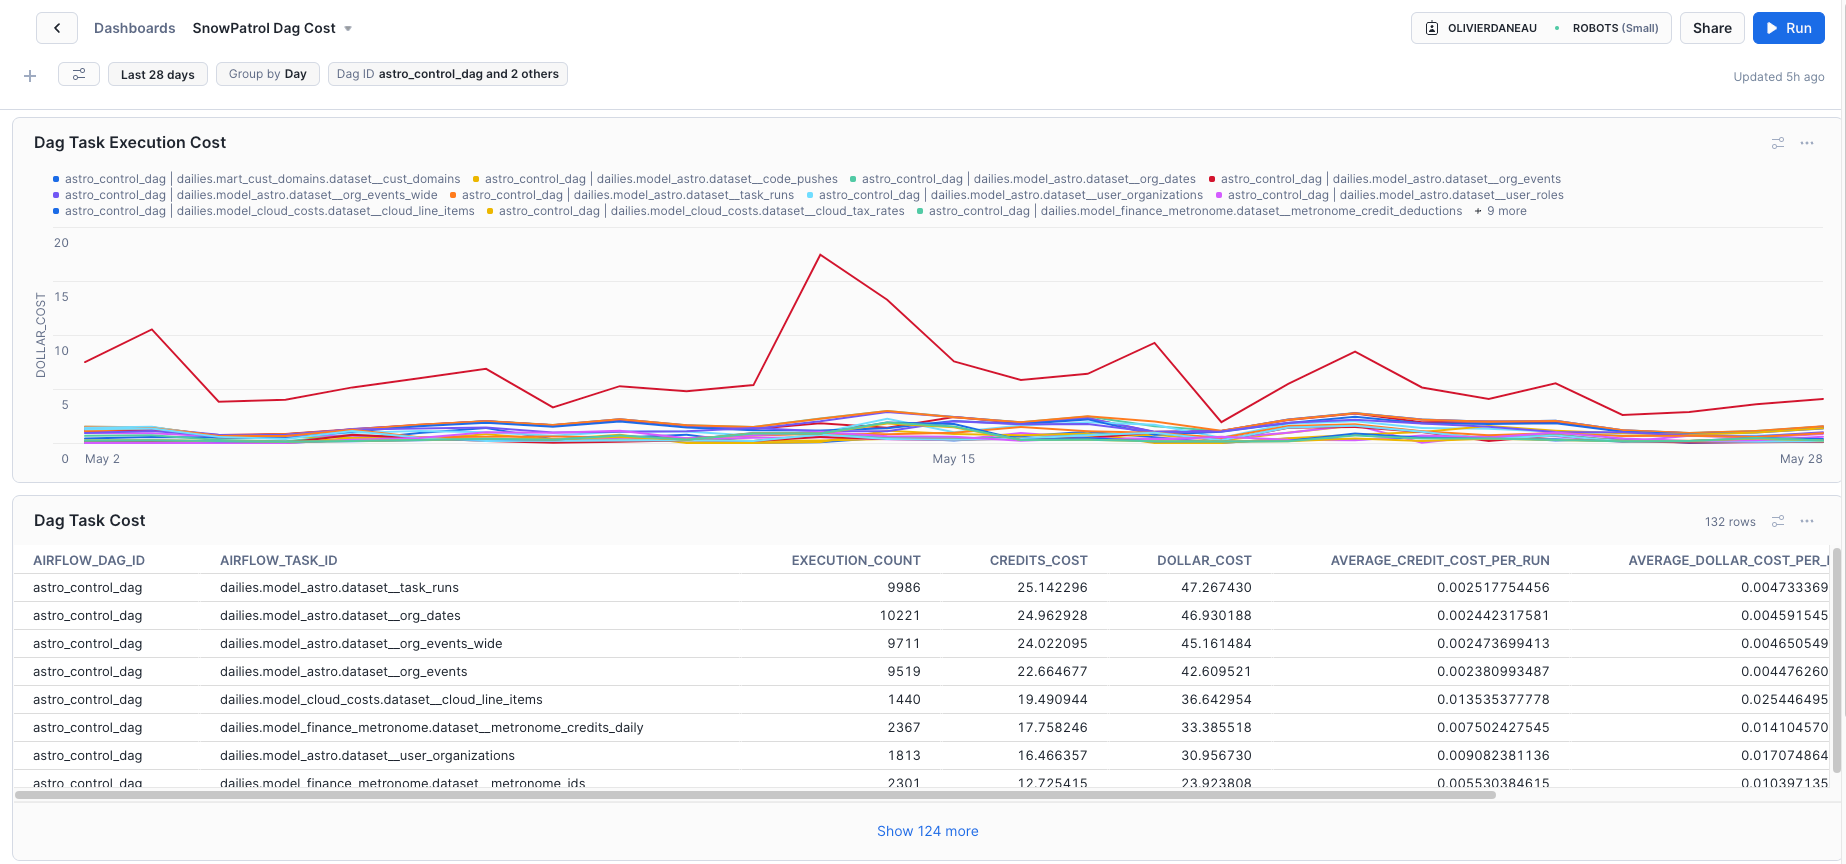
The first visualization we chose to display is the Airflow DAG execution cost. We aggregate all Snowflake queries by DAGs and Tasks, allowing viewers to identify the most expensive ones quickly. With that information in hand, DAG Authors can start refactoring and have a direct impact on reducing Snowflake costs.

To dive deeper into individual DAG execution, a detailed view is added below the aggregate. Each row maps to a single Task execution. By using the available filters, we can pinpoint abnormal Snowflake usage to a specific DAG and Task execution. We finally have the missing piece of the puzzle.

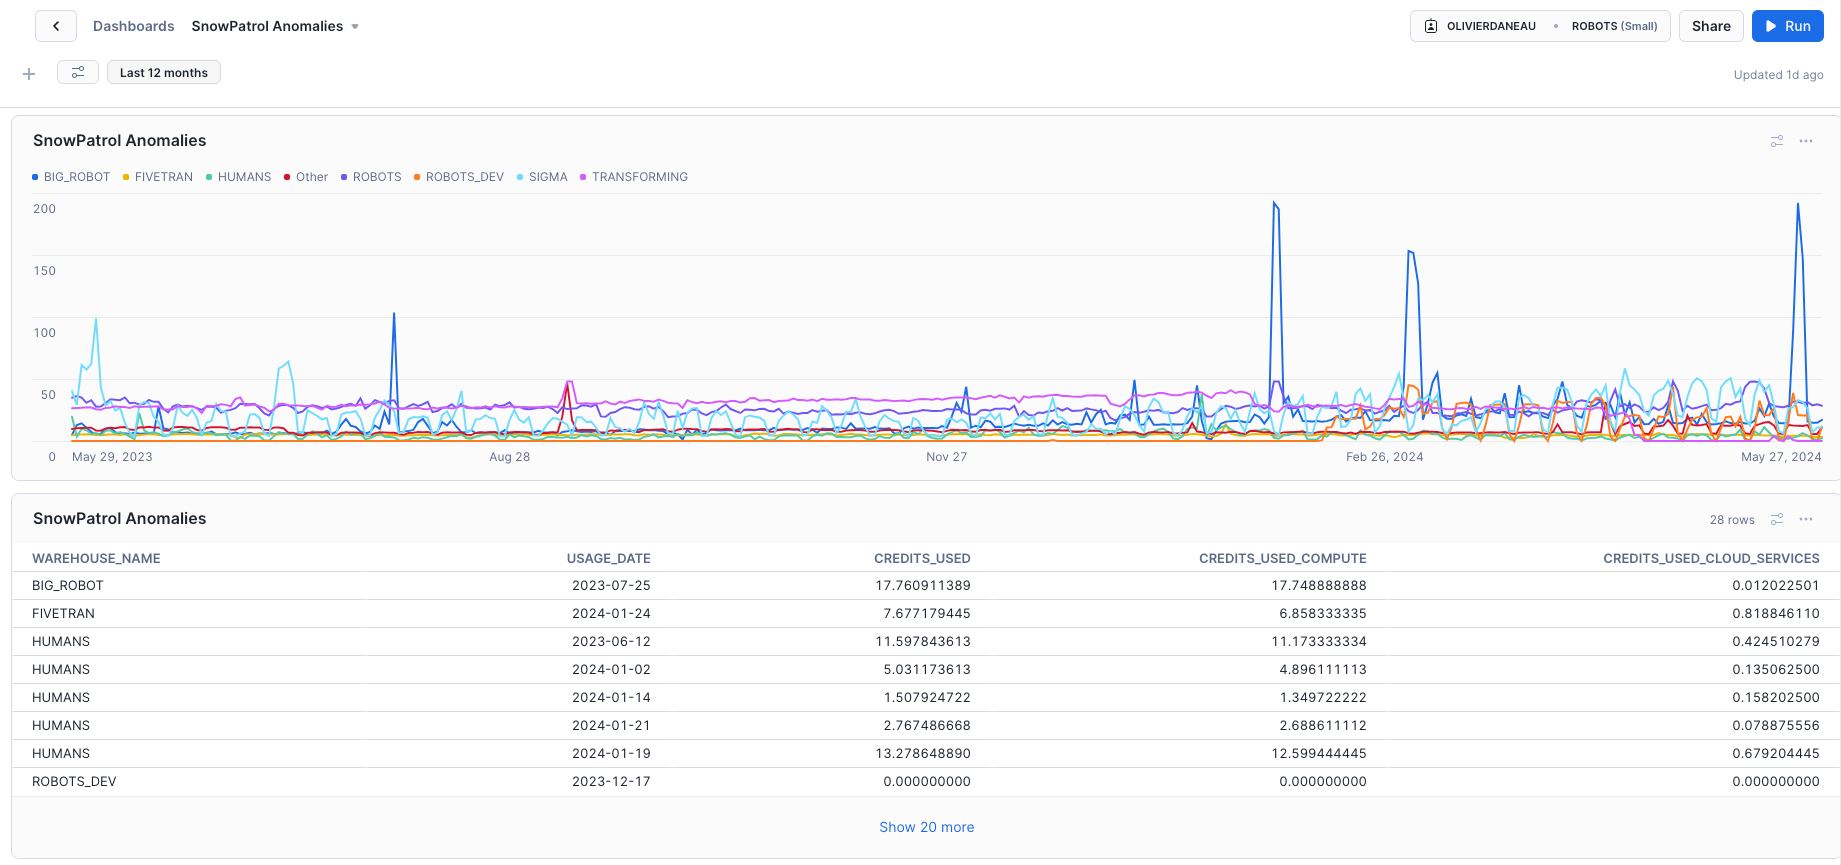
The second set of visualizations allows us to explore the detected anomalies through time. Browsing individual anomalies lets us explore the queries running in the 12 hours before the abnormal usage was detected. The list of queries and their associated metadata is displayed providing the elusive context we worked hard to obtain.

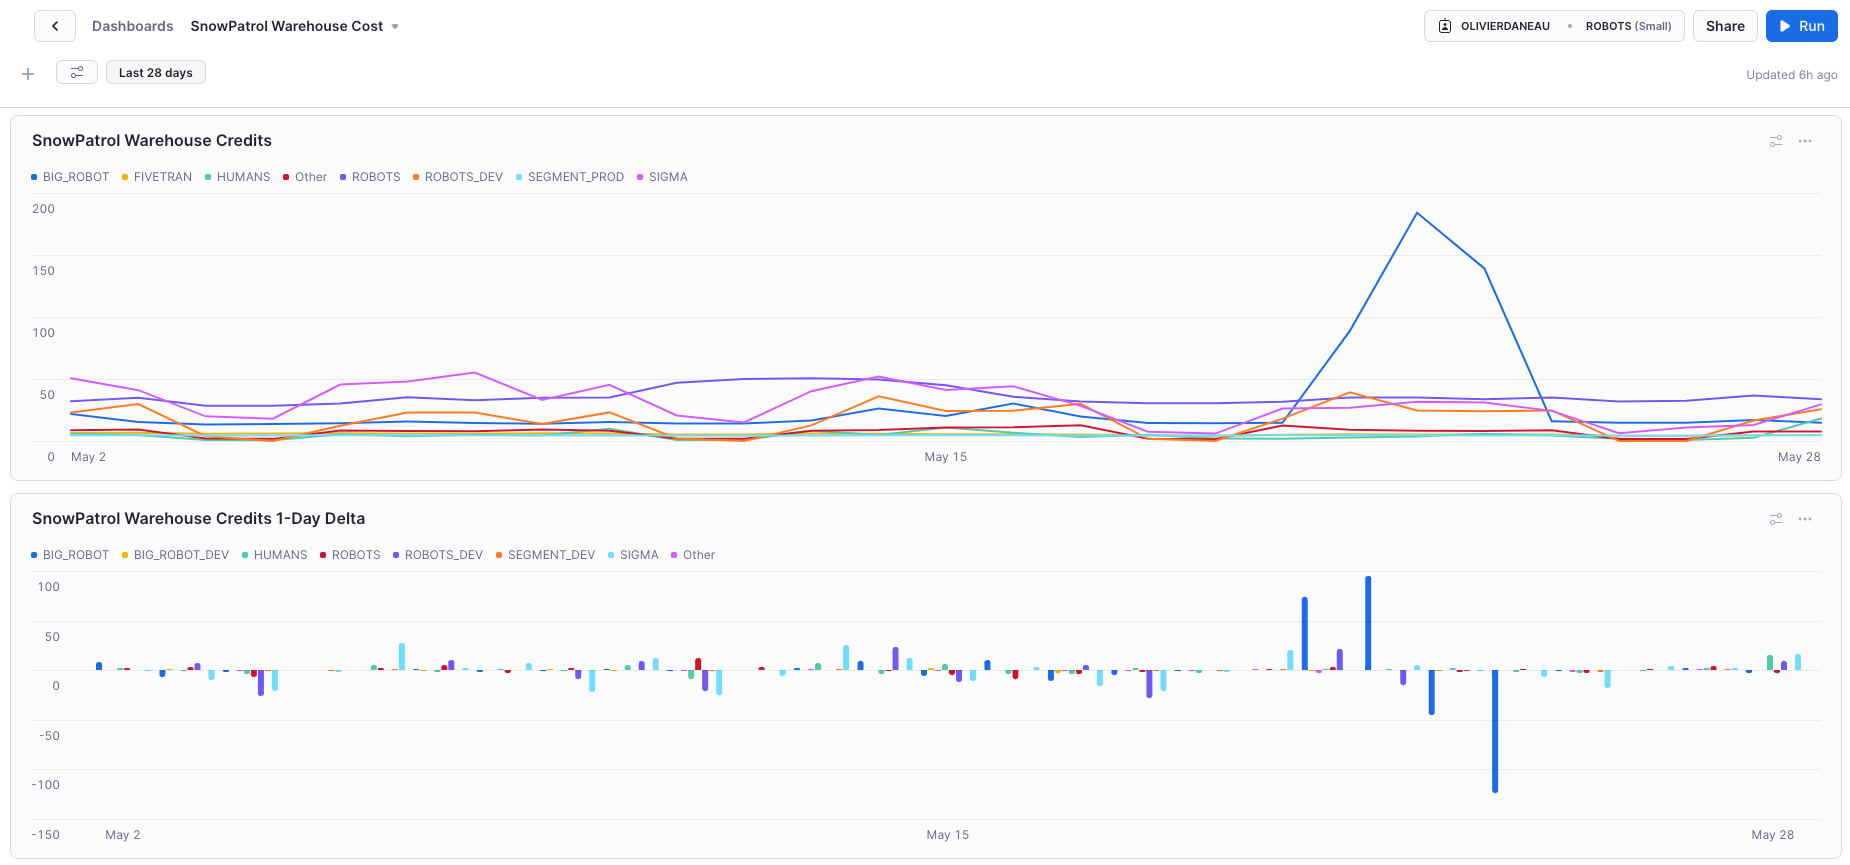
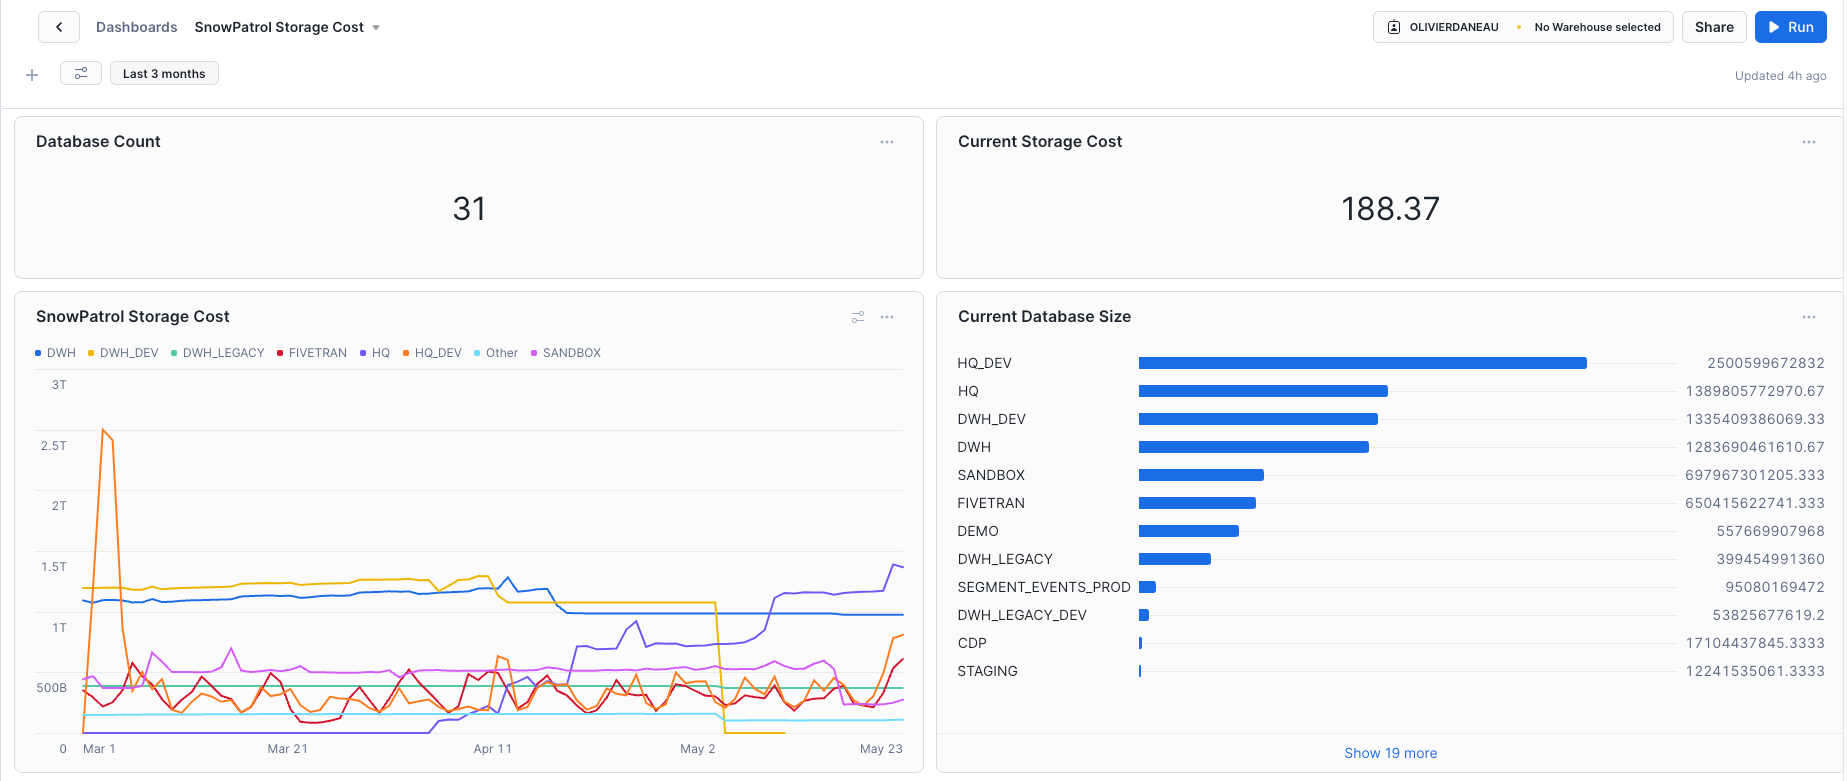
Finally, to help manage Snowflake costs at a higher level, SnowPatrol also includes visualization breaking down Storage and Compute usage by warehouse, schema, database, tables, etc. These visualizations allow us to keep track of weekly and monthly changes to Snowflake Costs and take necessary action to cut costs further.


Equipped with all these dashboards in hand, Astronomer’s Data Team managed to cut almost 25% of its Snowflake spend and is now able to keep a close eye on any unexpected increase in Storage or Compute costs.
Installing SnowPatrol in your Astro environment
As discussed above, there are two components to SnowPatrol: the SnowPatrol DAGs and the SnowPatrol Plugin. While the anomaly detection DAGs can be used on their own, they provide maximum value when used in combination with the SnowPatrol Plugin (or manually added query tags).
Here is how to get started deploying the two components in your Organisation.
First, the SnowPatrol Git Repository contains all the necessary Dags to run the anomaly detection model, monitor your Snowflake environment, and send notifications. It also packages the DAGs needed to prepare the reporting datasets.
To install SnowPatrol in your Astro environment, go to the SnowPatrol Git Repository, clone it locally, and use the Astro CLI to deploy it to a new Airflow Deployment. The Project Setup section of the Readme provides all the necessary information to configure your Airflow Deployment.
For detailed step-by-step instructions, refer to SnowPatrol’s documentation page.
Second, as we saw, the SnowPatrol Plugin adds a Cluster Policy to tag queries for every Task in your Airflow Deployments. For optimal results in larger organizations, it should be installed in every Airflow Deployments. This is to ensure a maximum of queries are tagged.
To install the SnowPatrol Plugin in each existing Airflow Deployment, add the astronomer-snowpatrol-plugin dependency to your Airflow requirements. If you are using Astro, you can simply add astronomer-snowpatrol-plugin to your requirements.txt.
For detailed instructions, see the SnowPatrol Plugin documentation page.
Future Work
By now, you will have noticed that our current solution of passing Airflow Metadata to Snowflake using query tags only works for Tasks executing directly inside of Airflow. If you leverage integration tools to transform your Snowflake data, query tags will have to be configured separately.
Future work could be done to add query tagging capabilities to Cosmos, our DBT model to the Airflow DAG interpreter Plugin.
The good news is that BaseSQLOperator’s hook_params parameter is implemented for a large number of SQL backends such as Oracle and BigQuery. Work could be done to generalize the SnowPatrol Plugin to support multiple databases.
For this blog post series, we will focus our attention on the anomaly detection model next.
In Part 3, we'll discuss SnowPatrol improvements and optimizations. A/B testing of models will be added to the model training DAG. We will use the Weights and Biases API to track model performance and compare models.
Other model architectures will be explored. We will try to use additional model features to detect anomalies over multiple days. We will also explore the use of supervised learning models once our database of labeled anomalies is large enough.
Conclusion
Part 2 covers how Astro customers (including Astronomer’s data team) have used these methods to convert detected anomalies into actionable insights. We introduce a handy anomaly exploration plug-in that enhances SnowPatrol's capabilities. We also explore how anomalies can be used to track down problematic DAGs and remediate issues.
We are excited to showcase this project with the community and hope it will be useful to others. We are looking forward to your feedback and contributions.
Watch our webinar to learn how Grindr uses Airflow and Astronomer to monitor and optimize Snowflake usage, and get a deep dive into SnowPatrol.


