Create a Redshift connection in Airflow
Info
This page has not yet been updated for Airflow 3. The concepts shown are relevant, but some code may need to be updated. If you run any examples, take care to update import statements and watch for any other breaking changes.
Amazon Redshift is a data warehouse product from AWS. Integrating Redshift with Airflow allows you to automate, schedule and monitor a variety of tasks. These tasks include creating, deleting, and resuming a cluster, ingesting or exporting data to and from Redshift, as well as running SQL queries against Redshift.
This document covers two different methods to connect Airflow to Amazon Redshift:
- Using database (DB) user credentials
- Using IAM credentials
- Using IAM role
Tip
If you’re an Astro user, Astronomer recommends using workload identity to authorize to your Deployments to Redshift. This eliminates the need to specify secrets in your Airflow connections or copying credentials file to your Airflow project. See Authorize Deployments to your cloud.
Prerequisites
- The Astro CLI.
- A locally running Astro project.
- Permissions to access to your Redshift cluster. See Using IAM authentication and Authorizing Amazon Redshift to access other AWS services.
Get connection details
Db Creds
DB user credentials can be used to establish a connection to an Amazon Redshift cluster. While straightforward to use, this approach lacks the strong security and user access controls provided by identity and access management (IAM). Connecting this way requires the following information:
- Cluster identifier
- Database name
- Port
- User
- Password
Complete the following steps to retrieve these values:
-
In your AWS console, select the region that contains your Redshift cluster, open the Redshift cluster dashboard, then open your cluster.
-
From the General information section, copy the Cluster identifier and Endpoint.
-
Open the Properties tab and copy the Database name and Port.
-
Create a Redshift user and grant a role so that Airflow can access Redshift through the user. Copy the username and password.
Iam Creds
You can use IAM credentials to connect Airflow to Redshift. This approach lets you use IAM credentials and limits Airflow’s permissions. The limitation of this method is that you must include an AWS credentials file in your Airflow project.
Following information is required:
- Cluster identifier
- Database name
- Port
- Region
- IAM user
- AWS credentials file
Complete the following steps to retrieve these values:
-
In your AWS console, select the region that contains your Redshift cluster, open the Redshift cluster dashboard, then open your cluster.
-
Open the General information tab, then copy the Cluster identifier and Endpoint.
-
Open the Properties tab and copy the Database name and Port.
-
Open your IAM dashboard, go to Users and select your user. Then, go to Permissions and follow the AWS documentation to ensure that the IAM user is authorized to connect to Redshift and perform SQL operations.
Iam Role
You can use AWS’s Assume Role method to automatically generate temporary credentials to connect to Redshift. This is useful to grant temporary access to limited-privilege IAM users or roles without storing any credentials on disk. The following information is required to create the connection:
- Cluster identifier
- Database name
- Port
- Region
- IAM role ARN
Complete the following steps to retrieve these values:
-
In your AWS console, select the region that contains your Redshift cluster, open the Redshift cluster dashboard, then open your cluster.
-
Open the General information tab, then copy the Cluster identifier and Endpoint.
-
Open the Properties tab and copy the Database name and Port.
-
Open your IAM dashboard, and follow the AWS documentation to create an IAM role and attach an IAM Policy to access the required services, for example AWS Redshift.
-
Edit the trust relationship of the role created in Step 4 to add a trust policy that allows the IAM role to assume your new role.
-
Copy the ARN of the role.
Create your connection
Info
Astro users can also create connections using the Astro Environment Manager, which stores connections in an Astro-managed secrets backend. These connections can be shared across multiple deployed and local Airflow environments. See Create Airflow connections in the Astro UI.
Db Creds
-
Open your Astro project and add the following line to your
requirements.txtfile:This will install the Amazon provider package, which makes the Amazon Redshift connection type available in Airflow.
-
Run
astro dev restartto restart your local Airflow environment and apply your changes inrequirements.txt. -
In the Airflow UI for your local Airflow environment, go to Admin > Connections. Click + to add a new connection, then select the connection type as Amazon Redshift.
-
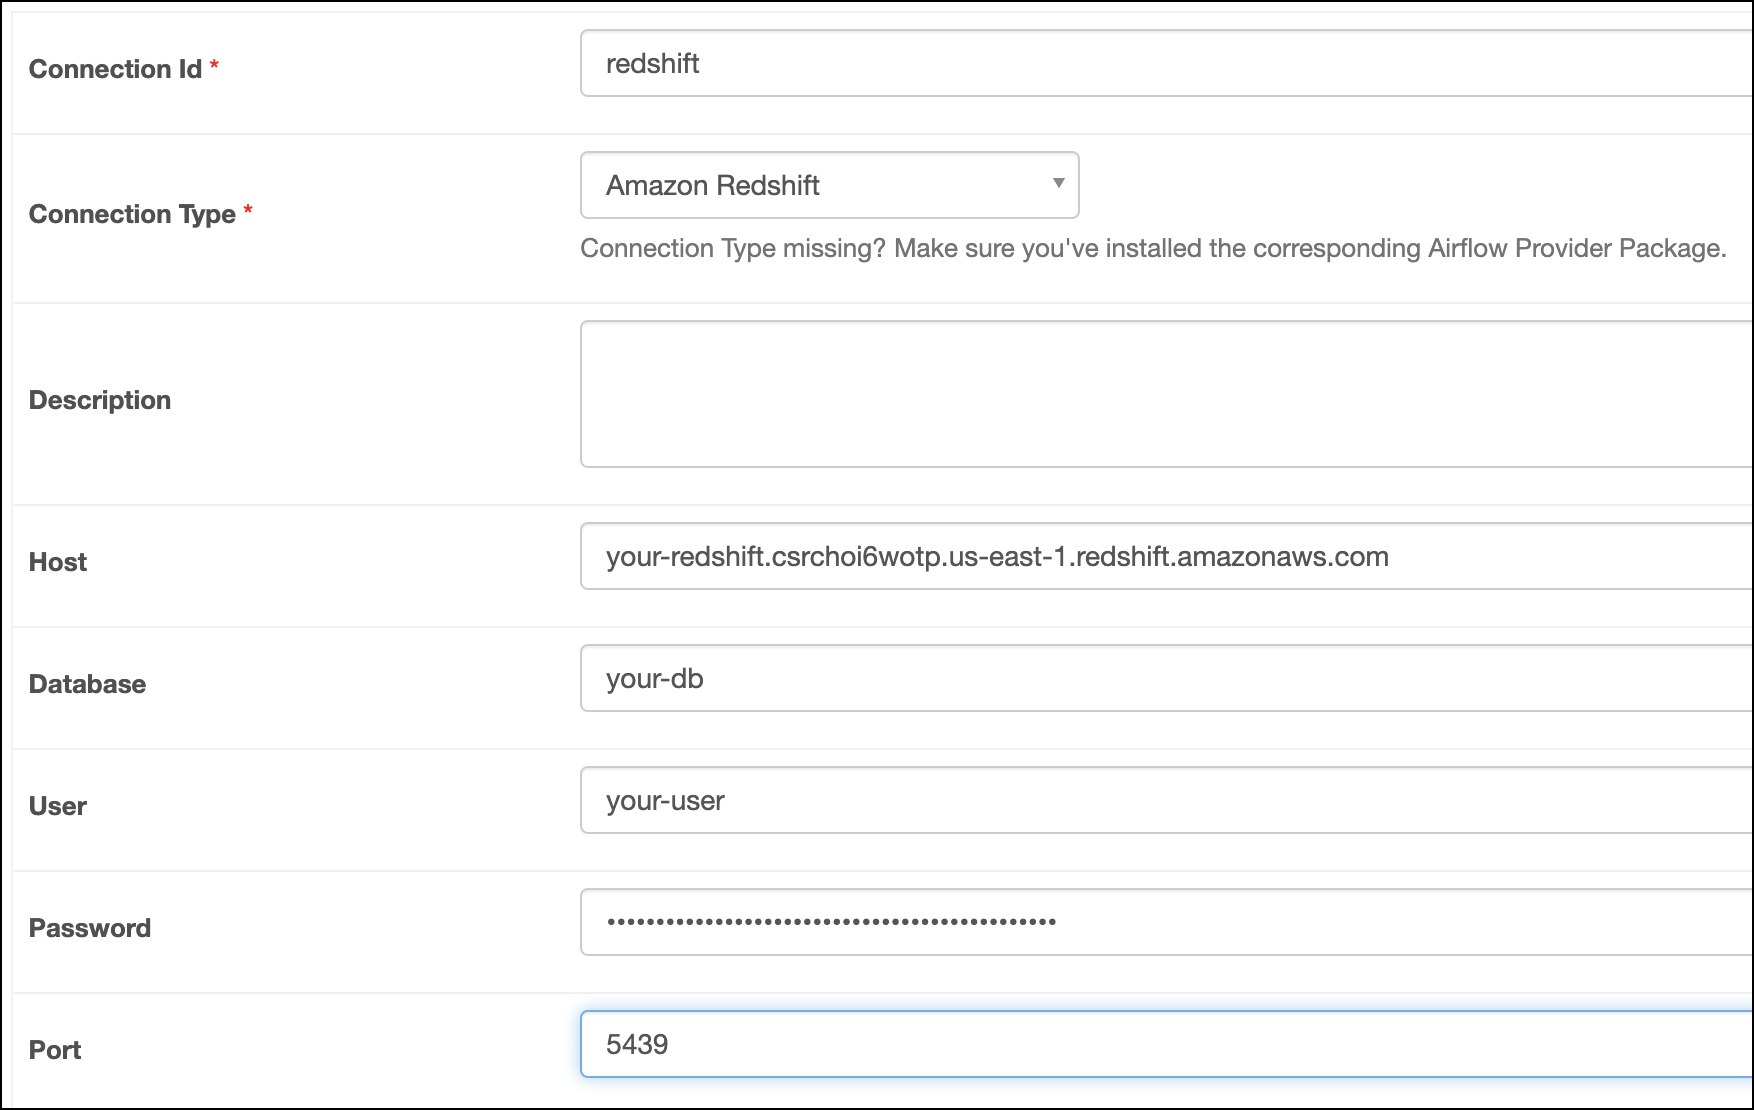
Fill out the following connection fields using the information you retrieved from Get connection details:
- Connection Id: Enter a name for the connection.
- Host: Enter the cluster Endpoint.
- Database: Enter the Database name.
- User: Enter the DB user username.
- Password: Enter the DB user password.
- Port: Enter the Port.
-
Click Test. After the connection test succeeds, click Save.
Iam Creds
-
Open your Astro project and add the following line to your
requirements.txtfile:This will install the Amazon provider package, which makes the Amazon Redshift connection type available in Airflow.
-
Copy the
awscredentials file to theincludedirectory of your Astro project. It should have the following format: -
Run
astro dev restartto restart your local Airflow environment and apply your changes inrequirements.txt. -
In the Airflow UI for your local Airflow environment, go to Admin > Connections. Click + to add a new connection, then select the connection type as Amazon Redshift.
-
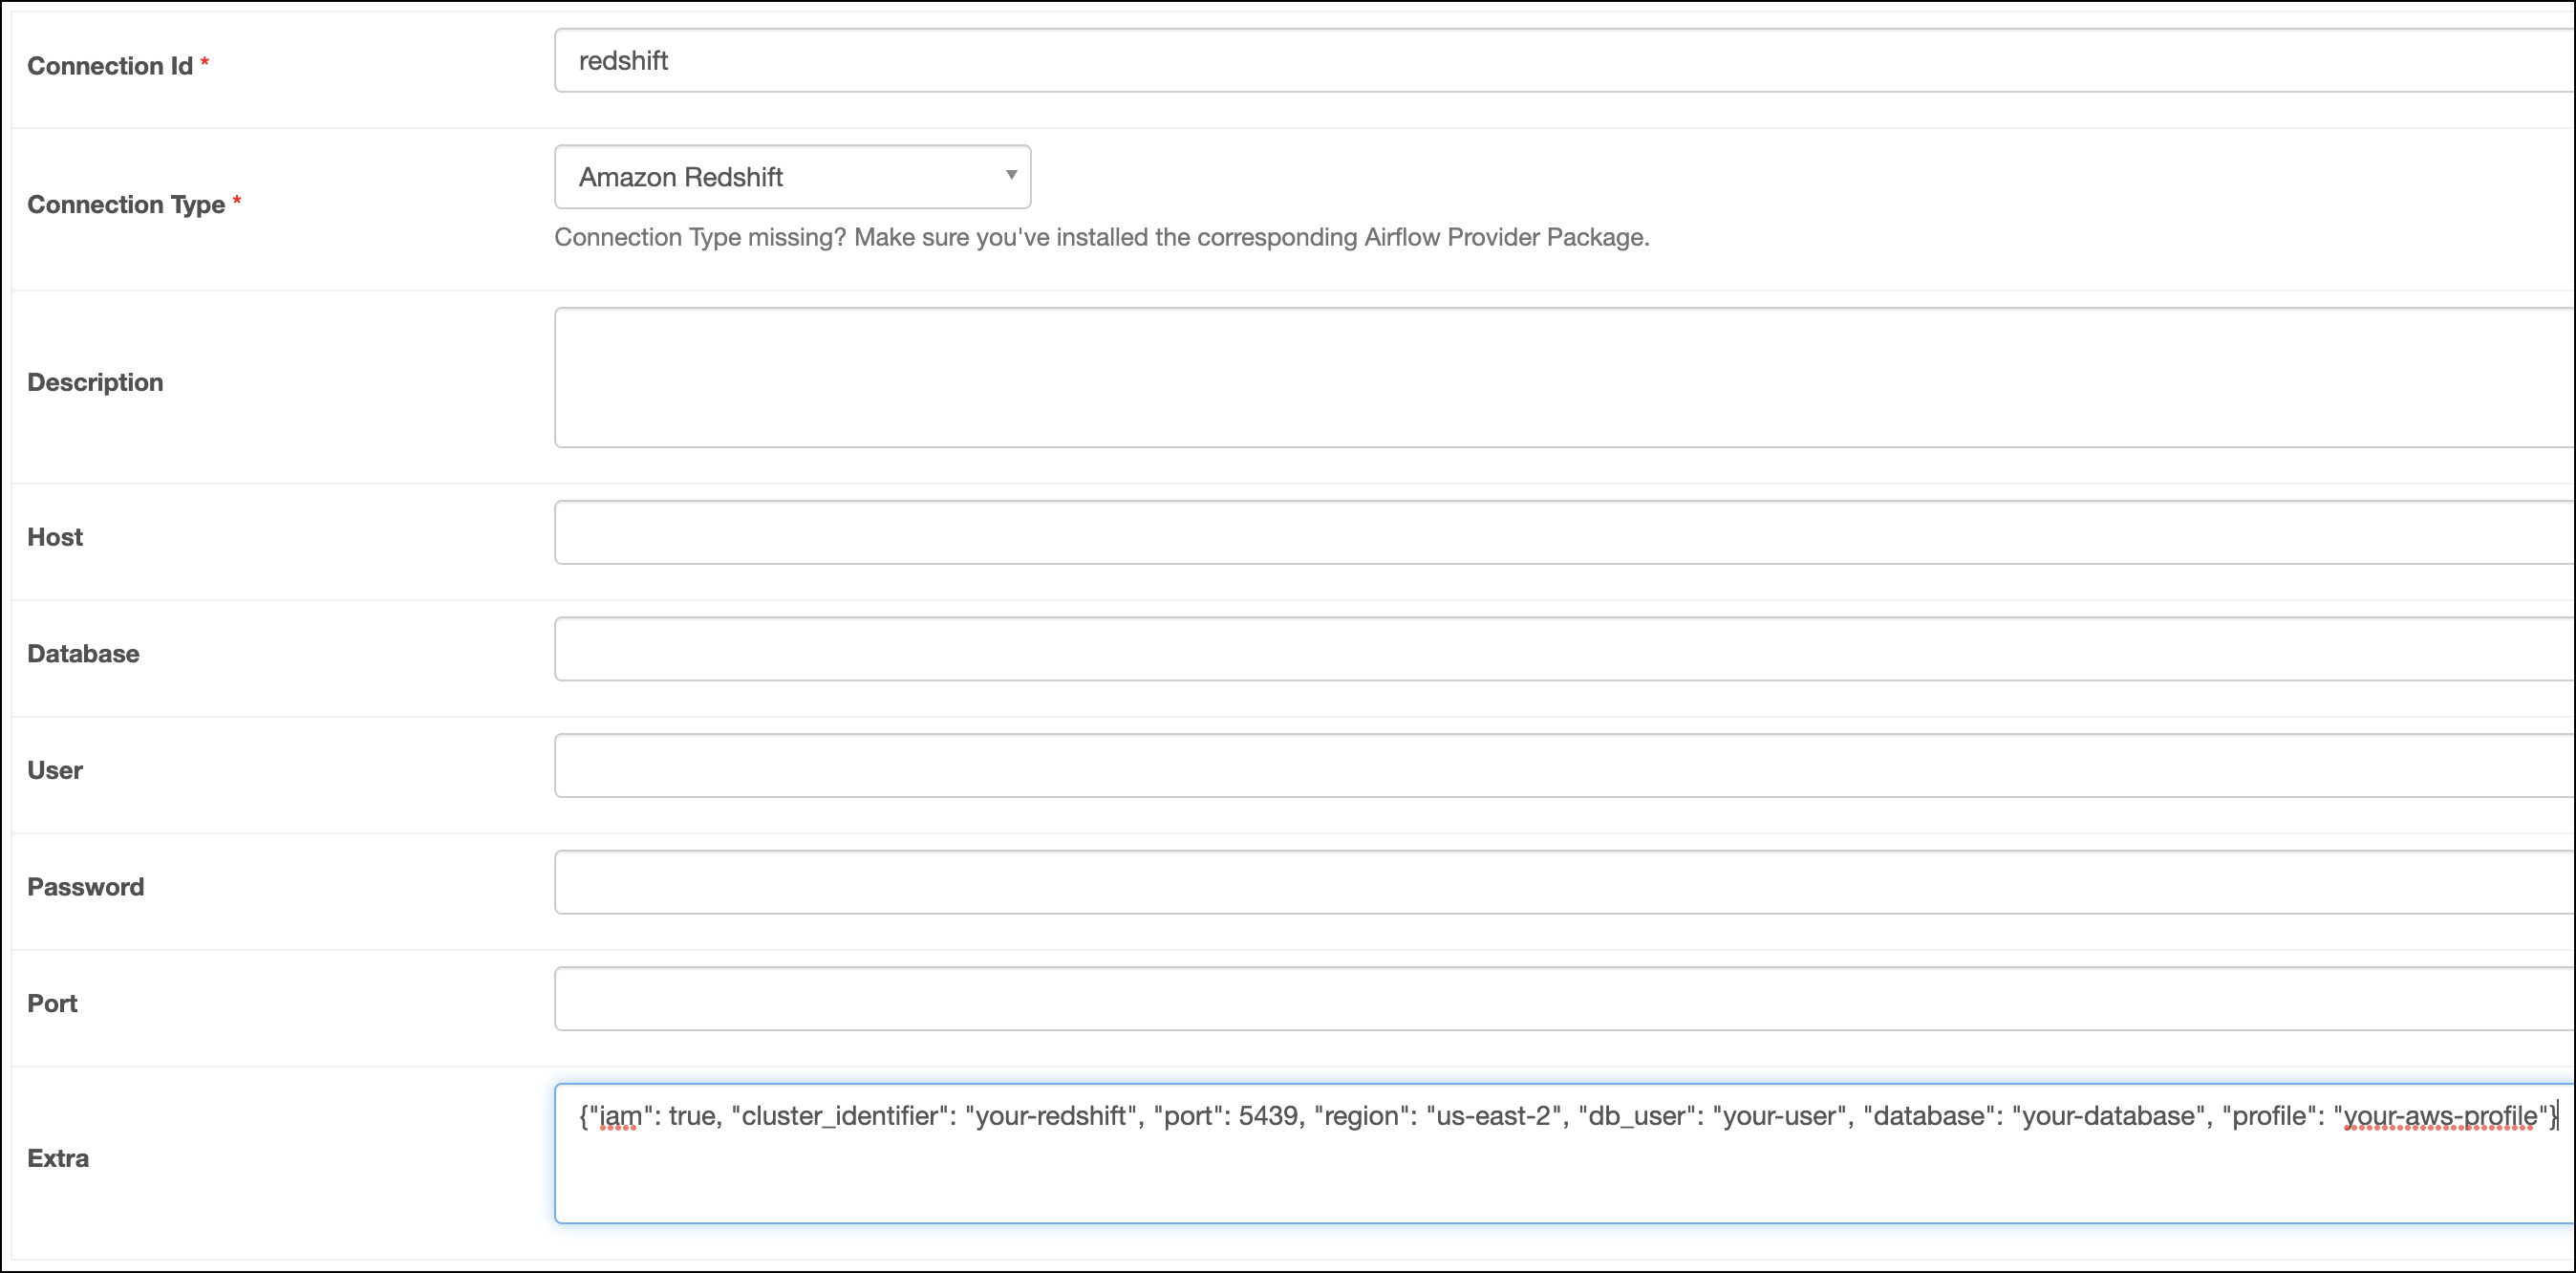
Enter a name for the connection in the Connection Id field.
-
Copy the following JSON template into the Extra field, then replace the placeholder values with the information you retrieved in Get connection details.
-
Click Test. After the connection test succeeds, click Save.
Iam Role
-
Open your Astro project and add the following line to your
requirements.txtfile:This will install the Amazon provider package, which makes the Amazon Redshift connection type available in Airflow.
-
Run
astro dev restartto restart your local Airflow environment and apply your changes inrequirements.txt. -
In the Airflow UI for your local Airflow environment, go to Admin > Connections. Click + to add a new connection, then select the connection type as Amazon Redshift.
-
Complete the following connection fields using the information you retrieved from Get connection details:
- Connection Id: Enter a name for the connection.
- Host: Enter the cluster Endpoint.
- Database: Enter the Database name.
- Port: Enter the Port.
- Extra:
-
Click Test. After the connection test succeeds, click Save.
How it works
Airflow uses the Amazon Redshift Python Connector to connect to Redshift through the RedshiftSQLHook.