Orchestrate Snowpark Machine Learning Workflows with Apache Airflow

Info

This page has not yet been updated for Airflow 3. The concepts shown are relevant, but some code may need to be updated. If you run any examples, take care to update import statements and watch for any other breaking changes.

Snowpark is the set of runtimes and libraries that securely deploy and process Python and other programming code in Snowflake. This includes Snowpark ML, the Python library and underlying infrastructure for end-to-end ML workflows in Snowflake. Snowpark ML has 2 components: Snowpark ML Modeling for model development, and Snowpark ML Operations including the Snowpark Model Registry, for model deployment and management.

In this tutorial, you’ll learn how to:

  • Create a custom XCom backend in Snowflake.
  • Create and use the Snowpark Model Registry in Snowflake.
  • Use Airflow decorators to run code in Snowpark, both in a pre-built and custom virtual environment.
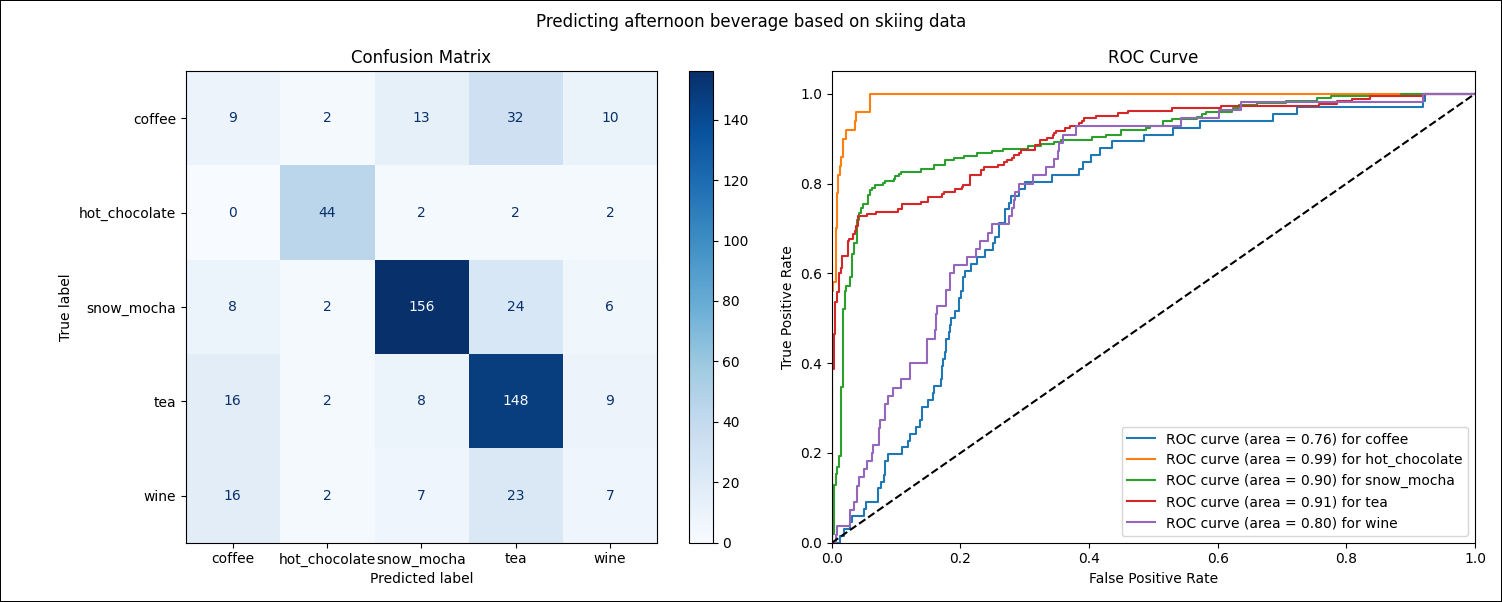
  • Run a Logistic Regression model on a synthetic dataset to predict skiers’ afternoon beverage choice.

Warning

The provider used in this tutorial is currently in beta and both its contents and decorators are subject to change. After the official release, this tutorial will be updated.

A plot showing a confusion matrix and ROC curve with a high AUC for hot_chocolate, a medium AUC for snow_mocha and tea, and low predictive power for wine and coffee.

Why use Airflow with Snowpark?

Snowpark allows you to use Python to perform transformations and machine learning operations on data stored in Snowflake.

Integrating Snowpark for Python with Airflow offers the benefits of:

  • Running machine learning models directly in Snowflake, without having to move data out of Snowflake.
  • Expressing data transformations in Snowflake in Python instead of SQL.
  • Storing and versioning your machine learning models using the Snowpark Model Registry inside Snowflake.
  • Using Snowpark’s compute resources instead of your Airflow cluster resources for machine learning.
  • Using Airflow for Snowpark Python orchestration to enable automation, auditing, logging, retry, and complex triggering for powerful workflows.

The Snowpark provider for Airflow simplifies interacting with Snowpark by:

  • Connecting to Snowflake using an Airflow connection, removing the need to directly pass credentials in your DAG.
  • Automatically instantiating a Snowpark session.
  • Automatically serializing and deserializing Snowpark dataframes passed using Airflow XCom.
  • Integrating with OpenLineage.
  • Providing a pre-built custom XCom backend for Snowflake.

Additionally, this tutorial shows how to use Snowflake as a custom XCom backend. This is especially useful for organizations with strict compliance requirements who want to keep all their data in Snowflake, but still leverage Airflow XCom to pass data between tasks.

Time to complete

This tutorial takes approximately 45 minutes to complete.

Assumed knowledge

To get the most out of this tutorial, make sure you have an understanding of:

Prerequisites

  • The Astro CLI.

  • A Snowflake account. A 30-day free trial is available. You need to have at least one database and one schema created to store the data and models used in this tutorial.

  • (Optional) This tutorial includes instructions on how to use the Snowflake custom XCom backend included in the provider. If you want to this custom XCom backend you will need to either:

    • Run the DAG using a Snowflake account with ACCOUNTADMIN privileges to allow the DAG’s first task to create the required database, schema, stage and table. See Step 3.3 for more instructions. The free trial account has the required privileges.

    • Ask your Snowflake administrator to:

      • Provide you with the name of an existing database, schema, and stage. You need to use these names in Step 1.8 for the AIRFLOW__CORE__XCOM_SNOWFLAKE_TABLE and AIRFLOW__CORE__XCOM_SNOWFLAKE_STAGE environment variables.
      • Create an XCOM_TABLE with the following schema:
      1dag_id varchar NOT NULL,
      2task_id varchar NOT NULL,
      3run_id varchar NOT NULL,
      4multi_index integer NOT NULL,
      5key varchar NOT NULL,
      6value_type varchar NOT NULL,
      7value varchar NOT NULL

Info

The example code from this tutorial is also available on GitHub.

Step 1: Configure your Astro project

  1. Create a new Astro project:

    1$ mkdir astro-snowpark-tutorial && cd astro-snowpark-tutorial
    2$ astro dev init
  2. Create a new file in your Astro project’s root directory called requirements-snowpark.txt. This file contains all Python packages that you install in your reusable Snowpark environment.

    psycopg2-binary
    snowflake_snowpark_python[pandas]>=1.11.1
    git+https://github.com/astronomer/astro-provider-snowflake.git
    virtualenv
  3. Change the content of the Dockerfile of your Astro project to the following, which creates a virtual environment by using the Astro venv buildkit. The requirements added in the previous step are installed in that virtual environment. This tutorial includes Snowpark Python tasks that are running in virtual environments, which is a common pattern in production to simplify dependency management. This Dockerfile creates a virtual environment called snowpark with the Python version 3.8 and the packages specified in requirements-snowpark.txt.

    1# syntax=quay.io/astronomer/airflow-extensions:latest
    2
    3FROM quay.io/astronomer/astro-runtime:10.2.0
    4
    5# Create the virtual environment
    6PYENV 3.8 snowpark requirements-snowpark.txt
    7
    8# Install packages into the virtual environment
    9COPY requirements-snowpark.txt /tmp
    10RUN python3.8 -m pip install -r /tmp/requirements-snowpark.txt
  4. Add the following package to your packages.txt file:

    build-essential
    git
  5. Add the following packages to your requirements.txt file. The Astro Snowflake provider is installed from the whl file.

    apache-airflow-providers-snowflake==5.2.0
    apache-airflow-providers-amazon==8.15.0
    snowflake-snowpark-python[pandas]==1.11.1
    snowflake-ml-python==1.1.2
    matplotlib==3.8.1
    git+https://github.com/astronomer/astro-provider-snowflake.git

Warning

The Astro Snowflake provider is currently in beta. Classes from this provider might be subject to change and will be included in the Snowflake provider in a future release.

  1. To create an Airflow connection to Snowflake and allow serialization of Astro Python SDK objects, add the following to your .env file. Make sure to enter your own Snowflake credentials as well as the name of an existing database and schema.

    AIRFLOW__CORE__ALLOWED_DESERIALIZATION_CLASSES=airflow\.* astro\.*
    AIRFLOW_CONN_SNOWFLAKE_DEFAULT='{
    "conn_type":"snowflake",
    "login":"<username>",
    "password":"<password>",
    "schema":"MY_SKI_DATA_SCHEMA",
    "extra":
    {
    "account":"<account>",
    "warehouse":"<warehouse>",
    "database":"MY_SKI_DATA_DATABASE",
    "region":"<region>",
    "role":"<role>",
    "authenticator":"snowflake",
    "session_parameters":null,
    "application":"AIRFLOW"
    }
    }'

Info

For more information on creating a Snowflake connection, see Create a Snowflake connection in Airflow.

  1. (Optional) If you want to use a Snowflake custom XCom backend, add the following additional variables to your .env. Replace the values with the name of your own database, schema, table, and stage if you are not using the suggested values.

    AIRFLOW__CORE__XCOM_BACKEND=snowpark_provider.xcom_backends.snowflake.SnowflakeXComBackend
    AIRFLOW__CORE__XCOM_SNOWFLAKE_TABLE='AIRFLOW_XCOM_DB.AIRFLOW_XCOM_SCHEMA.XCOM_TABLE'
    AIRFLOW__CORE__XCOM_SNOWFLAKE_STAGE='AIRFLOW_XCOM_DB.AIRFLOW_XCOM_SCHEMA.XCOM_STAGE'
    AIRFLOW__CORE__XCOM_SNOWFLAKE_CONN_NAME='snowflake_default'

Step 2: Add your data

The DAG in this tutorial runs a classification model on synthetic data to predict which afternoon beverage a skier will choose based on attributes like ski color, ski resort, and amount of new snow. The data is generated using this script.

  1. Create a new directory in your Astro project’s include directory called data.

  2. Download the dataset from Astronomer’s GitHub and save it in include/data.

Step 3: Create your DAG

  1. In your dags folder, create a file called airflow_with_snowpark_tutorial.py.

  2. Copy the following code into the file. Make sure to provide your Snowflake database and schema names to MY_SNOWFLAKE_DATABASE and MY_SNOWFLAKE_SCHEMA.

    1"""
    2### Orchestrate data transformation and model training in Snowflake using Snowpark
    3
    4This DAG shows how to use specialized decorators to run Snowpark code in Airflow.
    5Note that it uses the Airflow 2.7 feature of setup/ teardown tasks to create
    6and clean up a Snowflake custom XCom backend.
    7If you want to use regular XCom set
    8`SETUP_TEARDOWN_SNOWFLAKE_CUSTOM_XCOM_BACKEND` to `False`.
    9"""
    10
    11from datetime import datetime
    12from airflow.decorators import dag, task
    13from astro import sql as aql
    14from astro.files import File
    15from astro.sql.table import Table
    16from airflow.models.baseoperator import chain
    17
    18
    19# toggle to True if you are using the Snowflake XCOM backend and want to
    20# use setup/ teardown tasks to create all necessary objects and clean up the XCOM table
    21# after the DAG has run
    22SETUP_TEARDOWN_SNOWFLAKE_CUSTOM_XCOM_BACKEND = False
    23# provide your Snowflake XCOM database, schema, stage and table names
    24MY_SNOWFLAKE_XCOM_DATABASE = "SNOWPARK_XCOM_DB"
    25MY_SNOWFLAKE_XCOM_SCHEMA = "SNOWPARK_XCOM_SCHEMA"
    26MY_SNOWFLAKE_XCOM_STAGE = "XCOM_STAGE"
    27MY_SNOWFLAKE_XCOM_TABLE = "XCOM_TABLE"
    28
    29# provide your Snowflake database name, schema name, connection ID
    30# and path to the Snowpark environment binary
    31MY_SNOWFLAKE_DATABASE = "MY_SKI_DATA_DATABASE" # an existing database
    32MY_SNOWFLAKE_SCHEMA = "MY_SKI_DATA_SCHEMA" # an existing schema
    33MY_SNOWFLAKE_TABLE = "MY_SKI_DATA_TABLE"
    34SNOWFLAKE_CONN_ID = "snowflake_default"
    35SNOWPARK_BIN = "/home/astro/.venv/snowpark/bin/python"
    36
    37# while this tutorial will run with the default Snowflake warehouse, larger
    38# datasets may require a Snowpark optimized warehouse. Set the following toggle to true to
    39# use such a warehouse and provide your Snowpark and regular warehouses' names.
    40USE_SNOWPARK_WAREHOUSE = False
    41MY_SNOWPARK_WAREHOUSE = "SNOWPARK_WH"
    42MY_SNOWFLAKE_REGULAR_WAREHOUSE = "HUMANS"
    43
    44
    45@dag(
    46 start_date=datetime(2023, 9, 1),
    47 schedule=None,
    48 catchup=False,
    49)
    50def airflow_with_snowpark_tutorial():
    51 if SETUP_TEARDOWN_SNOWFLAKE_CUSTOM_XCOM_BACKEND:
    52
    53 @task.snowpark_python(
    54 snowflake_conn_id=SNOWFLAKE_CONN_ID,
    55 )
    56 def create_snowflake_objects(
    57 snowflake_xcom_database,
    58 snowflake_xcom_schema,
    59 snowflake_xcom_table,
    60 snowflake_xcom_table_stage,
    61 use_snowpark_warehouse=False,
    62 snowpark_warehouse=None,
    63 ):
    64 from snowflake.snowpark.exceptions import SnowparkSQLException
    65
    66 try:
    67 snowpark_session.sql(
    68 f"""CREATE DATABASE IF NOT EXISTS
    69 {snowflake_xcom_database};
    70 """
    71 ).collect()
    72 print(f"Created database {snowflake_xcom_database}.")
    73
    74 snowpark_session.sql(
    75 f"""CREATE SCHEMA IF NOT EXISTS
    76 {snowflake_xcom_database}.
    77 {snowflake_xcom_schema};
    78 """
    79 ).collect()
    80 print(f"Created schema {snowflake_xcom_schema}.")
    81
    82 if use_snowpark_warehouse:
    83 snowpark_session.sql(
    84 f"""CREATE WAREHOUSE IF NOT EXISTS
    85 {snowpark_warehouse}
    86 WITH
    87 WAREHOUSE_SIZE = 'MEDIUM'
    88 WAREHOUSE_TYPE = 'SNOWPARK-OPTIMIZED';
    89 """
    90 ).collect()
    91 print(f"Created warehouse {snowpark_warehouse}.")
    92 except SnowparkSQLException as e:
    93 print(e)
    94 print(
    95 f"""You do not have the necessary privileges to create objects in Snowflake.
    96 If they do not exist already, please contact your Snowflake administrator
    97 to create the following objects for you:
    98 - DATABASE: {snowflake_xcom_database},
    99 - SCHEMA: {snowflake_xcom_schema},
    100 - WAREHOUSE: {snowpark_warehouse} (if you want to use a Snowpark warehouse)
    101 """
    102 )
    103
    104 snowpark_session.sql(
    105 f"""CREATE TABLE IF NOT EXISTS
    106 {snowflake_xcom_database}.
    107 {snowflake_xcom_schema}.
    108 {snowflake_xcom_table}
    109 (
    110 dag_id varchar NOT NULL,
    111 task_id varchar NOT NULL,
    112 run_id varchar NOT NULL,
    113 multi_index integer NOT NULL,
    114 key varchar NOT NULL,
    115 value_type varchar NOT NULL,
    116 value varchar NOT NULL
    117 );
    118 """
    119 ).collect()
    120 print(f"Table {snowflake_xcom_table} is ready!")
    121
    122 snowpark_session.sql(
    123 f"""CREATE STAGE IF NOT EXISTS
    124 {snowflake_xcom_database}.\
    125 {snowflake_xcom_schema}.\
    126 {snowflake_xcom_table_stage}
    127 DIRECTORY = (ENABLE = TRUE)
    128 ENCRYPTION = (TYPE = 'SNOWFLAKE_SSE');
    129 """
    130 ).collect()
    131 print(f"Stage {snowflake_xcom_table_stage} is ready!")
    132
    133 create_snowflake_objects_obj = create_snowflake_objects(
    134 snowflake_xcom_database=MY_SNOWFLAKE_XCOM_DATABASE,
    135 snowflake_xcom_schema=MY_SNOWFLAKE_XCOM_SCHEMA,
    136 snowflake_xcom_table=MY_SNOWFLAKE_XCOM_TABLE,
    137 snowflake_xcom_table_stage=MY_SNOWFLAKE_XCOM_STAGE,
    138 use_snowpark_warehouse=USE_SNOWPARK_WAREHOUSE,
    139 snowpark_warehouse=MY_SNOWPARK_WAREHOUSE,
    140 )
    141
    142 # use the Astro Python SDK to load data from a CSV file into Snowflake
    143 load_file_obj = aql.load_file(
    144 task_id="load_file",
    145 input_file=File("include/data/ski_dataset.csv"),
    146 output_table=Table(
    147 metadata={
    148 "database": MY_SNOWFLAKE_DATABASE,
    149 "schema": MY_SNOWFLAKE_SCHEMA,
    150 },
    151 conn_id=SNOWFLAKE_CONN_ID,
    152 name=MY_SNOWFLAKE_TABLE,
    153 ),
    154 if_exists="replace",
    155 )
    156
    157 # create a model registry in Snowflake
    158 @task.snowpark_python(
    159 snowflake_conn_id=SNOWFLAKE_CONN_ID,
    160 )
    161 def create_model_registry(demo_database, demo_schema):
    162 from snowflake.ml.registry import model_registry
    163
    164 model_registry.create_model_registry(
    165 session=snowpark_session,
    166 database_name=demo_database,
    167 schema_name=demo_schema,
    168 )
    169
    170 # Tasks using the @task.snowpark_python decorator run in
    171 # the regular Snowpark Python environment
    172 @task.snowpark_python(
    173 snowflake_conn_id=SNOWFLAKE_CONN_ID,
    174 )
    175 def transform_table_step_one(df):
    176 from snowflake.snowpark.functions import col
    177 import pandas as pd
    178 import re
    179
    180 pattern = r"table=([^&]+)&schema=([^&]+)&database=([^&]+)"
    181 match = re.search(pattern, df.uri)
    182
    183 formatted_result = f"{match.group(3)}.{match.group(2)}.{match.group(1)}"
    184
    185 df_snowpark = snowpark_session.table(formatted_result)
    186
    187 filtered_data = df_snowpark.filter(
    188 (col("AFTERNOON_BEVERAGE") == "coffee")
    189 | (col("AFTERNOON_BEVERAGE") == "tea")
    190 | (col("AFTERNOON_BEVERAGE") == "snow_mocha")
    191 | (col("AFTERNOON_BEVERAGE") == "hot_chocolate")
    192 | (col("AFTERNOON_BEVERAGE") == "wine")
    193 ).collect()
    194 filtered_df = pd.DataFrame(filtered_data, columns=df_snowpark.columns)
    195
    196 return filtered_df
    197
    198 # Tasks using the @task.snowpark_ext_python decorator can use an
    199 # existing python environment
    200 @task.snowpark_ext_python(snowflake_conn_id=SNOWFLAKE_CONN_ID, python=SNOWPARK_BIN)
    201 def transform_table_step_two(df):
    202 df_serious_skiers = df[df["HOURS_SKIED"] >= 1]
    203
    204 return df_serious_skiers
    205
    206 # Tasks using the @task.snowpark_virtualenv decorator run in a virtual
    207 # environment created on the spot using the requirements specified
    208 @task.snowpark_virtualenv(
    209 snowflake_conn_id=SNOWFLAKE_CONN_ID,
    210 requirements=["pandas", "scikit-learn"],
    211 )
    212 def train_beverage_classifier(
    213 df,
    214 database_name,
    215 schema_name,
    216 use_snowpark_warehouse=False,
    217 snowpark_warehouse=None,
    218 snowflake_regular_warehouse=None,
    219 ):
    220 from sklearn.model_selection import train_test_split
    221 import pandas as pd
    222 from snowflake.ml.registry import model_registry
    223 from snowflake.ml.modeling.linear_model import LogisticRegression
    224 from uuid import uuid4
    225 from snowflake.ml.modeling.preprocessing import OneHotEncoder, StandardScaler
    226
    227 registry = model_registry.ModelRegistry(
    228 session=snowpark_session,
    229 database_name=database_name,
    230 schema_name=schema_name,
    231 )
    232
    233 df.columns = [str(col).replace("'", "").replace('"', "") for col in df.columns]
    234 X = df.drop(columns=["AFTERNOON_BEVERAGE", "SKIER_ID"])
    235 y = df["AFTERNOON_BEVERAGE"]
    236
    237 X_train, X_test, y_train, y_test = train_test_split(
    238 X, y, test_size=0.2, random_state=42
    239 )
    240
    241 train_data = pd.concat([X_train, y_train], axis=1)
    242 test_data = pd.concat([X_test, y_test], axis=1)
    243
    244 categorical_features = ["RESORT", "SKI_COLOR", "JACKET_COLOR", "HAD_LUNCH"]
    245 numeric_features = ["HOURS_SKIED", "SNOW_QUALITY", "CM_OF_NEW_SNOW"]
    246 label_col = ["AFTERNOON_BEVERAGE"]
    247
    248 scaler = StandardScaler(
    249 input_cols=numeric_features,
    250 output_cols=numeric_features,
    251 drop_input_cols=True,
    252 )
    253 scaler.fit(train_data)
    254 train_data_scaled = scaler.transform(train_data)
    255 test_data_scaled = scaler.transform(test_data)
    256
    257 one_hot_encoder = OneHotEncoder(
    258 input_cols=categorical_features,
    259 output_cols=categorical_features,
    260 drop_input_cols=True,
    261 )
    262 one_hot_encoder.fit(train_data_scaled)
    263 train_data_scaled_encoded = one_hot_encoder.transform(train_data_scaled)
    264 test_data_scaled_encoded = one_hot_encoder.transform(test_data_scaled)
    265
    266 feature_cols = train_data_scaled_encoded.drop(
    267 columns=["AFTERNOON_BEVERAGE"]
    268 ).columns
    269
    270 classifier = LogisticRegression(
    271 max_iter=10000, input_cols=feature_cols, label_cols=label_col
    272 )
    273
    274 feature_cols = [str(col).replace('"', "") for col in feature_cols]
    275
    276 if use_snowpark_warehouse:
    277 snowpark_session.use_warehouse(snowpark_warehouse)
    278
    279 classifier.fit(train_data_scaled_encoded)
    280 score = classifier.score(test_data_scaled_encoded)
    281 print(f"Accuracy: {score:.4f}")
    282
    283 y_pred = classifier.predict(test_data_scaled_encoded)
    284 y_pred_proba = classifier.predict_proba(test_data_scaled_encoded)
    285
    286 # register the Snowpark model in the Snowflake model registry
    287 registry.log_model(
    288 model=classifier,
    289 model_version=uuid4().urn,
    290 model_name="Ski Beverage Classifier",
    291 tags={"stage": "dev", "model_type": "LogisticRegression"},
    292 )
    293
    294 if use_snowpark_warehouse:
    295 snowpark_session.use_warehouse(snowflake_regular_warehouse)
    296 snowpark_session.sql(
    297 f"""ALTER WAREHOUSE
    298 {snowpark_warehouse}
    299 SUSPEND;"""
    300 ).collect()
    301
    302 y_pred_proba.columns = [
    303 str(col).replace('"', "") for col in y_pred_proba.columns
    304 ]
    305 y_pred.columns = [str(col).replace('"', "") for col in y_pred.columns]
    306
    307 prediction_results = pd.concat(
    308 [
    309 y_pred_proba[
    310 [
    311 "PREDICT_PROBA_snow_mocha",
    312 "PREDICT_PROBA_tea",
    313 "PREDICT_PROBA_coffee",
    314 "PREDICT_PROBA_hot_chocolate",
    315 "PREDICT_PROBA_wine",
    316 ]
    317 ],
    318 y_pred[["OUTPUT_AFTERNOON_BEVERAGE"]],
    319 y_test,
    320 ],
    321 axis=1,
    322 )
    323
    324 classes = classifier.to_sklearn().classes_
    325 classes_df = pd.DataFrame(classes)
    326
    327 # convert to string column names for parquet serialization
    328 prediction_results.columns = [
    329 str(col).replace("'", "").replace('"', "")
    330 for col in prediction_results.columns
    331 ]
    332 classes_df.columns = ["classes"]
    333
    334 return {
    335 "prediction_results": prediction_results,
    336 "classes": classes_df,
    337 }
    338
    339 # using a regular Airflow task to plot the results
    340 @task
    341 def plot_results(prediction_results):
    342 import matplotlib.pyplot as plt
    343 from sklearn.metrics import roc_curve, auc, ConfusionMatrixDisplay
    344 from sklearn.preprocessing import label_binarize
    345
    346 y_pred = prediction_results["prediction_results"]["OUTPUT_AFTERNOON_BEVERAGE"]
    347 y_test = prediction_results["prediction_results"]["AFTERNOON_BEVERAGE"]
    348 y_proba = prediction_results["prediction_results"][
    349 [
    350 "PREDICT_PROBA_coffee",
    351 "PREDICT_PROBA_hot_chocolate",
    352 "PREDICT_PROBA_snow_mocha",
    353 "PREDICT_PROBA_tea",
    354 "PREDICT_PROBA_wine",
    355 ]
    356 ]
    357 y_score = y_proba.to_numpy()
    358 classes = prediction_results["classes"].iloc[:, 0].values
    359 y_test_bin = label_binarize(y_test, classes=classes)
    360
    361 fig, ax = plt.subplots(1, 2, figsize=(15, 6))
    362
    363 ConfusionMatrixDisplay.from_predictions(y_test, y_pred, ax=ax[0], cmap="Blues")
    364 ax[0].set_title(f"Confusion Matrix")
    365
    366 fpr = dict()
    367 tpr = dict()
    368 roc_auc = dict()
    369
    370 for i, cls in enumerate(classes):
    371 fpr[cls], tpr[cls], _ = roc_curve(y_test_bin[:, i], y_score[:, i])
    372 roc_auc[cls] = auc(fpr[cls], tpr[cls])
    373
    374 ax[1].plot(
    375 fpr[cls],
    376 tpr[cls],
    377 label=f"ROC curve (area = {roc_auc[cls]:.2f}) for {cls}",
    378 )
    379
    380 ax[1].plot([0, 1], [0, 1], "k--")
    381 ax[1].set_xlim([0.0, 1.0])
    382 ax[1].set_ylim([0.0, 1.05])
    383 ax[1].set_xlabel("False Positive Rate")
    384 ax[1].set_ylabel("True Positive Rate")
    385 ax[1].set_title(f"ROC Curve")
    386 ax[1].legend(loc="lower right")
    387
    388 fig.suptitle("Predicting afternoon beverage based on skiing data")
    389
    390 plt.tight_layout()
    391 plt.savefig(f"include/metrics.png")
    392
    393 if SETUP_TEARDOWN_SNOWFLAKE_CUSTOM_XCOM_BACKEND:
    394 # clean up the XCOM table
    395 @task.snowpark_ext_python(
    396 snowflake_conn_id=SNOWFLAKE_CONN_ID,
    397 python="/home/astro/.venv/snowpark/bin/python",
    398 )
    399 def cleanup_xcom_table(
    400 snowflake_xcom_database,
    401 snowflake_xcom_schema,
    402 snowflake_xcom_table,
    403 snowflake_xcom_stage,
    404 ):
    405 snowpark_session.database = snowflake_xcom_database
    406 snowpark_session.schema = snowflake_xcom_schema
    407
    408 snowpark_session.sql(
    409 f"""DROP TABLE IF EXISTS
    410 {snowflake_xcom_database}.
    411 {snowflake_xcom_schema}.
    412 {snowflake_xcom_table};"""
    413 ).collect()
    414
    415 snowpark_session.sql(
    416 f"""DROP STAGE IF EXISTS
    417 {snowflake_xcom_database}.
    418 {snowflake_xcom_schema}.
    419 {snowflake_xcom_stage};"""
    420 ).collect()
    421
    422 cleanup_xcom_table_obj = cleanup_xcom_table(
    423 snowflake_xcom_database=MY_SNOWFLAKE_XCOM_DATABASE,
    424 snowflake_xcom_schema=MY_SNOWFLAKE_XCOM_SCHEMA,
    425 snowflake_xcom_table=MY_SNOWFLAKE_XCOM_TABLE,
    426 snowflake_xcom_stage=MY_SNOWFLAKE_XCOM_STAGE,
    427 )
    428
    429 # set dependencies
    430 create_model_registry_obj = create_model_registry(
    431 demo_database=MY_SNOWFLAKE_DATABASE, demo_schema=MY_SNOWFLAKE_SCHEMA
    432 )
    433
    434 train_beverage_classifier_obj = train_beverage_classifier(
    435 transform_table_step_two(transform_table_step_one(load_file_obj)),
    436 database_name=MY_SNOWFLAKE_DATABASE,
    437 schema_name=MY_SNOWFLAKE_SCHEMA,
    438 use_snowpark_warehouse=USE_SNOWPARK_WAREHOUSE,
    439 snowpark_warehouse=MY_SNOWPARK_WAREHOUSE,
    440 snowflake_regular_warehouse=MY_SNOWFLAKE_REGULAR_WAREHOUSE,
    441 )
    442
    443 chain(create_model_registry_obj, train_beverage_classifier_obj)
    444
    445 plot_results_obj = plot_results(train_beverage_classifier_obj)
    446
    447 if SETUP_TEARDOWN_SNOWFLAKE_CUSTOM_XCOM_BACKEND:
    448 chain(create_snowflake_objects_obj, load_file_obj)
    449 chain(
    450 plot_results_obj,
    451 cleanup_xcom_table_obj.as_teardown(setups=create_snowflake_objects_obj),
    452 )
    453
    454
    455airflow_with_snowpark_tutorial()

    This DAG consists of eight tasks in a simple ML orchestration pipeline.

    • (Optional) create_snowflake_objects: Creates the Snowflake objects required for the Snowflake custom XCom backend. This task uses the @task.snowflake_python decorator to run code within Snowpark, automatically instantiating a Snowpark session called snowpark_session from the connection ID provided to the snowflake_conn_id parameter. This task is a setup task and is only shown in the DAG graph if you set SETUP_TEARDOWN_SNOWFLAKE_CUSTOM_XCOM_BACKEND to True. See also Step 3.3.

    • load_file: Loads the data from the ski_dataset.csv file into the Snowflake table MY_SNOWFLAKE_TABLE using the load_file operator from the Astro Python SDK.

    • create_model_registry: Creates a model registry in Snowpark using the Snowpark ML package. Since the task is defined by the @task.snowflake_python decorator, the snowpark session is automatically instantiated from provided connection ID.

    • transform_table_step_one: Transforms the data in the Snowflake table using Snowpark syntax to filter to only include rows of skiers that ordered the beverages we are interested in. Computation of this task runs within Snowpark. The resulting table is written to XCom as a pandas DataFrame.

    • transform_table_step_two: Transforms the pandas DataFrame created by the upstream task to filter only for serious skiers (those who skied at least one hour that day). This task uses the @task.snowpark_ext_python decorator, running the code in the Snowpark virtual environment created in Step 1. The binary provided to the python parameter of the decorator determines which virtual environment to run a task in. The @task.snowpark_ext_python decorator works analogously to the @task.external_python decorator, except the code is executed within Snowpark’s compute.

    • train_beverage_classifier: Trains a Snowpark Logistic Regression model on the dataset, saves the model to the model registry, and creates predictions from a test dataset. This task uses the @task.snowpark_virtualenv decorator to run the code in a newly created virtual environment within Snowpark’s compute. The requirements parameter of the decorator specifies the packages to install in the virtual environment. The model predictions are saved to XCom as a pandas DataFrame.

    • plot_metrics: Creates a plot of the model performance metrics and saves it to the include directory. This task runs in the Airflow environment using the @task decorator.

    • (Optional) cleanup_xcom_table: Cleans up the Snowflake custom XCom backend by dropping the XCOM_TABLE and XCOM_STAGE. This task is a teardown task and is only shown in the DAG graph if you set SETUP_TEARDOWN_SNOWFLAKE_CUSTOM_XCOM_BACKEND to True. See also Step 3.3.

  3. (Optional) This DAG has two optional features you can enable.

    • If you want to use setup/ teardown tasks to create and clean up a Snowflake custom XCom backend for this DAG, set SETUP_TEARDOWN_SNOWFLAKE_CUSTOM_XCOM_BACKEND to True. This setting adds the create_snowflake_objects and cleanup_xcom_table tasks to your DAG and creates a setup/ teardown workflow. Note that your Snowflake account needs to have ACCOUNTADMIN privileges to perform the operations in the create_snowflake_objects task and you need to define the environment variables described in Step 1.8 to enable the custom XCom backend.

    • If you want to use a Snowpark-optimized warehouse for model training, set the USE_SNOWPARK_WH variable to True and provide your warehouse names to MY_SNOWPARK_WAREHOUSE and MY_SNOWFLAKE_REGULAR_WAREHOUSE. If the create_snowflake_objects task is enabled, it creates the MY_SNOWPARK_WAREHOUSE warehouse. Otherwise, you need to create the warehouse manually before running the DAG.

Info

While this tutorial DAG uses a small dataset where model training can be accomplished using the standard Snowflake warehouse, Astronomer recommends using a Snowpark-optimized warehouse for model training in production.

Step 4: Run your DAG

  1. Run astro dev start in your Astro project to start up Airflow and open the Airflow UI at localhost:8080.

  2. In the Airflow UI, run the airflow_with_snowpark_tutorial DAG by clicking the play button.

Standard

Screenshot of the Airflow UI showing the airflow_with_snowpark_tutorial DAG having completed successfully in the Grid view with the Graph tab selected.

Setup Teardown

Screenshot of the Airflow UI in the Grid view with the Graph tab selected, showing the successfully completed airflow_with_snowpark_tutorial DAG. This screenshot displays the version of the DAG where SETUP_TEARDOWN_SNOWFLAKE_CUSTOM_XCOM_BACKEND is set to true, creating an additional setup/ teardown workflow.

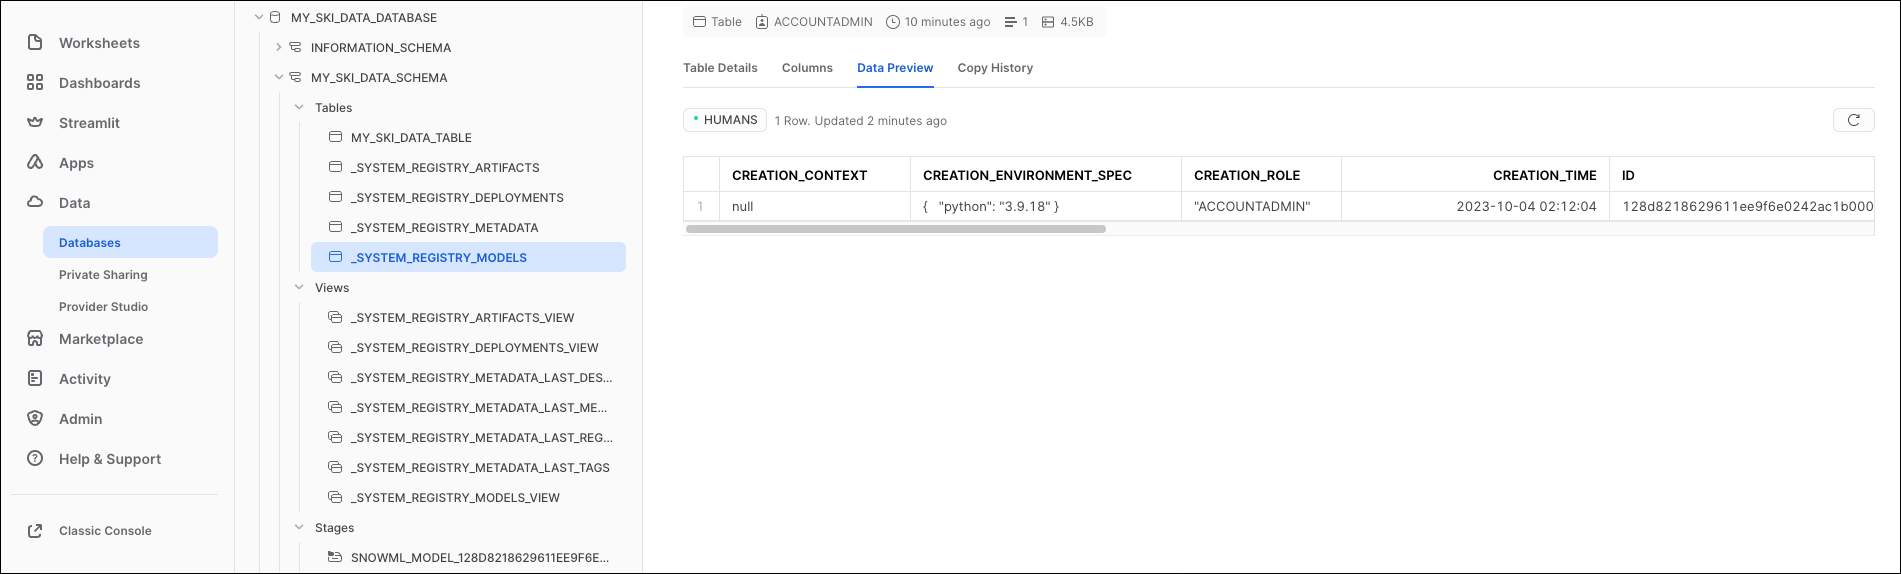
  1. In the Snowflake UI, view the model registry to see the model that was created by the DAG. In a production context, you can pull a specific model from the registry to run predictions on new data.

    Screenshot of the Snowflake UI showing the model registry containing one model.

  2. Navigate to your include directory to view the metrics.png image, which contains the model performance metrics shown at the start of this tutorial.

Conclusion

Congratulations! You trained a classification model in Snowpark using Airflow. This pipeline shows the three main options to run code in Snowpark using Airflow decorators:

  • @task.snowpark_python runs your code in a standard Snowpark environment. Use this decorator if you need to run code in Snowpark that does not require any additional packages that aren’t preinstalled in a standard Snowpark environment. The corresponding traditional operator is the SnowparkPythonOperator.
  • @task.snowpark_ext_python runs your code in a pre-existing virtual environment within Snowpark. Use this decorator when you want to reuse virtual environments in different tasks in the same Airflow instances, or your virtual environment takes a long time to build. The corresponding traditional operator is the SnowparkExternalPythonOperator.
  • @task.snowpark_virtualenv runs your code in a virtual environment in Snowpark that is created at runtime for that specific task. Use this decorator when you want to tailor a virtual environment to a task and don’t need to reuse it. The corresponding traditional operator is the SnowparkVirtualenvOperator.

Corresponding traditional operators are available: