

Astro Private Cloud 2.2This feature was introduced in Astro Private Cloud 2.2. To access this feature, upgrade your Astro Private Cloud installation to 2.2 or later.
Prerequisites
- Astro Private Cloud 2.2.0 or later. See Upgrade to a minor version.
- A registered data plane cluster. See Register a data plane.
- A node group in that cluster, with a label you can match on. Taints are optional.
- A role with node pool write permissions. Cluster Admin and System Admin can create, update, and delete pools; System Editor can update them. See Permissions.
Create a node pool
- Astro UI
- APC API
- In the Astro Private Cloud UI, go to Clusters and select your cluster.
- Click the Node Pools tab.
- Click Node Pool.
- In Name, enter a name. Worker queues reference this name, which must be unique within the cluster.
- (Optional) In Description, enter a note for other administrators. It isn’t used for scheduling.
- In Node selector, enter the label key and value that identify these nodes. Click Add label to match on more than one label. Leave it empty for a pool that can use any node.
- (Optional) Under Tolerations, click Add toleration for each taint on these nodes. See Tolerations.
- (Optional) Set Max CPU (millicores), Max memory (MiB), and Max ephemeral storage (MiB). See Ceilings.
- (Optional) In Nodes for worker queues, enter how many of these nodes worker queues can use.
- Click Add Node Pool.
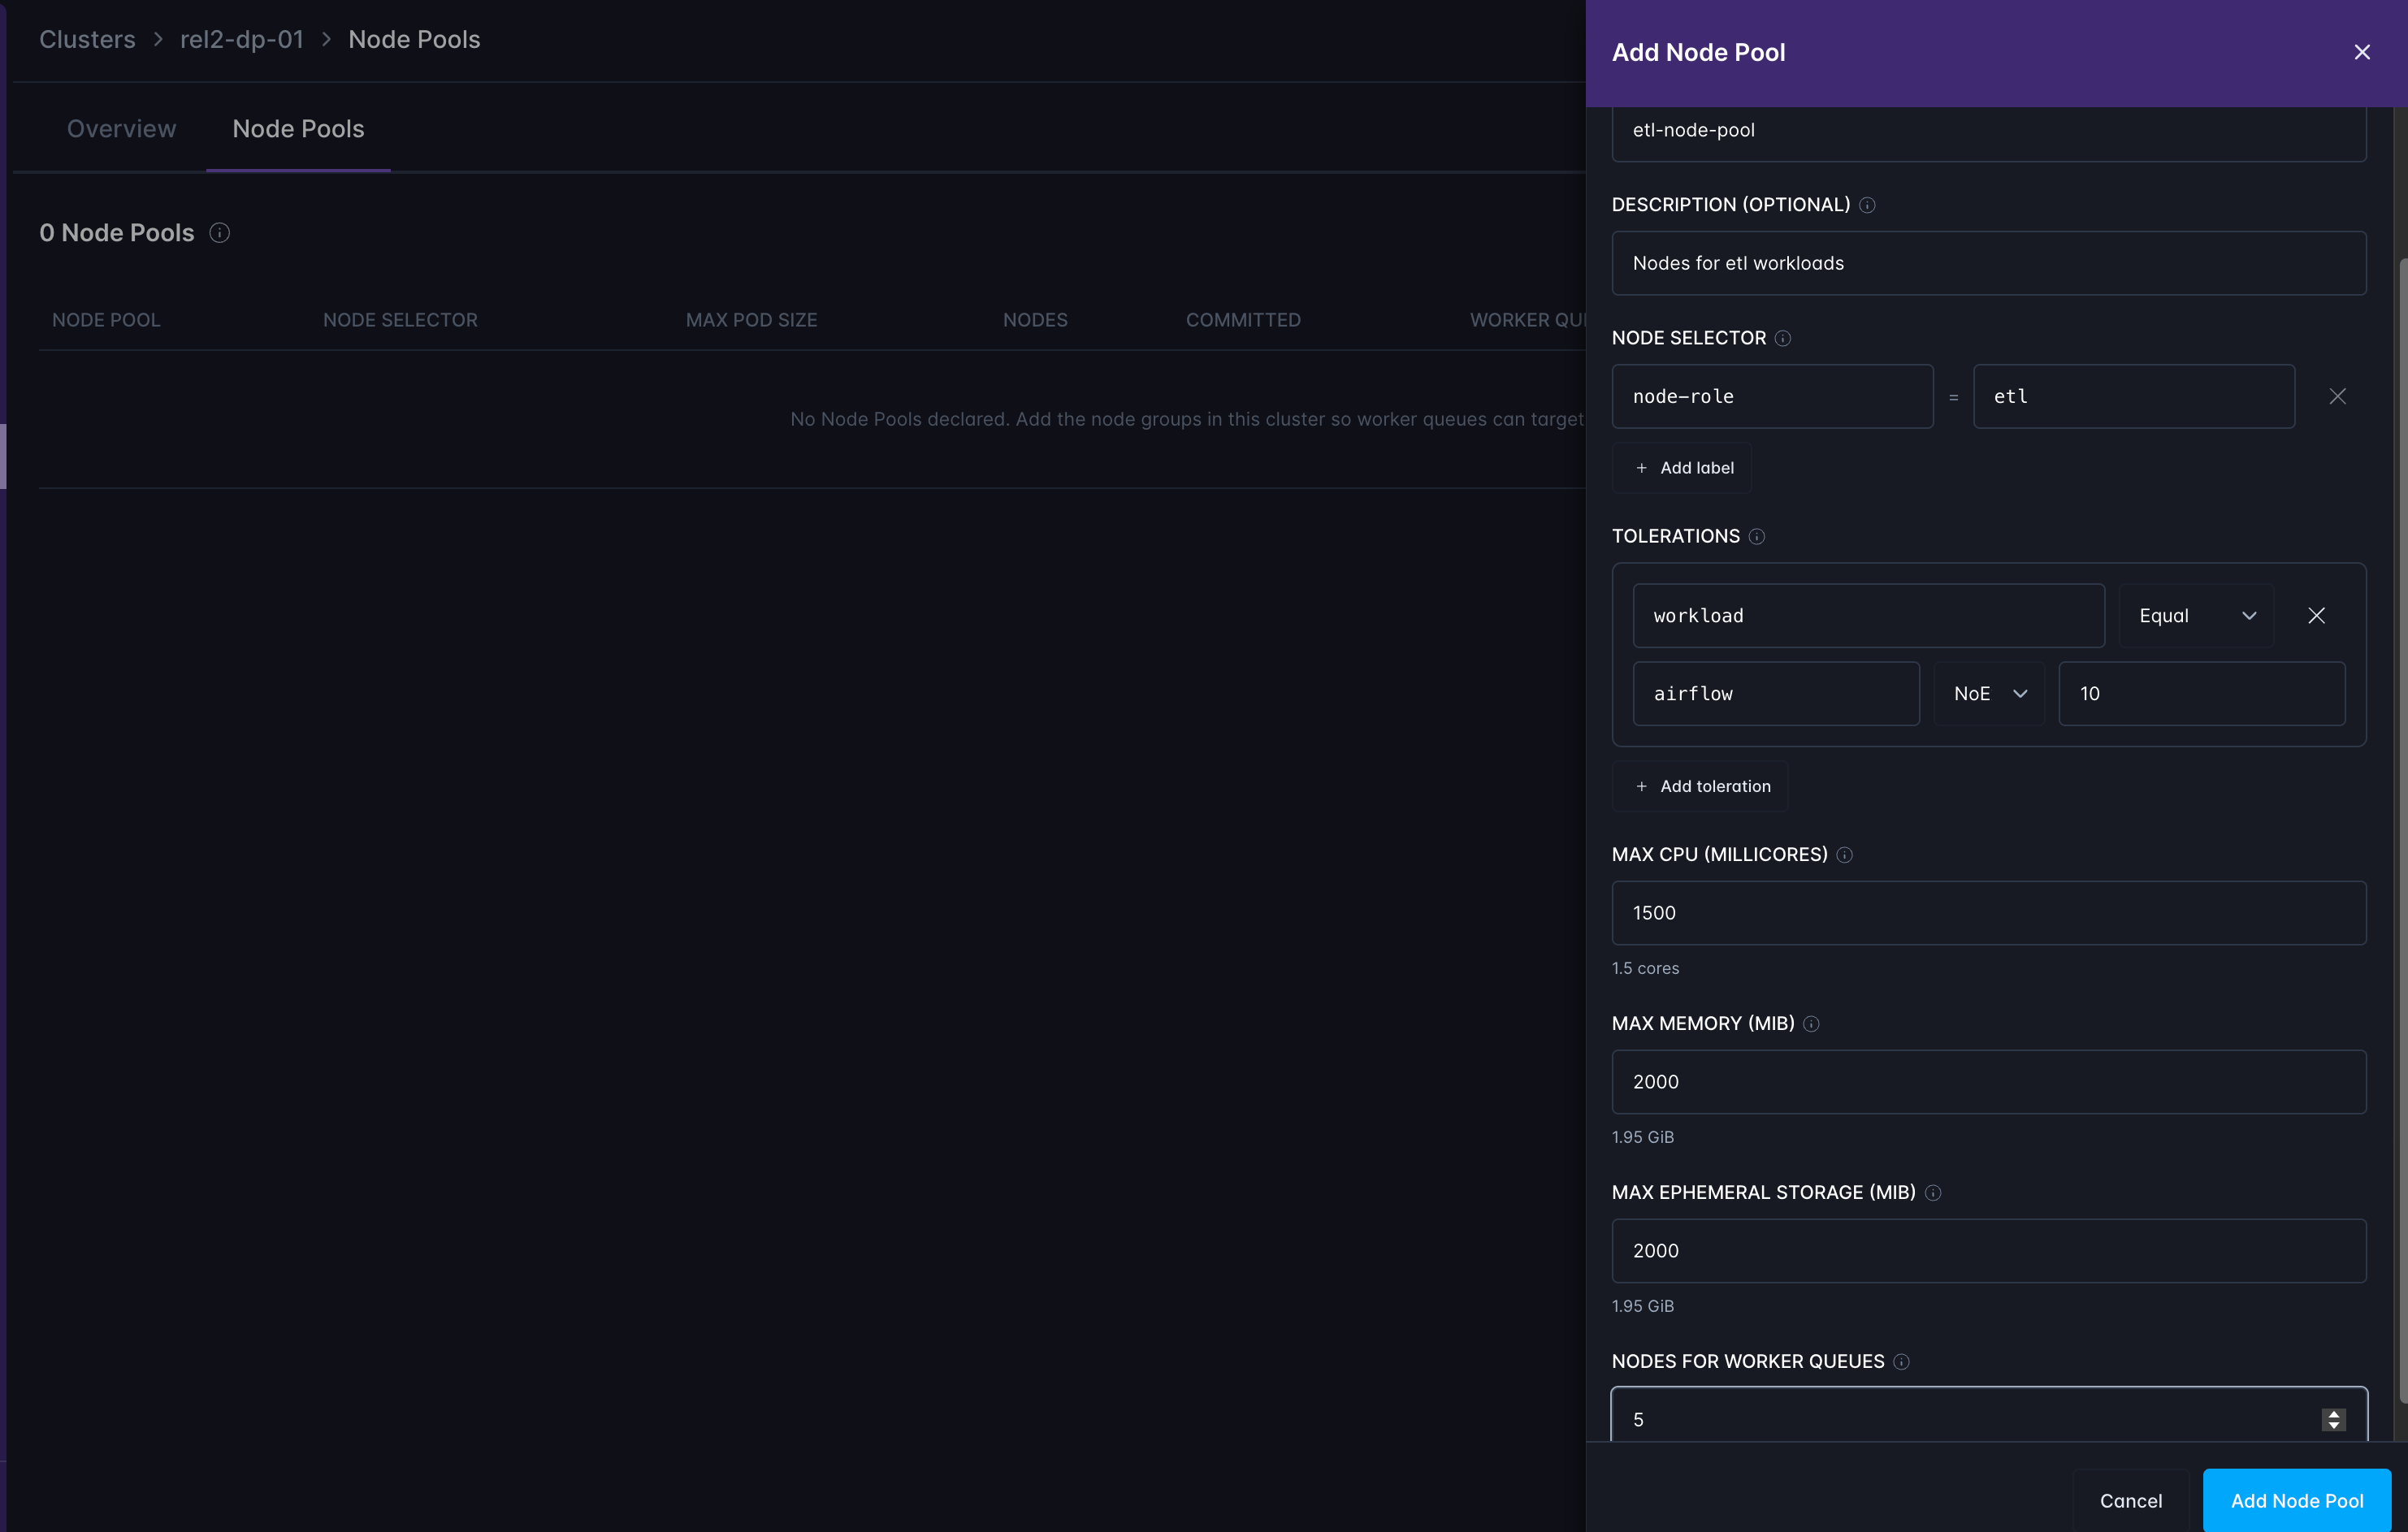
Tolerations
Add a toleration only if the nodes carry taints. Each toleration takes a key, an operator, and optionally a value, an effect, and a number of seconds:- Operator is
ExistsorEqual. WithExists, the value field is disabled becauseExistsmatches the key regardless of value. - Leave the key empty only with the
Existsoperator. An empty key matches every taint. - Effect is
NoSchedule,PreferNoSchedule,NoExecute, or Any effect to match all three. - The seconds field applies only to the
NoExecuteeffect.
Ceilings
The three maximums describe what a single node in this group can give a worker, after the kubelet and daemon sets take their share, so they’re smaller than the instance type’s nominal size. Each ceiling caps a single worker. Saving a worker queue that asks for more CPU, memory, or ephemeral storage than its pool allows is rejected, naming the Deployment, queue, field, requested value, and ceiling. The block is hard because a Pod larger than its node stays Pending permanently with no actionable error. Leave a ceiling empty to impose no pool-level limit on that dimension. The platform’s own resource limits still apply. The form shows the equivalent beneath each field. For example,15000 for Max CPU (millicores) shows 15 cores, and 30720 for Max memory (MiB) shows 30 GiB.
Node count and totals
Nodes for worker queues multiplied by the three ceilings gives the pool’s total budget. Two node pools that describe the same physical nodes should split the node count between them rather than each claiming all of them. Going over the total warns but doesn’t block. A queue counts against the total at its maximum worker count, so a pool can be committed beyond its budget with nothing broken yet. Workers past the total wait for a node that never arrives. For a queue with a worker range, the maximum is its Max workers, even while it runs fewer. The over-commitment warning appears in:- An Over total badge in the Committed column of the node pool list.
- A panel in the node pool form showing which queues are committed against the pool, largest first.
- A warning in the Worker Queues section of any Deployment whose queues would push the pool over.
Review node pools
The Node Pools tab lists every pool on the cluster: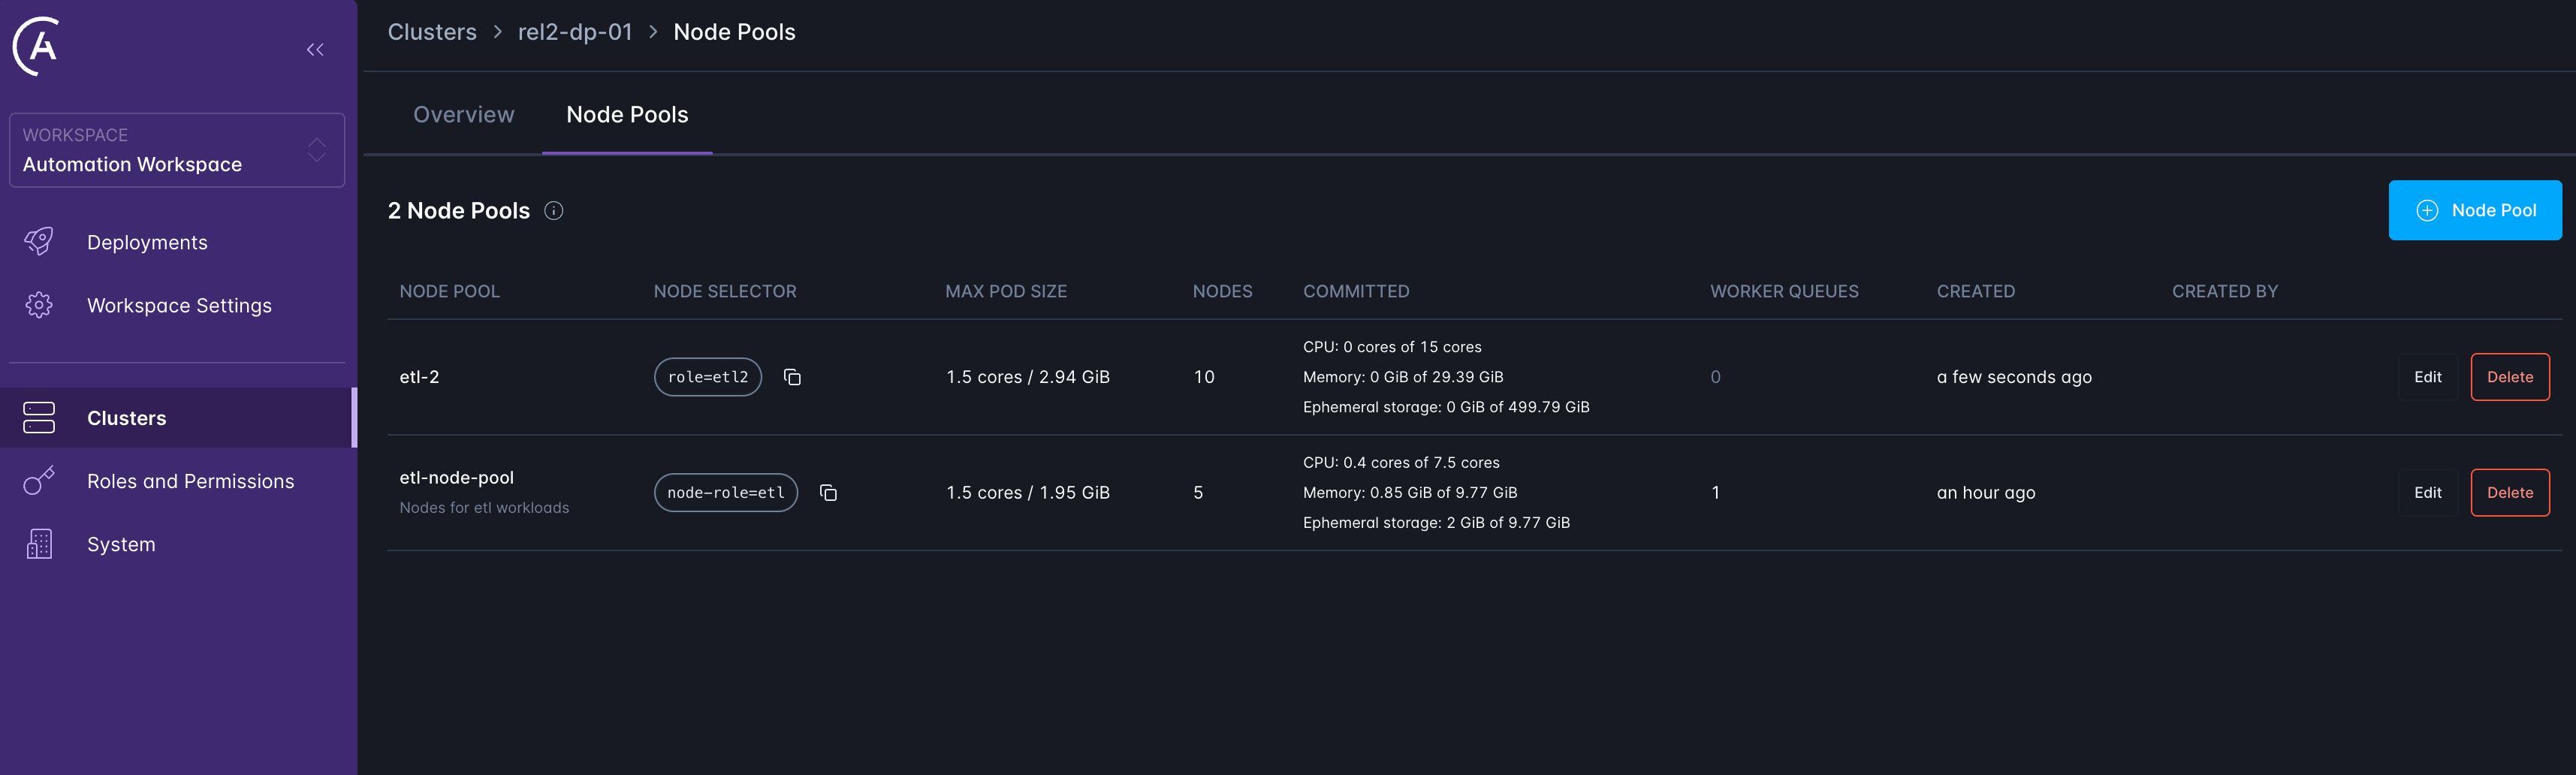
Edit a node pool
- Astro UI
- APC API
Click Edit on the pool, change the fields you want, and click Save Node Pool.An update is a partial patch on the optional fields: a ceiling or toleration you leave alone keeps its stored value. To clear a ceiling, set it explicitly to empty.
Lower a ceiling
Lowering a ceiling below what an existing worker queue requests is refused. The error names every conflicting Deployment, queue, field, requested value, and new ceiling. Resize those queues or move them to another pool first.Change placement
Changing a pool’s node selector or tolerations doesn’t affect Deployments that already use the pool until each one is rebuilt. Until then those workers keep selecting the old node group, while the Node Pools page shows the new label. After you save a placement change, the UI asks Upgrade deployments? and names how many Deployments haven’t picked it up. Click Upgrade to rebuild exactly those Deployments.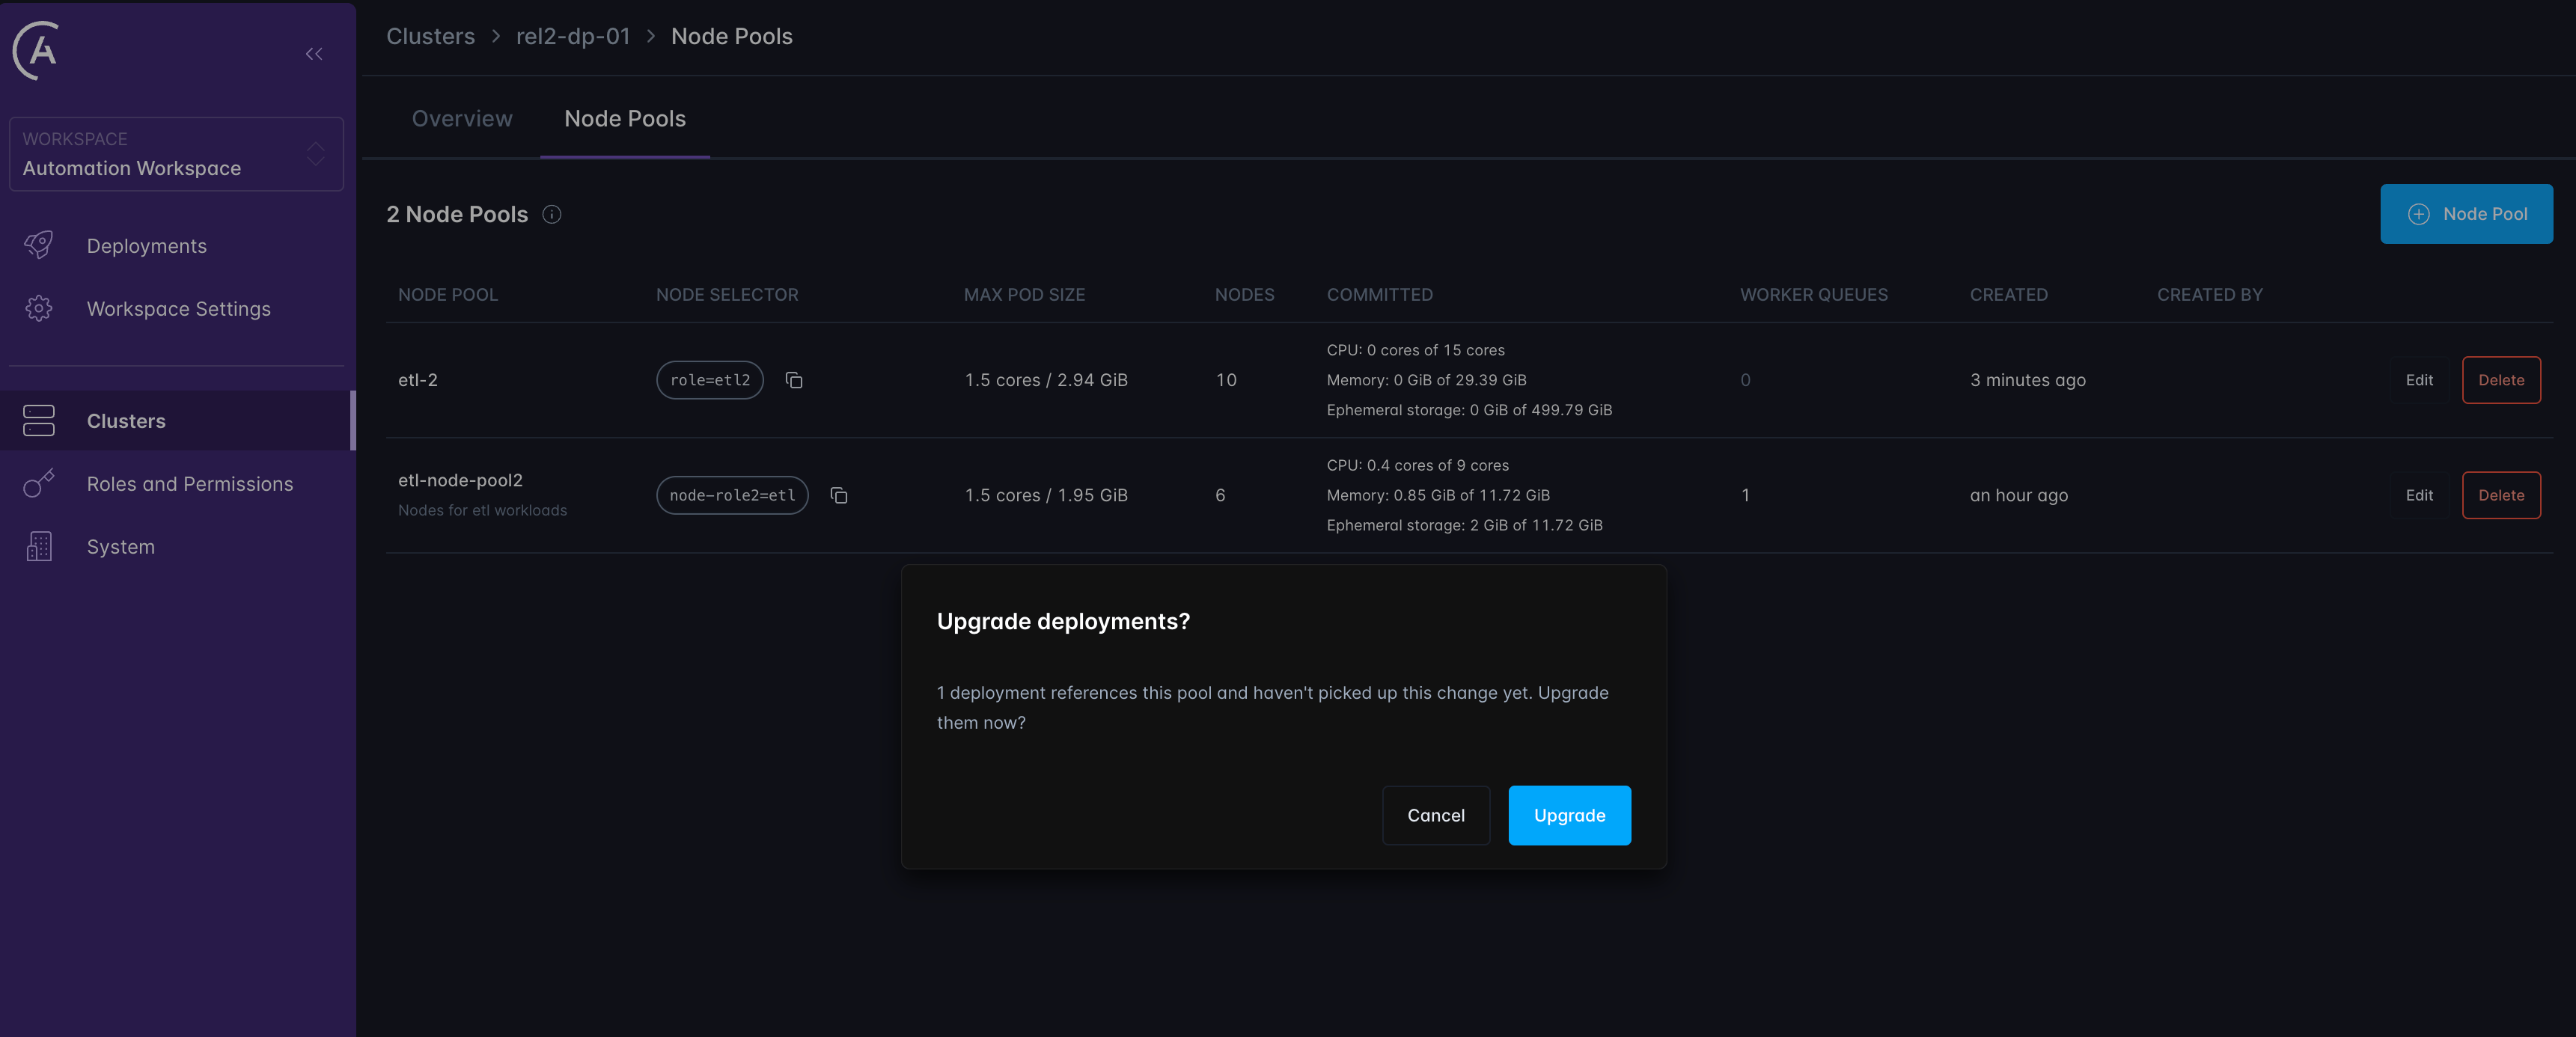
Delete a node pool
- Astro UI
- APC API
Click Delete on the pool, then click Delete Node Pool.A pool that any worker queue references can’t be deleted. The dialog shows how many queues use it, and the Delete Node Pool button is disabled. Move those queues to another pool, or remove them, first.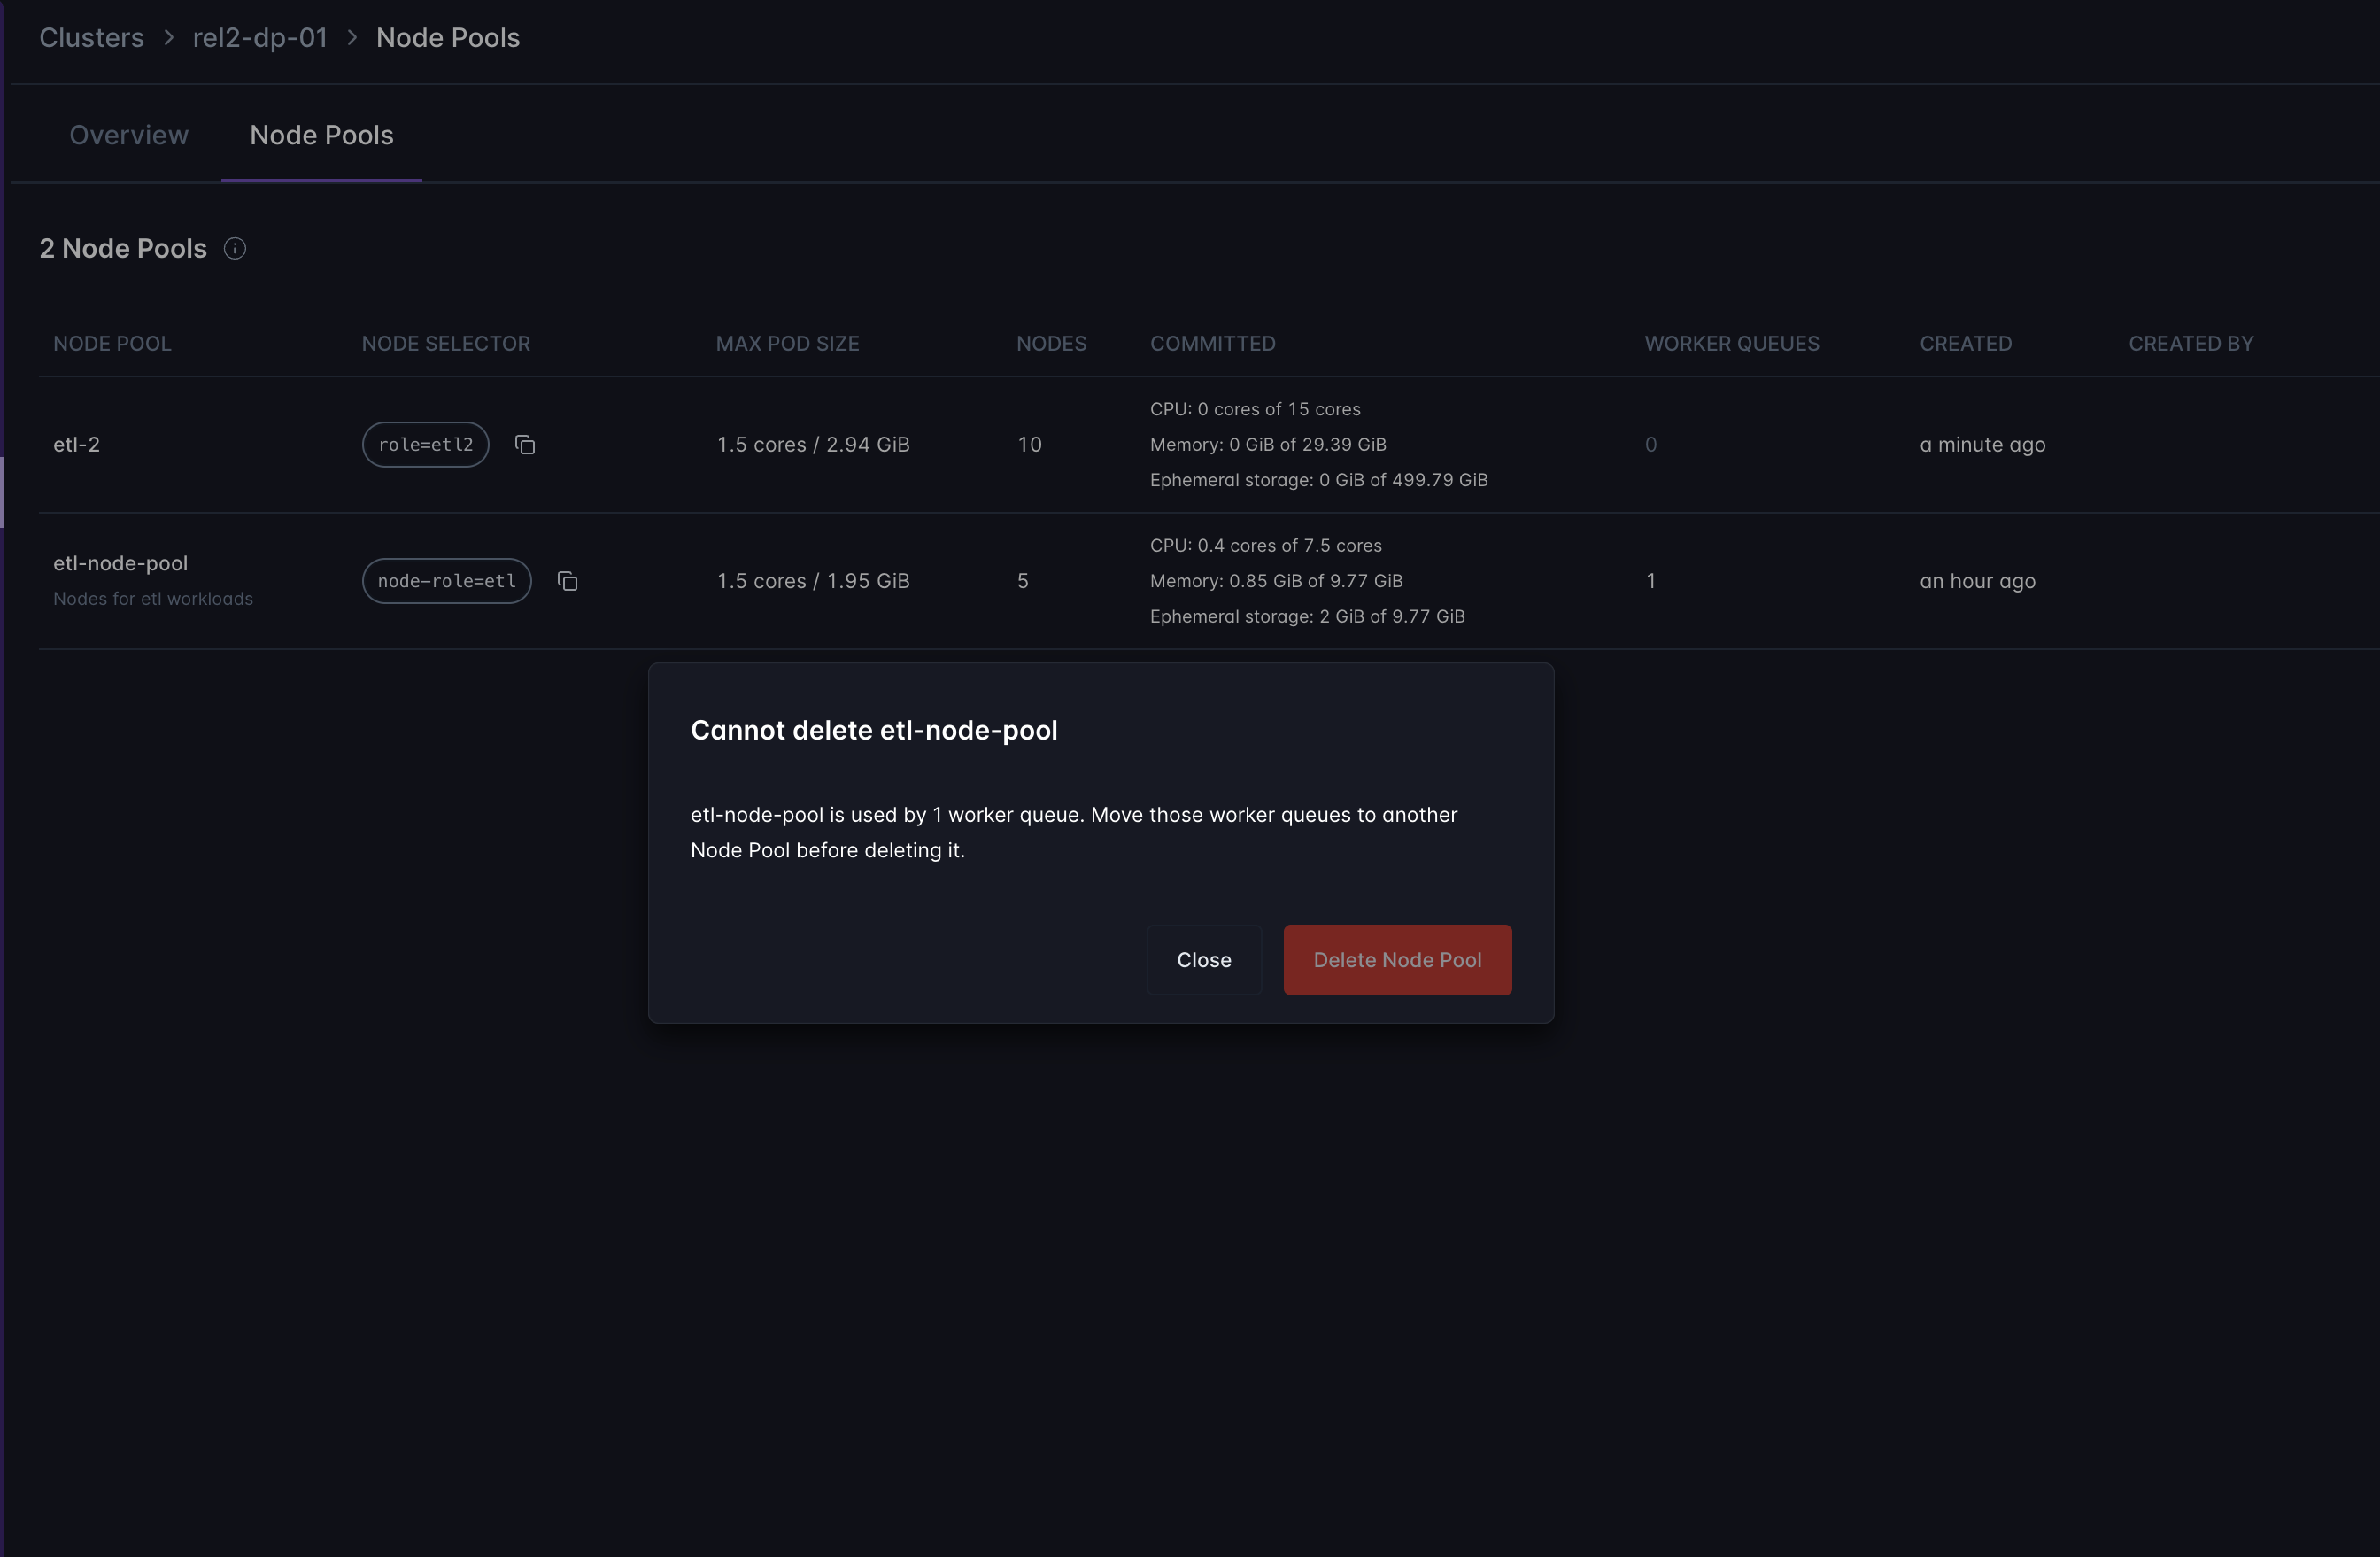
Permissions
The underlying permissions are
system.nodePools.get, system.nodePools.create, system.nodePools.update, and system.nodePools.delete at the system level, and the matching cluster.nodePools.* permissions scoped to a single cluster. A Cluster Admin holds the cluster.nodePools.* set on their own cluster and none on any other. See Role and permission reference.
A user without node pool permissions who queries node pools directly gets a permission error, not an empty list.