Run Azure Data Factory pipelines with Airflow
Info
This page has not yet been updated for Airflow 3. The concepts shown are relevant, but some code may need to be updated. If you run any examples, take care to update import statements and watch for any other breaking changes.
Azure Data Factory (ADF) is a commonly used service for constructing data pipelines and jobs. With a little preparation, it can be used in combination with Airflow to leverage the best of both tools. In this tutorial, you’ll learn why you might want to use these two tools together and how to run your ADF pipeline from your Airflow DAG.
Info
All code in this tutorial can be found on the Astronomer Registry.
Time to complete
This tutorial takes approximately 30 minutes to complete.
Assumed knowledge
To get the most out of this tutorial, make sure you have an understanding of:
- The basics of Azure Data Factory. See Introduction to Data Factory.
- Airflow fundamentals, such as writing DAGs and defining tasks. See Get started with Apache Airflow.
- Airflow operators. See Operators 101.
- Airflow connections. See Managing your Connections in Apache Airflow.
Prerequisites
To complete this tutorial, you need:
- Two ADF pipelines. If you do not currently have an ADF pipeline in your Azure account and are new to ADF, check out the ADF quick start docs for help getting started.
- The Astro CLI.
Step 1: Make your ADF pipelines runnable
Before you can orchestrate your ADF pipelines with Airflow, you have to make the pipelines runnable by an external service. There are multiple ways to do this depending on how you manage authentication within your Azure account. This tutorial shows how to register an App with Microsoft Entra to get a Client ID and Client Secret (API Key) for your Data Factory.
-
Go to Microsoft Entra ID and click App registrations to see a list of registered apps. If you created a Resource group, you should already have an app registered with the same name. Otherwise you can create a new one.

Click the app associated with your resource group, and note the Application (client) Id. You’ll need this to connect Airflow to ADF.
-
Go to Certificates & Secrets -> New client secret and create a Client Secret which will be used to connect Data Factory in Airflow.
-
Connect your Client Secret API key to your Data Factory instance. Go back to the overview of your Data Factory and click Access Control -> Add role assignments and add your Application as a contributor to the Data Factory.
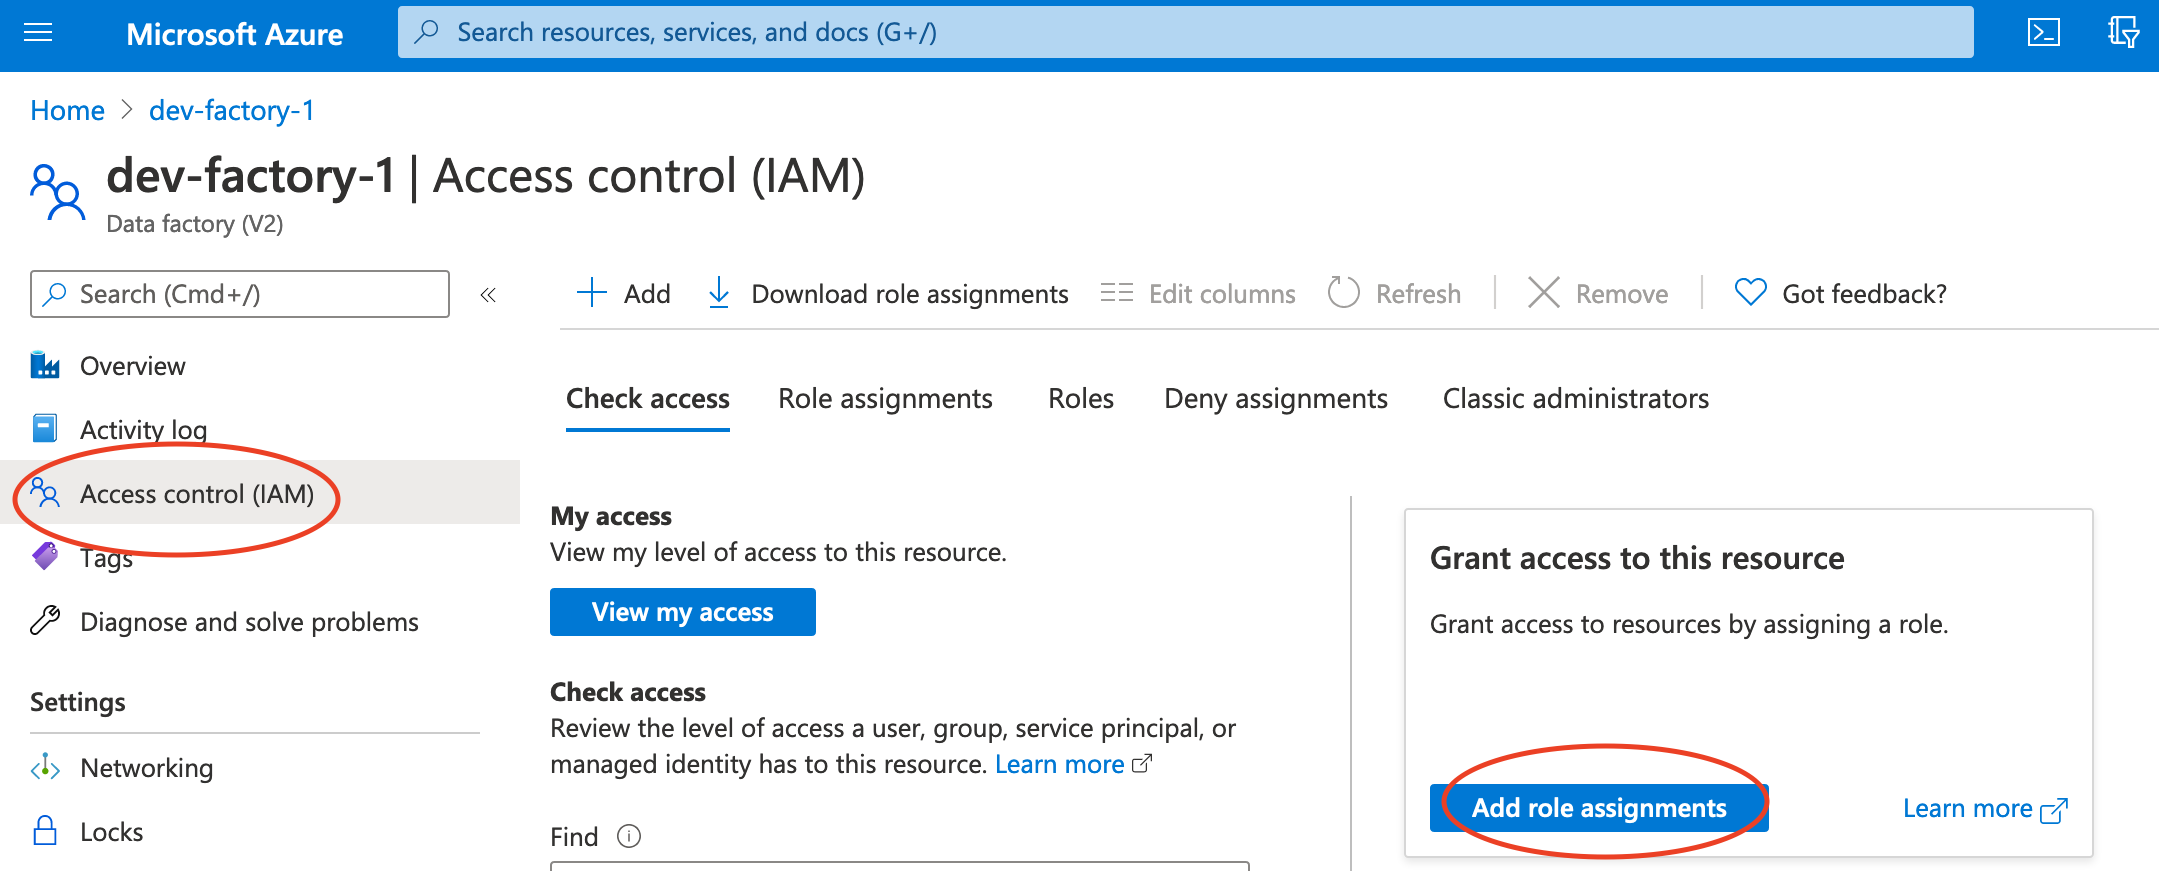
-
Add a role assignment with the following settings:
- Role: Data Factory Contributor
- Assign access to: User, group, or service principal
Search for your app, add it to ‘Selected members’ and click save.
Info
Find additional detail on requirements for interacting with Azure Data Factory using the REST API in the Microsoft documentation. You can also reference the documentation for more information on creating a registered application in Microsoft Entra ID.
Step 2: Configure your Astro project
Now that you have your Azure resources configured, you can move on to setting up Airflow.
-
Create a new Astro project:
-
Add the following line to the
requirements.txtfile of your Astro project:This installs the Azure provider package that contains all of the relevant ADF modules.
-
Run the following command to start your project in a local environment:
Step 3: Create an Airflow connection to ADF
Add a connection that Airflow will use to connect to ADF. In the Airflow UI, go to Admin -> Connections.
Create a new connection named azure_data_factory and choose the Azure Data Factory connection type. Enter the following information:
- Login: Your Azure Client ID from Step 1
- Password: Your Azure Client secret from Step 1
- Extras:
{"tenantId":"Your Tenant ID", "subscriptionId":"Your Subscription ID"}
Step 4: Create your DAG
In your Astro project dags/ folder, create a new file called adf-pipeline.py. Paste the following code into the file:
Update the following parameters in the DAG code:
pipeline_namein therun_pipeline1andrun_pipeline2tasks to the names of your two ADF pipelines.factory_namein thedefault_argsto your factory name.resource_group_namein thedefault_argsto your resource group name from Step 1.
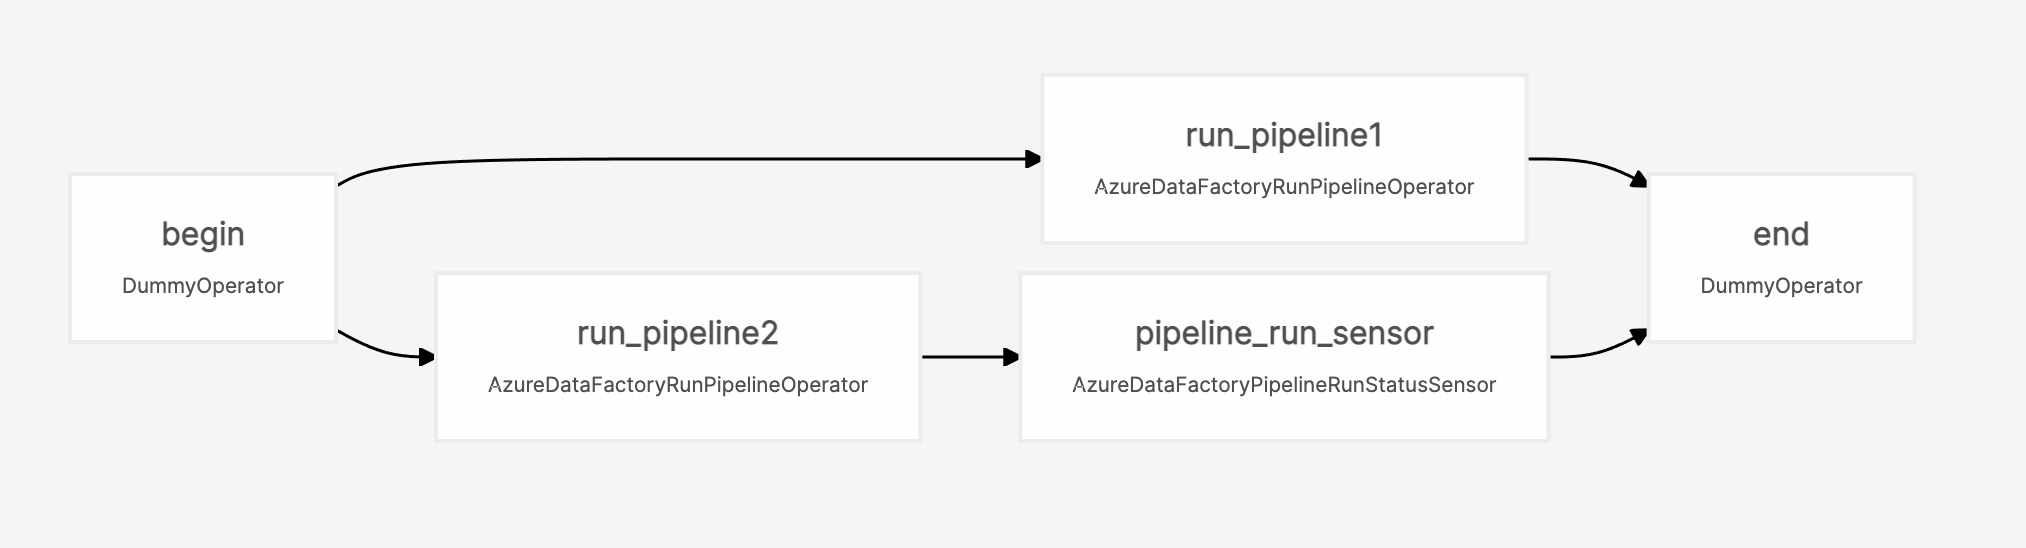
The DAG graph should look similar to this:
Step 5: Run your DAG to execute your ADF pipelines
Go to the Airflow UI, unpause your example_adf_run_pipeline DAG, and trigger it to run the your ADF pipelines.
The DAG will execute both ADF pipelines in parallel (tasks run_pipeline1 and run_pipeline2), and then will use an AzureDataFactoryPipelineRunStatusSensor to wait until pipeline2 has completed before finishing the DAG.
To learn more about all of the ADF modules in the Microsoft Azure provider, check out the Airflow Registry.
Why use Airflow with ADF
ADF is an easy to learn tool that allows you to quickly create jobs without writing code. It integrates seamlessly with on-premises data sources and other Azure services. However, it has some disadvantages when used alone - namely:
- Building and integrating custom tools can be difficult
- Integrations with services outside of Azure are limited
- Orchestration capabilities are limited
- Custom packages and dependencies can be complex to manage
That’s where Airflow comes in. ADF jobs can be run using an Airflow DAG, giving the full capabilities of Airflow orchestration beyond using ADF alone. This allows users that are comfortable with ADF to write their job there, while Airflow acts as the control plane for orchestration.
For a more complex example of orchestrating dependent ADF pipelines with Airflow, see Orchestrating Multiple Azure Data Factory Pipelines in Airflow.