> ## Documentation Index
> Fetch the complete documentation index at: https://astronomer.io/docs/llms.txt
> Use this file to discover all available pages before exploring further.
# Airflow plugins
[Airflow plugins](https://airflow.apache.org/docs/apache-airflow/stable/plugins.html) are external features that can be added to customize your Airflow installation, including the [Airflow UI](/docs/learn/airflow-ui). Airflow 3 added comprehensive plugin support in version 3.1 with a plugin manager interface that allows you to add many different components to a plugin, from custom macros, to FastAPI endpoints, to React apps.
In this guide, you'll learn about when you might want to use plugins and how to create them, including examples for popular types of plugins.
Airflow 2 supported Flask AppBuilder views, Flask AppBuilder menu items, and Flask Blueprints in plugins, which have been deprecated in Airflow 3. All new plugins in Airflow 3 should use [External views](#external-views), [React apps](#react-apps), [FastAPI apps](#fastapi-apps), and [FastAPI middlewares](#middlewares) instead.
If you are looking to use legacy FAB-based plugin in Airflow 3, see the [Upgrading Guide in the FAB provider documentation](https://airflow.apache.org/docs/apache-airflow-providers-fab/stable/upgrading.html).
In Airflow 3.2+ you can change the colors and CSS stylings of the UI with the [AIRFLOW\_\_API\_\_THEME](http://apache-airflow-docs.s3-website.eu-central-1.amazonaws.com/docs/apache-airflow/stable/configurations-ref.html#theme) configuration.
## Assumed knowledge
To get the most out of this guide, you should have an understanding of:
* Basic Airflow concepts. See [Introduction to Apache Airflow](/docs/learn/intro-to-airflow).
* Airflow core components. See [Airflow's components](/docs/learn/airflow-components).
* Basics of [FastAPI](https://fastapi.tiangolo.com/).
* Basics of [JavaScript](https://developer.mozilla.org/en-US/docs/Web/JavaScript) and [React](https://react.dev/).
## When to use plugins
Plugins offer a flexible way to build on top of Airflow. While most plugins are written to extend the Airflow UI, you can also add other functionality to your Airflow instance like a FastAPI app. Some examples of when you might want to use plugins include:
* Adding a button to the **Home** view to trigger a custom action, for example to pause and unpause all dags.
* Adding middleware to the Airflow API to log or modify requests and responses.
* Adding a custom button to the task instance **Details** view that links to files or logs in external data tools relevant to the task.
* Creating additional API endpoints for your Airflow instance, for example to run a specific set of dags.
* Adding a custom dashboard displaying information related to your data pipelines on a new page in the Airflow UI, for example showing the status of your most critical tasks.
## Plugin interface
The plugin interface is defined by the `AirflowPlugin` class and allows you to add components to your plugin. A plugin can consist of one or more components; for example you can add a React app, a FastAPI app, and several custom macros in the same plugin. You can add as many plugins as you want to your Airflow instance.
To register a plugin, place it in a Python file in the `plugins` folder of your Airflow instance. Astronomer recommends keeping each plugin in a separate file.
The code snippet below shows the `my_plugin` plugin. It is instantiated by inheriting from the `AirflowPlugin` class and adding components to the plugin. Currently the plugin doesn't have any components, so it doesn't do anything. You can learn more about the different components in the [Plugin components](#plugin-components) section.
Note that when developing plugins you'll need to restart the Airflow API server to see the changes you make to the plugin. You can set `AIRFLOW__CORE__LAZY_LOAD_PLUGINS=False` in your `airflow.cfg` file to reload plugins automatically, however, changes won't be reflected in new running tasks until after the scheduler is restarted.
```python wrap theme={null}
from airflow.plugins_manager import AirflowPlugin
class MyPlugin(AirflowPlugin):
name = "my_plugin"
external_views = []
react_apps = []
macros = []
fastapi_apps = []
fastapi_root_middlewares = []
global_operator_extra_links = []
operator_extra_links = []
timetables = []
listeners = []
def on_load(*args, **kwargs):
pass
```
## Verify loaded plugins
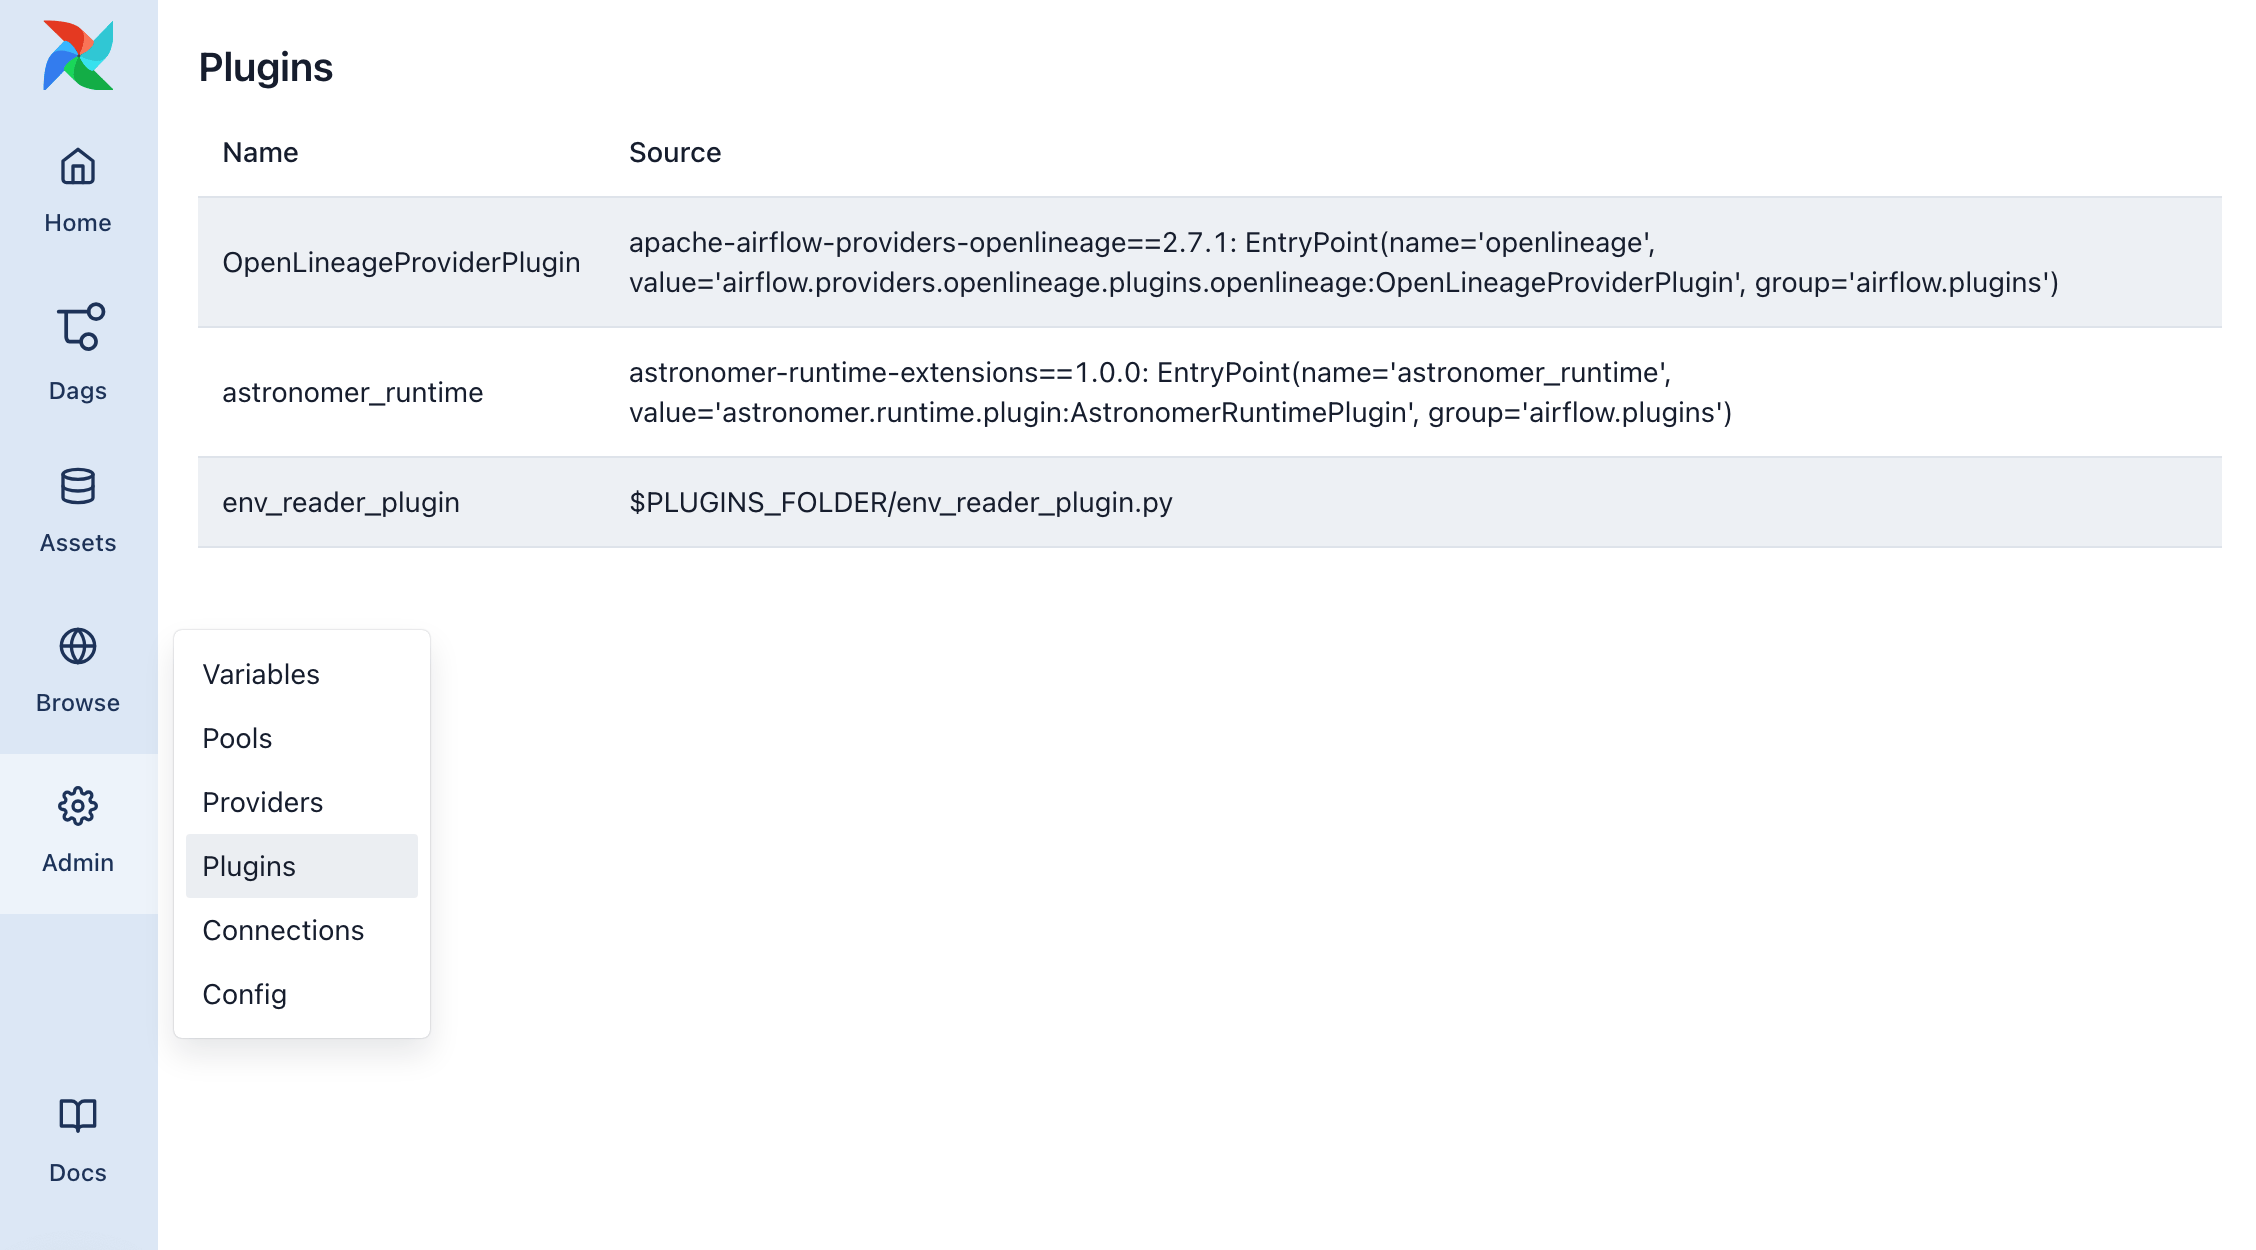
To see all currently loaded plugins, and to verify whether your plugin has been loaded, open the Plugins page from the Admin menu on the left navigation bar.
## Plugin components
This section contains examples for each of the different components that can be added to a plugin. The available components are:
* [External views](#external-views): Additional Airflow UI views in different locations.
* [React apps](#react-apps): Embedding a React app in the Airflow UI.
* [Macros](#macros): Pre-defined functions that can be used in Jinja [templates](/docs/learn/templating) in templatable fields of your operators.
* [FastAPI apps](#fastapi-apps): Additional API endpoints for your Airflow instance.
* [Middlewares](#middlewares): Middleware for Airflow API.
* [Operator extra links](#operator-extra-links): Buttons for your operators that often link to external systems.
* Timetables: Additional timetables for your dags. See [timetables in the Airflow documentation](https://airflow.apache.org/docs/apache-airflow/stable/authoring-and-scheduling/timetable.html).
* Listeners: Listeners for your Airflow instance that execute when certain events occur. See [listeners in the Airflow documentation](https://airflow.apache.org/docs/apache-airflow/stable/administration-and-deployment/listeners.html).
### External views
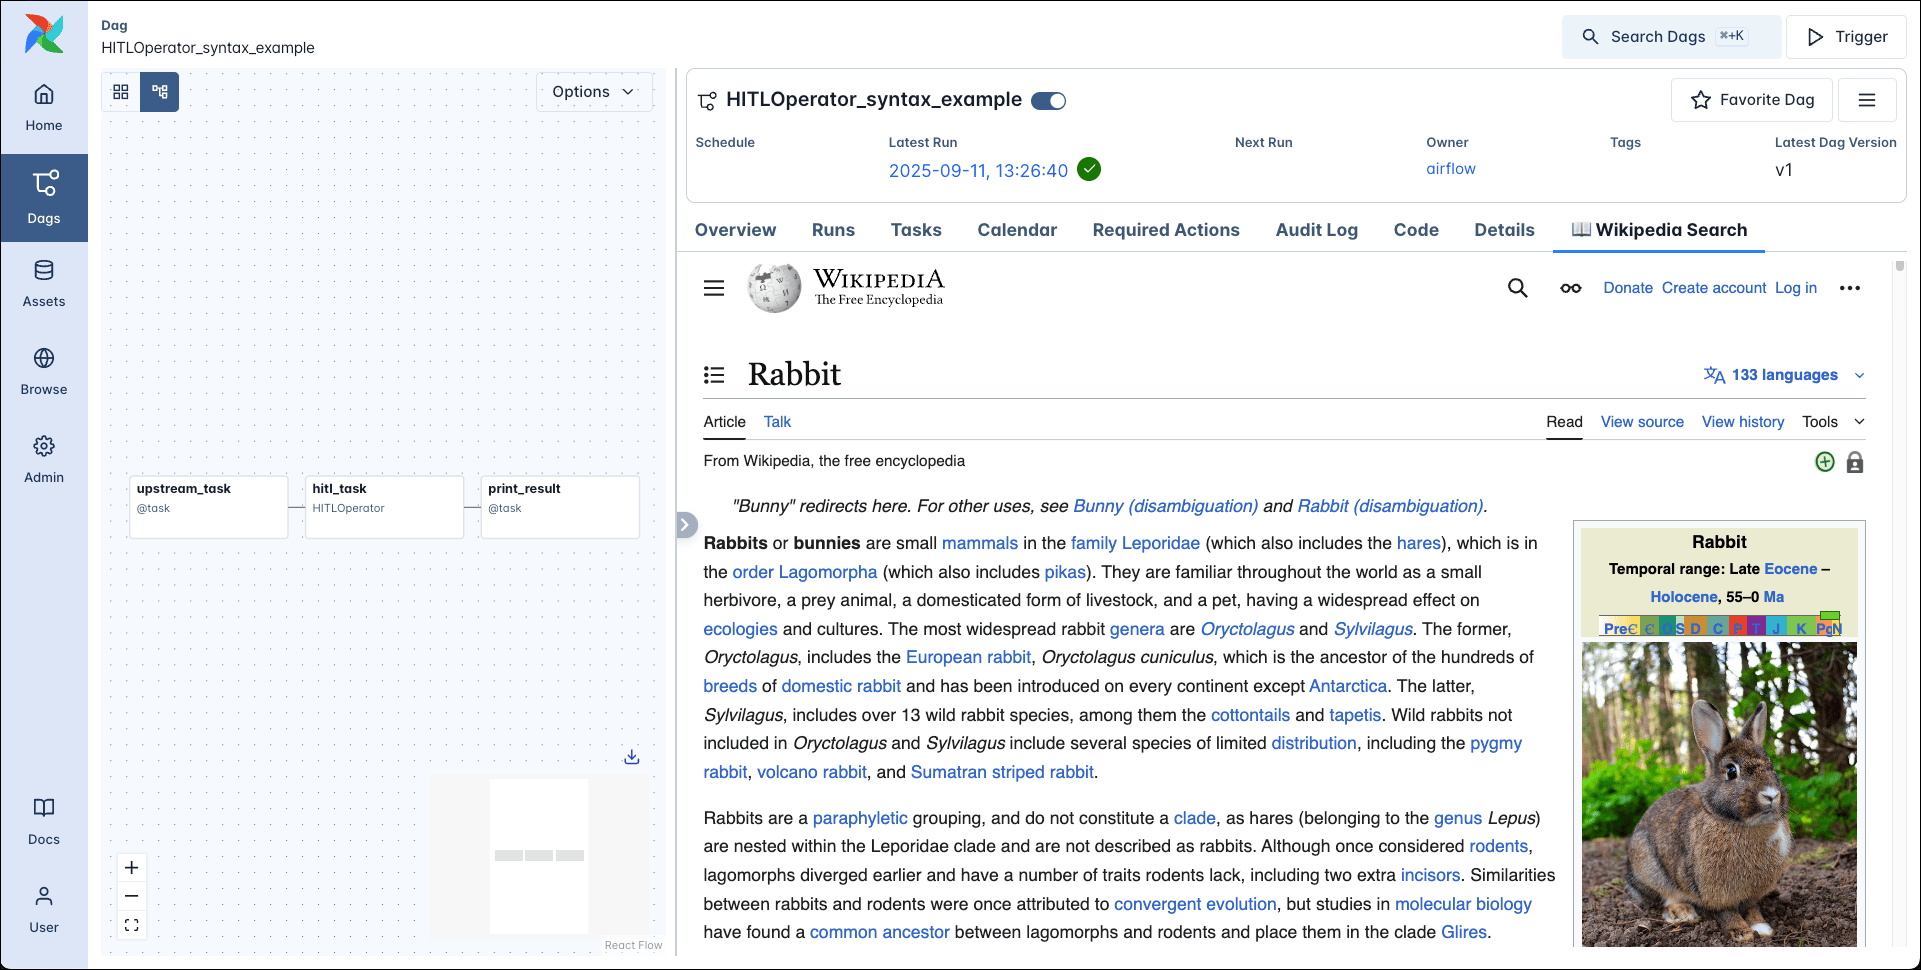
You can add additional views to your Airflow instance in different [locations](#locations). You can point the view to an existing Website to embed it as an iframe or to a new one you create in a [FastAPI app](#fastapi-apps) that is registered alongside the external view in the same plugin. The example below shows how to add a view that embeds Wikipedia as an iframe.
```python wrap theme={null}
from airflow.plugins_manager import AirflowPlugin
class WikipediaExternalViewPlugin(AirflowPlugin):
name = "wikipedia_external_view"
external_views = [
{
"name": "📖 Wikipedia Search",
"href": "https://en.wikipedia.org/wiki/Main_Page",
"destination": "dag",
"url_route": "wikipedia_search"
}
]
```
In the Airflow UI, you can see the external view button in the **Details** view of the dag.
### React apps
If you want to embed a more complex application in the Airflow UI, you can use a [React app](#react-apps). React apps can be added in the same locations as [External views](#external-views).
```python expandable wrap theme={null}
from pathlib import Path
from airflow.plugins_manager import AirflowPlugin
from fastapi import FastAPI
from fastapi.responses import FileResponse, HTMLResponse
PLUGIN_DIR = Path(__file__).parent
app = FastAPI(title="Simple React App", version="1.0.0")
@app.get("/my-app.js")
async def serve_react_component():
js_file_path = PLUGIN_DIR / "my-app.js"
return FileResponse(
path=str(js_file_path),
media_type="application/javascript",
filename="my-app.js",
)
@app.get("/")
async def root():
return {
"message": "🌟 Simple React App Plugin",
"type": "react_app",
"component_url": "/simple-react-app/my-app.js",
"description": "Embeds a React component directly in Airflow UI",
}
class SimpleReactAppPlugin(AirflowPlugin):
name = "simple_react_app"
fastapi_apps = [
{"app": app, "url_prefix": "/simple-react-app", "name": "Simple React App"}
]
react_apps = [
{
"name": "React Example Plugin",
"bundle_url": "/simple-react-app/my-app.js",
"destination": "nav",
"category": "browse",
"url_route": "simple-react-app",
}
]
```
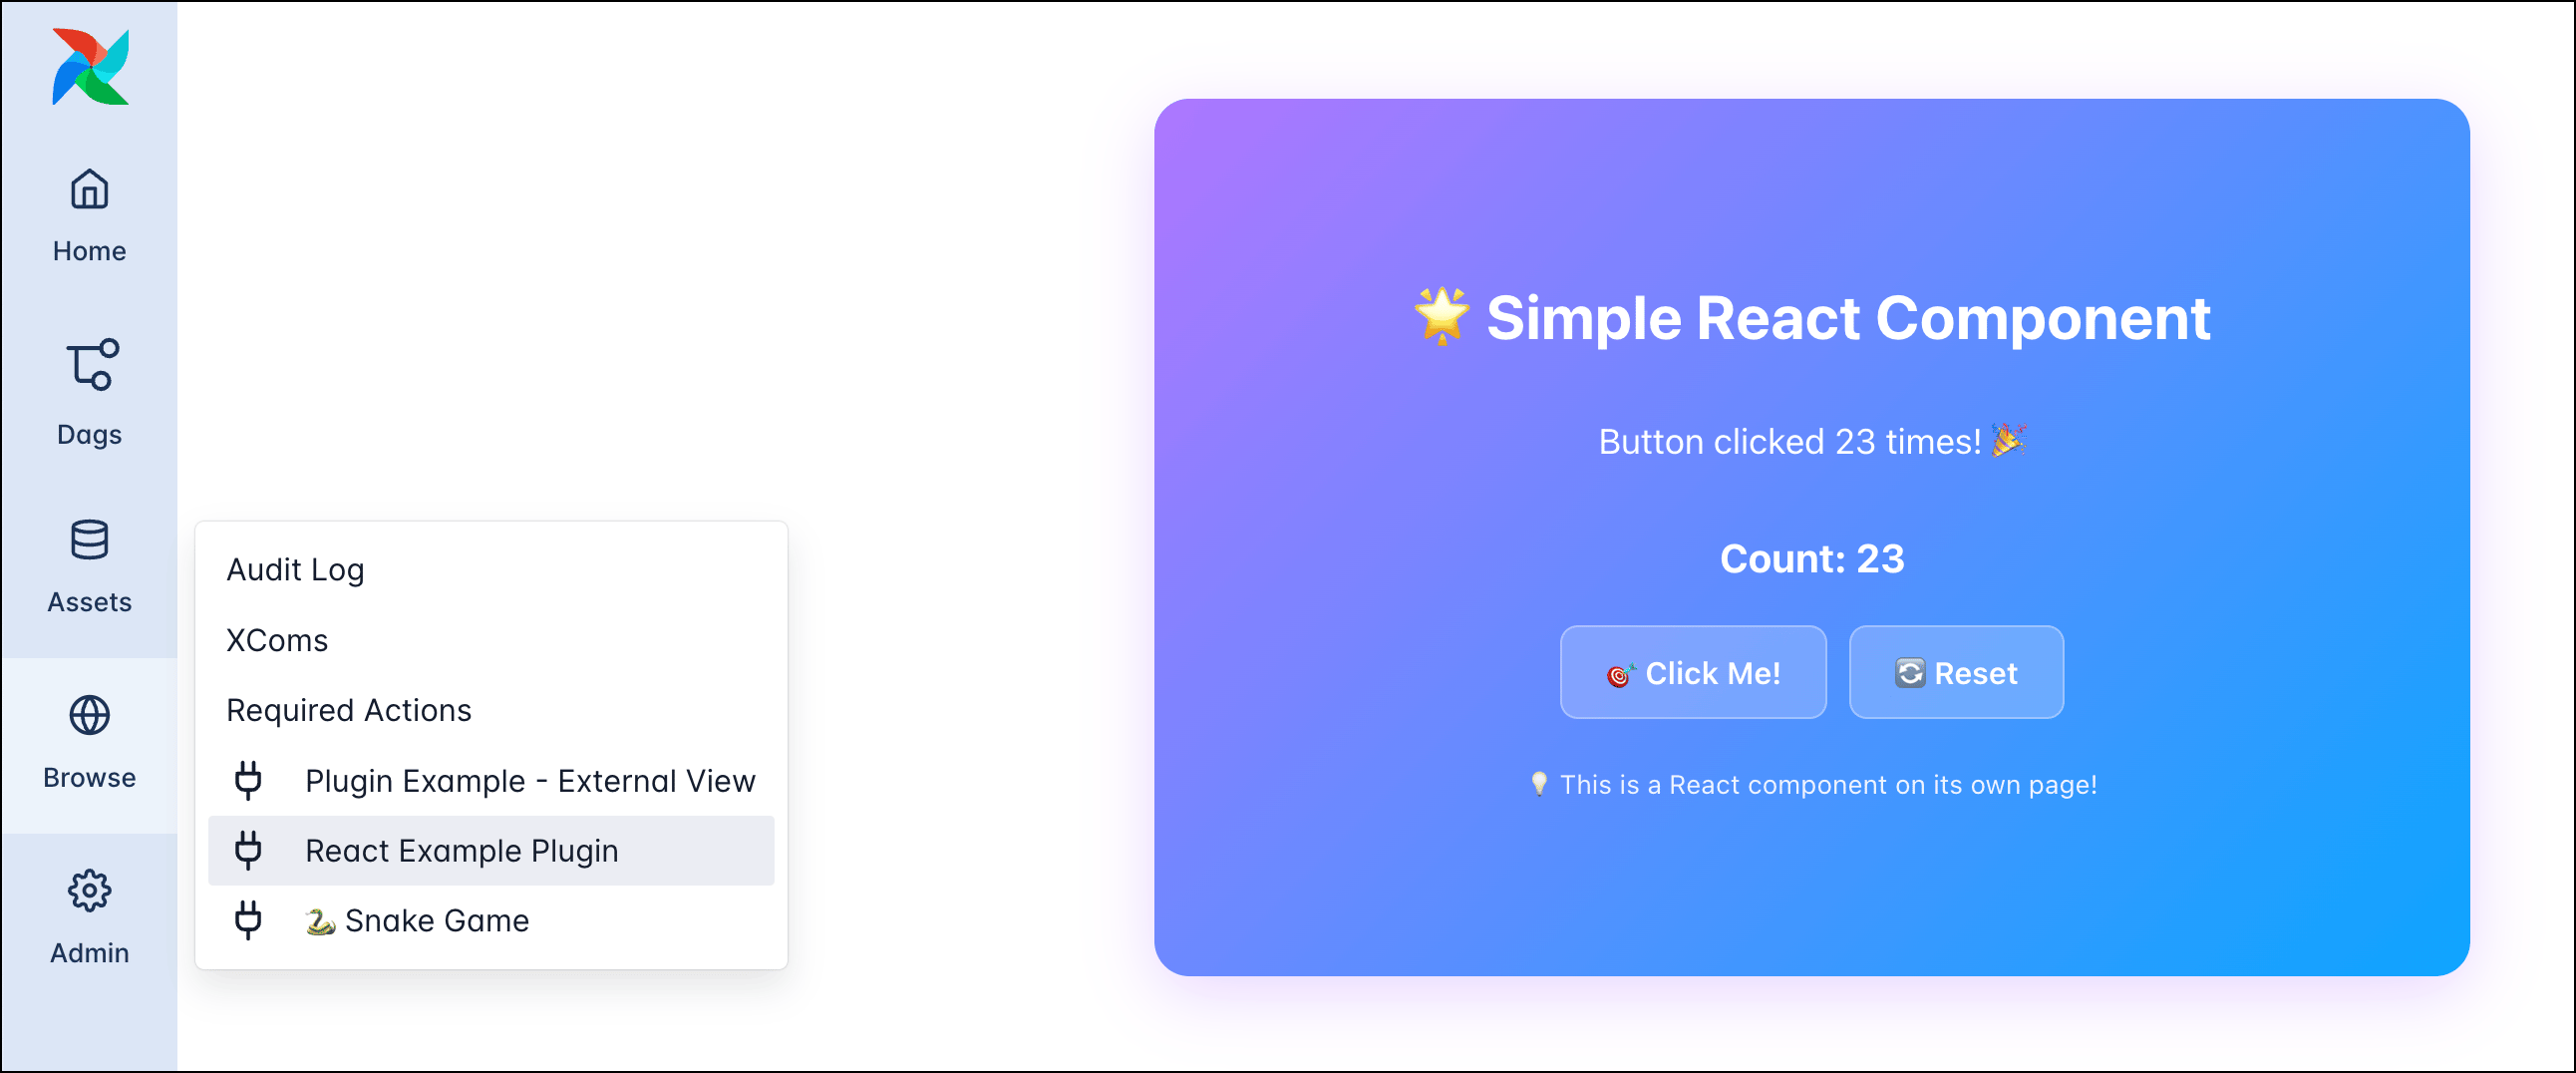
After this you can add your React app in the `my-app.js` file and access it in the Airflow UI at `http://localhost:8080/simple-react-app/`.
You can put your React app inside of a few selected existing pages in the Airflow UI. The supported views are `dashboard`, `dag_overview` and `task_overview`. To position the element in the existing page use the CSS [`order` rule](https://www.w3schools.com/cssref/css3_pr_order.php) which will determine the flex order.
Note that you need to make the plugin available as a global variable in the JavaScript file. The example below shows how to do this for the `DAGToggleWidget` plugin.
```javascript wrap theme={null}
globalThis['DAG Toggle Widget'] = DAGToggleWidget; // Matching the plugin name
globalThis.AirflowPlugin = DAGToggleWidget; // Fallback that Airflow looks for
```
The React app integration is experimental and interfaces might change in future versions. Particularly, dependency and state interactions between the UI and plugins may need to be refactored for more complex plugin apps.
### Macros
A macro is a pre-defined function that can be used in Jinja [templates](/docs/learn/templating) in templatable fields of your operators.
```python wrap theme={null}
from airflow.plugins_manager import AirflowPlugin
from datetime import datetime
def month_start(ds):
d = datetime.strptime(ds, "%Y-%m-%d")
return d.replace(day=1).strftime("%Y-%m-%d")
class AirflowTestPlugin(AirflowPlugin):
name = "macro_plugin_example"
macros = [month_start]
```
In your dag your can use the macro in any [templateable field](/docs/learn/templating).
```python wrap theme={null}
from airflow.providers.standard.operators.bash import BashOperator
BashOperator(
task_id="print_hello",
bash_command="echo {{ macros.macro_plugin_example.month_start(ds) }}"
)
```
### FastAPI apps
You can use a [FastAPI](https://fastapi.tiangolo.com/) app in your plugin to add endpoints to your Airflow instance through which you can interact with it, in addition to the public Airflow API.
```python wrap theme={null}
from airflow.plugins_manager import AirflowPlugin
from fastapi import FastAPI
app = FastAPI(title="Hello World FastAPI App", version="1.0.0")
@app.get("/hello")
async def hello_world():
return {"message": "Hello from Airflow!"}
class FastAPIAppPlugin(AirflowPlugin):
name = "hello_fastapi_app"
fastapi_apps = [
{"app": app, "url_prefix": "/hello-app", "name": "Hello World FastAPI App"}
]
```
After adding the plugin to your Airflow instance, you can access the endpoints of the FastAPI app at `http://localhost:8080/`. In the example above, you can send a GET request to `http://localhost:8080/hello-app/hello` to get the response "Hello from Airflow!".
```bash wrap theme={null}
curl http://localhost:8080/hello-app/hello
```
**FastAPI endpoints on Astro**
For calling FastAPI plugin endpoint on Astro, for example when combining a FastAPI app with an `external_views` nav link, use a **relative path** (no leading `/`) in the `href`. On Astro, the API server is reachable at a different base URL than in other environments, and a relative path ensures that URIs are resolved correctly.
```python wrap theme={null}
from airflow.plugins_manager import AirflowPlugin
from fastapi import FastAPI
app = FastAPI()
@app.get("/dashboard")
async def dashboard():
return {"message": "Hello!"}
class MyDashboardPlugin(AirflowPlugin):
name = "my_dashboard"
fastapi_apps = [
{"app": app, "url_prefix": "/my-dashboard", "name": "My Dashboard"}
]
external_views = [{
"name": "My Dashboard",
"href": "my-dashboard/dashboard", # relative path, no leading /
"destination": "nav",
"url_route": "my-dashboard",
}]
```
When serving static files using FastAPI's `StaticFiles`, always use **relative paths** in your HTML templates and Python code. Absolute paths like `/my-app/static/style.css` break on Astro because the base URL differs from local development.
```html wrap theme={null}
```
API documentation is automatically generated:
* [OpenAPI JSON schema](https://swagger.io/specification) under `https:////openapi.json`
* [Swagger UI](https://swagger.io) under `https:////docs`
* [Redoc](https://github.com/Redocly/redoc) under `https:////redoc`
Note that this endpoint isn't protected by the Airflow API, so you need to set up authentication for it on your own. See [the FastAPI docs](https://fastapi.tiangolo.com/tutorial/security/) for more information.
### Middlewares
You can add middleware to the Airflow API server to modify requests and responses to **all** its APIs. This includes the REST API, and also the API serving the Airflow UI or any FastAPI app you might have added.
```python wrap theme={null}
from typing import Callable
from airflow.plugins_manager import AirflowPlugin
from fastapi import Request, Response
from starlette.middleware.base import BaseHTTPMiddleware
class HelloWorldLoggingMiddleware(BaseHTTPMiddleware):
async def dispatch(self, request: Request, call_next: Callable) -> Response:
print(f"🌐 Hello from middleware! Request: {request.method} {request.url}")
response = await call_next(request)
response.headers["X-Hello-Middleware"] = "Hello from Airflow middleware!"
return response
class HelloWorldMiddlewarePlugin(AirflowPlugin):
name = "hello_middleware"
fastapi_root_middlewares = [
{
"middleware": HelloWorldLoggingMiddleware,
"args": [],
"kwargs": {},
"name": "Hello World Logging Middleware"
}
]
```
This simple example just adds a print statement to the console when a request is made to the Airflow API, and adds a custom header to the response.
```text wrap theme={null}
2025-09-12T13:51:49.146084000+02:00🌐 Hello from middleware! Request: GET http://localhost:8080/api/v2/hitlDetails/?dag_id=plugin_dag&dag_run_id=manual__2025-09-12T09%3A35%3A49.540843%2B00%3A00&task_id=search_task
```
Remember that middleware is applied to all requests to any API served by the Airflow API server. If you'd like to be selective about which requests to modify, you need to implement the logic in the middleware to only execute the middleware for the specific requests you want to modify.
### Operator extra links
An operator extra link is a button that can be added to the **Details** view of a task instance of any operator. Operator extra links can be implemented in two ways:
* `global_operator_extra_links`: A button that will be added to the **Details** view of every task instance of every operator.
* `operator_extra_links`: A button that will be added to the **Details** view of all task instances of a specific operator.
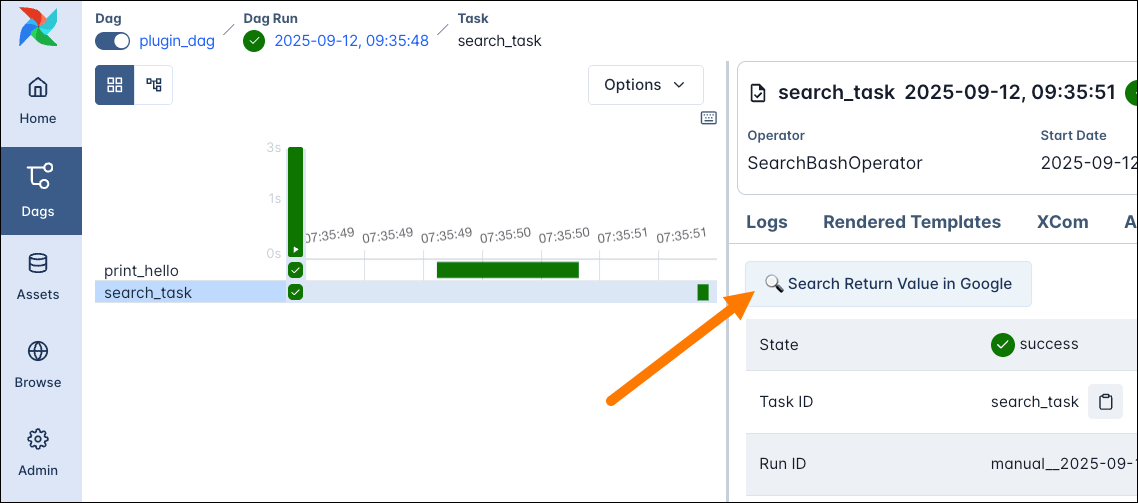
Global and specific operator extra links are added separately in Airflow plugins. The example below shows how to add a global operator extra link that links to the Google search results of the value returned by a task instance.
```python wrap theme={null}
from airflow.plugins_manager import AirflowPlugin
from airflow.sdk.bases.operatorlink import BaseOperatorLink
from airflow.models import XCom
from urllib.parse import quote_plus
from typing import Optional, Dict, Any
class GoogleSearchXComLink(BaseOperatorLink):
name = "🔍 Search Return Value in Google"
def get_link(self, operator, *, ti_key, **context) -> str:
xcom_value = XCom.get_value(ti_key=ti_key, key="return_value")
search_term = str(xcom_value)
encoded_search = quote_plus(search_term)
return f"https://www.google.com/search?q={encoded_search}"
class OperatorExtraLinkPlugin(AirflowPlugin):
name = "operator_extra_link"
operator_extra_links = [GoogleSearchXComLink()]
```
To use this operator extra link you need to add it to one of your operators, essentially creating a [custom operator](/docs/learn/airflow-importing-custom-hooks-operators). The code snippet below shows the `SearchBashOperator` that subclasses the `BashOperator` and adds the `GoogleSearchXComLink` to it.
```python wrap theme={null}
class SearchBashOperator(BashOperator):
operator_extra_links = [GoogleSearchXComLink()]
search_task = SearchBashOperator(
task_id="search_task",
bash_command="echo 'Cute animal picture'",
)
```
In the Airflow UI, you can see the operator extra link button in the **Details** view of the task instance.
## Locations
UI plugins like [React apps](#react-apps) and [External views](#external-views) can be added to the Airflow UI in different locations.
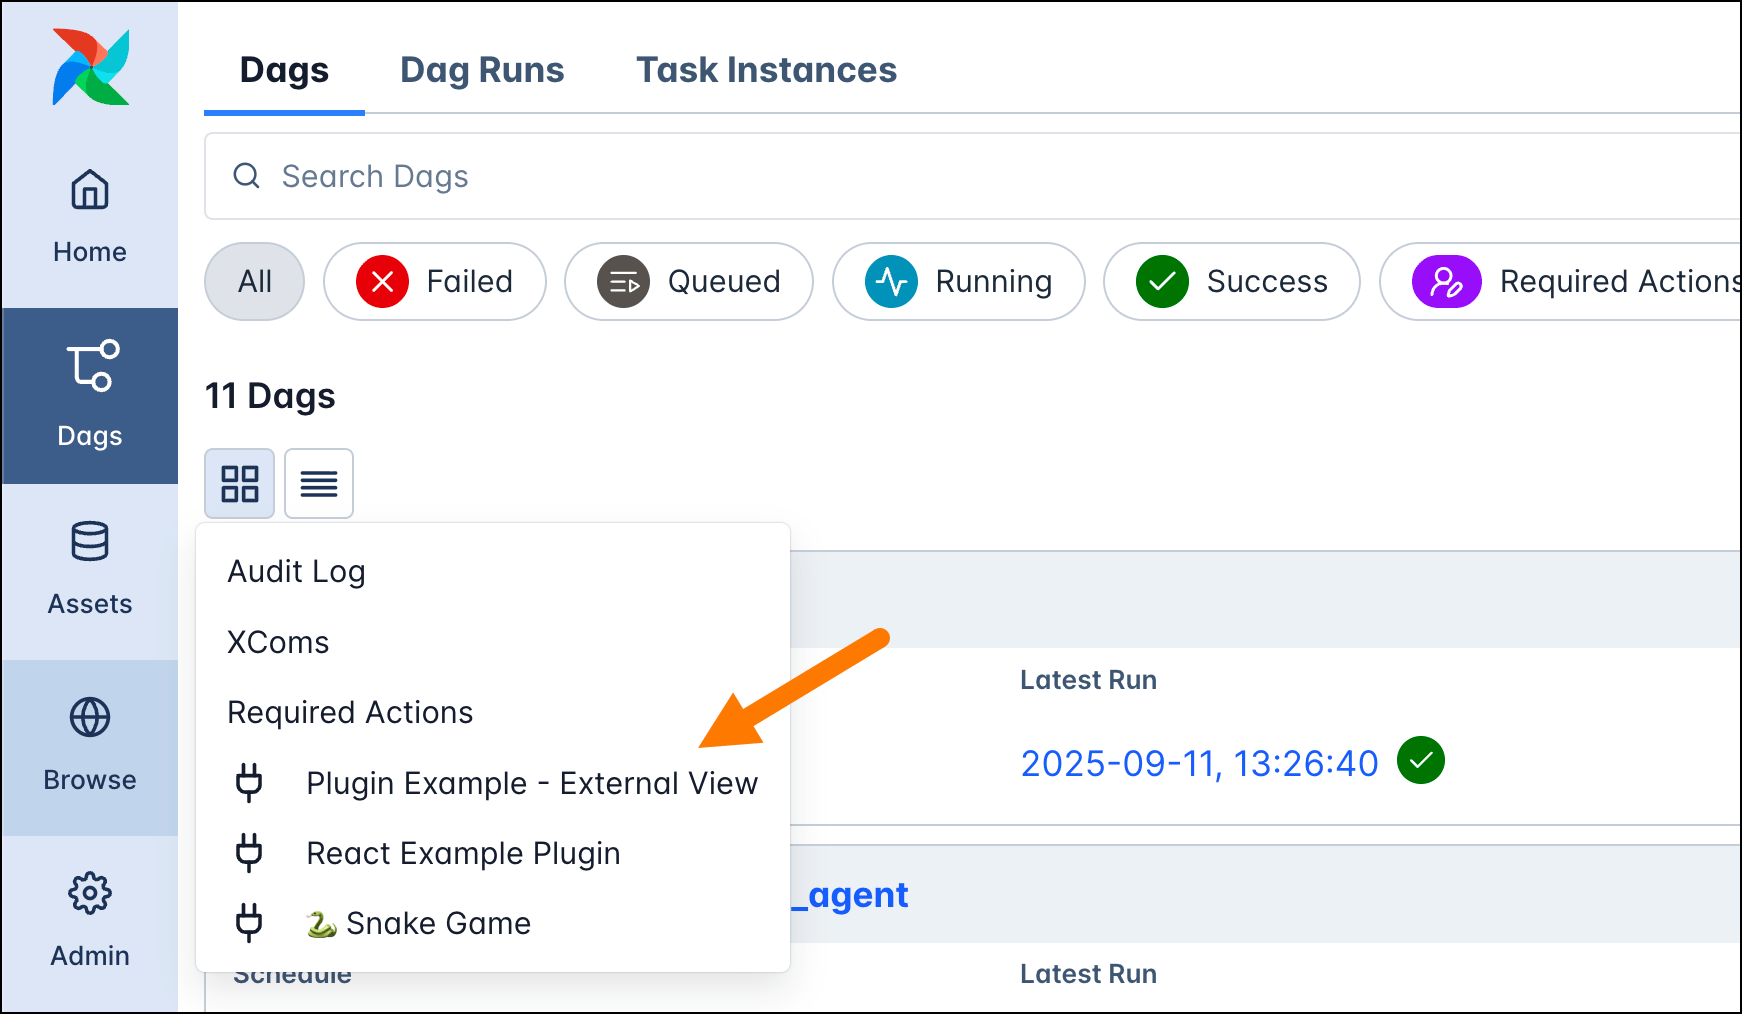
Plugins set to `destination":"nav"` will be added in the navigation bar to the left. You also need to specify the `category` to the plugin, for example the `browse` category will add the plugin to the **Browse** menu.
In Airflow 3.3+ you can use `"destination":"nav"` together with `"nav_top_level":True` to add your plugin as a top level item in the Airflow navigation bar.
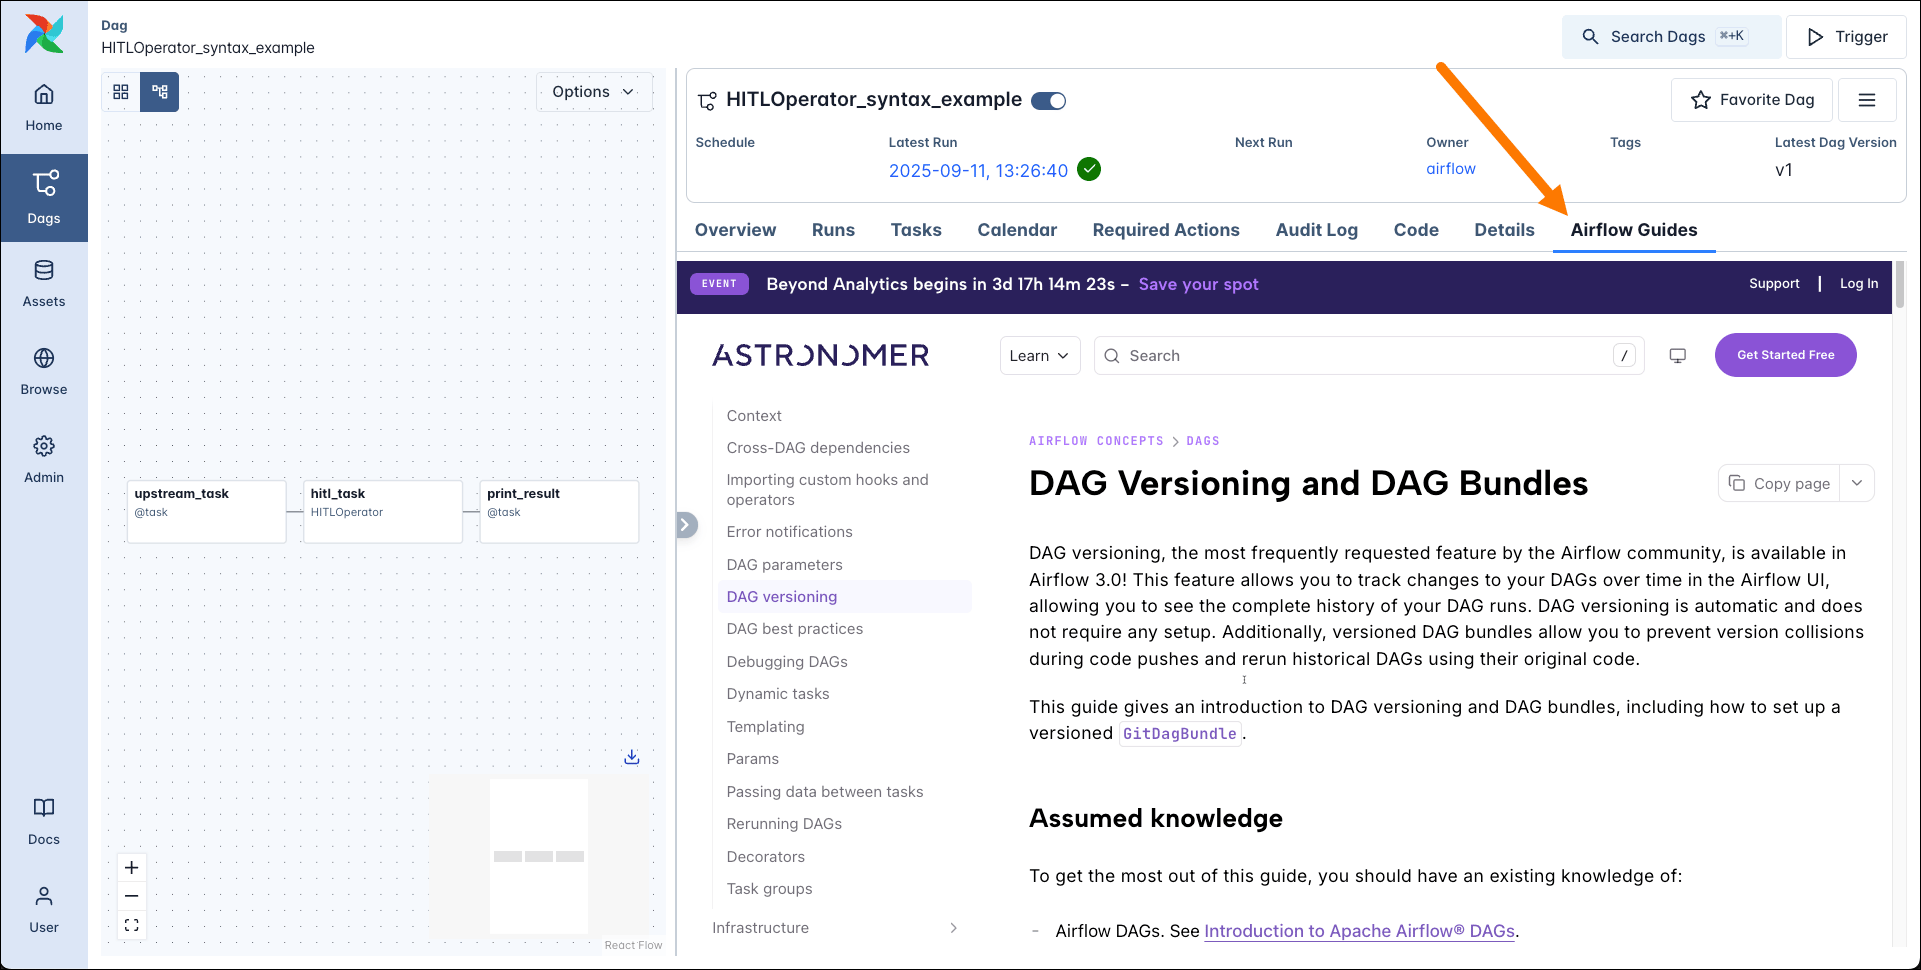
The `dag` destination will add the plugin in an additional tab on every dag page.
Any other locations can be chosen by using the `base` destination.
Similarly, the `dag_run`, `task`, and `task_instance` destinations will add the plugin in an additional tab on every dag run, task, and task instance page respectively.
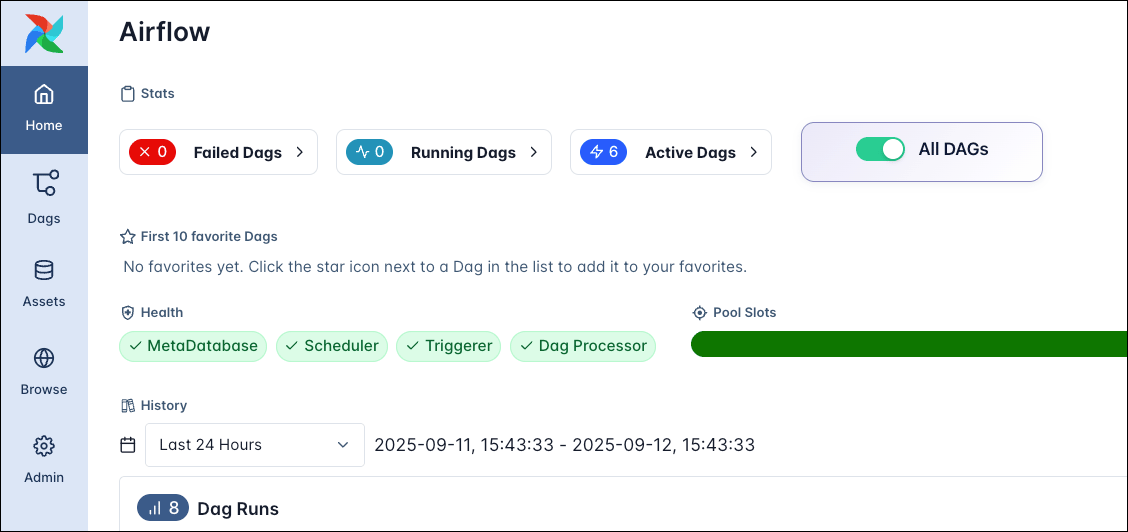
In the case of React apps you can also embed them in existing pages in the Airflow UI, the supported locations are `dashboard`, `dag_overview` and `task_overview`. The example below shows a button that pauses and unpauses all dags in the Airflow instance, embedded in the **Home** (dashboard) page.
 ## Plugin components
This section contains examples for each of the different components that can be added to a plugin. The available components are:
* [External views](#external-views): Additional Airflow UI views in different locations.
* [React apps](#react-apps): Embedding a React app in the Airflow UI.
* [Macros](#macros): Pre-defined functions that can be used in Jinja [templates](/docs/learn/templating) in templatable fields of your operators.
* [FastAPI apps](#fastapi-apps): Additional API endpoints for your Airflow instance.
* [Middlewares](#middlewares): Middleware for Airflow API.
* [Operator extra links](#operator-extra-links): Buttons for your operators that often link to external systems.
* Timetables: Additional timetables for your dags. See [timetables in the Airflow documentation](https://airflow.apache.org/docs/apache-airflow/stable/authoring-and-scheduling/timetable.html).
* Listeners: Listeners for your Airflow instance that execute when certain events occur. See [listeners in the Airflow documentation](https://airflow.apache.org/docs/apache-airflow/stable/administration-and-deployment/listeners.html).
### External views
You can add additional views to your Airflow instance in different [locations](#locations). You can point the view to an existing Website to embed it as an iframe or to a new one you create in a [FastAPI app](#fastapi-apps) that is registered alongside the external view in the same plugin. The example below shows how to add a view that embeds Wikipedia as an iframe.
```python wrap theme={null}
from airflow.plugins_manager import AirflowPlugin
class WikipediaExternalViewPlugin(AirflowPlugin):
name = "wikipedia_external_view"
external_views = [
{
"name": "📖 Wikipedia Search",
"href": "https://en.wikipedia.org/wiki/Main_Page",
"destination": "dag",
"url_route": "wikipedia_search"
}
]
```
In the Airflow UI, you can see the external view button in the **Details** view of the dag.
## Plugin components
This section contains examples for each of the different components that can be added to a plugin. The available components are:
* [External views](#external-views): Additional Airflow UI views in different locations.
* [React apps](#react-apps): Embedding a React app in the Airflow UI.
* [Macros](#macros): Pre-defined functions that can be used in Jinja [templates](/docs/learn/templating) in templatable fields of your operators.
* [FastAPI apps](#fastapi-apps): Additional API endpoints for your Airflow instance.
* [Middlewares](#middlewares): Middleware for Airflow API.
* [Operator extra links](#operator-extra-links): Buttons for your operators that often link to external systems.
* Timetables: Additional timetables for your dags. See [timetables in the Airflow documentation](https://airflow.apache.org/docs/apache-airflow/stable/authoring-and-scheduling/timetable.html).
* Listeners: Listeners for your Airflow instance that execute when certain events occur. See [listeners in the Airflow documentation](https://airflow.apache.org/docs/apache-airflow/stable/administration-and-deployment/listeners.html).
### External views
You can add additional views to your Airflow instance in different [locations](#locations). You can point the view to an existing Website to embed it as an iframe or to a new one you create in a [FastAPI app](#fastapi-apps) that is registered alongside the external view in the same plugin. The example below shows how to add a view that embeds Wikipedia as an iframe.
```python wrap theme={null}
from airflow.plugins_manager import AirflowPlugin
class WikipediaExternalViewPlugin(AirflowPlugin):
name = "wikipedia_external_view"
external_views = [
{
"name": "📖 Wikipedia Search",
"href": "https://en.wikipedia.org/wiki/Main_Page",
"destination": "dag",
"url_route": "wikipedia_search"
}
]
```
In the Airflow UI, you can see the external view button in the **Details** view of the dag.
 ### React apps
If you want to embed a more complex application in the Airflow UI, you can use a [React app](#react-apps). React apps can be added in the same locations as [External views](#external-views).
```python expandable wrap theme={null}
from pathlib import Path
from airflow.plugins_manager import AirflowPlugin
from fastapi import FastAPI
from fastapi.responses import FileResponse, HTMLResponse
PLUGIN_DIR = Path(__file__).parent
app = FastAPI(title="Simple React App", version="1.0.0")
@app.get("/my-app.js")
async def serve_react_component():
js_file_path = PLUGIN_DIR / "my-app.js"
return FileResponse(
path=str(js_file_path),
media_type="application/javascript",
filename="my-app.js",
)
@app.get("/")
async def root():
return {
"message": "🌟 Simple React App Plugin",
"type": "react_app",
"component_url": "/simple-react-app/my-app.js",
"description": "Embeds a React component directly in Airflow UI",
}
class SimpleReactAppPlugin(AirflowPlugin):
name = "simple_react_app"
fastapi_apps = [
{"app": app, "url_prefix": "/simple-react-app", "name": "Simple React App"}
]
react_apps = [
{
"name": "React Example Plugin",
"bundle_url": "/simple-react-app/my-app.js",
"destination": "nav",
"category": "browse",
"url_route": "simple-react-app",
}
]
```
After this you can add your React app in the `my-app.js` file and access it in the Airflow UI at `http://localhost:8080/simple-react-app/`.
### React apps
If you want to embed a more complex application in the Airflow UI, you can use a [React app](#react-apps). React apps can be added in the same locations as [External views](#external-views).
```python expandable wrap theme={null}
from pathlib import Path
from airflow.plugins_manager import AirflowPlugin
from fastapi import FastAPI
from fastapi.responses import FileResponse, HTMLResponse
PLUGIN_DIR = Path(__file__).parent
app = FastAPI(title="Simple React App", version="1.0.0")
@app.get("/my-app.js")
async def serve_react_component():
js_file_path = PLUGIN_DIR / "my-app.js"
return FileResponse(
path=str(js_file_path),
media_type="application/javascript",
filename="my-app.js",
)
@app.get("/")
async def root():
return {
"message": "🌟 Simple React App Plugin",
"type": "react_app",
"component_url": "/simple-react-app/my-app.js",
"description": "Embeds a React component directly in Airflow UI",
}
class SimpleReactAppPlugin(AirflowPlugin):
name = "simple_react_app"
fastapi_apps = [
{"app": app, "url_prefix": "/simple-react-app", "name": "Simple React App"}
]
react_apps = [
{
"name": "React Example Plugin",
"bundle_url": "/simple-react-app/my-app.js",
"destination": "nav",
"category": "browse",
"url_route": "simple-react-app",
}
]
```
After this you can add your React app in the `my-app.js` file and access it in the Airflow UI at `http://localhost:8080/simple-react-app/`.
 You can put your React app inside of a few selected existing pages in the Airflow UI. The supported views are `dashboard`, `dag_overview` and `task_overview`. To position the element in the existing page use the CSS [`order` rule](https://www.w3schools.com/cssref/css3_pr_order.php) which will determine the flex order.
Note that you need to make the plugin available as a global variable in the JavaScript file. The example below shows how to do this for the `DAGToggleWidget` plugin.
```javascript wrap theme={null}
globalThis['DAG Toggle Widget'] = DAGToggleWidget; // Matching the plugin name
globalThis.AirflowPlugin = DAGToggleWidget; // Fallback that Airflow looks for
```
You can put your React app inside of a few selected existing pages in the Airflow UI. The supported views are `dashboard`, `dag_overview` and `task_overview`. To position the element in the existing page use the CSS [`order` rule](https://www.w3schools.com/cssref/css3_pr_order.php) which will determine the flex order.
Note that you need to make the plugin available as a global variable in the JavaScript file. The example below shows how to do this for the `DAGToggleWidget` plugin.
```javascript wrap theme={null}
globalThis['DAG Toggle Widget'] = DAGToggleWidget; // Matching the plugin name
globalThis.AirflowPlugin = DAGToggleWidget; // Fallback that Airflow looks for
```
 ## Locations
UI plugins like [React apps](#react-apps) and [External views](#external-views) can be added to the Airflow UI in different locations.
Plugins set to `destination":"nav"` will be added in the navigation bar to the left. You also need to specify the `category` to the plugin, for example the `browse` category will add the plugin to the **Browse** menu.
## Locations
UI plugins like [React apps](#react-apps) and [External views](#external-views) can be added to the Airflow UI in different locations.
Plugins set to `destination":"nav"` will be added in the navigation bar to the left. You also need to specify the `category` to the plugin, for example the `browse` category will add the plugin to the **Browse** menu.
 In Airflow 3.3+ you can use `"destination":"nav"` together with `"nav_top_level":True` to add your plugin as a top level item in the Airflow navigation bar.
The `dag` destination will add the plugin in an additional tab on every dag page.
In Airflow 3.3+ you can use `"destination":"nav"` together with `"nav_top_level":True` to add your plugin as a top level item in the Airflow navigation bar.
The `dag` destination will add the plugin in an additional tab on every dag page.
 Any other locations can be chosen by using the `base` destination.
 Similarly, the `dag_run`, `task`, and `task_instance` destinations will add the plugin in an additional tab on every dag run, task, and task instance page respectively.
In the case of React apps you can also embed them in existing pages in the Airflow UI, the supported locations are `dashboard`, `dag_overview` and `task_overview`. The example below shows a button that pauses and unpauses all dags in the Airflow instance, embedded in the **Home** (dashboard) page.
Similarly, the `dag_run`, `task`, and `task_instance` destinations will add the plugin in an additional tab on every dag run, task, and task instance page respectively.
In the case of React apps you can also embed them in existing pages in the Airflow UI, the supported locations are `dashboard`, `dag_overview` and `task_overview`. The example below shows a button that pauses and unpauses all dags in the Airflow instance, embedded in the **Home** (dashboard) page.