> ## Documentation Index
> Fetch the complete documentation index at: https://astronomer.io/docs/llms.txt
> Use this file to discover all available pages before exploring further.
# Integrate OpenLineage and Airflow with Marquez
[OpenLineage](https://openlineage.io/) is the open source industry standard framework for data lineage. Integrating OpenLineage with Airflow gives you greater observability over your data pipelines and helps with everything from data governance to tracking the affected area of a task failure across DAGs to managing PII.
Viewing and interacting with lineage metadata requires running a lineage front end. [Marquez](https://github.com/MarquezProject/marquez) is the most common open source choice for this purpose, and integrates easily with Airflow.
In this tutorial, you'll run OpenLineage with Airflow locally using Marquez as a lineage front end. You'll then generate and interpret lineage metadata using two DAGs that process data in Postgres.
## Time to complete
This tutorial takes approximately 30 minutes to complete.
## Assumed knowledge
To get the most out of this tutorial, make sure you have an understanding of:
* The basics of OpenLineage. See [Integrate OpenLineage and Airflow](/docs/learn/airflow-openlineage).
* Airflow fundamentals, such as writing DAGs and defining tasks. See [Get started with Apache Airflow](/docs/learn/get-started-with-airflow).
## Prerequisites
* The [Astro CLI](/docs/cli/v1.43/overview).
* [PostgreSQL](https://www.postgresql.org/download/).
## Step 1: Run Marquez locally
1. Clone the Marquez repository:
```sh wrap theme={null}
git clone https://github.com/MarquezProject/marquez && cd marquez
```
2. Run the following command in the `marquez` directory to start Marquez:
```sh wrap theme={null}
./docker/up.sh
```
For more details, see the quickstart in the [Marquez README](https://github.com/MarquezProject/marquez#quickstart).
## Step 2: Configure your Astro project
Use the Astro CLI to create and run an Airflow project locally that will integrate with Marquez.
1. Create a new Astro project:
```sh wrap theme={null}
$ mkdir astro-marquez-tutorial && cd astro-marquez-tutorial
$ astro dev init
```
2. Add the Airflow OpenLineage provider to your `requirements.txt` file. Note that the minimum Apache Airflow version required is 2.7.0 (Astro Runtime 9.0.0+).
```text wrap theme={null}
apache-airflow-providers-openlineage==1.10.0
```
3. Add the following environment variables below to your Astro project `.env` file:
```bash wrap theme={null}
OPENLINEAGE_URL=http://host.docker.internal:5000
OPENLINEAGE_NAMESPACE=example
```
These variables allow Airflow to connect with the OpenLineage API and send your lineage metadata to Marquez.
By default, Marquez uses port 5000 when you run it using Docker. If you are using a different OpenLineage front end instead of Marquez, or you are running Marquez remotely, you can modify the `OPENLINEAGE_URL` as needed.
4. Marquez also uses Postgres, so Airflow needs to use a different port than the default 5432, which is already allocated to Airflow. Run the following command to use a port 5435 for Postgres:
```sh wrap theme={null}
astro config set postgres.port 5435
```
5. Run the following command to start your local project:
```sh wrap theme={null}
astro dev start
```
6. Confirm Airflow is running by going to `http://localhost:8080`, and Marquez is running by going to `http://localhost:3000`.
## Step 3: Configure your database
To show the lineage metadata that can result from Airflow DAG runs, you'll use two sample DAGs that process data in Postgres. To run this example in your local environment, complete the following steps:
1. Using `psql`, create a local Postgres database in the same container as the Airflow metastore:
```bash wrap theme={null}
psql -h localhost -p 5435 -U postgres
# enter password `postgres` when prompted
create database lineagetutorial;
\c lineagetutorial;
```
If you already have a Postgres database or are using a different type of database you can skip this step. Note that this database should be separate from the Airflow and Marquez metastores.
2. Run the following SQL statements in your new database to create and populate two source tables:
```sql wrap theme={null}
CREATE TABLE IF NOT EXISTS adoption_center_1
(date DATE, type VARCHAR, name VARCHAR, age INTEGER);
CREATE TABLE IF NOT EXISTS adoption_center_2
(date DATE, type VARCHAR, name VARCHAR, age INTEGER);
INSERT INTO
adoption_center_1 (date, type, name, age)
VALUES
('2022-01-01', 'Dog', 'Bingo', 4),
('2022-02-02', 'Cat', 'Bob', 7),
('2022-03-04', 'Fish', 'Bubbles', 2);
INSERT INTO
adoption_center_2 (date, type, name, age)
VALUES
('2022-06-10', 'Horse', 'Seabiscuit', 4),
('2022-07-15', 'Snake', 'Stripes', 8),
('2022-08-07', 'Rabbit', 'Hops', 3);
```
## Step 4: Configure your Airflow connection
The connection you configure will connect to the Postgres database you created in [Step 3](#step-3-configure-your-database).
1. In the Airflow UI, go to **Admin** > **Connections**.
2. Create a new connection named `postgres_default` and choose the `postgres` connection type. Enter the following information:
* **Host:** `host.docker.internal`
* **Login:** `postgres`
* **Password:** `postgres`
* **Port:** `5435`
If you are working with a database other than local Postgres, you may need to provide different information to the connection.
## Step 5: Create your DAGs
For this tutorial, you create two DAGs to generate and interpret lineage metadata.
1. In your Astro project `dags` folder, create a new file called `lineage-combine.py`. Paste the following code into the file:
```python expandable wrap theme={null}
from datetime import datetime, timedelta
from airflow.models.dag import DAG
from airflow.providers.common.sql.operators.sql import SQLExecuteQueryOperator
create_table_query= '''
CREATE TABLE IF NOT EXISTS animal_adoptions_combined (
date DATE,
type VARCHAR,
name VARCHAR,
age INTEGER
);
'''
combine_data_query= '''
INSERT INTO animal_adoptions_combined (date, type, name, age)
SELECT *
FROM adoption_center_1
UNION
SELECT *
FROM adoption_center_2;
'''
with DAG(
'lineage-combine-postgres',
start_date=datetime(2022, 12, 1),
max_active_runs=1,
schedule='@daily',
default_args = {
'retries': 1,
'retry_delay': timedelta(minutes=1)
},
catchup=False
):
create_table = SQLExecuteQueryOperator(
task_id='create_table',
postgres_conn_id='postgres_default',
sql=create_table_query
)
insert_data = SQLExecuteQueryOperator(
task_id='combine',
postgres_conn_id='postgres_default',
sql=combine_data_query
)
create_table >> insert_data
```
2. Create another file in your `dags` folder and call it `lineage-reporting.py`. Paste the following code into the file:
```python expandable wrap theme={null}
from datetime import datetime, timedelta
from airflow.models.dag import DAG
from airflow.providers.common.sql.operators.sql import SQLExecuteQueryOperator
aggregate_reporting_query = '''
INSERT INTO adoption_reporting_long (date, type, number)
SELECT c.date, c.type, COUNT(c.type)
FROM animal_adoptions_combined c
GROUP BY date, type;
'''
with DAG(
'lineage-reporting-postgres',
start_date=datetime(2020, 6, 1),
max_active_runs=1,
schedule='@daily',
default_args={
'retries': 1,
'retry_delay': timedelta(minutes=1)
},
catchup=False
):
create_table = SQLExecuteQueryOperator(
task_id='create_reporting_table',
postgres_conn_id='postgres_default',
sql='''
CREATE TABLE IF NOT EXISTS adoption_reporting_long (
date DATE,
type VARCHAR,
number INTEGER
);
''',
)
insert_data = SQLExecuteQueryOperator(
task_id='reporting',
postgres_conn_id='postgres_default',
sql=aggregate_reporting_query
)
create_table >> insert_data
```
The first DAG creates and populates a table (`animal_adoptions_combined`) with data aggregated from the two source tables (`adoption_center_1` and `adoption_center_2`) you created in [Step 3](#step-3-configure-your-database). The second DAG creates and populates a reporting table (`adoption_reporting_long`) using data from the aggregated table (`animal_adoptions_combined`) created in your first DAG. Both of these DAGs use the `SQLExecuteQueryOperator` - supported by OpenLineage, so lineage is generated automatically.
You might want to make adjustments to these DAGs if you are working with different source tables, or if your Postgres connection id isn't `postgres_default`.
## Step 6: Run your DAGs and view lineage metadata
You can trace the data through the DAGs you created in Step 5 by viewing their lineage metadata in Marquez.
1. Run the `lineage-combine-postgres` DAG.
2. Run the `lineage-reporting-postgres` DAG.
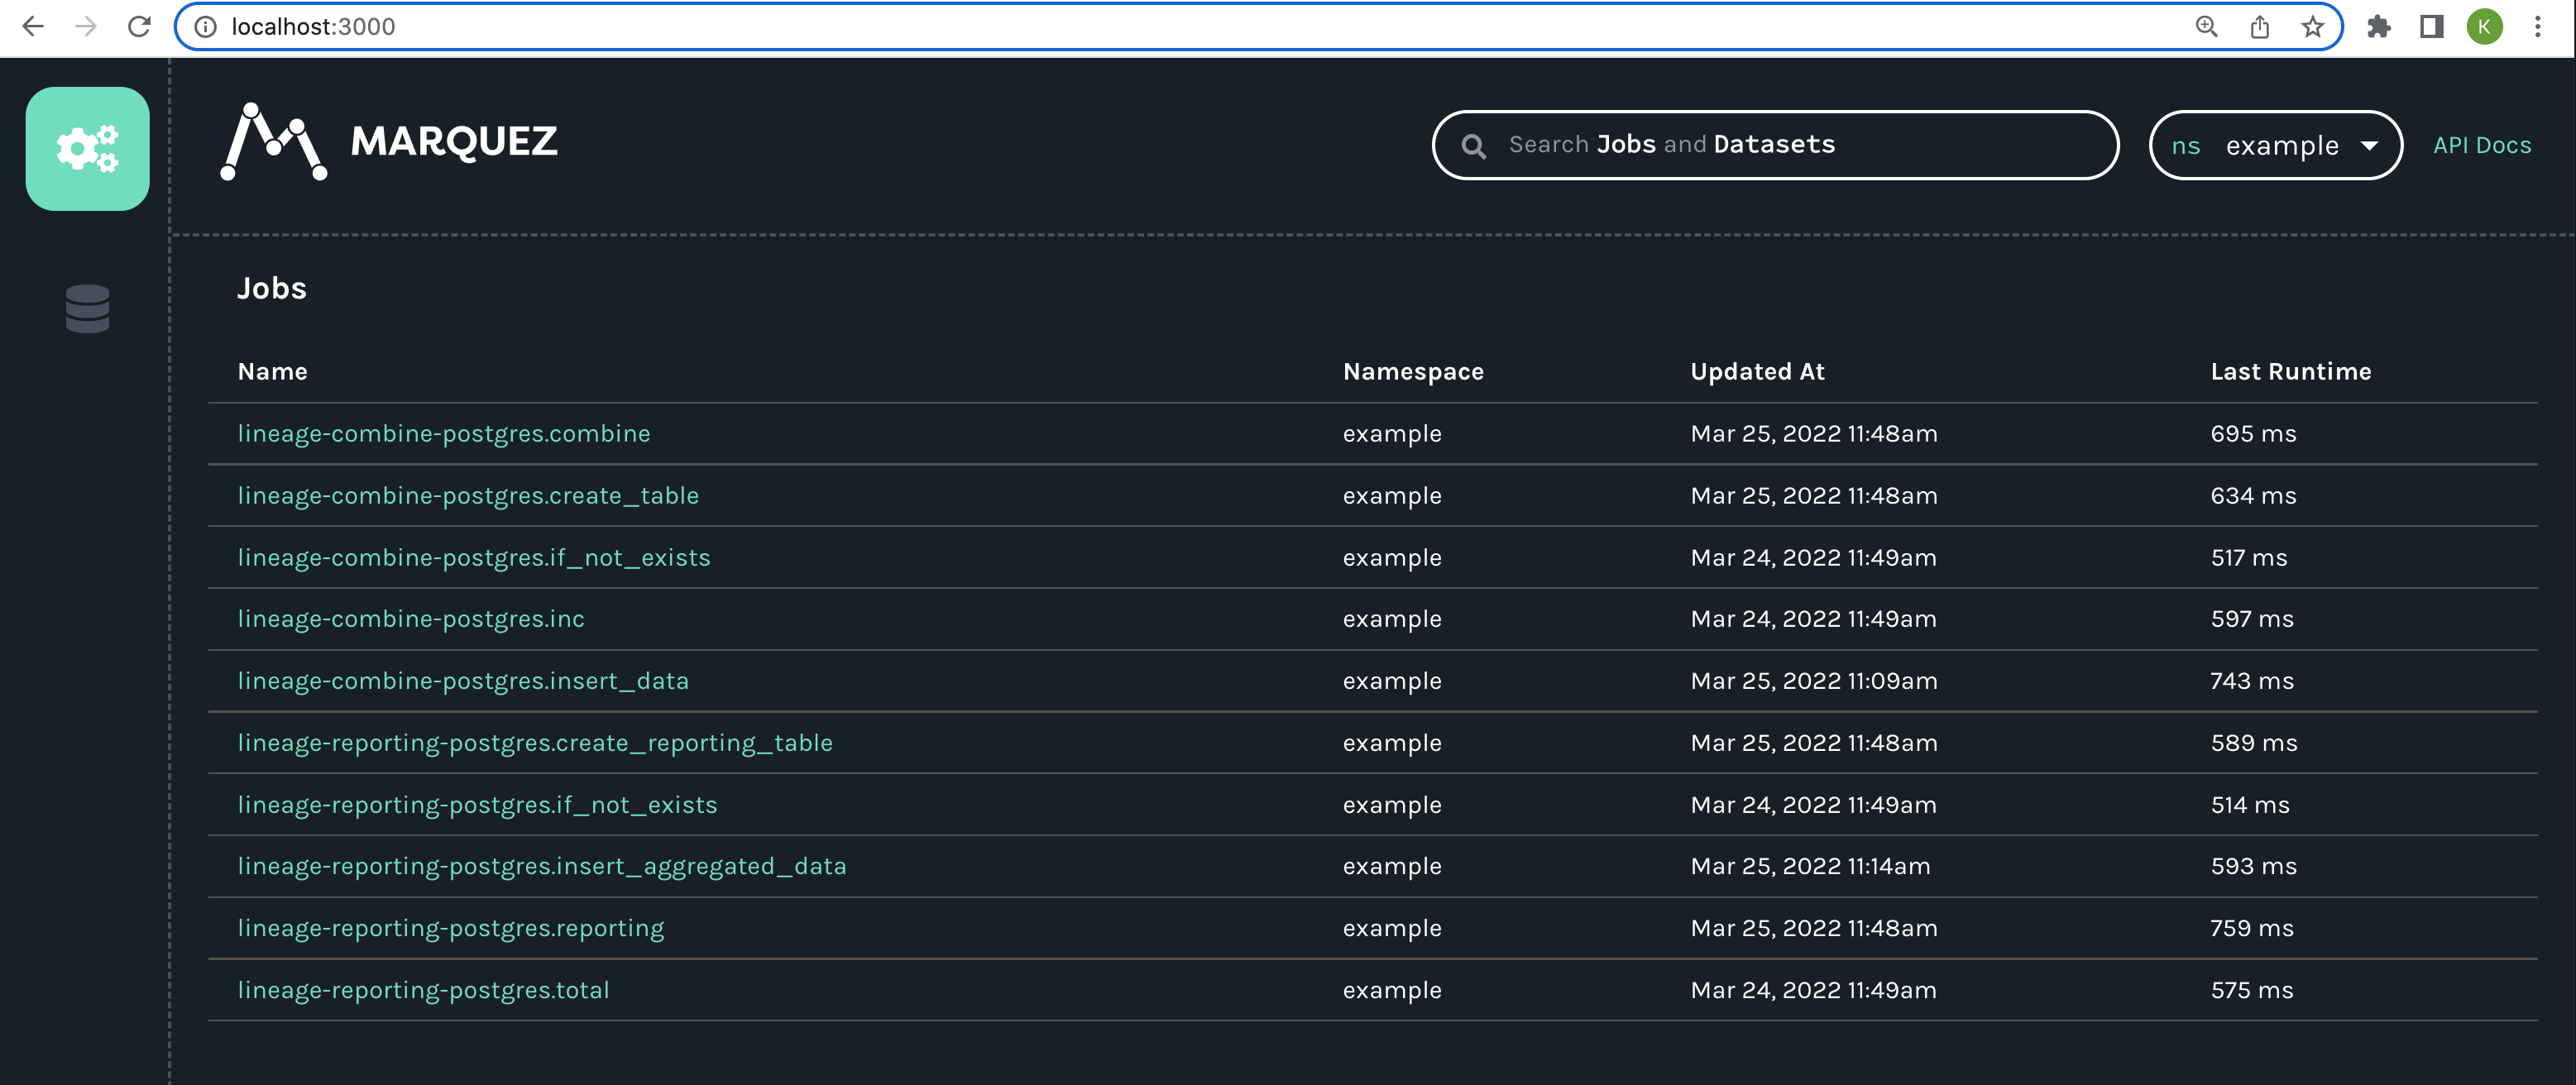
3. Go to the Marquez UI at `localhost:3000` and view the jobs created by each task instance. You should see something like this:
 4. Click one of the jobs from your DAGs to see the full lineage graph.
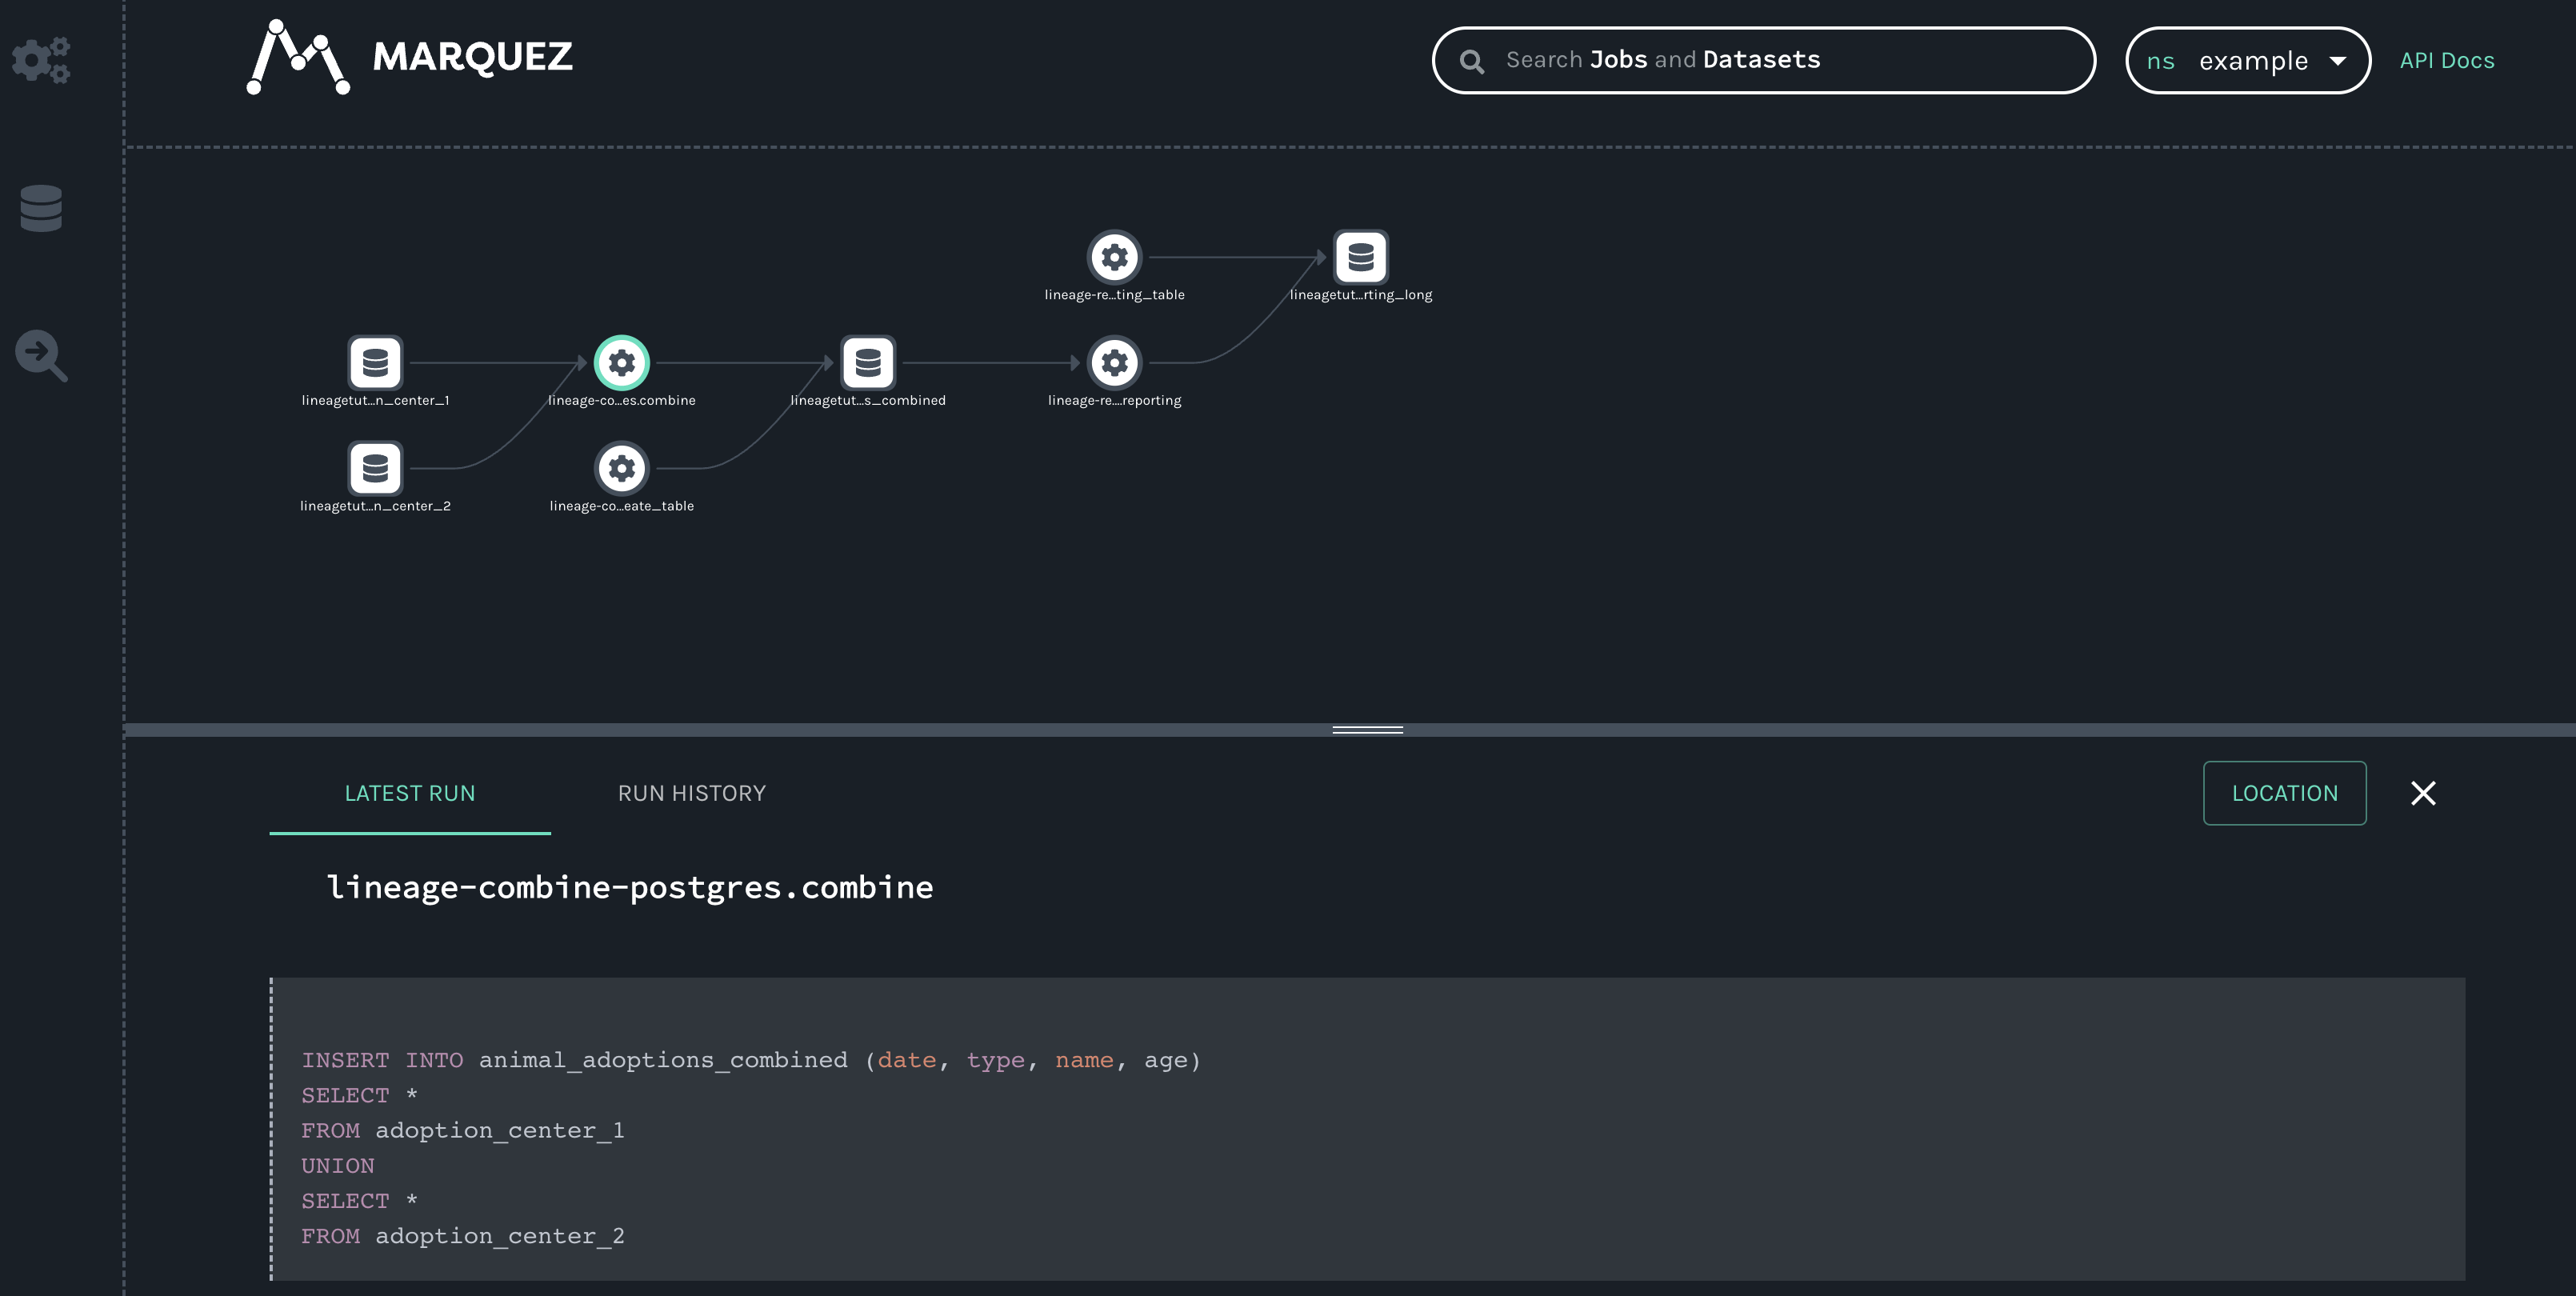 The lineage graph shows:
* Two origin datasets that are used to populate the combined data table.
* The four jobs (tasks) from your DAGs that create new tables and result in new combined datasets: `combine` and `reporting`.
* Two new datasets that are created by those jobs.
The lineage graph shows you how these two DAGs are connected and how data flows through the entire pipeline, giving you insight you wouldn't have if you were to view these DAGs in the Airflow UI alone.
## Conclusion
Congratulations! You can now run Marquez and Airflow locally and trace data through your DAGs by viewing their lineage. As a great next step, try other Airflow operators that generate lineage metadata. Or, if you are an Astronomer customer, check out [lineage in Astro](/docs/astro/create-data-products).
The lineage graph shows:
* Two origin datasets that are used to populate the combined data table.
* The four jobs (tasks) from your DAGs that create new tables and result in new combined datasets: `combine` and `reporting`.
* Two new datasets that are created by those jobs.
The lineage graph shows you how these two DAGs are connected and how data flows through the entire pipeline, giving you insight you wouldn't have if you were to view these DAGs in the Airflow UI alone.
## Conclusion
Congratulations! You can now run Marquez and Airflow locally and trace data through your DAGs by viewing their lineage. As a great next step, try other Airflow operators that generate lineage metadata. Or, if you are an Astronomer customer, check out [lineage in Astro](/docs/astro/create-data-products).