> ## Documentation Index
> Fetch the complete documentation index at: https://astronomer.io/docs/llms.txt
> Use this file to discover all available pages before exploring further.
# Use the KubernetesPodOperator
This page hasn't yet been updated for Airflow 3. The concepts shown are relevant, but some code may need to be updated. If you run any examples, take care to update import statements and watch for any other breaking changes.
The `KubernetesPodOperator` (KPO) runs a Docker image in a dedicated Kubernetes Pod. By abstracting calls to the Kubernetes API, the `KubernetesPodOperator` lets you start and run Pods from Airflow using DAG code.
In this guide, you'll learn:
* The requirements for running the `KubernetesPodOperator`.
* When to use the `KubernetesPodOperator`.
* How to configure the `KubernetesPodOperator`.
* The differences between the `KubernetesPodOperator` and the Kubernetes executor.
You'll also learn how to use the `KubernetesPodOperator` to run a task in a language other than Python, how to use the `KubernetesPodOperator` with XComs, and how to launch a Pod in a remote AWS EKS Cluster.
On Astro, all of the infrastructure required to run the `KubernetesPodOperator` is hosted by Astronomer and managed automatically. Therefore, some of the use cases on this page might be simplified if you're running the `KubernetesPodOperator` on Astro. See [Run the `KubernetesPodOperator` on Astro](/docs/astro/kubernetespodoperator) to learn more.
**Other ways to learn**
There are multiple resources for learning about this topic. See also:
* Astronomer Academy: [Airflow: The `KubernetesPodOperator`](https://academy.astronomer.io/astro-runtime-the-kubernetespodoperator-1) module.
* Webinar: [Running Airflow Tasks in Isolated Environments](https://www.astronomer.io/events/webinars/running-airflow-tasks-in-isolated-environments/).
## Assumed knowledge
To get the most out of this guide, you should have an understanding of:
* Airflow operators. See [Operators 101](/docs/learn/what-is-an-operator).
* Kubernetes basics. See the [Kubernetes Documentation](https://kubernetes.io/docs/home/).
## Prerequisites
To use the `KubernetesPodOperator` you need to install the Kubernetes provider package. To install it with pip, run:
```bash wrap theme={null}
pip install apache-airflow-providers-cncf-kubernetes==
```
If you use the [Astro CLI](/docs/cli/v1.43/overview), you can alternatively install the package by adding the following line to your Astro project:
```text wrap theme={null}
apache-airflow-providers-cncf-kubernetes==
```
Review the [Airflow Kubernetes provider Documentation](https://airflow.apache.org/docs/apache-airflow-providers-cncf-kubernetes/stable/index.html#requirements) to make sure you install the correct version of the provider package for your version of Airflow.
You also need an existing Kubernetes cluster to connect to. This is commonly the same cluster that Airflow is running on, but it doesn't have to be.
You don't need to use the Kubernetes executor to use the `KubernetesPodOperator`. You can choose one of the following executors:
* Local executor
* LocalKubernetes executor
* Celery executor
* Kubernetes executor
* CeleryKubernetes executor
On Astro, the infrastructure needed to run the `KubernetesPodOperator` with the Celery executor is included with all clusters by default. For more information, see [Run the `KubernetesPodOperator` on Astro](/docs/astro/kubernetespodoperator).
### Run the `KubernetesPodOperator` locally
Setting up your local environment to use the `KubernetesPodOperator` can help you avoid time consuming deployments to remote environments.
Use the steps below to quickly set up a local environment for the `KubernetesPodOperator` using the [Astro CLI](/docs/cli/v1.43/overview). Alternatively, you can use the [Helm Chart for Apache Airflow](https://airflow.apache.org/docs/helm-chart/stable/index.html) to run open source Airflow within a local Kubernetes cluster. See [Getting Started With the Official Airflow Helm Chart](https://www.youtube.com/watch?v=39k2Sz9jZ2c\&ab_channel=Astronomer).
#### Step 1: Set up Kubernetes
Windows And Mac
The latest versions of Docker for Windows and Mac let you run a single node Kubernetes cluster locally. If you are using Windows, see [Setting Up Docker for Windows and WSL to Work Flawlessly](https://nickjanetakis.com/blog/setting-up-docker-for-windows-and-wsl-to-work-flawlessly). If you are using Mac, see [Docker Desktop for Mac user manual](https://nickjanetakis.com/blog/setting-up-docker-for-windows-and-wsl-to-work-flawlessly). It isn't necessary to install Docker Compose.
1. Open Docker and go to **Settings** > **Kubernetes**.
2. Select the `Enable Kubernetes` checkbox.
3. Click **Apply and Restart**.
4. Click **Install** in the **Kubernetes Cluster Installation** dialog.
Docker restarts and the status indicator changes to green to indicate Kubernetes is running.
Linux
1. Install Microk8s. See [Microk8s](https://microk8s.io/).
2. Run `microk8s.start` to start Kubernetes.
#### Step 2: Update the kubeconfig file
Windows And Mac
1. Use the following commands to copy the `docker-desktop` context from the Kubernetes configuration file and save it as a separate file in the `/include/.kube/` folder in your Astro project. The `config` file contains all the information the `KubernetesPodOperator` uses to connect to your cluster.
```bash wrap theme={null}
kubectl config use-context docker-desktop
kubectl config view --minify --raw > /include/.kube
```
After running these commands, you will find a `config` file in the `/include/.kube/` folder of your Astro project which resembles this example:
```yaml wrap theme={null}
apiVersion: v1
clusters:
- cluster:
certificate-authority-data:
server: https://kubernetes.docker.internal:6443/
name: docker-desktop
contexts:
- context:
cluster: docker-desktop
user: docker-desktop
name: docker-desktop
current-context: docker-desktop
kind: Config
preferences: {}
users:
- name: docker-desktop
user:
client-certificate-data:
client-key-data:
```
2. If you have issues connecting, check the server configuration in the `kubeconfig` file. If `server: https://localhost:6445` is present, change to `server: https://kubernetes.docker.internal:6443` to identify the localhost running Kubernetes Pods. If this doesn't work, try `server: https://host.docker.internal:6445`.
3. (Optional) Add the `.kube` folder to `.gitignore` if your Astro project is hosted in a GitHub repository and you want to prevent the file from being tracked by your version control tool.
4. (Optional) Add the `.kube` folder to `.dockerignore` to exclude it from the Docker image.
Linux
In a `.kube` folder in your Astro project, create a config file with:
```bash wrap theme={null}
microk8s.config > /include/.kube/config
```
#### Step 3: Create Kubernetes Connection in the Airflow UI
To run a Kubernetes pod locally, you can use the following .json template to create a .json connection string that you can then use to create a Kubernetes connection using the local Airflow UI. First, edit the template with the values you gathered in the previous step:
```json expandable wrap theme={null}
{
"apiVersion": "v1",
"clusters": [
{
"cluster": {
"certificate-authority-data": "",
"server": "https://kubernetes.docker.internal:6443"
},
"name": "docker-desktop"
}
],
"contexts": [
{
"context": {
"cluster": "docker-desktop",
"user": "docker-desktop"
},
"name": "docker-desktop"
}
],
"current-context": "docker-desktop",
"kind": "Config",
"preferences": {},
"users": [
{
"name": "docker-desktop",
"user": {
"client-certificate-data": "",
"client-key-data": ""
}
}
]
}
```
Then, run `astro dev start` with the Astro CLI to spin up a local Airflow environment. Once your environment has been created, open up the connection management UI, and create a new connection of the `Kubernetes Cluster Connection` type. Within the connection creation menu, copy the .json file you created using the above template into the `Kube config (JSON format)` field, and save the connection with the connection id `k8s_conn`. If you'd like to use another connection id, make sure to alter the following example DAG code.
#### Step 4: Run your container
To use the `KubernetesPodOperator`, you must define the configuration of each task and the Kubernetes Pod in which it runs, including its namespace and Docker image.
This example DAG runs a `hello-world` Docker image using the `k8s_conn` connection you defined in the previous step to run it on your local Kubernetes cluster.
```python wrap theme={null}
from pendulum import datetime
from airflow import DAG
from airflow.providers.cncf.kubernetes.operators.kubernetes_pod import (
KubernetesPodOperator,
)
with DAG(
dag_id="example_kubernetes_pod",
schedule="@once",
start_date=datetime(2023, 3, 30),
) as dag:
example_kpo = KubernetesPodOperator(
kubernetes_conn_id="k8s_conn",
image="hello-world",
name="airflow-test-pod",
task_id="task-one",
is_delete_operator_pod=True,
get_logs=True,
)
example_kpo
```
#### Step 4: View Kubernetes logs
(Optional) Use the `kubectl` command line tool to review the logs for any Pods that were created by the operator for issues and help with troubleshooting. If you haven't installed the `kubectl` command line tool, see [Install Tools](https://kubernetes.io/docs/tasks/tools/#kubectl).
Windows And Mac
Run `kubectl get pods -n $namespace` or `kubectl logs {pod_name} -n $namespace` to examine the logs for the Pod that just ran. By default, `docker-for-desktop` runs Pods in the `default` namespace.
Linux
Run `microk8s.kubectl get pods -n $namespace` or `microk8s.kubectl logs {pod_name} -n $namespace` to examine the logs for the pod that just ran. By default, `microk8s` runs pods in the `default` namespace.
## When to use the `KubernetesPodOperator`
The `KubernetesPodOperator` runs any Docker image provided to it. Frequent use cases are:
* Running a task in a language other than Python. This guide includes an example of how to run a Haskell script with the `KubernetesPodOperator`.
* Having full control over how much compute resources and memory a single task can use.
* Executing tasks in a separate environment with individual packages and dependencies.
* Running tasks that use a version of Python not supported by your Airflow environment.
* Running tasks with specific Node (a virtual or physical machine in Kubernetes) constraints, such as only running on Nodes located in the European Union.
### A comparison of the `KubernetesPodOperator` and the Kubernetes executor
[Executors](/docs/learn/airflow-executors-explained) determine how your Airflow tasks are executed. The Kubernetes executor and the `KubernetesPodOperator` both dynamically launch and terminate Pods to run Airflow tasks. As the name suggests, the Kubernetes executor affects how all tasks in an Airflow instance are executed. The `KubernetesPodOperator` launches only its own task in a Kubernetes Pod with its own configuration. It doesn't affect any other tasks in the Airflow instance. To configure the Kubernetes executor, see [Kubernetes Executor](https://airflow.apache.org/docs/apache-airflow/stable/executor/kubernetes.html).
The following are the primary differences between the `KubernetesPodOperator` and the Kubernetes executor:
* The `KubernetesPodOperator` requires a Docker image to be specified, while the Kubernetes executor doesn't.
* The `KubernetesPodOperator` defines one isolated Airflow task. In contrast, the Kubernetes executor is implemented at the configuration level of the Airflow instance, which means all tasks run in their own Kubernetes Pod. This might be desired in some use cases that require auto-scaling, but it's not ideal for environments with a high volume of shorter running tasks.
* In comparison to the `KubernetesPodOperator`, the Kubernetes executor has less abstraction over Pod configuration. All task-level configurations have to be passed to the executor as a dictionary using the `BaseOperator's` `executor_config` argument, which is available to all operators.
* If a custom Docker image is passed to the Kubernetes executor's `base` container by providing it to either the `pod_template_file` or the `pod_override` key in the dictionary for the `executor_config` argument, Airflow must be installed or the task won't run. A possible reason for customizing this Docker image would be to run a task in an environment with different versions of packages than other tasks running in your Airflow instance. This isn't the case with the `KubernetesPodOperator`, which can run any valid Docker image.
Both the `KubernetesPodOperator` and the Kubernetes executor can use the Kubernetes API to create Pods for running tasks. Typically, the `KubernetesPodOperator` is ideal for controlling the environment in which the task runs, while the Kubernetes executor is ideal for controlling resource optimization. It's common to use both the Kubernetes executor and the `KubernetesPodOperator` in the same Airflow environment, where all tasks need to run on Kubernetes but only some tasks require additional environment configurations.
## How to configure the `KubernetesPodOperator`
The `KubernetesPodOperator` launches any valid Docker image provided to it in a dedicated Kubernetes Pod on a Kubernetes cluster. The `KubernetesPodOperator` supports arguments for some of the most common Pod settings. For advanced use cases, you can specify a [Pod template file](https://kubernetes.io/docs/concepts/workloads/pods/#pod-templates) that supports all possible Pod settings.
The `KubernetesPodOperator` can be instantiated like any other operator within the context of a DAG.
### Required arguments
* `task_id`: A unique string identifying the task within Airflow.
* `namespace`: The namespace within your Kubernetes cluster to which the new Pod is assigned.
* `name`: The name of the Pod being created. This name must be unique for each Pod within a namespace.
* `image`: The Docker image to launch. Images from [hub.docker.com](https://hub.docker.com/) can be passed with just the image name, but you must provide the full URL for custom repositories.
### Optional arguments
* `random_name_suffix`: Generates a random suffix for the Pod name if set to `True`. Avoids naming conflicts when running a large number of Pods.
* `labels`: A list of key and value pairs which can be used to logically group decoupled objects together.
* `ports`: Ports for the Pod.
* `reattach_on_restart`: Defines how to handle losing the worker while the Pod is running. When set to `True`, the existing Pod reattaches to the worker on the next try. When set to `False`, a new Pod will be created for each try. The default is `True`.
* `is_delete_operator_pod`: Determines whether to delete the Pod when it reaches its final state or when the execution is interrupted. The default is `True`.
* `get_logs`: Determines whether to use the `stdout` of the container as task-logs to the Airflow logging system.
* `log_events_on_failure`: Determines whether events are logged in case the Pod fails. The default is `False`.
* `env_vars`: A dictionary of environment variables for the Pod.
* `container_resources`: A [`k8s.V1ResourceRequirements`](https://github.com/kubernetes-client/python/blob/master/kubernetes/docs/V1ResourceRequirements) object containing the resource requests and/or limits for the Pod.
```python wrap theme={null}
# from airflow.providers.cncf.kubernetes.operators.kubernetes_pod import (
# KubernetesPodOperator,
# )
# from kubernetes.client import CoreV1Api, V1Pod, models as k8s
KubernetesPodOperator(
# other arguments
container_resources=k8s.V1ResourceRequirements(
requests={"cpu": "100m", "memory": "64Mi", "ephemeral-storage": "1Gi"},
limits={"cpu": "200m", "memory": "420Mi", "ephemeral-storage": "2Gi"},
)
)
```
See the [Kubernetes Documentation on Resource Management for Pods and Containers](https://kubernetes.io/docs/concepts/configuration/manage-resources-containers/) for more information.
Astronomer customers can set default resource requests and limits for all KPO tasks in their deployment settings, see [Configure Kubernetes Pod resources](/docs/astro/deployment-resources#configure-kubernetes-pod-resources). Setting the `container_resources` argument in the KPO task will override the default settings. Note that using `ephemeral-storage` for Astro Hosted is currently in [Preview](/docs/astro/feature-previews).
* `volumes`: A list of `k8s.V1Volumes`, see also this [Kubernetes example DAG](https://github.com/apache/airflow/blob/providers-cncf-kubernetes/10.0.0/providers/tests/system/cncf/kubernetes/example_kubernetes.py).
* `affinity` and `tolerations`: Dictionaries of rules for [Pod to Node assignments](https://kubernetes.io/docs/concepts/scheduling-eviction/assign-pod-node/). Like the `volumes` parameter, these also require a `k8s` object.
* `pod_template_file`: The path to a Pod template file.
* `full_pod_spec`: A complete Pod configuration formatted as a Python `k8s` object.
You can also use many other arguments to configure the Pod and pass information to the Docker image. For a list of the available `KubernetesPodOperator` arguments, see the [`KubernetesPodOperator` source code](https://github.com/apache/airflow/blob/main/providers/cncf/kubernetes/src/airflow/providers/cncf/kubernetes/operators/pod.py).
The following `KubernetesPodOperator` arguments can be used with Jinja templates: `image`, `cmds`, `arguments`, `env_vars`, `labels`, `config_file`, `pod_template_file`, and `namespace`.
### Configure a Kubernetes connection
If you leave `in_cluster=True`, you only need to specify the `KubernetesPodOperator`'s `namespace` argument to establish a connection with your Kubernetes cluster. The Pod specified by the `KubernetesPodOperator` runs on the same Kubernetes cluster as your Airflow instance.
If you aren't running Airflow on Kubernetes, or want to send the Pod to a different cluster than the one currently hosting your Airflow instance, you can create a Kubernetes Cluster [connection](/docs/learn/connections) which uses the [Kubernetes hook](https://airflow.apache.org/registry/providers/cncf-kubernetes#cncf-kubernetes-kubernetes-KubernetesHook) to connect to the [Kubernetes API](https://kubernetes.io/docs/reference/kubernetes-api/) of a different Kubernetes cluster. This connection can be passed to the `KubernetesPodOperator` using the `kubernetes_conn_id` argument and requires the following components to work:
* A `KubeConfig` file, provided as either a path to the file or in JSON format.
* The cluster context from the provided `KubeConfig` file.
The following image shows how to set up a Kubernetes cluster connection in the Airflow UI.
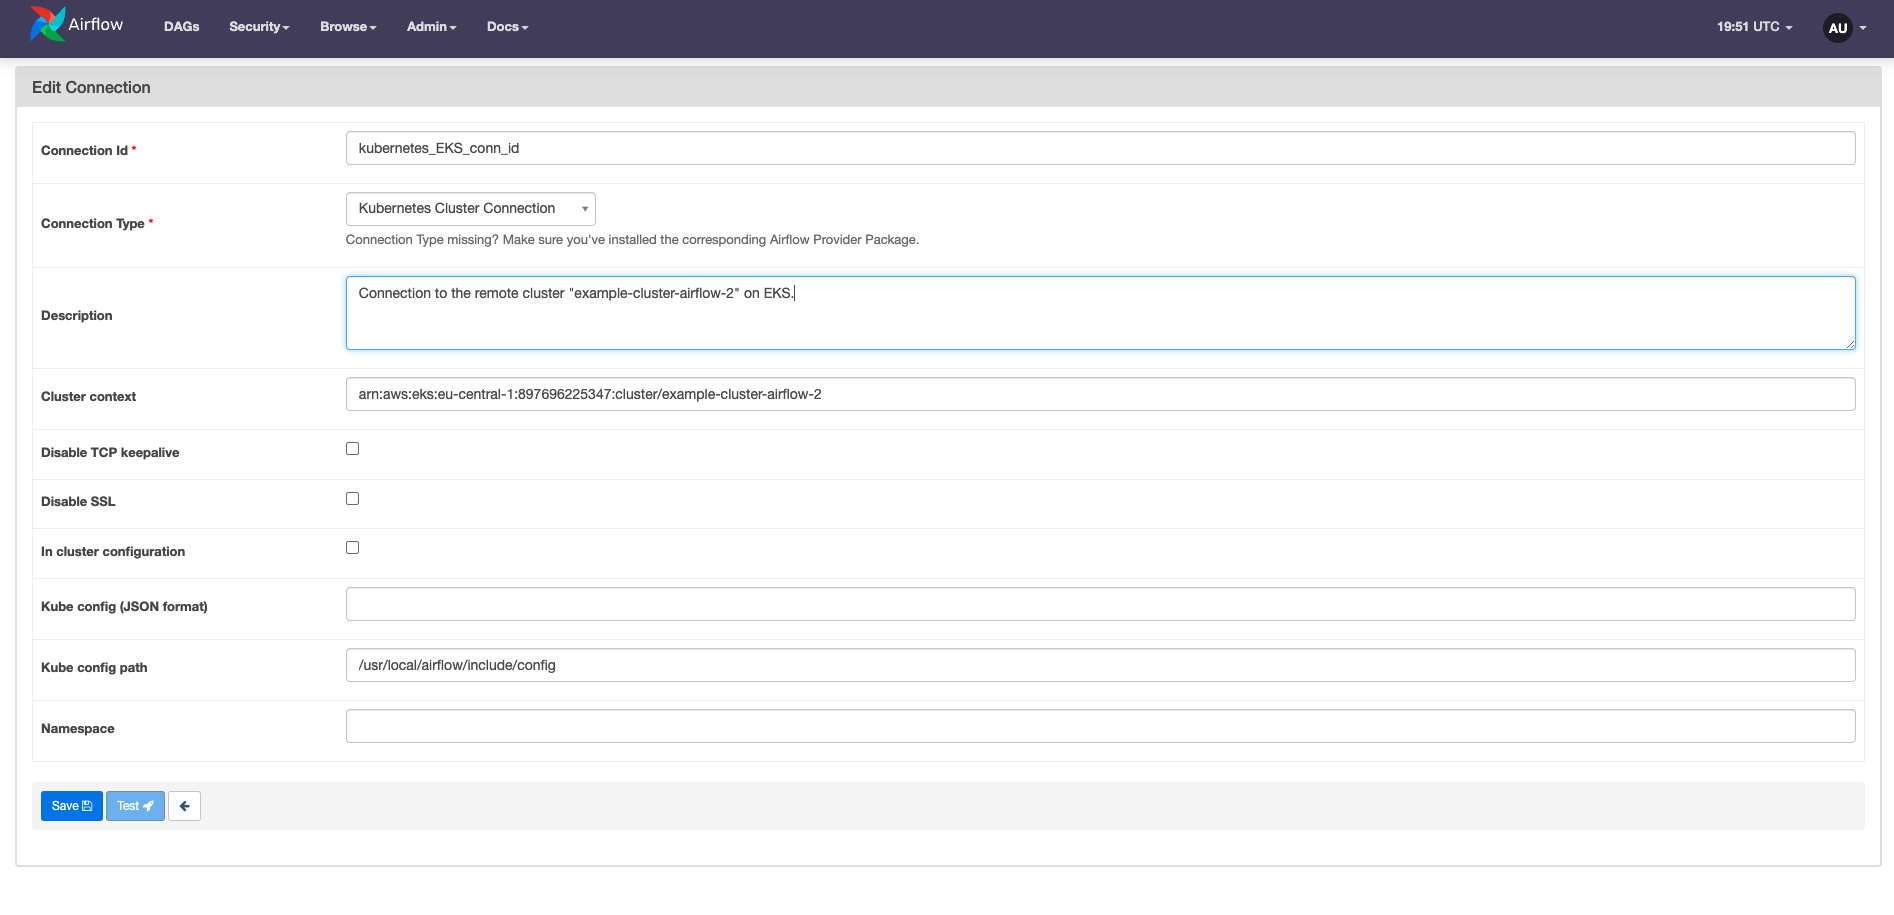 The components of the connection can also be set or overwritten at the task level by using the arguments `config_file` (to specify the path to the `KubeConfig` file) and `cluster_context`. Setting these parameters in `airflow.cfg` is deprecated.
**Launching Pods in external clusters**
If some of your tasks require specific resources such as a GPU, you might want to run them in a different cluster than your Airflow instance.
The way that you connect to an external cluster will vary based on where your cluster is hosted and where your Airflow environment is hosted, but generally the following conditions must be met to launch a Pod in an external cluster:
* Your Airflow environment must have a network connection to the external cluster.
* Your Airflow environment must have permissions to spin up Pods in the external cluster.
* Your cluster configuration must be passed to your `KubernetesPodOperator` tasks either through a task-level configuration or a Kubernetes connection.
See the [Astro documentation](/docs/astro/kubernetespodoperator) for a more detailed example of how to configure a `KubernetesPodOperator` task to launch a Pod in an external EKS cluster.
## Use the `@task.kubernetes` decorator
The `@task.kubernetes` decorator provides an alternative to the traditional `KubernetesPodOperator` when you run Python scripts in a separate Kubernetes Pod. The Docker image provided to the `@task.kubernetes` decorator must support executing Python scripts.
Like regular `@task` decorated functions, XComs can be passed to the Python script running in the dedicated Kubernetes pod. If `do_xcom_push` is set to `True` in the decorator parameters, the value returned by the decorated function is pushed to XCom. You can learn more about decorators in the [Introduction to Airflow decorators](/docs/learn/airflow-decorators) guide.
Astronomer recommends using the `@task.kubernetes` decorator instead of the `KubernetesPodOperator` when using XCom with Python scripts in a dedicated Kubernetes pod.
```python expandable wrap theme={null}
from pendulum import datetime
from airflow.configuration import conf
from airflow.decorators import dag, task
import random
# get the current Kubernetes namespace Airflow is running in
namespace = conf.get("kubernetes", "NAMESPACE")
@dag(
start_date=datetime(2023, 1, 1),
catchup=False,
schedule="@daily",
)
def kubernetes_decorator_example_dag():
@task
def extract_data():
# simulating querying from a database
data_point = random.randint(0, 100)
return data_point
@task.kubernetes(
# specify the Docker image to launch, it needs to be able to run a Python script
image="python",
# launch the Pod on the same cluster as Airflow is running on
in_cluster=True,
# launch the Pod in the same namespace as Airflow is running in
namespace=namespace,
# Pod configuration
# naming the Pod
name="my_pod",
# log stdout of the container as task logs
get_logs=True,
# log events in case of Pod failure
log_events_on_failure=True,
# enable pushing to XCom
do_xcom_push=True,
)
def transform(data_point):
multiplied_data_point = 23 * int(data_point)
return multiplied_data_point
@task
def load_data(**context):
# pull the XCom value that has been pushed by the KubernetesPodOperator
transformed_data_point = context["ti"].xcom_pull(
task_ids="transform", key="return_value"
)
print(transformed_data_point)
load_data(transform(extract_data()))
kubernetes_decorator_example_dag()
```
## Example: Use the `KubernetesPodOperator` to run a script in another language
A frequent use case for the `KubernetesPodOperator` is running a task in a language other than Python. To do this, you build a custom Docker image containing the script.
In the following example, the Haskell script runs and the value `NAME_TO_GREET` is printed on the console:
```haskell wrap theme={null}
import System.Environment
main = do
name <- getEnv "NAME_TO_GREET"
putStrLn ("Hello, " ++ name)
```
The Dockerfile creates the necessary environment to run the script and then executes it with a `CMD` command:
```docker wrap theme={null}
FROM haskell
WORKDIR /opt/hello_name
RUN cabal update
COPY ./haskell_example.cabal /opt/hello_name/haskell_example.cabal
RUN cabal build --only-dependencies -j4
COPY . /opt/hello_name
RUN cabal install
CMD ["haskell_example"]
```
After making the Docker image available, it can be run from the `KubernetesPodOperator` with the `image` argument. The following example DAG showcases a variety of arguments of the `KubernetesPodOperator`, including how to pass `NAME_TO_GREET` to the Haskell code.
```python expandable wrap theme={null}
from airflow import DAG
from pendulum import datetime
from airflow.providers.cncf.kubernetes.operators.kubernetes_pod import (
KubernetesPodOperator,
)
from airflow.configuration import conf
# get the current Kubernetes namespace Airflow is running in
namespace = conf.get("kubernetes", "NAMESPACE")
# set the name that will be printed
name = "your_name"
# instantiate the DAG
with DAG(
start_date=datetime(2022, 6, 1),
catchup=False,
schedule="@daily",
dag_id="KPO_different_language_example_dag",
) as dag:
say_hello_name_in_haskell = KubernetesPodOperator(
# unique id of the task within the DAG
task_id="say_hello_name_in_haskell",
# the Docker image to launch
image="",
# launch the Pod on the same cluster as Airflow is running on
in_cluster=True,
# launch the Pod in the same namespace as Airflow is running in
namespace=namespace,
# Pod configuration
# name the Pod
name="my_pod",
# give the Pod name a random suffix, ensure uniqueness in the namespace
random_name_suffix=True,
# attach labels to the Pod, can be used for grouping
labels={"app": "backend", "env": "dev"},
# reattach to worker instead of creating a new Pod on worker failure
reattach_on_restart=True,
# delete Pod after the task is finished
is_delete_operator_pod=True,
# get log stdout of the container as task logs
get_logs=True,
# log events in case of Pod failure
log_events_on_failure=True,
# pass your name as an environment var
env_vars={"NAME_TO_GREET": f"{name}"},
)
```
## Example: Use the `KubernetesPodOperator` with XComs
[XCom](https://airflow.apache.org/docs/apache-airflow/stable/core-concepts/xcoms.html) is a commonly used Airflow feature for passing small amounts of data between tasks. You can use the `KubernetesPodOperator` to both receive values stored in XCom and push values to XCom.
The following example DAG shows an ETL pipeline with an `extract_data` task that runs a query on a database and returns a value. The [TaskFlow API](https://airflow.apache.org/docs/apache-airflow/stable/tutorial_taskflow_api.html#tutorial-on-the-taskflow-api) automatically pushes the return value to XComs.
The `transform` task is a `KubernetesPodOperator` which requires that the XCom data is pushed from the upstream task before it, and then launches an image created with the following Dockerfile:
```docker wrap theme={null}
FROM python
WORKDIR /
# creating the file to write XComs to
RUN mkdir -p airflow/xcom
RUN echo "" > airflow/xcom/return.json
COPY multiply_by_23.py ./
CMD ["python", "./multiply_by_23.py"]
```
When using XComs with the `KubernetesPodOperator`, you must create the file `airflow/xcom/return.json` in your Docker container (ideally from within your Dockerfile), because Airflow can only look for XComs to pull at that specific location. In the following example, the Docker image contains a simple Python script to multiply an environment variable by 23, package the result into JSON, and then write that JSON to the correct file to be retrieved as an XCom. The XComs from the `KubernetesPodOperator` are pushed only if the task is marked successful.
```python wrap theme={null}
import os
# import the result of the previous task as an environment variable
data_point = os.environ["DATA_POINT"]
# multiply the data point by 23 and package the result into a json
multiplied_data_point = str(23 * int(data_point))
return_json = {"return_value": f"{multiplied_data_point}"}
# write to the file checked by Airflow for XComs
f = open("./airflow/xcom/return.json", "w")
f.write(f"{return_json}")
f.close()
```
The `load_data` task pulls the XCom returned from the `transform` task and prints it to the console.
The full DAG code is provided in the following example. To avoid task failure, turn on `do_xcom_push` after you create the `airflow/xcom/return.json` within the Docker container run by the `KubernetesPodOperator`.
The components of the connection can also be set or overwritten at the task level by using the arguments `config_file` (to specify the path to the `KubeConfig` file) and `cluster_context`. Setting these parameters in `airflow.cfg` is deprecated.
**Launching Pods in external clusters**
If some of your tasks require specific resources such as a GPU, you might want to run them in a different cluster than your Airflow instance.
The way that you connect to an external cluster will vary based on where your cluster is hosted and where your Airflow environment is hosted, but generally the following conditions must be met to launch a Pod in an external cluster:
* Your Airflow environment must have a network connection to the external cluster.
* Your Airflow environment must have permissions to spin up Pods in the external cluster.
* Your cluster configuration must be passed to your `KubernetesPodOperator` tasks either through a task-level configuration or a Kubernetes connection.
See the [Astro documentation](/docs/astro/kubernetespodoperator) for a more detailed example of how to configure a `KubernetesPodOperator` task to launch a Pod in an external EKS cluster.
## Use the `@task.kubernetes` decorator
The `@task.kubernetes` decorator provides an alternative to the traditional `KubernetesPodOperator` when you run Python scripts in a separate Kubernetes Pod. The Docker image provided to the `@task.kubernetes` decorator must support executing Python scripts.
Like regular `@task` decorated functions, XComs can be passed to the Python script running in the dedicated Kubernetes pod. If `do_xcom_push` is set to `True` in the decorator parameters, the value returned by the decorated function is pushed to XCom. You can learn more about decorators in the [Introduction to Airflow decorators](/docs/learn/airflow-decorators) guide.
Astronomer recommends using the `@task.kubernetes` decorator instead of the `KubernetesPodOperator` when using XCom with Python scripts in a dedicated Kubernetes pod.
```python expandable wrap theme={null}
from pendulum import datetime
from airflow.configuration import conf
from airflow.decorators import dag, task
import random
# get the current Kubernetes namespace Airflow is running in
namespace = conf.get("kubernetes", "NAMESPACE")
@dag(
start_date=datetime(2023, 1, 1),
catchup=False,
schedule="@daily",
)
def kubernetes_decorator_example_dag():
@task
def extract_data():
# simulating querying from a database
data_point = random.randint(0, 100)
return data_point
@task.kubernetes(
# specify the Docker image to launch, it needs to be able to run a Python script
image="python",
# launch the Pod on the same cluster as Airflow is running on
in_cluster=True,
# launch the Pod in the same namespace as Airflow is running in
namespace=namespace,
# Pod configuration
# naming the Pod
name="my_pod",
# log stdout of the container as task logs
get_logs=True,
# log events in case of Pod failure
log_events_on_failure=True,
# enable pushing to XCom
do_xcom_push=True,
)
def transform(data_point):
multiplied_data_point = 23 * int(data_point)
return multiplied_data_point
@task
def load_data(**context):
# pull the XCom value that has been pushed by the KubernetesPodOperator
transformed_data_point = context["ti"].xcom_pull(
task_ids="transform", key="return_value"
)
print(transformed_data_point)
load_data(transform(extract_data()))
kubernetes_decorator_example_dag()
```
## Example: Use the `KubernetesPodOperator` to run a script in another language
A frequent use case for the `KubernetesPodOperator` is running a task in a language other than Python. To do this, you build a custom Docker image containing the script.
In the following example, the Haskell script runs and the value `NAME_TO_GREET` is printed on the console:
```haskell wrap theme={null}
import System.Environment
main = do
name <- getEnv "NAME_TO_GREET"
putStrLn ("Hello, " ++ name)
```
The Dockerfile creates the necessary environment to run the script and then executes it with a `CMD` command:
```docker wrap theme={null}
FROM haskell
WORKDIR /opt/hello_name
RUN cabal update
COPY ./haskell_example.cabal /opt/hello_name/haskell_example.cabal
RUN cabal build --only-dependencies -j4
COPY . /opt/hello_name
RUN cabal install
CMD ["haskell_example"]
```
After making the Docker image available, it can be run from the `KubernetesPodOperator` with the `image` argument. The following example DAG showcases a variety of arguments of the `KubernetesPodOperator`, including how to pass `NAME_TO_GREET` to the Haskell code.
```python expandable wrap theme={null}
from airflow import DAG
from pendulum import datetime
from airflow.providers.cncf.kubernetes.operators.kubernetes_pod import (
KubernetesPodOperator,
)
from airflow.configuration import conf
# get the current Kubernetes namespace Airflow is running in
namespace = conf.get("kubernetes", "NAMESPACE")
# set the name that will be printed
name = "your_name"
# instantiate the DAG
with DAG(
start_date=datetime(2022, 6, 1),
catchup=False,
schedule="@daily",
dag_id="KPO_different_language_example_dag",
) as dag:
say_hello_name_in_haskell = KubernetesPodOperator(
# unique id of the task within the DAG
task_id="say_hello_name_in_haskell",
# the Docker image to launch
image="",
# launch the Pod on the same cluster as Airflow is running on
in_cluster=True,
# launch the Pod in the same namespace as Airflow is running in
namespace=namespace,
# Pod configuration
# name the Pod
name="my_pod",
# give the Pod name a random suffix, ensure uniqueness in the namespace
random_name_suffix=True,
# attach labels to the Pod, can be used for grouping
labels={"app": "backend", "env": "dev"},
# reattach to worker instead of creating a new Pod on worker failure
reattach_on_restart=True,
# delete Pod after the task is finished
is_delete_operator_pod=True,
# get log stdout of the container as task logs
get_logs=True,
# log events in case of Pod failure
log_events_on_failure=True,
# pass your name as an environment var
env_vars={"NAME_TO_GREET": f"{name}"},
)
```
## Example: Use the `KubernetesPodOperator` with XComs
[XCom](https://airflow.apache.org/docs/apache-airflow/stable/core-concepts/xcoms.html) is a commonly used Airflow feature for passing small amounts of data between tasks. You can use the `KubernetesPodOperator` to both receive values stored in XCom and push values to XCom.
The following example DAG shows an ETL pipeline with an `extract_data` task that runs a query on a database and returns a value. The [TaskFlow API](https://airflow.apache.org/docs/apache-airflow/stable/tutorial_taskflow_api.html#tutorial-on-the-taskflow-api) automatically pushes the return value to XComs.
The `transform` task is a `KubernetesPodOperator` which requires that the XCom data is pushed from the upstream task before it, and then launches an image created with the following Dockerfile:
```docker wrap theme={null}
FROM python
WORKDIR /
# creating the file to write XComs to
RUN mkdir -p airflow/xcom
RUN echo "" > airflow/xcom/return.json
COPY multiply_by_23.py ./
CMD ["python", "./multiply_by_23.py"]
```
When using XComs with the `KubernetesPodOperator`, you must create the file `airflow/xcom/return.json` in your Docker container (ideally from within your Dockerfile), because Airflow can only look for XComs to pull at that specific location. In the following example, the Docker image contains a simple Python script to multiply an environment variable by 23, package the result into JSON, and then write that JSON to the correct file to be retrieved as an XCom. The XComs from the `KubernetesPodOperator` are pushed only if the task is marked successful.
```python wrap theme={null}
import os
# import the result of the previous task as an environment variable
data_point = os.environ["DATA_POINT"]
# multiply the data point by 23 and package the result into a json
multiplied_data_point = str(23 * int(data_point))
return_json = {"return_value": f"{multiplied_data_point}"}
# write to the file checked by Airflow for XComs
f = open("./airflow/xcom/return.json", "w")
f.write(f"{return_json}")
f.close()
```
The `load_data` task pulls the XCom returned from the `transform` task and prints it to the console.
The full DAG code is provided in the following example. To avoid task failure, turn on `do_xcom_push` after you create the `airflow/xcom/return.json` within the Docker container run by the `KubernetesPodOperator`.
TaskFlow
```python expandable wrap theme={null}
from pendulum import datetime
from airflow.providers.cncf.kubernetes.operators.kubernetes_pod import (
KubernetesPodOperator,
)
from airflow.configuration import conf
from airflow.decorators import dag, task
import random
# get the current Kubernetes namespace Airflow is running in
namespace = conf.get("kubernetes", "NAMESPACE")
# instantiate the DAG
@dag(
start_date=datetime(2022, 6, 1),
catchup=False,
schedule="@daily",
)
def KPO_XComs_example_dag():
@task
def extract_data():
# simulating querying from a database
data_point = random.randint(0, 100)
return data_point
transform = KubernetesPodOperator(
# set task id
task_id="transform",
# specify the Docker image to launch
image="",
# launch the Pod on the same cluster as Airflow is running on
in_cluster=True,
# launch the Pod in the same namespace as Airflow is running in
namespace=namespace,
# Pod configuration
# naming the Pod
name="my_pod",
# log stdout of the container as task logs
get_logs=True,
# log events in case of Pod failure
log_events_on_failure=True,
# pull a variable from XComs using Jinja templating and provide it
# to the Pod as an environment variable
env_vars={
"DATA_POINT": """{{ ti.xcom_pull(task_ids='extract_data',
key='return_value') }}"""
},
# push the contents from xcom.json to Xcoms. Remember to only set this
# argument to True if you have created the `airflow/xcom/return.json`
# file within the Docker container run by the KubernetesPodOperator.
do_xcom_push=True,
)
@task
def load_data(**context):
# pull the XCom value that has been pushed by the KubernetesPodOperator
transformed_data_point = context["ti"].xcom_pull(
task_ids="transform", key="return_value"
)
print(transformed_data_point)
# set dependencies (tasks defined using Decorators need to be called)
extract_data() >> transform >> load_data()
KPO_XComs_example_dag()
```
Traditional
```python expandable wrap theme={null}
from airflow import DAG
from pendulum import datetime
from airflow.providers.cncf.kubernetes.operators.kubernetes_pod import (
KubernetesPodOperator,
)
from airflow.configuration import conf
from airflow.operators.python import PythonOperator
import random
# get the current Kubernetes namespace Airflow is running in
namespace = conf.get("kubernetes", "NAMESPACE")
def extract_data_function():
# simulating querying from a database
data_point = random.randint(0, 100)
return data_point
def load_data_function(**context):
# pull the XCom value that has been pushed by the KubernetesPodOperator
transformed_data_point = context["ti"].xcom_pull(
task_ids="transform", key="return_value"
)
print(transformed_data_point)
# instantiate the DAG
with DAG(
dag_id="KPO_XComs_example_dag",
start_date=datetime(2022, 6, 1),
catchup=False,
schedule="@daily",
):
extract_data = PythonOperator(
task_id="extract_data", python_callable=extract_data_function
)
transform = KubernetesPodOperator(
# set task id
task_id="transform",
# specify the Docker image to launch
image="",
# launch the Pod on the same cluster as Airflow is running on
in_cluster=True,
# launch the Pod in the same namespace as Airflow is running in
namespace=namespace,
# Pod configuration
# naming the Pod
name="my_pod",
# log stdout of the container as task logs
get_logs=True,
# log events in case of Pod failure
log_events_on_failure=True,
# pull a variable from XComs using Jinja templating and provide it
# to the Pod as an environment variable
env_vars={
"DATA_POINT": """{{ ti.xcom_pull(task_ids='extract_data',
key='return_value') }}"""
},
# push the contents from xcom.json to Xcoms. Remember to only set this
# argument to True if you have created the `airflow/xcom/return.json`
# file within the Docker container run by the KubernetesPodOperator.
do_xcom_push=True,
)
load_data = PythonOperator(
task_id="load_data",
python_callable=load_data_function,
)
# set dependencies (tasks defined using Decorators need to be called)
extract_data >> transform >> load_data
```