> ## Documentation Index
> Fetch the complete documentation index at: https://astronomer.io/docs/llms.txt
> Use this file to discover all available pages before exploring further.
# Set up Remote Execution Agents on Astro
Remote Execution is a feature in Airflow 3 that allows you to run your Airflow tasks on any machine, in the cloud or on-premises. When using Remote Execution, only the information that’s essential for running the task, such as scheduling details and heartbeat pings, is available to Airflow system components. Everything else stays within the remote environment, making this a key feature in highly regulated industries.
This tutorial covers when to use Remote Execution and how to set it up on Astro with Remote Execution Agents running on AWS EKS or on-premises infrastructure. While this guide focuses on these specific environments, the concepts and steps can be adapted for other Kubernetes clusters, for example running on GCP or Azure.
Remote execution on Astro is only available for Airflow 3.x Deployments on the **Enterprise** tier or above. See [Astro Plans and Pricing](https://www.astronomer.io/pricing/).
## When to use remote execution
You might want to use Remote Execution in the following situations:
* Running tasks that need to access and/or use sensitive data that can't leave a particular environment, such as an on-premises server. This requirement is common in highly regulated industries like financial services and health care.
* Running tasks that require specialized compute, such as a GPU or TPU machine to train neural networks.
You can accomplish Remote Execution in two ways:
* When running Airflow on Astro, you can use [Remote Execution Agents](/docs/astro/remote-execution-configure-agents) with the [AstroExecutor](/docs/astro/astro-executor).
* When running open source Airflow, you can use the EdgeExecutor, which is part of the [edge3 provider package](https://airflow.apache.org/docs/apache-airflow-providers-edge3/stable/index.html).
This tutorial covers the steps for setting up Remote Execution Agents on Astro to run on AWS EKS and on-premises.
## Time to complete
This tutorial takes approximately one hour to complete.
## Assumed knowledge
To get the most out of this tutorial, you should have an understanding of:
* The [Airflow components](/docs/learn/airflow-components) and how they work together.
## Prerequisites
* An Astronomer account on the [Enterprise tier](https://www.astronomer.io/pricing/).
* Access to [AWS EKS](https://docs.aws.amazon.com/eks/) or an on-premises Kubernetes environment.
* [kubectl](https://kubernetes.io/docs/tasks/tools/) installed.
* An [S3](https://docs.aws.amazon.com/s3/) bucket to store [XComs](/docs/learn/airflow-passing-data-between-tasks).
* If you are using AWS EKS, you need to have [eksctl](https://github.com/eksctl-io/eksctl) and the [AWS CLI](https://docs.aws.amazon.com/cli/latest/) installed.
## Step 1: Create a Remote Execution Deployment
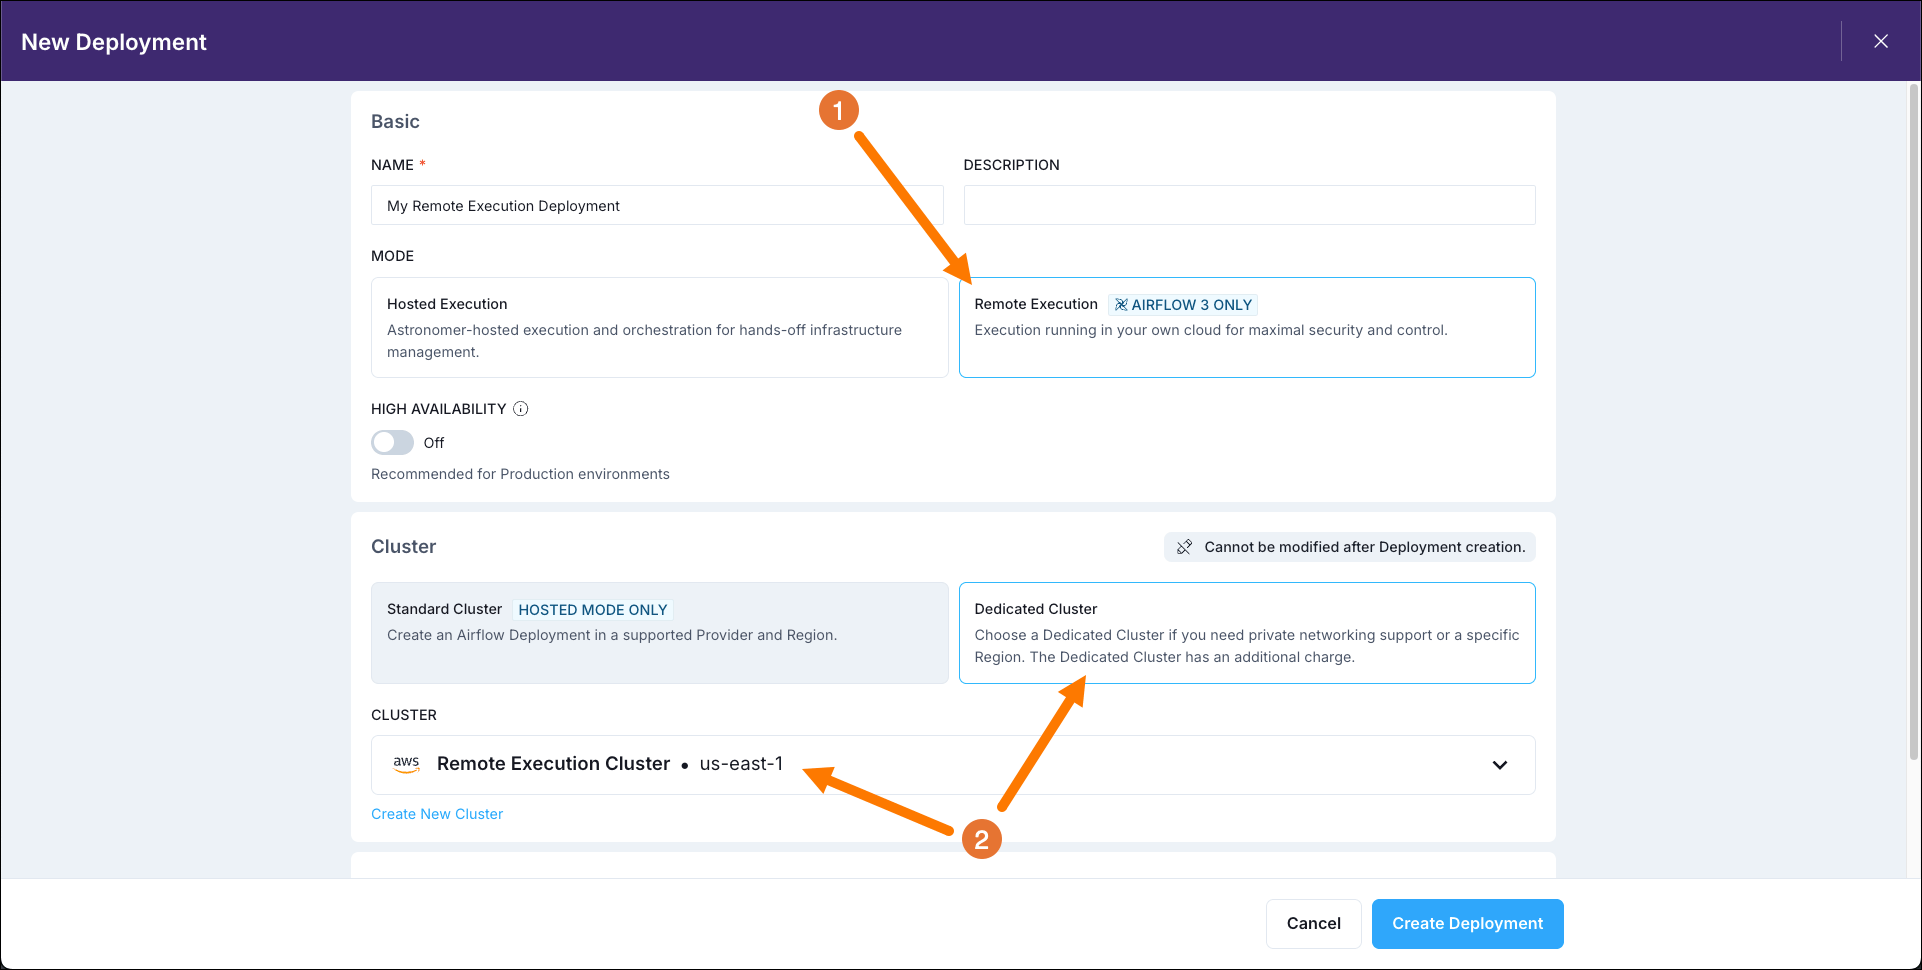
To start registering Remote Execution Agents, you first need to create a dedicated Remote Execution Deployment on Astro.
1. Make sure you have a **dedicated cluster** in your Astro Workspace. If you don't, you can [create a new dedicated cluster](/docs/astro/create-dedicated-cluster). When creating a new cluster, you can leave the VPC Subnet range at its default setting (`172.20.0.0/19`) or customize it for your needs. Note that it can take up to an hour for a new cluster to be provisioned. If you later want to use customer managed workload identity to read logs from Remote Execution Agents running on AWS EKS, you need to create your dedicated cluster on AWS.
2. [Create a Remote Execution Deployment](/docs/astro/create-deployment) in your Astro Workspace.
* Select **Remote Execution** as the execution mode.
* Select your dedicated cluster.
 ## Step 2: Create an agent token
Your Remote Execution Agents will need to authenticate themselves to your Astro Deployment. To do this, you need to create an Agent Token.
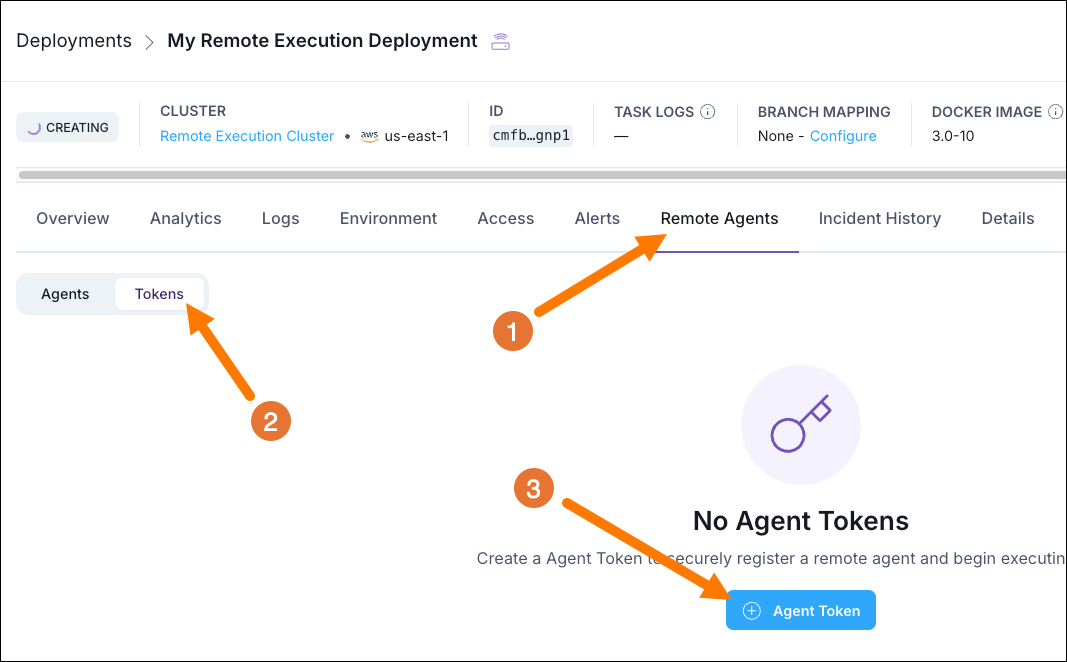
1. In the Astro UI, select the Remote Execution Deployment you created in the previous step and click the **Remote Agents** tab.
2. Select **Tokens**.
3. Click **+Agent Token** and create a new Agent Token.
## Step 2: Create an agent token
Your Remote Execution Agents will need to authenticate themselves to your Astro Deployment. To do this, you need to create an Agent Token.
1. In the Astro UI, select the Remote Execution Deployment you created in the previous step and click the **Remote Agents** tab.
2. Select **Tokens**.
3. Click **+Agent Token** and create a new Agent Token.
 4. Make sure to save the Agent Token in a secure location as you will need it later.
## Step 3: Create a Deployment API Token
Your Remote Execution Agents will also need to fetch the right images from your Astro Deployment. To do this, you need to create a Deployment API Token.
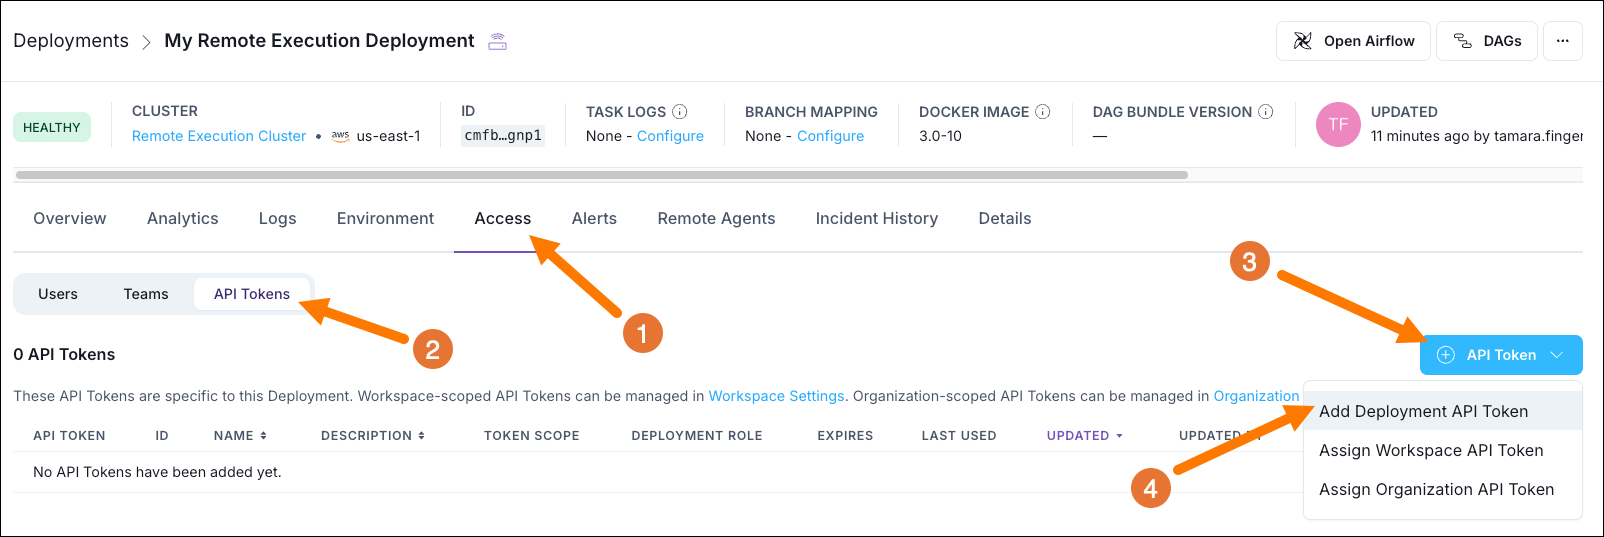
1. In the Astro UI, select the Remote Execution Deployment you created in [Step 1](#step-1-create-a-remote-execution-deployment) and click the **Access** tab.
2. Select **API Tokens**.
3. Click **+ API Token**.
4. Select **Add Deployment API Token** and create a new Deployment API Token with Admin permissions.
4. Make sure to save the Agent Token in a secure location as you will need it later.
## Step 3: Create a Deployment API Token
Your Remote Execution Agents will also need to fetch the right images from your Astro Deployment. To do this, you need to create a Deployment API Token.
1. In the Astro UI, select the Remote Execution Deployment you created in [Step 1](#step-1-create-a-remote-execution-deployment) and click the **Access** tab.
2. Select **API Tokens**.
3. Click **+ API Token**.
4. Select **Add Deployment API Token** and create a new Deployment API Token with Admin permissions.
 5. Make sure to save the Deployment API Token in a secure location as you will need it later.
## Step 4: Retrieve your `values.yaml` file
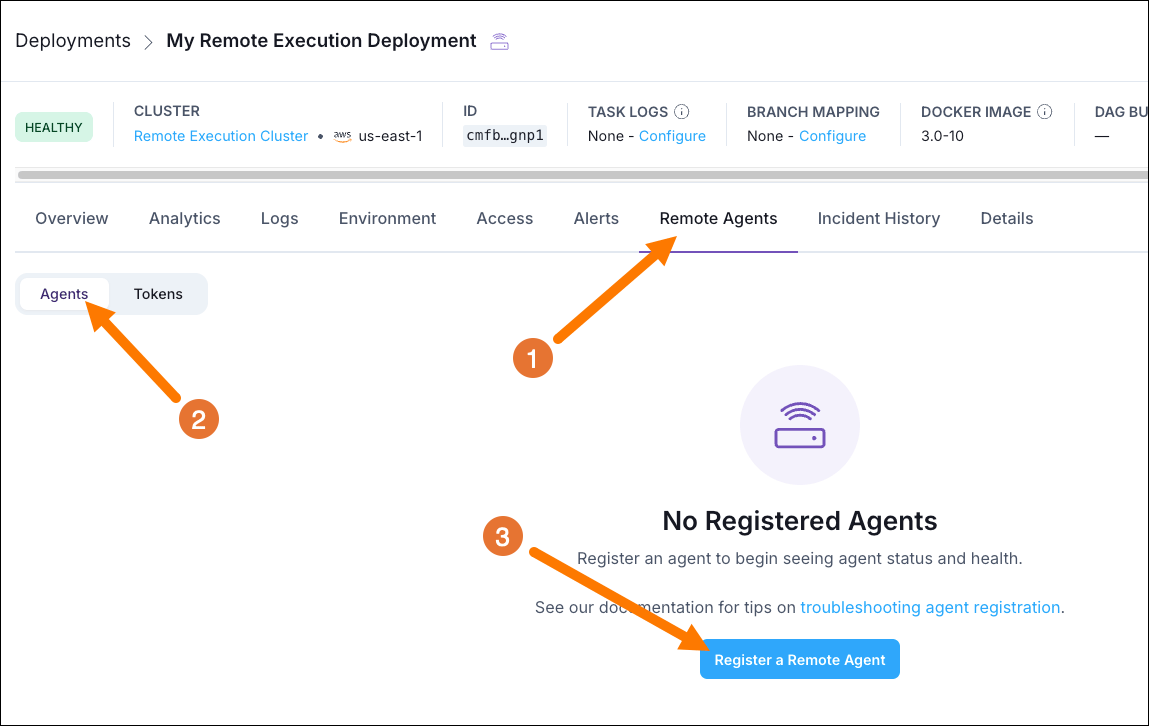
1. In the Astro UI, select the Remote Execution Deployment you created in [Step 1](#step-1-create-a-remote-execution-deployment) and click the **Remote Agents** tab.
2. Click **Register a Remote Agent**.
5. Make sure to save the Deployment API Token in a secure location as you will need it later.
## Step 4: Retrieve your `values.yaml` file
1. In the Astro UI, select the Remote Execution Deployment you created in [Step 1](#step-1-create-a-remote-execution-deployment) and click the **Remote Agents** tab.
2. Click **Register a Remote Agent**.
 3. Download the `values.yaml` file you are given.
Note that no Remote Execution Agents show up in the list yet, they will only appear in the **Remote Agents** tab when they start heartbeating!
## Step 5A: Set up your Kubernetes cluster on EKS
This step covers the setup for deploying the Remote Execution Agent on AWS EKS. For a simple on-premises setup see [Step 5B](#step-5b-set-up-your-local-kubernetes-cluster).
1. Authenticate your machine to your AWS account. If your organization uses SSO, use `aws configure sso` and sign in through the browser. Make sure to set the `AWS_PROFILE` environment variable to the profile (`CLI profile name`) you used to sign in with `export AWS_PROFILE=`. You can verify your profile by running `aws sts get-caller-identity`.
2. To create a new EKS cluster, you need to define its parameters in a `my-cluster.yaml` file. Make sure the `workers` node group is large enough to support your intended workload and the Agent specifications in your `values.yaml` file for all 3 Agents. You can use the below example as a starting point, make sure to update `` and `` with your own values.
```yaml wrap theme={null}
apiVersion: eksctl.io/v1alpha5
kind: ClusterConfig
metadata:
name:
region: # it is recommended to use the same region as your Astro Cluster
version: "1.33"
cloudWatch:
clusterLogging:
enableTypes: ["api", "audit", "authenticator", "controllerManager", "scheduler"]
iam:
withOIDC: true # This setting is important for the IRSA role that will interact with S3 to save logs/xcom
nodeGroups:
- name: workers
instanceType: m5.xlarge # 4 vCPUs, 16 GiB RAM - minimum for 3x1CPU + k8s overhead
desiredCapacity: 2 # Number of nodes to start with
minSize: 0 # Minimum number of nodes
maxSize: 4 # Maximum number of nodes
volumeSize: 50 # EBS volume size in GB
amiFamily: AmazonLinux2023
labels: { role: worker }
tags:
k8s.io/cluster-autoscaler/enabled: "true"
k8s.io/cluster-autoscaler/remote-execution-airflow-cluster: "owned"
```
3. Create the EKS cluster by running the following command. Note the cluster creation can take up to 15-25 minutes.
```bash wrap theme={null}
eksctl create cluster -f my-cluster.yaml
```
4. Configure `kubectl` to use your new EKS cluster by running the following command. Replace `` with the name of your cluster.
```bash wrap theme={null}
aws eks update-kubeconfig --name
```
5. Verify that `kubectl` is aimed at the right cluster by running:
```bash wrap theme={null}
kubectl get nodes
```
The output should look similar to this:
```bash wrap theme={null}
NAME STATUS ROLES AGE VERSION
ip-123-45-67-89.ec2.internal Ready 16m v1.33.4-eks-99d6cc0
ip-123-45-67-90.ec2.internal Ready 16m v1.33.4-eks-99d6cc0
```
## Step 5B: Set up your local Kubernetes cluster
Alternatively, you can deploy the Remote Execution Agent on your on-premises cluster. If you want to test Remote Execution locally, a good option is to use the `Kubernetes` feature of [Orbstack](https://www.orbstack.dev/) or [Docker Desktop](https://docs.docker.com/desktop/kubernetes/). In this step we'll use Orbstack as an example.
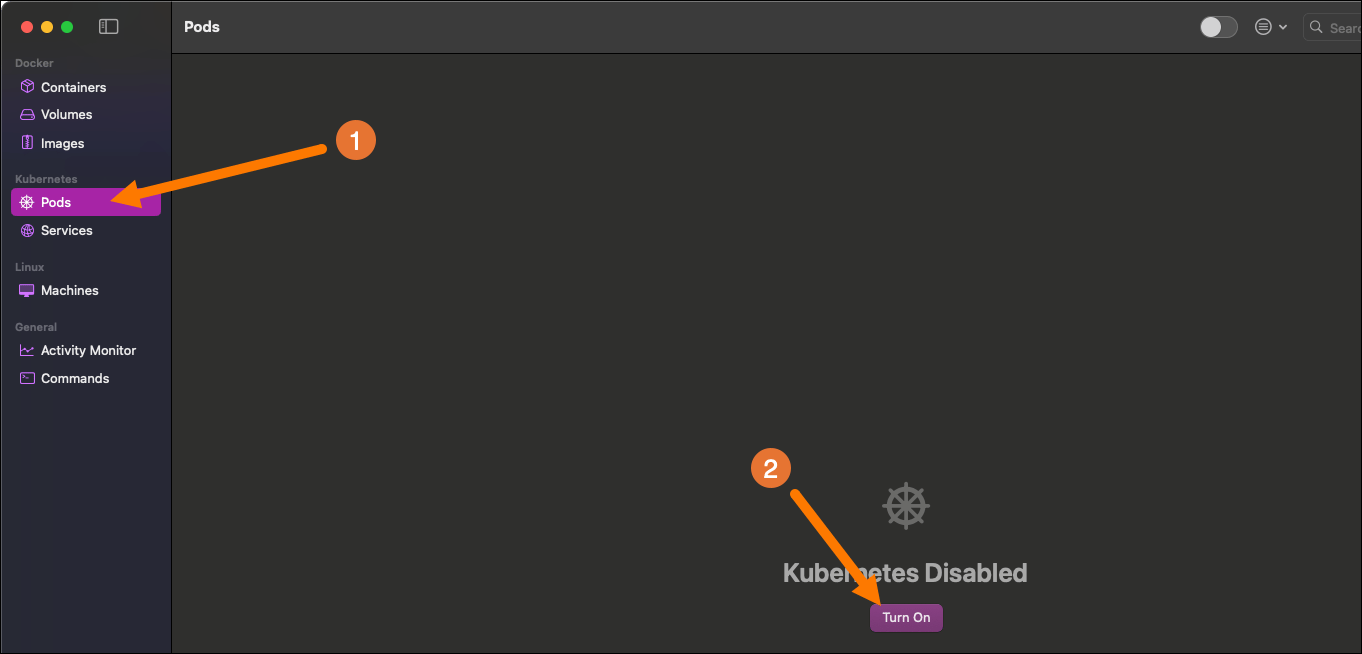
1. Enable the `Kubernetes` feature in Orbstack.
3. Download the `values.yaml` file you are given.
Note that no Remote Execution Agents show up in the list yet, they will only appear in the **Remote Agents** tab when they start heartbeating!
## Step 5A: Set up your Kubernetes cluster on EKS
This step covers the setup for deploying the Remote Execution Agent on AWS EKS. For a simple on-premises setup see [Step 5B](#step-5b-set-up-your-local-kubernetes-cluster).
1. Authenticate your machine to your AWS account. If your organization uses SSO, use `aws configure sso` and sign in through the browser. Make sure to set the `AWS_PROFILE` environment variable to the profile (`CLI profile name`) you used to sign in with `export AWS_PROFILE=`. You can verify your profile by running `aws sts get-caller-identity`.
2. To create a new EKS cluster, you need to define its parameters in a `my-cluster.yaml` file. Make sure the `workers` node group is large enough to support your intended workload and the Agent specifications in your `values.yaml` file for all 3 Agents. You can use the below example as a starting point, make sure to update `` and `` with your own values.
```yaml wrap theme={null}
apiVersion: eksctl.io/v1alpha5
kind: ClusterConfig
metadata:
name:
region: # it is recommended to use the same region as your Astro Cluster
version: "1.33"
cloudWatch:
clusterLogging:
enableTypes: ["api", "audit", "authenticator", "controllerManager", "scheduler"]
iam:
withOIDC: true # This setting is important for the IRSA role that will interact with S3 to save logs/xcom
nodeGroups:
- name: workers
instanceType: m5.xlarge # 4 vCPUs, 16 GiB RAM - minimum for 3x1CPU + k8s overhead
desiredCapacity: 2 # Number of nodes to start with
minSize: 0 # Minimum number of nodes
maxSize: 4 # Maximum number of nodes
volumeSize: 50 # EBS volume size in GB
amiFamily: AmazonLinux2023
labels: { role: worker }
tags:
k8s.io/cluster-autoscaler/enabled: "true"
k8s.io/cluster-autoscaler/remote-execution-airflow-cluster: "owned"
```
3. Create the EKS cluster by running the following command. Note the cluster creation can take up to 15-25 minutes.
```bash wrap theme={null}
eksctl create cluster -f my-cluster.yaml
```
4. Configure `kubectl` to use your new EKS cluster by running the following command. Replace `` with the name of your cluster.
```bash wrap theme={null}
aws eks update-kubeconfig --name
```
5. Verify that `kubectl` is aimed at the right cluster by running:
```bash wrap theme={null}
kubectl get nodes
```
The output should look similar to this:
```bash wrap theme={null}
NAME STATUS ROLES AGE VERSION
ip-123-45-67-89.ec2.internal Ready 16m v1.33.4-eks-99d6cc0
ip-123-45-67-90.ec2.internal Ready 16m v1.33.4-eks-99d6cc0
```
## Step 5B: Set up your local Kubernetes cluster
Alternatively, you can deploy the Remote Execution Agent on your on-premises cluster. If you want to test Remote Execution locally, a good option is to use the `Kubernetes` feature of [Orbstack](https://www.orbstack.dev/) or [Docker Desktop](https://docs.docker.com/desktop/kubernetes/). In this step we'll use Orbstack as an example.
1. Enable the `Kubernetes` feature in Orbstack.
 2. Switch to the `orbstack` context:
```bash wrap theme={null}
kubectl config use-context orbstack
```
## Step 6: Deploy the Remote Execution Agent
1. Create a new namespace for the Remote Execution Agent by running:
```bash wrap theme={null}
kubectl create namespace
```
2. Create a secret containing the Agent Token named `my-agent-token` by running the following command. Replace `` with the Agent Token you created in [Step 2](#step-2-create-an-agent-token). Replace `` with the namespace you created.
```bash wrap theme={null}
kubectl create secret generic my-agent-token \
--from-literal=token= \
--namespace
```
3. Create a secret containing the Deployment API Token named `my-astro-registry-secret` by running the following command. Replace `` with the Deployment API Token you created in [Step 3](#step-3-create-a-deployment-api-token) and replace `` with your namespace.
```bash wrap theme={null}
kubectl create secret docker-registry my-astro-registry-secret \
--namespace \
--docker-server=images.astronomer.cloud \
--docker-username=cli \
--docker-password=
```
4. Modify your `values.yaml` file to add ``, as well as the names for your agent token (`agentTokenSecretName`) and deployment API token (`imagePullSecretName`).
```yaml wrap theme={null}
resourceNamePrefix: "astro-agent" # you can choose any prefix you want
namespace:
imagePullSecretName: my-astro-registry-secret
agentTokenSecretName: my-agent-token
```
5. Modify your `values.yaml` file to add your Dag bundle configuration to the `dagBundleConfigList` section.
```yaml wrap theme={null}
dagBundleConfigList:
```
Note that you need to store your Dags in a Dag bundle accessible to your Remote Execution Agents. Below is an example of a `GitDagBundle` configuration working with a Git connection named `git_default` (set in the `commonEnv` section later in this tutorial).
```yaml wrap theme={null}
dagBundleConfigList: '[{"name": "gitbundle-1", "classpath": "airflow.providers.git.bundles.git.GitDagBundle", "kwargs": {"git_conn_id": "git_default", "subdir": "dags", "tracking_ref": "main", "refresh_interval": 10}}]'
```
6. Modify your `values.yaml` file to add your XCom backend configuration to the `xcomBackend` section. For this tutorial we'll use the [Object Storage XCom Backend](/docs/learn/custom-xcom-backends-tutorial). The credentials are set in the `commonEnv` section later in this tutorial.
```yaml wrap theme={null}
xcomBackend: "airflow.providers.common.io.xcom.backend.XComObjectStorageBackend"
```
7. Modify your `values.yaml` file to set a secrets backend, we'll use the [Local Filesystem Secrets Backend](https://airflow.apache.org/docs/apache-airflow/stable/security/secrets/secrets-backend/local-filesystem-secrets-backend.html) as a placeholder. Note that if you want to install an external secrets backend, you need to provide the relevant provider packages to the worker containers and credentials in `commonEnv`. For more information on how to interact with secrets backends, see [Configure a secrets backend](/docs/astro/secrets-backend).
```yaml wrap theme={null}
secretBackend: "airflow.secrets.local_filesystem.LocalFilesystemBackend"
```
8. Modify your `values.yaml` file to add necessary environment variables to the `commonEnv` section. Make sure to replace all placeholders with your own values.
```yaml wrap theme={null}
commonEnv:
- name: ASTRONOMER_ENVIRONMENT
value: "cloud"
# This is the connection used in the GitDagBundle. If you want to access a private repo you need an access token with read and write permissions.
- name: AIRFLOW_CONN_GIT_DEFAULT
value: '{"conn_type": "git", "login": "", "password": "", "host": "https://github.com//"}'
# Update with your credentials that have access to your XCom S3 bucket!
- name: AIRFLOW_CONN_AWS_DEFAULT
value: '{"conn_type": "aws", "login": "", "password": "", "extra": {"region_name": ""}}'
# These two environment variables are needed for the custom XCom backend
- name: AIRFLOW__COMMON_IO__XCOM_OBJECTSTORAGE_PATH
value: "s3://aws_default@/xcom" # replace the bucket with your XCom bucket. Uses the aws_default connection
- name: AIRFLOW__COMMON_IO__XCOM_OBJECTSTORAGE_THRESHOLD
value: "0" # all XCom will be stored in Object storage
# Add any necessary environment variables for your secrets backend
```
9. Install the Helm chart by running the following command. Replace `` with your namespace.
```bash wrap theme={null}
helm repo add astronomer https://helm.astronomer.io/
helm repo update
helm install astro-agent astronomer/astro-remote-execution-agent --namespace --values values.yaml
```
10. Verify that the 3 Remote Execution Agent pods are running by running the following command. Replace `` with your namespace.
```bash wrap theme={null}
kubectl get pods -n
```
The output should look similar to this:
```bash wrap theme={null}
NAME READY STATUS RESTARTS AGE
astro-agent--dag-processor-7b46c75566-dsdlq 1/1 Running 0 87s
astro-agent--triggerer-6cb88c8db7-kx9d2 1/1 Running 0 87s
astro-agent--worker-default-worker-779c98cfb5-7chg2 1/1 Running 0 86s
```
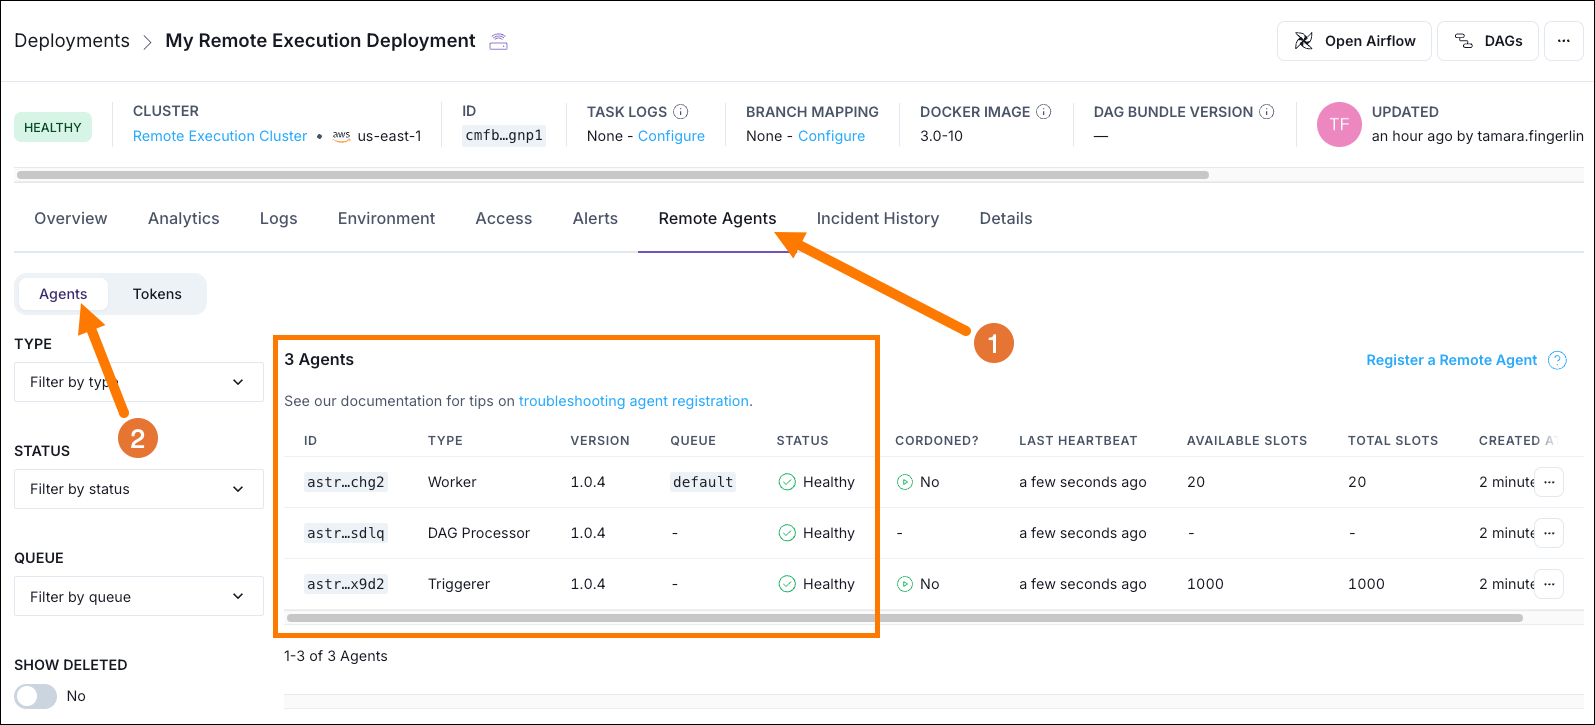
On Astro you can see the 3 Remote Execution Agent pods happily heartbeating to your Astro Deployment. When you open the Airflow UI on this Astro Deployment, you'll be able to see and interact with all Dags contained in the configured Dag bundles.
2. Switch to the `orbstack` context:
```bash wrap theme={null}
kubectl config use-context orbstack
```
## Step 6: Deploy the Remote Execution Agent
1. Create a new namespace for the Remote Execution Agent by running:
```bash wrap theme={null}
kubectl create namespace
```
2. Create a secret containing the Agent Token named `my-agent-token` by running the following command. Replace `` with the Agent Token you created in [Step 2](#step-2-create-an-agent-token). Replace `` with the namespace you created.
```bash wrap theme={null}
kubectl create secret generic my-agent-token \
--from-literal=token= \
--namespace
```
3. Create a secret containing the Deployment API Token named `my-astro-registry-secret` by running the following command. Replace `` with the Deployment API Token you created in [Step 3](#step-3-create-a-deployment-api-token) and replace `` with your namespace.
```bash wrap theme={null}
kubectl create secret docker-registry my-astro-registry-secret \
--namespace \
--docker-server=images.astronomer.cloud \
--docker-username=cli \
--docker-password=
```
4. Modify your `values.yaml` file to add ``, as well as the names for your agent token (`agentTokenSecretName`) and deployment API token (`imagePullSecretName`).
```yaml wrap theme={null}
resourceNamePrefix: "astro-agent" # you can choose any prefix you want
namespace:
imagePullSecretName: my-astro-registry-secret
agentTokenSecretName: my-agent-token
```
5. Modify your `values.yaml` file to add your Dag bundle configuration to the `dagBundleConfigList` section.
```yaml wrap theme={null}
dagBundleConfigList:
```
Note that you need to store your Dags in a Dag bundle accessible to your Remote Execution Agents. Below is an example of a `GitDagBundle` configuration working with a Git connection named `git_default` (set in the `commonEnv` section later in this tutorial).
```yaml wrap theme={null}
dagBundleConfigList: '[{"name": "gitbundle-1", "classpath": "airflow.providers.git.bundles.git.GitDagBundle", "kwargs": {"git_conn_id": "git_default", "subdir": "dags", "tracking_ref": "main", "refresh_interval": 10}}]'
```
6. Modify your `values.yaml` file to add your XCom backend configuration to the `xcomBackend` section. For this tutorial we'll use the [Object Storage XCom Backend](/docs/learn/custom-xcom-backends-tutorial). The credentials are set in the `commonEnv` section later in this tutorial.
```yaml wrap theme={null}
xcomBackend: "airflow.providers.common.io.xcom.backend.XComObjectStorageBackend"
```
7. Modify your `values.yaml` file to set a secrets backend, we'll use the [Local Filesystem Secrets Backend](https://airflow.apache.org/docs/apache-airflow/stable/security/secrets/secrets-backend/local-filesystem-secrets-backend.html) as a placeholder. Note that if you want to install an external secrets backend, you need to provide the relevant provider packages to the worker containers and credentials in `commonEnv`. For more information on how to interact with secrets backends, see [Configure a secrets backend](/docs/astro/secrets-backend).
```yaml wrap theme={null}
secretBackend: "airflow.secrets.local_filesystem.LocalFilesystemBackend"
```
8. Modify your `values.yaml` file to add necessary environment variables to the `commonEnv` section. Make sure to replace all placeholders with your own values.
```yaml wrap theme={null}
commonEnv:
- name: ASTRONOMER_ENVIRONMENT
value: "cloud"
# This is the connection used in the GitDagBundle. If you want to access a private repo you need an access token with read and write permissions.
- name: AIRFLOW_CONN_GIT_DEFAULT
value: '{"conn_type": "git", "login": "", "password": "", "host": "https://github.com//"}'
# Update with your credentials that have access to your XCom S3 bucket!
- name: AIRFLOW_CONN_AWS_DEFAULT
value: '{"conn_type": "aws", "login": "", "password": "", "extra": {"region_name": ""}}'
# These two environment variables are needed for the custom XCom backend
- name: AIRFLOW__COMMON_IO__XCOM_OBJECTSTORAGE_PATH
value: "s3://aws_default@/xcom" # replace the bucket with your XCom bucket. Uses the aws_default connection
- name: AIRFLOW__COMMON_IO__XCOM_OBJECTSTORAGE_THRESHOLD
value: "0" # all XCom will be stored in Object storage
# Add any necessary environment variables for your secrets backend
```
9. Install the Helm chart by running the following command. Replace `` with your namespace.
```bash wrap theme={null}
helm repo add astronomer https://helm.astronomer.io/
helm repo update
helm install astro-agent astronomer/astro-remote-execution-agent --namespace --values values.yaml
```
10. Verify that the 3 Remote Execution Agent pods are running by running the following command. Replace `` with your namespace.
```bash wrap theme={null}
kubectl get pods -n
```
The output should look similar to this:
```bash wrap theme={null}
NAME READY STATUS RESTARTS AGE
astro-agent--dag-processor-7b46c75566-dsdlq 1/1 Running 0 87s
astro-agent--triggerer-6cb88c8db7-kx9d2 1/1 Running 0 87s
astro-agent--worker-default-worker-779c98cfb5-7chg2 1/1 Running 0 86s
```
On Astro you can see the 3 Remote Execution Agent pods happily heartbeating to your Astro Deployment. When you open the Airflow UI on this Astro Deployment, you'll be able to see and interact with all Dags contained in the configured Dag bundles.
 You can now run tasks on the remote EKS cluster! In order to be able to use XCom, see [Step 7](#step-7-configure-xcom) for more information.
If you ever need to update the Helm chart you can use the following command. Replace `` with your namespace.
```bash wrap theme={null}
helm upgrade astro-agent astronomer/astro-remote-execution-agent --namespace --values values.yaml
```
## Step 7: Configure XCom
If you want to use XCom to pass information between tasks running using Remote Execution, you need to configure a custom XCom backend. You already laid the foundation for this in [Step 6](#step-6-deploy-the-remote-execution-agent) when setting the following:
```yaml wrap theme={null}
xcomBackend: "airflow.providers.common.io.xcom.backend.XComObjectStorageBackend"
commonEnv:
# ...
- name: AIRFLOW_CONN_AWS_DEFAULT
value: '{"conn_type": "aws", "extra": {"region_name": "us-east-1"}}'
- name: AIRFLOW__COMMON_IO__XCOM_OBJECTSTORAGE_PATH
value: "s3://aws_default@/xcom"
- name: AIRFLOW__COMMON_IO__XCOM_OBJECTSTORAGE_THRESHOLD
value: "0"
```
But in order for the worker pod to be able to use the XCom backend, you need to install the necessary Airflow provider packages on it. To make installation faster we recommend using a constraints file.
1. Create your `constraints.txt` file (see [GitHub](https://github.com/astronomer/webinar-demos/blob/apache-airflow-3-stronger-security-and-remote-execution/remote_execution_eks_templates/constraints.txt) for an example). Make sure that it includes the [Airflow Common IO provider](https://airflow.apache.org/registry/providers/common-io/) and the [Amazon provider](https://airflow.apache.org/registry/providers/amazon/) with the `s3fs` extra.
2. Add the constraints file as a configmap to the k8s cluster. Replace `` with the namespace you created in [Step 6](#step-6-deploy-the-remote-execution-agent).
```bash wrap theme={null}
kubectl create configmap constraints-configmap --from-file=constraints.txt -n
```
3. Update your `values.yaml` file to install the necessary provider packages in the `workers` section. Update the versions as needed. Note that you also need to update the `PYTHONPATH` environment variable to include the shared packages. Note that your `image` version likely differs from the one in the example below.
```yaml wrap theme={null}
initContainers:
- name: install-amazon-provider-s3fs
image: images.astronomer.cloud/baseimages/astro-remote-execution-agent:3.0-4-python-3.12-astro-agent-1.0.2
command:
- "pip"
- "install"
- "--target"
- "/shared/packages"
- "--prefer-binary"
- "--constraint"
- "/constraints/constraints.txt"
- "apache-airflow-providers-amazon[s3fs]==9.9.0"
- "apache-airflow-providers-common-io==1.6.1"
volumeMounts:
- name: shared-packages
mountPath: /shared/packages
- name: constraints
mountPath: /constraints
env:
- name: PYTHONPATH
value: "/shared/packages:$PYTHONPATH"
```
4. Update your `values.yaml` file to mount the constraints file.
```yaml wrap theme={null}
volumes:
- name: shared-packages
emptyDir: {}
- name: constraints
configMap:
name: constraints-configmap
volumeMounts:
- name: shared-packages
mountPath: /shared/packages
readOnly: true
```
5. Update the Helm chart by running the following command. Replace `` with your namespace.
```bash wrap theme={null}
helm upgrade astro-agent astronomer/astro-remote-execution-agent --namespace --values values.yaml
```
6. Run a Dag that uses XCom to verify the setup. Remember that you need to push the Dag to your Dag bundle location for it to be accessible to the Remote Execution Agent.
If you'd like to see your task logs displayed in the Airflow UI, see our docs on [Task logging for remote Deployments](/docs/astro/remote-execution-logging-overview).
## Step 8: (optional, AWS only) use a secrets backend
If you want to use a secrets backend to store your connections and variables, you need to configure the Remote Execution Agent to use it.
1. First, you need an IAM role to attach this policy to. The IAM role's trust policy needs to include the EKS OIDC ID, so you need to fetch that first. Replace `` with the name of your EKS cluster and `` with the region of your EKS cluster.
```bash wrap theme={null}
OIDC_ISSUER_URL=$(aws eks describe-cluster --name --query "cluster.identity.oidc.issuer" --output text)
EKS_OIDC_ID=$(echo "$OIDC_ISSUER_URL" | sed -e 's|https://oidc.eks..amazonaws.com/id/||')
echo $EKS_OIDC_ID
```
2. Create a new file called `my-airflow-trust-policy.json` and add the following trust policy. Replace `` with your AWS account ID, `` with the region of your EKS cluster, `` with the namespace you created in [Step 6](#step-6-deploy-the-remote-execution-agent), and `` with the EKS OIDC ID you fetched in the previous substep.
```json wrap theme={null}
{
"Version": "2012-10-17",
"Statement": [
{
"Effect": "Allow",
"Principal": {
"Federated": "arn:aws:iam:::oidc-provider/oidc.eks..amazonaws.com/id/"
},
"Action": "sts:AssumeRoleWithWebIdentity",
"Condition": {
"StringEquals": {
"oidc.eks..amazonaws.com/id/:sub": "system:serviceaccount::*",
"oidc.eks..amazonaws.com/id/:aud": "sts.amazonaws.com"
}
}
}
]
}
```
3. Create a new IAM role called `RemoteAgentsRole` with the trust policy you created in the previous step.
```bash wrap theme={null}
aws iam create-role \
--role-name RemoteAgentsRole \
--assume-role-policy-document file://my-airflow-trust-policy.json
```
4. Create a new file called `my-airflow-secrets-policy.json` and add the following policy. Replace `` with the region of your EKS cluster and `` with your AWS account ID.
```json wrap theme={null}
{
"Version": "2012-10-17",
"Statement": [
{
"Effect": "Allow",
"Action": [
"secretsmanager:GetSecretValue",
"secretsmanager:DescribeSecret",
"secretsmanager:ListSecrets"
],
"Resource": "arn:aws:secretsmanager:::secret:airflow/*"
}
]
}
```
Create the policy using the following command.
```bash wrap theme={null}
aws iam create-policy \
--policy-name AirflowSecretsManagerAccess \
--policy-document file://my-airflow-secrets-policy.json
```
5. Attach the `AirflowSecretsManagerAccess` policy to the `RemoteAgentsRole` role.
```bash wrap theme={null}
aws iam attach-role-policy \
--role-name RemoteAgentsRole \
--policy-arn arn:aws:iam:::policy/AirflowSecretsManagerAccess
```
6. Update the `serviceAccount` section in your `values.yaml` file to annotate the role to your service accounts. Replace `` with your AWS account ID.
```yaml wrap theme={null}
serviceAccount:
workers:
annotations:
eks.amazonaws.com/role-arn: arn:aws:iam:::role/RemoteAgentsRole
dagProcessor:
annotations:
eks.amazonaws.com/role-arn: arn:aws:iam:::role/RemoteAgentsRole
triggerer:
annotations:
eks.amazonaws.com/role-arn: arn:aws:iam:::role/RemoteAgentsRole
```
7. Update the `commonEnv` section in your `values.yaml` file to configure the secrets backend. Replace `` with the ARN of the IAM role you created in the previous step.
```yaml wrap theme={null}
secretBackend: "airflow.providers.amazon.aws.secrets.secrets_manager.SecretsManagerBackend"
commonEnv:
- name: AIRFLOW__SECRETS__BACKEND_KWARGS
value: '{"connections_prefix": "airflow/connections", "variables_prefix": "airflow/variables"}'
- name: AWS_DEFAULT_REGION
value: ''
```
8. Since the secrets backend is also used in the Dag processor and Triggerer components and part of the [Airflow Amazon provider](https://airflow.apache.org/docs/apache-airflow-providers-amazon/stable/secrets-backends/aws-secrets-manager.html), you need to install the necessary provider packages on these components as well, like you did for the worker pods when configuring the XCom backend in [Step 7](#step-7-configure-xcom). Note that your `image` version likely differs from the one in the example below.
```yaml expandable wrap theme={null}
dagProcessor:
# ... other dagProcessor config ...
# Add PYTHONPATH to dagProcessor env
env:
- name: PYTHONPATH
value: "/shared/packages:$PYTHONPATH"
# Add initContainers (replace initContainers: [])
initContainers:
- name: install-amazon-provider-s3fs
image: images.astronomer.cloud/baseimages/astro-remote-execution-agent:3.0-4-python-3.12-astro-agent-1.0.2
command:
- "pip"
- "install"
- "--target"
- "/shared/packages"
- "--prefer-binary"
- "--constraint"
- "/constraints/constraints.txt"
- "apache-airflow-providers-amazon[s3fs]==9.9.0"
- "apache-airflow-providers-common-io==1.6.1"
volumeMounts:
- name: shared-packages
mountPath: "/shared/packages"
- name: constraints
mountPath: "/constraints"
# Add volumes (replace volumes: [])
volumes:
- name: shared-packages
emptyDir: {}
- name: constraints
configMap:
name: constraints-configmap
# Add volumeMounts (replace volumeMounts: [])
volumeMounts:
- name: shared-packages
mountPath: /shared/packages
# In values.yaml, under triggerer section
triggerer:
# ... other triggerer config ...
# Add PYTHONPATH to triggerer env
env:
- name: PYTHONPATH
value: "/shared/packages:$PYTHONPATH"
# Add initContainers (replace initContainers: [])
initContainers:
- name: install-amazon-provider-s3fs
image: images.astronomer.cloud/baseimages/astro-remote-execution-agent:3.0-4-python-3.12-astro-agent-1.0.2
command:
- "pip"
- "install"
- "--target"
- "/shared/packages"
- "--prefer-binary"
- "--constraint"
- "/constraints/constraints.txt"
- "apache-airflow-providers-amazon[s3fs]==9.9.0"
- "apache-airflow-providers-common-io==1.6.1"
volumeMounts:
- name: shared-packages
mountPath: "/shared/packages"
- name: constraints
mountPath: "/constraints"
# Add volumes (replace volumes: [])
volumes:
- name: shared-packages
emptyDir: {}
- name: constraints
configMap:
name: constraints-configmap
# Add volumeMounts (replace volumeMounts: [])
volumeMounts:
- name: shared-packages
mountPath: /shared/packages
```
9. Update the Helm chart with the new `values.yaml` file.
```bash wrap theme={null}
helm upgrade astro-agent astronomer/astro-remote-execution-agent --namespace --values values.yaml
```
10. Now your tasks have access to the secrets backend! You can store [connections](/docs/learn/connections) under `airflow/connections` and [variables](/docs/learn/airflow-variables) under `airflow/variables`.
## Step 9: (optional, AWS only) Configure logs in the Airflow UI
When using Remote Execution with a Deployment running on AWS and the Remote Execution Agent running on AWS, you can configure your task logs to be read from an S3 bucket using a [customer workload identity](/docs/astro/authorize-deployments-to-your-cloud#step-1-authorize-the-deployment-to-your-iam-role).
1. Create a new IAM policy called `AirflowS3Access` and attach the following policy. Replace `` with the name of your logging bucket. Make sure to record the policy ARN `arn:aws:iam:::policy/AirflowS3Access` from the output of the command.
```bash wrap theme={null}
aws iam create-policy \
--policy-name AirflowS3Access \
--policy-document file://my-airflow-s3-policy.json
```
This is the policy you need to create in the `my-airflow-s3-policy.json` file.
```json expandable wrap theme={null}
{
"Version": "2012-10-17",
"Statement": [
{
"Action": [
"s3:ListBucket"
],
"Resource": [
"arn:aws:s3:::"
],
"Effect": "Allow",
"Sid": "ListObjectsInBucket"
},
{
"Action": [
"s3:GetObject",
"s3:PutObject",
"s3:DeleteObject"
],
"Resource": [
"arn:aws:s3:::/*"
],
"Effect": "Allow",
"Sid": "AllObjectActions"
},
{
"Sid": "AssumeRole",
"Effect": "Allow",
"Action": "sts:AssumeRole",
"Resource": "*"
}
]
}
```
2. Attach the `AirflowS3Access` policy to the `RemoteAgentsRole` role you created and add to the service account annotations in [Step 8](#step-8-optional-aws-only-use-a-secrets-backend). Replace `` with your AWS account ID.
```bash wrap theme={null}
aws iam attach-role-policy \
--role-name RemoteAgentsRole \
--policy-arn arn:aws:iam:::policy/AirflowS3Access
```
3. Update the `commonEnv` section in your `values.yaml` file to configure the logs to be written to S3. Replace `` with the name of your logging bucket and `` with the ID of your deployment.
```yaml wrap theme={null}
commonEnv:
# ...
- name: AIRFLOW__LOGGING__REMOTE_LOGGING
value: "True"
- name: AIRFLOW__LOGGING__REMOTE_LOG_CONN_ID
value: "astro_aws_logging"
- name: AIRFLOW_CONN_ASTRO_AWS_LOGGING
value: "s3://" # means the credentials are fetched from IRSA
- name: AIRFLOW__LOGGING__REMOTE_BASE_LOG_FOLDER
value: "s3:///"
- name: AIRFLOW__LOGGING__LOGGING_CONFIG_CLASS
value: "astronomer.runtime.logging.logging_config"
- name: ASTRONOMER_ENVIRONMENT
value: "cloud"
```
4. Update the Helm chart with the new `values.yaml` file. Upon the next Dag run you should be able to see the logs in your S3 bucket.
5. To see the logs in the Airflow UI, you need to configure the Astro Deployment to use the S3 bucket for task logs. In the Astro UI, navigate to your Deployment and click the **Details** tab. Click **Edit** in the **Advanced** section.
You can now run tasks on the remote EKS cluster! In order to be able to use XCom, see [Step 7](#step-7-configure-xcom) for more information.
If you ever need to update the Helm chart you can use the following command. Replace `` with your namespace.
```bash wrap theme={null}
helm upgrade astro-agent astronomer/astro-remote-execution-agent --namespace --values values.yaml
```
## Step 7: Configure XCom
If you want to use XCom to pass information between tasks running using Remote Execution, you need to configure a custom XCom backend. You already laid the foundation for this in [Step 6](#step-6-deploy-the-remote-execution-agent) when setting the following:
```yaml wrap theme={null}
xcomBackend: "airflow.providers.common.io.xcom.backend.XComObjectStorageBackend"
commonEnv:
# ...
- name: AIRFLOW_CONN_AWS_DEFAULT
value: '{"conn_type": "aws", "extra": {"region_name": "us-east-1"}}'
- name: AIRFLOW__COMMON_IO__XCOM_OBJECTSTORAGE_PATH
value: "s3://aws_default@/xcom"
- name: AIRFLOW__COMMON_IO__XCOM_OBJECTSTORAGE_THRESHOLD
value: "0"
```
But in order for the worker pod to be able to use the XCom backend, you need to install the necessary Airflow provider packages on it. To make installation faster we recommend using a constraints file.
1. Create your `constraints.txt` file (see [GitHub](https://github.com/astronomer/webinar-demos/blob/apache-airflow-3-stronger-security-and-remote-execution/remote_execution_eks_templates/constraints.txt) for an example). Make sure that it includes the [Airflow Common IO provider](https://airflow.apache.org/registry/providers/common-io/) and the [Amazon provider](https://airflow.apache.org/registry/providers/amazon/) with the `s3fs` extra.
2. Add the constraints file as a configmap to the k8s cluster. Replace `` with the namespace you created in [Step 6](#step-6-deploy-the-remote-execution-agent).
```bash wrap theme={null}
kubectl create configmap constraints-configmap --from-file=constraints.txt -n
```
3. Update your `values.yaml` file to install the necessary provider packages in the `workers` section. Update the versions as needed. Note that you also need to update the `PYTHONPATH` environment variable to include the shared packages. Note that your `image` version likely differs from the one in the example below.
```yaml wrap theme={null}
initContainers:
- name: install-amazon-provider-s3fs
image: images.astronomer.cloud/baseimages/astro-remote-execution-agent:3.0-4-python-3.12-astro-agent-1.0.2
command:
- "pip"
- "install"
- "--target"
- "/shared/packages"
- "--prefer-binary"
- "--constraint"
- "/constraints/constraints.txt"
- "apache-airflow-providers-amazon[s3fs]==9.9.0"
- "apache-airflow-providers-common-io==1.6.1"
volumeMounts:
- name: shared-packages
mountPath: /shared/packages
- name: constraints
mountPath: /constraints
env:
- name: PYTHONPATH
value: "/shared/packages:$PYTHONPATH"
```
4. Update your `values.yaml` file to mount the constraints file.
```yaml wrap theme={null}
volumes:
- name: shared-packages
emptyDir: {}
- name: constraints
configMap:
name: constraints-configmap
volumeMounts:
- name: shared-packages
mountPath: /shared/packages
readOnly: true
```
5. Update the Helm chart by running the following command. Replace `` with your namespace.
```bash wrap theme={null}
helm upgrade astro-agent astronomer/astro-remote-execution-agent --namespace --values values.yaml
```
6. Run a Dag that uses XCom to verify the setup. Remember that you need to push the Dag to your Dag bundle location for it to be accessible to the Remote Execution Agent.
If you'd like to see your task logs displayed in the Airflow UI, see our docs on [Task logging for remote Deployments](/docs/astro/remote-execution-logging-overview).
## Step 8: (optional, AWS only) use a secrets backend
If you want to use a secrets backend to store your connections and variables, you need to configure the Remote Execution Agent to use it.
1. First, you need an IAM role to attach this policy to. The IAM role's trust policy needs to include the EKS OIDC ID, so you need to fetch that first. Replace `` with the name of your EKS cluster and `` with the region of your EKS cluster.
```bash wrap theme={null}
OIDC_ISSUER_URL=$(aws eks describe-cluster --name --query "cluster.identity.oidc.issuer" --output text)
EKS_OIDC_ID=$(echo "$OIDC_ISSUER_URL" | sed -e 's|https://oidc.eks..amazonaws.com/id/||')
echo $EKS_OIDC_ID
```
2. Create a new file called `my-airflow-trust-policy.json` and add the following trust policy. Replace `` with your AWS account ID, `` with the region of your EKS cluster, `` with the namespace you created in [Step 6](#step-6-deploy-the-remote-execution-agent), and `` with the EKS OIDC ID you fetched in the previous substep.
```json wrap theme={null}
{
"Version": "2012-10-17",
"Statement": [
{
"Effect": "Allow",
"Principal": {
"Federated": "arn:aws:iam:::oidc-provider/oidc.eks..amazonaws.com/id/"
},
"Action": "sts:AssumeRoleWithWebIdentity",
"Condition": {
"StringEquals": {
"oidc.eks..amazonaws.com/id/:sub": "system:serviceaccount::*",
"oidc.eks..amazonaws.com/id/:aud": "sts.amazonaws.com"
}
}
}
]
}
```
3. Create a new IAM role called `RemoteAgentsRole` with the trust policy you created in the previous step.
```bash wrap theme={null}
aws iam create-role \
--role-name RemoteAgentsRole \
--assume-role-policy-document file://my-airflow-trust-policy.json
```
4. Create a new file called `my-airflow-secrets-policy.json` and add the following policy. Replace `` with the region of your EKS cluster and `` with your AWS account ID.
```json wrap theme={null}
{
"Version": "2012-10-17",
"Statement": [
{
"Effect": "Allow",
"Action": [
"secretsmanager:GetSecretValue",
"secretsmanager:DescribeSecret",
"secretsmanager:ListSecrets"
],
"Resource": "arn:aws:secretsmanager:::secret:airflow/*"
}
]
}
```
Create the policy using the following command.
```bash wrap theme={null}
aws iam create-policy \
--policy-name AirflowSecretsManagerAccess \
--policy-document file://my-airflow-secrets-policy.json
```
5. Attach the `AirflowSecretsManagerAccess` policy to the `RemoteAgentsRole` role.
```bash wrap theme={null}
aws iam attach-role-policy \
--role-name RemoteAgentsRole \
--policy-arn arn:aws:iam:::policy/AirflowSecretsManagerAccess
```
6. Update the `serviceAccount` section in your `values.yaml` file to annotate the role to your service accounts. Replace `` with your AWS account ID.
```yaml wrap theme={null}
serviceAccount:
workers:
annotations:
eks.amazonaws.com/role-arn: arn:aws:iam:::role/RemoteAgentsRole
dagProcessor:
annotations:
eks.amazonaws.com/role-arn: arn:aws:iam:::role/RemoteAgentsRole
triggerer:
annotations:
eks.amazonaws.com/role-arn: arn:aws:iam:::role/RemoteAgentsRole
```
7. Update the `commonEnv` section in your `values.yaml` file to configure the secrets backend. Replace `` with the ARN of the IAM role you created in the previous step.
```yaml wrap theme={null}
secretBackend: "airflow.providers.amazon.aws.secrets.secrets_manager.SecretsManagerBackend"
commonEnv:
- name: AIRFLOW__SECRETS__BACKEND_KWARGS
value: '{"connections_prefix": "airflow/connections", "variables_prefix": "airflow/variables"}'
- name: AWS_DEFAULT_REGION
value: ''
```
8. Since the secrets backend is also used in the Dag processor and Triggerer components and part of the [Airflow Amazon provider](https://airflow.apache.org/docs/apache-airflow-providers-amazon/stable/secrets-backends/aws-secrets-manager.html), you need to install the necessary provider packages on these components as well, like you did for the worker pods when configuring the XCom backend in [Step 7](#step-7-configure-xcom). Note that your `image` version likely differs from the one in the example below.
```yaml expandable wrap theme={null}
dagProcessor:
# ... other dagProcessor config ...
# Add PYTHONPATH to dagProcessor env
env:
- name: PYTHONPATH
value: "/shared/packages:$PYTHONPATH"
# Add initContainers (replace initContainers: [])
initContainers:
- name: install-amazon-provider-s3fs
image: images.astronomer.cloud/baseimages/astro-remote-execution-agent:3.0-4-python-3.12-astro-agent-1.0.2
command:
- "pip"
- "install"
- "--target"
- "/shared/packages"
- "--prefer-binary"
- "--constraint"
- "/constraints/constraints.txt"
- "apache-airflow-providers-amazon[s3fs]==9.9.0"
- "apache-airflow-providers-common-io==1.6.1"
volumeMounts:
- name: shared-packages
mountPath: "/shared/packages"
- name: constraints
mountPath: "/constraints"
# Add volumes (replace volumes: [])
volumes:
- name: shared-packages
emptyDir: {}
- name: constraints
configMap:
name: constraints-configmap
# Add volumeMounts (replace volumeMounts: [])
volumeMounts:
- name: shared-packages
mountPath: /shared/packages
# In values.yaml, under triggerer section
triggerer:
# ... other triggerer config ...
# Add PYTHONPATH to triggerer env
env:
- name: PYTHONPATH
value: "/shared/packages:$PYTHONPATH"
# Add initContainers (replace initContainers: [])
initContainers:
- name: install-amazon-provider-s3fs
image: images.astronomer.cloud/baseimages/astro-remote-execution-agent:3.0-4-python-3.12-astro-agent-1.0.2
command:
- "pip"
- "install"
- "--target"
- "/shared/packages"
- "--prefer-binary"
- "--constraint"
- "/constraints/constraints.txt"
- "apache-airflow-providers-amazon[s3fs]==9.9.0"
- "apache-airflow-providers-common-io==1.6.1"
volumeMounts:
- name: shared-packages
mountPath: "/shared/packages"
- name: constraints
mountPath: "/constraints"
# Add volumes (replace volumes: [])
volumes:
- name: shared-packages
emptyDir: {}
- name: constraints
configMap:
name: constraints-configmap
# Add volumeMounts (replace volumeMounts: [])
volumeMounts:
- name: shared-packages
mountPath: /shared/packages
```
9. Update the Helm chart with the new `values.yaml` file.
```bash wrap theme={null}
helm upgrade astro-agent astronomer/astro-remote-execution-agent --namespace --values values.yaml
```
10. Now your tasks have access to the secrets backend! You can store [connections](/docs/learn/connections) under `airflow/connections` and [variables](/docs/learn/airflow-variables) under `airflow/variables`.
## Step 9: (optional, AWS only) Configure logs in the Airflow UI
When using Remote Execution with a Deployment running on AWS and the Remote Execution Agent running on AWS, you can configure your task logs to be read from an S3 bucket using a [customer workload identity](/docs/astro/authorize-deployments-to-your-cloud#step-1-authorize-the-deployment-to-your-iam-role).
1. Create a new IAM policy called `AirflowS3Access` and attach the following policy. Replace `` with the name of your logging bucket. Make sure to record the policy ARN `arn:aws:iam:::policy/AirflowS3Access` from the output of the command.
```bash wrap theme={null}
aws iam create-policy \
--policy-name AirflowS3Access \
--policy-document file://my-airflow-s3-policy.json
```
This is the policy you need to create in the `my-airflow-s3-policy.json` file.
```json expandable wrap theme={null}
{
"Version": "2012-10-17",
"Statement": [
{
"Action": [
"s3:ListBucket"
],
"Resource": [
"arn:aws:s3:::"
],
"Effect": "Allow",
"Sid": "ListObjectsInBucket"
},
{
"Action": [
"s3:GetObject",
"s3:PutObject",
"s3:DeleteObject"
],
"Resource": [
"arn:aws:s3:::/*"
],
"Effect": "Allow",
"Sid": "AllObjectActions"
},
{
"Sid": "AssumeRole",
"Effect": "Allow",
"Action": "sts:AssumeRole",
"Resource": "*"
}
]
}
```
2. Attach the `AirflowS3Access` policy to the `RemoteAgentsRole` role you created and add to the service account annotations in [Step 8](#step-8-optional-aws-only-use-a-secrets-backend). Replace `` with your AWS account ID.
```bash wrap theme={null}
aws iam attach-role-policy \
--role-name RemoteAgentsRole \
--policy-arn arn:aws:iam:::policy/AirflowS3Access
```
3. Update the `commonEnv` section in your `values.yaml` file to configure the logs to be written to S3. Replace `` with the name of your logging bucket and `` with the ID of your deployment.
```yaml wrap theme={null}
commonEnv:
# ...
- name: AIRFLOW__LOGGING__REMOTE_LOGGING
value: "True"
- name: AIRFLOW__LOGGING__REMOTE_LOG_CONN_ID
value: "astro_aws_logging"
- name: AIRFLOW_CONN_ASTRO_AWS_LOGGING
value: "s3://" # means the credentials are fetched from IRSA
- name: AIRFLOW__LOGGING__REMOTE_BASE_LOG_FOLDER
value: "s3:///"
- name: AIRFLOW__LOGGING__LOGGING_CONFIG_CLASS
value: "astronomer.runtime.logging.logging_config"
- name: ASTRONOMER_ENVIRONMENT
value: "cloud"
```
4. Update the Helm chart with the new `values.yaml` file. Upon the next Dag run you should be able to see the logs in your S3 bucket.
5. To see the logs in the Airflow UI, you need to configure the Astro Deployment to use the S3 bucket for task logs. In the Astro UI, navigate to your Deployment and click the **Details** tab. Click **Edit** in the **Advanced** section.
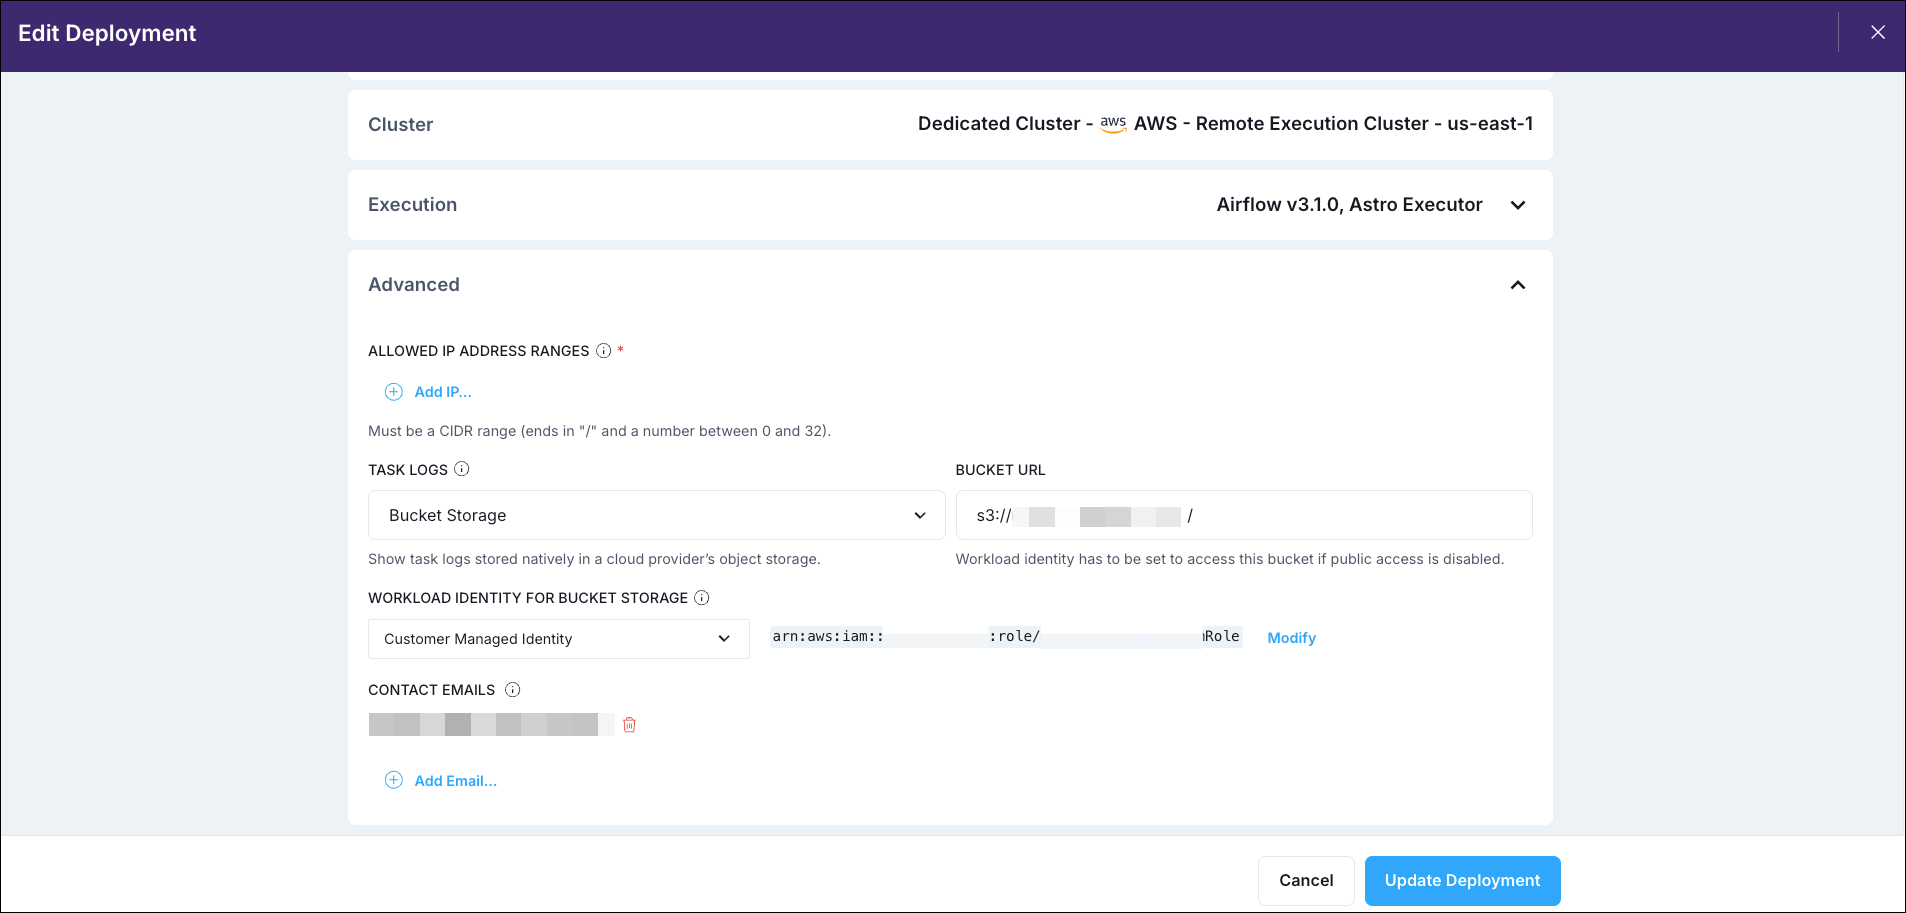
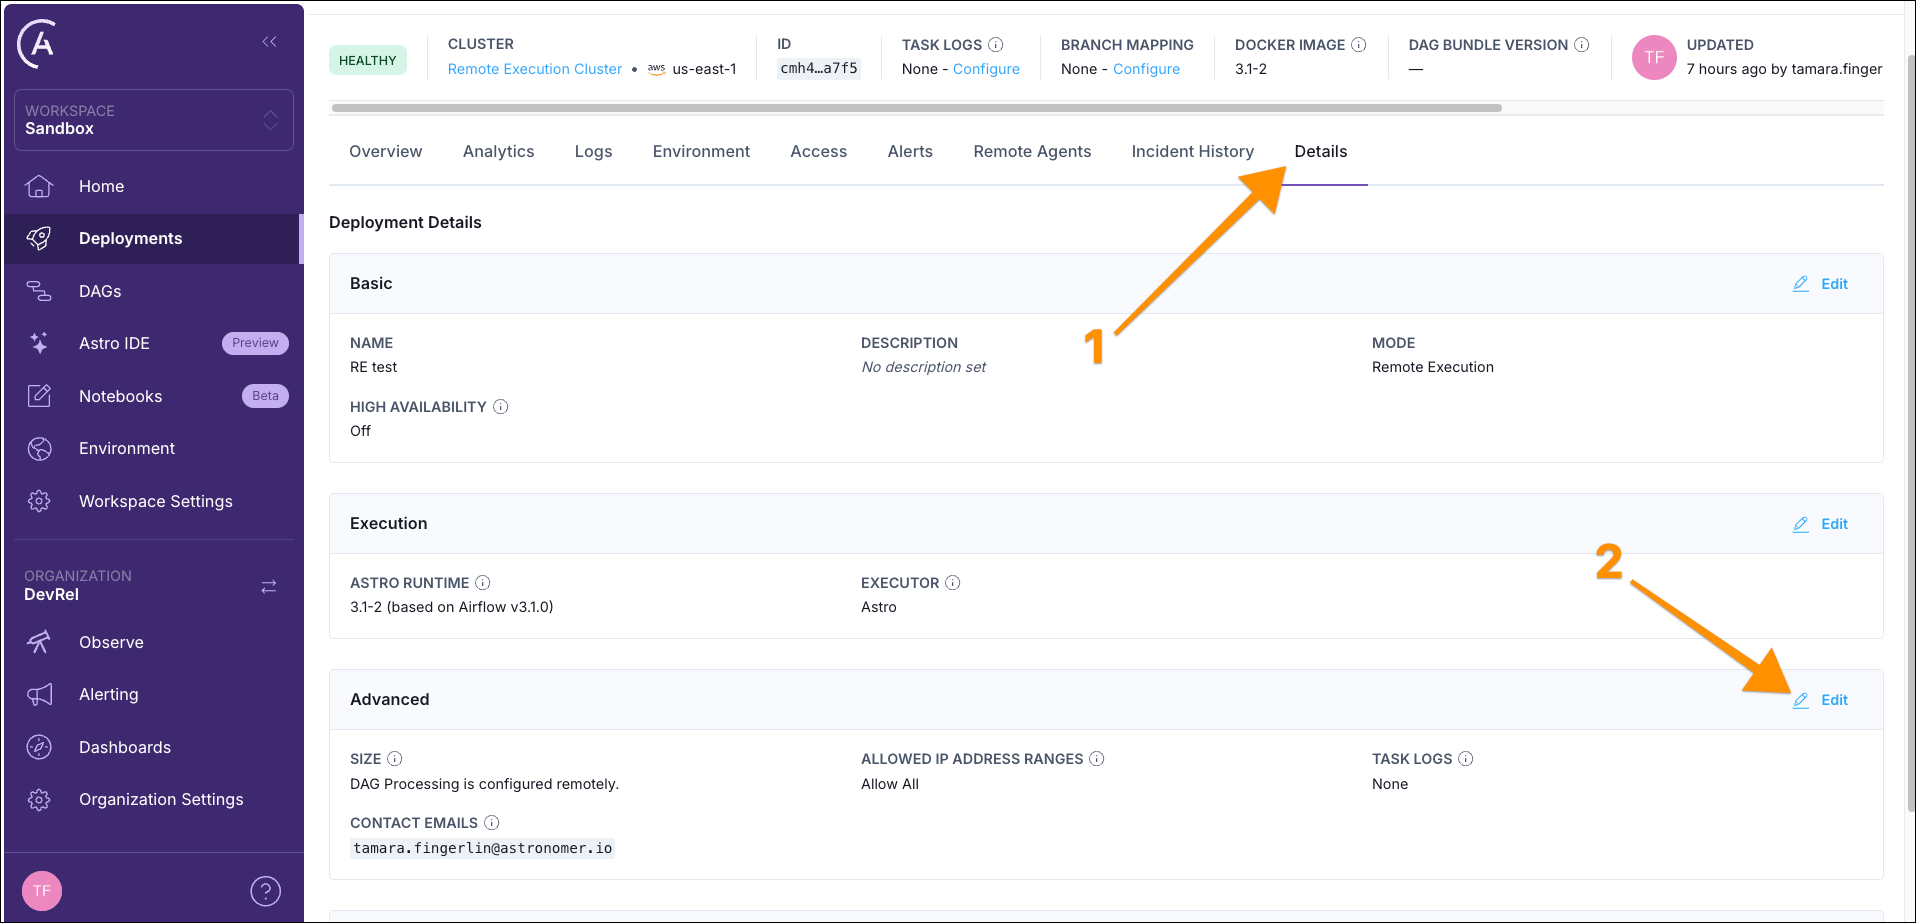 Select **Bucket Storage** in the **Task Logs** field and add the **Bucket URL** as `s3:///`. Select **Customer Managed Identity** in the **Workload Identity for Bucket Storage** field and use your `RemoteAgentsRole` IAM role ARN for the **Workload Identity ARN** before running the provided bash script.
 6. Now you should be able to see the task logs in the Airflow UI.