> ## Documentation Index
> Fetch the complete documentation index at: https://astronomer.io/docs/llms.txt
> Use this file to discover all available pages before exploring further.
# Get started with Astro Observe
This page has not yet been updated for Airflow 3. The concepts shown are relevant, but some code may need to be updated. If you run any examples, take care to update import statements and watch for any other breaking changes.
[Astro Observe](https://www.astronomer.io/product/observe/) is Astronomer's comprehensive observability solution for [Apache Airflow®](https://airflow.apache.org/). It allows you to define [data products](/docs/learn/data-products) consisting of Airflow pipelines and [datasets](/docs/learn/airflow-datasets) across your deployments. You can set [Service Level Agreements (SLAs)](/docs/learn/using-slas) on these data products to ensure that your data is delivered on time and is fresh. Easy to set up alerts notify you when SLAs aren't met.
After you complete this tutorial, you'll be able to use Astro Observe to:
* Create a data product.
* Set a timeliness SLA on a data product.
* Set a freshness SLA on a data product.
* Create an alert in case of an SLA not being met.
**Other ways to learn**
There are multiple resources for learning about this topic. See also:
* Webinar: [Introducing Astro Observe: Pipeline-level Observability](https://www.astronomer.io/events/webinars/introducing-astro-observe-pipeline-level-observability-video/).
## Time to complete
This quickstart takes approximately 45 minutes to complete.
## Assumed knowledge
To get the most out of this tutorial, make sure you have an understanding of:
* Basic Airflow concepts. See [Introduction to Apache Airflow](/docs/learn/intro-to-airflow).
* Basic observability concepts like data products and SLAs.
* Basics knowledge of how to navigate the [Astro Observe UI](/docs/astro/astro-observe).
## Prerequisites
* An Astro account with access to Astro Observe. Astro customers can [request access to Astro Observe](https://www.astronomer.io/product/observe/request).
* A GitHub account with permission to [authorize GitHub Apps](https://docs.github.com/en/apps/using-github-apps/authorizing-github-apps). If you don't have a GitHub account, you can create one for free on the [GitHub website](https://github.com/signup).
## Step 1: Set up your Astro deployment
1. Sign in to your Astro account.
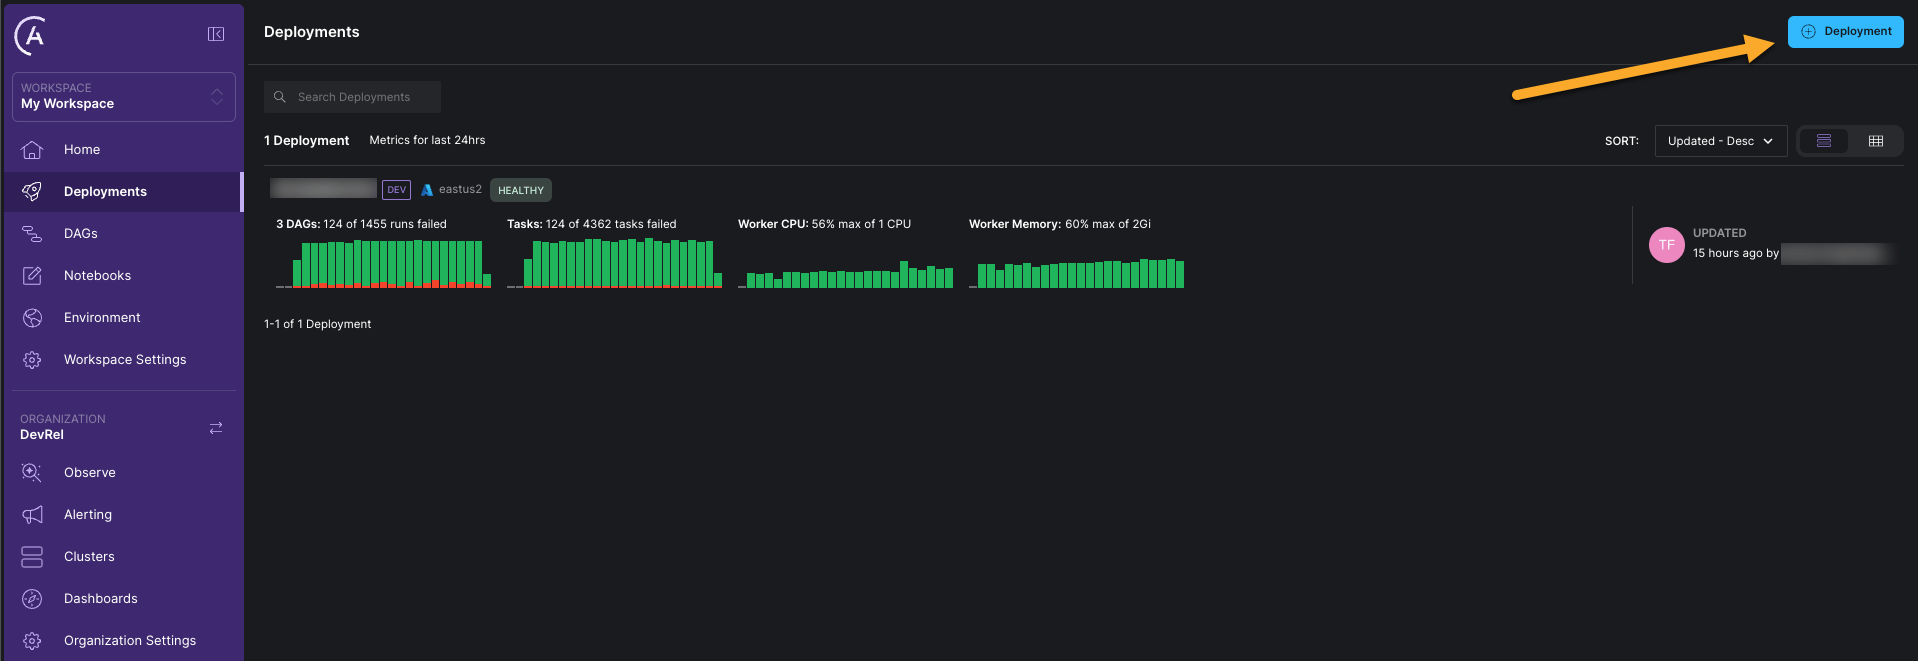
2. Click **+ Deployment** to [create a new deployment](/docs/astro/create-deployment) using default settings.
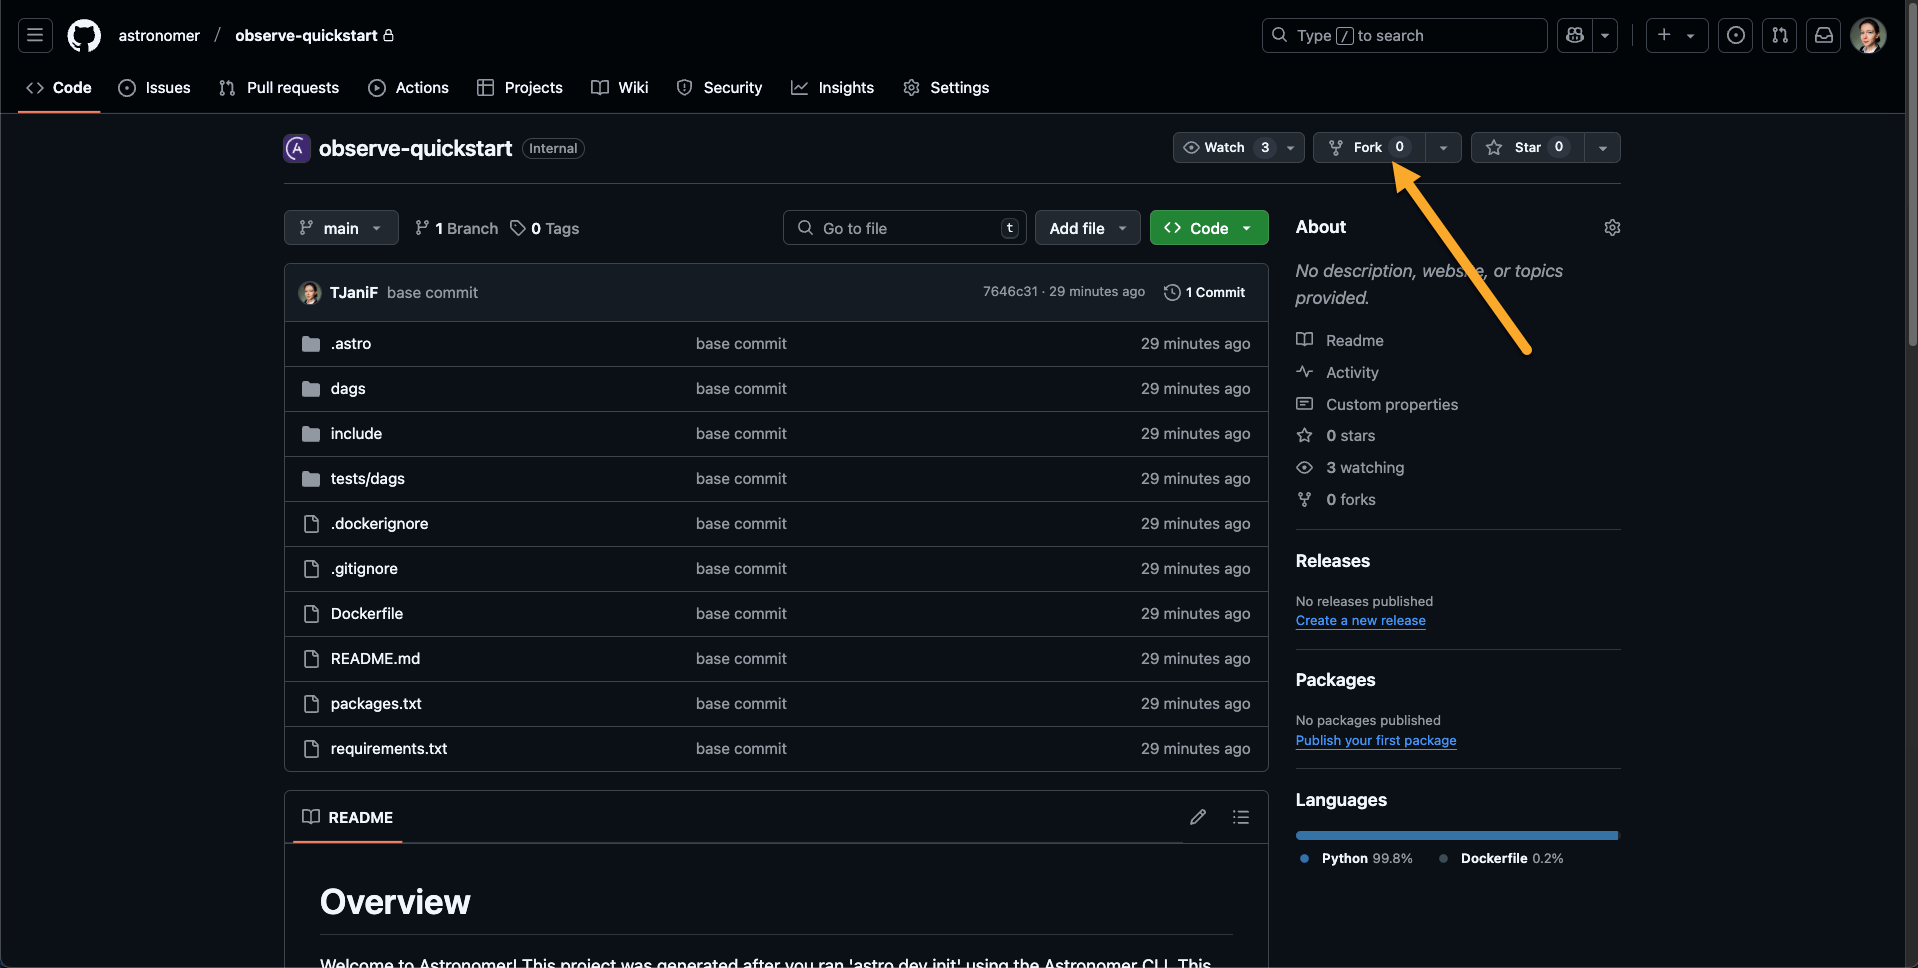
 3. [Fork](https://docs.github.com/en/pull-requests/collaborating-with-pull-requests/working-with-forks/fork-a-repo) the [Observe Quickstart GitHub repository](https://github.com/astronomer/observe-quickstart) to your GitHub account.
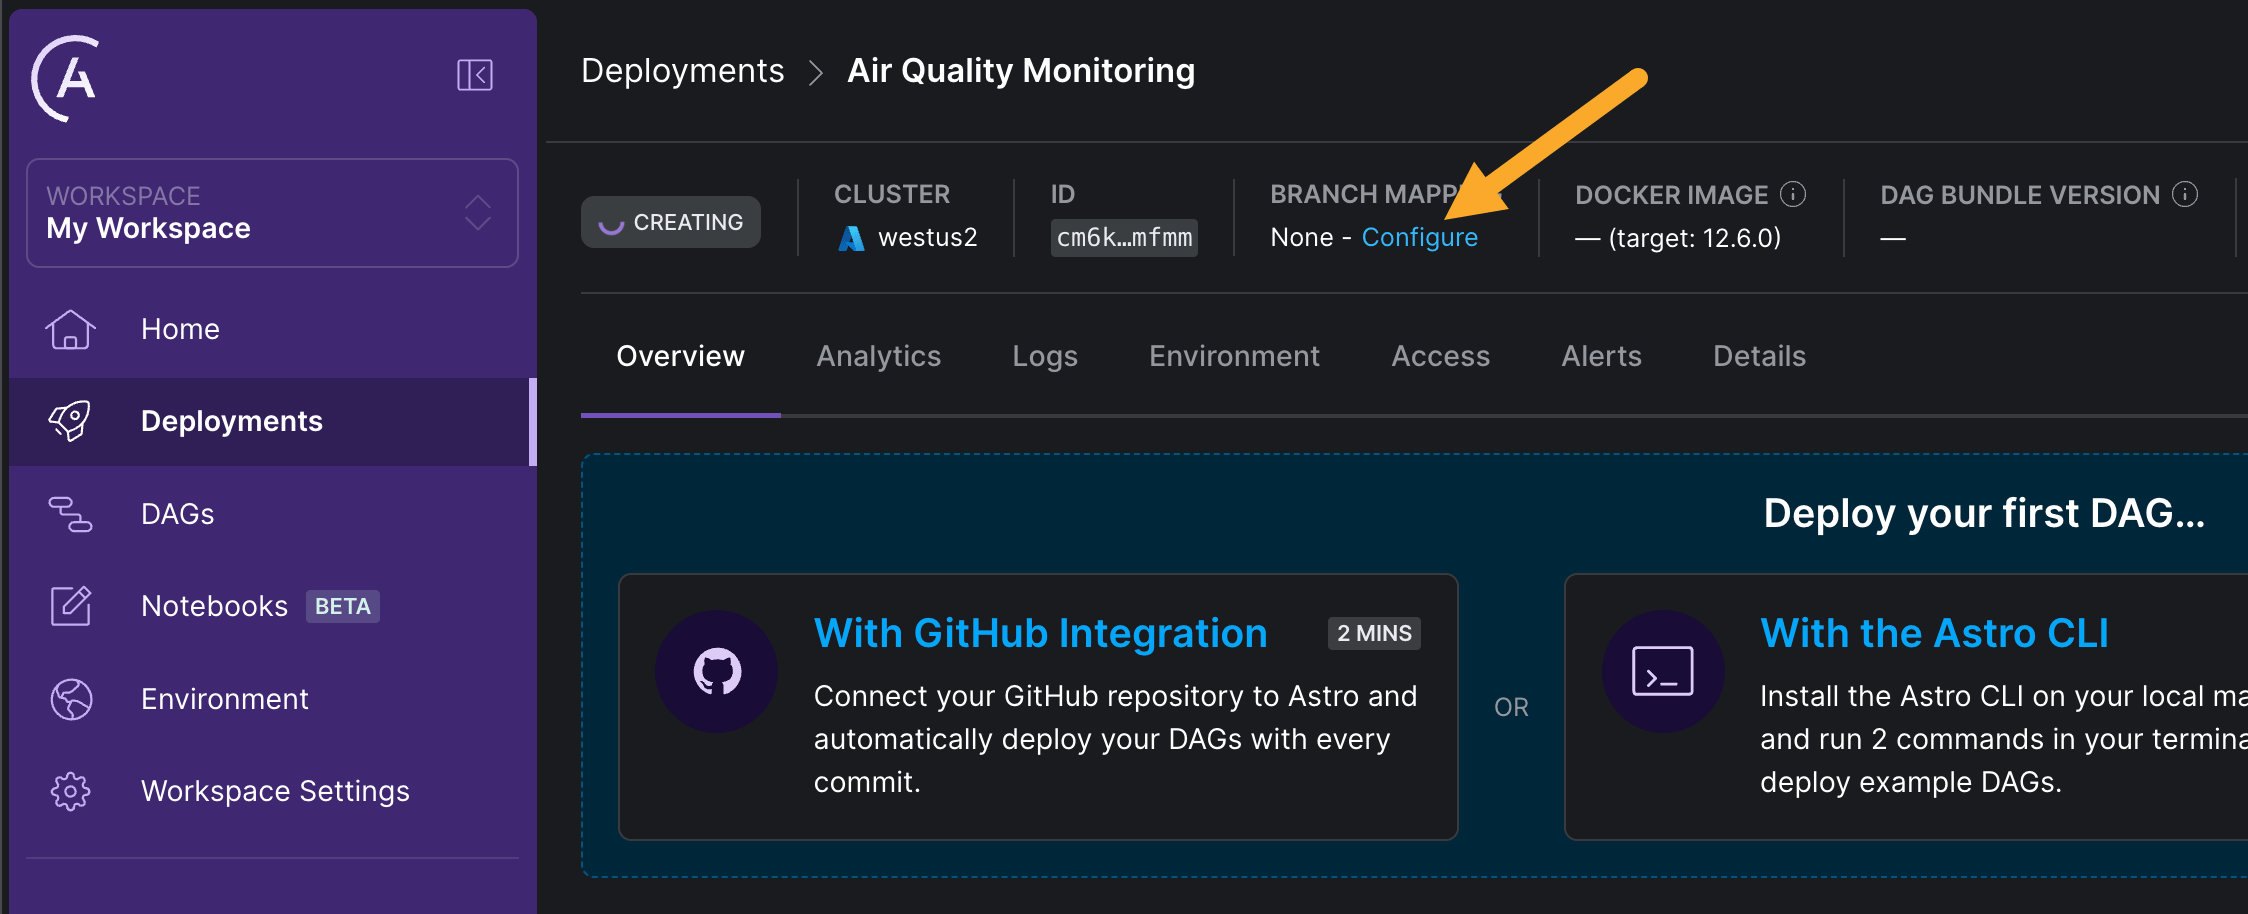
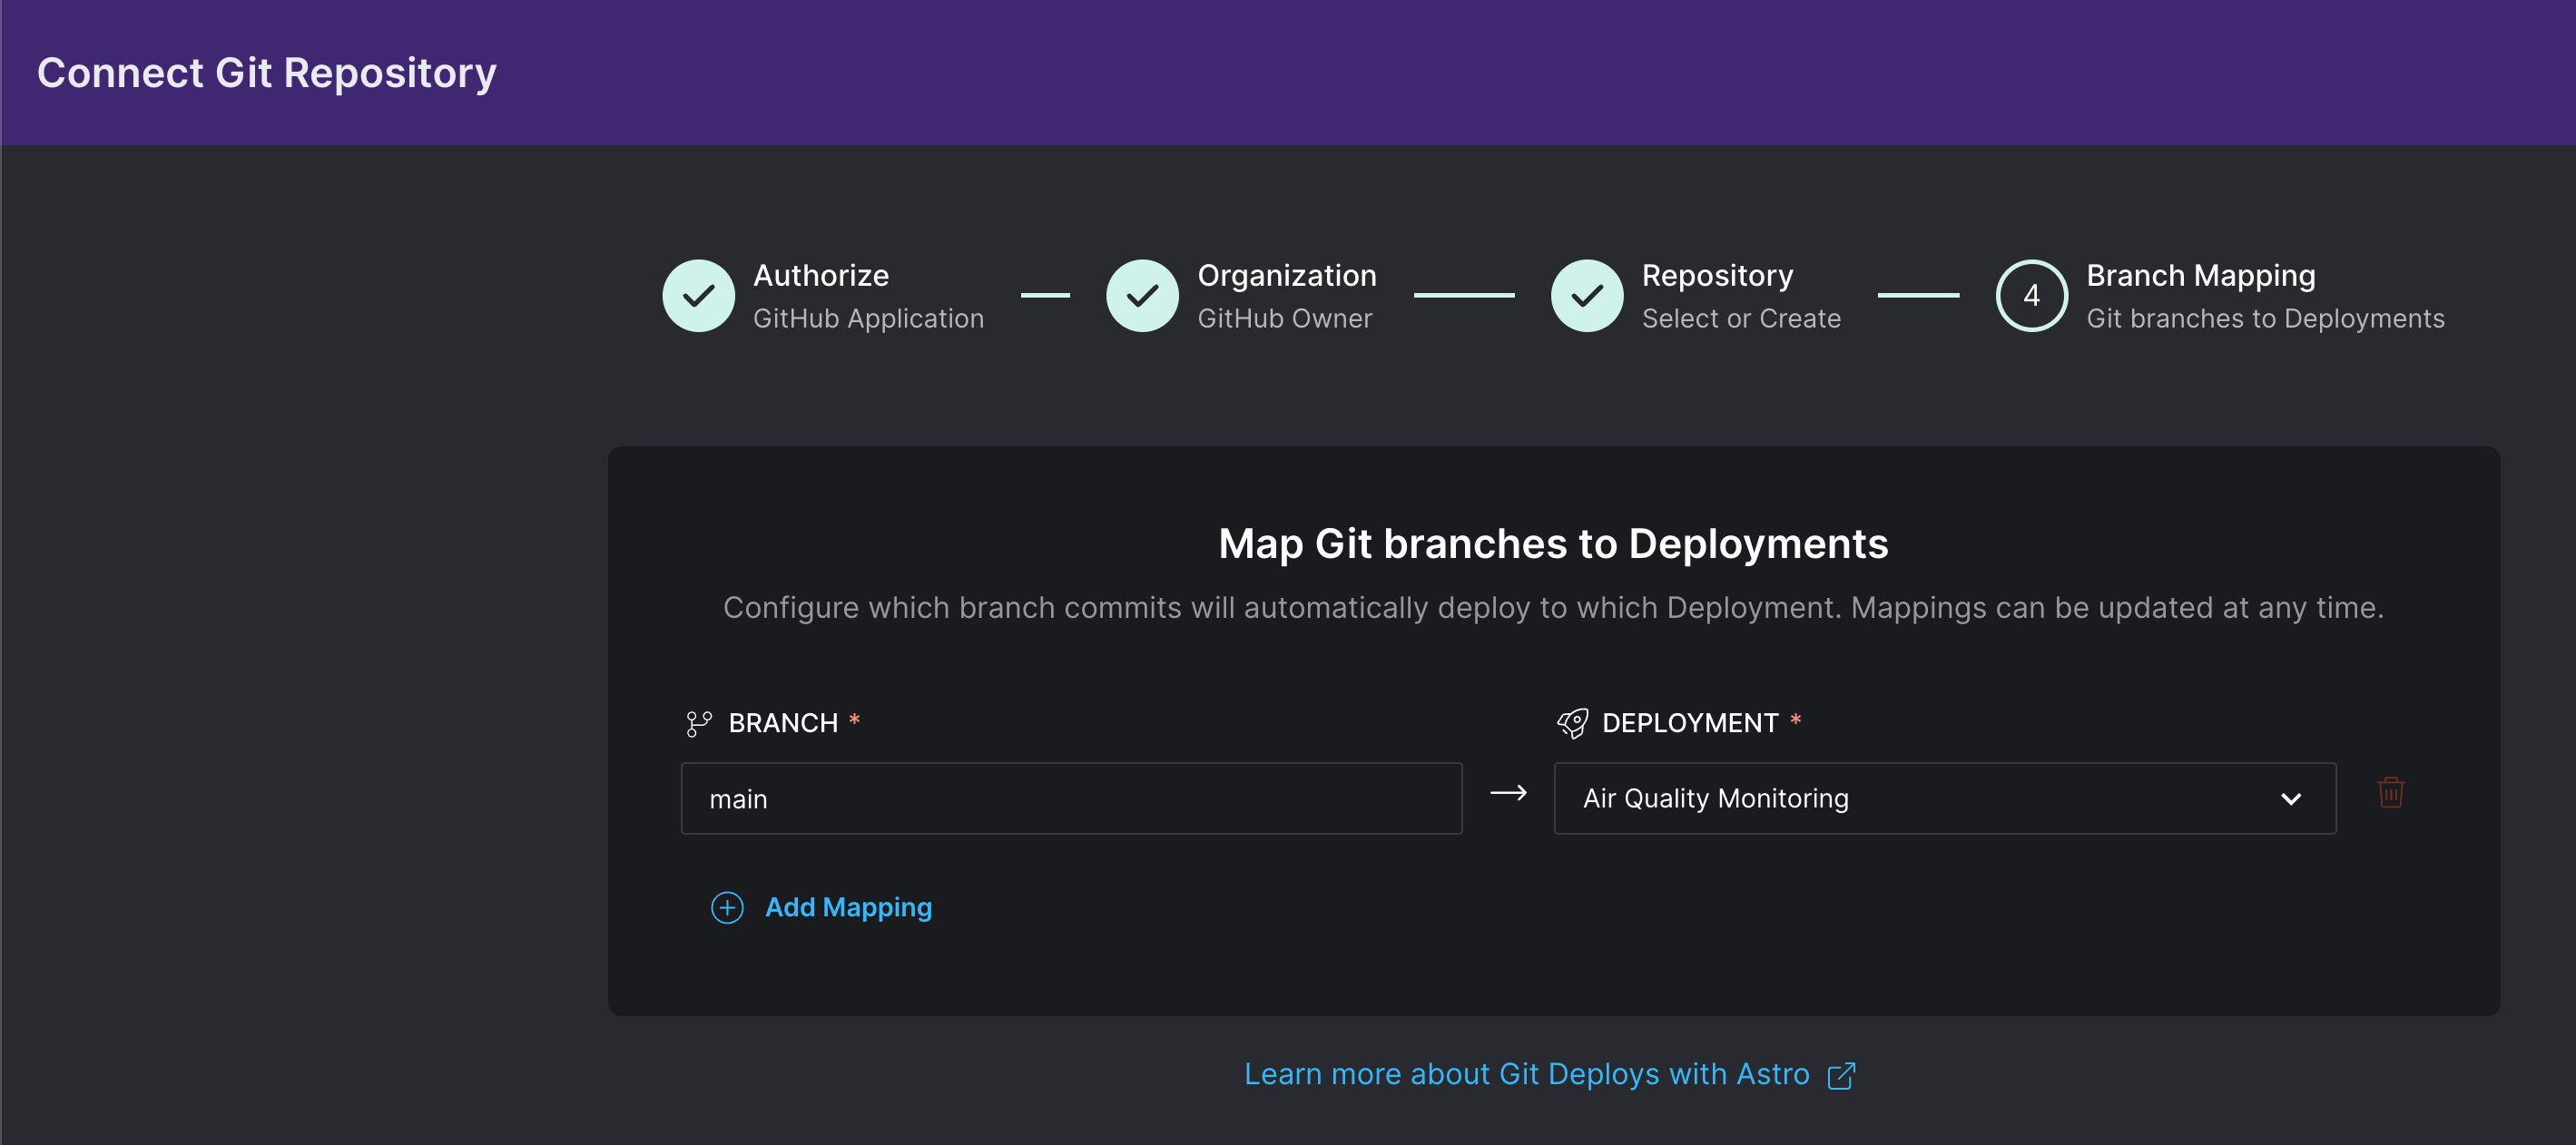
 4. In the Astro UI, go to your newly created deployment and click **Configure** in the **BRANCH MAPPING** section to map the deployment to a branch in your forked repository, see [Deploy code with the Astro GitHub integration](/docs/astro/deploy-github-integration)
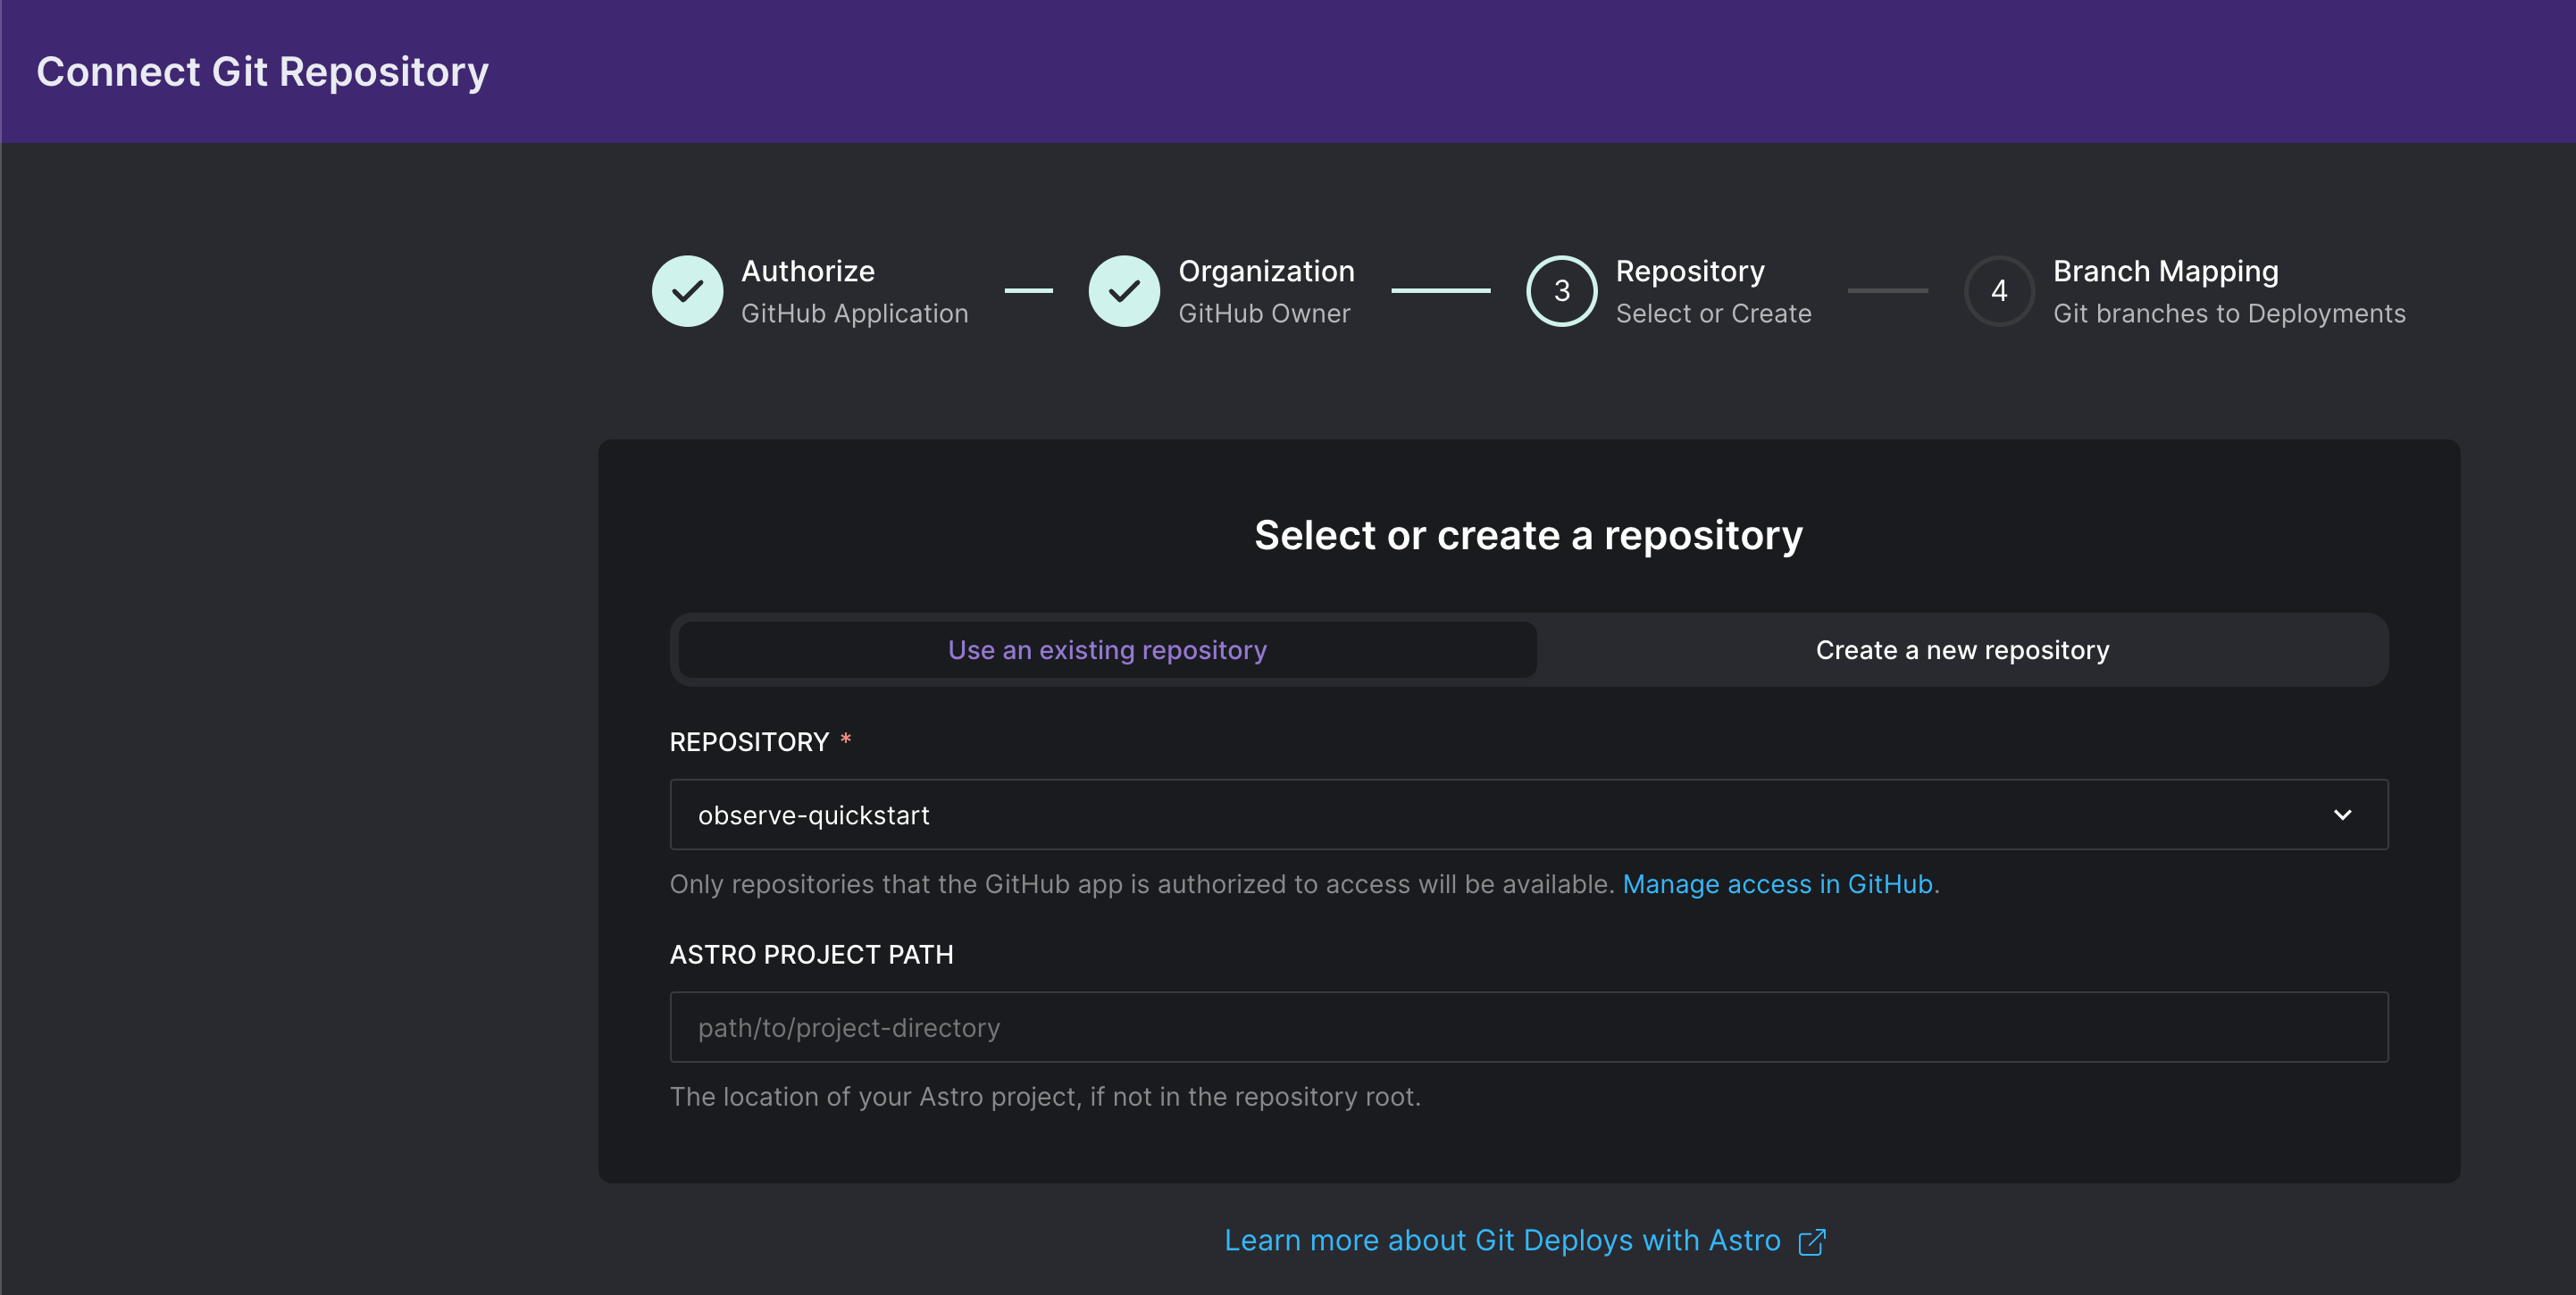
 5. Click **Connect Repository** and go through the steps in the UI to connect your forked repository to the deployment. Note that your GitHub Account needs to have the necessary permissions to [authorize GitHub Apps](https://docs.github.com/en/apps/using-github-apps/authorizing-github-apps). Make sure to select **Use an existing repository** and select your forked repository in the dropdown. You don't need to provide an **Astro project path**, since the project is at the root of the repository. Click **Connect Repository** to connect the repository to your Astro organization.
 6. Select the `main` branch as the **Branch** and map it to your empty Deployment. Click **Update Mappings** to save the changes.
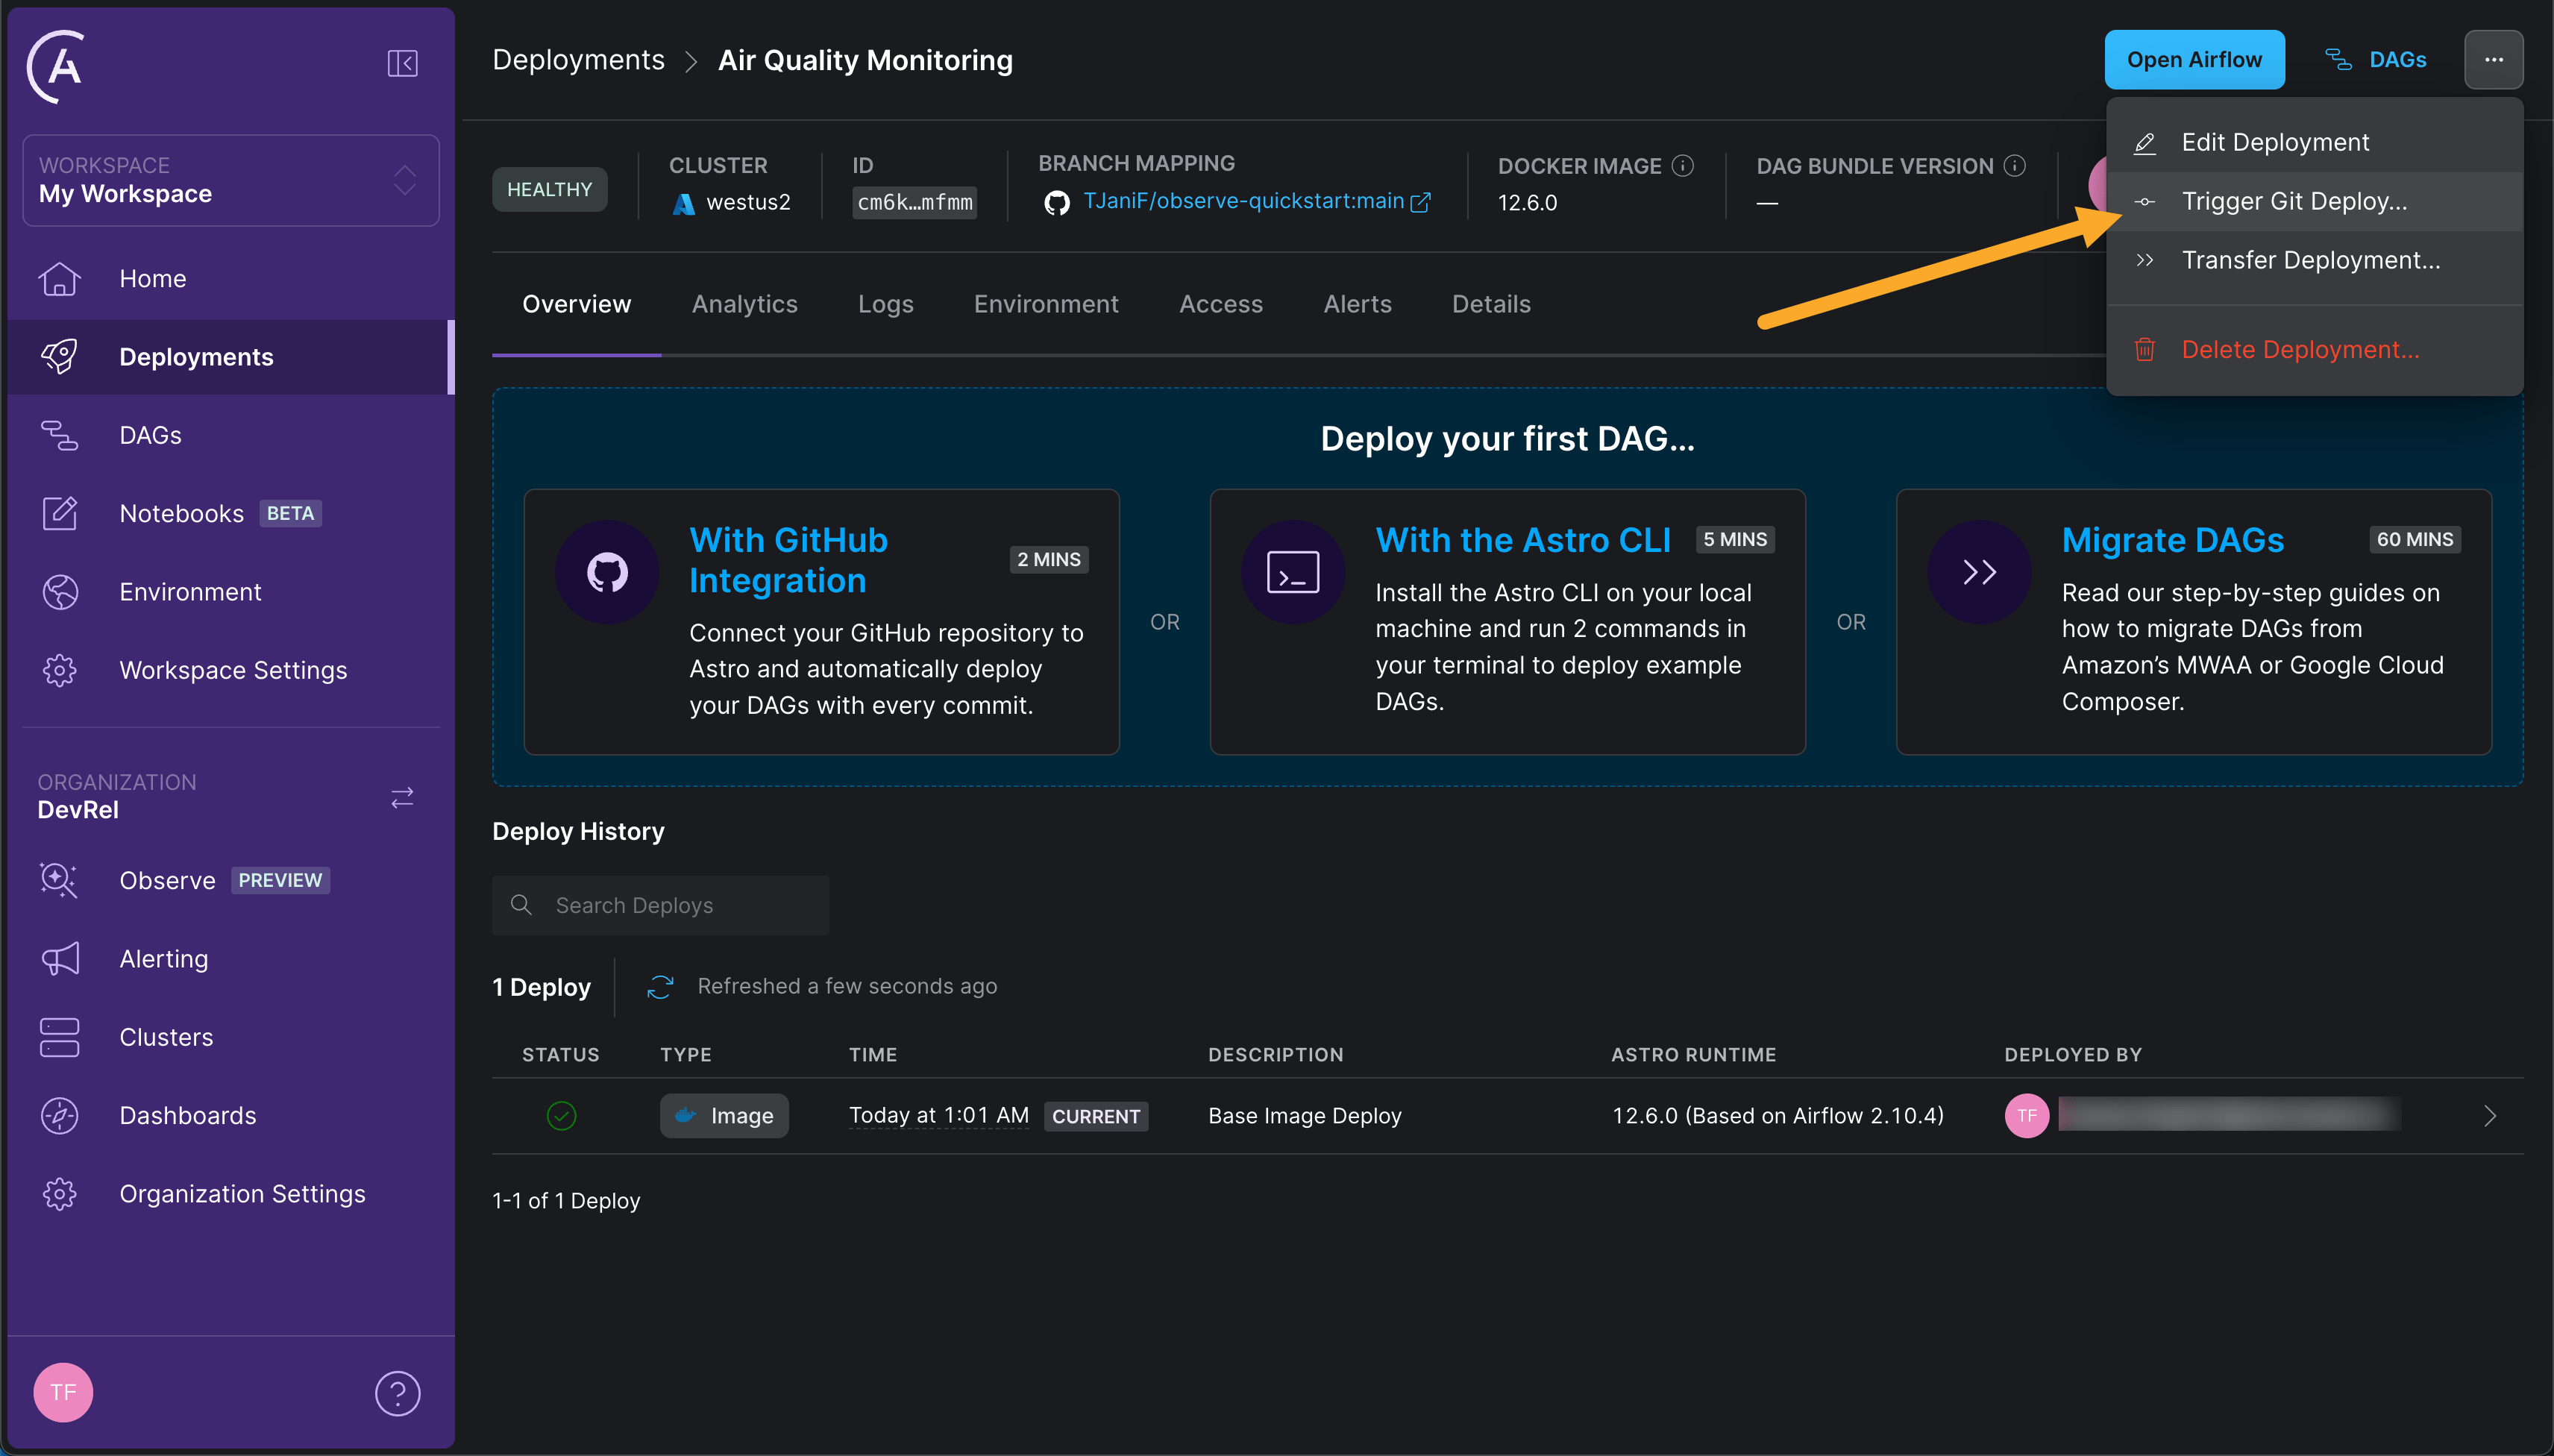
 7. To deploy the code currently on the main branch of the mapped repository, click the **...** button in the top right corner, and then click **Trigger Git Deploy...**. Any subsequent commits to the mapped branch will automatically trigger code deployment. You can verify that deploying was successful through the **Deploy History** of your Astro Deployment, which should show 2 Deploys with a green checkmark as their status. This process may take a few minutes.
 ## Step 2: Unpause your DAGs
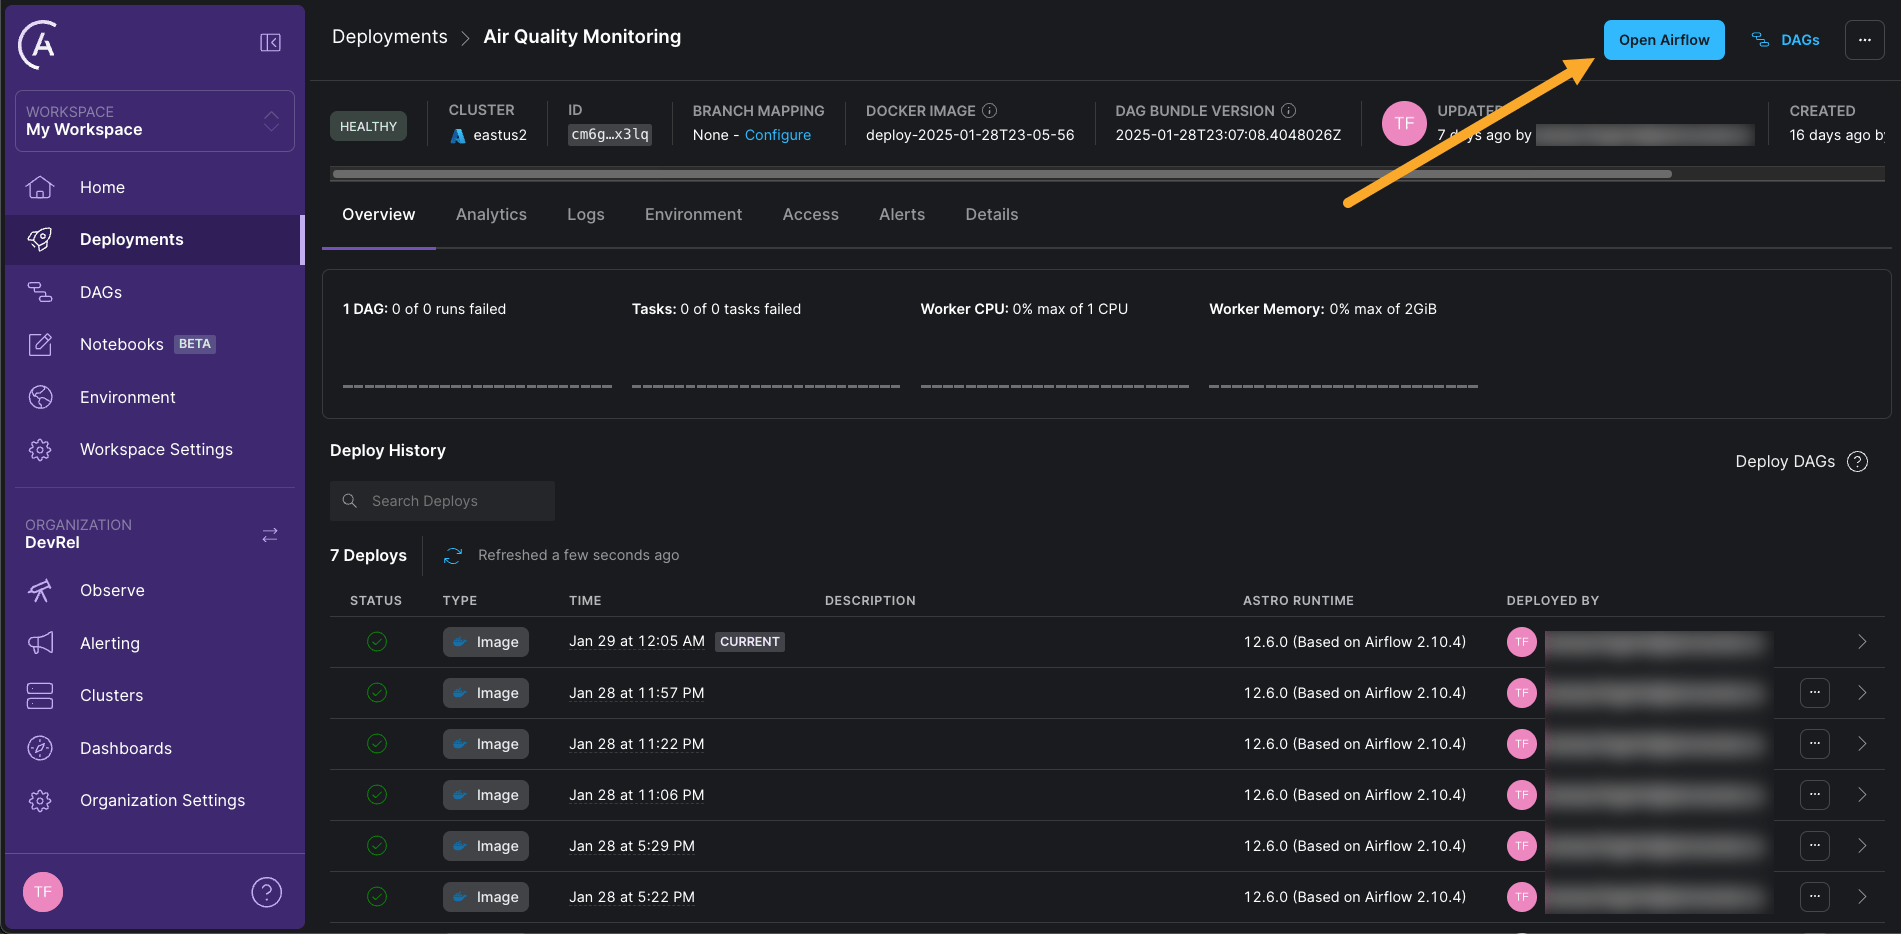
1. After the code has been deployed, click **Open Airflow** to open the Airflow UI.
## Step 2: Unpause your DAGs
1. After the code has been deployed, click **Open Airflow** to open the Airflow UI.
 2. Unpause all 3 DAGs in the Airflow UI by clicking on the play button next to each DAG. They will start running according to their schedules.
The three DAGs form a pipeline monitoring air quality data:
* `aq_etl`: This DAG runs once every minute to fetch the latest measurement from an air quality sensor. It will occasionally fail, mocking the sensor not always being available.
* `send_aq_alerts`: This DAG runs once every 10 minutes to check if the current air quality determined by the average of the measurements of the last 20 minutes is below a certain threshold. If it is, the DAG sends an alert.
* `create_aq_report`: This DAG runs at the top of every hour to create a report of air quality measurements. It reports average measurements for each of the last 24 hours.
## Step 3: Create your first data product
After all DAGs have at least run once, you can use Astro Observe to [create a data product](/docs/astro/create-data-products) to represent the output of these DAGs.
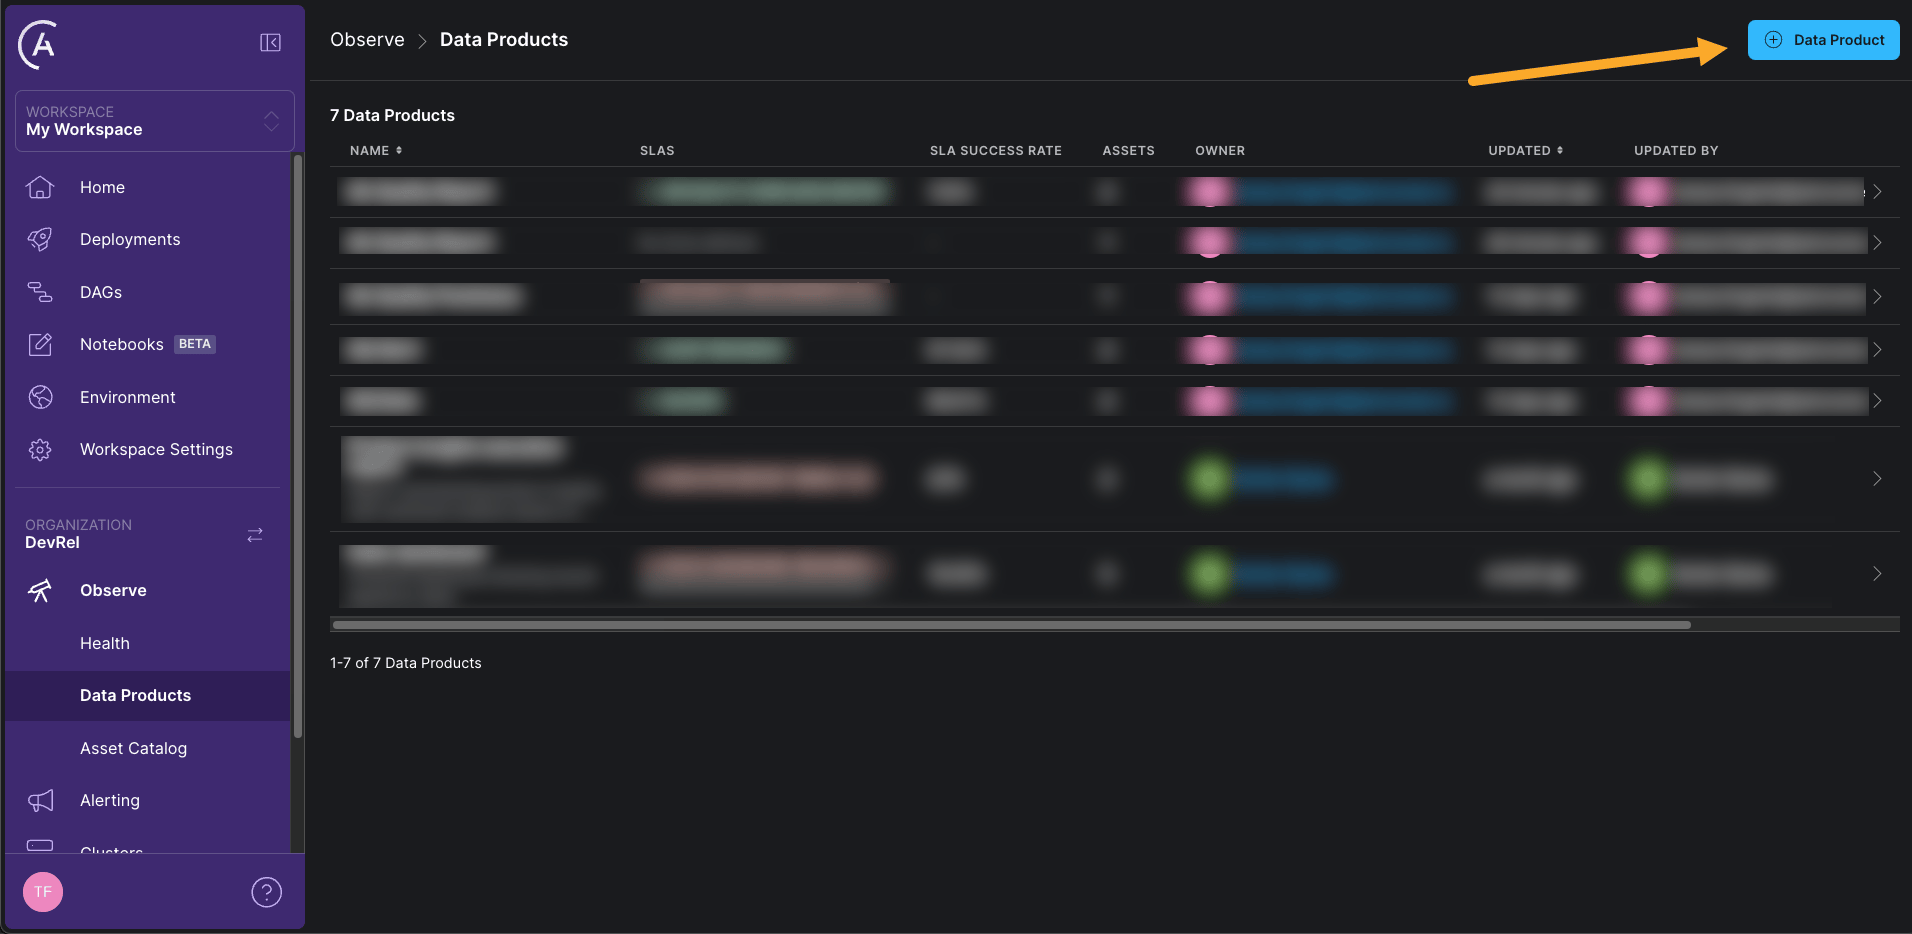
1. In the Astro UI, click **Observe** in the sidebar and then click **+ Data Product**.
2. Unpause all 3 DAGs in the Airflow UI by clicking on the play button next to each DAG. They will start running according to their schedules.
The three DAGs form a pipeline monitoring air quality data:
* `aq_etl`: This DAG runs once every minute to fetch the latest measurement from an air quality sensor. It will occasionally fail, mocking the sensor not always being available.
* `send_aq_alerts`: This DAG runs once every 10 minutes to check if the current air quality determined by the average of the measurements of the last 20 minutes is below a certain threshold. If it is, the DAG sends an alert.
* `create_aq_report`: This DAG runs at the top of every hour to create a report of air quality measurements. It reports average measurements for each of the last 24 hours.
## Step 3: Create your first data product
After all DAGs have at least run once, you can use Astro Observe to [create a data product](/docs/astro/create-data-products) to represent the output of these DAGs.
1. In the Astro UI, click **Observe** in the sidebar and then click **+ Data Product**.
 2. Give your data product a name (we used `Air Quality Report`) and select a **User** as an owner. Then search **All Assets** for the `send_aq_report` task in the `create_aq_report` DAG. This task creates a report of air quality measurements. Click the plus sign to add the task to the data product. Astro Observe will automatically determine upstream dependencies for the task and build a data product graph. This even works across Astro Deployments! Click **Create Data Product** to save the data product.
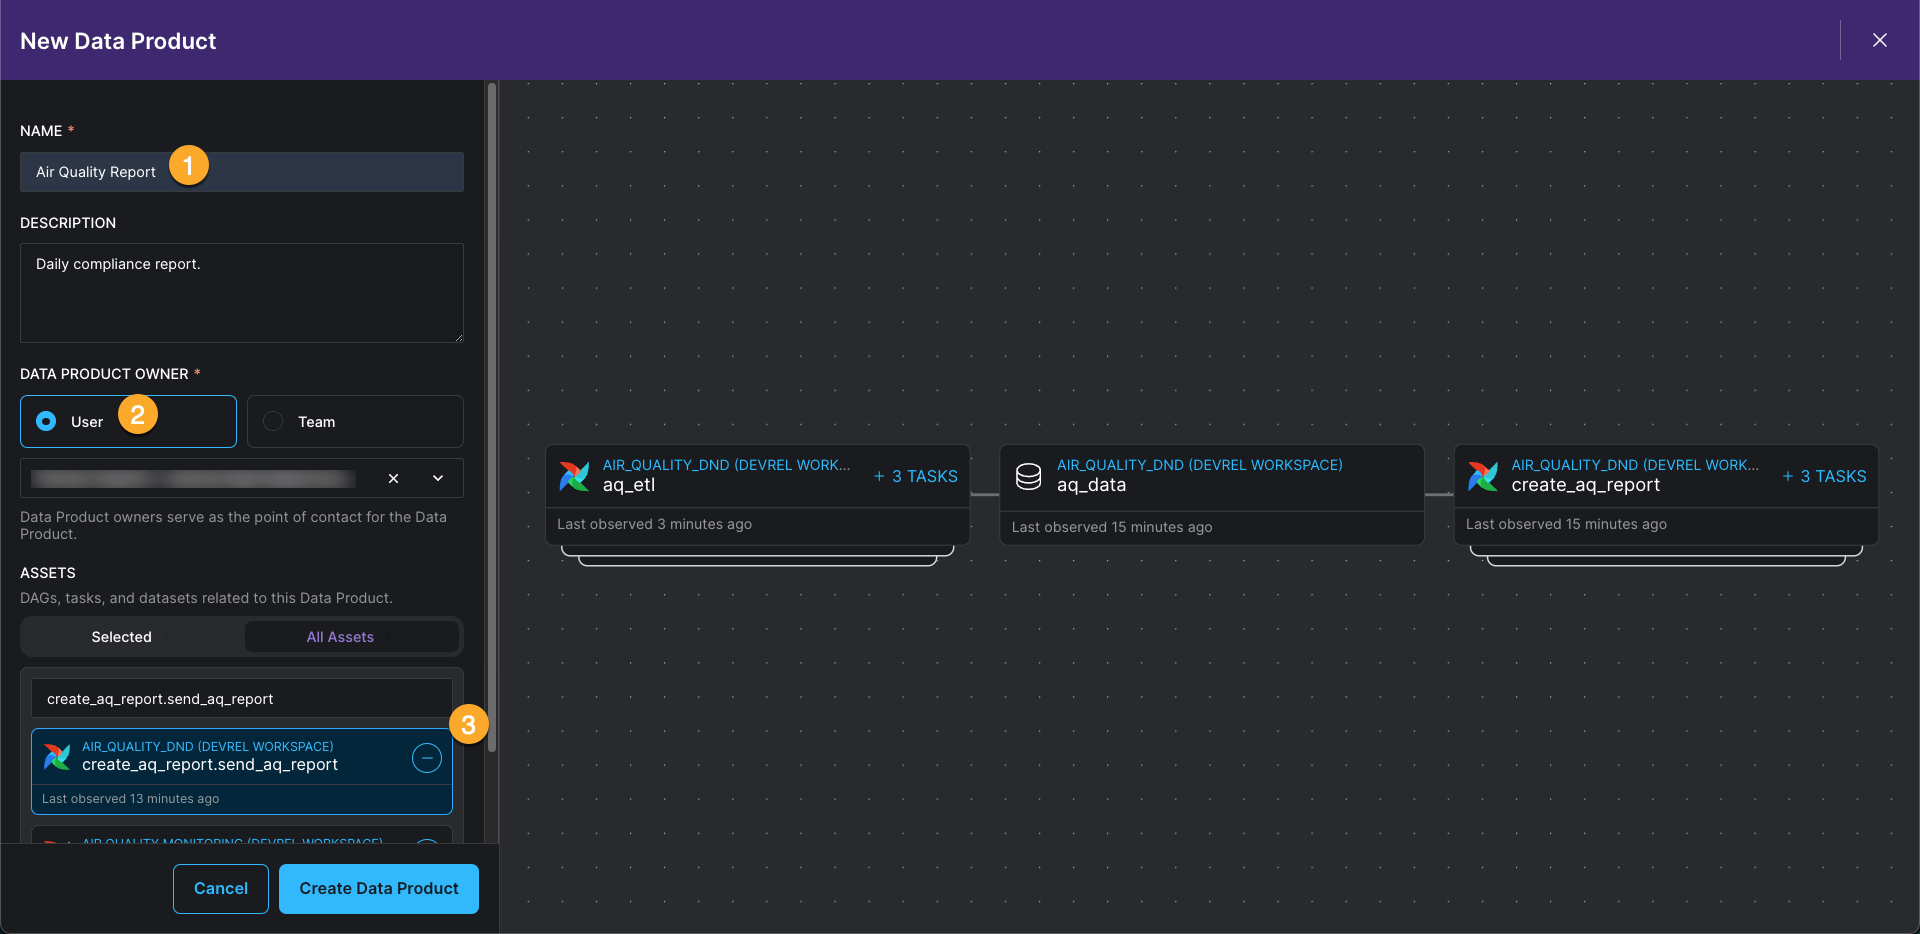 You can now see the data product in the Astro UI, monitoring the `send_aq_report` task and its upstream dependencies. Next, you'll create a timeliness SLA for this data product.
## Step 4: Set a timeliness SLA on your data product
The `create_aq_report` DAG runs once per hour. Once a day, you are required to send the latest air quality report to an external agency for compliance purposes. It is very important that this report is delivered on time, meaning you need to be sure that the `send_aq_report` task has successfully completed in the hour before the report is due.
This is where an SLA on a data product comes in handy.
1. Click the **Overview** tab of the `Air Quality Report` data product and then click **+ SLA**.
You can now see the data product in the Astro UI, monitoring the `send_aq_report` task and its upstream dependencies. Next, you'll create a timeliness SLA for this data product.
## Step 4: Set a timeliness SLA on your data product
The `create_aq_report` DAG runs once per hour. Once a day, you are required to send the latest air quality report to an external agency for compliance purposes. It is very important that this report is delivered on time, meaning you need to be sure that the `send_aq_report` task has successfully completed in the hour before the report is due.
This is where an SLA on a data product comes in handy.
1. Click the **Overview** tab of the `Air Quality Report` data product and then click **+ SLA**.
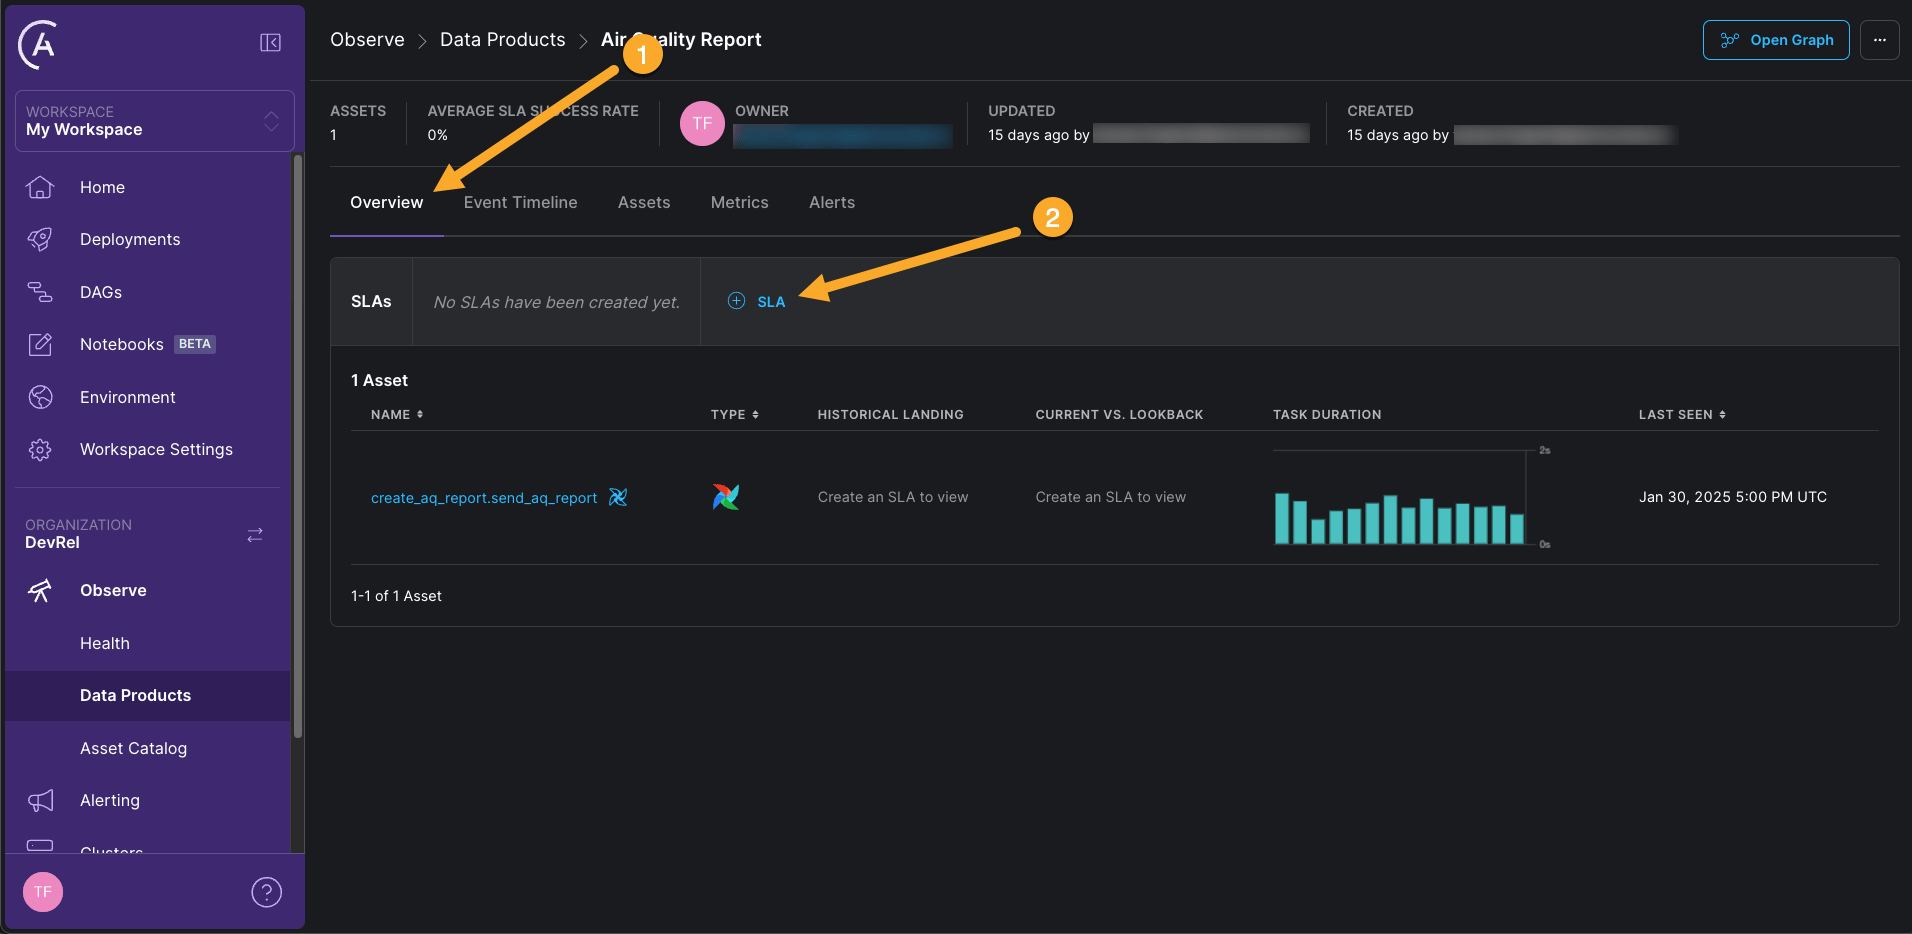 2. Define a new SLA with the following values:
* **Name**: `Air Quality Compliance Report`
* **Description**: `Ensure that the air quality report is delivered on time.`
* **SLA Type**: **Timeliness**
* **Days of the week (UTC)**: Click **Select All**.
* **Verification Time (UTC)**: Pick a time that is close to your current time, for example 10 minutes in the future.
* **Lookback Period**: `1 hour` (since you want a latest report that isn't older than 1 hour)
2. Define a new SLA with the following values:
* **Name**: `Air Quality Compliance Report`
* **Description**: `Ensure that the air quality report is delivered on time.`
* **SLA Type**: **Timeliness**
* **Days of the week (UTC)**: Click **Select All**.
* **Verification Time (UTC)**: Pick a time that is close to your current time, for example 10 minutes in the future.
* **Lookback Period**: `1 hour` (since you want a latest report that isn't older than 1 hour)
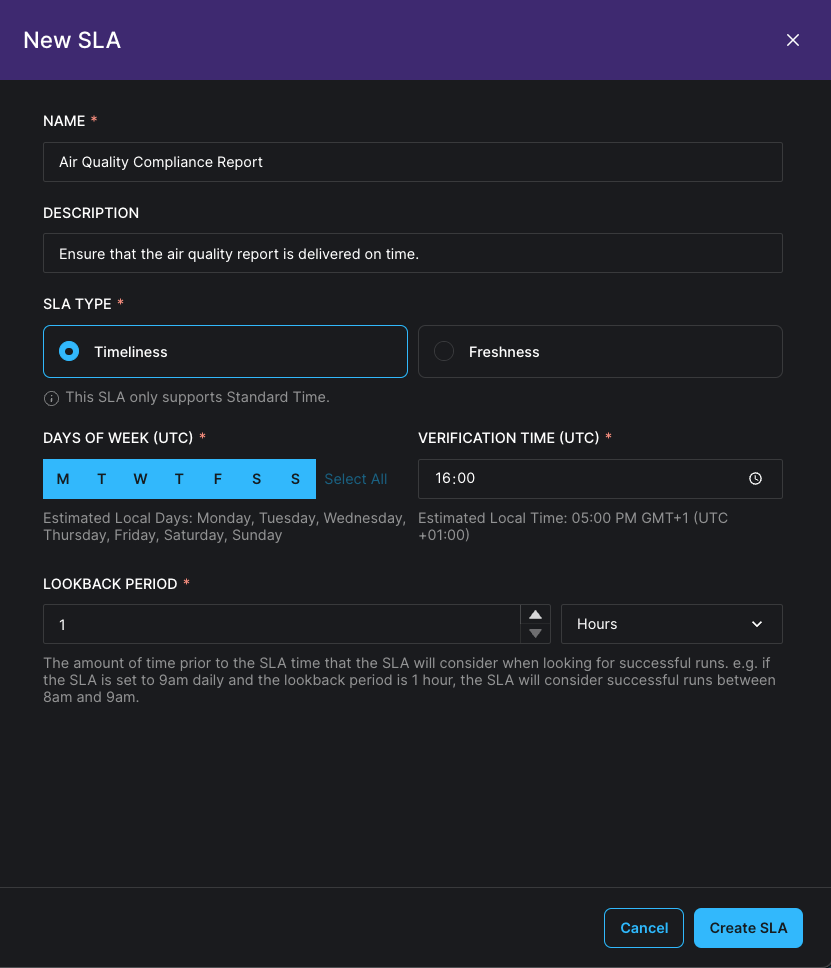 3. Click **Create SLA** to save the SLA.
## Step 5: Create an alert on your SLA
After creating the SLA, you can add an alert to it. This alert will notify you if the SLA isn't met — that is, if the **Verification Time** is reached and the `send_aq_report` task hasn't been successfully completed in the last hour.
1. Click the **Alerts** tab and **+ Alert** to add alerts to your SLAs.
3. Click **Create SLA** to save the SLA.
## Step 5: Create an alert on your SLA
After creating the SLA, you can add an alert to it. This alert will notify you if the SLA isn't met — that is, if the **Verification Time** is reached and the `send_aq_report` task hasn't been successfully completed in the last hour.
1. Click the **Alerts** tab and **+ Alert** to add alerts to your SLAs.
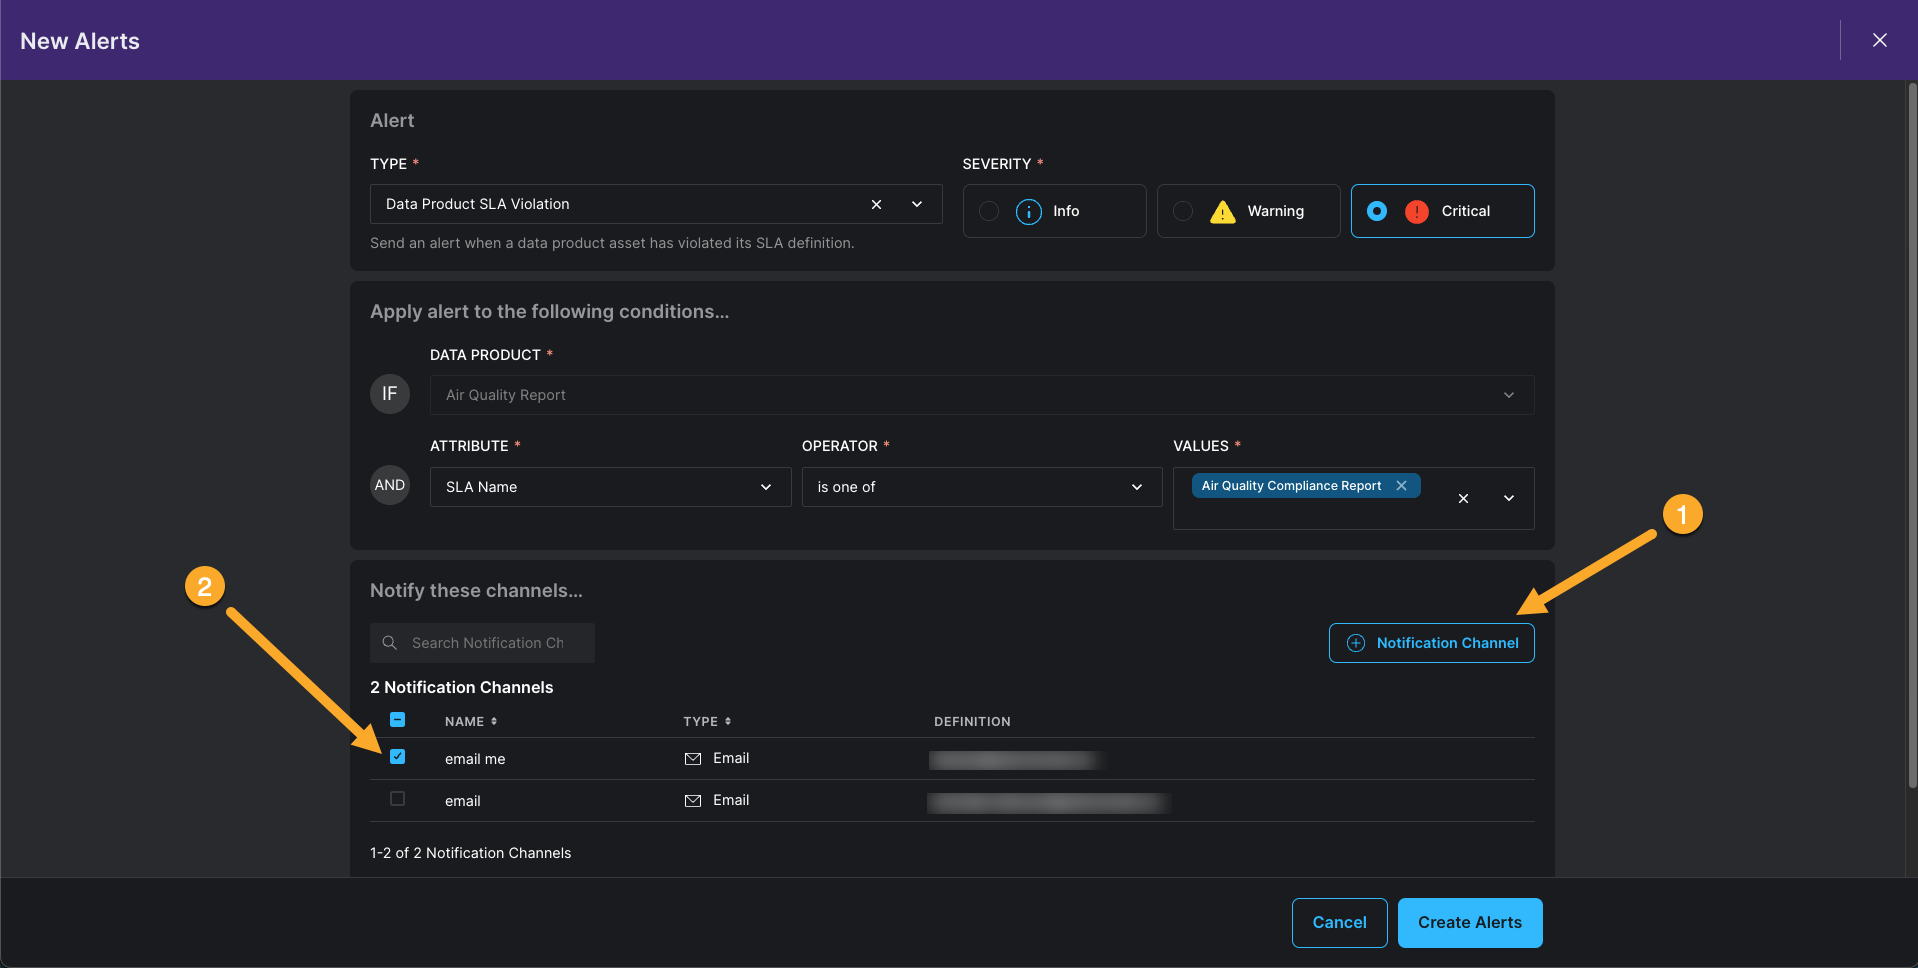
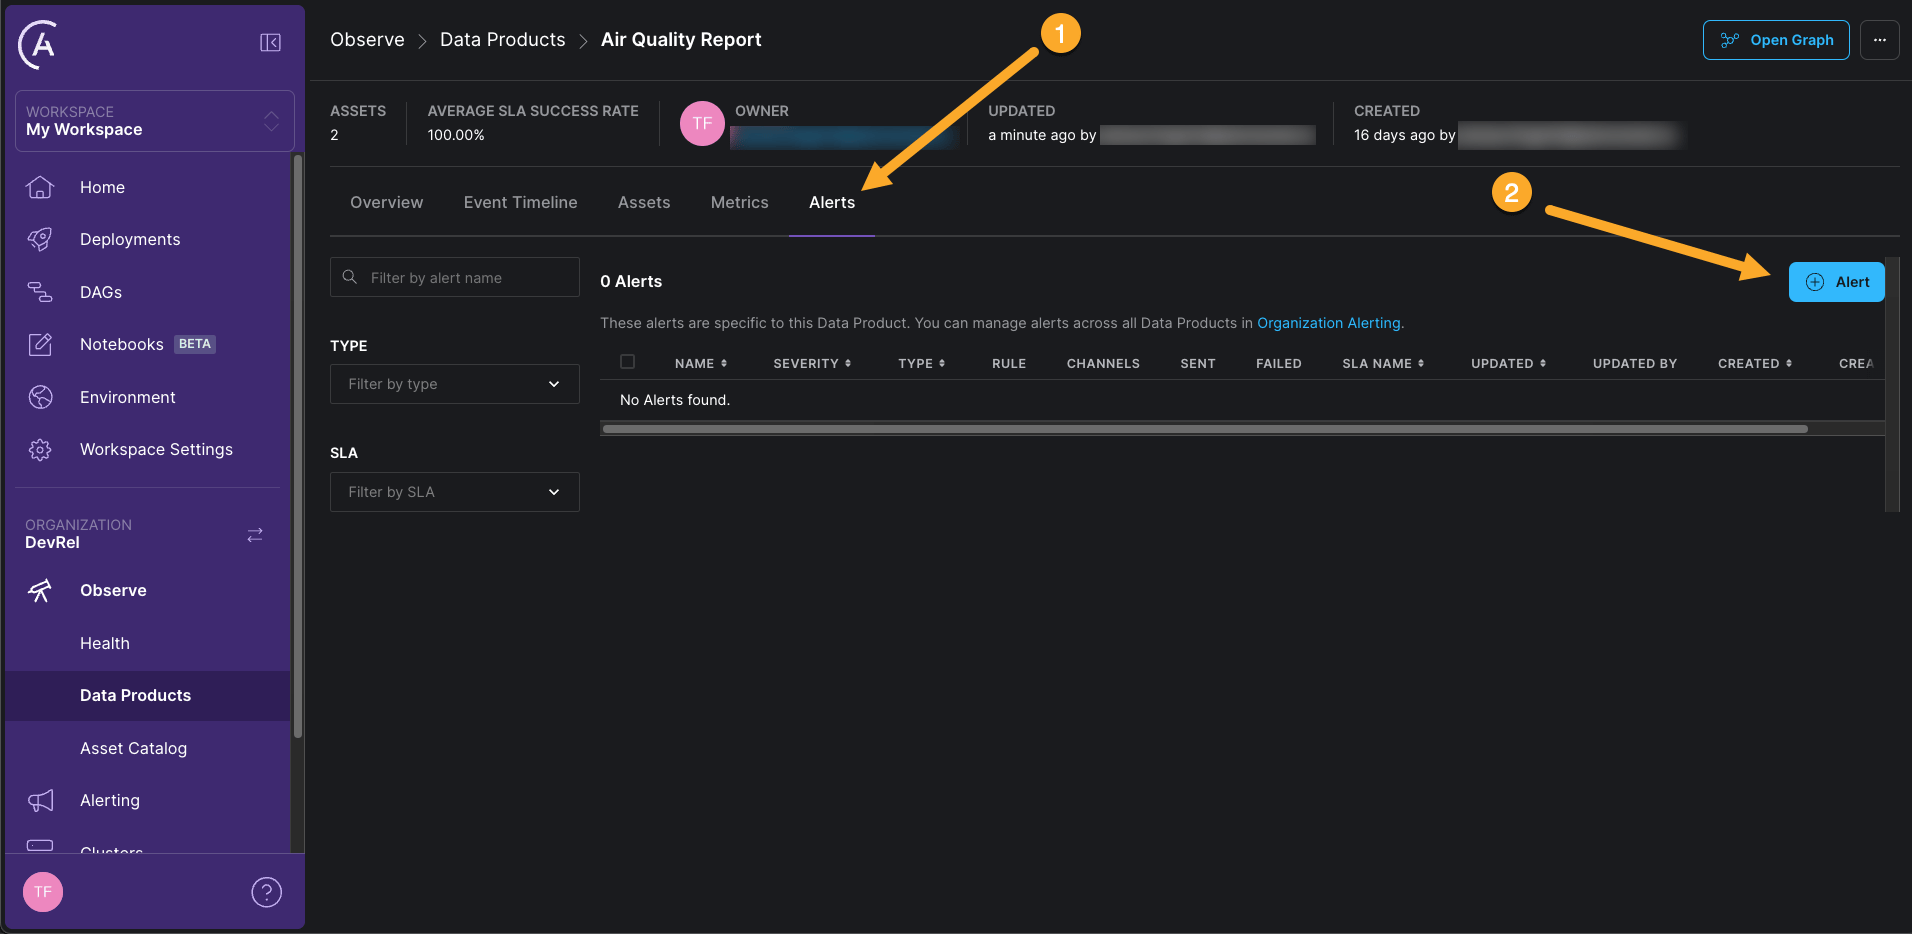 2. Select the following values for the alert, leaving all other fields at their default values:
* **Type**: **Data Product SLA Violation**
* **Severity**: **Critical**
If this is your first time creating an alert, you need to create a new notification channel. Click **+ Notification Channel**, give it a name, and select **Email** and add your email address using the blue plus sign. Click **Create Notification Channel** to save the notification channel. After creating the notification channel, you can select it in the alert form. Click **Create Alert** to save the alert.
2. Select the following values for the alert, leaving all other fields at their default values:
* **Type**: **Data Product SLA Violation**
* **Severity**: **Critical**
If this is your first time creating an alert, you need to create a new notification channel. Click **+ Notification Channel**, give it a name, and select **Email** and add your email address using the blue plus sign. Click **Create Notification Channel** to save the notification channel. After creating the notification channel, you can select it in the alert form. Click **Create Alert** to save the alert.
 ## Step 6: Create a second data product
Awesome! You will now be immediately informed if the air quality report isn't delivered on time. But there is a second aspect to this pipeline that you want to monitor: that the air quality measurements happen frequently enough, that is, that the data is fresh enough. For this, create a second data product that focuses on the `load_aq_data` task in the `aq_etl` DAG.
1. In the Astro UI, click **+ Data Product**.
2. Give your data product a name (we used `Air Quality Measurements`), select a **User** as an owner, and then search **All Assets** for the `load_aq_data` task in the `aq_etl` DAG. This task updates the air quality measurements table. Click the plus sign to add the task to the data product.
3. Click **Create Data Product** to save the data product.
## Step 7: Set a freshness SLA with an alert
The `aq_etl` DAG runs once per minute. Occasionally the air quality sensor is offline. This is expected, but you want to be sure that the latest air quality measurement is never older than 1 hour.
1. Click the **Overview** tab of the `Air Quality Measurements` data product and then click **+ SLA**.
2. Define a new SLA with the following values:
* **Name**: `Air Quality Freshness`
* **Description**: `Ensure that the air quality measurements are updated at least once every Hour.`
* **SLA Type**: **Freshness**
* **Freshness Policy**: `1 hour`
3. Click **Create SLA** to save the SLA.
4. Click the **Alerts** tab and **+ Alert** to add an alert to the SLA and add another Critical alert with the same notification channel as before.
5. Click **Create Alert** to save the alert.
## Step 8: (Optional) Test the SLA alert
To test the SLAs, you can manually trigger the `aq_etl` with the option of delaying the `get_aq_data` task for two hours. This will cause the `load_aq_data` task to not be updated for two hours, which will cause the freshness SLA to be violated. No new DAG runs are scheduled, because the DAG is set to only allow one concurrent run with the `max_active_runs` parameter.
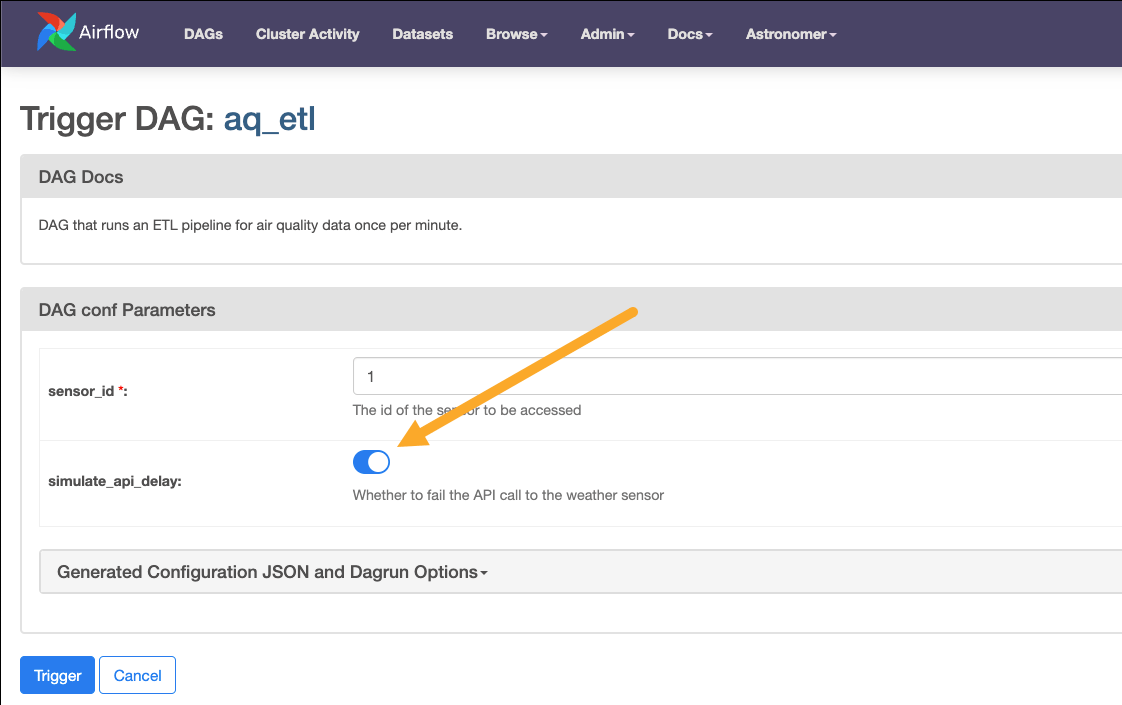
1. In the Airflow UI, click the play button next to the `aq_etl` DAG to open the form for manually triggering the DAG.
2. In the form, toggle the `simulate_api_delay` button.
## Step 6: Create a second data product
Awesome! You will now be immediately informed if the air quality report isn't delivered on time. But there is a second aspect to this pipeline that you want to monitor: that the air quality measurements happen frequently enough, that is, that the data is fresh enough. For this, create a second data product that focuses on the `load_aq_data` task in the `aq_etl` DAG.
1. In the Astro UI, click **+ Data Product**.
2. Give your data product a name (we used `Air Quality Measurements`), select a **User** as an owner, and then search **All Assets** for the `load_aq_data` task in the `aq_etl` DAG. This task updates the air quality measurements table. Click the plus sign to add the task to the data product.
3. Click **Create Data Product** to save the data product.
## Step 7: Set a freshness SLA with an alert
The `aq_etl` DAG runs once per minute. Occasionally the air quality sensor is offline. This is expected, but you want to be sure that the latest air quality measurement is never older than 1 hour.
1. Click the **Overview** tab of the `Air Quality Measurements` data product and then click **+ SLA**.
2. Define a new SLA with the following values:
* **Name**: `Air Quality Freshness`
* **Description**: `Ensure that the air quality measurements are updated at least once every Hour.`
* **SLA Type**: **Freshness**
* **Freshness Policy**: `1 hour`
3. Click **Create SLA** to save the SLA.
4. Click the **Alerts** tab and **+ Alert** to add an alert to the SLA and add another Critical alert with the same notification channel as before.
5. Click **Create Alert** to save the alert.
## Step 8: (Optional) Test the SLA alert
To test the SLAs, you can manually trigger the `aq_etl` with the option of delaying the `get_aq_data` task for two hours. This will cause the `load_aq_data` task to not be updated for two hours, which will cause the freshness SLA to be violated. No new DAG runs are scheduled, because the DAG is set to only allow one concurrent run with the `max_active_runs` parameter.
1. In the Airflow UI, click the play button next to the `aq_etl` DAG to open the form for manually triggering the DAG.
2. In the form, toggle the `simulate_api_delay` button.
 3. Click **Trigger** to trigger a manual DAG run.
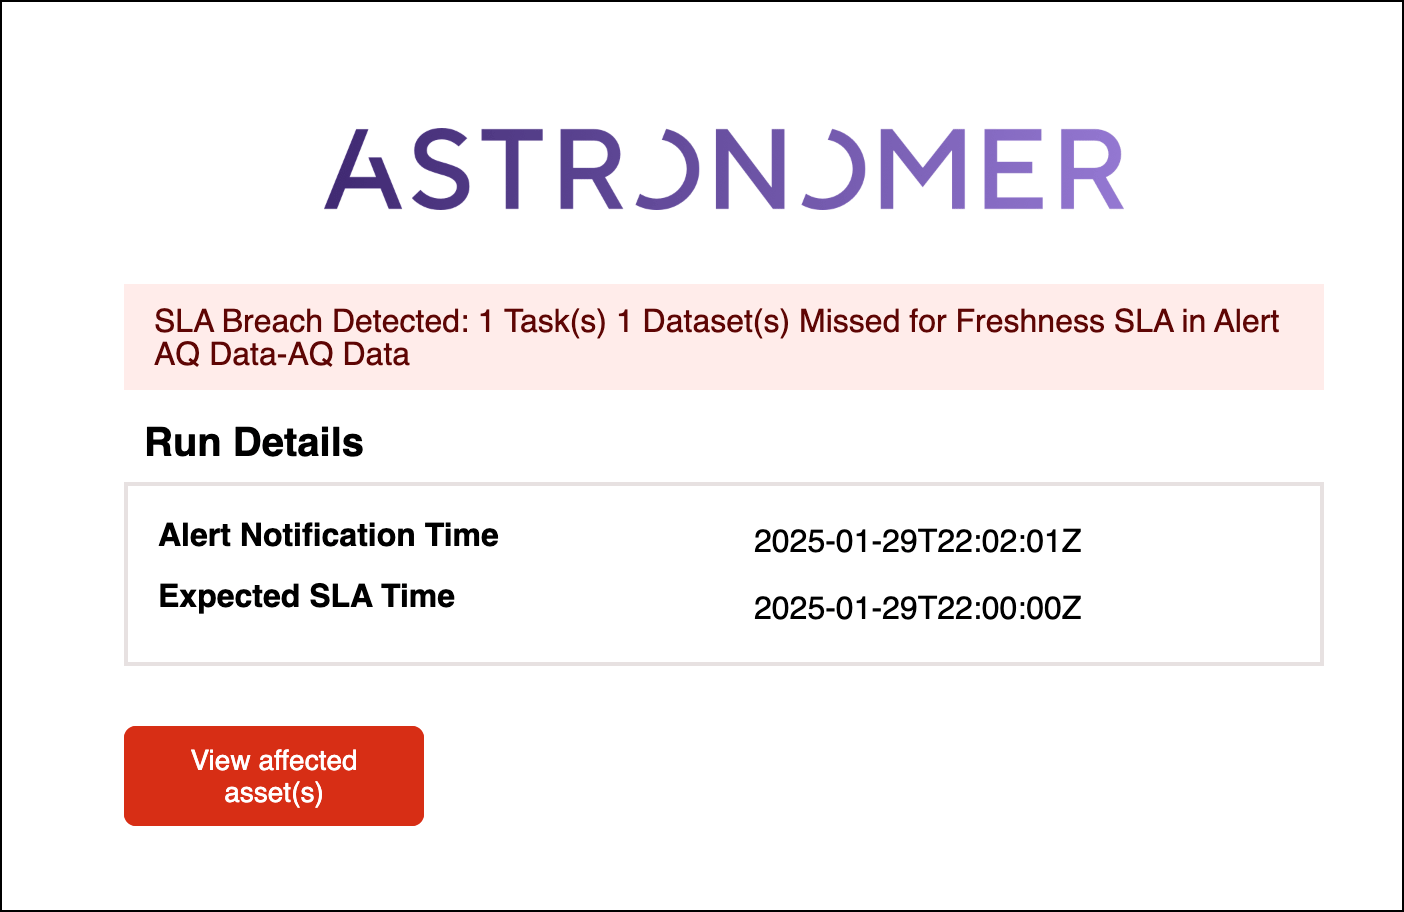
After 1 hour, you should receive an email notification that the freshness SLA has been violated.
3. Click **Trigger** to trigger a manual DAG run.
After 1 hour, you should receive an email notification that the freshness SLA has been violated.
 Congrats! You have successfully set up Astro Observe to monitor several aspects of an air quality pipeline! Of course there is much more to Astro Observe, check out the [Astro Observe documentation](/docs/astro/astro-observe) for more information.