> ## Documentation Index
> Fetch the complete documentation index at: https://astronomer.io/docs/llms.txt
> Use this file to discover all available pages before exploring further.
# Apache Airflow® GenAI Quickstart
Welcome to Astronomer's [Apache Airflow®](https://airflow.apache.org/) GenAI Quickstart! 🚀
You will set up and run a fully functional Airflow project for a TaaS (Trees-as-a-Service) business that provides personalized, hyperlocal recommendations for which trees to plant in an area. This quickstart focuses on a GenAI DAG that uses the [Airflow AI SDK](https://github.com/astronomer/airflow-ai-sdk) to create a personalized description of your future garden 🌲🌳🌴!
 **Other ways to learn**
You can watch the recording of our recent [Orchestrating LLM workflows with the Airflow AI SDK](https://www.astronomer.io/events/webinars/from-zero-to-production-orchestrating-llm-workflows-with-the-airflow-ai-sdk-video/) webinar to learn more about all decorators in the [Airflow AI SDK](https://github.com/astronomer/airflow-ai-sdk).
For a hands-on version of this project, check out the [Airflow quickstart workshop](https://github.com/astronomer/devrel-public-workshops/tree/airflow-quickstart-workshop) containing exercises to practice how to use key Airflow features.
## Time to complete
This quickstart takes approximately 15 minutes to complete.
## Assumed knowledge
To get the most out of this quickstart, make sure you have an understanding of:
* Basic Airflow concepts. See [Introduction to Apache Airflow](/docs/learn/intro-to-airflow).
* Basic Python. See the [Python Documentation](https://docs.python.org/3/tutorial/index.html).
## Prerequisites
* [Homebrew](https://brew.sh/) installed on your local machine.
* An integrated development environment (IDE) for Python development. This quickstart uses [Cursor](https://cursor.com/) which is very similar to [Visual Studio Code](https://code.visualstudio.com/).
* An [OpenAI API Key](https://platform.openai.com/docs/api-reference/authentication).
* (Optional) A local installation of [Python 3](https://www.python.org/downloads/) to improve your Python developer experience.
## Step 1: Install the Astro CLI
The free Astro CLI is the easiest way to run Airflow locally in a containerized environment. Follow the instructions in this step to install the Astro CLI on a Mac using [Homebrew](https://brew.sh/), for other installation options and operating systems see [Install the Astro CLI](/docs/cli/v1.43/install-cli).
1. Run the following command in your terminal to install the Astro CLI.
```sh wrap theme={null}
brew install astro
```
2. Verify the installation and check your Astro CLI version. You need to be on at least version **1.34.0** to run the quickstart.
```sh wrap theme={null}
astro version
```
3. (Optional). Upgrade the Astro CLI to the latest version.
```sh wrap theme={null}
brew upgrade astro
```
If you can't install the Astro CLI locally, skip to [Run the quickstart without the Astro CLI](#run-the-quickstart-without-the-astro-cli) to deploy and run the project with a [free trial of Astro](https://www.astronomer.io/lp/signup/?utm_source=website\&utm_medium=learn-guides\&utm_campaign=quickstart-etl-7-25).
## Step 2: Clone and open the project
1. [Clone](https://docs.github.com/en/repositories/creating-and-managing-repositories/cloning-a-repository) the quickstart code from its [branch on GitHub](https://github.com/astronomer/devrel-public-workshops). This command will create a folder called `devrel-public-workshops` on your computer.
```sh wrap theme={null}
git clone -b airflow-quickstart-complete --single-branch https://github.com/astronomer/devrel-public-workshops.git
```
2. Open the project folder in your IDE of choice.
If you quickly need a new Airflow project in the future you can always create one in any empty directory by running `astro dev init`.
## Step 3: Add your OpenAI API key
In order to be able to send requests to a Large Language Model (LLM) via the Airflow AI SDK you need to have an API Key and make it available to the Airflow AI SDK as an environment variable. This quickstart uses [OpenAI](https://platform.openai.com/docs/overview); you can learn about other model providers that are compatible with the Airflow AI SDK in the [Airflow AI SDK's `pyproject.toml` file](https://github.com/astronomer/airflow-ai-sdk/blob/main/pyproject.toml#L30).
1. In the root of your repository, create a new file called `.env` (1). This file is ignored by git and a good place to define your (secret) environment variables
**Other ways to learn**
You can watch the recording of our recent [Orchestrating LLM workflows with the Airflow AI SDK](https://www.astronomer.io/events/webinars/from-zero-to-production-orchestrating-llm-workflows-with-the-airflow-ai-sdk-video/) webinar to learn more about all decorators in the [Airflow AI SDK](https://github.com/astronomer/airflow-ai-sdk).
For a hands-on version of this project, check out the [Airflow quickstart workshop](https://github.com/astronomer/devrel-public-workshops/tree/airflow-quickstart-workshop) containing exercises to practice how to use key Airflow features.
## Time to complete
This quickstart takes approximately 15 minutes to complete.
## Assumed knowledge
To get the most out of this quickstart, make sure you have an understanding of:
* Basic Airflow concepts. See [Introduction to Apache Airflow](/docs/learn/intro-to-airflow).
* Basic Python. See the [Python Documentation](https://docs.python.org/3/tutorial/index.html).
## Prerequisites
* [Homebrew](https://brew.sh/) installed on your local machine.
* An integrated development environment (IDE) for Python development. This quickstart uses [Cursor](https://cursor.com/) which is very similar to [Visual Studio Code](https://code.visualstudio.com/).
* An [OpenAI API Key](https://platform.openai.com/docs/api-reference/authentication).
* (Optional) A local installation of [Python 3](https://www.python.org/downloads/) to improve your Python developer experience.
## Step 1: Install the Astro CLI
The free Astro CLI is the easiest way to run Airflow locally in a containerized environment. Follow the instructions in this step to install the Astro CLI on a Mac using [Homebrew](https://brew.sh/), for other installation options and operating systems see [Install the Astro CLI](/docs/cli/v1.43/install-cli).
1. Run the following command in your terminal to install the Astro CLI.
```sh wrap theme={null}
brew install astro
```
2. Verify the installation and check your Astro CLI version. You need to be on at least version **1.34.0** to run the quickstart.
```sh wrap theme={null}
astro version
```
3. (Optional). Upgrade the Astro CLI to the latest version.
```sh wrap theme={null}
brew upgrade astro
```
If you can't install the Astro CLI locally, skip to [Run the quickstart without the Astro CLI](#run-the-quickstart-without-the-astro-cli) to deploy and run the project with a [free trial of Astro](https://www.astronomer.io/lp/signup/?utm_source=website\&utm_medium=learn-guides\&utm_campaign=quickstart-etl-7-25).
## Step 2: Clone and open the project
1. [Clone](https://docs.github.com/en/repositories/creating-and-managing-repositories/cloning-a-repository) the quickstart code from its [branch on GitHub](https://github.com/astronomer/devrel-public-workshops). This command will create a folder called `devrel-public-workshops` on your computer.
```sh wrap theme={null}
git clone -b airflow-quickstart-complete --single-branch https://github.com/astronomer/devrel-public-workshops.git
```
2. Open the project folder in your IDE of choice.
If you quickly need a new Airflow project in the future you can always create one in any empty directory by running `astro dev init`.
## Step 3: Add your OpenAI API key
In order to be able to send requests to a Large Language Model (LLM) via the Airflow AI SDK you need to have an API Key and make it available to the Airflow AI SDK as an environment variable. This quickstart uses [OpenAI](https://platform.openai.com/docs/overview); you can learn about other model providers that are compatible with the Airflow AI SDK in the [Airflow AI SDK's `pyproject.toml` file](https://github.com/astronomer/airflow-ai-sdk/blob/main/pyproject.toml#L30).
1. In the root of your repository, create a new file called `.env` (1). This file is ignored by git and a good place to define your (secret) environment variables
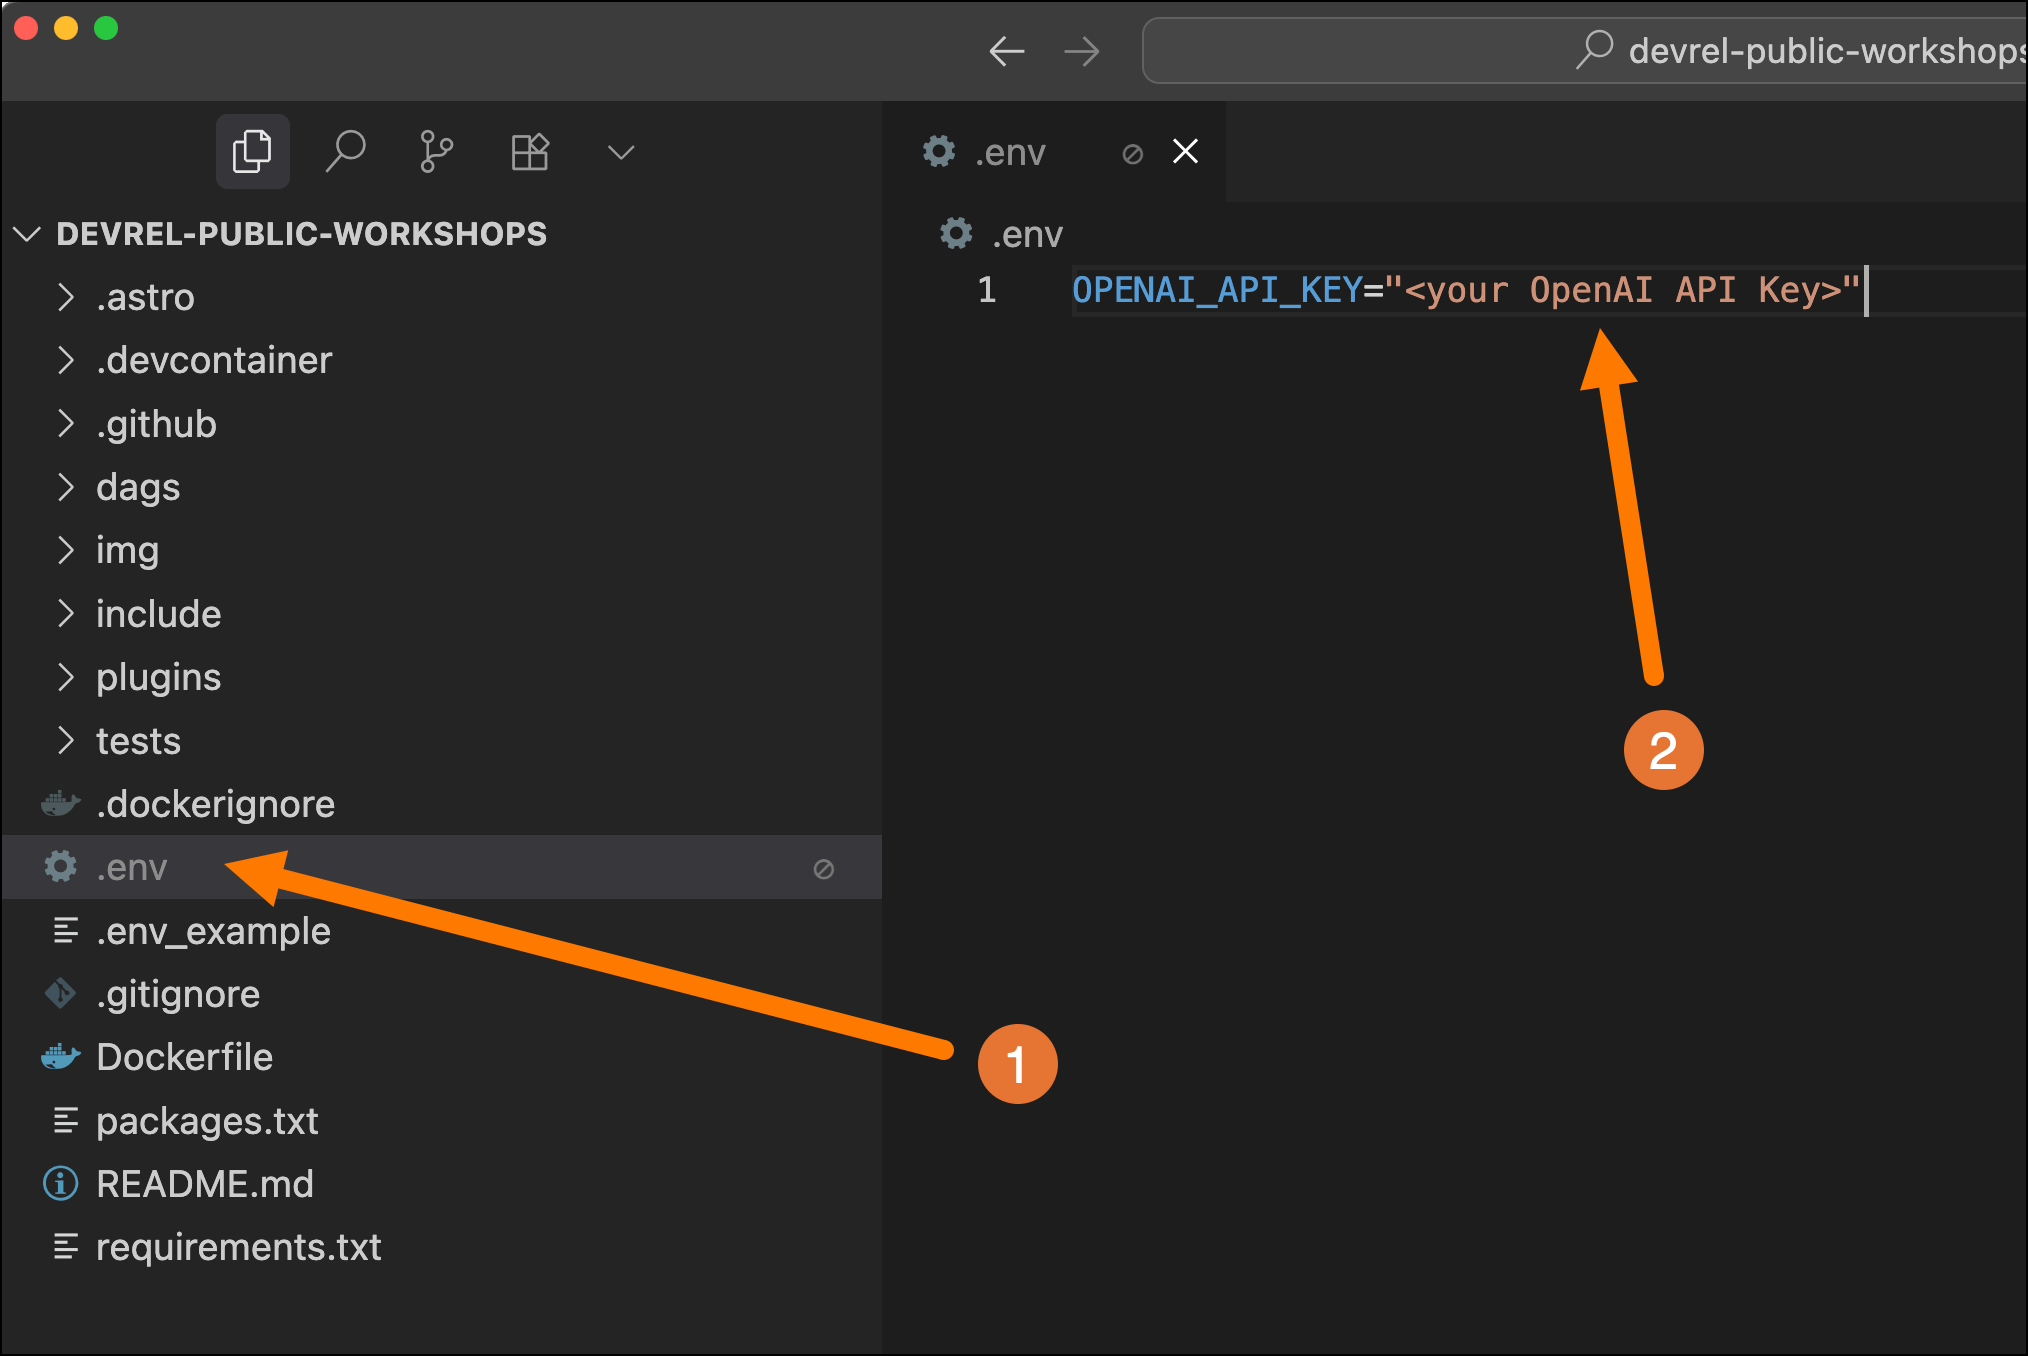 2. In the `.env` file, define a variable called `OPENAI_API_KEY` and set it to your [OpenAI API Key](https://platform.openai.com/docs/api-reference/authentication) (2).
3. To use the AI SDK you also need to install the [Airflow AI SDK Python package](https://github.com/astronomer/airflow-ai-sdk) with the extra relevant to your model provider by adding it to the `requirements.txt` file. This has already been done for you in the quickstart repository.
Whenever you make changes to your `.env` or `requirements.txt` file you need to restart your Airflow environment using `astro dev restart` for the changes to take effect.
## Step 4: Start the project
The code you cloned from GitHub already contains a fully functional Airflow project. Let's start it!
1. Run the following command in the root of the cloned folder to start the quickstart:
```sh wrap theme={null}
astro dev start
```
If port 8080 or 5432 are in use on your machine, Airflow won't be able to start. To run Airflow on alternative ports, run:
```sh wrap theme={null}
astro config set webserver.port
astro config set postgres.port
```
2. As soon as the project has started, the Airflow UI opens in your default browser. When running the start command for the first time this might take a couple of minutes. Note that as long as the Airflow project is running, you can always access the UI in another browser or additional tab by going to `localhost:8080`.
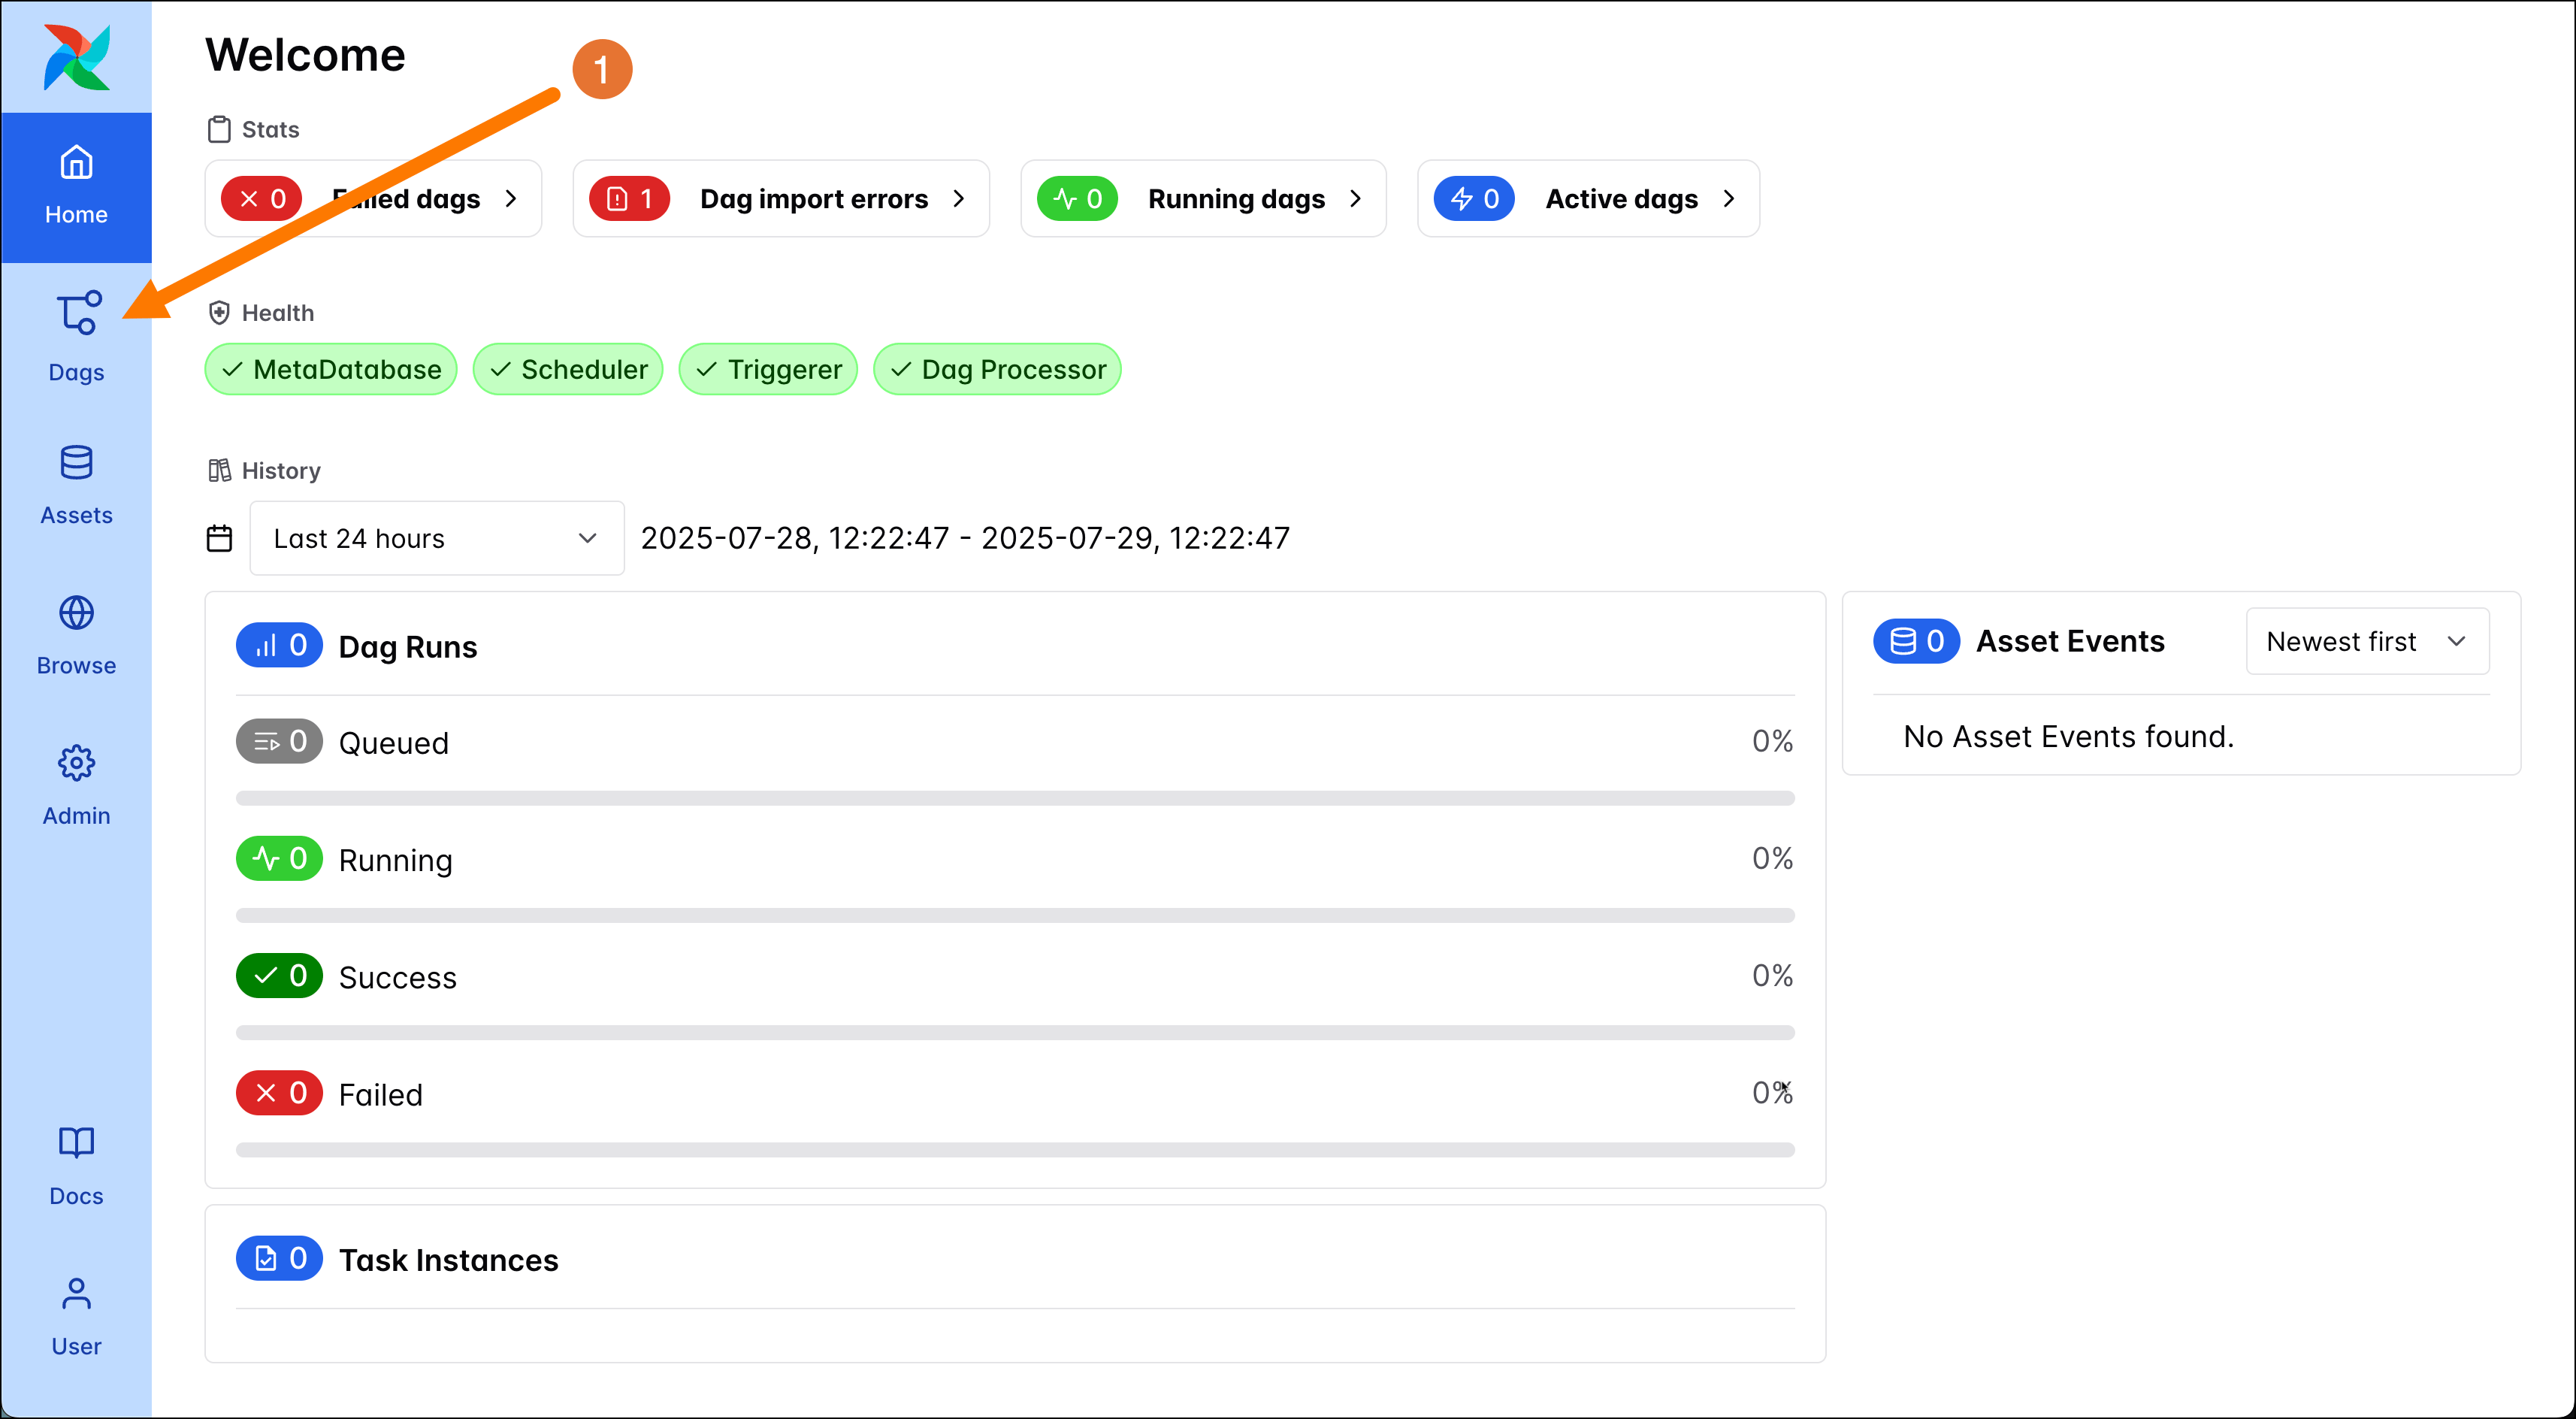
3. Click the **Dags** button (1) in the Airflow UI to get to the DAG overview page to see the DAGs contained in this project.
2. In the `.env` file, define a variable called `OPENAI_API_KEY` and set it to your [OpenAI API Key](https://platform.openai.com/docs/api-reference/authentication) (2).
3. To use the AI SDK you also need to install the [Airflow AI SDK Python package](https://github.com/astronomer/airflow-ai-sdk) with the extra relevant to your model provider by adding it to the `requirements.txt` file. This has already been done for you in the quickstart repository.
Whenever you make changes to your `.env` or `requirements.txt` file you need to restart your Airflow environment using `astro dev restart` for the changes to take effect.
## Step 4: Start the project
The code you cloned from GitHub already contains a fully functional Airflow project. Let's start it!
1. Run the following command in the root of the cloned folder to start the quickstart:
```sh wrap theme={null}
astro dev start
```
If port 8080 or 5432 are in use on your machine, Airflow won't be able to start. To run Airflow on alternative ports, run:
```sh wrap theme={null}
astro config set webserver.port
astro config set postgres.port
```
2. As soon as the project has started, the Airflow UI opens in your default browser. When running the start command for the first time this might take a couple of minutes. Note that as long as the Airflow project is running, you can always access the UI in another browser or additional tab by going to `localhost:8080`.
3. Click the **Dags** button (1) in the Airflow UI to get to the DAG overview page to see the DAGs contained in this project.
 ## Step 5: Run the GenAI DAG
You should now see 4 DAGs. They will be paused by default, with no runs yet. For this quickstart, only the `genai_trees` DAG will be relevant. The other DAGs belong to the [Airflow ETL Quickstart](/docs/learn/airflow-quickstart-etl).
1. Open the Trigger DAG form of the `genai_trees` DAG by clicking on its play button (1).
## Step 5: Run the GenAI DAG
You should now see 4 DAGs. They will be paused by default, with no runs yet. For this quickstart, only the `genai_trees` DAG will be relevant. The other DAGs belong to the [Airflow ETL Quickstart](/docs/learn/airflow-quickstart-etl).
1. Open the Trigger DAG form of the `genai_trees` DAG by clicking on its play button (1).
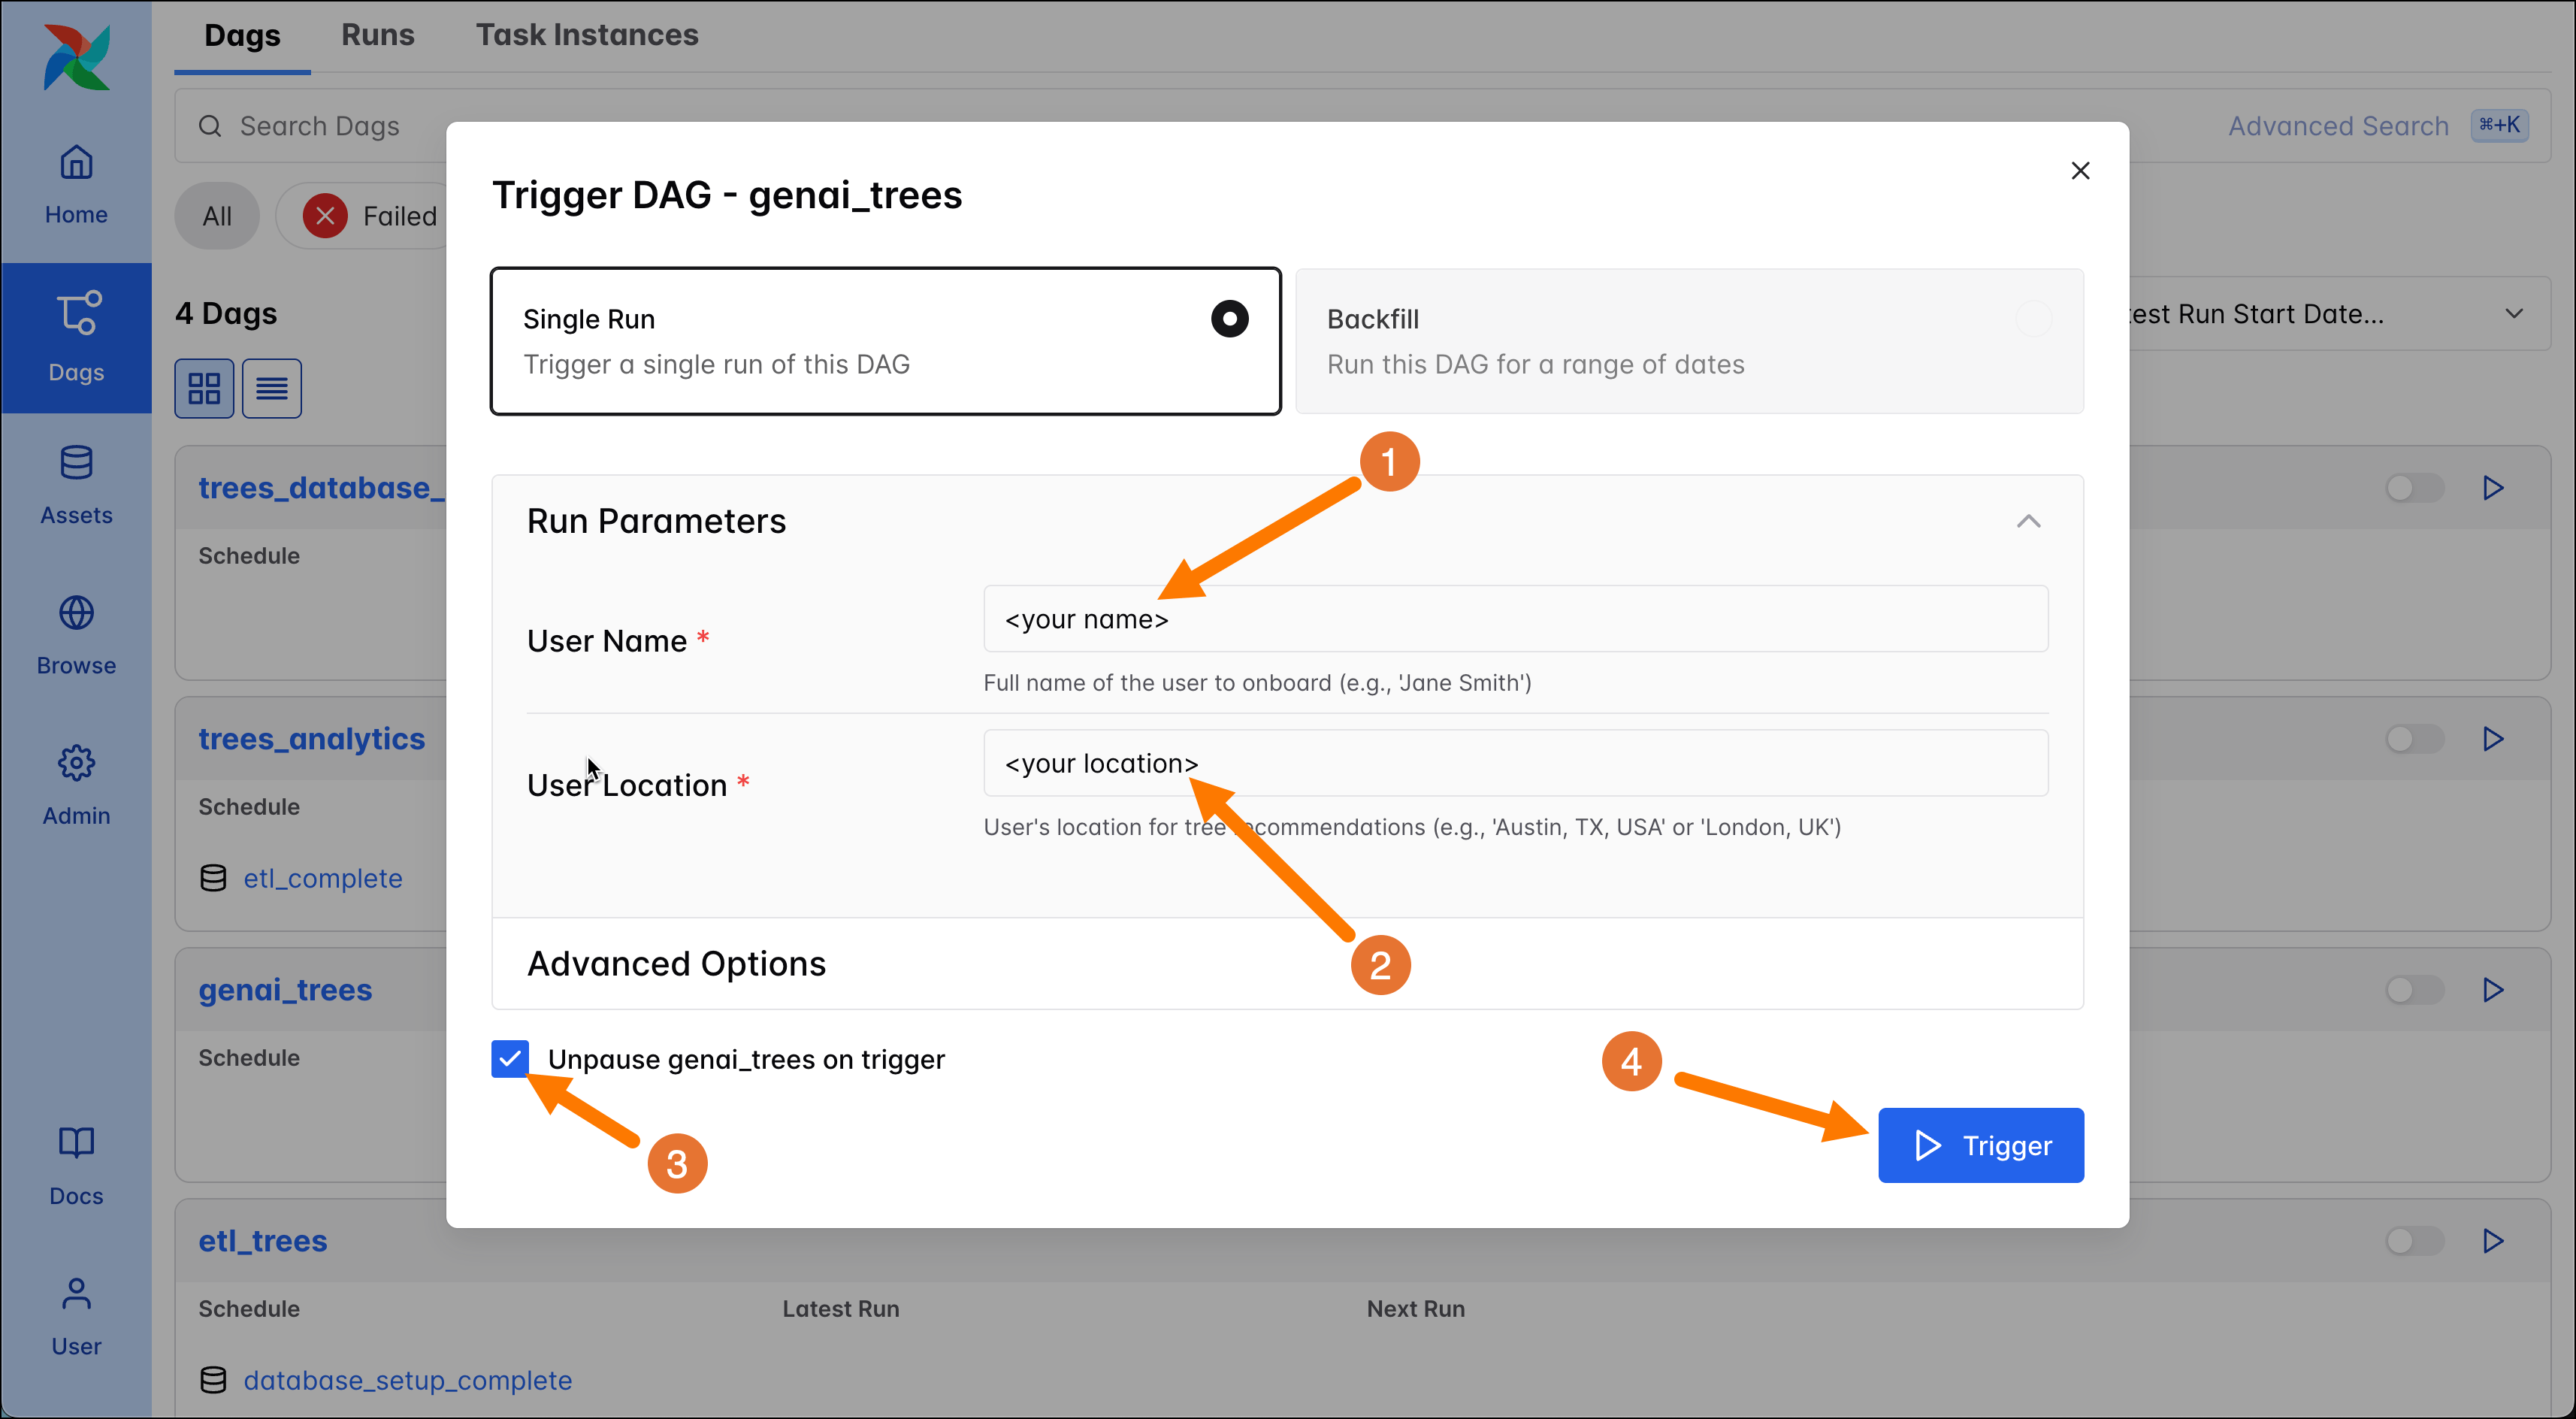
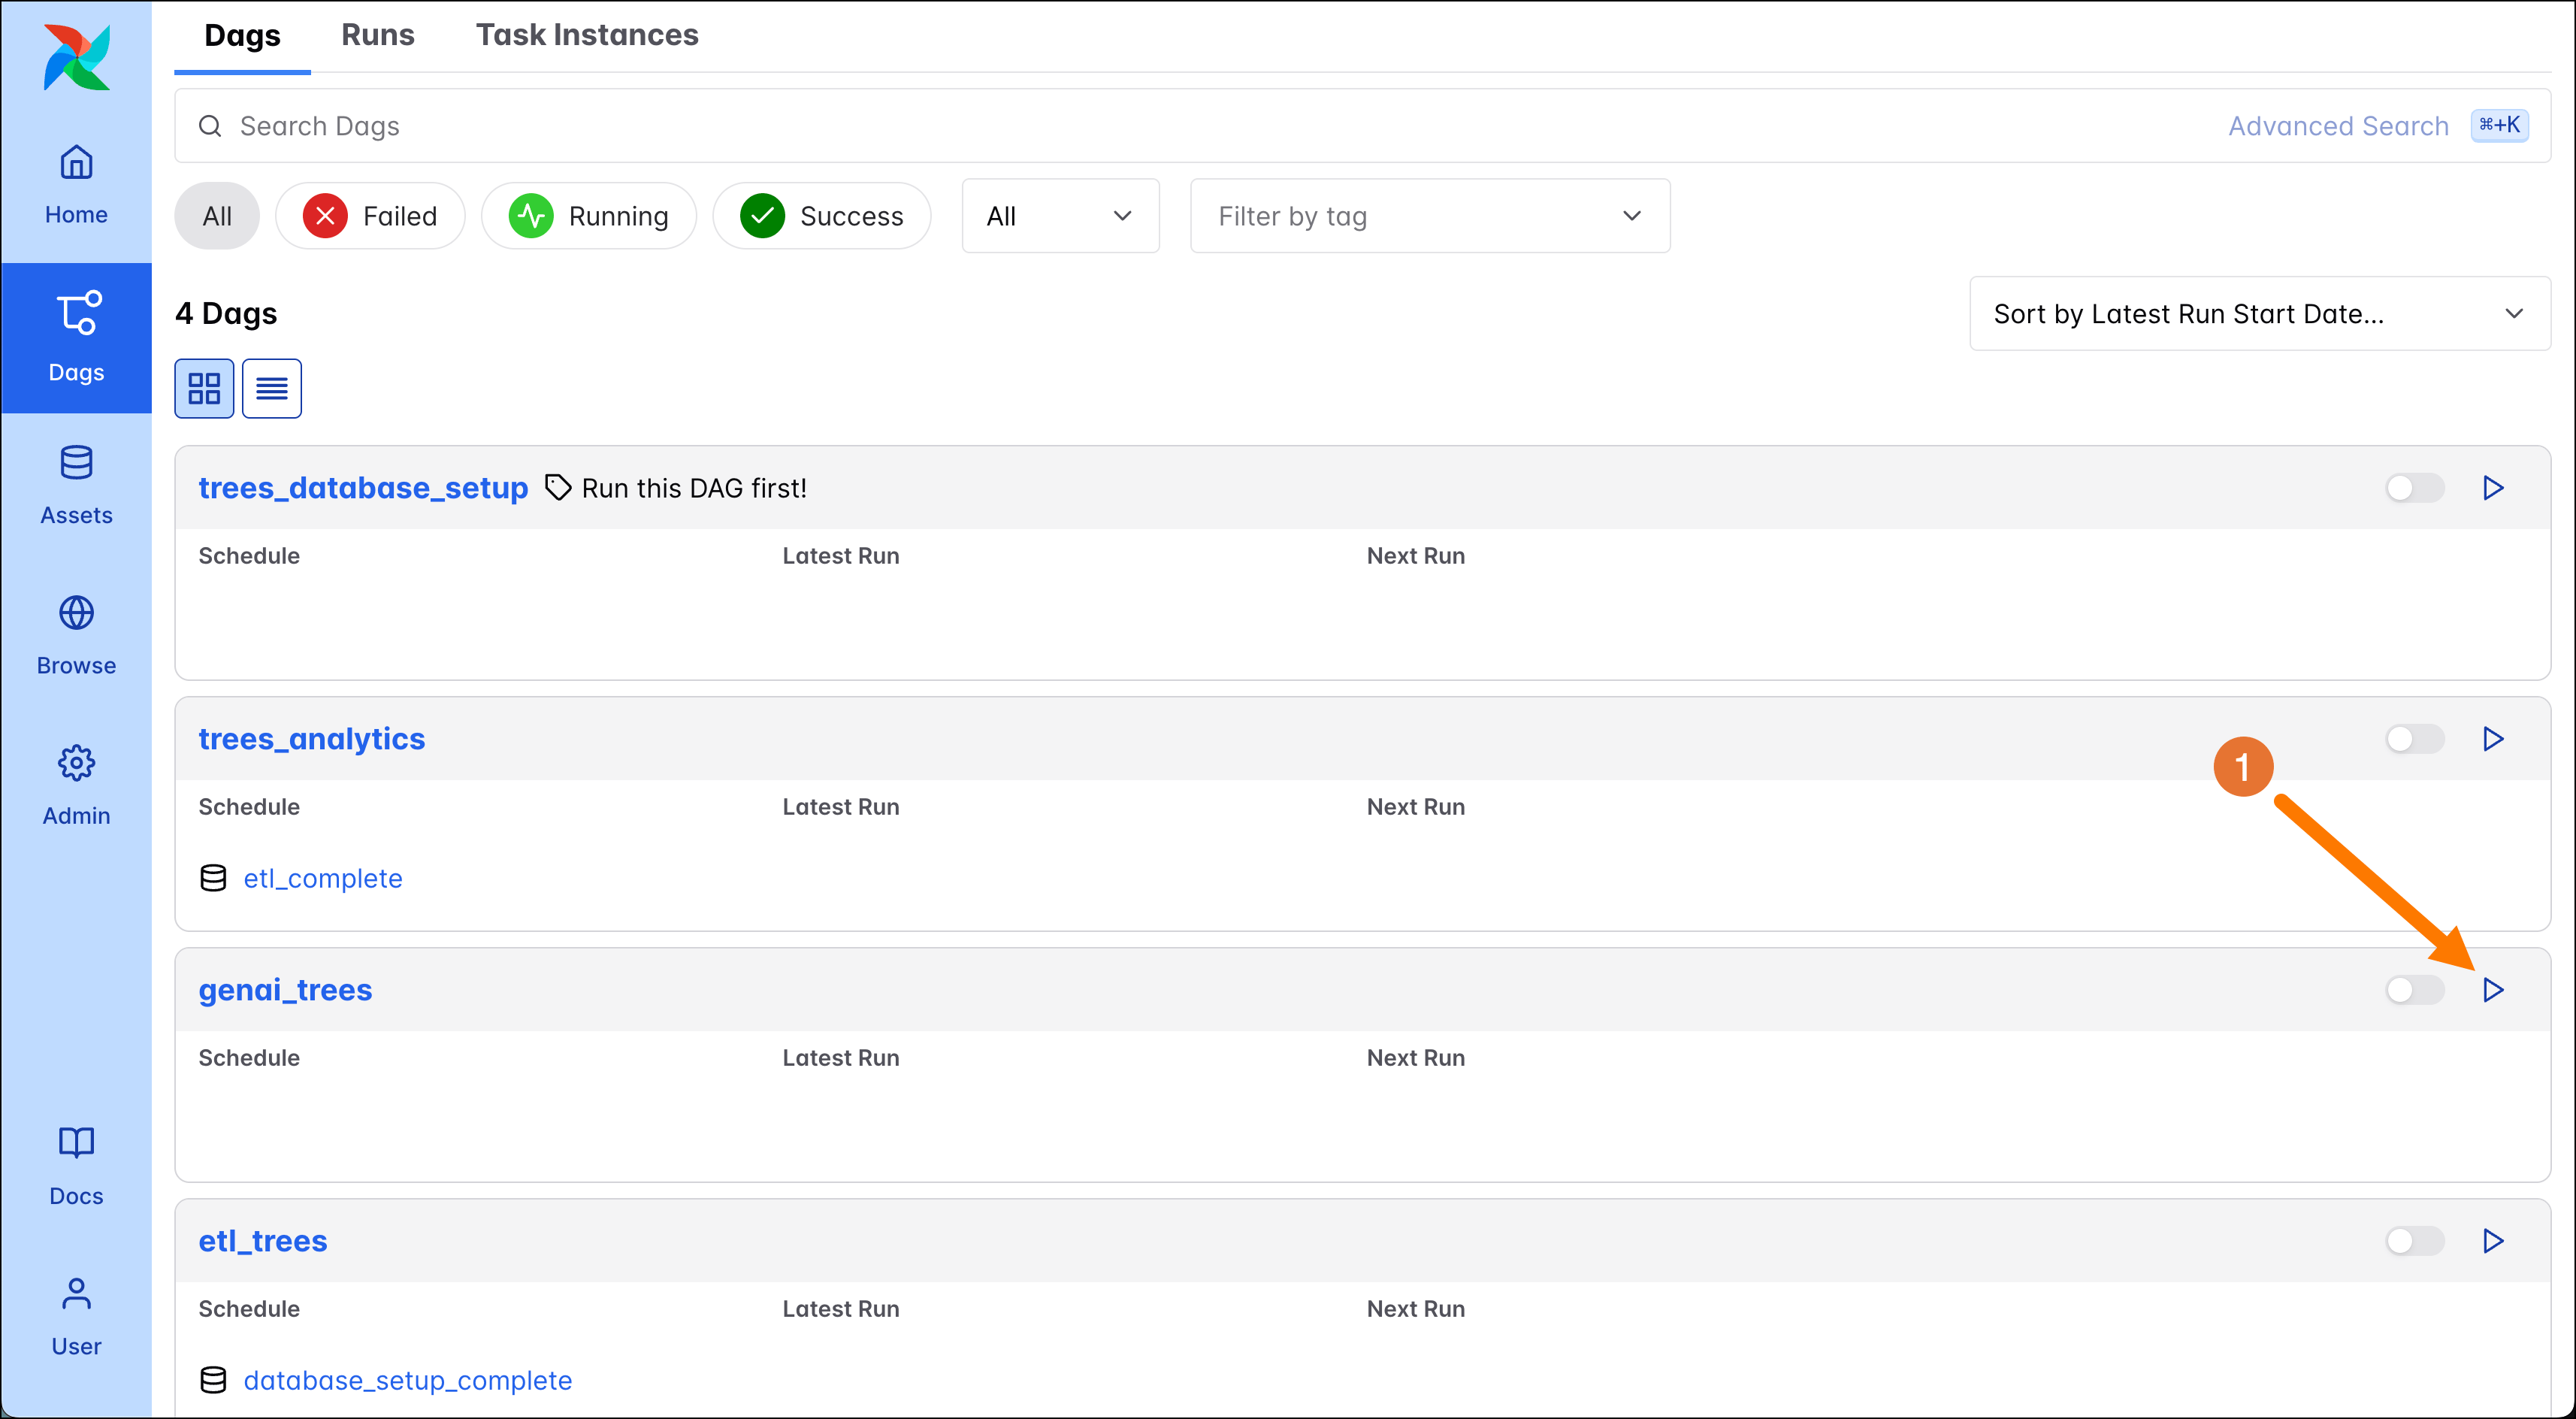 2. The `genai_trees` DAG runs with [params](/docs/learn/airflow-params). If the DAG were to run based on a schedule the given defaults are used, but on a manual run, like right now, you can provide your own values. In the Trigger DAG form, enter your name (1) and your location (2), then trigger (3) a DAG run. Make sure the **Unpause `genai_trees` on trigger** checkbox (4) is selected.
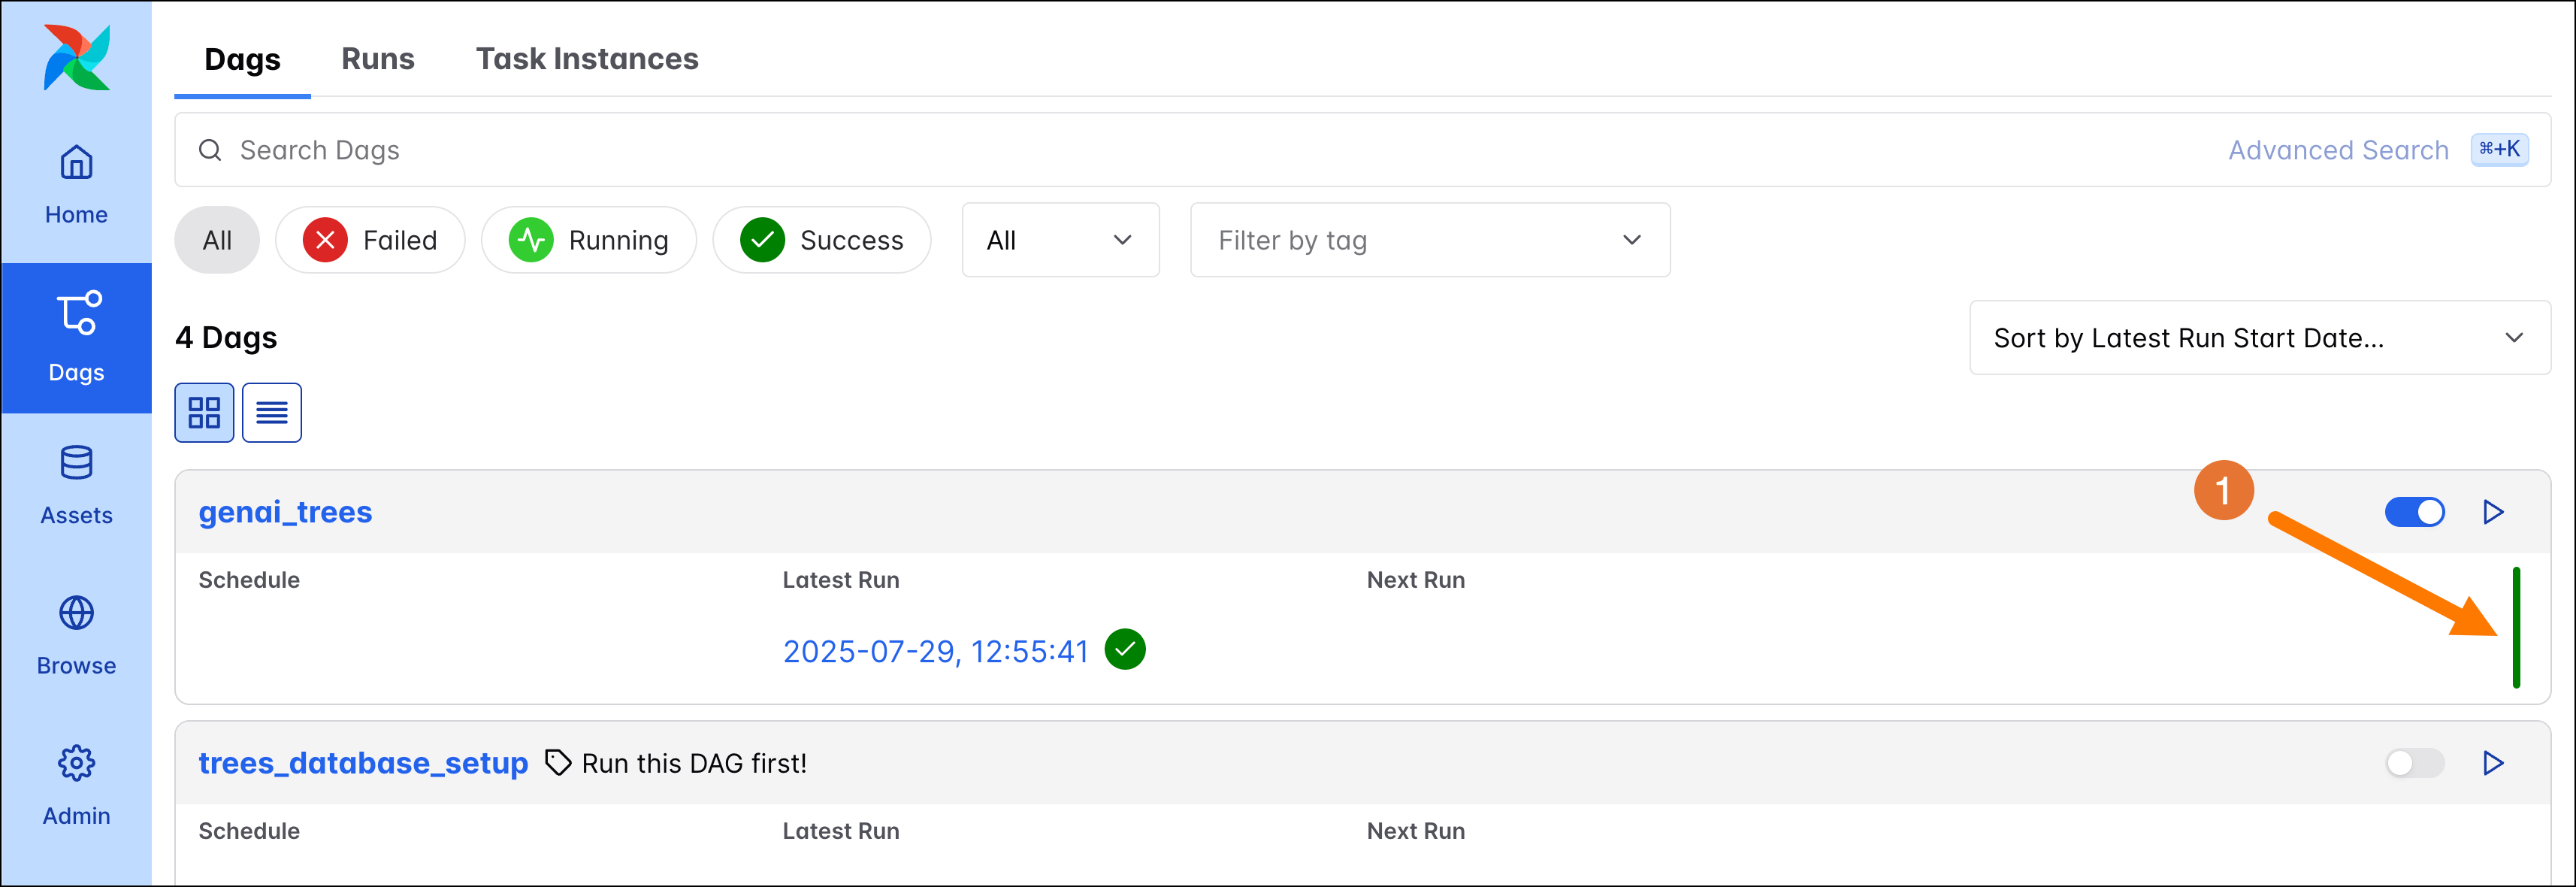
 3. After 20-30 seconds the `genai_trees` DAG has completed successfully (1).
 ## Step 6: Explore the GenAI DAG
Let's explore the ETL DAG in more detail.
1. Click the DAG name to get to the DAG overview. From here you can access a lot of detailed information about this specific DAG.
## Step 6: Explore the GenAI DAG
Let's explore the ETL DAG in more detail.
1. Click the DAG name to get to the DAG overview. From here you can access a lot of detailed information about this specific DAG.
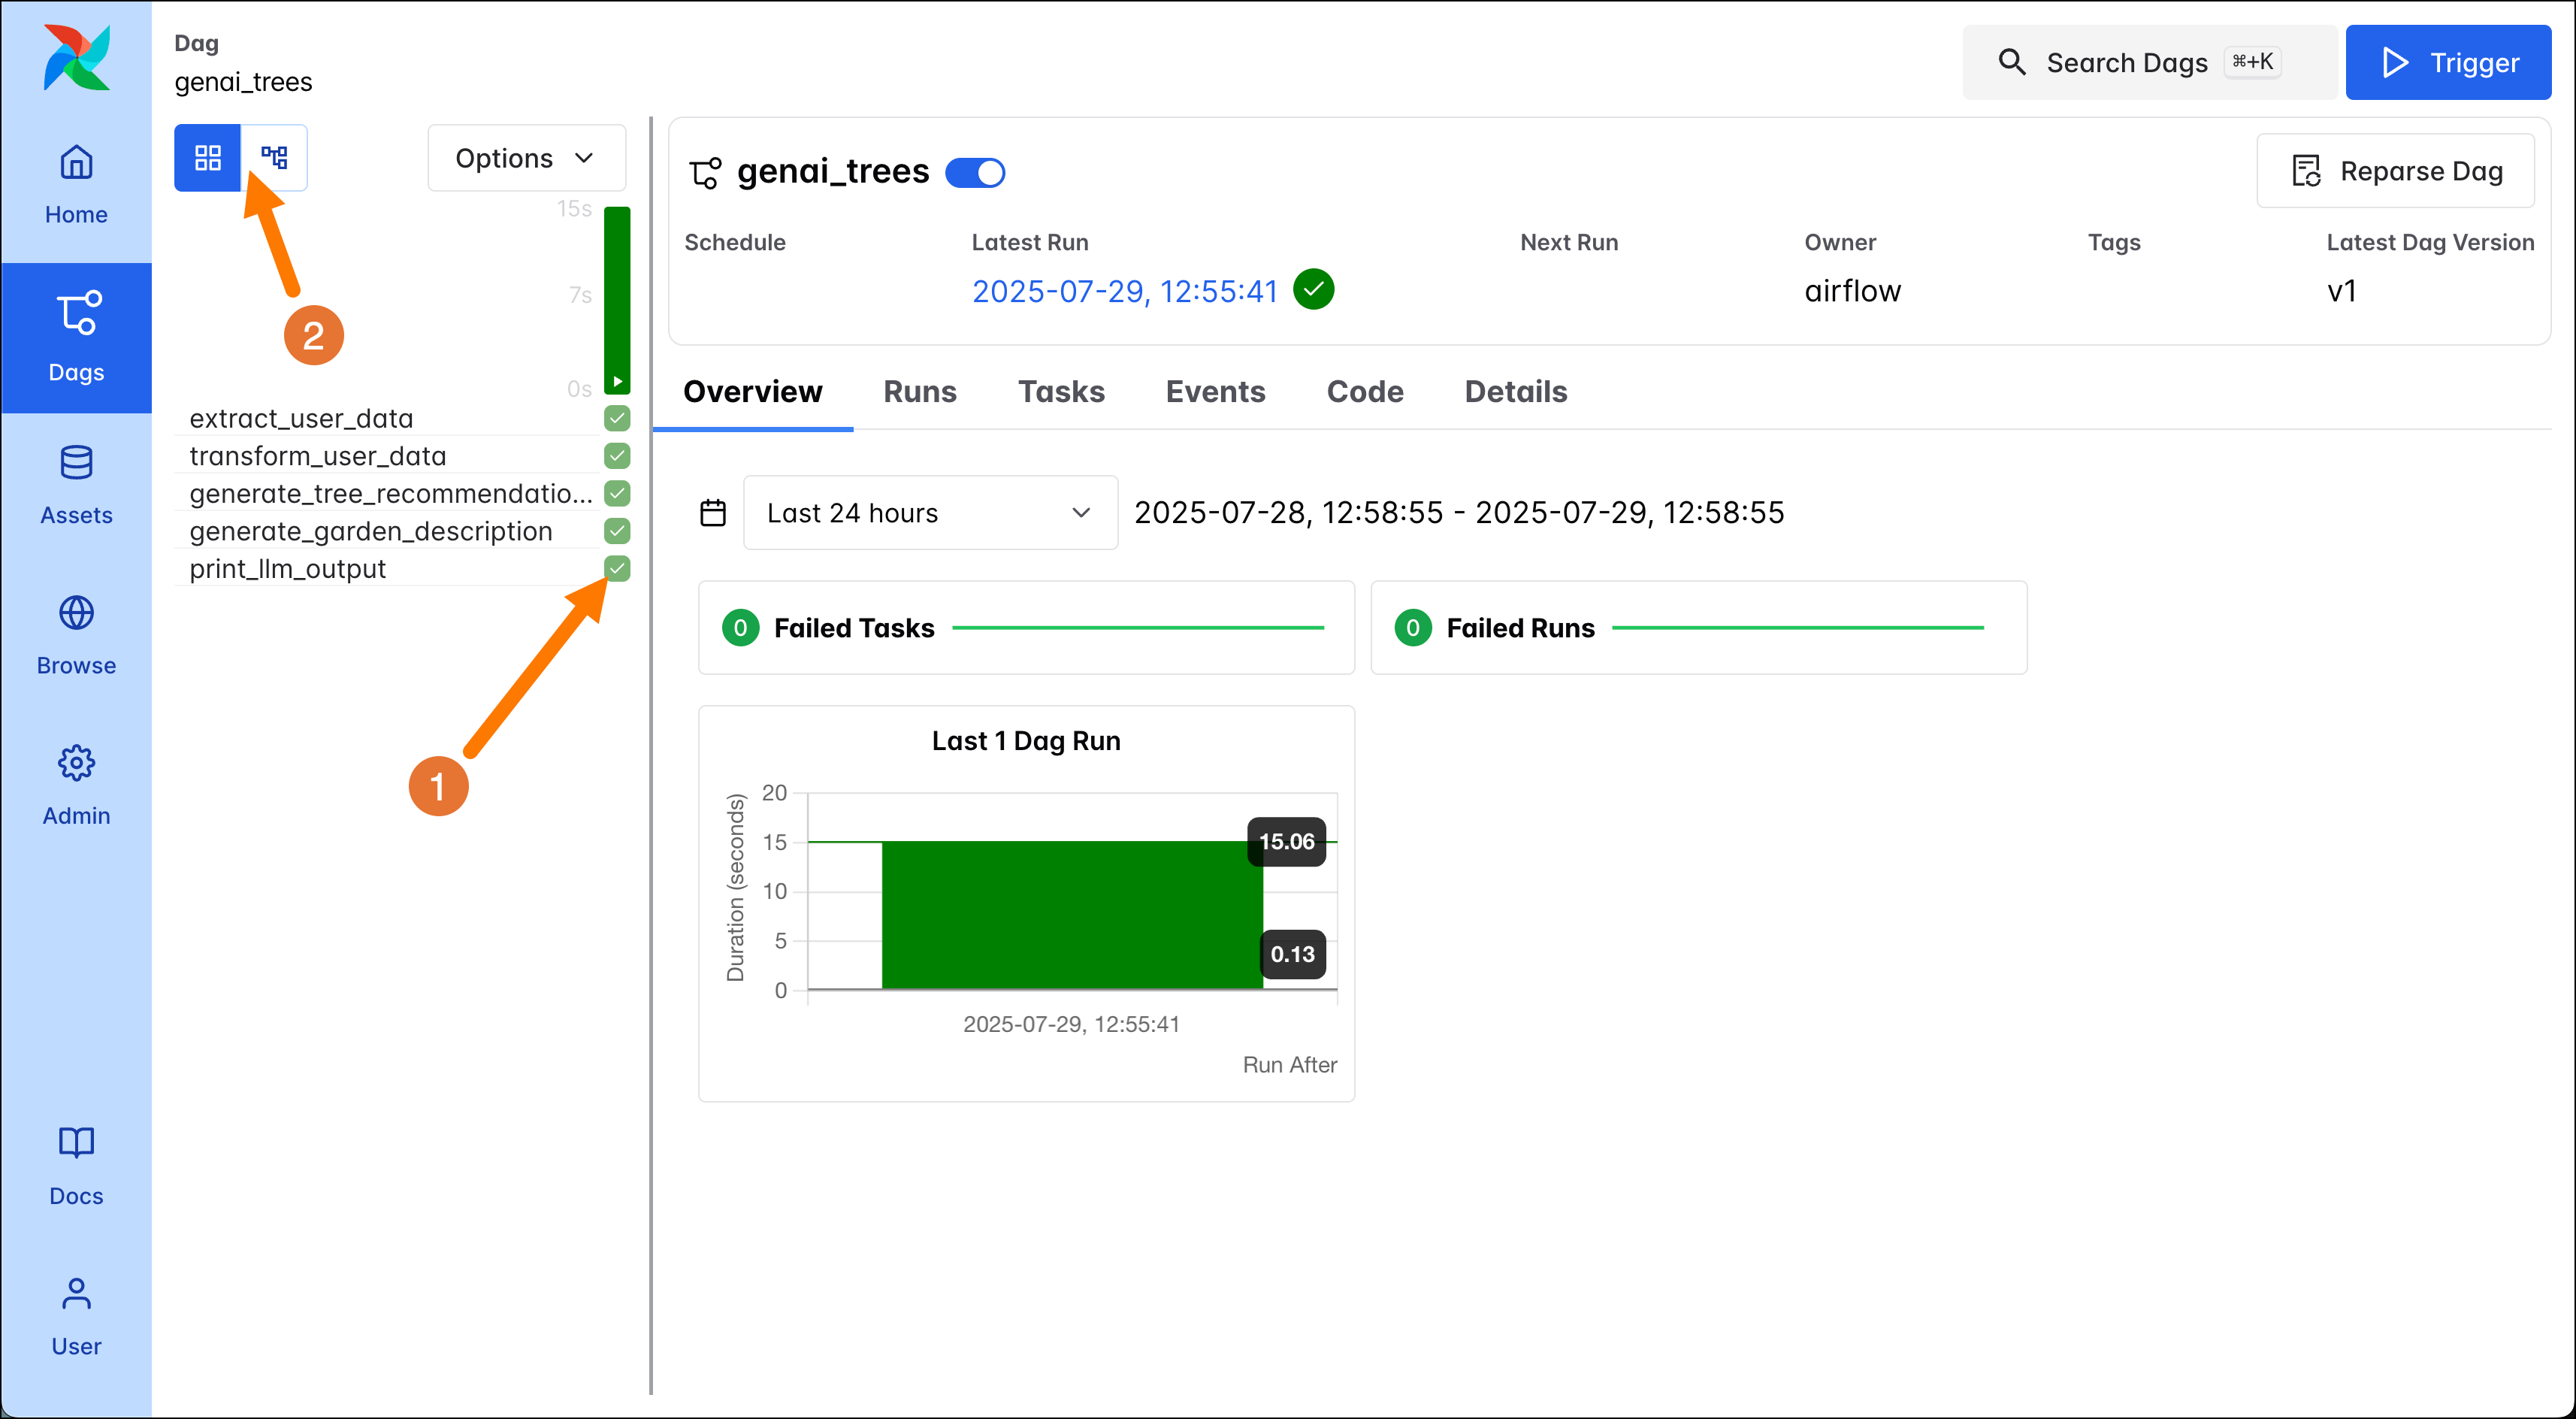 2. To navigate to the logs of individual task instances, click the squares in the grid view. Open the logs for the `print_llm_output` task (1) to see your garden description!
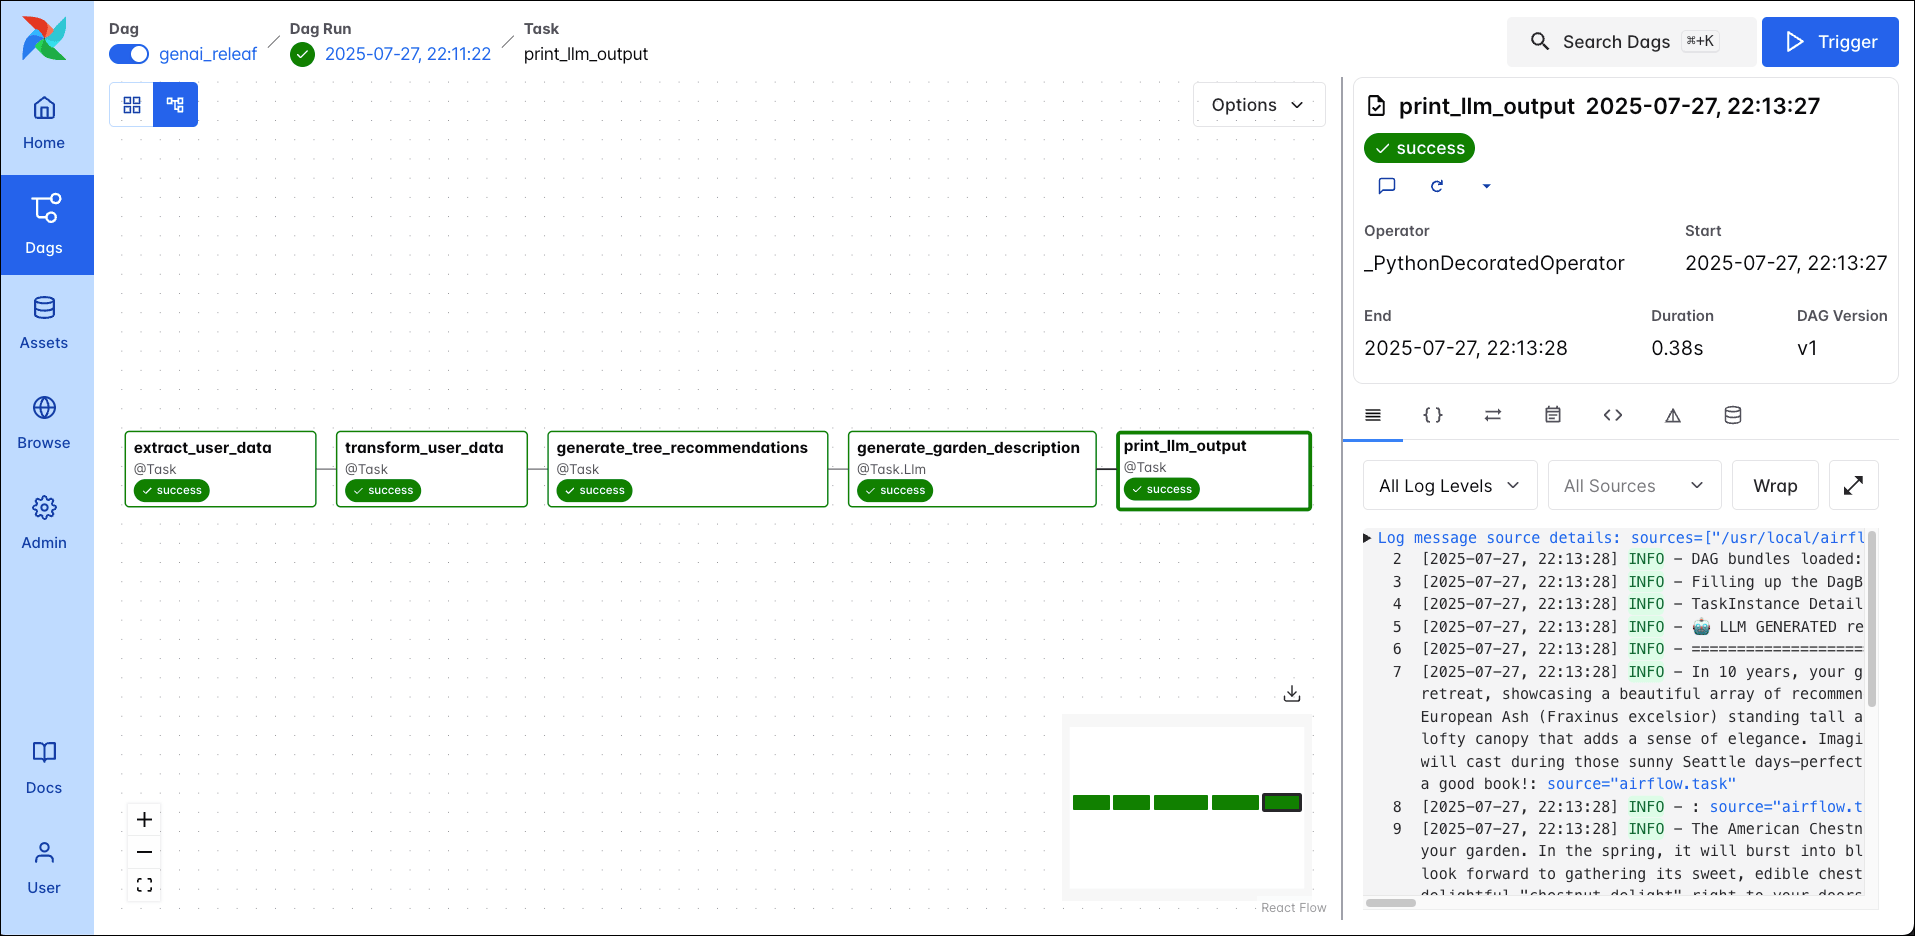
3. Next, to view the dependencies between your DAGs you can toggle between the **Grid** and **Graph** view in the top left corner of the DAG overview (2). Each node in the graph corresponds to one task. The edges between the nodes denote how the tasks depend on each other, and by default the DAG graph is read from left to right. The code of the DAG can be viewed by clicking on the Code tab (1).
2. To navigate to the logs of individual task instances, click the squares in the grid view. Open the logs for the `print_llm_output` task (1) to see your garden description!
3. Next, to view the dependencies between your DAGs you can toggle between the **Grid** and **Graph** view in the top left corner of the DAG overview (2). Each node in the graph corresponds to one task. The edges between the nodes denote how the tasks depend on each other, and by default the DAG graph is read from left to right. The code of the DAG can be viewed by clicking on the Code tab (1).
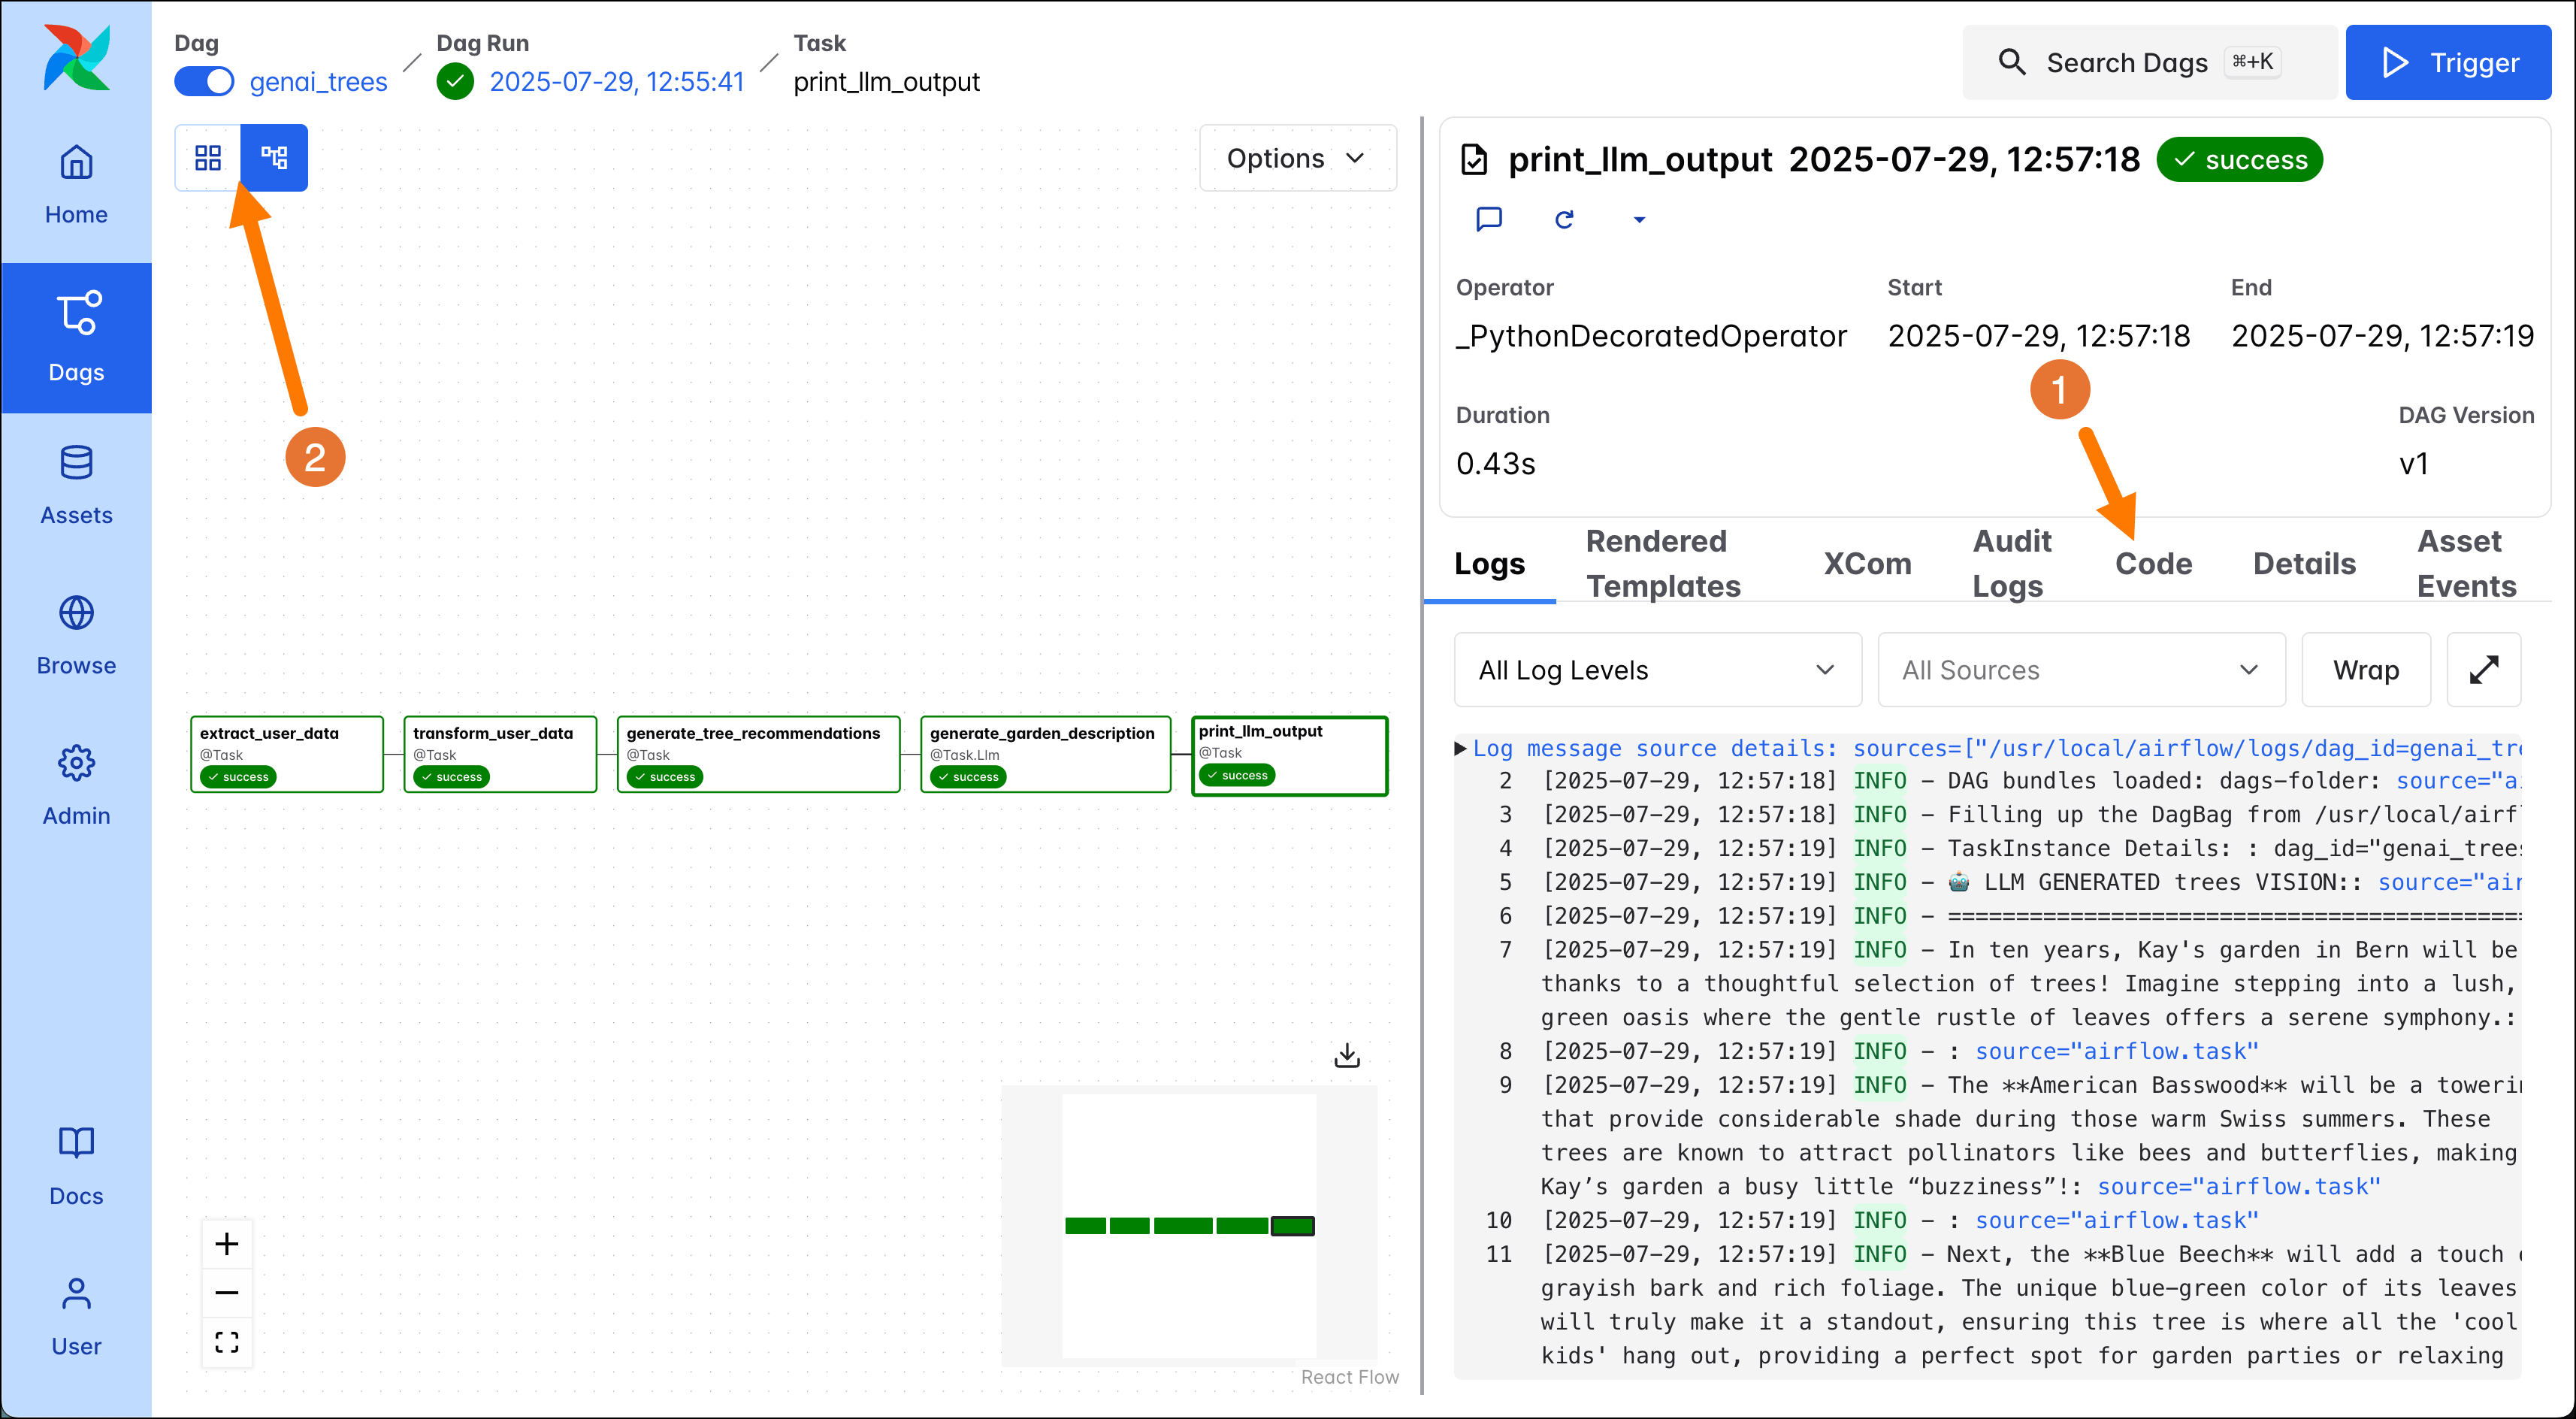 In the screenshot above you can see the graph of the ETL DAG, it consists of 6 tasks:
* `extract_user_data`: This task extracts user data. In this quickstart example the DAG uses the data entered in the DAG Trigger form, the name and location of one user. In a real-world use case, it would likely extract several users' records at the same time through calling an API or reading from a database.
* `transform_user_data`: This task uses the data the first task extracted and creates a comprehensive user record from it using modularized functions stored in the `include` folder.
* `generate_tree_recommendations`: The third task generates the tree recommendations based on the transformed data about the user.
* `generate_garden_description`: This task uses the `@task.llm` decorator of the Airflow AI SDK to make a call to the OpenAI API to generate a description of your future garden, if you were to follow the tree recommendations.
* `print_llm_output`: The final task prints the output of the LLM to the task logs.
4. Lastly, let's check out the code that defines this DAG by clicking on the Code tab. Note that while you can view the DAG code in the Airflow UI, you can only make changes to it in your IDE, not directly in the UI. You can see how each task in your DAG corresponds to one function that has been turned into an Airflow task using the [`@task` decorator](/docs/learn/airflow-decorators).
The [`@task` decorator](/docs/learn/airflow-decorators) is one of several options for defining your DAGs. The two other options are using [traditional operators](/docs/learn/what-is-an-operator) or the [`@asset` decorator](/docs/learn/airflow-datasets#asset-definition).
5. (Optional). Make a small change to your DAG code, for example by adding a print statement in one of the `@task` decorated functions. After the change has taken effect, run your DAG again and see the added print statement in the task logs.
When running Airflow with default settings, it can take up to 30 seconds for DAG changes to be visible in the UI and up to 5 minutes for a new DAG (with a new DAG ID) to show up in the UI. If you don't want to wait, you can run the following command to parse all existing and new DAG files in your `dags` folder.
```sh wrap theme={null}
astro dev run dags reserialize
```
## Step 7: Deploy your project
It is time to move the project to production!
1. If you don't have access to Astro already, sign up for a free [Astro trial](https://www.astronomer.io/lp/signup/?utm_source=website\&utm_medium=learn-guides\&utm_campaign=quickstart-etl-7-25).
2. [Create a new Deployment](/docs/astro/create-deployment) in your Astro workspace.
3. Run the following command in your local CLI to authenticate your computer to Astro. Follow the sign-in instructions in the window that opens in your browser.
```sh wrap theme={null}
astro login
```
4. Run the command to the deploy to Astro.
```sh wrap theme={null}
astro deploy -f
```
5. Since environment variables often contain secrets, they aren't deployed from `.env` with the rest of your project code. To add environment variables like your `OPENAI_API_KEY` to an Astro Deployment, use the **Environment** tab (1) on your Deployment. Make sure to mark the environment variables as secret!
In the screenshot above you can see the graph of the ETL DAG, it consists of 6 tasks:
* `extract_user_data`: This task extracts user data. In this quickstart example the DAG uses the data entered in the DAG Trigger form, the name and location of one user. In a real-world use case, it would likely extract several users' records at the same time through calling an API or reading from a database.
* `transform_user_data`: This task uses the data the first task extracted and creates a comprehensive user record from it using modularized functions stored in the `include` folder.
* `generate_tree_recommendations`: The third task generates the tree recommendations based on the transformed data about the user.
* `generate_garden_description`: This task uses the `@task.llm` decorator of the Airflow AI SDK to make a call to the OpenAI API to generate a description of your future garden, if you were to follow the tree recommendations.
* `print_llm_output`: The final task prints the output of the LLM to the task logs.
4. Lastly, let's check out the code that defines this DAG by clicking on the Code tab. Note that while you can view the DAG code in the Airflow UI, you can only make changes to it in your IDE, not directly in the UI. You can see how each task in your DAG corresponds to one function that has been turned into an Airflow task using the [`@task` decorator](/docs/learn/airflow-decorators).
The [`@task` decorator](/docs/learn/airflow-decorators) is one of several options for defining your DAGs. The two other options are using [traditional operators](/docs/learn/what-is-an-operator) or the [`@asset` decorator](/docs/learn/airflow-datasets#asset-definition).
5. (Optional). Make a small change to your DAG code, for example by adding a print statement in one of the `@task` decorated functions. After the change has taken effect, run your DAG again and see the added print statement in the task logs.
When running Airflow with default settings, it can take up to 30 seconds for DAG changes to be visible in the UI and up to 5 minutes for a new DAG (with a new DAG ID) to show up in the UI. If you don't want to wait, you can run the following command to parse all existing and new DAG files in your `dags` folder.
```sh wrap theme={null}
astro dev run dags reserialize
```
## Step 7: Deploy your project
It is time to move the project to production!
1. If you don't have access to Astro already, sign up for a free [Astro trial](https://www.astronomer.io/lp/signup/?utm_source=website\&utm_medium=learn-guides\&utm_campaign=quickstart-etl-7-25).
2. [Create a new Deployment](/docs/astro/create-deployment) in your Astro workspace.
3. Run the following command in your local CLI to authenticate your computer to Astro. Follow the sign-in instructions in the window that opens in your browser.
```sh wrap theme={null}
astro login
```
4. Run the command to the deploy to Astro.
```sh wrap theme={null}
astro deploy -f
```
5. Since environment variables often contain secrets, they aren't deployed from `.env` with the rest of your project code. To add environment variables like your `OPENAI_API_KEY` to an Astro Deployment, use the **Environment** tab (1) on your Deployment. Make sure to mark the environment variables as secret!
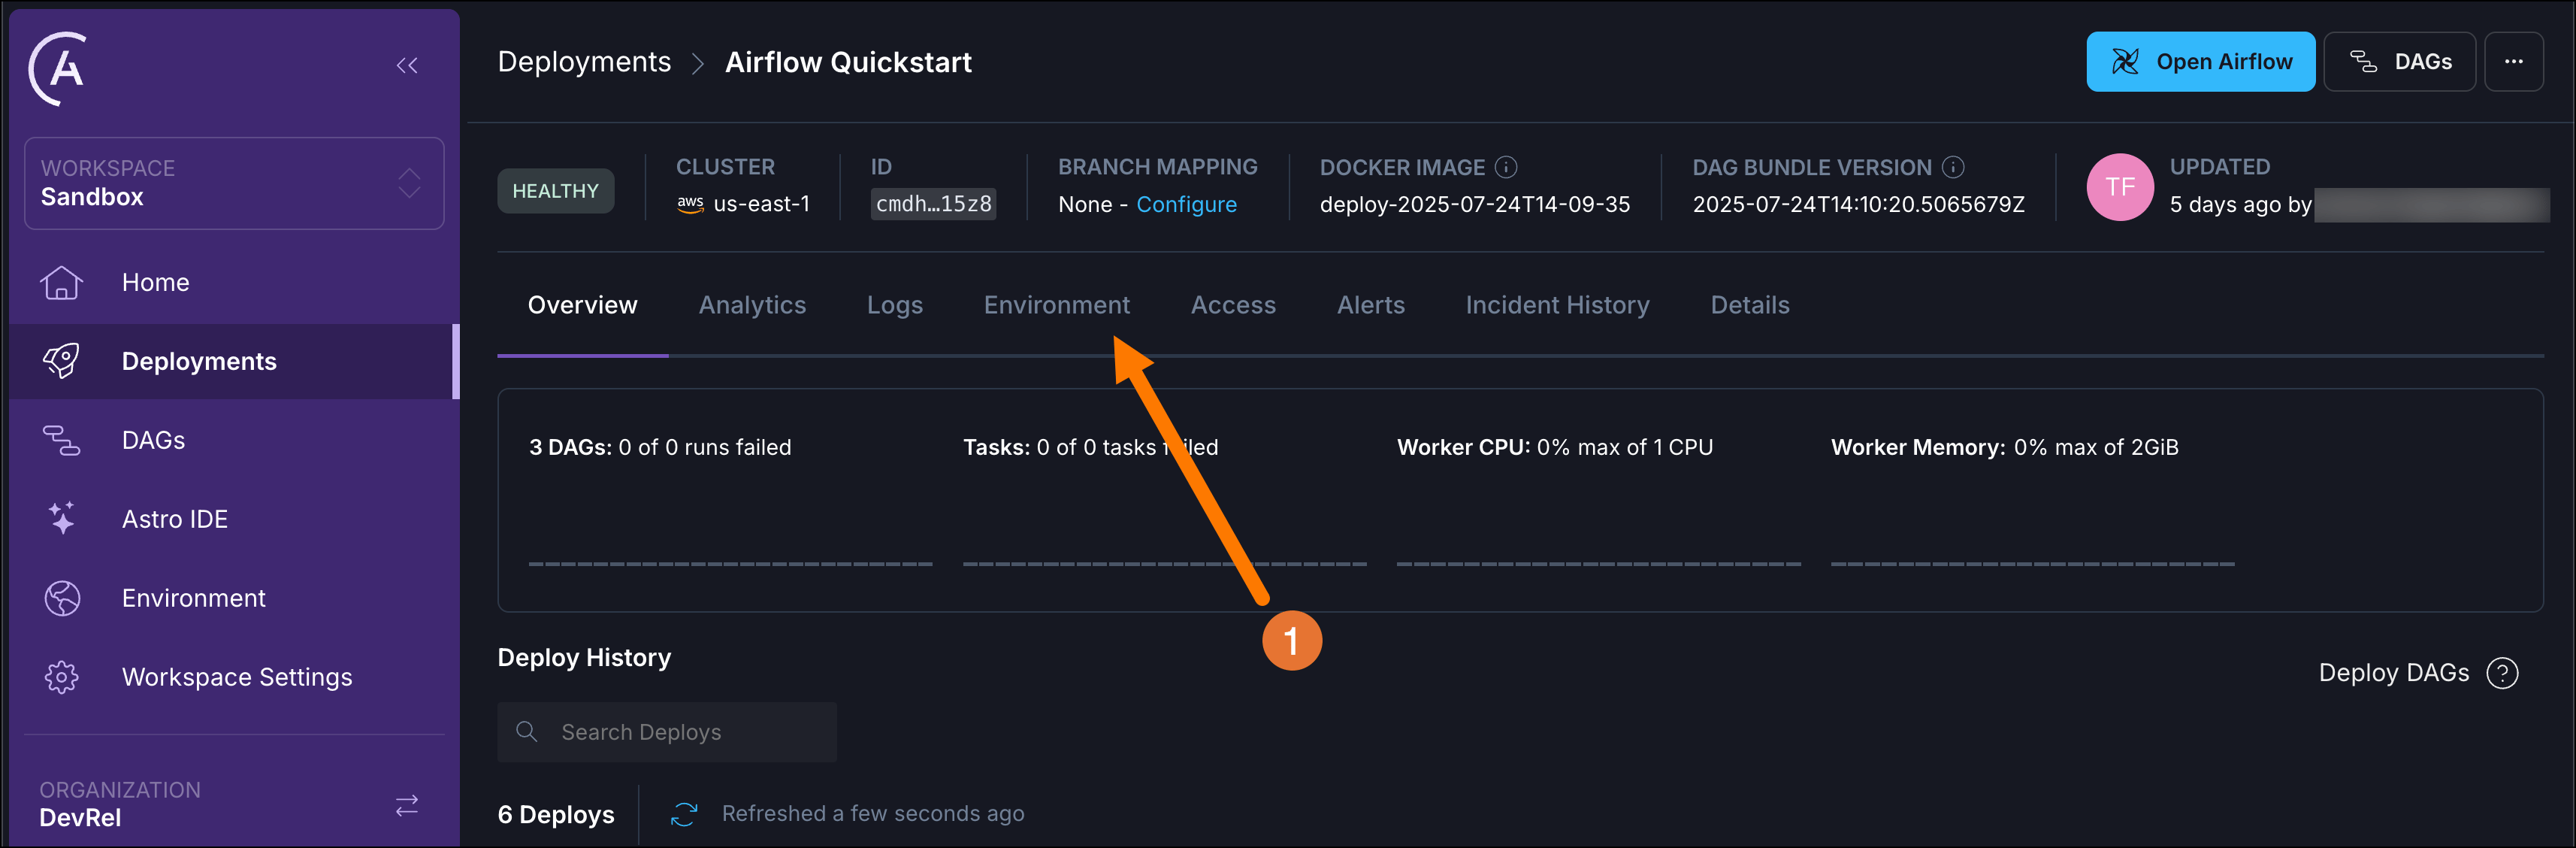 6. Once the deploy has completed, click the blue **Open Airflow** button on your Deployment to see the DAGs running in the cloud. Here, you can run the `genai_trees` DAG again to get another garden description!
## Next steps
Awesome! You ran a GenAI DAG locally and in the cloud. To continue your learning we recommend the following resources:
* If you are curious about the other DAGs in this Quickstart which form an ETL pipeline, check out the [Airflow ETL quickstart](/docs/learn/airflow-quickstart-etl).
* To get a structured video-based introduction to Apache Airflow and its concepts, sign up for the [Airflow 101 (Airflow 3) Learning Path](https://academy.astronomer.io/path/airflow-101) in the Astronomer Academy.
* For a short step-by-step walkthrough of the most important Airflow features, complete our [Airflow tutorial](/docs/learn/get-started-with-airflow).
## Run the quickstart without the Astro CLI
If you can't install the Astro CLI on your local computer, you can still run the pipeline in this example.
1. Sign up for a free trial of [Astro](https://www.astronomer.io/lp/signup/?utm_source=website\&utm_medium=learn-guides\&utm_campaign=quickstart-etl-7-25).
2. [Create a new Deployment](/docs/astro/create-deployment) in your Astro workspace.
3. [Fork](https://docs.github.com/en/pull-requests/collaborating-with-pull-requests/working-with-forks/fork-a-repo) the [Airflow quickstart](https://github.com/astronomer/devrel-public-workshops) repository to your GitHub account. Make sure to **uncheck** the **Copy the main branch only** box!
6. Once the deploy has completed, click the blue **Open Airflow** button on your Deployment to see the DAGs running in the cloud. Here, you can run the `genai_trees` DAG again to get another garden description!
## Next steps
Awesome! You ran a GenAI DAG locally and in the cloud. To continue your learning we recommend the following resources:
* If you are curious about the other DAGs in this Quickstart which form an ETL pipeline, check out the [Airflow ETL quickstart](/docs/learn/airflow-quickstart-etl).
* To get a structured video-based introduction to Apache Airflow and its concepts, sign up for the [Airflow 101 (Airflow 3) Learning Path](https://academy.astronomer.io/path/airflow-101) in the Astronomer Academy.
* For a short step-by-step walkthrough of the most important Airflow features, complete our [Airflow tutorial](/docs/learn/get-started-with-airflow).
## Run the quickstart without the Astro CLI
If you can't install the Astro CLI on your local computer, you can still run the pipeline in this example.
1. Sign up for a free trial of [Astro](https://www.astronomer.io/lp/signup/?utm_source=website\&utm_medium=learn-guides\&utm_campaign=quickstart-etl-7-25).
2. [Create a new Deployment](/docs/astro/create-deployment) in your Astro workspace.
3. [Fork](https://docs.github.com/en/pull-requests/collaborating-with-pull-requests/working-with-forks/fork-a-repo) the [Airflow quickstart](https://github.com/astronomer/devrel-public-workshops) repository to your GitHub account. Make sure to **uncheck** the **Copy the main branch only** box!
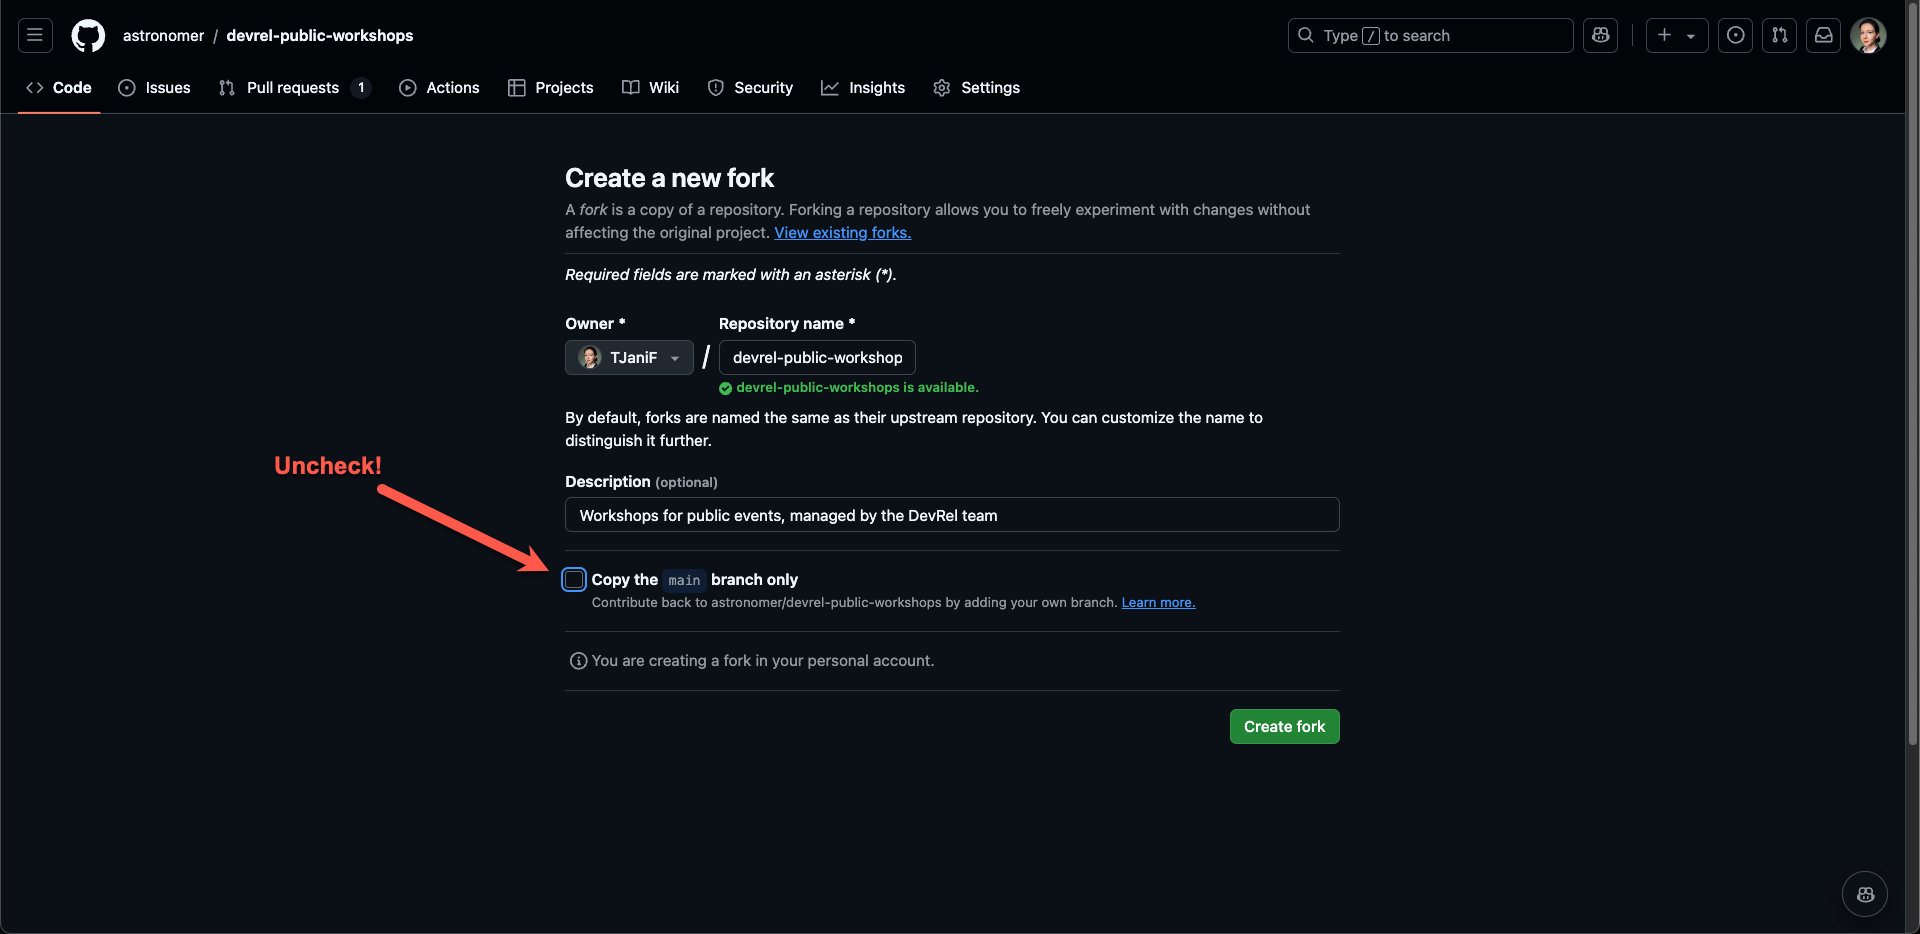 4. [Set up the Astro GitHub integration](/docs/astro/deploy-github-integration) to map your Deployment to the `airflow-quickstart-complete` branch of your forked repository.
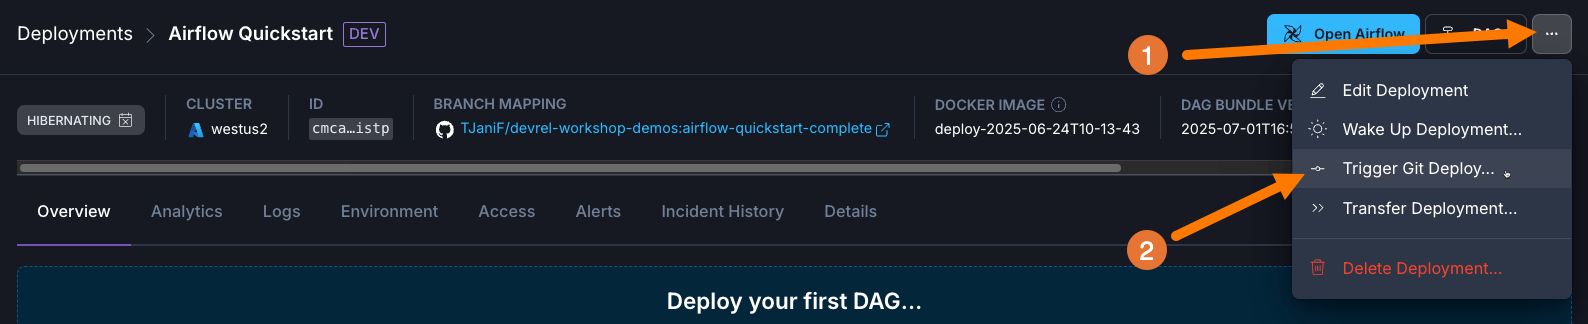
5. Select **Trigger Git Deploy** from the **More actions** menu in your Deployment settings to trigger the first deploy for the mapped repository.
4. [Set up the Astro GitHub integration](/docs/astro/deploy-github-integration) to map your Deployment to the `airflow-quickstart-complete` branch of your forked repository.
5. Select **Trigger Git Deploy** from the **More actions** menu in your Deployment settings to trigger the first deploy for the mapped repository.
 6. Add an environment variable called `OPENAI_API_KEY` with the value of your [OpenAI API Key](https://platform.openai.com/docs/api-reference/authentication) to your Astro Deployment by clicking on the **Environment** tab (1) on your Deployment. Make sure to mark the environment variables as secret! This key will be used by the Airflow AI SDK to make a call to OpenAI generating your future garden description.
7. Once the deploy has completed, click the blue **Open Airflow** button on your Deployment to see the DAGs running in the cloud. From here you can complete [Step 5](#step-5-run-the-genai-dag) and complete the quickstart, skipping over the deploy instructions in [Step 7](#step-7-deploy-your-project), since you already deployed your project!
6. Add an environment variable called `OPENAI_API_KEY` with the value of your [OpenAI API Key](https://platform.openai.com/docs/api-reference/authentication) to your Astro Deployment by clicking on the **Environment** tab (1) on your Deployment. Make sure to mark the environment variables as secret! This key will be used by the Airflow AI SDK to make a call to OpenAI generating your future garden description.
7. Once the deploy has completed, click the blue **Open Airflow** button on your Deployment to see the DAGs running in the cloud. From here you can complete [Step 5](#step-5-run-the-genai-dag) and complete the quickstart, skipping over the deploy instructions in [Step 7](#step-7-deploy-your-project), since you already deployed your project!