> ## Documentation Index
> Fetch the complete documentation index at: https://astronomer.io/docs/llms.txt
> Use this file to discover all available pages before exploring further.
# Orchestrate dbt Core projects with Airflow and Cosmos
 [dbt Core](https://docs.getdbt.com/) is an open-source library for analytics engineering that helps users build interdependent SQL models for in-warehouse data transformation, using ephemeral compute of data warehouses. [Cosmos](https://astronomer.github.io/astronomer-cosmos/) is an open-source package developed by Astronomer to run dbt models that are part of a dbt Core project within Airflow.
### dbt on Airflow with Cosmos and the Astro CLI
The open-source provider package [Cosmos](https://astronomer.github.io/astronomer-cosmos/) allows you to integrate dbt jobs into Airflow by automatically creating Airflow tasks from dbt models. You can turn your dbt Core projects into an Airflow Dag or task group with just a few lines of code.
You can find comprehensive instructions on how to set up Cosmos for different data warehouses, Cosmos configuration options, and how to optimize Cosmos performance in the [Orchestrating dbt with Apache Airflow® using Cosmos eBook](https://www.astronomer.io/ebooks/orchestrating-dbt-with-airflow-using-cosmos/?utm_source=website\&utm_medium=learn-guides\&utm_campaign=learn-dbt-tutorial-11-25) and a shorter summary of the most important concepts in the [Quick Notes: Airflow + dbt with Cosmos](https://www.astronomer.io/ebooks/quick-notes-airflow-dbt-with-cosmos/?utm_source=website\&utm_medium=learn-guides\&utm_campaign=learn-dbt-tutorial-11-25).
## Why use Airflow with dbt Core?
dbt Core offers the possibility to build modular, reusable SQL components with built-in dependency management and [incremental builds](https://docs.getdbt.com/docs/build/incremental-models).
With [Cosmos](https://astronomer.github.io/astronomer-cosmos/), you can integrate dbt jobs into your open-source Airflow orchestration environment as standalone Dags or as task groups within Dags.
The benefits of using Airflow with dbt Core include:
* Use Airflow's [data-aware scheduling](/docs/learn/airflow-datasets) and [Airflow sensors](/docs/learn/what-is-a-sensor) to run models depending on other events in your data ecosystem.
* Turn each dbt model into a task, complete with Airflow features like [retries](/docs/learn/rerunning-dags#automatically-retry-tasks) and [error notifications](/docs/learn/error-notifications-in-airflow), as well as full observability into past runs directly in the Airflow UI.
* Run `dbt test` on tables created by individual models immediately after a model has completed. Catch issues before moving downstream and integrate additional [data quality checks](/docs/learn/data-quality) with your preferred tool to run alongside dbt tests.
* Run dbt projects using [Airflow connections](/docs/learn/connections) instead of dbt profiles. You can store all your connections in one place, directly within Airflow or by using a [secrets backend](https://airflow.apache.org/docs/apache-airflow/stable/security/secrets/secrets-backend/index.html).
* Use native support for installing and running dbt in a virtual environment to avoid dependency conflicts with Airflow.
* [Generate](https://astronomer.github.io/astronomer-cosmos/configuration/generating-docs.html) and [host](https://astronomer.github.io/astronomer-cosmos/configuration/hosting-docs.html) dbt docs with Airflow.
With Astro, you get all the above benefits and you can deploy your dbt project to your Astro Deployment independently of your Airflow project using the Astro CLI. For more information, see [Deploy dbt projects to Astro](/docs/astro/deploy-dbt-project).
## Time to complete
This tutorial takes approximately 30 minutes to complete.
## Assumed knowledge
To get the most out of this tutorial, make sure you have an understanding of:
* The basics of dbt Core. See [What is dbt?](https://docs.getdbt.com/docs/introduction).
* Airflow fundamentals, such as writing Dags and defining tasks. See [Get started with Apache Airflow](/docs/learn/get-started-with-airflow).
* How Airflow and dbt concepts relate to each other. See [Similar dbt and Airflow concepts](https://astronomer.github.io/astronomer-cosmos/getting_started/dbt-airflow-concepts.html).
* Airflow operators. See [Operators 101](/docs/learn/what-is-an-operator).
* Airflow task groups. See [Airflow task groups](/docs/learn/task-groups).
* Airflow connections. See [Manage connections in Apache Airflow](/docs/learn/connections).
## Prerequisites
* The [Astro CLI](/docs/cli/v1.43/overview).
* Access to a data warehouse supported by dbt Core. See [dbt documentation](https://docs.getdbt.com/docs/supported-data-platforms) for all supported warehouses. This tutorial uses a Postgres database.
You don't need to have dbt Core installed locally in order to complete this tutorial.
## Step 1: Configure your Astro project
To use dbt Core with Airflow install dbt Core in a virtual environment and Cosmos in a new Astro project.
1. Create a new Astro project:
```sh wrap theme={null}
$ mkdir astro-dbt-core-tutorial && cd astro-dbt-core-tutorial
$ astro dev init
```
2. Add [Cosmos](https://github.com/astronomer/astronomer-cosmos), the [Airflow Postgres provider](https://airflow.apache.org/registry/providers/postgres/) and the [dbt Postgres adapter](https://github.com/dbt-labs/dbt-adapters) to your Astro project `requirements.txt` file. If you are using a different data warehouse, replace `apache-airflow-providers-postgres` and `dbt-postgres` with the provider package for your data warehouse. You can find information on all provider packages on the [Airflow Registry](https://airflow.apache.org/registry/).
```text wrap theme={null}
astronomer-cosmos==1
apache-airflow-providers-postgres==6
apache-airflow-providers-common-sql==1
dbt-postgres==1
```
3. (Alternative) If you can't install your dbt adapter in the same environment as Airflow due to package conflicts you can create a dbt executable in a virtual environment. In your `Dockerfile` add the following lines to the end of the file:
```text wrap theme={null}
# replace dbt-postgres with another supported adapter if you're using a different warehouse type
RUN python -m venv dbt_venv && source dbt_venv/bin/activate && \
pip install --no-cache-dir dbt-postgres && deactivate
```
This code runs a bash command when the Docker image is built that creates a virtual environment called `dbt_venv` inside of the Astro CLI scheduler container. The `dbt-postgres` package, which also contains `dbt-core`, is installed in the virtual environment. If you are using a different data warehouse, replace `dbt-postgres` with the adapter package for your data warehouse.
There are other options to run Cosmos even if you can't install your dbt adapter in the `requirements.txt` file or create a virtual environment in your Docker image. See the [Cosmos documentation on execution modes](https://astronomer.github.io/astronomer-cosmos/getting_started/execution-modes.html) for more information.
## Step 2: Prepare your dbt project
To integrate your dbt project with Airflow, you need to add the project folder to your Airflow environment. For this step you can either add your own project or follow the steps below to create a simple project using two models.
1. Create a folder called `dbt` in your `include` folder.
2. In the `dbt` folder, create a folder called `my_simple_dbt_project`.
3. In the `my_simple_dbt_project` folder add your `dbt_project.yml`. This configuration file needs to contain at least the name of the project. This tutorial additionally shows how to inject a variable called `my_name` from Airflow into your dbt project.
```yaml wrap theme={null}
version: '0.1'
name: 'my_simple_dbt_project'
vars:
my_name: "No entry"
```
4. Add your dbt models in a subfolder called `models` in the `my_simple_dbt_project` folder. You can add as many models as you want to run. This tutorial uses the following two models:
`model1.sql`:
```sql wrap theme={null}
SELECT '{{ var("my_name") }}' as name
```
`model2.sql`:
```sql wrap theme={null}
SELECT * FROM {{ ref('model1') }}
```
`model1.sql` selects the variable `my_name`. `model2.sql` depends on `model1.sql` and selects everything from the upstream model.
You should now have the following structure within your Airflow environment:
```text wrap theme={null}
.
└── dags
└── include
└── dbt
└── my_simple_dbt_project
├── dbt_project.yml
└── models
├── model1.sql
└── model2.sql
```
If storing your dbt project alongside your Airflow project isn't feasible, there are other ways to use Cosmos, even if the dbt project is hosted in a different location, for example by using a manifest file to parse the project and a containerized execution mode. See the [Cosmos documentation](https://astronomer.github.io/astronomer-cosmos/configuration/index.html) for more information.
## Step 3: Create an Airflow connection to your data warehouse
Cosmos allows you to apply Airflow connections to your dbt project.
1. Start Airflow by running `astro dev start`.
2. In the Airflow UI, go to **Admin** -> **Connections** and click **+**.
3. Create a new connection named `db_conn`. Select the connection type and supplied parameters based on the data warehouse you are using. For a Postgres connection, enter the following information:
* **Connection ID**: `db_conn`.
* **Connection Type**: `Postgres`.
* **Host**: Your Postgres host address.
* **Schema**: Your Postgres database.
* **Login**: Your Postgres login username.
* **Password**: Your Postgres password.
* **Port**: Your Postgres port.
If a connection type for your database isn't available, you might need to make it available by adding the [relevant provider package](https://airflow.apache.org/registry/) to `requirements.txt` and running `astro dev restart`.
## Step 4: Write your Airflow Dag
The Dag you'll write uses Cosmos to create tasks from existing dbt models and the [`SQLExecuteQueryOperator`](https://airflow.apache.org/registry/providers/common-sql#common-sql-sql-SQLExecuteQueryOperator) to query a table that was created. You can add more upstream and downstream tasks to embed the dbt project within other actions in your data ecosystem.
1. In your `dags` folder, create a file called `my_simple_dbt_dag.py`.
2. Copy and paste the following Dag code into the file:
```python expandable wrap theme={null}
"""
### Run a dbt Core project as a task group with Cosmos
Simple DAG showing how to run a dbt project as a task group, using
an Airflow connection and injecting a variable into the dbt project.
"""
from airflow.sdk import dag, chain
from airflow.providers.common.sql.operators.sql import SQLExecuteQueryOperator
from cosmos import DbtTaskGroup, ProjectConfig, ProfileConfig, ExecutionConfig
# adjust for other database types
from cosmos.profiles.postgres import PostgresUserPasswordProfileMapping
import os
YOUR_NAME = "YOUR_NAME"
CONNECTION_ID = "db_conn"
DB_NAME = "YOUR_DB_NAME"
SCHEMA_NAME = "YOUR_SCHEMA_NAME"
MODEL_TO_QUERY = "model2"
# The path to the dbt project
DBT_PROJECT_PATH = f"{os.environ['AIRFLOW_HOME']}/include/dbt/my_simple_dbt_project"
# OPTIONAL: The path where Cosmos will find the dbt executable
# in the virtual environment created in the Dockerfile if you cannot
# install your dbt adapter in requirements.txt due to package conflicts.
# DBT_EXECUTABLE_PATH = f"{os.environ['AIRFLOW_HOME']}/dbt_venv/bin/dbt"
profile_config = ProfileConfig(
profile_name="default",
target_name="dev",
profile_mapping=PostgresUserPasswordProfileMapping(
conn_id=CONNECTION_ID,
profile_args={"schema": SCHEMA_NAME},
),
)
# OPTIONAL: The path where Cosmos will find the dbt executable
# execution_config = ExecutionConfig(
# dbt_executable_path=DBT_EXECUTABLE_PATH,
# )
@dag(
params={"my_name": YOUR_NAME},
)
def my_simple_dbt_dag():
transform_data = DbtTaskGroup(
group_id="transform_data",
project_config=ProjectConfig(DBT_PROJECT_PATH),
profile_config=profile_config,
# OPTIONAL: your execution config if you are using a virtual environment
# execution_config=execution_config,
operator_args={
"vars": '{"my_name": {{ params.my_name }} }',
},
default_args={"retries": 2},
)
query_table = SQLExecuteQueryOperator(
task_id="query_table",
conn_id=CONNECTION_ID,
sql=f"SELECT * FROM {DB_NAME}.{SCHEMA_NAME}.{MODEL_TO_QUERY}",
)
chain(transform_data, query_table)
my_simple_dbt_dag()
```
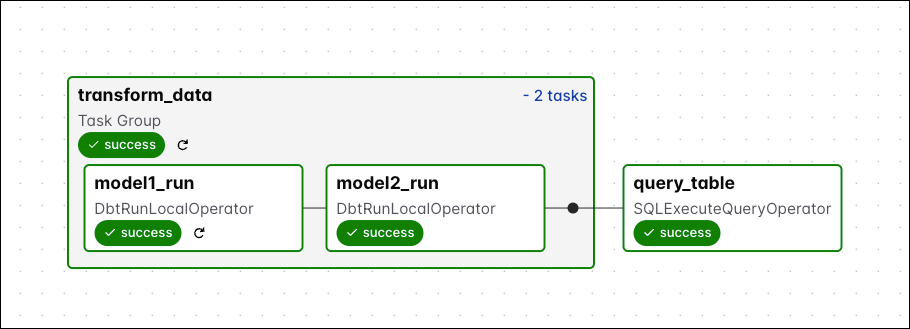
This Dag uses the `DbtTaskGroup` class from the Cosmos package to create a task group from the models in your dbt project. Dependencies between your dbt models are automatically turned into dependencies between Airflow tasks. Make sure to add your own values for `YOUR_NAME`, `YOUR_DB_NAME`, and `YOUR_SCHEMA_NAME`.
Using the `vars` keyword in the dictionary provided to the `operator_args` parameter, you can inject variables into the dbt project. This DAG injects `YOUR_NAME` for the `my_name` variable. If your dbt project contains dbt tests, they will be run directly after a model has completed. Note that it is a best practice to set `retries` to at least 2 for all tasks that run dbt models.
In some cases, especially in larger dbt projects, you might run into a `DagBag import timeout` error. This error can be resolved by increasing the value of the Airflow configuration [core.`dagbag_import_timeout`](https://airflow.apache.org/docs/apache-airflow/stable/configurations-ref.html#dagbag-import-timeout).
3. Run the Dag manually by clicking the play button and view the Dag in the graph view. Expand the [task groups](/docs/learn/task-groups) to see all tasks.
[dbt Core](https://docs.getdbt.com/) is an open-source library for analytics engineering that helps users build interdependent SQL models for in-warehouse data transformation, using ephemeral compute of data warehouses. [Cosmos](https://astronomer.github.io/astronomer-cosmos/) is an open-source package developed by Astronomer to run dbt models that are part of a dbt Core project within Airflow.
### dbt on Airflow with Cosmos and the Astro CLI
The open-source provider package [Cosmos](https://astronomer.github.io/astronomer-cosmos/) allows you to integrate dbt jobs into Airflow by automatically creating Airflow tasks from dbt models. You can turn your dbt Core projects into an Airflow Dag or task group with just a few lines of code.
You can find comprehensive instructions on how to set up Cosmos for different data warehouses, Cosmos configuration options, and how to optimize Cosmos performance in the [Orchestrating dbt with Apache Airflow® using Cosmos eBook](https://www.astronomer.io/ebooks/orchestrating-dbt-with-airflow-using-cosmos/?utm_source=website\&utm_medium=learn-guides\&utm_campaign=learn-dbt-tutorial-11-25) and a shorter summary of the most important concepts in the [Quick Notes: Airflow + dbt with Cosmos](https://www.astronomer.io/ebooks/quick-notes-airflow-dbt-with-cosmos/?utm_source=website\&utm_medium=learn-guides\&utm_campaign=learn-dbt-tutorial-11-25).
## Why use Airflow with dbt Core?
dbt Core offers the possibility to build modular, reusable SQL components with built-in dependency management and [incremental builds](https://docs.getdbt.com/docs/build/incremental-models).
With [Cosmos](https://astronomer.github.io/astronomer-cosmos/), you can integrate dbt jobs into your open-source Airflow orchestration environment as standalone Dags or as task groups within Dags.
The benefits of using Airflow with dbt Core include:
* Use Airflow's [data-aware scheduling](/docs/learn/airflow-datasets) and [Airflow sensors](/docs/learn/what-is-a-sensor) to run models depending on other events in your data ecosystem.
* Turn each dbt model into a task, complete with Airflow features like [retries](/docs/learn/rerunning-dags#automatically-retry-tasks) and [error notifications](/docs/learn/error-notifications-in-airflow), as well as full observability into past runs directly in the Airflow UI.
* Run `dbt test` on tables created by individual models immediately after a model has completed. Catch issues before moving downstream and integrate additional [data quality checks](/docs/learn/data-quality) with your preferred tool to run alongside dbt tests.
* Run dbt projects using [Airflow connections](/docs/learn/connections) instead of dbt profiles. You can store all your connections in one place, directly within Airflow or by using a [secrets backend](https://airflow.apache.org/docs/apache-airflow/stable/security/secrets/secrets-backend/index.html).
* Use native support for installing and running dbt in a virtual environment to avoid dependency conflicts with Airflow.
* [Generate](https://astronomer.github.io/astronomer-cosmos/configuration/generating-docs.html) and [host](https://astronomer.github.io/astronomer-cosmos/configuration/hosting-docs.html) dbt docs with Airflow.
With Astro, you get all the above benefits and you can deploy your dbt project to your Astro Deployment independently of your Airflow project using the Astro CLI. For more information, see [Deploy dbt projects to Astro](/docs/astro/deploy-dbt-project).
## Time to complete
This tutorial takes approximately 30 minutes to complete.
## Assumed knowledge
To get the most out of this tutorial, make sure you have an understanding of:
* The basics of dbt Core. See [What is dbt?](https://docs.getdbt.com/docs/introduction).
* Airflow fundamentals, such as writing Dags and defining tasks. See [Get started with Apache Airflow](/docs/learn/get-started-with-airflow).
* How Airflow and dbt concepts relate to each other. See [Similar dbt and Airflow concepts](https://astronomer.github.io/astronomer-cosmos/getting_started/dbt-airflow-concepts.html).
* Airflow operators. See [Operators 101](/docs/learn/what-is-an-operator).
* Airflow task groups. See [Airflow task groups](/docs/learn/task-groups).
* Airflow connections. See [Manage connections in Apache Airflow](/docs/learn/connections).
## Prerequisites
* The [Astro CLI](/docs/cli/v1.43/overview).
* Access to a data warehouse supported by dbt Core. See [dbt documentation](https://docs.getdbt.com/docs/supported-data-platforms) for all supported warehouses. This tutorial uses a Postgres database.
You don't need to have dbt Core installed locally in order to complete this tutorial.
## Step 1: Configure your Astro project
To use dbt Core with Airflow install dbt Core in a virtual environment and Cosmos in a new Astro project.
1. Create a new Astro project:
```sh wrap theme={null}
$ mkdir astro-dbt-core-tutorial && cd astro-dbt-core-tutorial
$ astro dev init
```
2. Add [Cosmos](https://github.com/astronomer/astronomer-cosmos), the [Airflow Postgres provider](https://airflow.apache.org/registry/providers/postgres/) and the [dbt Postgres adapter](https://github.com/dbt-labs/dbt-adapters) to your Astro project `requirements.txt` file. If you are using a different data warehouse, replace `apache-airflow-providers-postgres` and `dbt-postgres` with the provider package for your data warehouse. You can find information on all provider packages on the [Airflow Registry](https://airflow.apache.org/registry/).
```text wrap theme={null}
astronomer-cosmos==1
apache-airflow-providers-postgres==6
apache-airflow-providers-common-sql==1
dbt-postgres==1
```
3. (Alternative) If you can't install your dbt adapter in the same environment as Airflow due to package conflicts you can create a dbt executable in a virtual environment. In your `Dockerfile` add the following lines to the end of the file:
```text wrap theme={null}
# replace dbt-postgres with another supported adapter if you're using a different warehouse type
RUN python -m venv dbt_venv && source dbt_venv/bin/activate && \
pip install --no-cache-dir dbt-postgres && deactivate
```
This code runs a bash command when the Docker image is built that creates a virtual environment called `dbt_venv` inside of the Astro CLI scheduler container. The `dbt-postgres` package, which also contains `dbt-core`, is installed in the virtual environment. If you are using a different data warehouse, replace `dbt-postgres` with the adapter package for your data warehouse.
There are other options to run Cosmos even if you can't install your dbt adapter in the `requirements.txt` file or create a virtual environment in your Docker image. See the [Cosmos documentation on execution modes](https://astronomer.github.io/astronomer-cosmos/getting_started/execution-modes.html) for more information.
## Step 2: Prepare your dbt project
To integrate your dbt project with Airflow, you need to add the project folder to your Airflow environment. For this step you can either add your own project or follow the steps below to create a simple project using two models.
1. Create a folder called `dbt` in your `include` folder.
2. In the `dbt` folder, create a folder called `my_simple_dbt_project`.
3. In the `my_simple_dbt_project` folder add your `dbt_project.yml`. This configuration file needs to contain at least the name of the project. This tutorial additionally shows how to inject a variable called `my_name` from Airflow into your dbt project.
```yaml wrap theme={null}
version: '0.1'
name: 'my_simple_dbt_project'
vars:
my_name: "No entry"
```
4. Add your dbt models in a subfolder called `models` in the `my_simple_dbt_project` folder. You can add as many models as you want to run. This tutorial uses the following two models:
`model1.sql`:
```sql wrap theme={null}
SELECT '{{ var("my_name") }}' as name
```
`model2.sql`:
```sql wrap theme={null}
SELECT * FROM {{ ref('model1') }}
```
`model1.sql` selects the variable `my_name`. `model2.sql` depends on `model1.sql` and selects everything from the upstream model.
You should now have the following structure within your Airflow environment:
```text wrap theme={null}
.
└── dags
└── include
└── dbt
└── my_simple_dbt_project
├── dbt_project.yml
└── models
├── model1.sql
└── model2.sql
```
If storing your dbt project alongside your Airflow project isn't feasible, there are other ways to use Cosmos, even if the dbt project is hosted in a different location, for example by using a manifest file to parse the project and a containerized execution mode. See the [Cosmos documentation](https://astronomer.github.io/astronomer-cosmos/configuration/index.html) for more information.
## Step 3: Create an Airflow connection to your data warehouse
Cosmos allows you to apply Airflow connections to your dbt project.
1. Start Airflow by running `astro dev start`.
2. In the Airflow UI, go to **Admin** -> **Connections** and click **+**.
3. Create a new connection named `db_conn`. Select the connection type and supplied parameters based on the data warehouse you are using. For a Postgres connection, enter the following information:
* **Connection ID**: `db_conn`.
* **Connection Type**: `Postgres`.
* **Host**: Your Postgres host address.
* **Schema**: Your Postgres database.
* **Login**: Your Postgres login username.
* **Password**: Your Postgres password.
* **Port**: Your Postgres port.
If a connection type for your database isn't available, you might need to make it available by adding the [relevant provider package](https://airflow.apache.org/registry/) to `requirements.txt` and running `astro dev restart`.
## Step 4: Write your Airflow Dag
The Dag you'll write uses Cosmos to create tasks from existing dbt models and the [`SQLExecuteQueryOperator`](https://airflow.apache.org/registry/providers/common-sql#common-sql-sql-SQLExecuteQueryOperator) to query a table that was created. You can add more upstream and downstream tasks to embed the dbt project within other actions in your data ecosystem.
1. In your `dags` folder, create a file called `my_simple_dbt_dag.py`.
2. Copy and paste the following Dag code into the file:
```python expandable wrap theme={null}
"""
### Run a dbt Core project as a task group with Cosmos
Simple DAG showing how to run a dbt project as a task group, using
an Airflow connection and injecting a variable into the dbt project.
"""
from airflow.sdk import dag, chain
from airflow.providers.common.sql.operators.sql import SQLExecuteQueryOperator
from cosmos import DbtTaskGroup, ProjectConfig, ProfileConfig, ExecutionConfig
# adjust for other database types
from cosmos.profiles.postgres import PostgresUserPasswordProfileMapping
import os
YOUR_NAME = "YOUR_NAME"
CONNECTION_ID = "db_conn"
DB_NAME = "YOUR_DB_NAME"
SCHEMA_NAME = "YOUR_SCHEMA_NAME"
MODEL_TO_QUERY = "model2"
# The path to the dbt project
DBT_PROJECT_PATH = f"{os.environ['AIRFLOW_HOME']}/include/dbt/my_simple_dbt_project"
# OPTIONAL: The path where Cosmos will find the dbt executable
# in the virtual environment created in the Dockerfile if you cannot
# install your dbt adapter in requirements.txt due to package conflicts.
# DBT_EXECUTABLE_PATH = f"{os.environ['AIRFLOW_HOME']}/dbt_venv/bin/dbt"
profile_config = ProfileConfig(
profile_name="default",
target_name="dev",
profile_mapping=PostgresUserPasswordProfileMapping(
conn_id=CONNECTION_ID,
profile_args={"schema": SCHEMA_NAME},
),
)
# OPTIONAL: The path where Cosmos will find the dbt executable
# execution_config = ExecutionConfig(
# dbt_executable_path=DBT_EXECUTABLE_PATH,
# )
@dag(
params={"my_name": YOUR_NAME},
)
def my_simple_dbt_dag():
transform_data = DbtTaskGroup(
group_id="transform_data",
project_config=ProjectConfig(DBT_PROJECT_PATH),
profile_config=profile_config,
# OPTIONAL: your execution config if you are using a virtual environment
# execution_config=execution_config,
operator_args={
"vars": '{"my_name": {{ params.my_name }} }',
},
default_args={"retries": 2},
)
query_table = SQLExecuteQueryOperator(
task_id="query_table",
conn_id=CONNECTION_ID,
sql=f"SELECT * FROM {DB_NAME}.{SCHEMA_NAME}.{MODEL_TO_QUERY}",
)
chain(transform_data, query_table)
my_simple_dbt_dag()
```
This Dag uses the `DbtTaskGroup` class from the Cosmos package to create a task group from the models in your dbt project. Dependencies between your dbt models are automatically turned into dependencies between Airflow tasks. Make sure to add your own values for `YOUR_NAME`, `YOUR_DB_NAME`, and `YOUR_SCHEMA_NAME`.
Using the `vars` keyword in the dictionary provided to the `operator_args` parameter, you can inject variables into the dbt project. This DAG injects `YOUR_NAME` for the `my_name` variable. If your dbt project contains dbt tests, they will be run directly after a model has completed. Note that it is a best practice to set `retries` to at least 2 for all tasks that run dbt models.
In some cases, especially in larger dbt projects, you might run into a `DagBag import timeout` error. This error can be resolved by increasing the value of the Airflow configuration [core.`dagbag_import_timeout`](https://airflow.apache.org/docs/apache-airflow/stable/configurations-ref.html#dagbag-import-timeout).
3. Run the Dag manually by clicking the play button and view the Dag in the graph view. Expand the [task groups](/docs/learn/task-groups) to see all tasks.
 4. Check the [XCom](/docs/learn/airflow-passing-data-between-tasks) returned by the `query_table` task to see your name in the `model2` table.
The DbtTaskGroup class populates an Airflow task group with Airflow tasks created from dbt models inside of a normal Dag. To directly define a full Dag containing only dbt models use the `DbtDag` class, as shown in the [Cosmos documentation](https://astronomer.github.io/astronomer-cosmos/getting_started/astro.html).
Congratulations! You've run a Dag using Cosmos to automatically create tasks from dbt models. You can learn more about how to configure Cosmos in the [Cosmos documentation](https://astronomer.github.io/astronomer-cosmos/index.html).
If you are running large dbt projects and want to increase performance, there are several options available to you. A recent feature is the experimental watcher execution mode that can reduce Dag execution time by up to 80% and reaches speeds on par with running `dbt build` with the dbt CLI. See the [Cosmos documentation](https://astronomer.github.io/astronomer-cosmos/getting_started/watcher-execution-mode.html) for more information.
## Alternative ways to run dbt Core with Airflow
While using Cosmos is recommended, there are several other ways to run dbt Core with Airflow.
### Use the `BashOperator`
You can use the [`BashOperator`](https://airflow.apache.org/registry/providers/standard#standard-bash-BashOperator) to execute specific dbt commands. It's recommended to run `dbt-core` and the dbt adapter for your database in a virtual environment because there often are dependency conflicts between dbt and other packages.
The Dag below uses the `BashOperator` to activate the virtual environment and execute `dbt_run` for a dbt project.
```python wrap theme={null}
from airflow.sdk import dag
from airflow.providers.standard.operators.bash import BashOperator
PATH_TO_DBT_PROJECT = ""
PATH_TO_DBT_VENV = ""
@dag
def simple_dbt_dag():
dbt_run = BashOperator(
task_id="dbt_run",
bash_command="source $PATH_TO_DBT_VENV && dbt run --models .",
env={"PATH_TO_DBT_VENV": PATH_TO_DBT_VENV},
cwd=PATH_TO_DBT_PROJECT,
)
simple_dbt_dag()
```
Using the `BashOperator` to run `dbt run` and other dbt commands can be useful during development. However, running dbt at the project level has a couple of issues:
* There is low observability into what execution state the project is in.
* Failures are absolute and require all models in a project to be run again, which can be costly.
### Use a manifest file
Using a dbt-generated `manifest.json` file gives you more visibility into the steps dbt is running in each task. This file is generated in the target directory of your `dbt` project and contains its full representation. For more information on this file, see the [dbt documentation](https://docs.getdbt.com/reference/dbt-artifacts/).
Cosmos can parse manifest files, see the [Cosmos documentation](https://astronomer.github.io/astronomer-cosmos/configuration/parsing-methods.html) for more information.
4. Check the [XCom](/docs/learn/airflow-passing-data-between-tasks) returned by the `query_table` task to see your name in the `model2` table.
The DbtTaskGroup class populates an Airflow task group with Airflow tasks created from dbt models inside of a normal Dag. To directly define a full Dag containing only dbt models use the `DbtDag` class, as shown in the [Cosmos documentation](https://astronomer.github.io/astronomer-cosmos/getting_started/astro.html).
Congratulations! You've run a Dag using Cosmos to automatically create tasks from dbt models. You can learn more about how to configure Cosmos in the [Cosmos documentation](https://astronomer.github.io/astronomer-cosmos/index.html).
If you are running large dbt projects and want to increase performance, there are several options available to you. A recent feature is the experimental watcher execution mode that can reduce Dag execution time by up to 80% and reaches speeds on par with running `dbt build` with the dbt CLI. See the [Cosmos documentation](https://astronomer.github.io/astronomer-cosmos/getting_started/watcher-execution-mode.html) for more information.
## Alternative ways to run dbt Core with Airflow
While using Cosmos is recommended, there are several other ways to run dbt Core with Airflow.
### Use the `BashOperator`
You can use the [`BashOperator`](https://airflow.apache.org/registry/providers/standard#standard-bash-BashOperator) to execute specific dbt commands. It's recommended to run `dbt-core` and the dbt adapter for your database in a virtual environment because there often are dependency conflicts between dbt and other packages.
The Dag below uses the `BashOperator` to activate the virtual environment and execute `dbt_run` for a dbt project.
```python wrap theme={null}
from airflow.sdk import dag
from airflow.providers.standard.operators.bash import BashOperator
PATH_TO_DBT_PROJECT = ""
PATH_TO_DBT_VENV = ""
@dag
def simple_dbt_dag():
dbt_run = BashOperator(
task_id="dbt_run",
bash_command="source $PATH_TO_DBT_VENV && dbt run --models .",
env={"PATH_TO_DBT_VENV": PATH_TO_DBT_VENV},
cwd=PATH_TO_DBT_PROJECT,
)
simple_dbt_dag()
```
Using the `BashOperator` to run `dbt run` and other dbt commands can be useful during development. However, running dbt at the project level has a couple of issues:
* There is low observability into what execution state the project is in.
* Failures are absolute and require all models in a project to be run again, which can be costly.
### Use a manifest file
Using a dbt-generated `manifest.json` file gives you more visibility into the steps dbt is running in each task. This file is generated in the target directory of your `dbt` project and contains its full representation. For more information on this file, see the [dbt documentation](https://docs.getdbt.com/reference/dbt-artifacts/).
Cosmos can parse manifest files, see the [Cosmos documentation](https://astronomer.github.io/astronomer-cosmos/configuration/parsing-methods.html) for more information.