> ## Documentation Index
> Fetch the complete documentation index at: https://astronomer.io/docs/llms.txt
> Use this file to discover all available pages before exploring further.
# Airflow plugins
Plugins are external features that can be added to customize your Airflow installation. They are automatically imported upon starting your Airflow instance if they have been added to `plugins` folder of an Airflow project.
In this guide, you'll learn how to add a plugin to your Airflow instance and what Airflow components can be part of a plugin.
## Assumed knowledge
To get the most out of this guide, you should have an understanding of:
* Basic Airflow concepts. See [Introduction to Apache Airflow](/docs/learn/2.x/intro-to-airflow).
* Airflow core components. See [Airflow's components](/docs/learn/2.x/airflow-components).
* The basics of Flask. See the [Flask documentation](https://flask.palletsprojects.com/en/2.2.x/).
## When to use plugins
Plugins offer a flexible way to customize your Airflow experience by building on top of existing Airflow components. For example, you can:
* Add views to your Airflow UI that display contents of the Airflow metadata database in a custom way.
* Build an application that monitors Airflow's functioning and sends out custom alerts, for example in case of a certain number of DAGs failing in a specified time frame.
* Add a button to the task instance **Details** view that dynamically links to files or logs in external data tools relevant to the task.
## How to create a plugin
To add a new plugin to your Airflow instance, you need to create a Python file in the `plugins` folder of your Airflow project. Within that file, create a class which inherits from the `AirflowPlugin` to define the plugin. The code snippet below defines a plugin with the name `empty` without any components.
```python wrap theme={null}
from airflow.plugins_manager import AirflowPlugin
class MyAirflowPlugin(AirflowPlugin):
# name your plugin, this is mandatory
name = "empty"
## Add plugin components
# ...
# ...
# ...
# Add an optional callback to perform actions when airflow starts and
# the plugin is loaded.
# NOTE: Ensure your plugin has *args, and **kwargs in the method definition
# to protect against extra parameters injected into the on_load()
# function in future changes
def on_load(*args, **kwargs):
# perform Plugin boot actions
pass
```
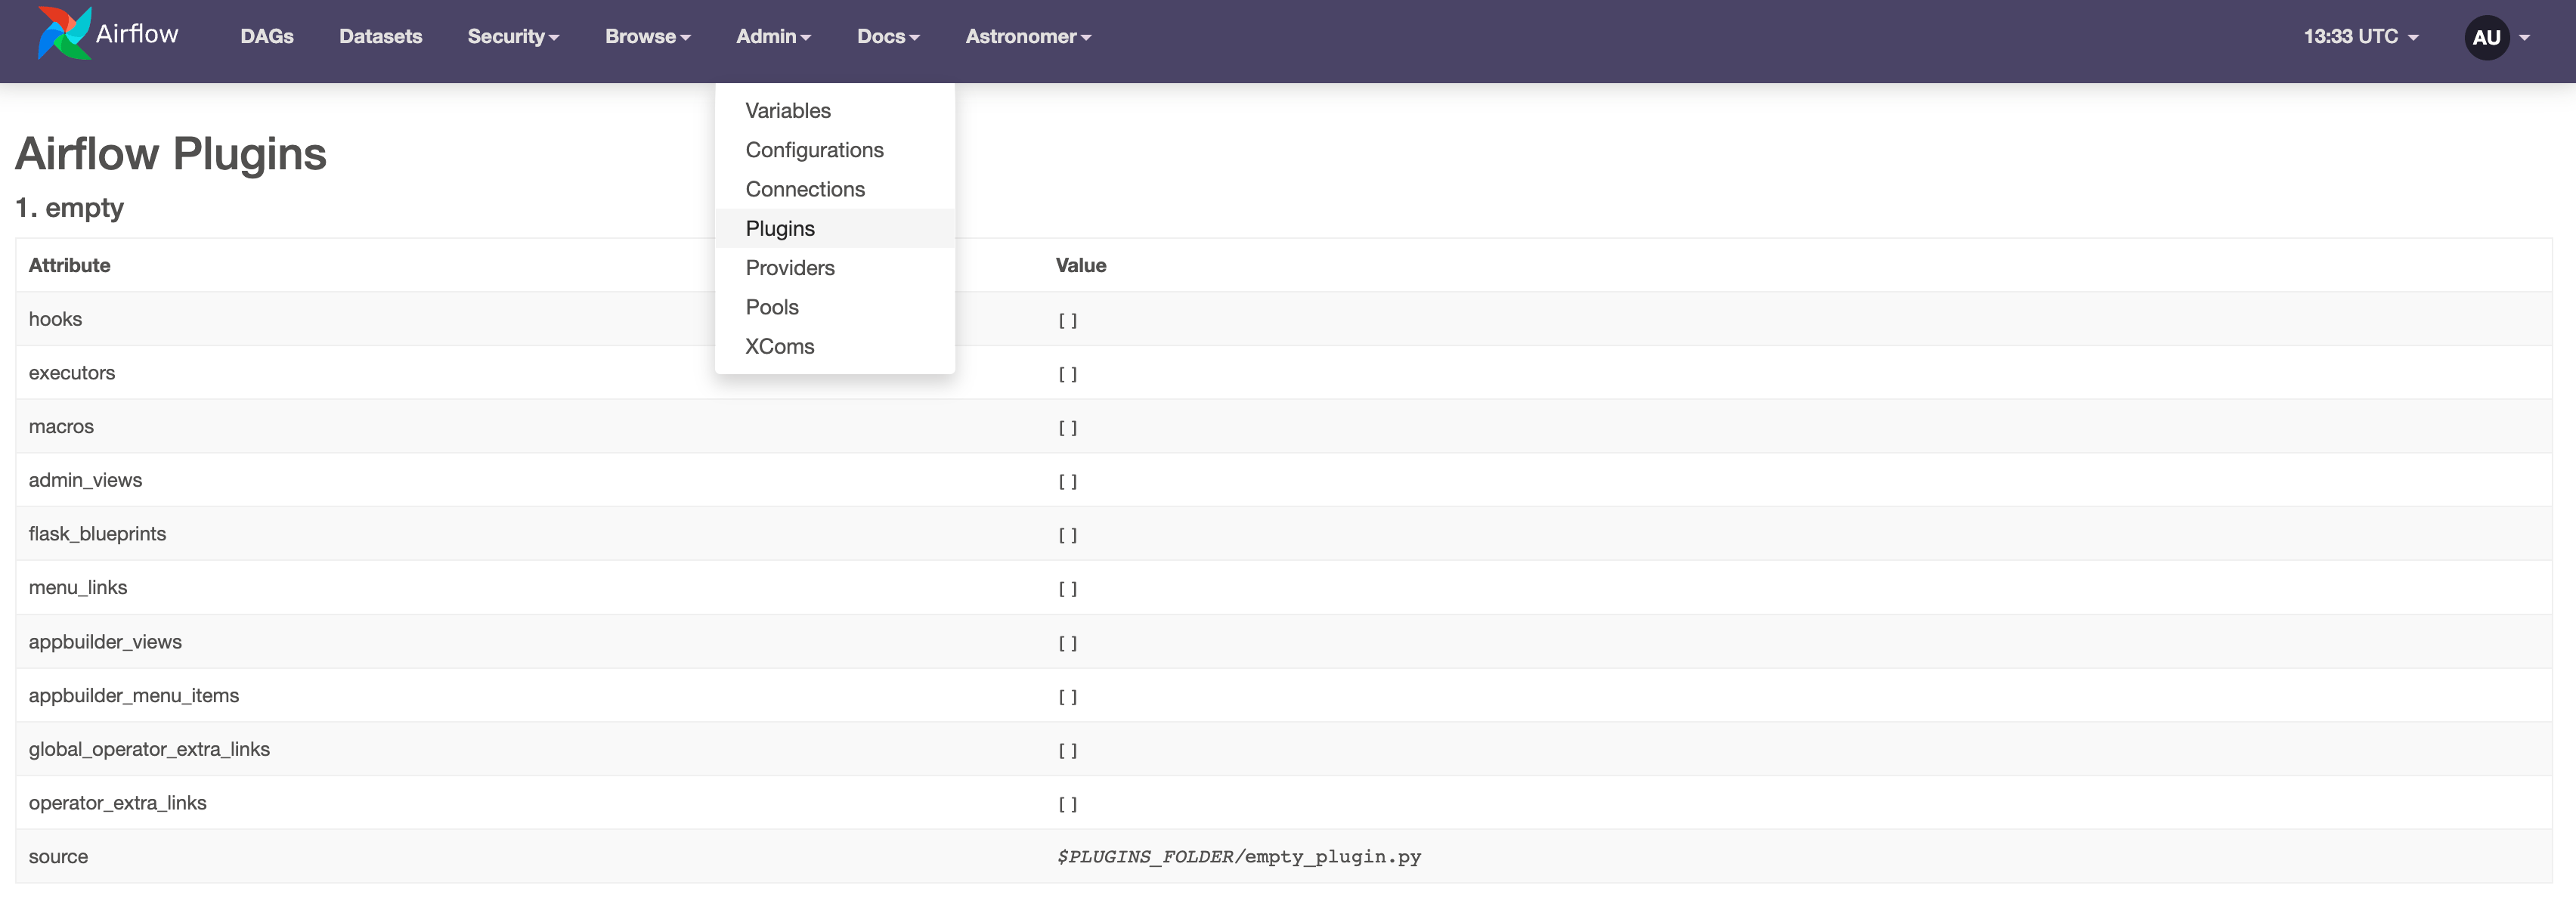
The list of currently active plugins can be viewed in the Airflow UI under **Admin** -> **Plugins**. The code above creates the following entry:
 In order for changes to your plugin to be registered, you will need to restart any Airflow components (for example, the webserver or scheduler) that use the plugin. Learn more in the [official Airflow documentation on plugins](https://airflow.apache.org/docs/apache-airflow/stable/plugins.html#when-are-plugins-re-loaded).
## Plugin components
Functionality is added to a plugin by adding components to the class which defines the plugin. There are 10 types of plugin components that can be added to Airflow. In this guide we will show the more commonly used components, including:
* `appbuilder_menu_items` allow you to add additional sections and links to the Airflow menu.
* `flask_blueprints` and `appbuilder_views` offer the possibility to build a Flask project on top of Airflow.
* `operator_extra_links` and `global_operator_extra_links` are ways to add links to Airflow task instances.
* `macros` expand upon existing Jinja templates using custom functions.
* `listeners` define custom code to execute whenever certain events happen anywhere in your Airflow instance.
Other types of plugin components not covered in this guide include:
* `timetables` offer the option to register custom timetables that define schedules which can't be expressed in CRON. See the [DAG Schedule DAGs in Airflow guide](/docs/learn/scheduling-in-airflow#timetables) for more information and a code example.
* `executors` add the possibility to use a custom [executor](/docs/learn/airflow-executors-explained) in your Airflow instance.
Before Airflow 2.0 custom operators and hooks were added as plugins. This pattern has been deprecated and [custom operators and hooks](/docs/learn/airflow-importing-custom-hooks-operators) can now be used simply by importing a script located in `include`.
### AppBuilder menu items
You can update the menu at the top of the Airflow UI to contain custom tabs with links to external websites. Adding top-level menu items and adding sub-items are both supported.
If you are an Astro user, in order for the menu items to be visible to all users, the top-level menu item must be set to **Custom Menu** or one of the existing top-level menus such as **Docs** in the example below. This is done by passing the appropriate top-level menu to the `category` and `name` parameters in the menu sub-item.
The following code creates a plugin that adds two menu items.
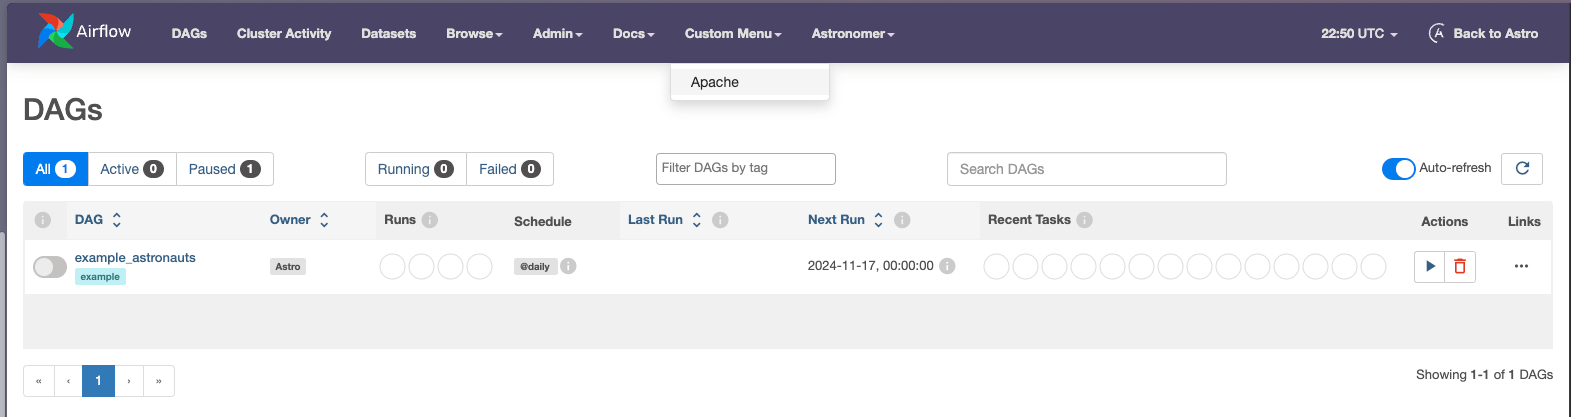
* `apache_mitem_subitem` is a sub-item which is added to **Custom Menu**. It is labeled `Apache` and links to the [Apache homepage](https://www.apache.org/).
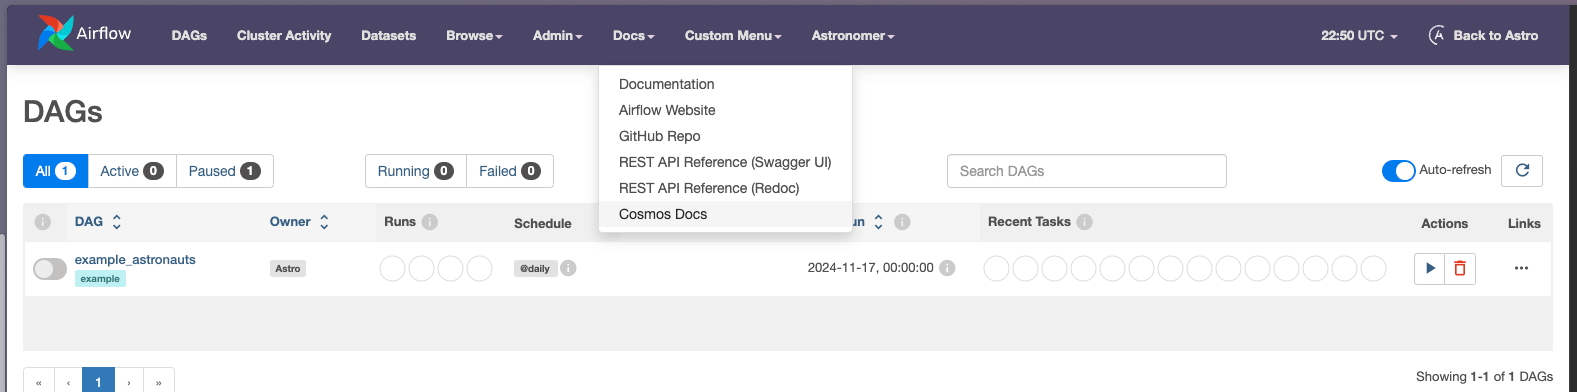
* `cosmos_mitem_subitem` is a sub-item which is added to the **Docs** menu. It is labeled `Cosmos Docs` and links out to [the documentation for Cosmos](https://astronomer.github.io/astronomer-cosmos/).
Both additional menu items are added to the `app_builder_menu_items` component of a plugin called `Menu items plugin` which is defined in the `MyMenuItemsPlugin` class.
```python wrap theme={null}
from airflow.plugins_manager import AirflowPlugin
# creating a new sub-item in the Custom Menu item
apache_mitem_subitem = {
"label": "Apache",
"href": "https://www.apache.org/",
"category": "Custom Menu",
"name": "Custom Menu",
}
# creating a new sub-item in the Docs menu item
cosmos_mitem_subitem = {
"label": "Cosmos Docs",
"href": "https://astronomer.github.io/astronomer-cosmos/",
"category": "Docs",
"name": "Docs",
}
# defining the plugin class
class MyMenuItemsPlugin(AirflowPlugin):
name = "Menu items plugin"
# adding the menu items to the plugin
appbuilder_menu_items = [apache_mitem_subitem, cosmos_mitem_subitem]
```
The screenshots below show the additional menu items in the Airflow UI.
In order for changes to your plugin to be registered, you will need to restart any Airflow components (for example, the webserver or scheduler) that use the plugin. Learn more in the [official Airflow documentation on plugins](https://airflow.apache.org/docs/apache-airflow/stable/plugins.html#when-are-plugins-re-loaded).
## Plugin components
Functionality is added to a plugin by adding components to the class which defines the plugin. There are 10 types of plugin components that can be added to Airflow. In this guide we will show the more commonly used components, including:
* `appbuilder_menu_items` allow you to add additional sections and links to the Airflow menu.
* `flask_blueprints` and `appbuilder_views` offer the possibility to build a Flask project on top of Airflow.
* `operator_extra_links` and `global_operator_extra_links` are ways to add links to Airflow task instances.
* `macros` expand upon existing Jinja templates using custom functions.
* `listeners` define custom code to execute whenever certain events happen anywhere in your Airflow instance.
Other types of plugin components not covered in this guide include:
* `timetables` offer the option to register custom timetables that define schedules which can't be expressed in CRON. See the [DAG Schedule DAGs in Airflow guide](/docs/learn/scheduling-in-airflow#timetables) for more information and a code example.
* `executors` add the possibility to use a custom [executor](/docs/learn/airflow-executors-explained) in your Airflow instance.
Before Airflow 2.0 custom operators and hooks were added as plugins. This pattern has been deprecated and [custom operators and hooks](/docs/learn/airflow-importing-custom-hooks-operators) can now be used simply by importing a script located in `include`.
### AppBuilder menu items
You can update the menu at the top of the Airflow UI to contain custom tabs with links to external websites. Adding top-level menu items and adding sub-items are both supported.
If you are an Astro user, in order for the menu items to be visible to all users, the top-level menu item must be set to **Custom Menu** or one of the existing top-level menus such as **Docs** in the example below. This is done by passing the appropriate top-level menu to the `category` and `name` parameters in the menu sub-item.
The following code creates a plugin that adds two menu items.
* `apache_mitem_subitem` is a sub-item which is added to **Custom Menu**. It is labeled `Apache` and links to the [Apache homepage](https://www.apache.org/).
* `cosmos_mitem_subitem` is a sub-item which is added to the **Docs** menu. It is labeled `Cosmos Docs` and links out to [the documentation for Cosmos](https://astronomer.github.io/astronomer-cosmos/).
Both additional menu items are added to the `app_builder_menu_items` component of a plugin called `Menu items plugin` which is defined in the `MyMenuItemsPlugin` class.
```python wrap theme={null}
from airflow.plugins_manager import AirflowPlugin
# creating a new sub-item in the Custom Menu item
apache_mitem_subitem = {
"label": "Apache",
"href": "https://www.apache.org/",
"category": "Custom Menu",
"name": "Custom Menu",
}
# creating a new sub-item in the Docs menu item
cosmos_mitem_subitem = {
"label": "Cosmos Docs",
"href": "https://astronomer.github.io/astronomer-cosmos/",
"category": "Docs",
"name": "Docs",
}
# defining the plugin class
class MyMenuItemsPlugin(AirflowPlugin):
name = "Menu items plugin"
# adding the menu items to the plugin
appbuilder_menu_items = [apache_mitem_subitem, cosmos_mitem_subitem]
```
The screenshots below show the additional menu items in the Airflow UI.
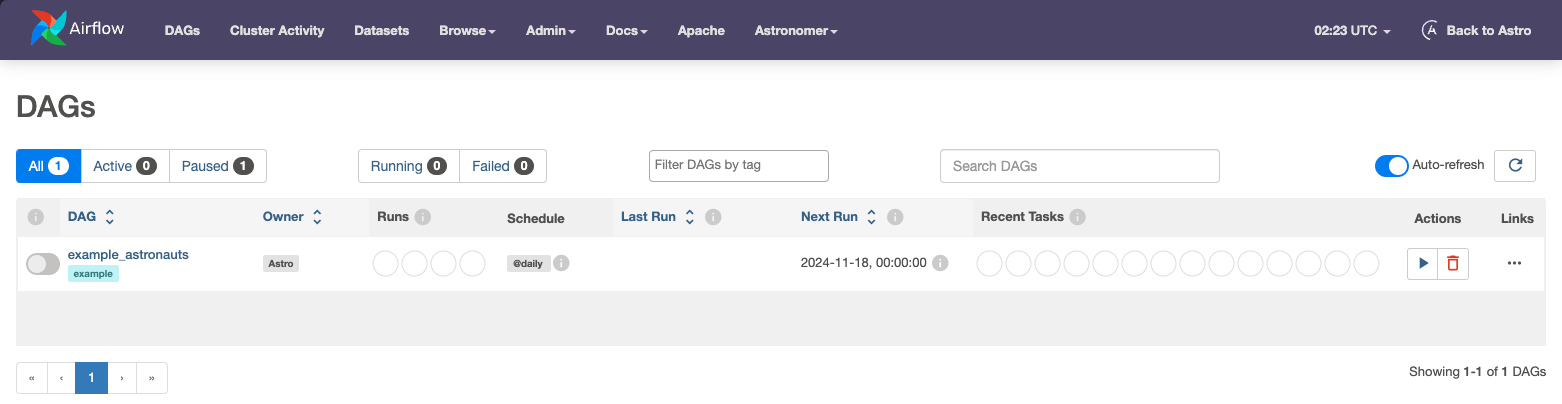
 If you aren't using Astro, you can create a top-level menu item with any name. For example, you can directly create a top-level menu item named "Apache" that links to the [Apache homepage](https://www.apache.org/) with the below code.
```python wrap theme={null}
from airflow.plugins_manager import AirflowPlugin
# creating the Apache top-level menu item
apache_mitem_toplevel = {
"name": "Apache",
"href": "https://www.apache.org/",
}
# defining the plugin class
class MyMenuItemsPlugin(AirflowPlugin):
name = "Menu items plugin"
# adding the menu item to the plugin
appbuilder_menu_items = [apache_mitem_toplevel]
```
The screenshot below shows the top-level Apache menu item.
If you aren't using Astro, you can create a top-level menu item with any name. For example, you can directly create a top-level menu item named "Apache" that links to the [Apache homepage](https://www.apache.org/) with the below code.
```python wrap theme={null}
from airflow.plugins_manager import AirflowPlugin
# creating the Apache top-level menu item
apache_mitem_toplevel = {
"name": "Apache",
"href": "https://www.apache.org/",
}
# defining the plugin class
class MyMenuItemsPlugin(AirflowPlugin):
name = "Menu items plugin"
# adding the menu item to the plugin
appbuilder_menu_items = [apache_mitem_toplevel]
```
The screenshot below shows the top-level Apache menu item.
 ### Flask blueprints and AppBuilder views
Flask blueprints and views are plugin components that allow you to add more elaborate customization to the Airflow UI. A Flask blueprint functions as an organizational tool to group related views and supporting code while Flask views render web pages from HTML templates.
To learn more check out the [Blueprints and Views tutorial](https://flask.palletsprojects.com/en/2.2.x/tutorial/views/) in the official Flask documentation.
You can add a view to render a simple templated HTML file on top of the Airflow UI by following the steps below. The code also includes an additional example of creating an AppBuilder menu item (similar to the Cosmos Docs example) that can be accessed from the same top-level **Custom Menu** as the AppBuilder view.
1. Create a folder within the `plugins` directory called `templates`.
2. Within that folder create a HTML file called `test.html` and copy the following code into it:
```html wrap theme={null}
{% extends "appbuilder/base.html" %}
{% block content %}
### Flask blueprints and AppBuilder views
Flask blueprints and views are plugin components that allow you to add more elaborate customization to the Airflow UI. A Flask blueprint functions as an organizational tool to group related views and supporting code while Flask views render web pages from HTML templates.
To learn more check out the [Blueprints and Views tutorial](https://flask.palletsprojects.com/en/2.2.x/tutorial/views/) in the official Flask documentation.
You can add a view to render a simple templated HTML file on top of the Airflow UI by following the steps below. The code also includes an additional example of creating an AppBuilder menu item (similar to the Cosmos Docs example) that can be accessed from the same top-level **Custom Menu** as the AppBuilder view.
1. Create a folder within the `plugins` directory called `templates`.
2. Within that folder create a HTML file called `test.html` and copy the following code into it:
```html wrap theme={null}
{% extends "appbuilder/base.html" %}
{% block content %}
Airflow is {{ content }}!
{% endblock %}
```
3. In the `plugins` directory, add a Python file called `my_first_view_plugin.py`. Copy the code below. If you are using Astro, different code is required depending on whether your Airflow version is \< 2.10 or >= 2.10.
Airflow Above 2 10
```python expandable wrap theme={null}
from airflow.plugins_manager import AirflowPlugin
from flask import Blueprint
from flask_appbuilder import expose, BaseView as AppBuilderBaseView
from airflow.configuration import conf
# from airflow.www.auth import has_access # uncomment to use the plugin on Astro
# from airflow.security import permissions # uncomment to use the plugin on Astro
CUSTOM_ASTRO_RESOURCE = "Custom Menu"
# define a Flask blueprint
my_blueprint = Blueprint(
"test_plugin",
__name__,
# register airflow/plugins/templates as a Jinja template folder
template_folder="templates",
)
# create a flask appbuilder BaseView
class MyBaseView(AppBuilderBaseView):
default_view = "test"
# If you are using Astro, uncomment the "has_access" line below, and do not change it
@expose("/")
# @has_access([(permissions.ACTION_CAN_ACCESS_MENU, CUSTOM_ASTRO_RESOURCE)])
def test(self):
# render the HTML file from the templates directory with content
return self.render_template("test.html", content="awesome")
# instantiate MyBaseView
my_view = MyBaseView()
my_view_package = {
"category": CUSTOM_ASTRO_RESOURCE,
"name": CUSTOM_ASTRO_RESOURCE,
"view": my_view,
"label": "Custom Plugins",
}
# Appbuilder menu item without Flask view
google_mitem = {
"category": CUSTOM_ASTRO_RESOURCE,
"label": "Google",
"href": "https://www.google.com",
"name": CUSTOM_ASTRO_RESOURCE,
}
# define the plugin class
class MyViewPlugin(AirflowPlugin):
# name the plugin
name = "My appbuilder view"
# add the blueprint and appbuilder components
flask_blueprints = [my_blueprint]
appbuilder_views = [my_view_package]
appbuilder_menu_items = [google_mitem]
```
Airflow Below 2 10
```python expandable wrap theme={null}
from airflow.plugins_manager import AirflowPlugin
from flask import Blueprint
from flask_appbuilder import expose, BaseView as AppBuilderBaseView
from airflow.configuration import conf
# from airflow.www.auth import has_access # uncomment to use the plugin on Astro
# from airflow.security import permissions # uncomment to use the plugin on Astro
CUSTOM_ASTRO_RESOURCE = "Custom Menu"
# define a Flask blueprint
my_blueprint = Blueprint(
"test_plugin",
__name__,
# register airflow/plugins/templates as a Jinja template folder
template_folder="templates",
)
# create a flask appbuilder BaseView
class MyBaseView(AppBuilderBaseView):
default_view = "test"
# If you are using Astro, uncomment the "has_access" line below, and do not change it
@expose("/")
# @has_access([(permissions.ACTION_CAN_ACCESS_MENU, CUSTOM_ASTRO_RESOURCE)])
def test(self):
# render the HTML file from the templates directory with content
return self.render_template("test.html", content="awesome")
# instantiate MyBaseView
my_view = MyBaseView()
# get the base URL of the Airflow webserver
base_url = conf.get("webserver", "base_url")
view_link = f"{str(base_url)}/{my_view.__class__.__name__.lower()}"
# Note: The view below is without "name" due to a bug that doesn't propagate labels in Airflow < 2.10
my_view_package = {
"category": CUSTOM_ASTRO_RESOURCE,
"view": my_view,
}
# "my_mitem" below uses the "view_link" to make it reachable via a clickable link in Airflow < 2.10
my_mitem = {
"label": "Custom Plugins",
"href": view_link,
"name": CUSTOM_ASTRO_RESOURCE,
"category": CUSTOM_ASTRO_RESOURCE,
}
# Appbuilder menu item without Flask view
google_mitem = {
"category": CUSTOM_ASTRO_RESOURCE,
"label": "Google",
"href": "https://www.google.com",
"name": CUSTOM_ASTRO_RESOURCE,
}
# define the plugin class
class MyViewPlugin(AirflowPlugin):
# name the plugin
name = "My appbuilder view"
# add the blueprint and appbuilder_views components
flask_blueprints = [my_blueprint]
appbuilder_views = [my_view_package]
appbuilder_menu_items = [my_mitem, google_mitem]
```
4. Start your Airflow instance using `astro dev start` or `astro dev restart` if you were already running Airflow.
This plugin will add a top-level menu item called **Custom Menu** which contains the sub-items **Custom Plugins** and **Google**.
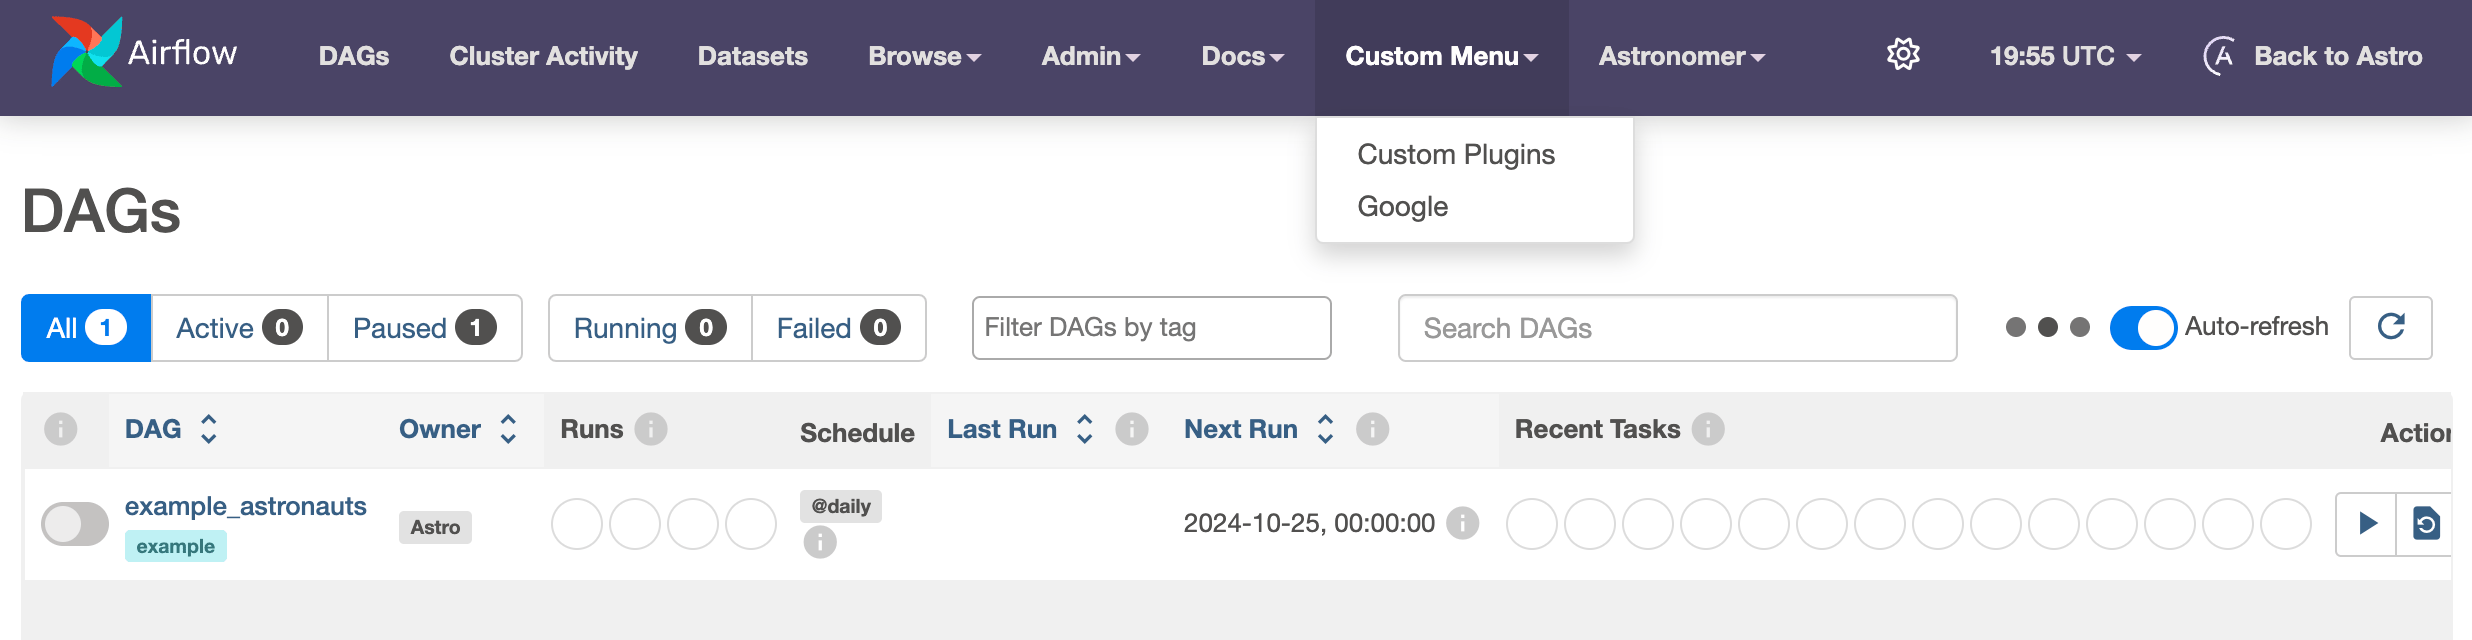 By clicking on **Custom Plugins** you can access the Flask View that was defined as `my_view`. It shows the HTML template (`test.html`) rendered with the provided content.
 Clicking on **Google** will take you to the URL `https://www.google.com` similar to the **Cosmos Docs** example in the previous **AppBuilder menu items** section.
If you want to use custom menu items in an Airflow environment hosted on Astro, you must make sure to give your plugin the necessary permissions. To do this with AppBuilder views, use the `@has_access` decorator to give your BaseView method the `ACTION_CAN_ACCESS_MENU` permission on the **Custom Menu** resource (defined by `CUSTOM_ASTRO_RESOURCE` variable). The **Custom Menu** resource is registered in the Airflow Security Manager by Astronomer to allow users to create custom menu items.
```python wrap theme={null}
from airflow.www.auth import has_access
from airflow.security import permissions
# ...
CUSTOM_ASTRO_RESOURCE = "Custom Menu"
# ...
# create a flask appbuilder BaseView
class MyBaseView(AppBuilderBaseView):
default_view = "test"
# Do not change the "has_access" line below
@expose("/")
@has_access([(permissions.ACTION_CAN_ACCESS_MENU, CUSTOM_ASTRO_RESOURCE)])
def test(self):
# render the HTML file from the templates directory with content
return self.render_template("test.html", content="awesome")
```
Airflow environments hosted on Astro must have **Custom Menu** or one of the existing top-level menu items such as **Docs**, **Browse**, or **Astronomer** passed as the `category` and `name` value in their menu sub-items for both AppBuilder views and menu items. This is because the `category` and `name` values must match a permission in the Airflow Security Manager. With **Custom Menu** as the `category` and `name` values, the menu item will be mapped to the existing **Custom Menu** resource in the Airflow Security Manager. The Airflow Security Manager also contains resources for **Docs**, **Browse**, and **Astronomer**. Therefore, these values can also be passed to `category` and `name`. If a different value is passed to `category` and `name`, no users besides the Workspace Owner will be able to see the custom plugin since a corresponding resource would not exist in the Airflow Security Manager, and the appropriate permissions won't be mapped to the menu sub-items.
```python wrap theme={null}
CUSTOM_ASTRO_RESOURCE = "Custom Menu"
# ...
# Menu sub-item
google_mitem = {
"category": CUSTOM_ASTRO_RESOURCE,
"label": "Google",
"href": "https://www.google.com",
"name": CUSTOM_ASTRO_RESOURCE,
}
```
The code to add the view is different for Airflow \< 2.10 since there is a bug with the `label` field for views in those versions. As a workaround, we don't pass the `name` attribute to the view. Airflow checks for that `name` attribute to decide whether it should use `appbuilder.add_view method` or `appbuilder.add_view_no_menu`. Because we don't pass name, it creates a view with **No menu**.
```python wrap theme={null}
my_view_package = {
"category": CUSTOM_ASTRO_RESOURCE,
"view": my_view,
}
```
Now we create a menu item `my_mitem` with the `label` **Custom Plugins** and add an explicit link to the view created with **No menu**. To get the correct link, we use the following code:
```python wrap theme={null}
from airflow.configuration import conf
# ...
base_url = conf.get("webserver", "base_url")
view_link = f"{str(base_url)}/{my_view.__class__.__name__.lower()}"
```
And then pass it like this:
```python wrap theme={null}
my_mitem = {
"label": "Custom Plugins",
"href": view_link,
"name": CUSTOM_ASTRO_RESOURCE,
"category": CUSTOM_ASTRO_RESOURCE,
}
```
The bug is fixed in Airflow 2.10. Therefore, we can directly pass the `name` argument to `my_view_package`. Since `name` is used, Airflow will directly call `appbuilder.add_view` for `my_view_package`. Therefore, we don't have a separate `my_mitem` definition like we do in Airflow \< 2.10.
### Operator extra links
Operator extra links are additional buttons with links that can be added to specific operators. They can be defined as Python classes derived from the `BaseOperatorLink` class. The example below shows how to create a new operator extra link `MyLink` that is applied to `MyOperator1` and `MyOperator2`. The operator extra link is registered with the `MyAirflowPlugin` by adding it its `operator_extra_links` list.
```python wrap theme={null}
from airflow.models.baseoperator import BaseOperatorLink
from include.custom_operators import MyOperator1, MyOperator2
from airflow.plugins_manager import AirflowPlugin
# create the operator extra link
class MyLink(BaseOperatorLink):
# name the link button
name = "My extra link"
# add the link button to one or more operators
operators = [MyOperator1, MyOperator2]
# function determining the link
def get_link(self, operator, *, ti_key=None):
return "http://my_link.com/"
# add the operator extra link to a plugin
class MyOperatorExtraLink(AirflowPlugin):
name = "my_plugin_name"
operator_extra_links = [
MyLink(),
]
```
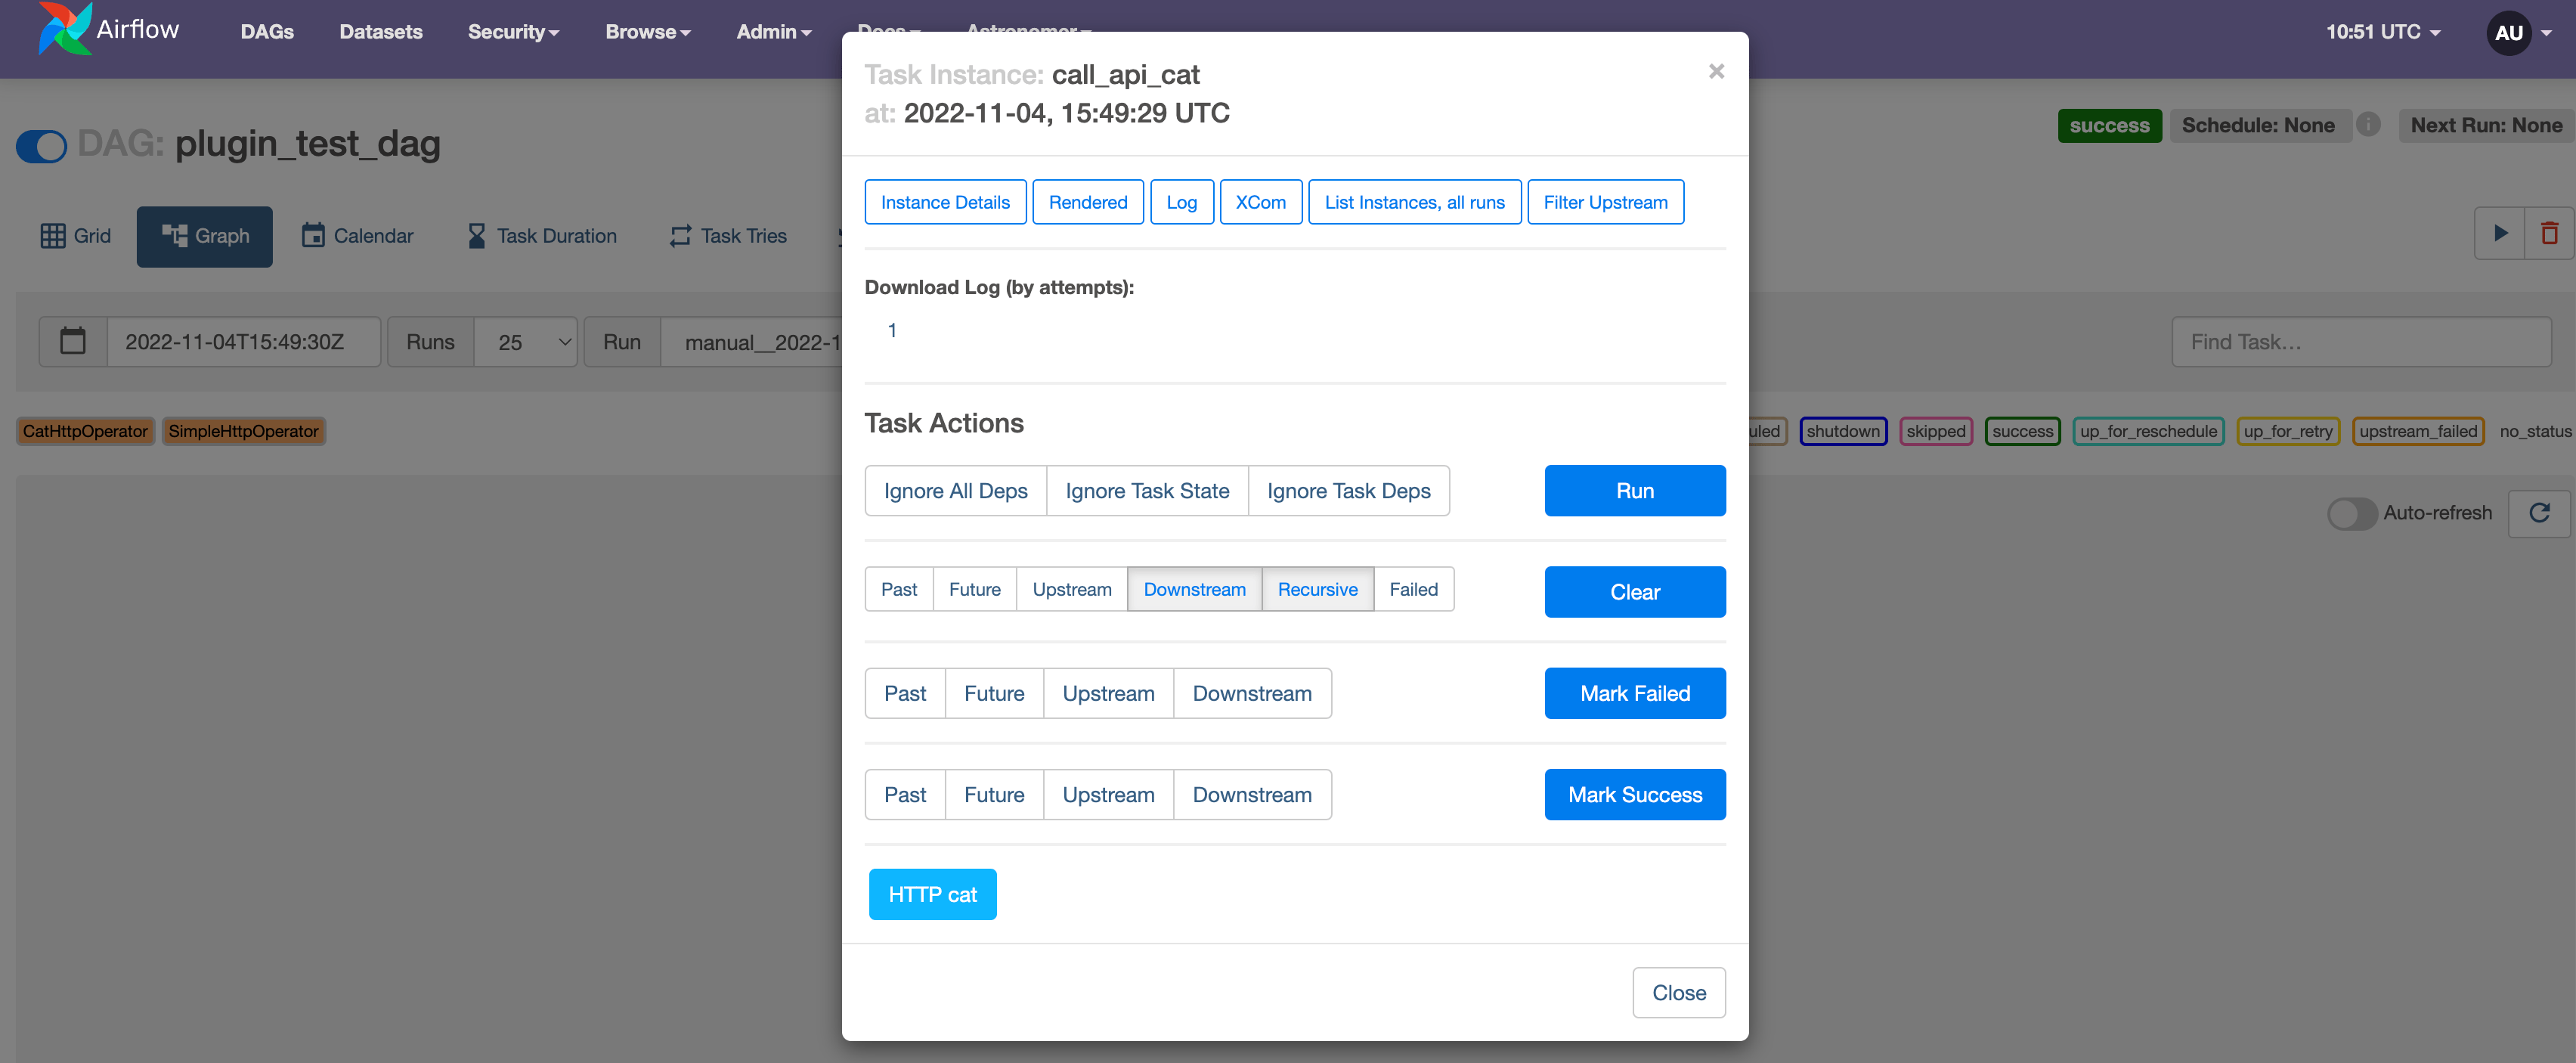
The screenshot below shows an operator extra link called "HTTP cat" that was added to the custom `CatHttpOperator`. For more instructions, see this [step-by-step tutorial](/docs/learn/2.x/operator-extra-link-tutorial) on how to add operator extra links.
Clicking on **Google** will take you to the URL `https://www.google.com` similar to the **Cosmos Docs** example in the previous **AppBuilder menu items** section.
If you want to use custom menu items in an Airflow environment hosted on Astro, you must make sure to give your plugin the necessary permissions. To do this with AppBuilder views, use the `@has_access` decorator to give your BaseView method the `ACTION_CAN_ACCESS_MENU` permission on the **Custom Menu** resource (defined by `CUSTOM_ASTRO_RESOURCE` variable). The **Custom Menu** resource is registered in the Airflow Security Manager by Astronomer to allow users to create custom menu items.
```python wrap theme={null}
from airflow.www.auth import has_access
from airflow.security import permissions
# ...
CUSTOM_ASTRO_RESOURCE = "Custom Menu"
# ...
# create a flask appbuilder BaseView
class MyBaseView(AppBuilderBaseView):
default_view = "test"
# Do not change the "has_access" line below
@expose("/")
@has_access([(permissions.ACTION_CAN_ACCESS_MENU, CUSTOM_ASTRO_RESOURCE)])
def test(self):
# render the HTML file from the templates directory with content
return self.render_template("test.html", content="awesome")
```
Airflow environments hosted on Astro must have **Custom Menu** or one of the existing top-level menu items such as **Docs**, **Browse**, or **Astronomer** passed as the `category` and `name` value in their menu sub-items for both AppBuilder views and menu items. This is because the `category` and `name` values must match a permission in the Airflow Security Manager. With **Custom Menu** as the `category` and `name` values, the menu item will be mapped to the existing **Custom Menu** resource in the Airflow Security Manager. The Airflow Security Manager also contains resources for **Docs**, **Browse**, and **Astronomer**. Therefore, these values can also be passed to `category` and `name`. If a different value is passed to `category` and `name`, no users besides the Workspace Owner will be able to see the custom plugin since a corresponding resource would not exist in the Airflow Security Manager, and the appropriate permissions won't be mapped to the menu sub-items.
```python wrap theme={null}
CUSTOM_ASTRO_RESOURCE = "Custom Menu"
# ...
# Menu sub-item
google_mitem = {
"category": CUSTOM_ASTRO_RESOURCE,
"label": "Google",
"href": "https://www.google.com",
"name": CUSTOM_ASTRO_RESOURCE,
}
```
The code to add the view is different for Airflow \< 2.10 since there is a bug with the `label` field for views in those versions. As a workaround, we don't pass the `name` attribute to the view. Airflow checks for that `name` attribute to decide whether it should use `appbuilder.add_view method` or `appbuilder.add_view_no_menu`. Because we don't pass name, it creates a view with **No menu**.
```python wrap theme={null}
my_view_package = {
"category": CUSTOM_ASTRO_RESOURCE,
"view": my_view,
}
```
Now we create a menu item `my_mitem` with the `label` **Custom Plugins** and add an explicit link to the view created with **No menu**. To get the correct link, we use the following code:
```python wrap theme={null}
from airflow.configuration import conf
# ...
base_url = conf.get("webserver", "base_url")
view_link = f"{str(base_url)}/{my_view.__class__.__name__.lower()}"
```
And then pass it like this:
```python wrap theme={null}
my_mitem = {
"label": "Custom Plugins",
"href": view_link,
"name": CUSTOM_ASTRO_RESOURCE,
"category": CUSTOM_ASTRO_RESOURCE,
}
```
The bug is fixed in Airflow 2.10. Therefore, we can directly pass the `name` argument to `my_view_package`. Since `name` is used, Airflow will directly call `appbuilder.add_view` for `my_view_package`. Therefore, we don't have a separate `my_mitem` definition like we do in Airflow \< 2.10.
### Operator extra links
Operator extra links are additional buttons with links that can be added to specific operators. They can be defined as Python classes derived from the `BaseOperatorLink` class. The example below shows how to create a new operator extra link `MyLink` that is applied to `MyOperator1` and `MyOperator2`. The operator extra link is registered with the `MyAirflowPlugin` by adding it its `operator_extra_links` list.
```python wrap theme={null}
from airflow.models.baseoperator import BaseOperatorLink
from include.custom_operators import MyOperator1, MyOperator2
from airflow.plugins_manager import AirflowPlugin
# create the operator extra link
class MyLink(BaseOperatorLink):
# name the link button
name = "My extra link"
# add the link button to one or more operators
operators = [MyOperator1, MyOperator2]
# function determining the link
def get_link(self, operator, *, ti_key=None):
return "http://my_link.com/"
# add the operator extra link to a plugin
class MyOperatorExtraLink(AirflowPlugin):
name = "my_plugin_name"
operator_extra_links = [
MyLink(),
]
```
The screenshot below shows an operator extra link called "HTTP cat" that was added to the custom `CatHttpOperator`. For more instructions, see this [step-by-step tutorial](/docs/learn/2.x/operator-extra-link-tutorial) on how to add operator extra links.
 ### Global operator extra links
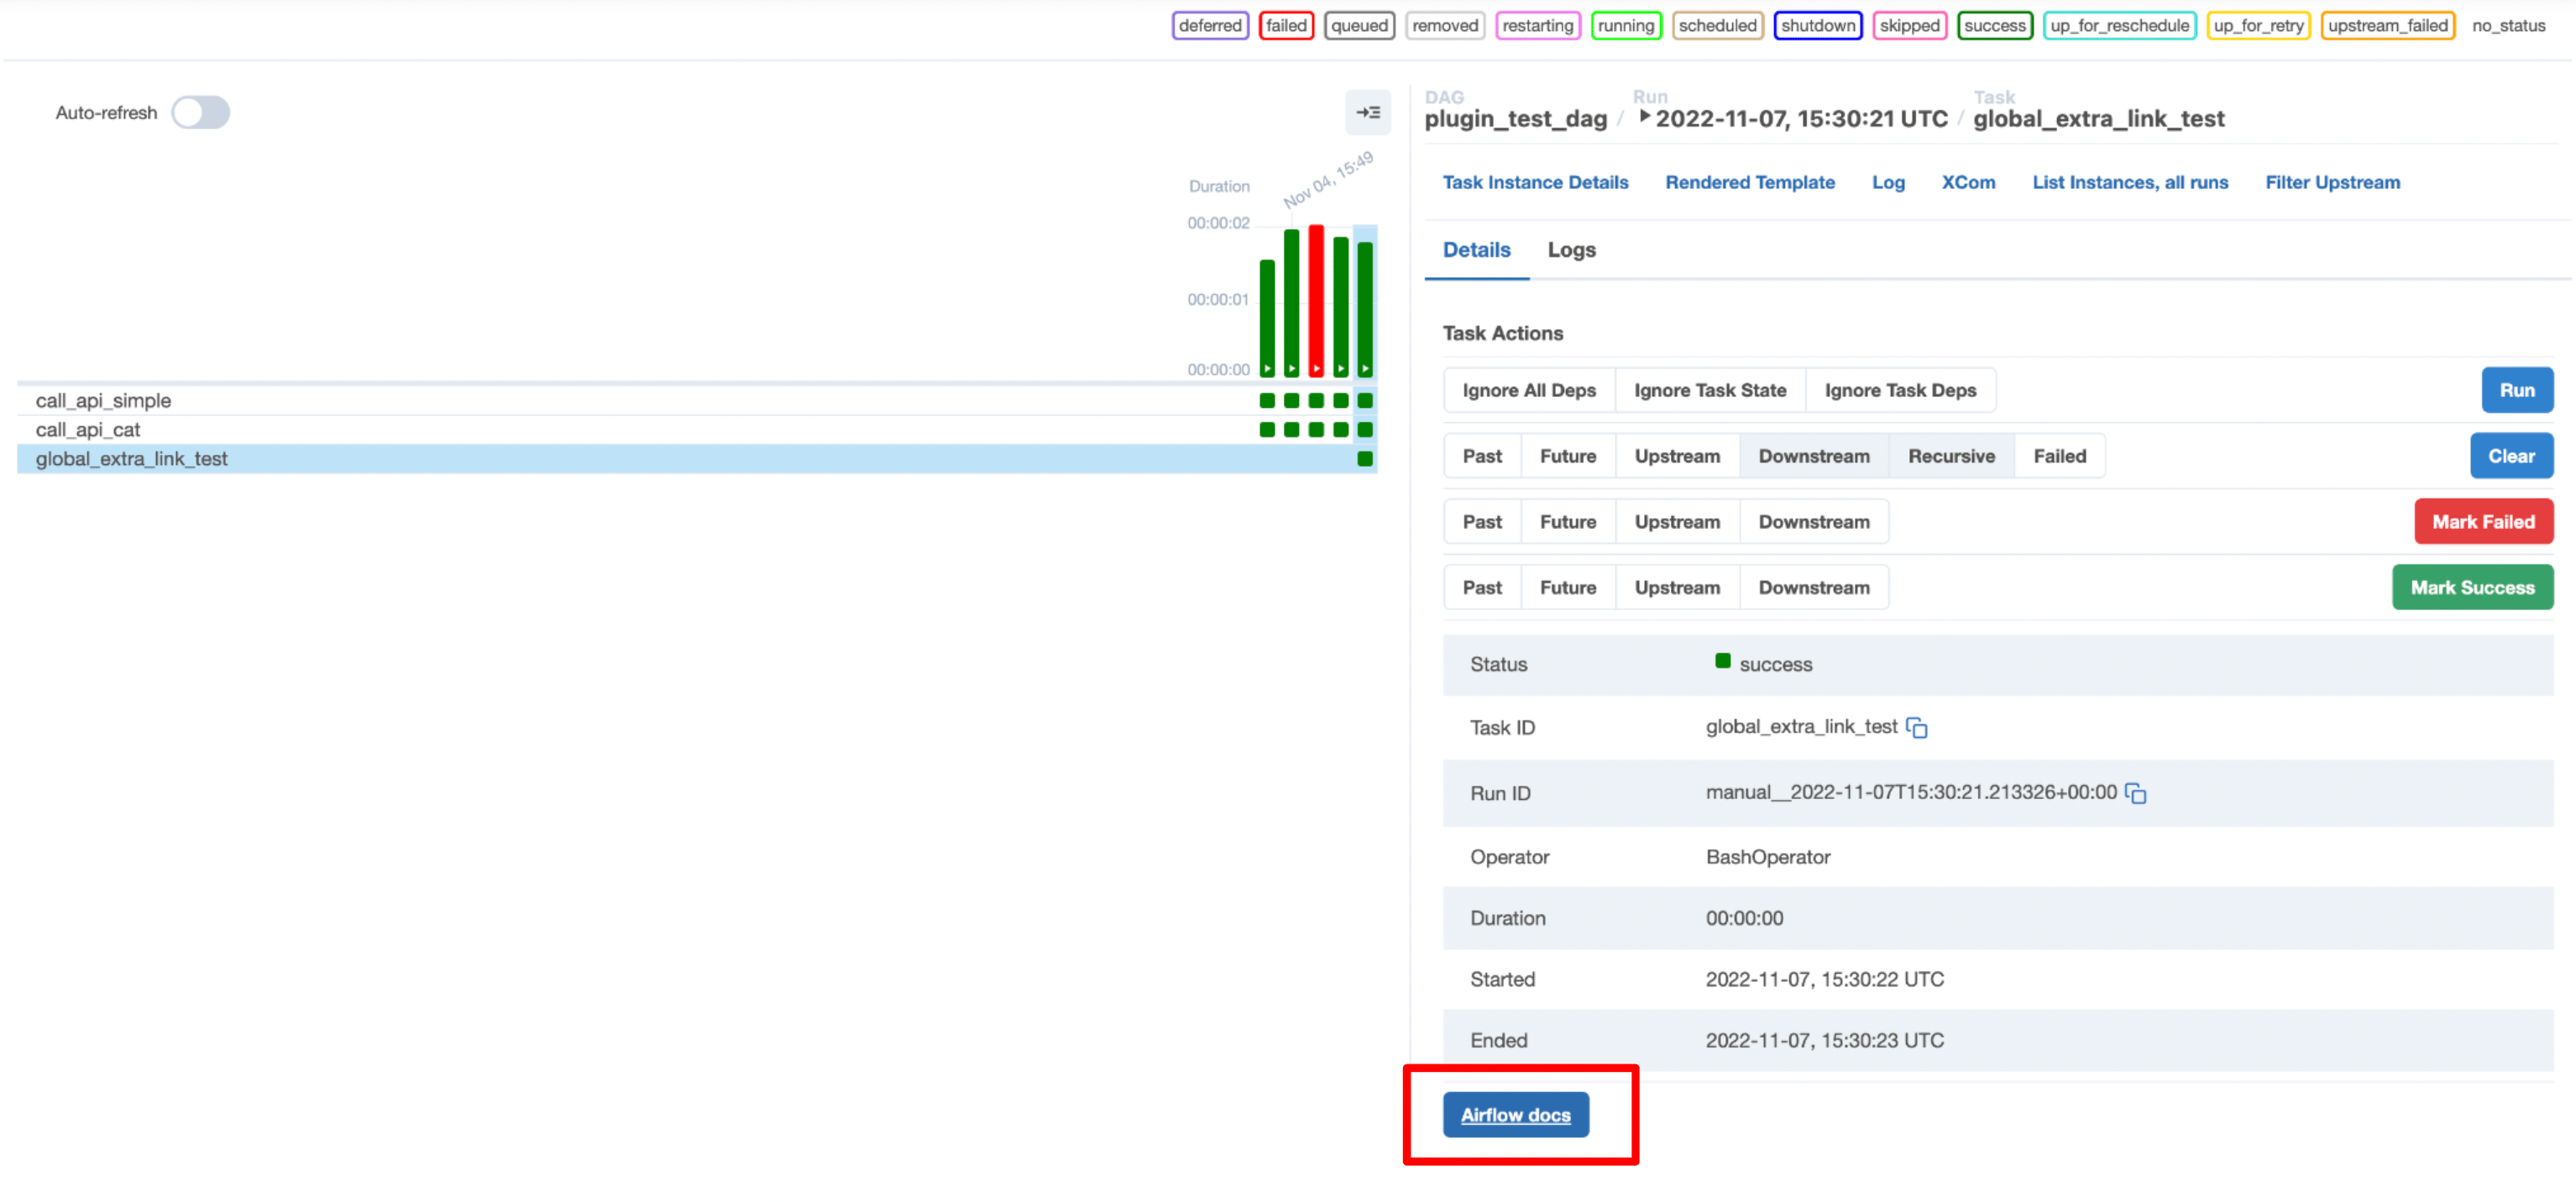
Global operator extra links are additional buttons with links that will be added to every operator. This example adds a button named **Airflow docs** to all operators that links out to the Airflow documentation.
```python wrap theme={null}
class GlobalLink(BaseOperatorLink):
# name the link button
name = "Airflow docs"
# function determining the link
def get_link(self, operator, *, ti_key=None):
return "https://airflow.apache.org/"
# add the operator extra link to a plugin
class MyGlobalLink(AirflowPlugin):
name = "my_plugin_name"
global_operator_extra_links = [
GlobalLink(),
]
```
You can access the button on task instances in both the **Graph** and **Grid** views.
### Global operator extra links
Global operator extra links are additional buttons with links that will be added to every operator. This example adds a button named **Airflow docs** to all operators that links out to the Airflow documentation.
```python wrap theme={null}
class GlobalLink(BaseOperatorLink):
# name the link button
name = "Airflow docs"
# function determining the link
def get_link(self, operator, *, ti_key=None):
return "https://airflow.apache.org/"
# add the operator extra link to a plugin
class MyGlobalLink(AirflowPlugin):
name = "my_plugin_name"
global_operator_extra_links = [
GlobalLink(),
]
```
You can access the button on task instances in both the **Graph** and **Grid** views.
 ### Macros
In Airflow you can define custom macros which can be accessed using Jinja templating. Macros can be added at the DAG level by defining them in the DAG parameter `user_defined_macros` as shown in [Using Airflow templates](/docs/learn/2.x/templating). If you want to make macros available to your whole Airflow instance you can register them as a plugin.
Common use cases for custom macros include:
* Injecting dynamic datetime objects into DAG code in formats not available in pre-defined macros. For example, converting the `{{ ts }}` predefined macro, which provides the logical date of the DAG as a timestamp from `YYYY-MM-DDThh:mm:ss+00:00` to `hh:mm`.
* Injecting dynamic arguments into DAG code based on Python logic. For example, passing a different argument to a function on weekdays versus the weekend.
* Injecting dynamic arguments into DAG code based on XCom values. For example, using a different target blob storage depending on how many files will be ingested, a count determined and pushed to XCom by an upstream task.
```python wrap theme={null}
from airflow.plugins_manager import AirflowPlugin
from random import randint
def random_number_macro():
return randint(0, 1000)
class MyAirflowMacro(AirflowPlugin):
name = "my_macro_plugin"
macros = [
random_number_macro,
]
```
The code above creates a macro that returns a random number between 0 and 1000. It can be referenced using Jinja templating in any templateable parameter of any operator. The code snippet below shows how the macro can be used within the `bash_command` parameter of the `BashOperator` to print out a random number.
```python wrap theme={null}
use_plugin_macro = BashOperator(
task_id="use_plugin_macro",
bash_command="echo {{ macros.my_macro_plugin.random_number_macro() }}",
)
```
### Airflow listeners
[Airflow listeners](https://airflow.apache.org/docs/apache-airflow/stable/administration-and-deployment/listeners.html#listeners) allow you to execute custom code when certain events occur anywhere in your Airflow instance, for example whenever any DAG run fails or an update to any dataset is detected.
Listeners execute based on the event they are waiting for and aren't attached to a task or DAG. This is in contrast to [Airflow callbacks](/docs/learn/2.x/error-notifications-in-airflow#airflow-callbacks) which are attached to a specific DAG or (set of) task(s) or [Airflow dataset](/docs/learn/2.x/airflow-datasets) consumer DAGs that only execute when a specific (set of) dataset(s) is updated.
While the listener itself will execute any time its event occurs, you can use conditional logic to determine whether or not to execute the code within the listener. For example, you can use a listener to send a Slack notification when a DAG run fails, but only if the DAG run wasn't manually triggered.
You can create a listener using the `@hookimpl` decorator on functions defined with the same name and parameters as listed in the [listeners spec](https://github.com/apache/airflow/tree/main/airflow/listeners/spec) source code.
For example, the [@hookspec of the `on_task_instance_failed` function](https://github.com/apache/airflow/blob/main/airflow/listeners/spec/taskinstance.py) is:
```python wrap theme={null}
@hookspec
def on_task_instance_failed(
previous_state: TaskInstanceState | None, task_instance: TaskInstance, session: Session | None
):
"""Execute when task state changes to FAIL. previous_state can be None."""
```
In order to create a listener that executes whenever any task instance fails in your whole Airflow environment, you need to define a function called `on_task_instance_failed` that takes three parameters: `previous_state`, `task_instance` and `session`. Then, you decorate it with `@hookimpl`.
```python wrap theme={null}
from airflow.listeners import hookimpl
@hookimpl
def on_task_instance_failed(
previous_state: TaskInstanceState | None, task_instance: TaskInstance, session: Session | None
):
# Your code here
```
The listener file can then be registered as a plugin by adding it to the `listeners` component of the plugin class.
```python wrap theme={null}
from airflow.plugins_manager import AirflowPlugin
from plugins import listener_code
class MyListenerPlugin(AirflowPlugin):
name = "my_listener_plugin"
listeners = [listener_code]
```
To see a full example of how to create and register a listener, check out the [Use a listener to send a Slack notification when a Dataset is updated](/docs/learn/2.x/airflow-listeners) tutorial.
### Macros
In Airflow you can define custom macros which can be accessed using Jinja templating. Macros can be added at the DAG level by defining them in the DAG parameter `user_defined_macros` as shown in [Using Airflow templates](/docs/learn/2.x/templating). If you want to make macros available to your whole Airflow instance you can register them as a plugin.
Common use cases for custom macros include:
* Injecting dynamic datetime objects into DAG code in formats not available in pre-defined macros. For example, converting the `{{ ts }}` predefined macro, which provides the logical date of the DAG as a timestamp from `YYYY-MM-DDThh:mm:ss+00:00` to `hh:mm`.
* Injecting dynamic arguments into DAG code based on Python logic. For example, passing a different argument to a function on weekdays versus the weekend.
* Injecting dynamic arguments into DAG code based on XCom values. For example, using a different target blob storage depending on how many files will be ingested, a count determined and pushed to XCom by an upstream task.
```python wrap theme={null}
from airflow.plugins_manager import AirflowPlugin
from random import randint
def random_number_macro():
return randint(0, 1000)
class MyAirflowMacro(AirflowPlugin):
name = "my_macro_plugin"
macros = [
random_number_macro,
]
```
The code above creates a macro that returns a random number between 0 and 1000. It can be referenced using Jinja templating in any templateable parameter of any operator. The code snippet below shows how the macro can be used within the `bash_command` parameter of the `BashOperator` to print out a random number.
```python wrap theme={null}
use_plugin_macro = BashOperator(
task_id="use_plugin_macro",
bash_command="echo {{ macros.my_macro_plugin.random_number_macro() }}",
)
```
### Airflow listeners
[Airflow listeners](https://airflow.apache.org/docs/apache-airflow/stable/administration-and-deployment/listeners.html#listeners) allow you to execute custom code when certain events occur anywhere in your Airflow instance, for example whenever any DAG run fails or an update to any dataset is detected.
Listeners execute based on the event they are waiting for and aren't attached to a task or DAG. This is in contrast to [Airflow callbacks](/docs/learn/2.x/error-notifications-in-airflow#airflow-callbacks) which are attached to a specific DAG or (set of) task(s) or [Airflow dataset](/docs/learn/2.x/airflow-datasets) consumer DAGs that only execute when a specific (set of) dataset(s) is updated.
While the listener itself will execute any time its event occurs, you can use conditional logic to determine whether or not to execute the code within the listener. For example, you can use a listener to send a Slack notification when a DAG run fails, but only if the DAG run wasn't manually triggered.
You can create a listener using the `@hookimpl` decorator on functions defined with the same name and parameters as listed in the [listeners spec](https://github.com/apache/airflow/tree/main/airflow/listeners/spec) source code.
For example, the [@hookspec of the `on_task_instance_failed` function](https://github.com/apache/airflow/blob/main/airflow/listeners/spec/taskinstance.py) is:
```python wrap theme={null}
@hookspec
def on_task_instance_failed(
previous_state: TaskInstanceState | None, task_instance: TaskInstance, session: Session | None
):
"""Execute when task state changes to FAIL. previous_state can be None."""
```
In order to create a listener that executes whenever any task instance fails in your whole Airflow environment, you need to define a function called `on_task_instance_failed` that takes three parameters: `previous_state`, `task_instance` and `session`. Then, you decorate it with `@hookimpl`.
```python wrap theme={null}
from airflow.listeners import hookimpl
@hookimpl
def on_task_instance_failed(
previous_state: TaskInstanceState | None, task_instance: TaskInstance, session: Session | None
):
# Your code here
```
The listener file can then be registered as a plugin by adding it to the `listeners` component of the plugin class.
```python wrap theme={null}
from airflow.plugins_manager import AirflowPlugin
from plugins import listener_code
class MyListenerPlugin(AirflowPlugin):
name = "my_listener_plugin"
listeners = [listener_code]
```
To see a full example of how to create and register a listener, check out the [Use a listener to send a Slack notification when a Dataset is updated](/docs/learn/2.x/airflow-listeners) tutorial.