> ## Documentation Index
> Fetch the complete documentation index at: https://astronomer.io/docs/llms.txt
> Use this file to discover all available pages before exploring further.
# Predict possum tail length using MLflow, Airflow, and linear regression
The [MLflow Airflow provider](https://github.com/astronomer/airflow-provider-mlflow) has been deprecated and is no longer maintained. This use case was kept for reference purposes only.
[MLflow](https://mlflow.org/) is a popular tool for tracking and managing machine learning models. When combined, Airflow and MLflow make a powerful platform for ML orchestration (MLOx).
This use case shows how to use MLflow with Airflow to engineer machine learning features, train a [scikit-learn Ridge linear regression model](https://scikit-learn.org/stable/modules/generated/sklearn.linear_model.RidgeCV.html), and create predictions based on the trained model.
 ## Before you start
Before trying this example, make sure you have:
* The [Astro CLI](/docs/cli/v1.43/overview).
## Clone the project
Clone the example project from the [Astronomer GitHub](https://github.com/astronomer/use-case-mlflow). To keep your credentials secure when you deploy this project to your own git repository, make sure to create a file called `.env` with the contents of the `.env_example` file in the project root directory.
The repository is configured to spin up and use local MLflow and MinIO instances without you needing to define connections or access external tools.
## Run the project
To run the example project, open your project directory and run:
```sh wrap theme={null}
astro dev start
```
This command builds your project and spins up 6 containers on your machine to run it:
* The Airflow webserver, which runs the Airflow UI and can be accessed at `https://localhost:8080/`.
* The Airflow scheduler, which is responsible for monitoring and triggering tasks.
* The Airflow triggerer, which is an Airflow component used to run deferrable operators.
* The Airflow metadata database, which is a Postgres database that runs on port `5432`.
* A local [MinIO](https://min.io/) instance, which can be accessed at `https://localhost:9000/`.
* A local [MLflow](https://mlflow.org/) instance, which can be accessed at `https://localhost:5000/`.
## Project contents
### Data source
This example uses the [Possum Regression dataset](https://www.kaggle.com/datasets/abrambeyer/openintro-possum) from Kaggle. It contains measurements of different attributes, such as total length, skull width, or age, for 104 possums. This data was originally published by Lindenmayer and others (1995) in the Australian Journal of Zoology and is commonly used to teach linear regression.
### Project overview
This project consists of three DAGs which have dependency relationships through [Airflow datasets](/docs/learn/2.x/airflow-datasets).
## Before you start
Before trying this example, make sure you have:
* The [Astro CLI](/docs/cli/v1.43/overview).
## Clone the project
Clone the example project from the [Astronomer GitHub](https://github.com/astronomer/use-case-mlflow). To keep your credentials secure when you deploy this project to your own git repository, make sure to create a file called `.env` with the contents of the `.env_example` file in the project root directory.
The repository is configured to spin up and use local MLflow and MinIO instances without you needing to define connections or access external tools.
## Run the project
To run the example project, open your project directory and run:
```sh wrap theme={null}
astro dev start
```
This command builds your project and spins up 6 containers on your machine to run it:
* The Airflow webserver, which runs the Airflow UI and can be accessed at `https://localhost:8080/`.
* The Airflow scheduler, which is responsible for monitoring and triggering tasks.
* The Airflow triggerer, which is an Airflow component used to run deferrable operators.
* The Airflow metadata database, which is a Postgres database that runs on port `5432`.
* A local [MinIO](https://min.io/) instance, which can be accessed at `https://localhost:9000/`.
* A local [MLflow](https://mlflow.org/) instance, which can be accessed at `https://localhost:5000/`.
## Project contents
### Data source
This example uses the [Possum Regression dataset](https://www.kaggle.com/datasets/abrambeyer/openintro-possum) from Kaggle. It contains measurements of different attributes, such as total length, skull width, or age, for 104 possums. This data was originally published by Lindenmayer and others (1995) in the Australian Journal of Zoology and is commonly used to teach linear regression.
### Project overview
This project consists of three DAGs which have dependency relationships through [Airflow datasets](/docs/learn/2.x/airflow-datasets).
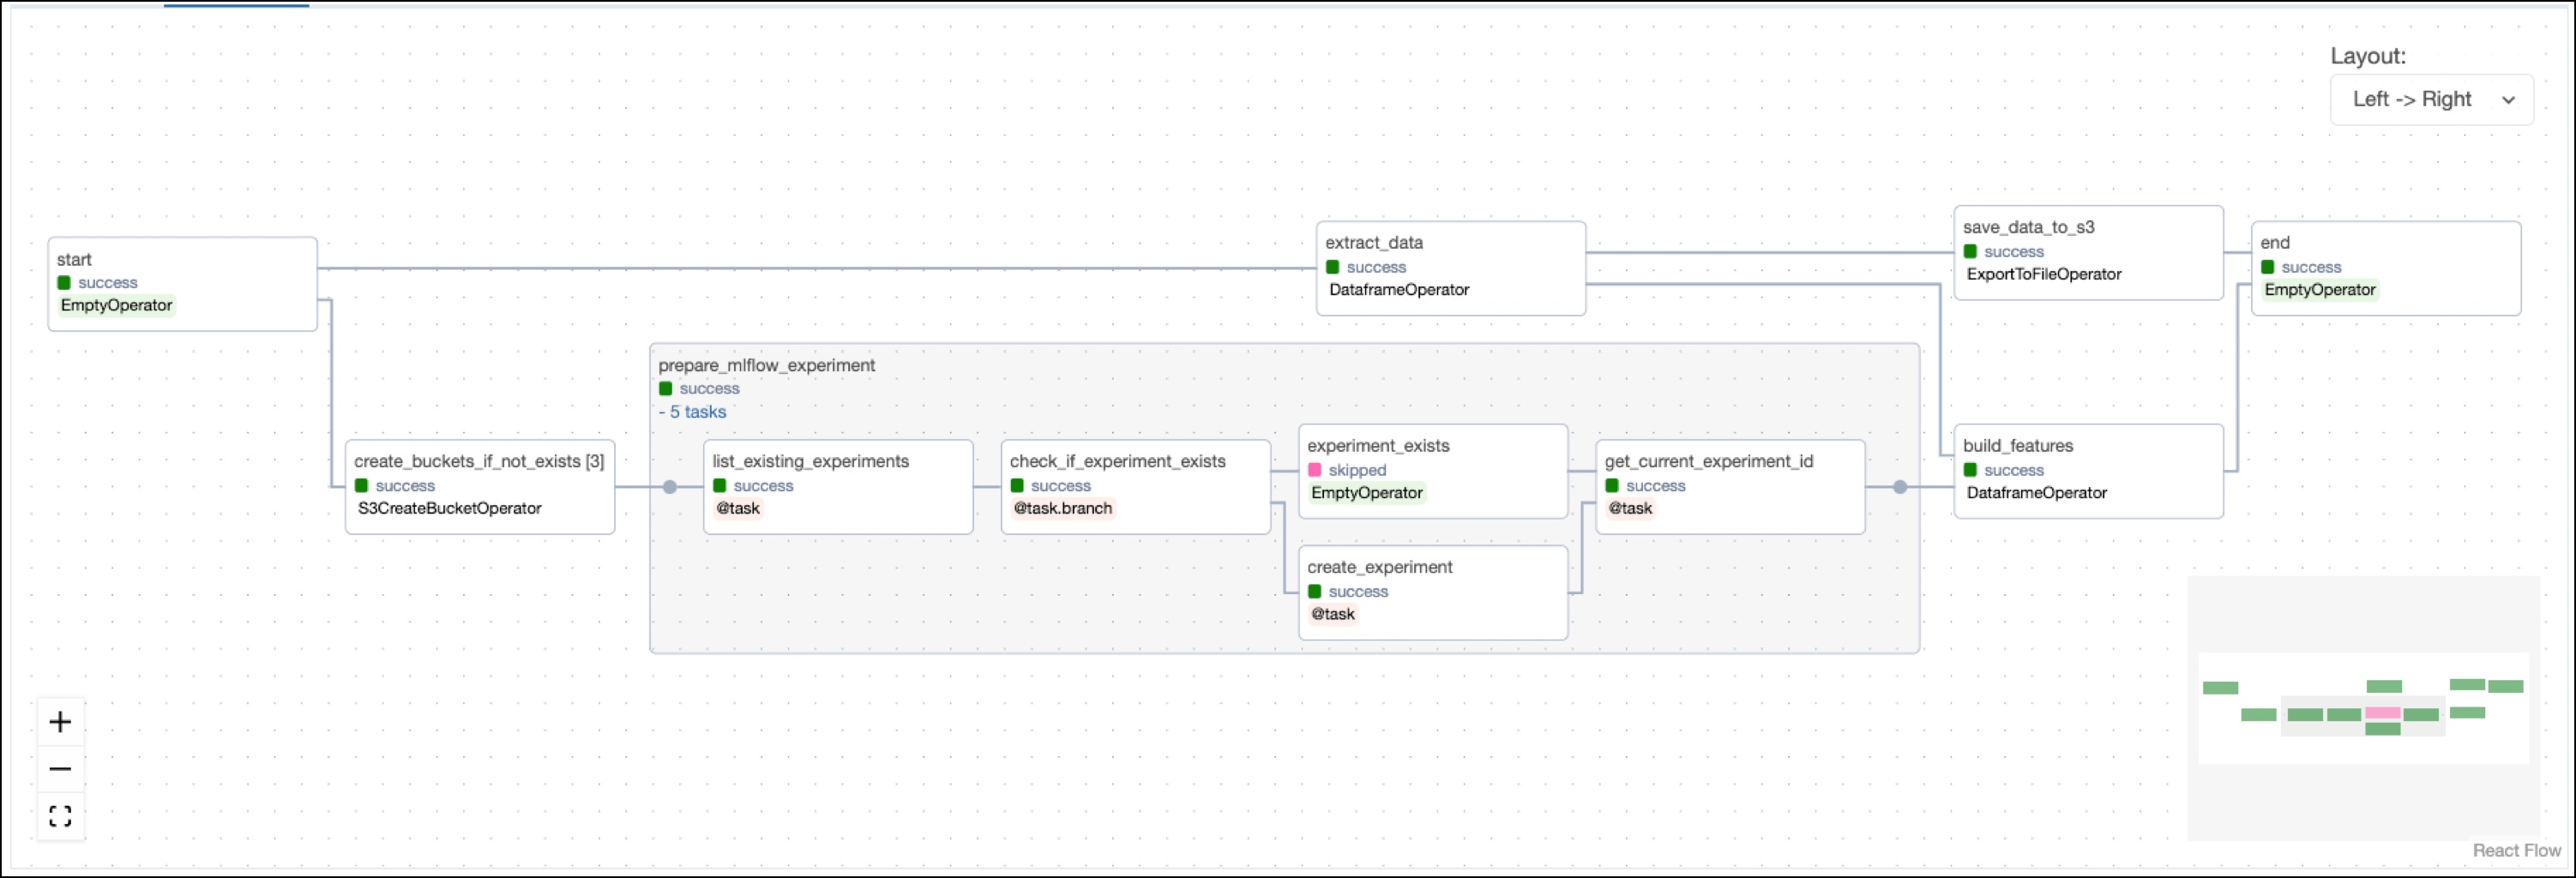
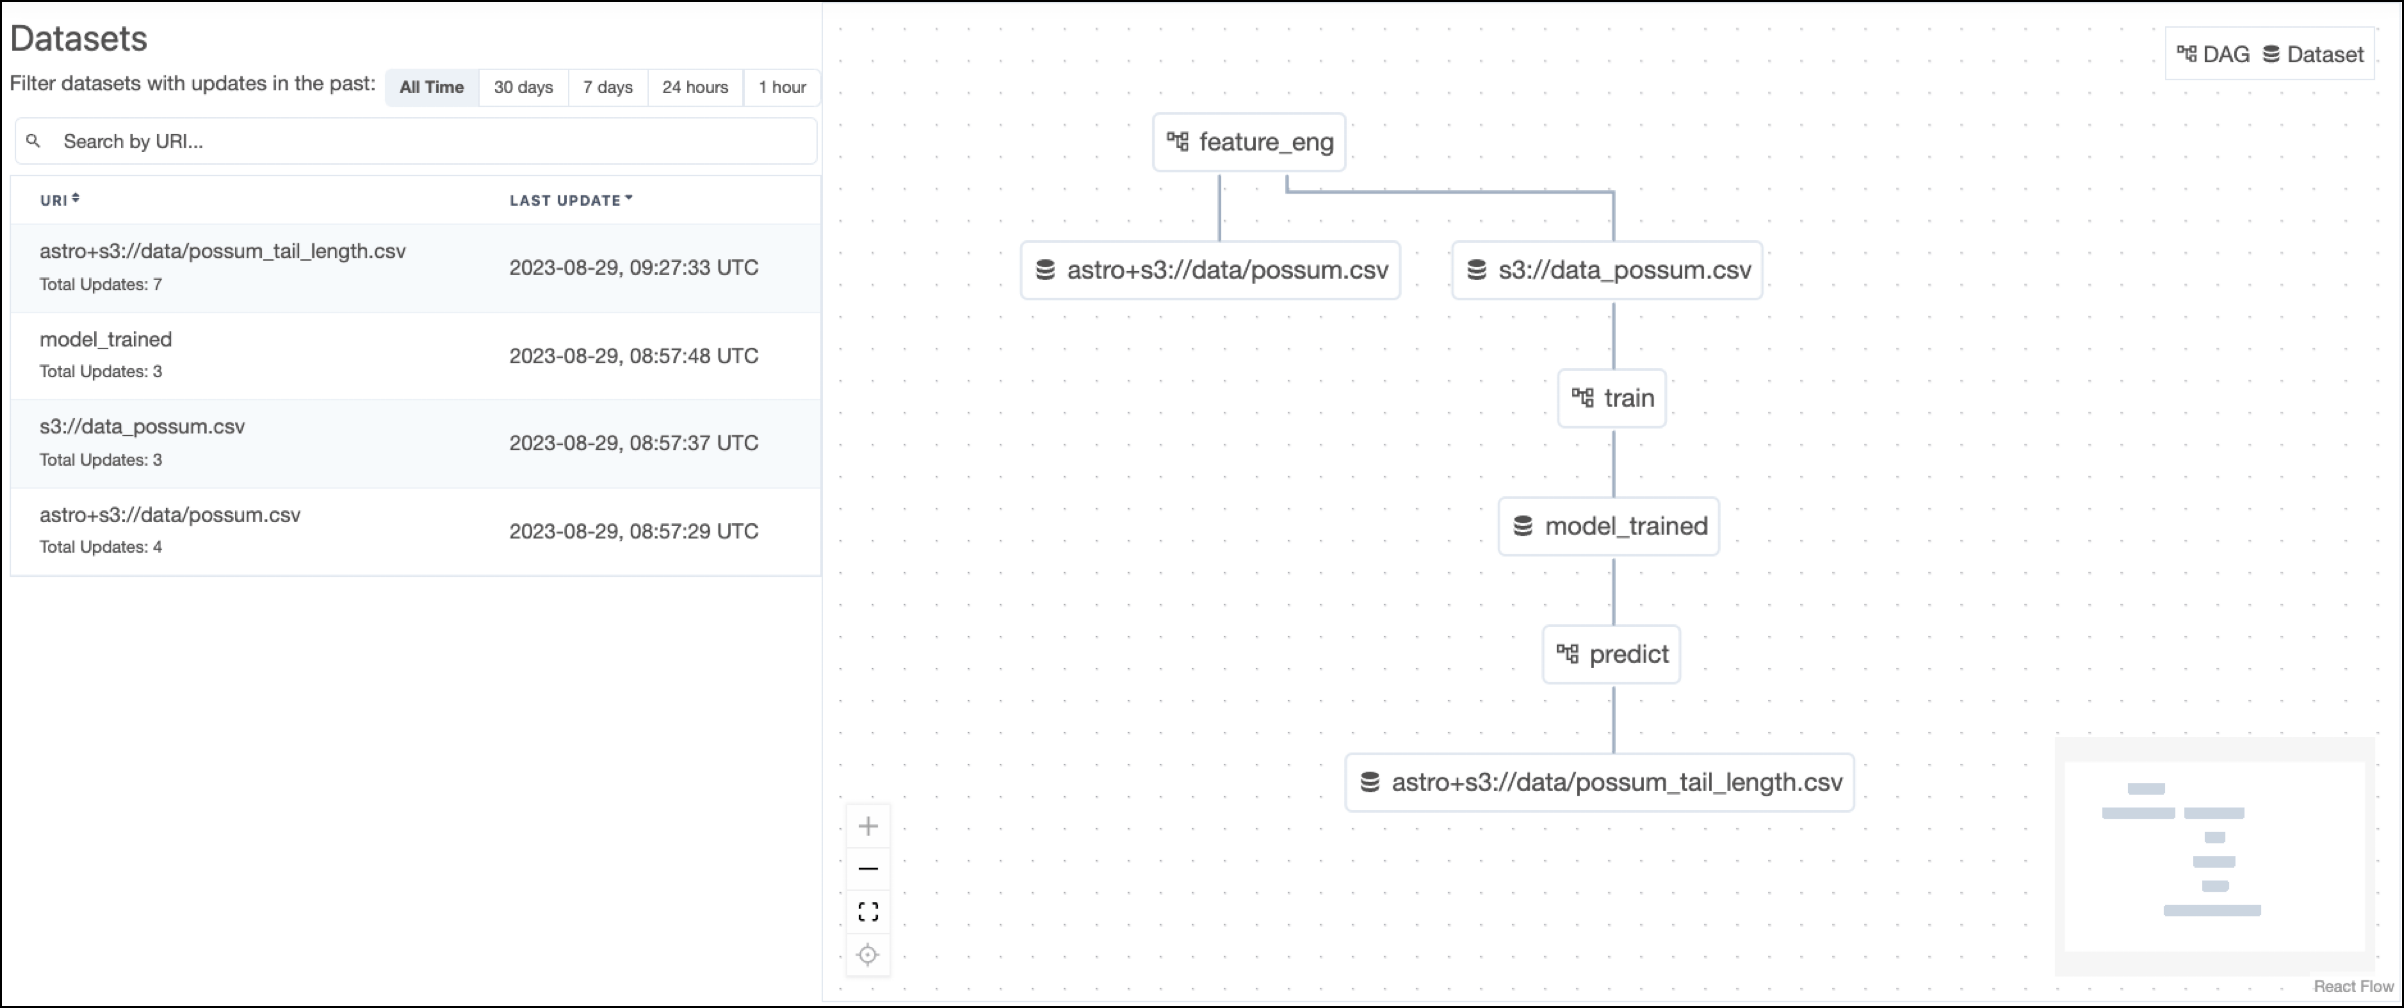 The [`feature_eng`](https://github.com/astronomer/use-case-mlflow/blob/main/dags/feature_eng.py) DAG prepares the MLflow experiment and builds prediction features from the possum data.
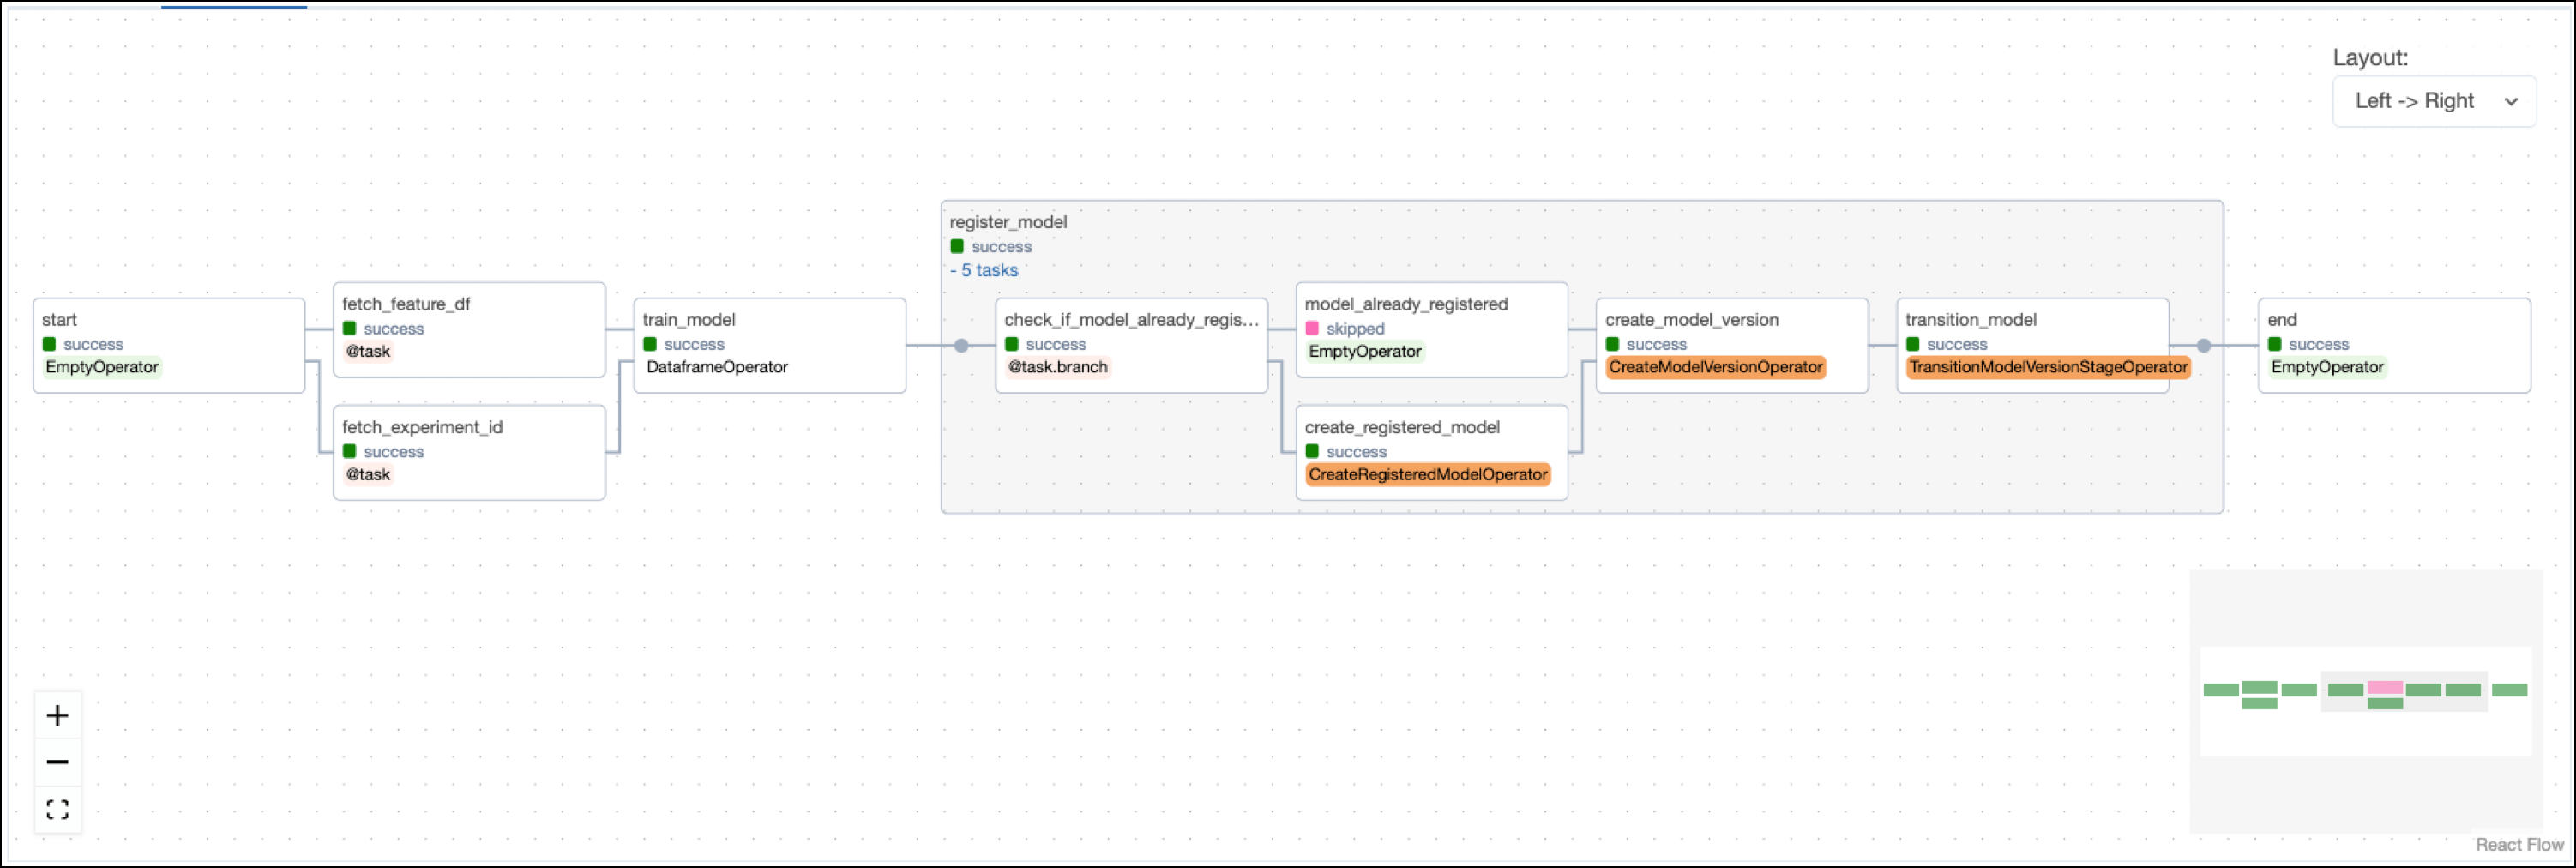
 The [`train`](https://github.com/astronomer/use-case-mlflow/blob/main/dags/train.py) DAG trains a RidgeCV model on the engineered features from `feature_eng` and then registers the model with MLflow using operators from the [MLflow Airflow provider](https://github.com/astronomer/airflow-provider-mlflow).
 The [`predict`](https://github.com/astronomer/use-case-mlflow/blob/main/dags/predict.py) DAG uses the trained model from `train` to create predictions and plot them against the target values.
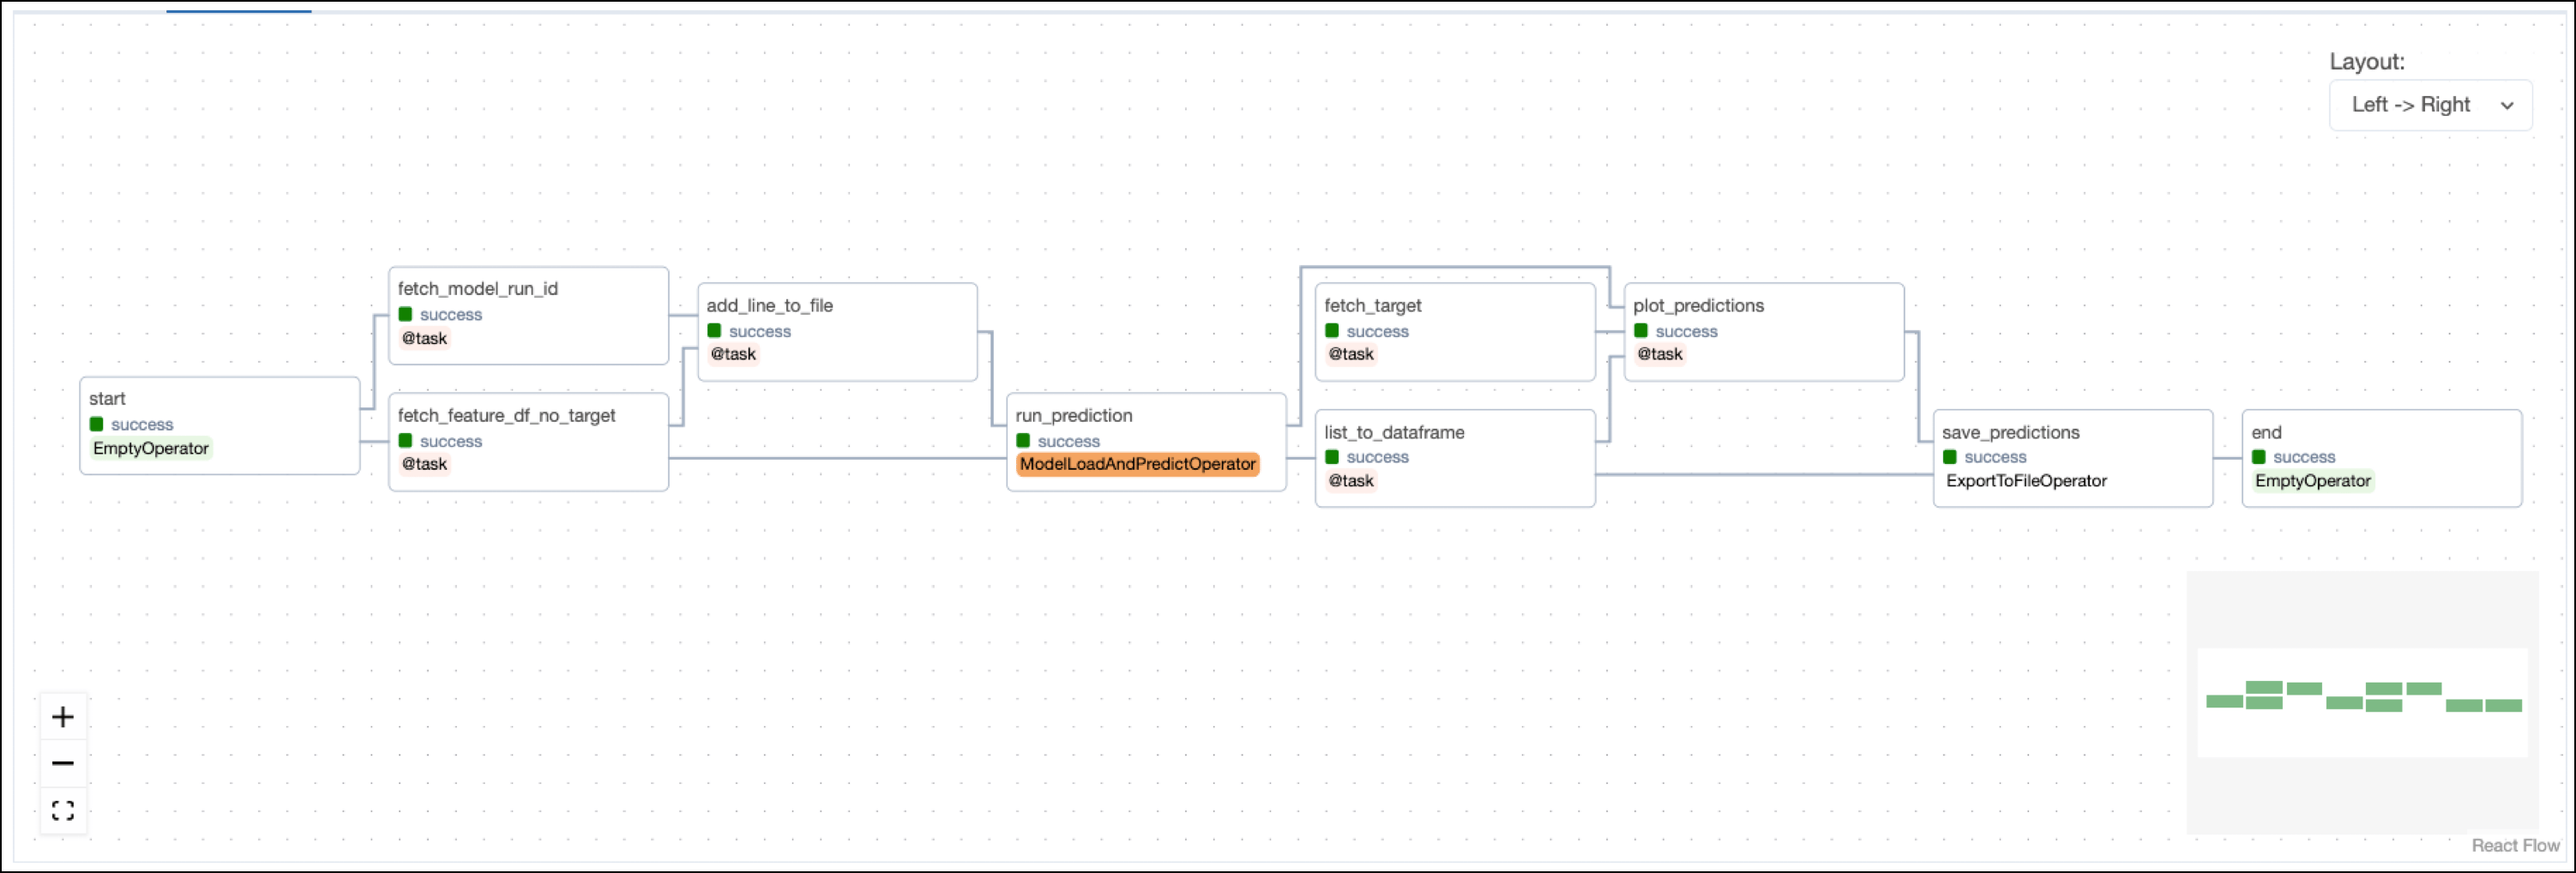 Note that the model is trained on the whole dataset and predictions are made on the same data. In a real world scenario you'd want to split the data into a training, validation, and test set.
### Project code
This use case shows many Airflow features and ways to interact with MLflow. The following sections will highlight a couple of relevant code snippets in each DAG and explain them in more detail.
#### Feature engineering DAG
The feature engineering DAG starts with a task that creates the necessary object storage buckets in the resource provided as `AWS_CONN_ID` using the [`S3CreateBucketOperator`](https://airflow.apache.org/registry/providers/amazon#amazon-s3-S3CreateBucketOperator). By default, the project uses a local MinIO instance, which is created when starting the Astro project. If you want to use remote object storage, you can change the `AWS_CONN_ID` in the `.env` file and provide your AWS credentials.
The operator is [dynamically mapped](/docs/learn/2.x/dynamic-tasks) over a list of bucket names to create all buckets in parallel.
```python wrap theme={null}
create_buckets_if_not_exists = S3CreateBucketOperator.partial(
task_id="create_buckets_if_not_exists",
aws_conn_id=AWS_CONN_ID,
).expand(bucket_name=[DATA_BUCKET_NAME, MLFLOW_ARTIFACT_BUCKET, XCOM_BUCKET])
```
The `prepare_mlflow_experiment` [task group](/docs/learn/2.x/task-groups) contains a pattern that lists all existing experiments in the MLflow instance connected through the `MLFLOW_CONN_ID`. It also creates a new experiment with a specified name if it doesn't exist yet using the [@`task.branch` decorator](/docs/learn/2.x/airflow-branch-operator). The [`MLflowClientHook`](https://github.com/astronomer/airflow-provider-mlflow/blob/main/mlflow_provider/hooks/client.py) contains the `run` method that creates the new experiment by making a call to the MLflow API.
```python wrap theme={null}
@task
def create_experiment(experiment_name, artifact_bucket):
"""Create a new MLFlow experiment with a specified name.
Save artifacts to the specified S3 bucket."""
mlflow_hook = MLflowClientHook(mlflow_conn_id=MLFLOW_CONN_ID)
new_experiment_information = mlflow_hook.run(
endpoint="api/2.0/mlflow/experiments/create",
request_params={
"name": experiment_name,
"artifact_location": f"s3://{artifact_bucket}/",
},
).json()
return new_experiment_information
```
The `build_features` task completes feature engineering using [Pandas](https://pandas.pydata.org/docs/reference/api/pandas.get_dummies.html) to one-hot encode categorical features and [scikit-learn](https://scikit-learn.org/stable/modules/generated/sklearn.preprocessing.StandardScaler.html) to scale numeric features.
The [mlflow](https://pypi.org/project/mlflow/) package is used to [track](https://mlflow.org/docs/latest/python_api/mlflow.html?highlight=start_run#mlflow.start_run) the scaler run in MLflow.
The task is defined using the [`@aql.dataframe`](https://astro-sdk-python.readthedocs.io/en/stable/astro/sql/operators/dataframe.html) decorator from the [Astro Python SDK](https://astro-sdk-python.readthedocs.io/en/stable/).
```python wrap theme={null}
@aql.dataframe()
def build_features(
raw_df: DataFrame,
experiment_id: str,
target_column: str,
categorical_columns: list,
numeric_columns: list,
) -> DataFrame:
# ...
scaler = StandardScaler()
with mlflow.start_run(experiment_id=experiment_id, run_name="Scaler") as run:
X_encoded = pd.DataFrame(
scaler.fit_transform(X_encoded), columns=X_encoded.columns
)
mlflow.sklearn.log_model(scaler, artifact_path="scaler")
mlflow.log_metrics(
pd.DataFrame(scaler.mean_, index=X_encoded.columns)[0].to_dict()
)
# ...
return X_encoded # return a pandas DataFrame
```
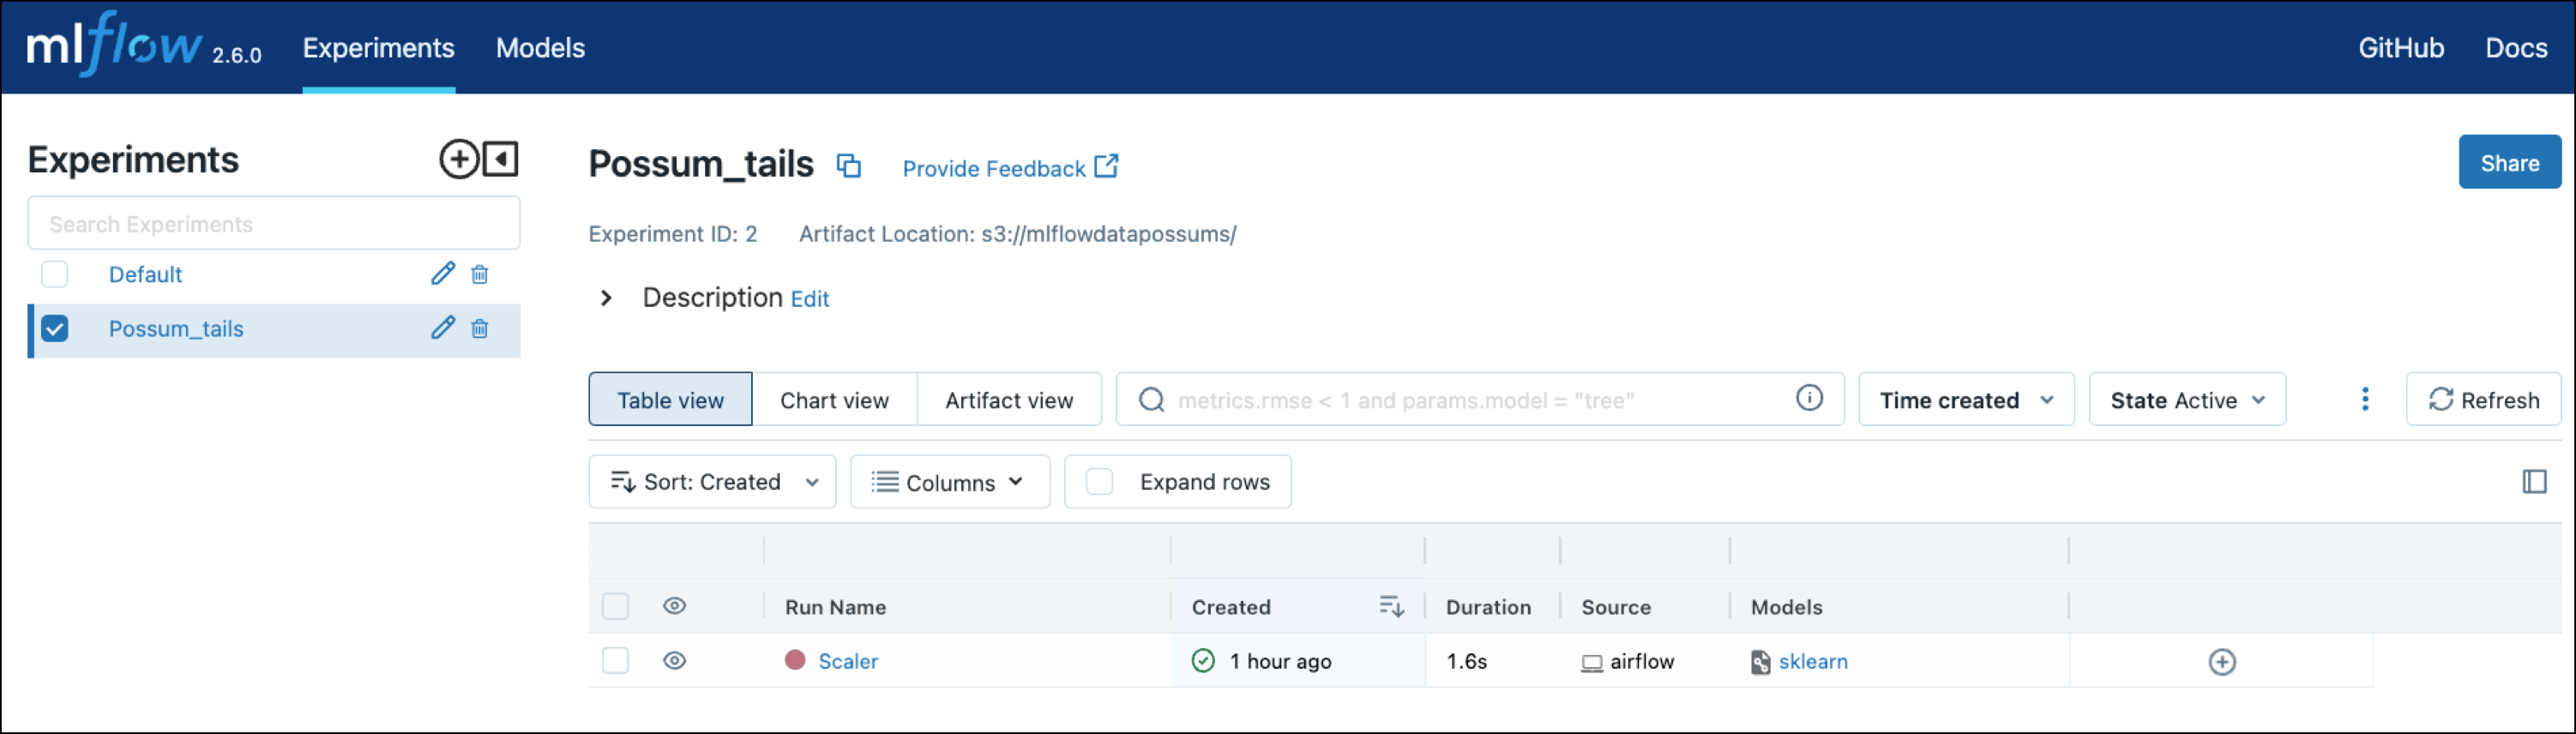
You can view the Scaler run in the MLflow UI at `localhost:5000`.
Note that the model is trained on the whole dataset and predictions are made on the same data. In a real world scenario you'd want to split the data into a training, validation, and test set.
### Project code
This use case shows many Airflow features and ways to interact with MLflow. The following sections will highlight a couple of relevant code snippets in each DAG and explain them in more detail.
#### Feature engineering DAG
The feature engineering DAG starts with a task that creates the necessary object storage buckets in the resource provided as `AWS_CONN_ID` using the [`S3CreateBucketOperator`](https://airflow.apache.org/registry/providers/amazon#amazon-s3-S3CreateBucketOperator). By default, the project uses a local MinIO instance, which is created when starting the Astro project. If you want to use remote object storage, you can change the `AWS_CONN_ID` in the `.env` file and provide your AWS credentials.
The operator is [dynamically mapped](/docs/learn/2.x/dynamic-tasks) over a list of bucket names to create all buckets in parallel.
```python wrap theme={null}
create_buckets_if_not_exists = S3CreateBucketOperator.partial(
task_id="create_buckets_if_not_exists",
aws_conn_id=AWS_CONN_ID,
).expand(bucket_name=[DATA_BUCKET_NAME, MLFLOW_ARTIFACT_BUCKET, XCOM_BUCKET])
```
The `prepare_mlflow_experiment` [task group](/docs/learn/2.x/task-groups) contains a pattern that lists all existing experiments in the MLflow instance connected through the `MLFLOW_CONN_ID`. It also creates a new experiment with a specified name if it doesn't exist yet using the [@`task.branch` decorator](/docs/learn/2.x/airflow-branch-operator). The [`MLflowClientHook`](https://github.com/astronomer/airflow-provider-mlflow/blob/main/mlflow_provider/hooks/client.py) contains the `run` method that creates the new experiment by making a call to the MLflow API.
```python wrap theme={null}
@task
def create_experiment(experiment_name, artifact_bucket):
"""Create a new MLFlow experiment with a specified name.
Save artifacts to the specified S3 bucket."""
mlflow_hook = MLflowClientHook(mlflow_conn_id=MLFLOW_CONN_ID)
new_experiment_information = mlflow_hook.run(
endpoint="api/2.0/mlflow/experiments/create",
request_params={
"name": experiment_name,
"artifact_location": f"s3://{artifact_bucket}/",
},
).json()
return new_experiment_information
```
The `build_features` task completes feature engineering using [Pandas](https://pandas.pydata.org/docs/reference/api/pandas.get_dummies.html) to one-hot encode categorical features and [scikit-learn](https://scikit-learn.org/stable/modules/generated/sklearn.preprocessing.StandardScaler.html) to scale numeric features.
The [mlflow](https://pypi.org/project/mlflow/) package is used to [track](https://mlflow.org/docs/latest/python_api/mlflow.html?highlight=start_run#mlflow.start_run) the scaler run in MLflow.
The task is defined using the [`@aql.dataframe`](https://astro-sdk-python.readthedocs.io/en/stable/astro/sql/operators/dataframe.html) decorator from the [Astro Python SDK](https://astro-sdk-python.readthedocs.io/en/stable/).
```python wrap theme={null}
@aql.dataframe()
def build_features(
raw_df: DataFrame,
experiment_id: str,
target_column: str,
categorical_columns: list,
numeric_columns: list,
) -> DataFrame:
# ...
scaler = StandardScaler()
with mlflow.start_run(experiment_id=experiment_id, run_name="Scaler") as run:
X_encoded = pd.DataFrame(
scaler.fit_transform(X_encoded), columns=X_encoded.columns
)
mlflow.sklearn.log_model(scaler, artifact_path="scaler")
mlflow.log_metrics(
pd.DataFrame(scaler.mean_, index=X_encoded.columns)[0].to_dict()
)
# ...
return X_encoded # return a pandas DataFrame
```
You can view the Scaler run in the MLflow UI at `localhost:5000`.
 #### Model training DAG
Airflow [datasets](/docs/learn/2.x/airflow-datasets) let you schedule DAGs based on when a specific file or database is updated in a separate DAG. In this example, the model training DAG is scheduled to run as soon as the last task in the feature engineering DAG completes.
```python wrap theme={null}
@dag(
schedule=[Dataset("s3://" + DATA_BUCKET_NAME + "_" + FILE_PATH)],
start_date=datetime(2023, 1, 1),
catchup=False,
)
```
The `fetch_feature_df` task pulls the feature dataframe that was pushed to [XCom](/docs/learn/2.x/airflow-passing-data-between-tasks) in the previous DAG.
```python wrap theme={null}
@task
def fetch_feature_df(**context):
"Fetch the feature dataframe from the feature engineering DAG."
feature_df = context["ti"].xcom_pull(
dag_id="feature_eng", task_ids="build_features", include_prior_dates=True
)
return feature_df
```
The ID number of the MLflow experiment is retrieved using the `MLflowClientHook` in the `fetch_experiment_id` task in order to track model training in the same experiment.
The `train_model` task, defined with the `@aql.dataframe` decorator, shows how model training can be parameterized when using Airflow. In this example, the hyperparameters, the `target_colum`, and the model class are hardcoded, but they could also be retrieved from upstream tasks through [XCom](/docs/learn/2.x/airflow-passing-data-between-tasks) or passed into manual runs of the DAG using [DAG params](/docs/learn/2.x/airflow-params).
The project is set up to train the [scikit-learn RidgeCV model](https://scikit-learn.org/stable/modules/generated/sklearn.linear_model.RidgeCV.html) to predict the tail length of possums using information such as their age, total length, or skull width.
```python wrap theme={null}
@aql.dataframe()
def train_model(
feature_df: DataFrame,
experiment_id: str,
target_column: str,
model_class: callable,
hyper_parameters: dict,
run_name: str,
) -> str:
"Train a model and log it to MLFlow."
# ...
with mlflow.start_run(experiment_id=experiment_id, run_name=run_name) as run:
model.fit(feature_df.drop(target, axis=1), feature_df[target])
run_id = run.info.run_id
return run_id
# ...
model_trained = train_model(
feature_df=fetched_feature_df,
experiment_id=fetched_experiment_id,
target_column=TARGET_COLUMN,
model_class=RidgeCV,
hyper_parameters={"alphas": np.logspace(-3, 1, num=30)},
run_name="RidgeCV",
)
```
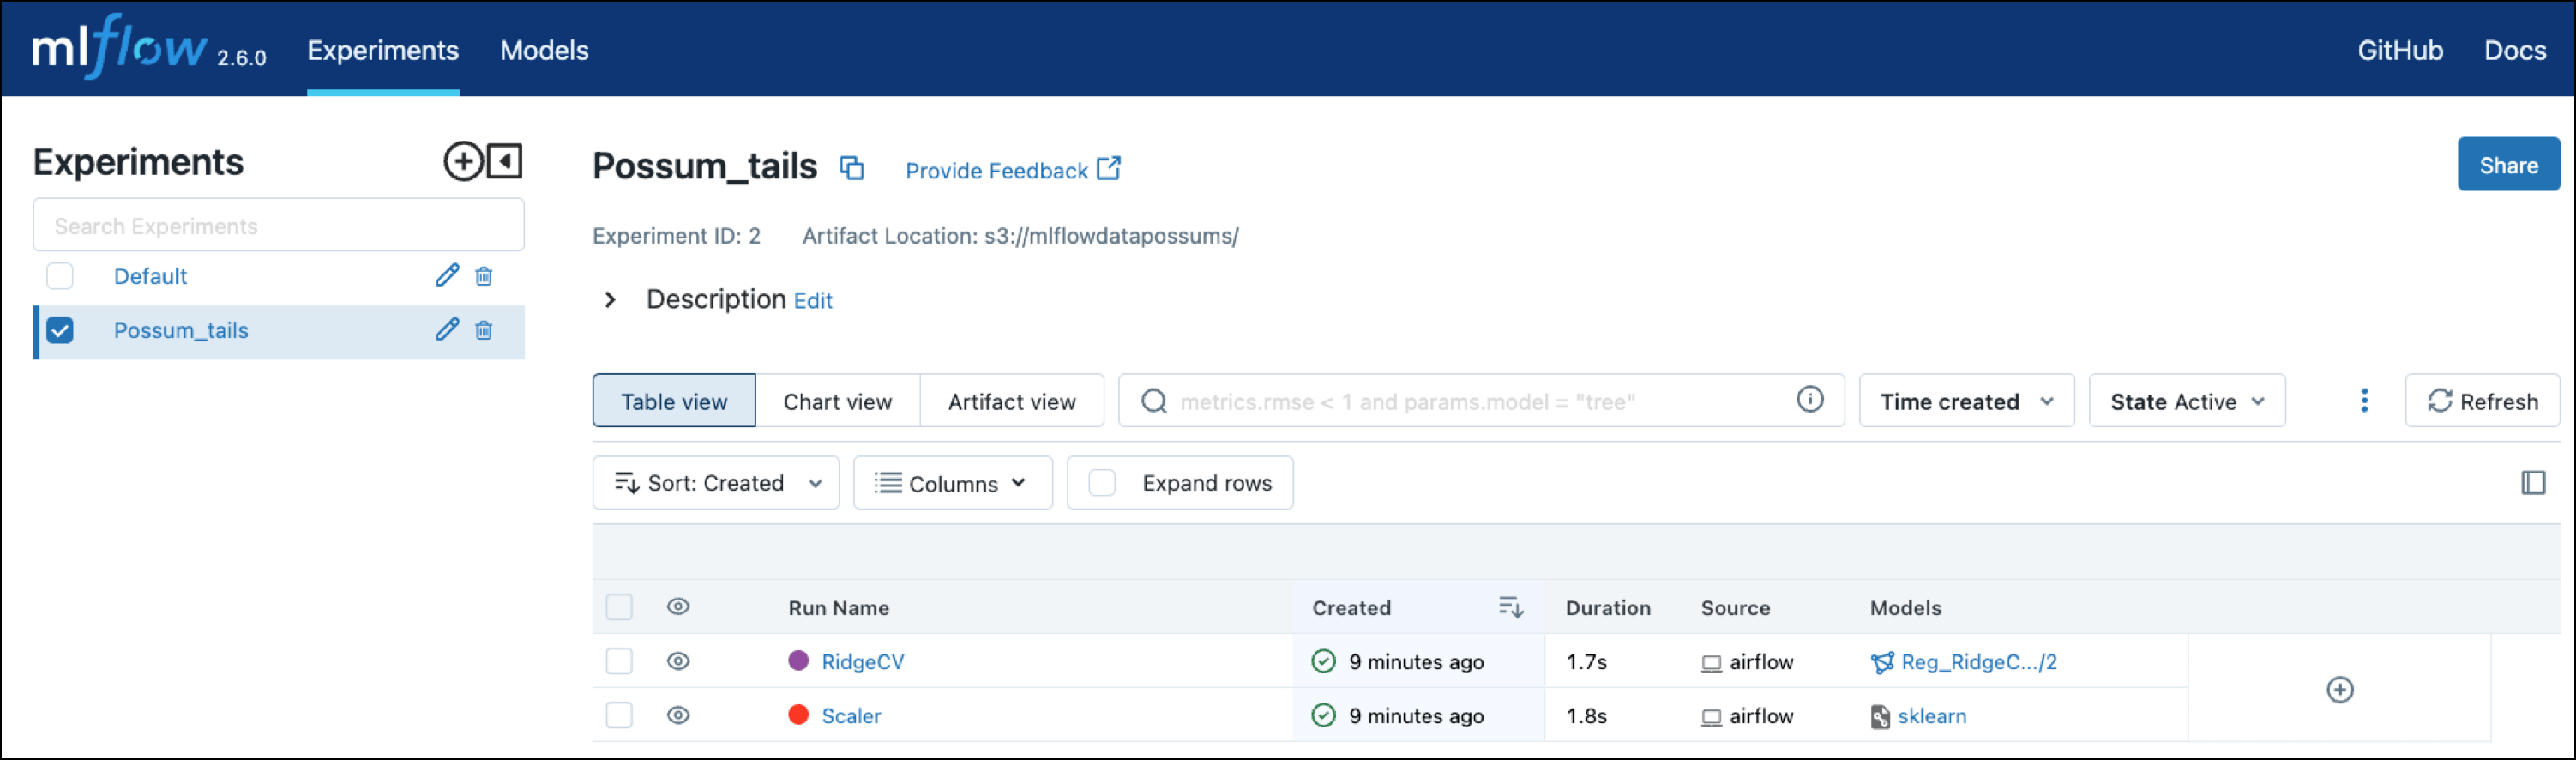
You can view the run of the RidgeCV model in the MLflow UI at `localhost:5000`.
#### Model training DAG
Airflow [datasets](/docs/learn/2.x/airflow-datasets) let you schedule DAGs based on when a specific file or database is updated in a separate DAG. In this example, the model training DAG is scheduled to run as soon as the last task in the feature engineering DAG completes.
```python wrap theme={null}
@dag(
schedule=[Dataset("s3://" + DATA_BUCKET_NAME + "_" + FILE_PATH)],
start_date=datetime(2023, 1, 1),
catchup=False,
)
```
The `fetch_feature_df` task pulls the feature dataframe that was pushed to [XCom](/docs/learn/2.x/airflow-passing-data-between-tasks) in the previous DAG.
```python wrap theme={null}
@task
def fetch_feature_df(**context):
"Fetch the feature dataframe from the feature engineering DAG."
feature_df = context["ti"].xcom_pull(
dag_id="feature_eng", task_ids="build_features", include_prior_dates=True
)
return feature_df
```
The ID number of the MLflow experiment is retrieved using the `MLflowClientHook` in the `fetch_experiment_id` task in order to track model training in the same experiment.
The `train_model` task, defined with the `@aql.dataframe` decorator, shows how model training can be parameterized when using Airflow. In this example, the hyperparameters, the `target_colum`, and the model class are hardcoded, but they could also be retrieved from upstream tasks through [XCom](/docs/learn/2.x/airflow-passing-data-between-tasks) or passed into manual runs of the DAG using [DAG params](/docs/learn/2.x/airflow-params).
The project is set up to train the [scikit-learn RidgeCV model](https://scikit-learn.org/stable/modules/generated/sklearn.linear_model.RidgeCV.html) to predict the tail length of possums using information such as their age, total length, or skull width.
```python wrap theme={null}
@aql.dataframe()
def train_model(
feature_df: DataFrame,
experiment_id: str,
target_column: str,
model_class: callable,
hyper_parameters: dict,
run_name: str,
) -> str:
"Train a model and log it to MLFlow."
# ...
with mlflow.start_run(experiment_id=experiment_id, run_name=run_name) as run:
model.fit(feature_df.drop(target, axis=1), feature_df[target])
run_id = run.info.run_id
return run_id
# ...
model_trained = train_model(
feature_df=fetched_feature_df,
experiment_id=fetched_experiment_id,
target_column=TARGET_COLUMN,
model_class=RidgeCV,
hyper_parameters={"alphas": np.logspace(-3, 1, num=30)},
run_name="RidgeCV",
)
```
You can view the run of the RidgeCV model in the MLflow UI at `localhost:5000`.
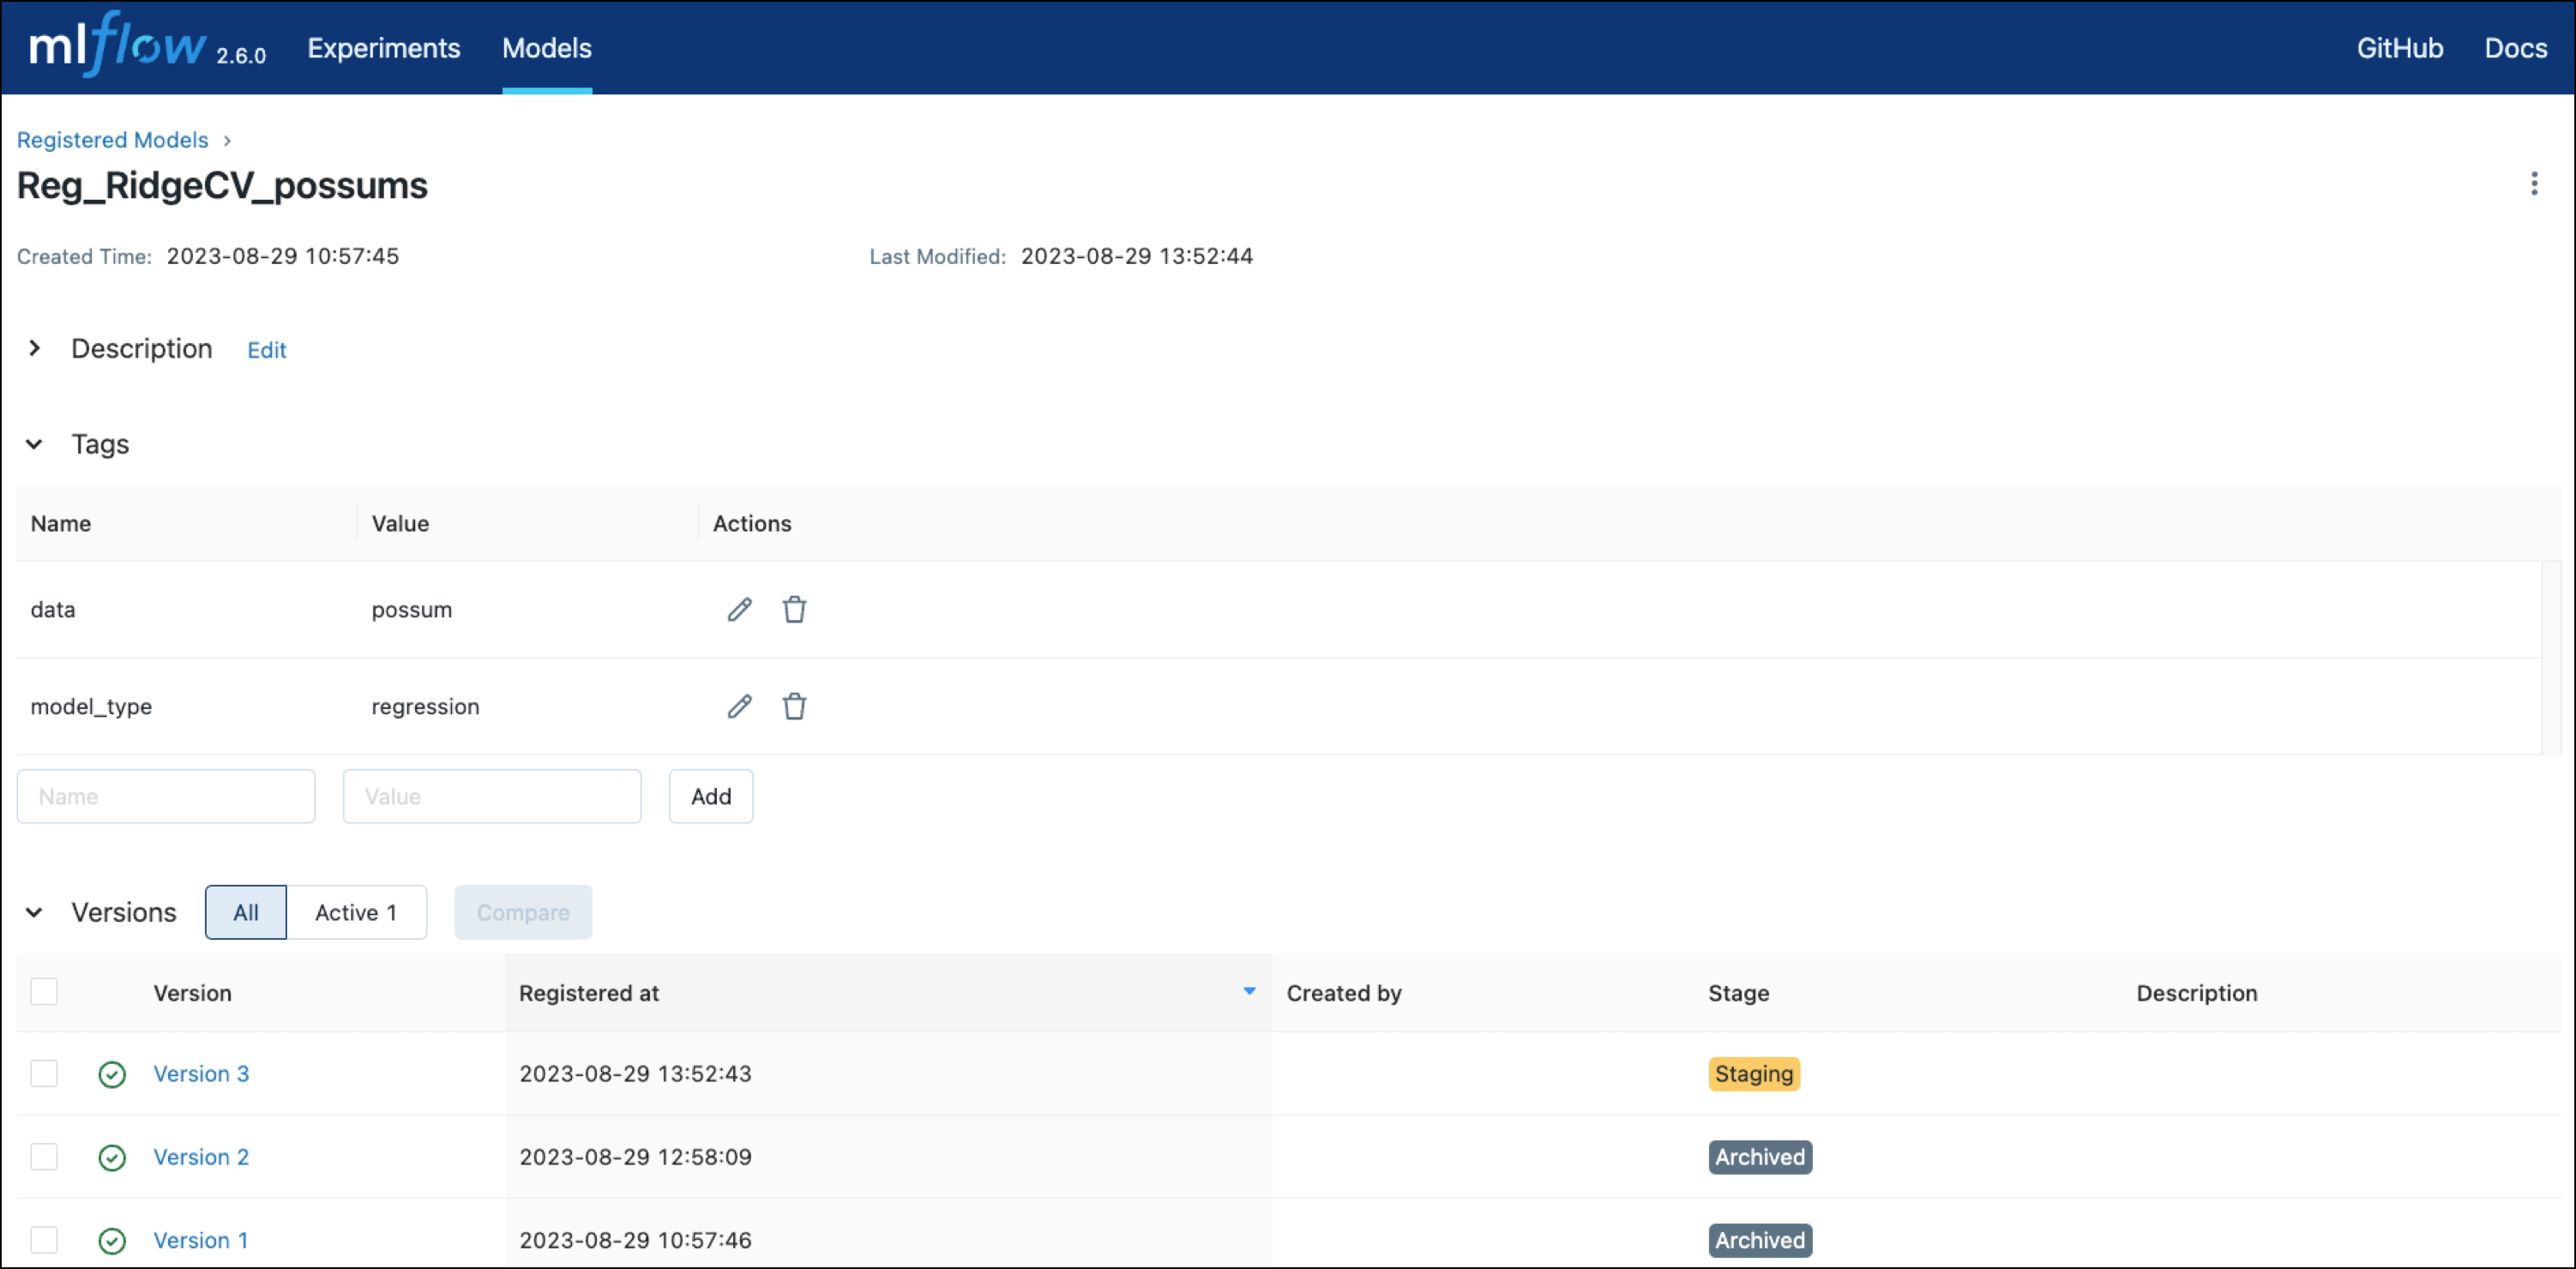
 Lastly, the model training DAG registers the model and its version with MLflow using three operators from the MLflow Airflow provider. Note how information like the `run_id` or `version` of the model is pulled from XCom using [Jinja templates](/docs/learn/2.x/templating).
```python wrap theme={null}
create_registered_model = CreateRegisteredModelOperator(
task_id="create_registered_model",
name=REGISTERED_MODEL_NAME,
tags=[
{"key": "model_type", "value": "regression"},
{"key": "data", "value": "possum"},
],
)
create_model_version = CreateModelVersionOperator(
task_id="create_model_version",
name=REGISTERED_MODEL_NAME,
source="s3://"
+ MLFLOW_ARTIFACT_BUCKET
+ "/"
+ "{{ ti.xcom_pull(task_ids='train_model') }}",
run_id="{{ ti.xcom_pull(task_ids='train_model') }}",
trigger_rule="none_failed",
)
transition_model = TransitionModelVersionStageOperator(
task_id="transition_model",
name=REGISTERED_MODEL_NAME,
version="{{ ti.xcom_pull(task_ids='register_model.create_model_version')['model_version']['version'] }}",
stage="Staging",
archive_existing_versions=True,
)
```
You can view the registered models in the **Models** tab of the MLflow UI at `localhost:5000`.
Lastly, the model training DAG registers the model and its version with MLflow using three operators from the MLflow Airflow provider. Note how information like the `run_id` or `version` of the model is pulled from XCom using [Jinja templates](/docs/learn/2.x/templating).
```python wrap theme={null}
create_registered_model = CreateRegisteredModelOperator(
task_id="create_registered_model",
name=REGISTERED_MODEL_NAME,
tags=[
{"key": "model_type", "value": "regression"},
{"key": "data", "value": "possum"},
],
)
create_model_version = CreateModelVersionOperator(
task_id="create_model_version",
name=REGISTERED_MODEL_NAME,
source="s3://"
+ MLFLOW_ARTIFACT_BUCKET
+ "/"
+ "{{ ti.xcom_pull(task_ids='train_model') }}",
run_id="{{ ti.xcom_pull(task_ids='train_model') }}",
trigger_rule="none_failed",
)
transition_model = TransitionModelVersionStageOperator(
task_id="transition_model",
name=REGISTERED_MODEL_NAME,
version="{{ ti.xcom_pull(task_ids='register_model.create_model_version')['model_version']['version'] }}",
stage="Staging",
archive_existing_versions=True,
)
```
You can view the registered models in the **Models** tab of the MLflow UI at `localhost:5000`.
 #### Prediction DAG
After retrieving the feature dataframe, the target column, and the `model_run_id` from XCom, the `run_prediction` task uses the [`ModelLoadAndPredictOperator`](https://github.com/astronomer/airflow-provider-mlflow/blob/main/mlflow_provider/operators/pyfunc.py) to run a prediction on the whole dataset using the latest version of the registered RidgeCV model.
```python wrap theme={null}
run_prediction = ModelLoadAndPredictOperator(
mlflow_conn_id="mlflow_default",
task_id="run_prediction",
model_uri=f"s3://{MLFLOW_ARTIFACT_BUCKET}/"
+ "{{ ti.xcom_pull(task_ids='fetch_model_run_id')}}"
+ "/artifacts/model",
data=fetched_feature_df,
)
```
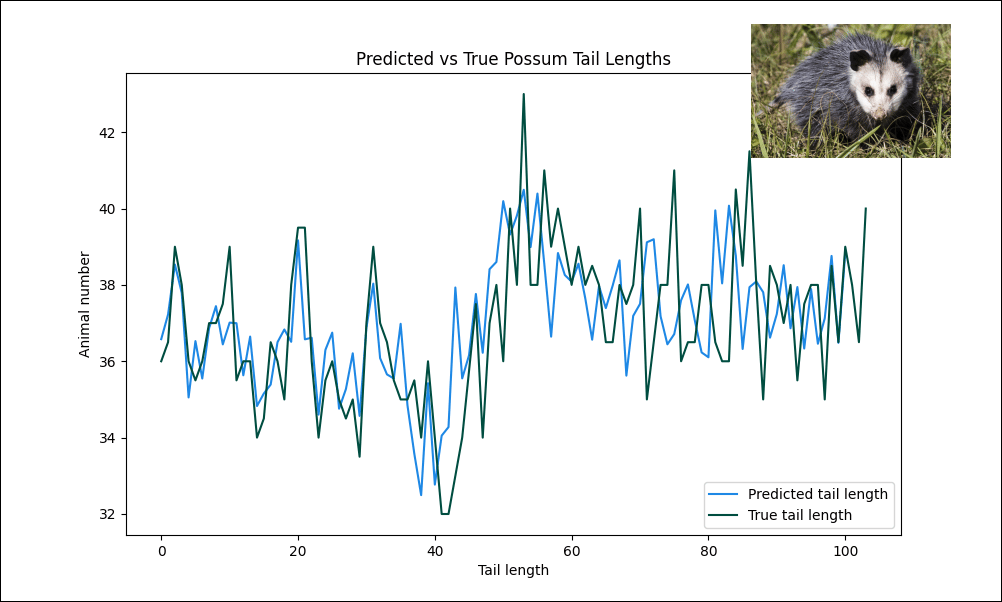
The predicted possum tail length values are converted to a dataframe and then plotted against the true tail lengths using matplotlib. The resulting graph offers a visual representation of how much variation of possum tail length can be explained by a linear regression model using the features in the dataset in this specific possum population of 104 animals.
Congratulations! You ran a ML pipeline tracking model parameters and versions in MLflow using the MLflow Airflow provider. You can now use this pipeline as a template for your own MLflow projects.
## See also
* Documentation: [MLflow](https://mlflow.org/docs).
* Tutorial: [Use MLflow with Apache Airflow](/docs/learn/2.x/airflow-mlflow).
* Provider: [MLflow Airflow provider](https://github.com/astronomer/airflow-provider-mlflow).
#### Prediction DAG
After retrieving the feature dataframe, the target column, and the `model_run_id` from XCom, the `run_prediction` task uses the [`ModelLoadAndPredictOperator`](https://github.com/astronomer/airflow-provider-mlflow/blob/main/mlflow_provider/operators/pyfunc.py) to run a prediction on the whole dataset using the latest version of the registered RidgeCV model.
```python wrap theme={null}
run_prediction = ModelLoadAndPredictOperator(
mlflow_conn_id="mlflow_default",
task_id="run_prediction",
model_uri=f"s3://{MLFLOW_ARTIFACT_BUCKET}/"
+ "{{ ti.xcom_pull(task_ids='fetch_model_run_id')}}"
+ "/artifacts/model",
data=fetched_feature_df,
)
```
The predicted possum tail length values are converted to a dataframe and then plotted against the true tail lengths using matplotlib. The resulting graph offers a visual representation of how much variation of possum tail length can be explained by a linear regression model using the features in the dataset in this specific possum population of 104 animals.
Congratulations! You ran a ML pipeline tracking model parameters and versions in MLflow using the MLflow Airflow provider. You can now use this pipeline as a template for your own MLflow projects.
## See also
* Documentation: [MLflow](https://mlflow.org/docs).
* Tutorial: [Use MLflow with Apache Airflow](/docs/learn/2.x/airflow-mlflow).
* Provider: [MLflow Airflow provider](https://github.com/astronomer/airflow-provider-mlflow).