> ## Documentation Index
> Fetch the complete documentation index at: https://astronomer.io/docs/llms.txt
> Use this file to discover all available pages before exploring further.
# Customize Operator Extra Links
Airflow includes plugins for customizing the Airflow UI. One small but impactful customization is adding extra links in the **Details** view for operators in the UI. These extra links can point to static websites, such as documentation for the operator, or dynamic links created from information during the task instance run.
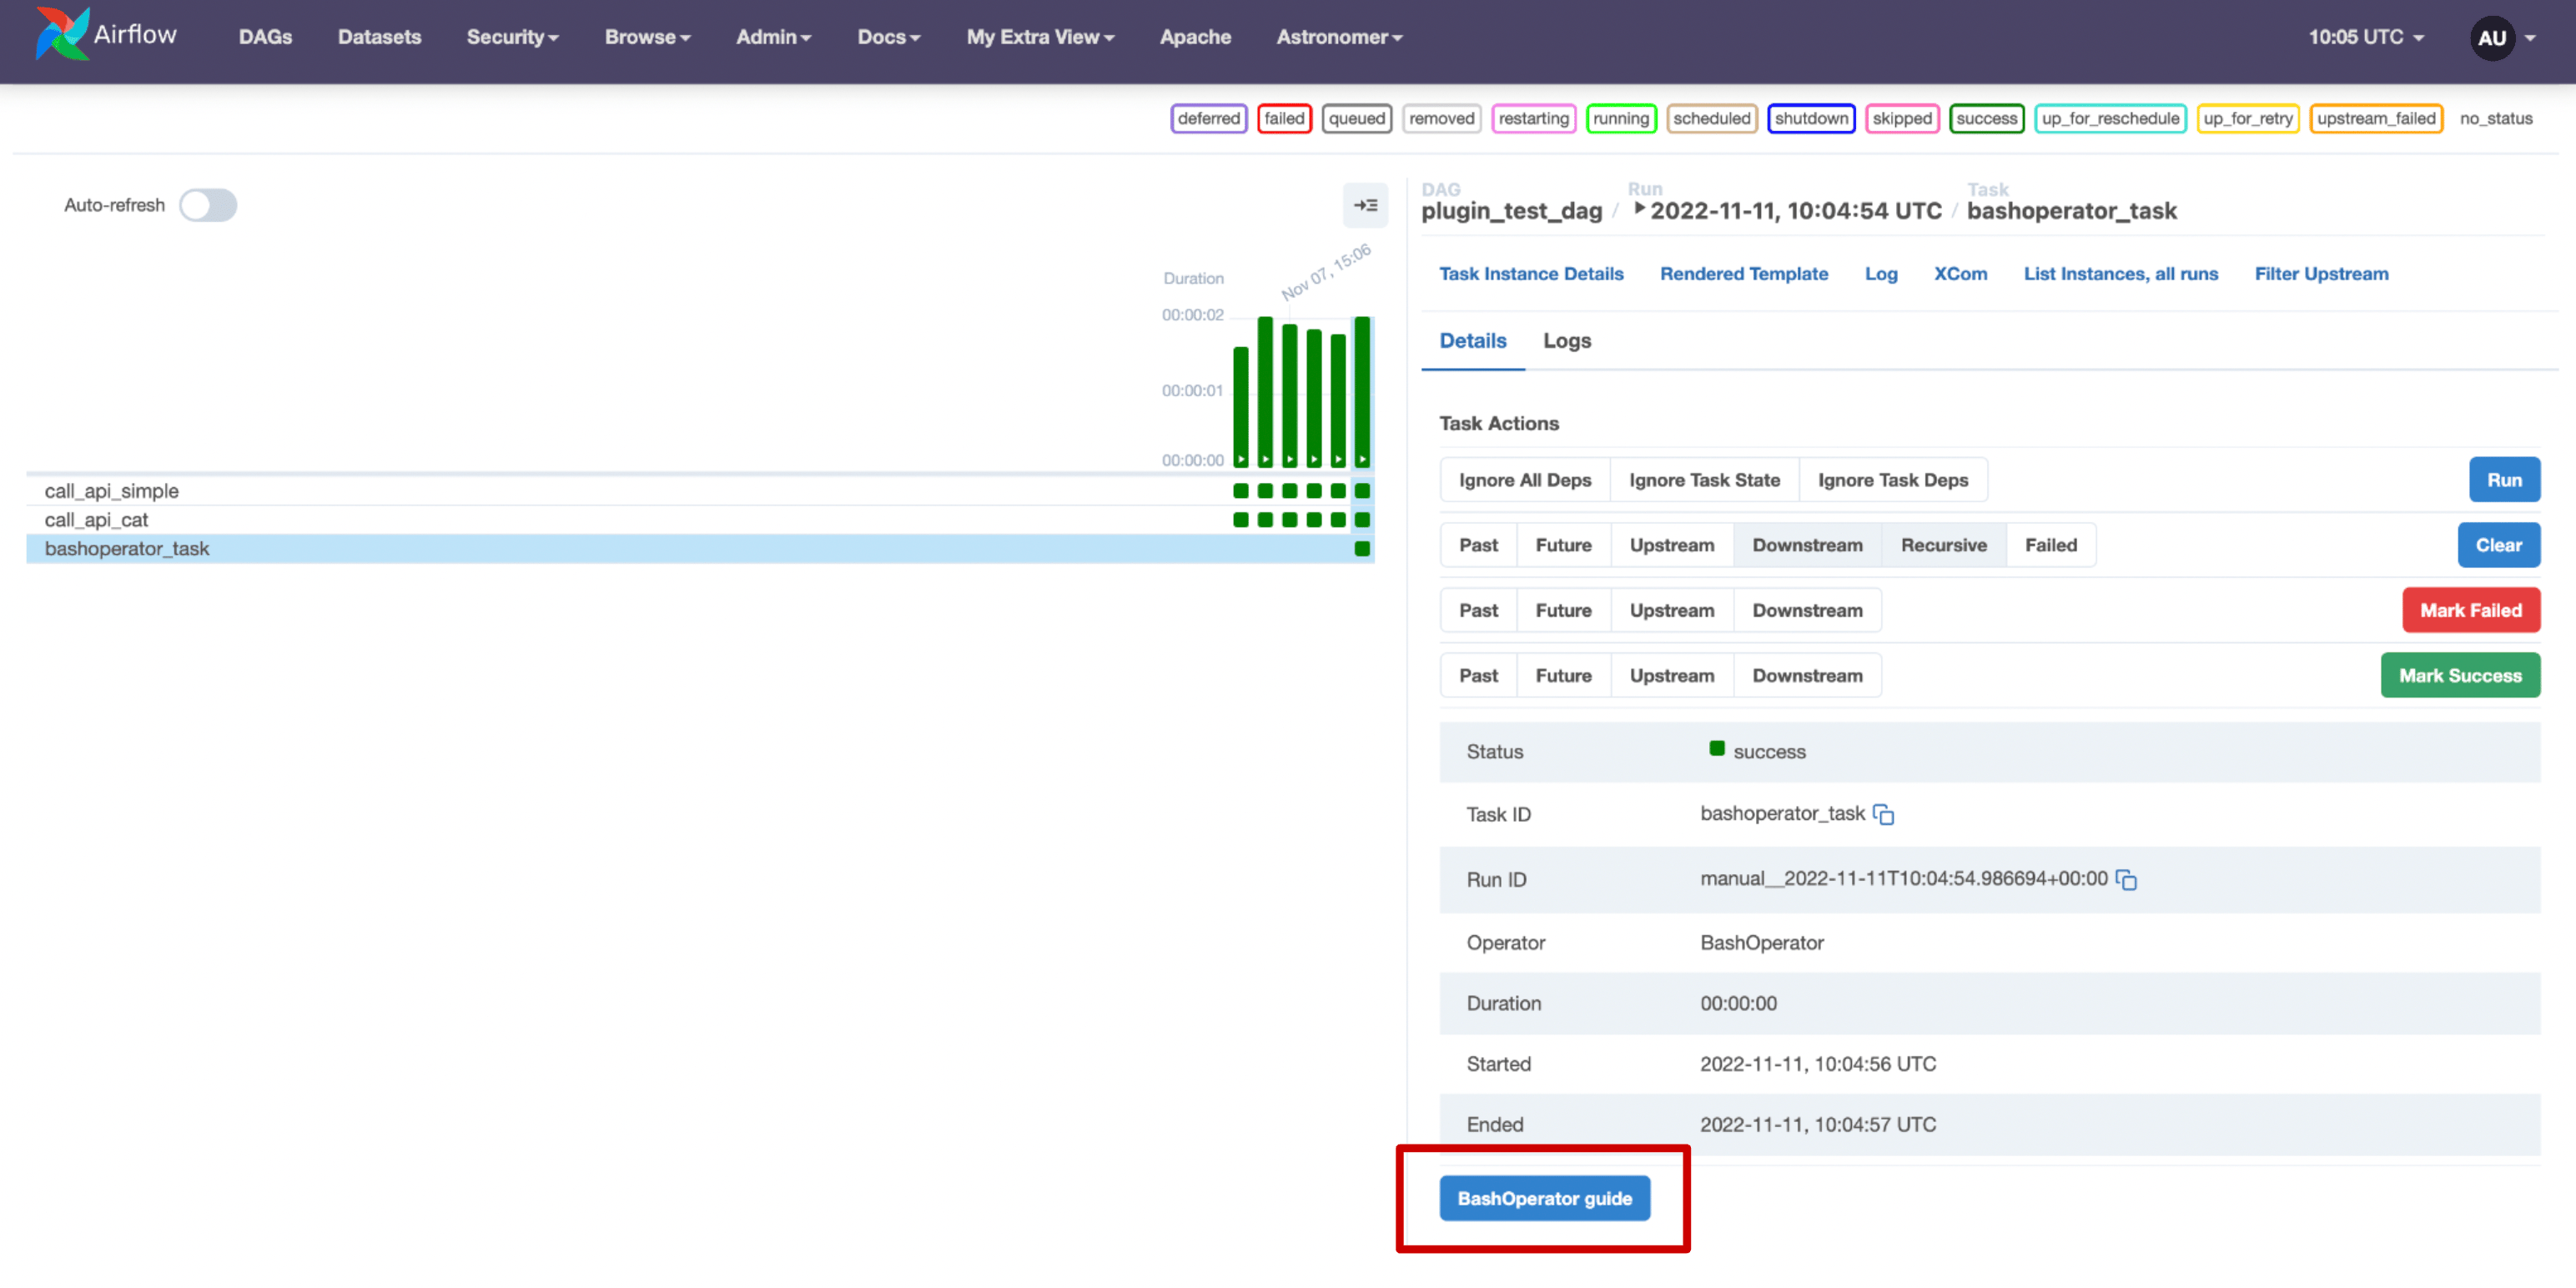 This tutorial shows how to add both static and dynamic extra links using the AirflowExtraLinkPlugin to existing and custom operators.
After you complete this tutorial, you'll be able to:
* Add a static operator extra link to any operator using an Airflow plugin.
* Modify an existing operator to push an additional value to XCom.
* Add a dynamic operator extra link to any operator using an Airflow plugin.
## Time to complete
This tutorial takes approximately 1 hour to complete.
## Assumed knowledge
To get the most out of this tutorial, make sure you have an understanding of:
* Navigating an Airflow Project. See [Get started with Apache Airflow](/docs/learn/2.x/get-started-with-airflow).
* Airflow Plugins. See [Import plugins to Airflow](/docs/learn/2.x/using-airflow-plugins).
* Airflow Connections. See [Manage connections in Apache Airflow](/docs/learn/2.x/connections).
* Intermediate knowledge of Python. See [the official Python documentation](https://docs.python.org/3/).
## Prerequisites
* The [Astro CLI](/docs/cli/v1.43/install-cli).
## Step 1: Create an Astro project
Set up Airflow by creating a new Astro project:
```sh wrap theme={null}
$ mkdir astro-extra-link-tutorial && cd astro-extra-link-tutorial
$ astro dev init
```
## Step 2: Create a DAG using the `SimpleHttpOperator`
You'll first add a static link to the `SimpleHttpOperator` which goes to the [Mozilla HTTP documentation](https://developer.mozilla.org/en-US/docs/Web/HTTP). This link will appear on every task instance created by this operator.
1. Create a new Python file named `plugin_test_dag.py` in the `dags` folder of your Airflow project.
2. Copy and paste the following DAG code into your file:
```python wrap theme={null}
from airflow.models.dag import DAG
from airflow.providers.http.operators.http import SimpleHttpOperator
from pendulum import datetime
with DAG(
dag_id="plugin_test_dag",
start_date=datetime(2022, 11, 1),
schedule=None,
catchup=False
):
call_api_simple = SimpleHttpOperator(
task_id="call_api_simple",
http_conn_id="random_user_api_conn",
method="GET"
)
```
This DAG has one `SimpleHttpOperator` task that posts a GET request to an API as defined in the `random_user_api_conn` connection.
## Step 3: Add a static operator extra link
Create an [Airflow plugin](/docs/learn/2.x/using-airflow-plugins) to add an extra link to the operator.
1. Create a new Python file named `my_extra_link_plugin.py` in the `plugins` folder of your Airflow project.
2. Copy paste the following code into your file.
```python wrap theme={null}
from airflow.plugins_manager import AirflowPlugin
from airflow.models.baseoperator import BaseOperatorLink
from airflow.providers.http.operators.http import SimpleHttpOperator
# define the extra link
class HTTPDocsLink(BaseOperatorLink):
# name the link button in the UI
name = "HTTP docs"
# add the button to one or more operators
operators = [SimpleHttpOperator]
# provide the link
def get_link(self, operator, *, ti_key=None):
return "https://developer.mozilla.org/en-US/docs/Web/HTTP"
# define the plugin class
class AirflowExtraLinkPlugin(AirflowPlugin):
name = "extra_link_plugin"
operator_extra_links = [
HTTPDocsLink(),
]
```
This script accomplishes the following:
* Defines an operator extra link called `HTTPDocsLink` which will create an extra link button with the name `HTTP docs`. Customize this string to change the name on the button displayed in the UI.
* Adds the `SimpleHttpOperator` to the list of operators this extra link will be applied to. You can add as many operators as you'd like, including custom operators.
* Defines the `get_link()` method which determines the website the operator extra link will link to. You can change this function to any Python function that returns a valid link. See [Step 9](#step-9-add-a-dynamic-extra-link-to-your-custom-operator) for instructions on how to make this link dynamically change between task instances.
* Creates an instance of the `AirflowPlugin` class which will be automatically picked up by Airflow to install the plugin named `extra_link_plugin` in your Airflow instance.
* Adds the `HTTPDocsLink` plugin to the `extra_link_plugin`. You can add several operator extra links to the same Airflow plugin.
## Step 4: Add an HTTP connection
1. Run `astro dev start` in your Astro project directory to start up Airflow. If your Airflow instance is already running, use `astro dev restart` to restart it in order to load any changes made in the `plugins` folder.
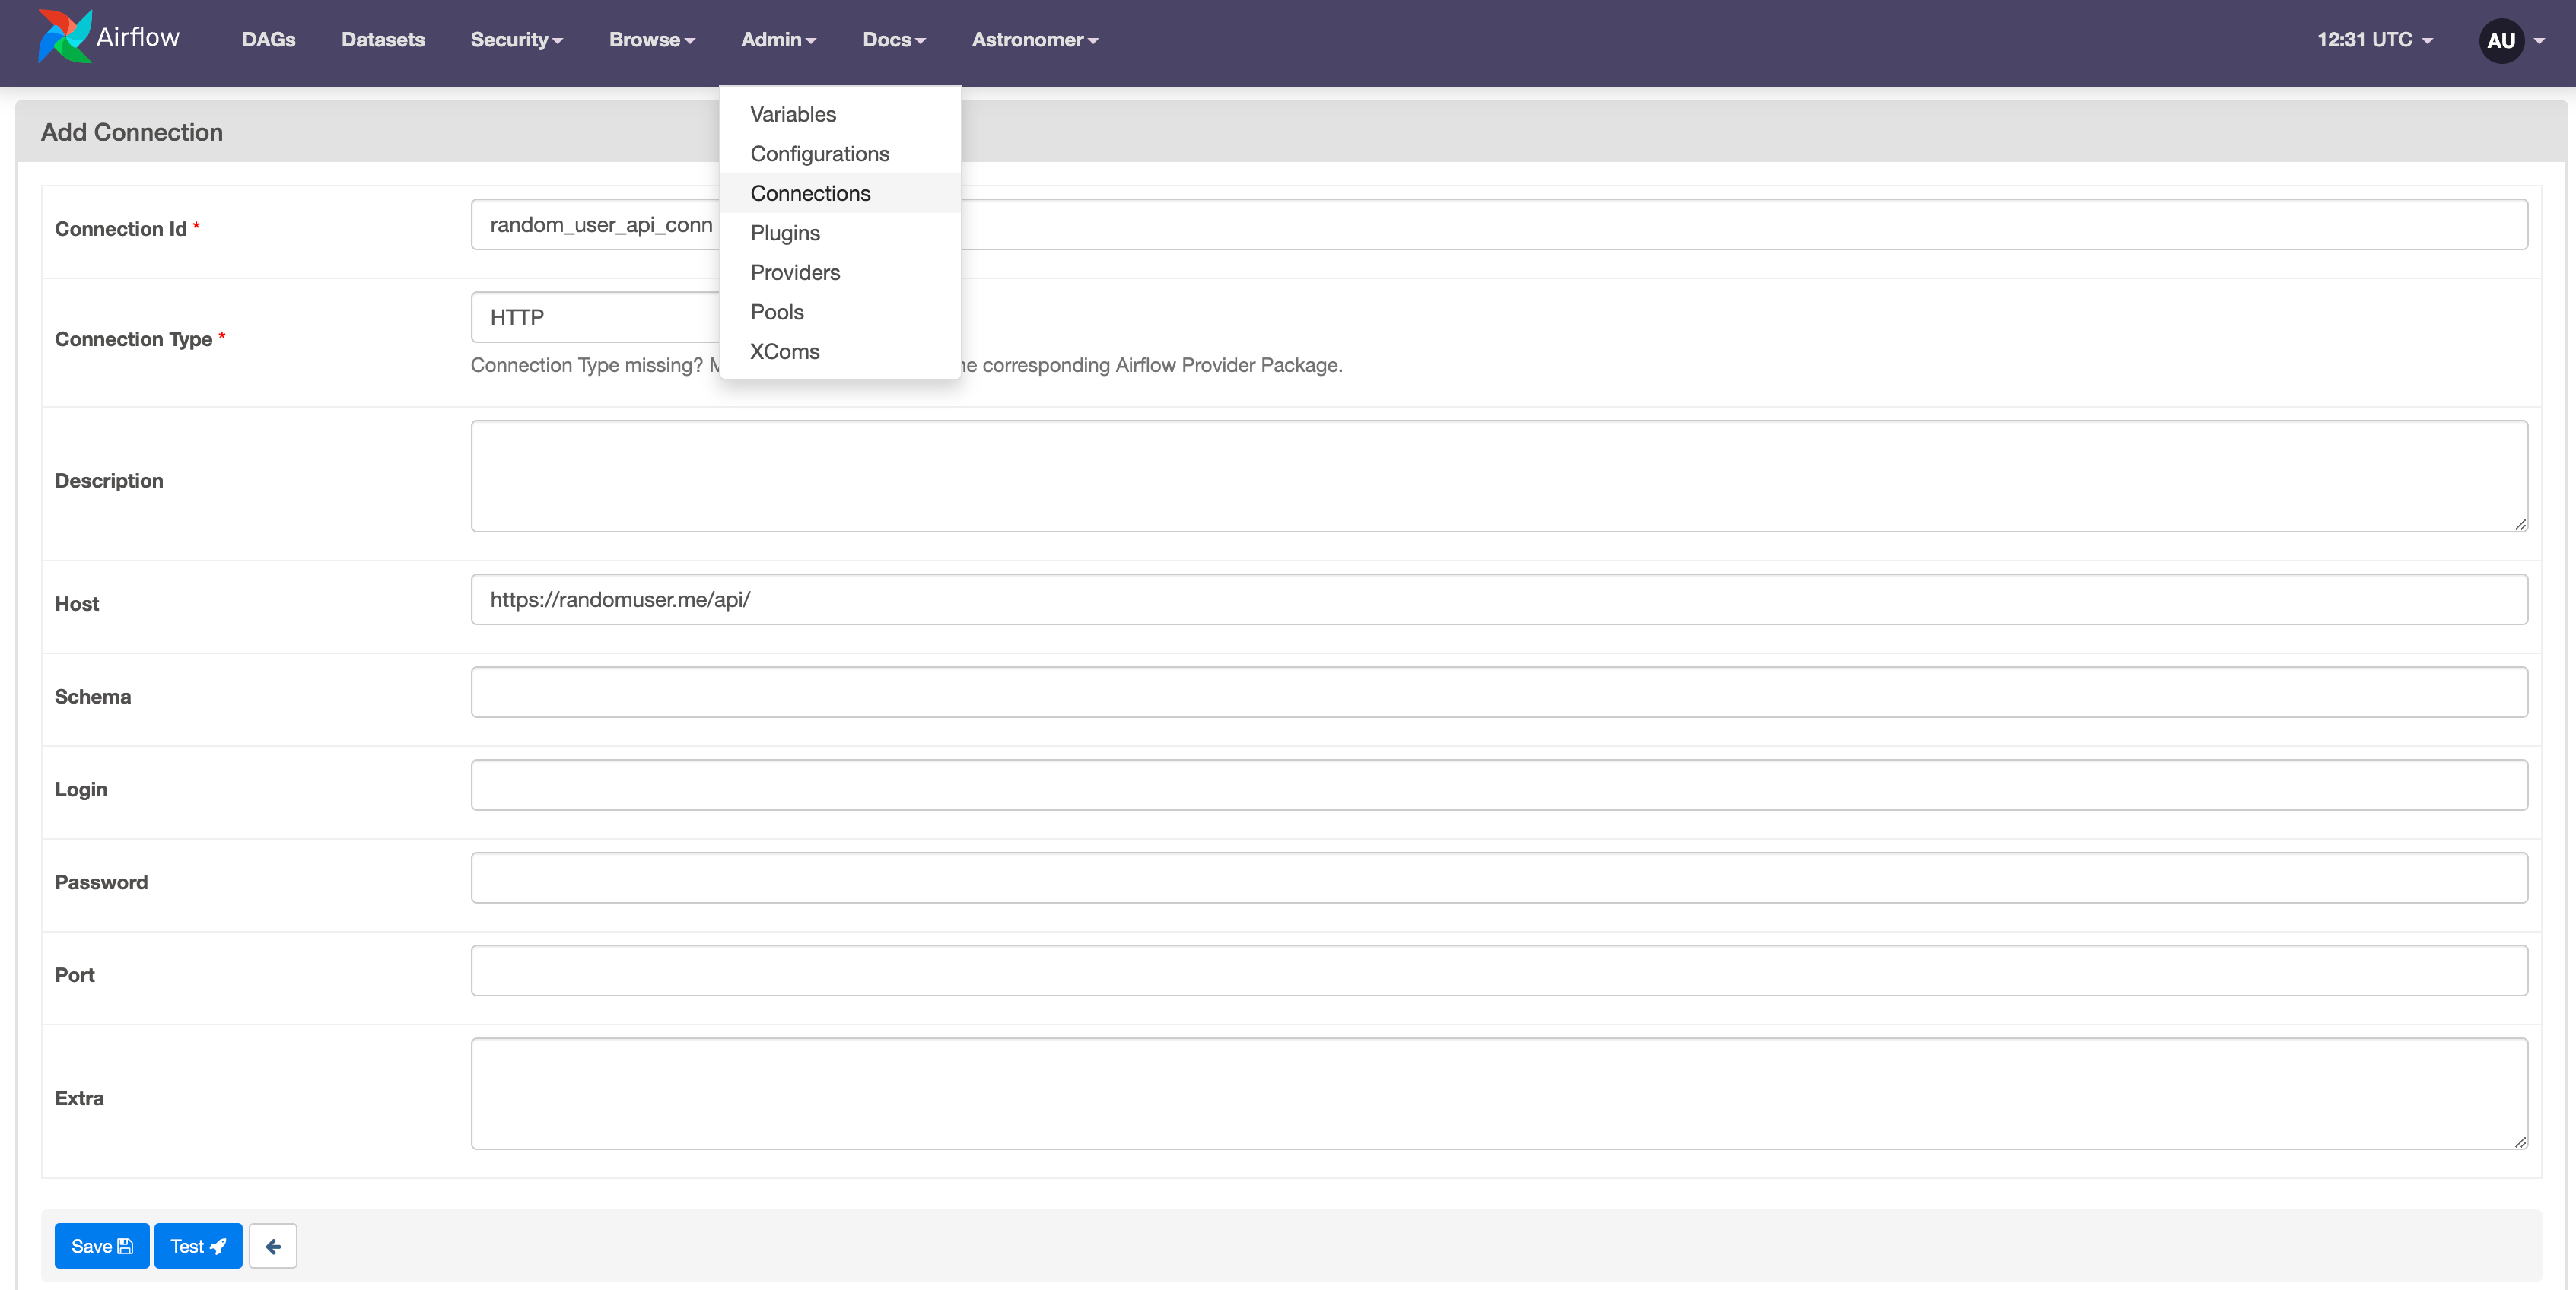
2. Add an HTTP connection called `random_user_api_conn` to `http://randomuser.me/api/` in the Airflow UI. This API will return data about a randomly generated user persona. Feel free to use a different API, the content returned won't be relevant for this tutorial. Learn more about connections in the [Manage connections in Apache Airflow](/docs/learn/2.x/connections) guide.
This tutorial shows how to add both static and dynamic extra links using the AirflowExtraLinkPlugin to existing and custom operators.
After you complete this tutorial, you'll be able to:
* Add a static operator extra link to any operator using an Airflow plugin.
* Modify an existing operator to push an additional value to XCom.
* Add a dynamic operator extra link to any operator using an Airflow plugin.
## Time to complete
This tutorial takes approximately 1 hour to complete.
## Assumed knowledge
To get the most out of this tutorial, make sure you have an understanding of:
* Navigating an Airflow Project. See [Get started with Apache Airflow](/docs/learn/2.x/get-started-with-airflow).
* Airflow Plugins. See [Import plugins to Airflow](/docs/learn/2.x/using-airflow-plugins).
* Airflow Connections. See [Manage connections in Apache Airflow](/docs/learn/2.x/connections).
* Intermediate knowledge of Python. See [the official Python documentation](https://docs.python.org/3/).
## Prerequisites
* The [Astro CLI](/docs/cli/v1.43/install-cli).
## Step 1: Create an Astro project
Set up Airflow by creating a new Astro project:
```sh wrap theme={null}
$ mkdir astro-extra-link-tutorial && cd astro-extra-link-tutorial
$ astro dev init
```
## Step 2: Create a DAG using the `SimpleHttpOperator`
You'll first add a static link to the `SimpleHttpOperator` which goes to the [Mozilla HTTP documentation](https://developer.mozilla.org/en-US/docs/Web/HTTP). This link will appear on every task instance created by this operator.
1. Create a new Python file named `plugin_test_dag.py` in the `dags` folder of your Airflow project.
2. Copy and paste the following DAG code into your file:
```python wrap theme={null}
from airflow.models.dag import DAG
from airflow.providers.http.operators.http import SimpleHttpOperator
from pendulum import datetime
with DAG(
dag_id="plugin_test_dag",
start_date=datetime(2022, 11, 1),
schedule=None,
catchup=False
):
call_api_simple = SimpleHttpOperator(
task_id="call_api_simple",
http_conn_id="random_user_api_conn",
method="GET"
)
```
This DAG has one `SimpleHttpOperator` task that posts a GET request to an API as defined in the `random_user_api_conn` connection.
## Step 3: Add a static operator extra link
Create an [Airflow plugin](/docs/learn/2.x/using-airflow-plugins) to add an extra link to the operator.
1. Create a new Python file named `my_extra_link_plugin.py` in the `plugins` folder of your Airflow project.
2. Copy paste the following code into your file.
```python wrap theme={null}
from airflow.plugins_manager import AirflowPlugin
from airflow.models.baseoperator import BaseOperatorLink
from airflow.providers.http.operators.http import SimpleHttpOperator
# define the extra link
class HTTPDocsLink(BaseOperatorLink):
# name the link button in the UI
name = "HTTP docs"
# add the button to one or more operators
operators = [SimpleHttpOperator]
# provide the link
def get_link(self, operator, *, ti_key=None):
return "https://developer.mozilla.org/en-US/docs/Web/HTTP"
# define the plugin class
class AirflowExtraLinkPlugin(AirflowPlugin):
name = "extra_link_plugin"
operator_extra_links = [
HTTPDocsLink(),
]
```
This script accomplishes the following:
* Defines an operator extra link called `HTTPDocsLink` which will create an extra link button with the name `HTTP docs`. Customize this string to change the name on the button displayed in the UI.
* Adds the `SimpleHttpOperator` to the list of operators this extra link will be applied to. You can add as many operators as you'd like, including custom operators.
* Defines the `get_link()` method which determines the website the operator extra link will link to. You can change this function to any Python function that returns a valid link. See [Step 9](#step-9-add-a-dynamic-extra-link-to-your-custom-operator) for instructions on how to make this link dynamically change between task instances.
* Creates an instance of the `AirflowPlugin` class which will be automatically picked up by Airflow to install the plugin named `extra_link_plugin` in your Airflow instance.
* Adds the `HTTPDocsLink` plugin to the `extra_link_plugin`. You can add several operator extra links to the same Airflow plugin.
## Step 4: Add an HTTP connection
1. Run `astro dev start` in your Astro project directory to start up Airflow. If your Airflow instance is already running, use `astro dev restart` to restart it in order to load any changes made in the `plugins` folder.
2. Add an HTTP connection called `random_user_api_conn` to `http://randomuser.me/api/` in the Airflow UI. This API will return data about a randomly generated user persona. Feel free to use a different API, the content returned won't be relevant for this tutorial. Learn more about connections in the [Manage connections in Apache Airflow](/docs/learn/2.x/connections) guide.
 ## Step 5: Use your static operator extra link
1. Run the `plugin_test_dag`.
2. In the **Grid** view, click the green square representing the successful run of the `call_api_simple` task. Select the **Details** tab and scroll down to see the extra link button called **HTTP docs**.
## Step 5: Use your static operator extra link
1. Run the `plugin_test_dag`.
2. In the **Grid** view, click the green square representing the successful run of the `call_api_simple` task. Select the **Details** tab and scroll down to see the extra link button called **HTTP docs**.
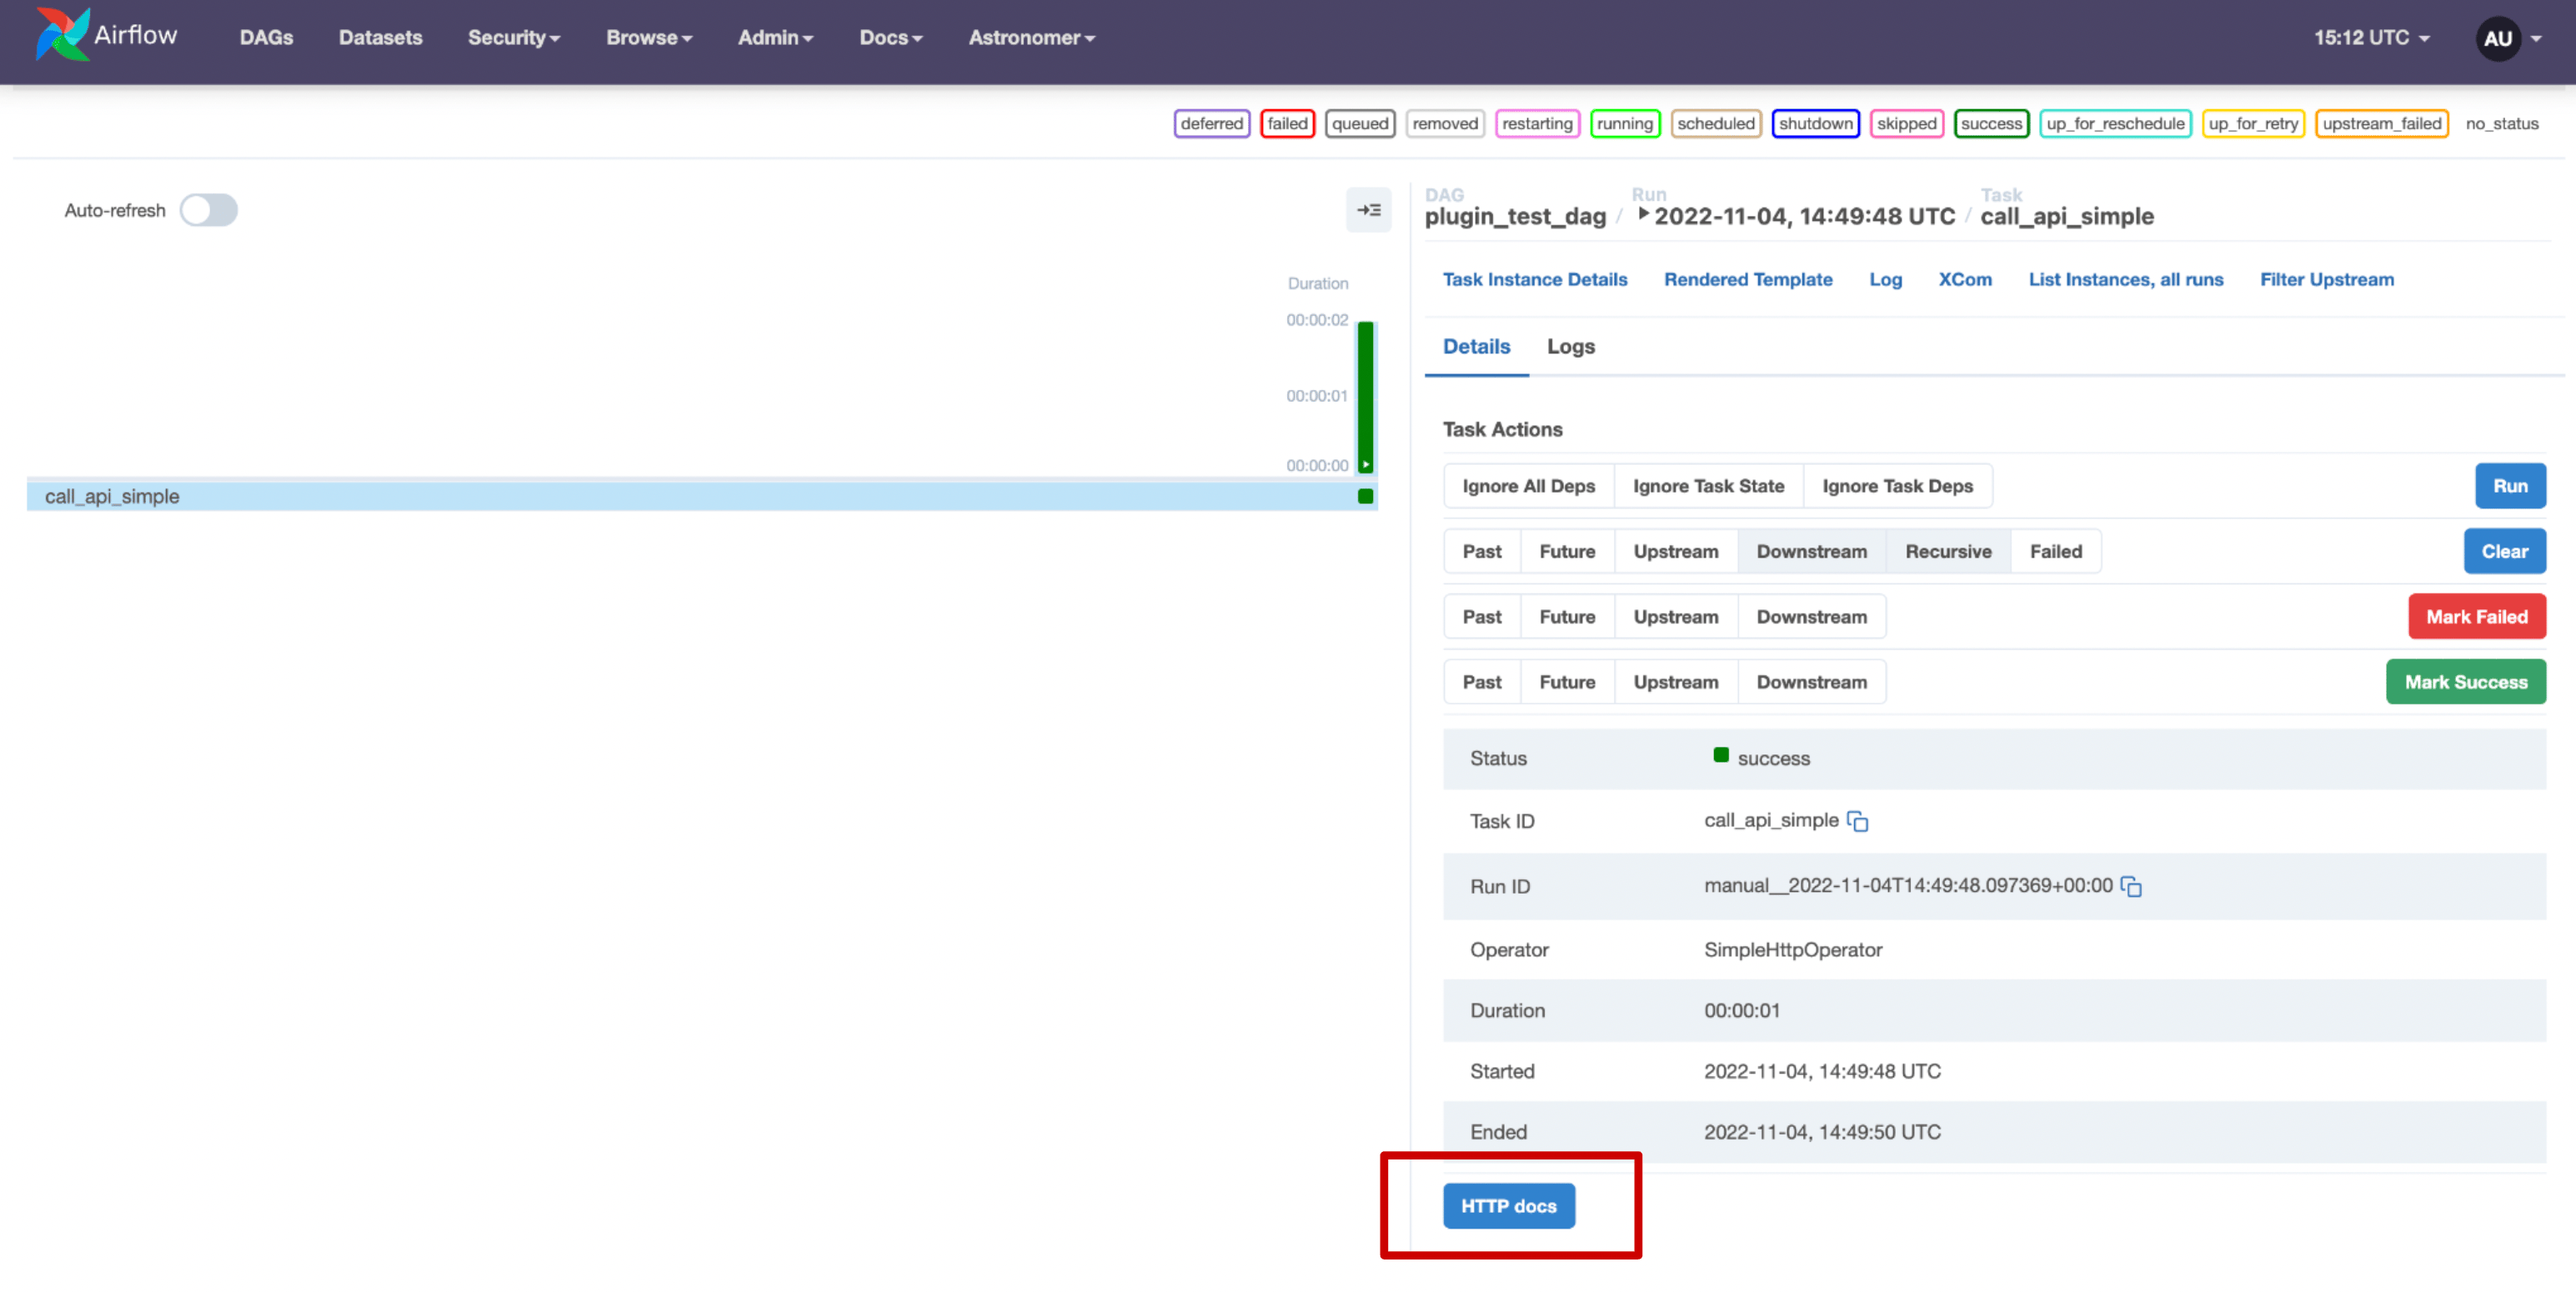 3. Click the button to visit the HTTP docs on Mozilla.
## Step 6: Create a custom operator
Another core feature of extra links is that you can dynamically generate them based on information returned by an operator at run time. The second half of this tutorial will cover how to modify an operator to push the value you need to [XComs](/docs/learn/2.x/airflow-passing-data-between-tasks) and retrieve that value for use in an extra link.
1. Create a new file called `cat_http.py` in the `include` folder of your Airflow project.
2. Copy the following code into the file.
```python expandable wrap theme={null}
from airflow.providers.http.operators.http import SimpleHttpOperator
from airflow.providers.http.hooks.http import HttpHook
from airflow.utils.operator_helpers import determine_kwargs
from airflow.exceptions import AirflowException
class CatHttpOperator(SimpleHttpOperator):
# initialize with identical arguments to the parent class
def __init__(self, **kwargs):
super().__init__(**kwargs)
def execute(self, context):
http = HttpHook(
self.method,
http_conn_id=self.http_conn_id,
auth_type=self.auth_type,
tcp_keep_alive=self.tcp_keep_alive,
tcp_keep_alive_idle=self.tcp_keep_alive_idle,
tcp_keep_alive_count=self.tcp_keep_alive_count,
tcp_keep_alive_interval=self.tcp_keep_alive_interval,
)
self.log.info("Calling HTTP method")
response = http.run(
self.endpoint, self.data, self.headers, self.extra_options
)
if self.log_response:
self.log.info(response.text)
if self.response_check:
kwargs = determine_kwargs(self.response_check, [response], context)
if not self.response_check(response, **kwargs):
raise AirflowException("Response check returned False.")
if self.response_filter:
kwargs = determine_kwargs(self.response_filter, [response], context)
return self.response_filter(response, **kwargs)
# pushing the HTTP status response to XComs
context["ti"].xcom_push(key="status_code", value=response.status_code)
return response.text
```
This code defines a custom version of the `SimpleHttpOperator` called the `CatHttpOperator`. This operator has a one-line customization before the `return` statement of the `.execute()` method:`context["ti"].xcom_push(key="status_code", value=response.status_code)`.
This line pushes the `status_code` attribute of the `response` object to XComs where it can be called from your plugin.
3. Add an empty Python file called `__init__.py` to your `include` folder. This file enables module imports from the folder.
## Step 7: Create a DAG with your custom operator
1. In the `plugin_test_dag.py` file import the `CatHttpOperator` by adding the following import statement at the start of the code:
```python wrap theme={null}
from include.cat_http import CatHttpOperator
```
2. Create a second task in the existing DAG context using the new operator with the code snippet below.
```python wrap theme={null}
call_api_cat = CatHttpOperator(
task_id="call_api_cat",
http_conn_id="random_user_api_conn",
method="GET"
)
```
This task will post the same GET request to the API you defined with the connection ID `random_user_api_conn` as the first task, but this time using the `CatHttpOperator`.
## Step 8: Run your DAG and view modified XComs
1. Run the `plugin_test_dag`, which now consists of two tasks.
2. Select the latest run of the `call_api_cat` task in the **Grid** view and click the **XCom** tab to view XComs returned by this task.
3. Click the button to visit the HTTP docs on Mozilla.
## Step 6: Create a custom operator
Another core feature of extra links is that you can dynamically generate them based on information returned by an operator at run time. The second half of this tutorial will cover how to modify an operator to push the value you need to [XComs](/docs/learn/2.x/airflow-passing-data-between-tasks) and retrieve that value for use in an extra link.
1. Create a new file called `cat_http.py` in the `include` folder of your Airflow project.
2. Copy the following code into the file.
```python expandable wrap theme={null}
from airflow.providers.http.operators.http import SimpleHttpOperator
from airflow.providers.http.hooks.http import HttpHook
from airflow.utils.operator_helpers import determine_kwargs
from airflow.exceptions import AirflowException
class CatHttpOperator(SimpleHttpOperator):
# initialize with identical arguments to the parent class
def __init__(self, **kwargs):
super().__init__(**kwargs)
def execute(self, context):
http = HttpHook(
self.method,
http_conn_id=self.http_conn_id,
auth_type=self.auth_type,
tcp_keep_alive=self.tcp_keep_alive,
tcp_keep_alive_idle=self.tcp_keep_alive_idle,
tcp_keep_alive_count=self.tcp_keep_alive_count,
tcp_keep_alive_interval=self.tcp_keep_alive_interval,
)
self.log.info("Calling HTTP method")
response = http.run(
self.endpoint, self.data, self.headers, self.extra_options
)
if self.log_response:
self.log.info(response.text)
if self.response_check:
kwargs = determine_kwargs(self.response_check, [response], context)
if not self.response_check(response, **kwargs):
raise AirflowException("Response check returned False.")
if self.response_filter:
kwargs = determine_kwargs(self.response_filter, [response], context)
return self.response_filter(response, **kwargs)
# pushing the HTTP status response to XComs
context["ti"].xcom_push(key="status_code", value=response.status_code)
return response.text
```
This code defines a custom version of the `SimpleHttpOperator` called the `CatHttpOperator`. This operator has a one-line customization before the `return` statement of the `.execute()` method:`context["ti"].xcom_push(key="status_code", value=response.status_code)`.
This line pushes the `status_code` attribute of the `response` object to XComs where it can be called from your plugin.
3. Add an empty Python file called `__init__.py` to your `include` folder. This file enables module imports from the folder.
## Step 7: Create a DAG with your custom operator
1. In the `plugin_test_dag.py` file import the `CatHttpOperator` by adding the following import statement at the start of the code:
```python wrap theme={null}
from include.cat_http import CatHttpOperator
```
2. Create a second task in the existing DAG context using the new operator with the code snippet below.
```python wrap theme={null}
call_api_cat = CatHttpOperator(
task_id="call_api_cat",
http_conn_id="random_user_api_conn",
method="GET"
)
```
This task will post the same GET request to the API you defined with the connection ID `random_user_api_conn` as the first task, but this time using the `CatHttpOperator`.
## Step 8: Run your DAG and view modified XComs
1. Run the `plugin_test_dag`, which now consists of two tasks.
2. Select the latest run of the `call_api_cat` task in the **Grid** view and click the **XCom** tab to view XComs returned by this task.
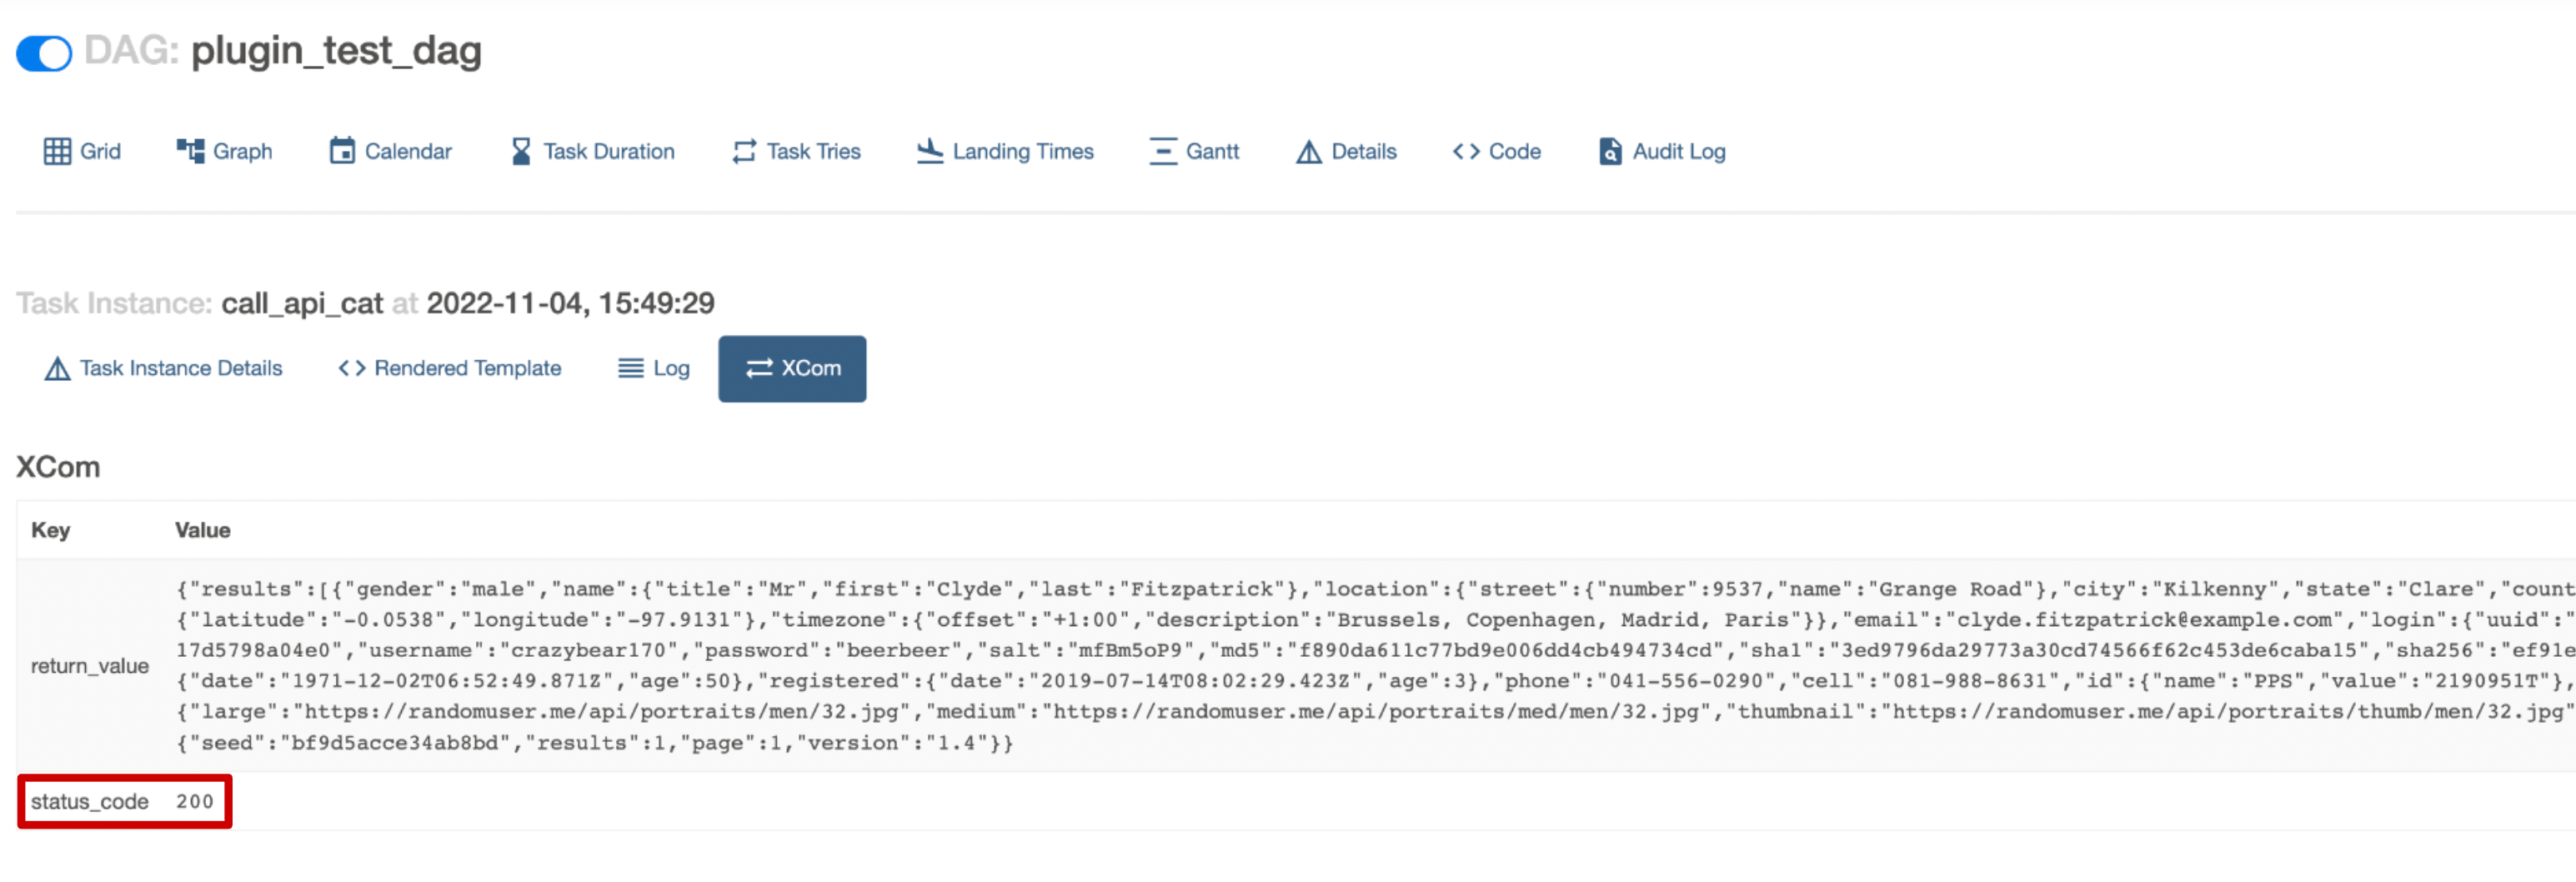
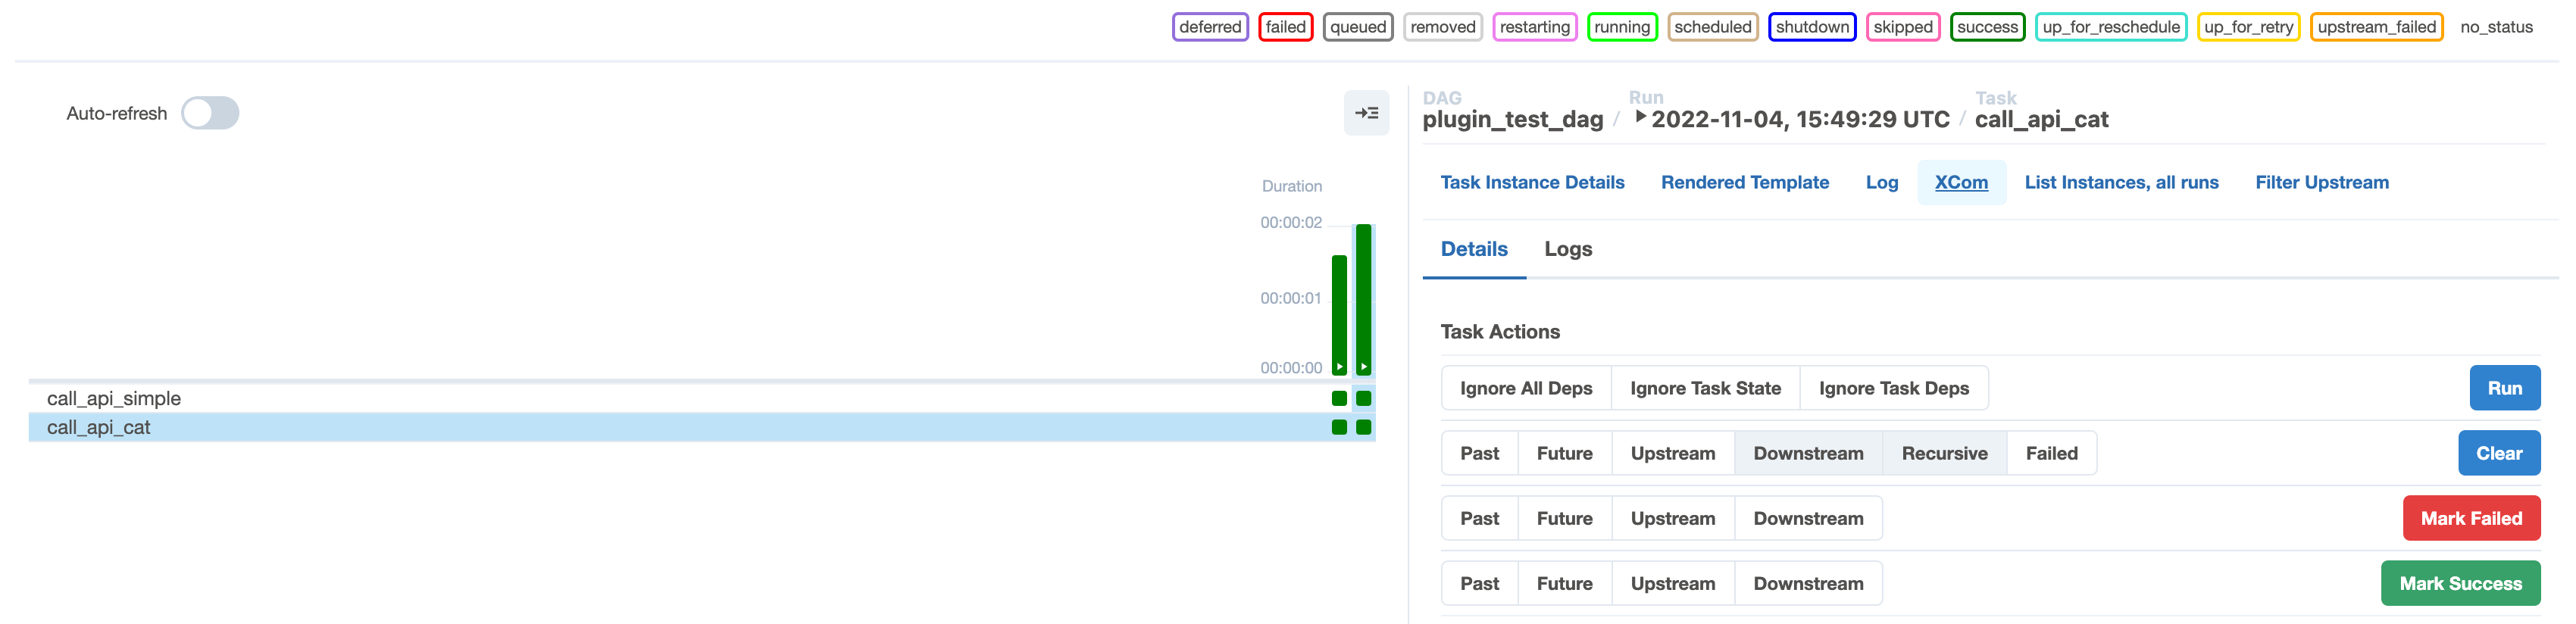 3. Verify that the XCom for this task instance contains an entry for `status_code`. In the screenshot below the HTTP status code returned was 200.
 ## Step 9: Add a dynamic extra link to your custom operator
Next, you will create a dynamic extra link using an Airflow plugin by following these steps:
1. Open `my_extra_link_plugin.py` in your `plugins` folder.
2. Add the following import statements at the start of the file:
```python wrap theme={null}
from include.cat_http import CatHttpOperator
from airflow.models import XCom
```
3. Copy paste the following code below the definition of the `HTTPDocsLink` class and above the definition of the `AirflowExtraLinkPlugin` class.
```python wrap theme={null}
class CatLink(BaseOperatorLink):
# name the link button in the UI
name = "HTTP cat"
# add the button to one or more operators
operators = [CatHttpOperator]
# provide the link
def get_link(self, operator, *, ti_key=None):
status_code = XCom.get_value(key="status_code", ti_key=ti_key) or ""
return f"https://http.cat/{status_code}"
```
This code creates a class called `CatLink` derived from `BaseOperatorLink`. The `.get_link()` method retrieves the `status_code` you pushed to XCom and appends it to the [HTTP Cat API link](https://http.cat/).
4. Update the `operator_extra_links` list in the `AirflowExtraLinkPlugin` class with the new `CatLink()`. The class should look like this:
```python wrap theme={null}
class AirflowExtraLinkPlugin(AirflowPlugin):
name = "extra_link_plugin"
operator_extra_links = [
CatLink(), # add this line
HTTPDocsLink()
]
```
5. Save the file and restart your Airflow instance with `astro dev restart`.
## Step 10: See your new extra link in action
Your second extra link has now been added to the `CatHttpOperator`.
1. In the Airflow UI, run `plugin_test_dag` again.
2. Navigate to the **Graph** view and click the `call_api_cat` task.
3. Click the HTTP Cat button to find the response of your last API call illustrated with a fitting cat.
## Step 9: Add a dynamic extra link to your custom operator
Next, you will create a dynamic extra link using an Airflow plugin by following these steps:
1. Open `my_extra_link_plugin.py` in your `plugins` folder.
2. Add the following import statements at the start of the file:
```python wrap theme={null}
from include.cat_http import CatHttpOperator
from airflow.models import XCom
```
3. Copy paste the following code below the definition of the `HTTPDocsLink` class and above the definition of the `AirflowExtraLinkPlugin` class.
```python wrap theme={null}
class CatLink(BaseOperatorLink):
# name the link button in the UI
name = "HTTP cat"
# add the button to one or more operators
operators = [CatHttpOperator]
# provide the link
def get_link(self, operator, *, ti_key=None):
status_code = XCom.get_value(key="status_code", ti_key=ti_key) or ""
return f"https://http.cat/{status_code}"
```
This code creates a class called `CatLink` derived from `BaseOperatorLink`. The `.get_link()` method retrieves the `status_code` you pushed to XCom and appends it to the [HTTP Cat API link](https://http.cat/).
4. Update the `operator_extra_links` list in the `AirflowExtraLinkPlugin` class with the new `CatLink()`. The class should look like this:
```python wrap theme={null}
class AirflowExtraLinkPlugin(AirflowPlugin):
name = "extra_link_plugin"
operator_extra_links = [
CatLink(), # add this line
HTTPDocsLink()
]
```
5. Save the file and restart your Airflow instance with `astro dev restart`.
## Step 10: See your new extra link in action
Your second extra link has now been added to the `CatHttpOperator`.
1. In the Airflow UI, run `plugin_test_dag` again.
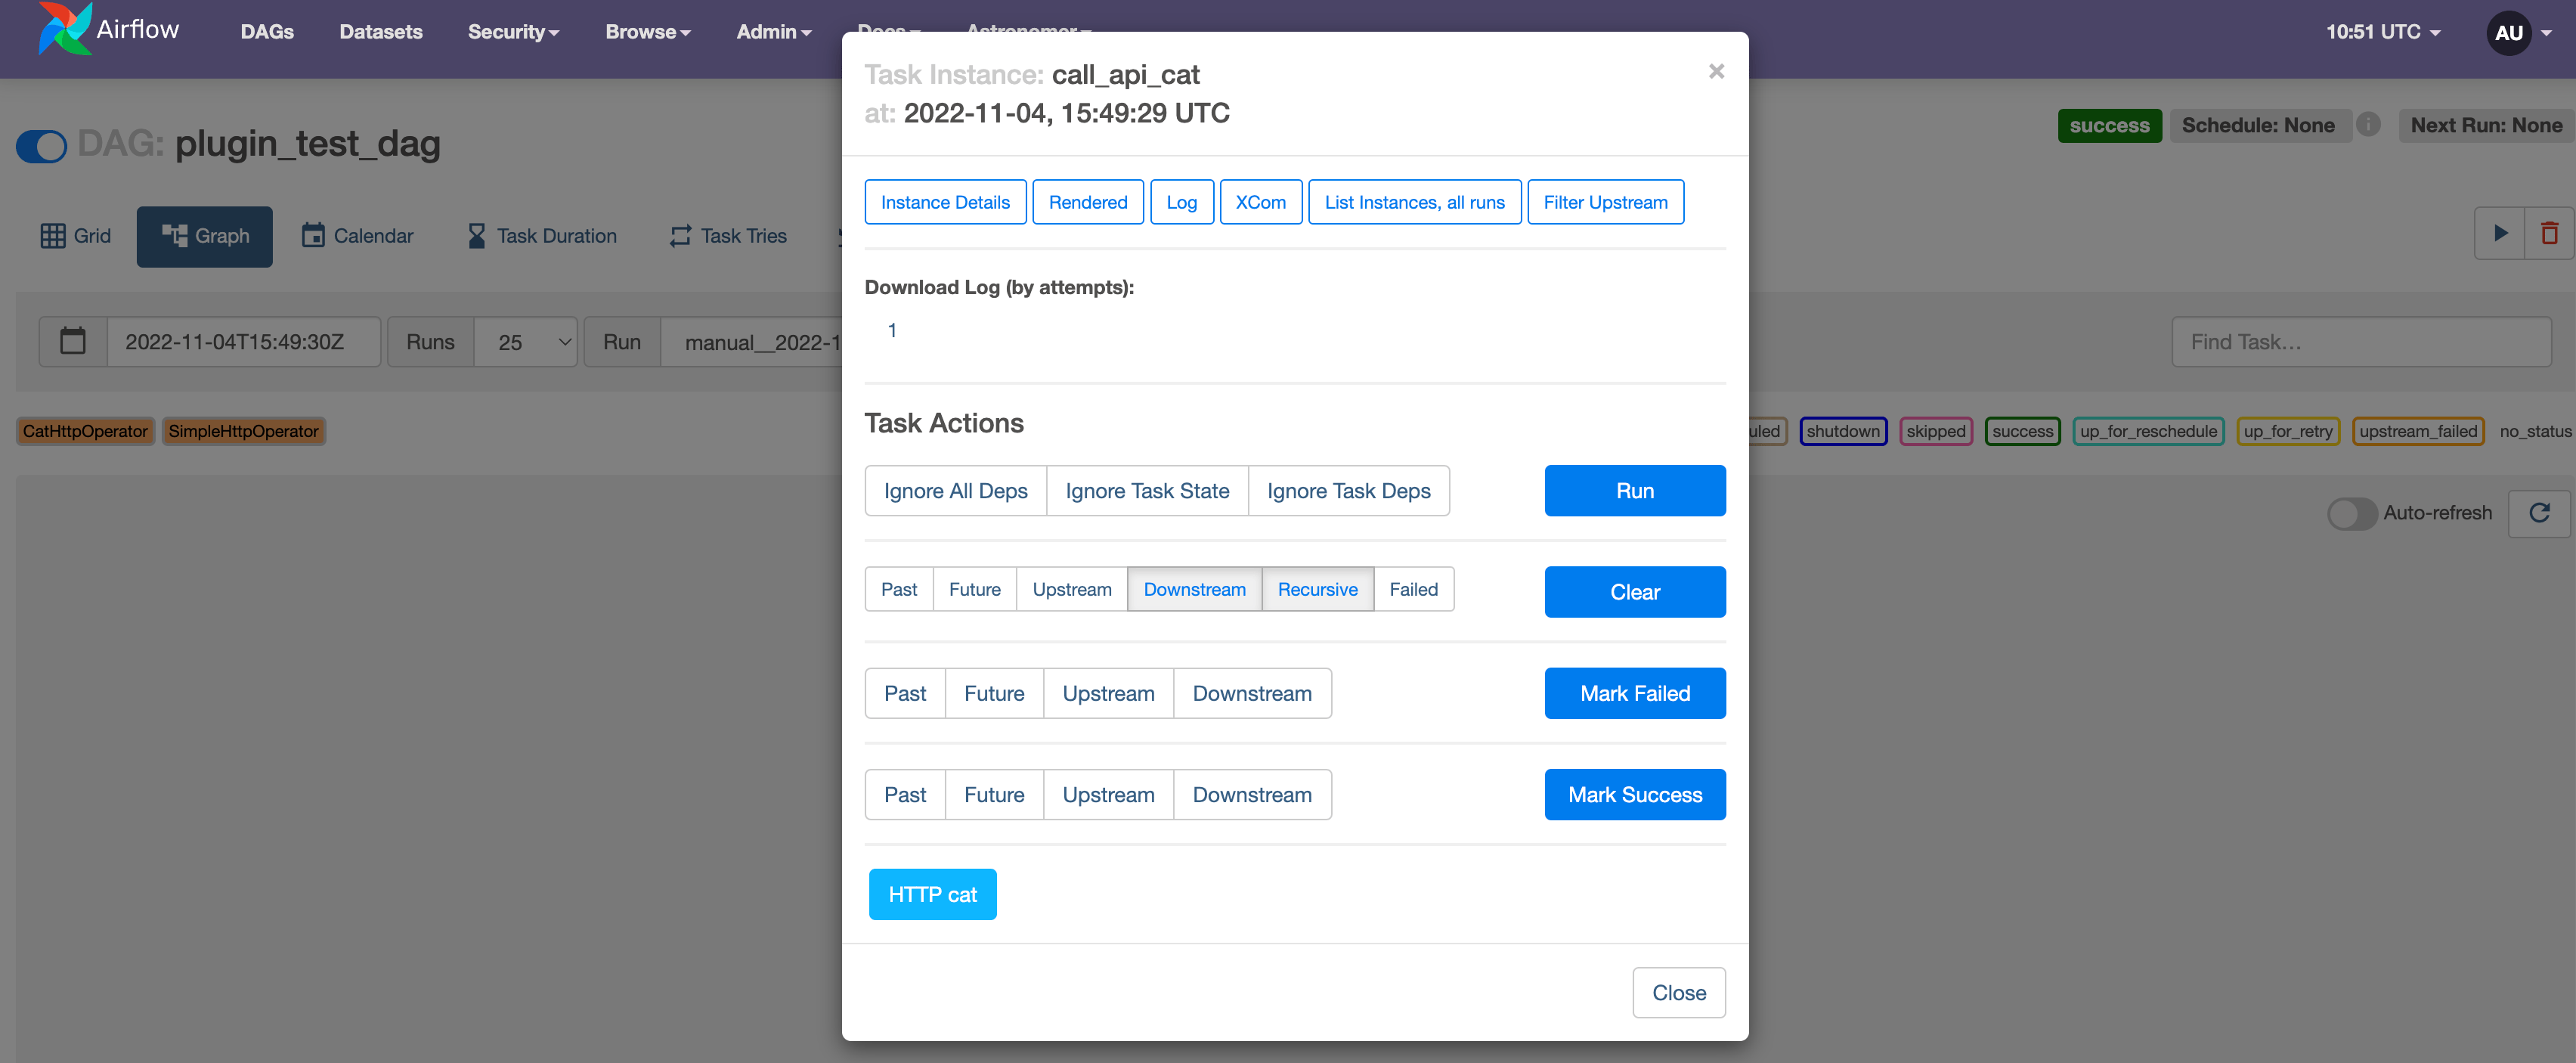
2. Navigate to the **Graph** view and click the `call_api_cat` task.
3. Click the HTTP Cat button to find the response of your last API call illustrated with a fitting cat.
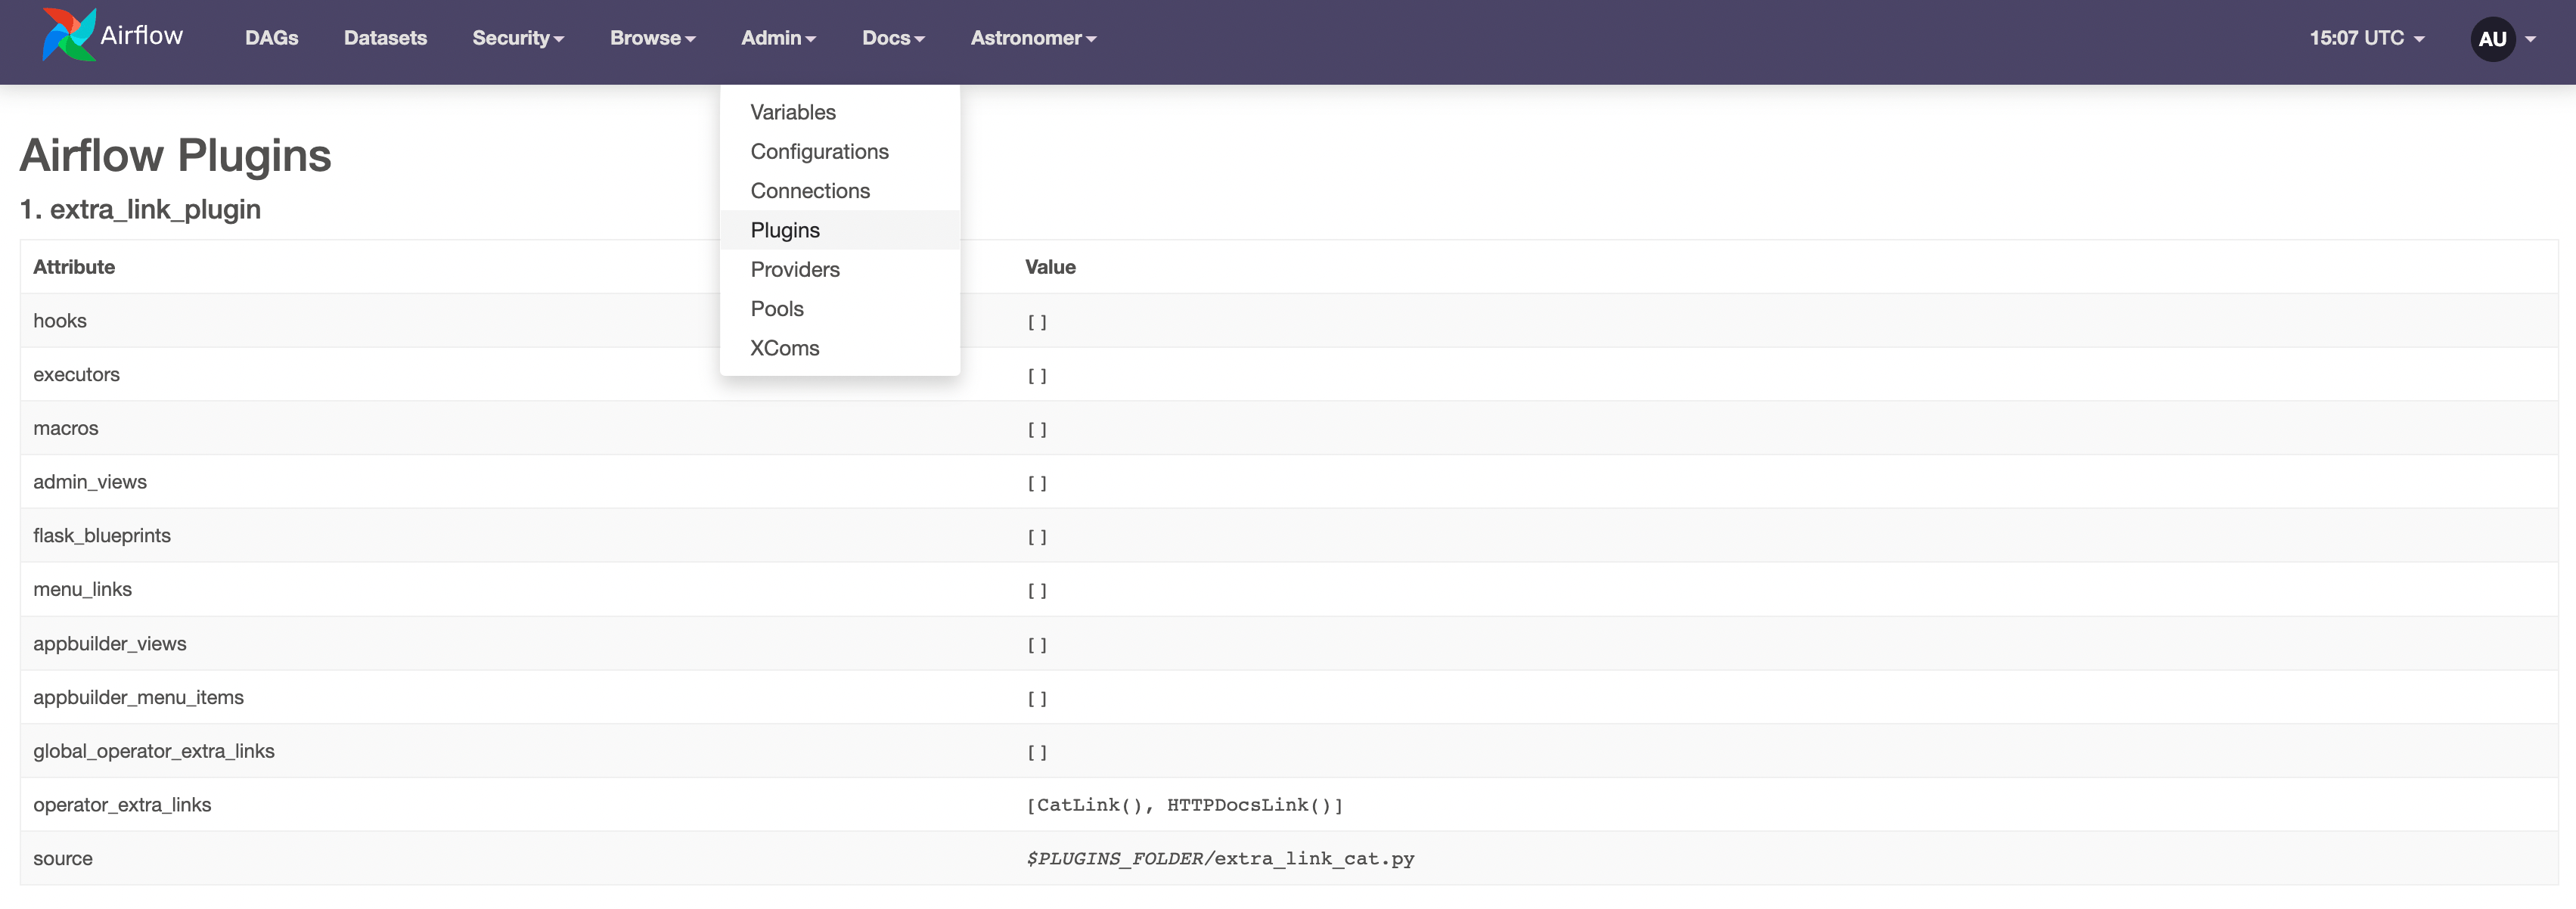
 4. (Optional) Go to **Admin** > **Plugins** to see all your plugins listed.
 ## Conclusion
Congratulations! You added two operator extra links as an Airflow plugin. On the way you also learned how to modify an existing operator to pass an additional value to XCom.
Extra links can be also be added to operators when creating an [Airflow provider](https://airflow.apache.org/docs/apache-airflow-providers/#how-to-create-your-own-provider). If you want to add an operator extra link to a custom operator as part of a provider package, make sure you install it with the rest of the package using a `setup.py` file or `wheels`.
In general, adding an operator extra link using a plugin as described in this tutorial is easier for use in a limited number of Airflow instances. However, if you are planning to use the extra link in a large number of deployments, consider adding them to an Airflow provider instead.
## Conclusion
Congratulations! You added two operator extra links as an Airflow plugin. On the way you also learned how to modify an existing operator to pass an additional value to XCom.
Extra links can be also be added to operators when creating an [Airflow provider](https://airflow.apache.org/docs/apache-airflow-providers/#how-to-create-your-own-provider). If you want to add an operator extra link to a custom operator as part of a provider package, make sure you install it with the rest of the package using a `setup.py` file or `wheels`.
In general, adding an operator extra link using a plugin as described in this tutorial is easier for use in a limited number of Airflow instances. However, if you are planning to use the extra link in a large number of deployments, consider adding them to an Airflow provider instead.