> ## Documentation Index
> Fetch the complete documentation index at: https://astronomer.io/docs/llms.txt
> Use this file to discover all available pages before exploring further.
# Get started with Apache Airflow, Part 1: Write and run your first DAG
Getting started with [Apache Airflow](https://airflow.apache.org/docs/apache-airflow/stable/index.html) is easy with the [Astro CLI](/docs/cli/v1.43/install-cli).
Follow this tutorial if you're new to Apache Airflow and want to create and run your first data pipeline.
After you complete this tutorial, you'll be able to:
* Create and start a local Airflow environment using the Astro CLI.
* Navigate the [Airflow UI](/docs/learn/2.x/airflow-ui).
* Write a simple directed acyclic graph (DAG) from scratch using the `@task` [decorator](/docs/learn/2.x/airflow-decorators) and the [`BashOperator`](https://airflow.apache.org/registry/providers/standard#standard-bash-BashOperator).
**Other ways to learn**
There are multiple resources for learning about this topic. See also:
* Astronomer Academy: [Airflow 101 Learning Path](https://academy.astronomer.io/path/airflow-101).
* Webinar: [Airflow 101: How to get started writing data pipelines with Apache Airflow](https://www.astronomer.io/events/webinars/intro-to-airflow-get-started-writing-pipelines-for-any-use-case-video/).
## Time to complete
This tutorial takes approximately 45 minutes to complete.
## Assumed knowledge
To get the most out of this tutorial, make sure you have an understanding of:
* Basic Airflow concepts. See [Introduction to Apache Airflow](/docs/learn/2.x/intro-to-airflow).
* Basic Python. See the [Python Documentation](https://docs.python.org/3/tutorial/index.html).
## Prerequisites
* The [Astro CLI](/docs/cli/v1.43/install-cli) version 1.25.0 or later.
* An integrated development environment (IDE) for Python development, such as [VSCode](https://code.visualstudio.com/).
* (Optional) A local installation of [Python 3](https://www.python.org/downloads/) to improve your Python developer experience.
## Step 1: Create an Astro project
To run data pipelines on Astro, you first need to create an Astro project, which contains the set of files necessary to run Airflow locally. This can be done with the [Astro CLI](/docs/cli/v1.43/overview).
1. Create a new directory for your Astro project:
```sh wrap theme={null}
mkdir
```
2. Open the directory:
```sh wrap theme={null}
cd
```
3. Run the following Astro CLI command to initialize an Astro project in the directory:
```sh wrap theme={null}
astro dev init
```
The Astro project is built to run Airflow with Podman (default) or Docker. [Podman](https://docs.podman.io/en/latest/) and [Docker](https://www.docker.com/) are services to run software in virtualized containers within a machine. When you run Airflow on your machine with the Astro CLI, Podman creates a container for each Airflow component that is required to run DAGs. For this tutorial, you don't need an in-depth knowledge of Podman. All you need to know is that Airflow runs on the compute resources of your machine, and that all necessary files for running Airflow are included in your Astro project.
The default Astro project structure includes a collection of folders and files that you can use to run and customize Airflow. For this tutorial, you only need to know the following files and folders:
* `/dags`: A directory of DAG files. Each Astro project includes an example DAG called `example_astronauts`. For more information on DAGs, see [Introduction to Airflow DAGs](/docs/learn/2.x/dags).
* `Dockerfile`: This is where you specify your version of [Astro Runtime](/docs/runtime/runtime-image-architecture), which is a runtime software based on Apache Airflow that is built and maintained by Astronomer. The CLI generates new Astro projects with the latest version of Runtime, which is equivalent to the latest version of Airflow. For advanced use cases, you can also configure this file with Docker-based commands to run locally at build time.
## Step 2: Start Airflow
Now that you have an Astro project ready, the next step is to actually start Airflow on your machine. In your terminal, open your Astro project directory and run the following command:
```sh wrap theme={null}
astro dev start
```
Starting Airflow for the first time can take 1 to 3 minutes. Once your local environment is ready, the CLI automatically opens a new tab or window in your default web browser to the Airflow UI at `https://localhost:8080`.
If port 8080 or 5432 are in use on your machine, Airflow won't be able to start. To run Airflow on alternative ports, run:
```sh wrap theme={null}
astro config set webserver.port
astro config set postgres.port
```
## Step 3: Sign in to the Airflow UI
The [Airflow UI](/docs/learn/2.x/airflow-ui) is essential for managing Airflow. It contains information about your DAGs and is the best place to create and update Airflow connections to third-party data services.
To access the Airflow UI, open `http://localhost:8080/` in a browser and sign in with `admin` for both your username and password.
The default page in the Airflow UI is the **DAGs** page, which shows an overview of all DAGs in your Airflow environment:
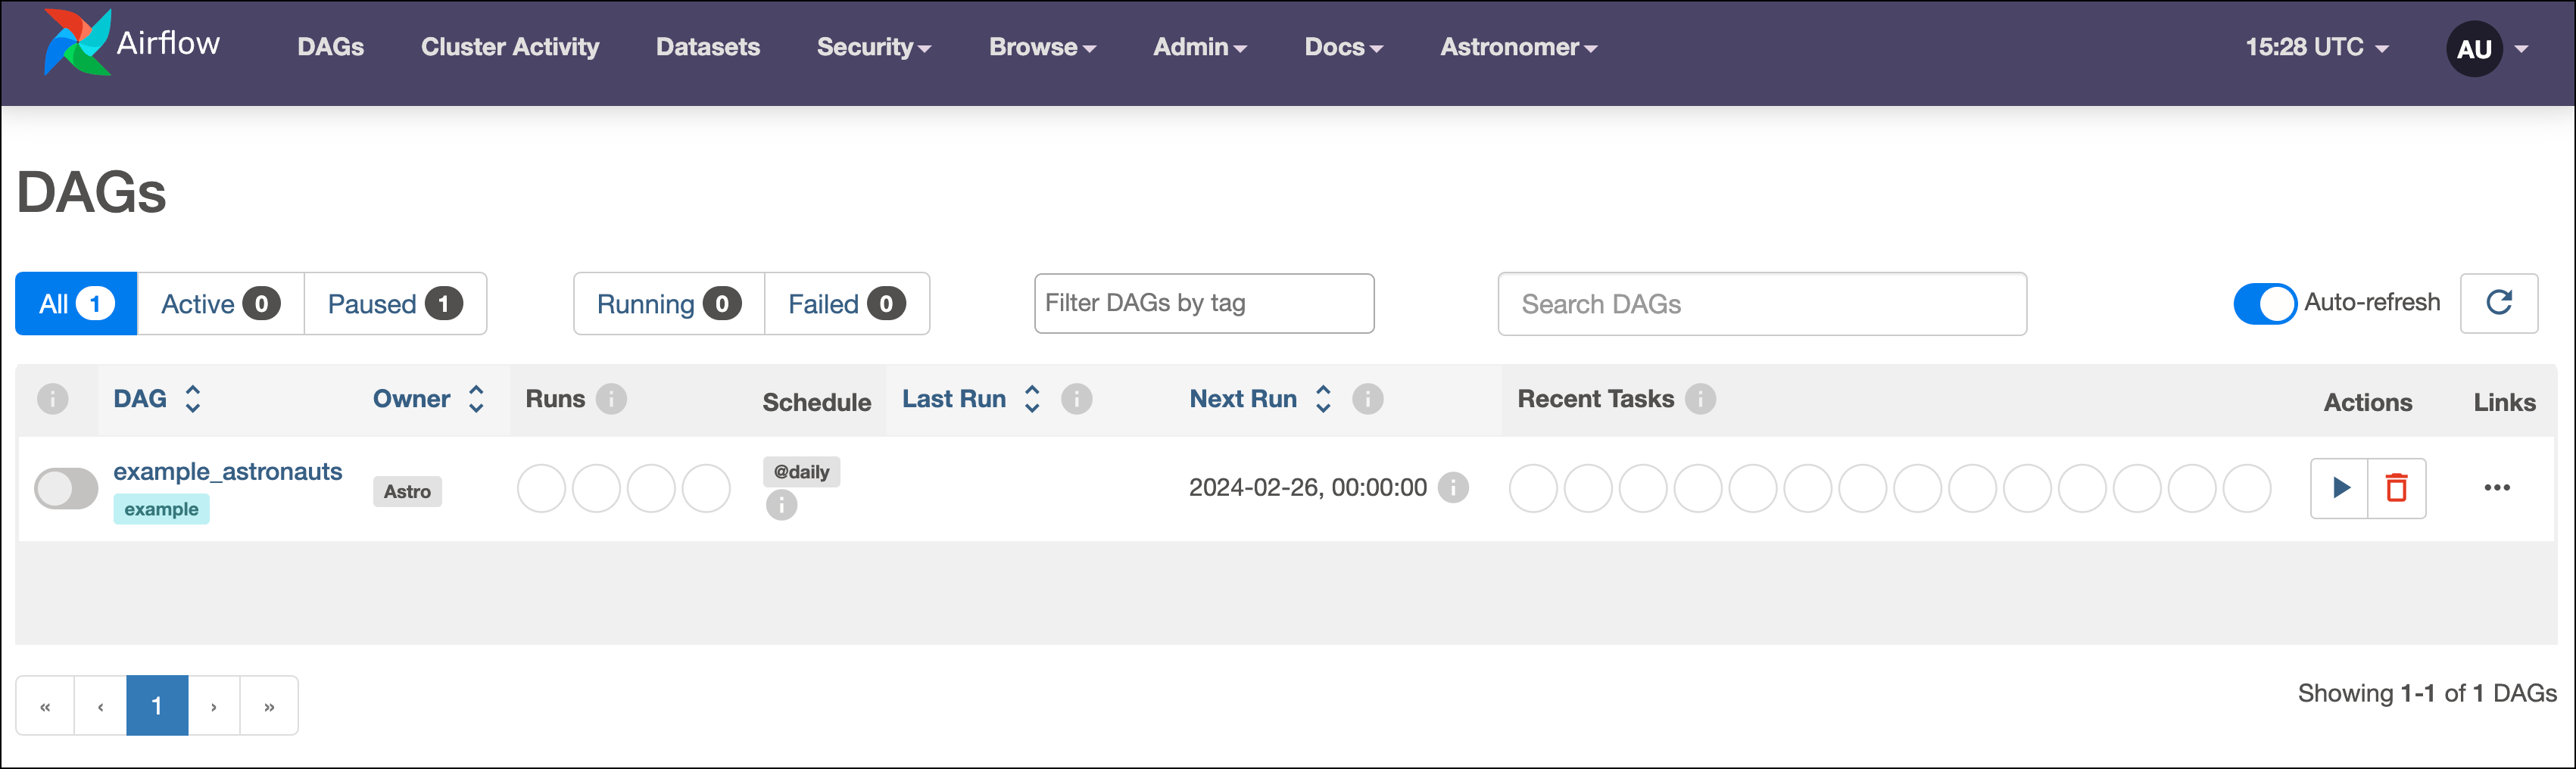 Each DAG is listed with a few of its properties, including tags, owner, previous runs, schedule, timestamp of the last and next run, and the states of recent tasks. Because you haven't run any DAGs yet, the **Runs** and **Recent Tasks** sections are empty. Let's fix that!
## Step 4: Trigger a DAG run
The `example_astronauts` DAG in your Astro project is a simple ETL pipeline with two tasks:
* `get_astronauts` queries the [Open Notify API](https://github.com/open-notify/Open-Notify-API) for information about astronauts currently in space. The task returns the list of dictionaries containing the name and the spacecraft of all astronauts currently in space, which is passed to the second task in the DAG. This tutorial doesn't explain how to pass data between tasks, but you can learn more about it in the [Pass data between tasks](/docs/learn/2.x/airflow-passing-data-between-tasks) guide.
* `print_astronaut_craft` is a task that uses dynamic mapping to create and run a task instance for each Astronaut in space. Each of these tasks prints a statement about its mapped astronaut. Dynamic task mapping is a versatile feature of Airflow that allows you to create a variable number of tasks at runtime. This feature is covered in more depth in the [Create dynamic Airflow tasks](/docs/learn/2.x/dynamic-tasks) guide.
A **DAG run** is an instance of a DAG running on a specific date. Let's trigger a run of the `example_astronauts` DAG!
1. Before you can trigger a DAG run in Airflow, you have to unpause the DAG. To unpause `example_astronauts`, click the slider button next to its name. Once you unpause it, the DAG starts to run on the schedule defined in its code.
Each DAG is listed with a few of its properties, including tags, owner, previous runs, schedule, timestamp of the last and next run, and the states of recent tasks. Because you haven't run any DAGs yet, the **Runs** and **Recent Tasks** sections are empty. Let's fix that!
## Step 4: Trigger a DAG run
The `example_astronauts` DAG in your Astro project is a simple ETL pipeline with two tasks:
* `get_astronauts` queries the [Open Notify API](https://github.com/open-notify/Open-Notify-API) for information about astronauts currently in space. The task returns the list of dictionaries containing the name and the spacecraft of all astronauts currently in space, which is passed to the second task in the DAG. This tutorial doesn't explain how to pass data between tasks, but you can learn more about it in the [Pass data between tasks](/docs/learn/2.x/airflow-passing-data-between-tasks) guide.
* `print_astronaut_craft` is a task that uses dynamic mapping to create and run a task instance for each Astronaut in space. Each of these tasks prints a statement about its mapped astronaut. Dynamic task mapping is a versatile feature of Airflow that allows you to create a variable number of tasks at runtime. This feature is covered in more depth in the [Create dynamic Airflow tasks](/docs/learn/2.x/dynamic-tasks) guide.
A **DAG run** is an instance of a DAG running on a specific date. Let's trigger a run of the `example_astronauts` DAG!
1. Before you can trigger a DAG run in Airflow, you have to unpause the DAG. To unpause `example_astronauts`, click the slider button next to its name. Once you unpause it, the DAG starts to run on the schedule defined in its code.
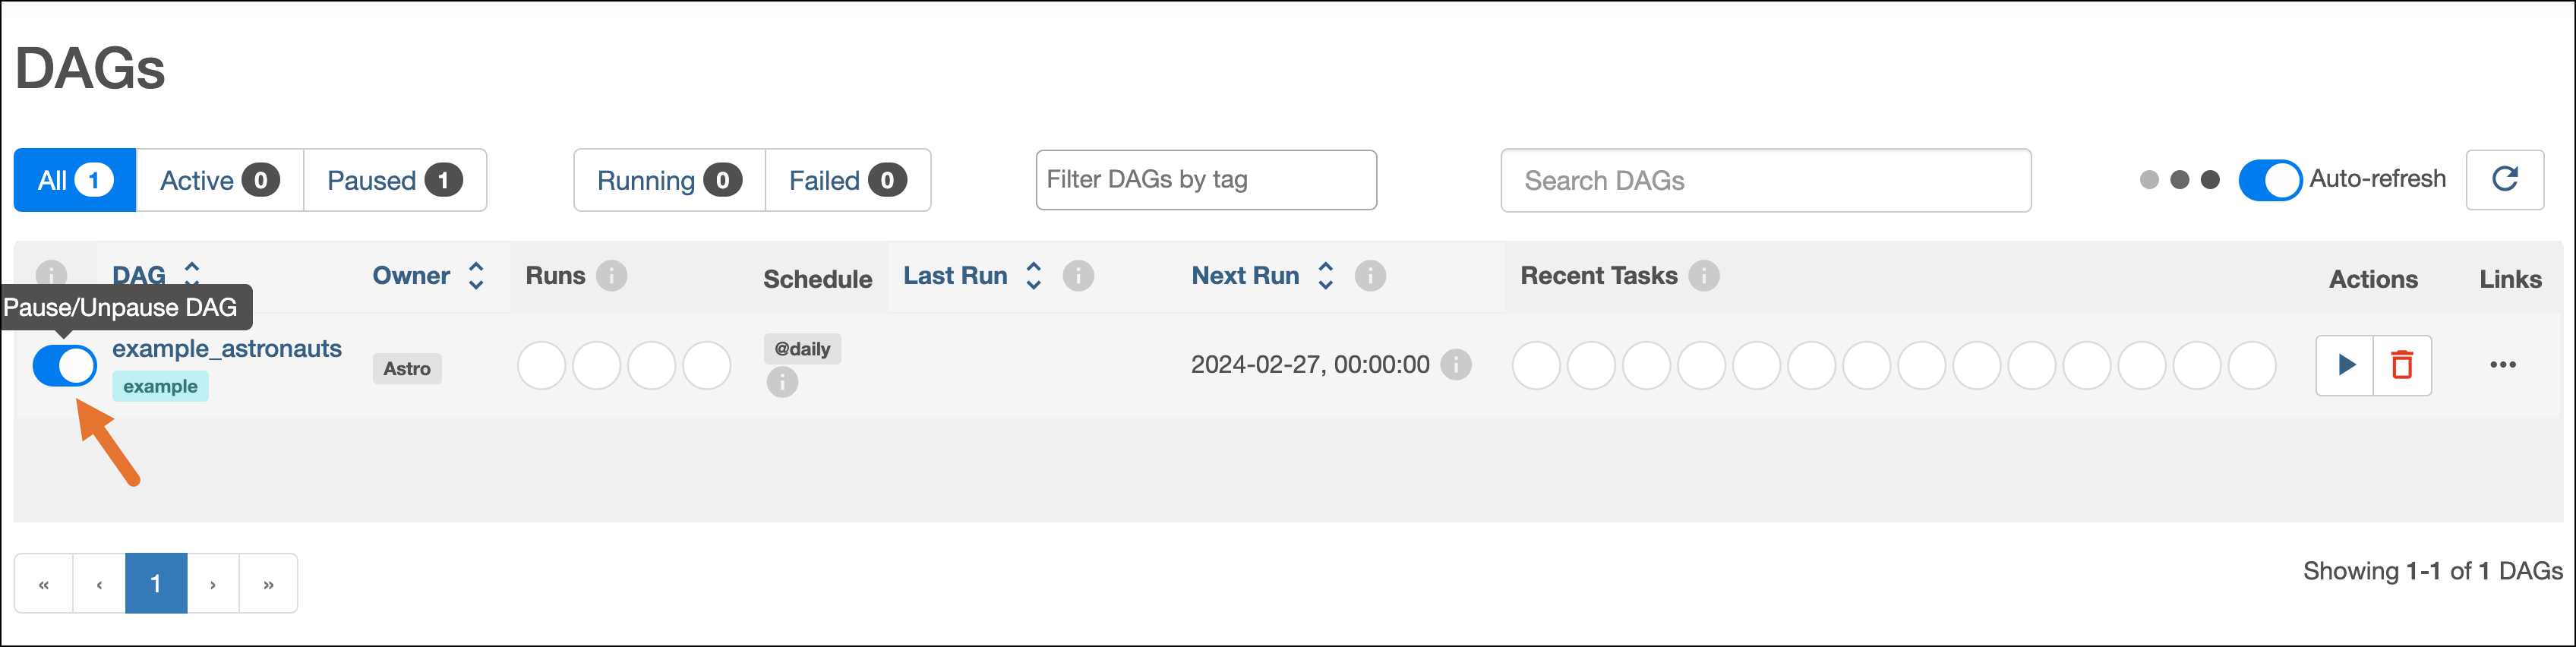 2. While all DAGs can run on a schedule defined in their code, you can manually trigger a DAG run at any time from the Airflow UI. Manually trigger `example_astronauts` by clicking the play button under the **Actions** column. During development, running DAGs on demand can help you identify and resolve issues.
After you press **Play**, the **Runs** and **Recent Tasks** sections for the DAG start to populate with data.
2. While all DAGs can run on a schedule defined in their code, you can manually trigger a DAG run at any time from the Airflow UI. Manually trigger `example_astronauts` by clicking the play button under the **Actions** column. During development, running DAGs on demand can help you identify and resolve issues.
After you press **Play**, the **Runs** and **Recent Tasks** sections for the DAG start to populate with data.
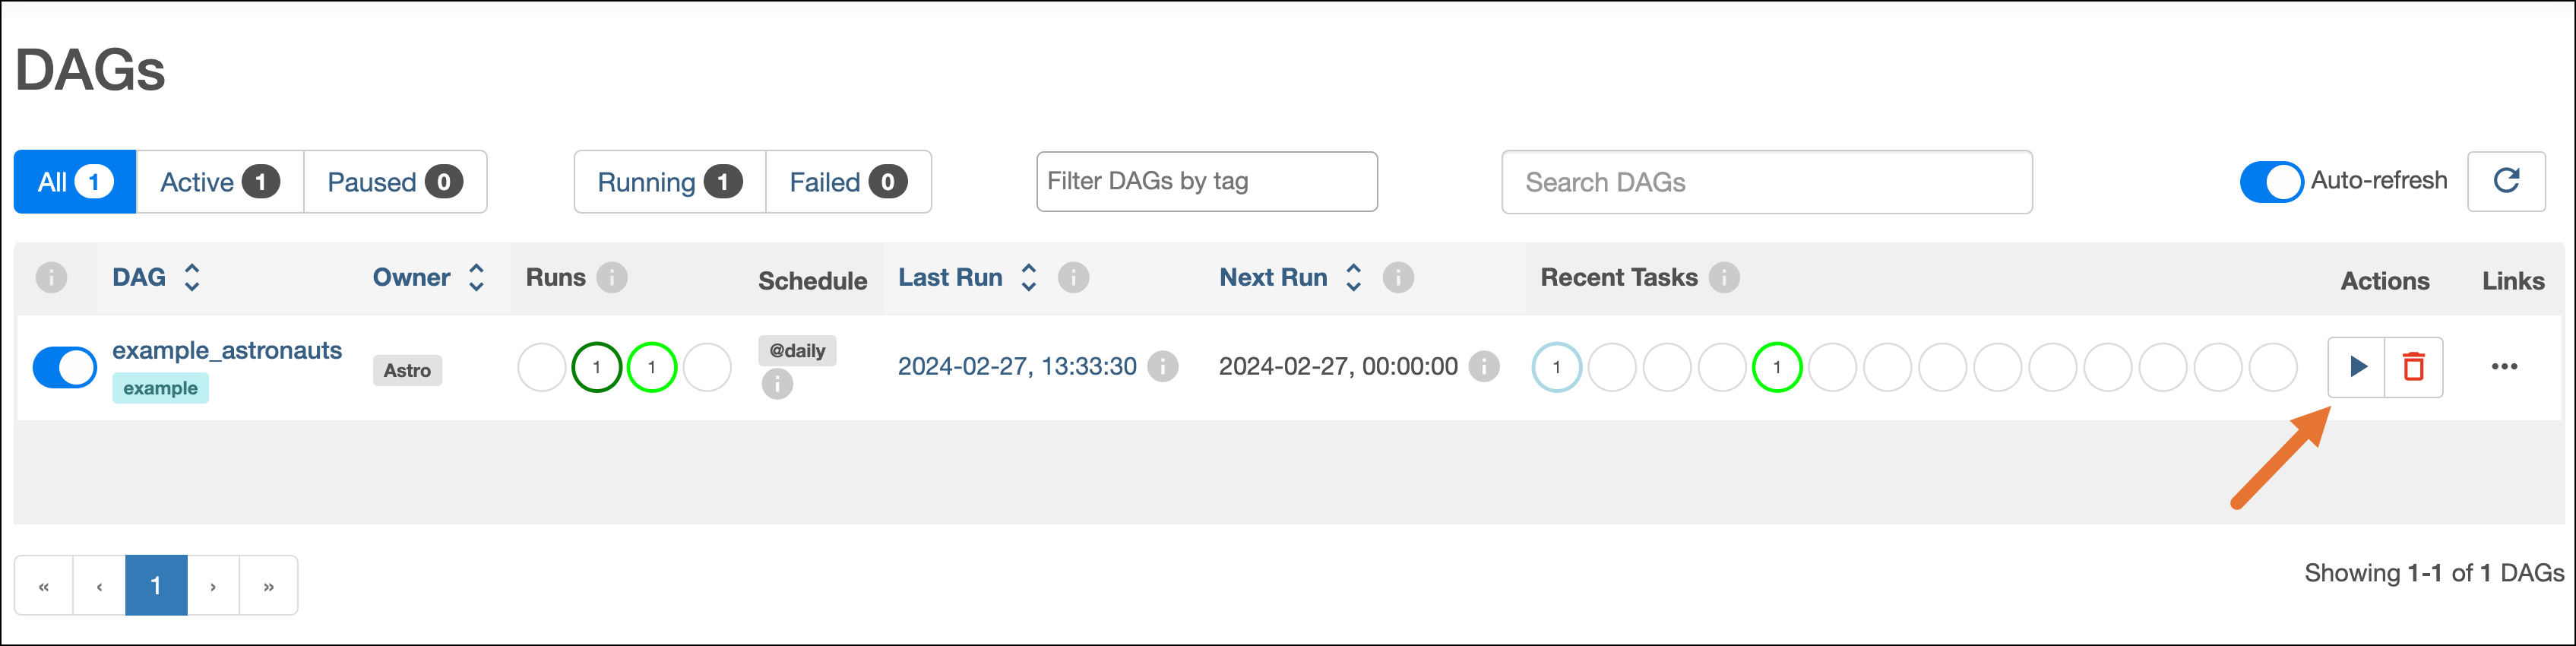 These circles represent different [states](https://airflow.apache.org/docs/apache-airflow/stable/core-concepts/tasks.html#task-instances) that your DAG and task runs can be in. However, these are only high-level summaries of your runs that won't make much sense until you learn more about how Airflow works. To get a better picture of how your DAG is running, let's explore some other views in Airflow.
## Step 5: Explore the Airflow UI
The navigation bar in the Airflow UI contains tabs with different information about your Airflow environment. For more information about what you can find in each tab, see [The Airflow UI](/docs/learn/2.x/airflow-ui).
Let's explore the available views in the **DAGs** page. To access different DAG views for `example_astronauts`:
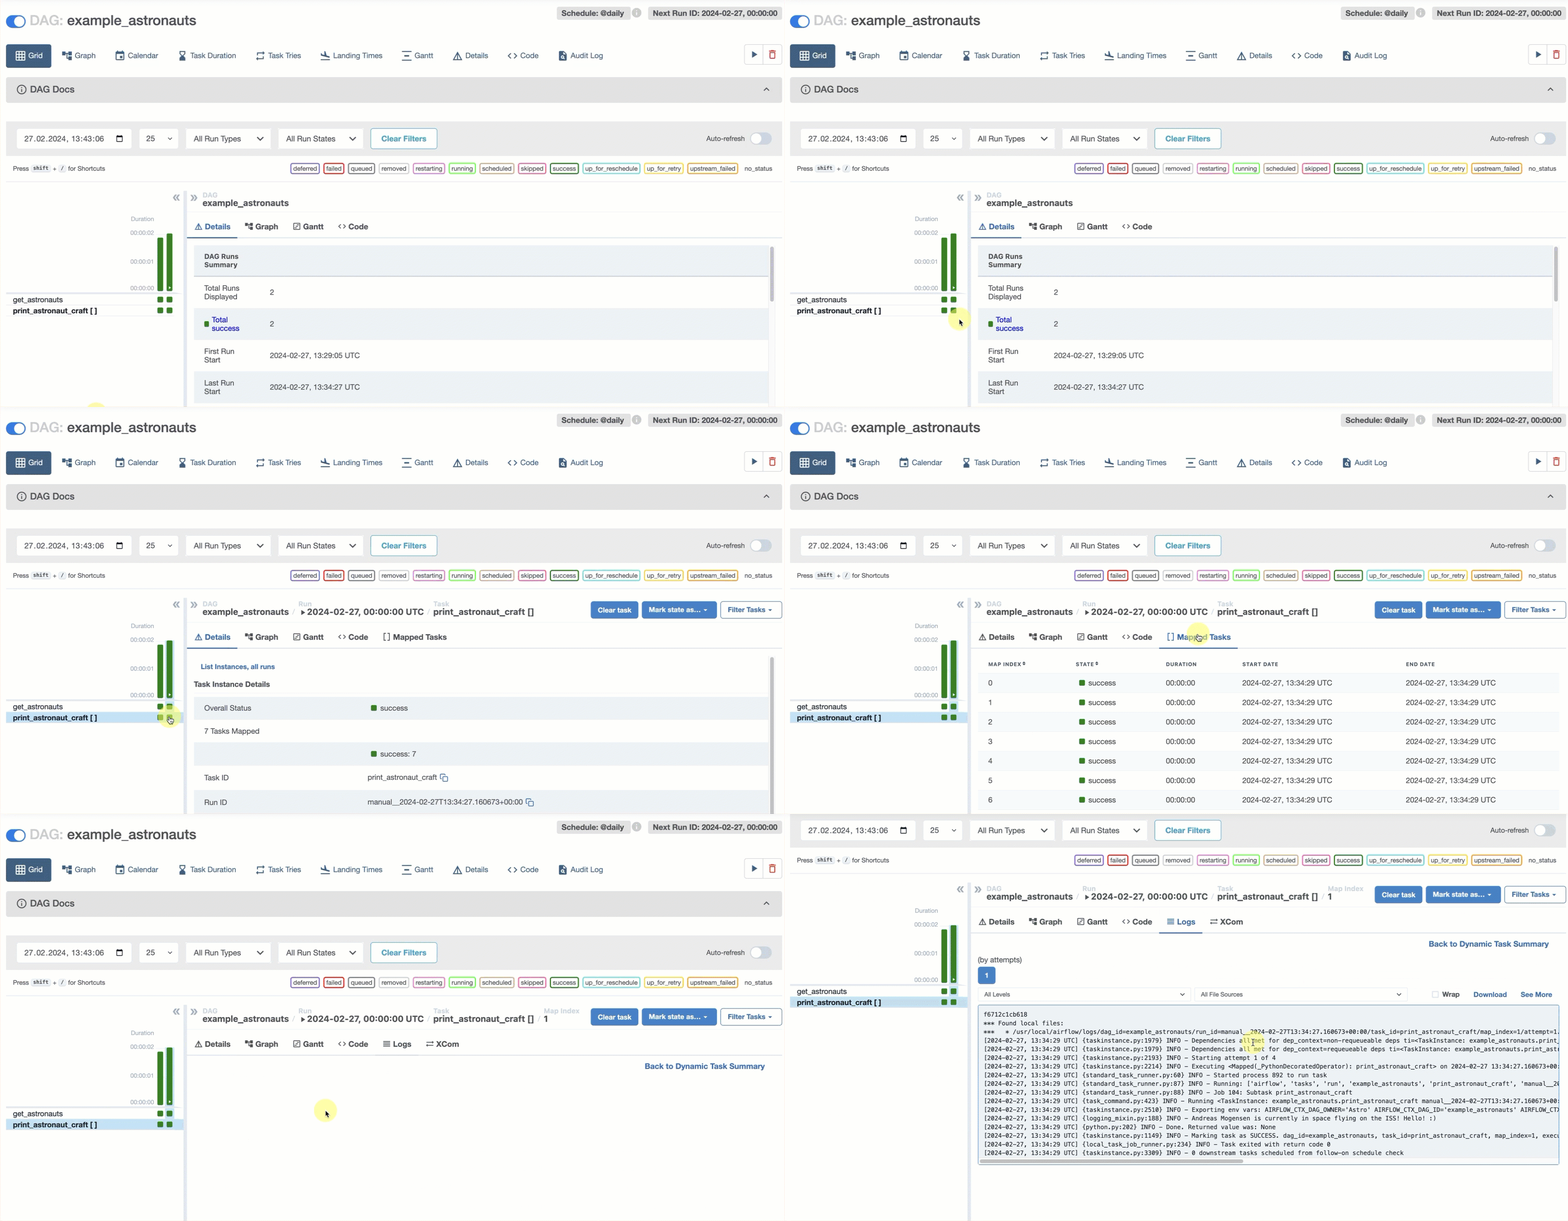
1. Click the name of the DAG to access the **Grid** view, which shows the status of running and completed tasks.
Each column in the grid represents a complete DAG run, and each block in the column represents a specific task instance. This view is useful for seeing DAG runs over time and troubleshooting previously failed task instances.
These circles represent different [states](https://airflow.apache.org/docs/apache-airflow/stable/core-concepts/tasks.html#task-instances) that your DAG and task runs can be in. However, these are only high-level summaries of your runs that won't make much sense until you learn more about how Airflow works. To get a better picture of how your DAG is running, let's explore some other views in Airflow.
## Step 5: Explore the Airflow UI
The navigation bar in the Airflow UI contains tabs with different information about your Airflow environment. For more information about what you can find in each tab, see [The Airflow UI](/docs/learn/2.x/airflow-ui).
Let's explore the available views in the **DAGs** page. To access different DAG views for `example_astronauts`:
1. Click the name of the DAG to access the **Grid** view, which shows the status of running and completed tasks.
Each column in the grid represents a complete DAG run, and each block in the column represents a specific task instance. This view is useful for seeing DAG runs over time and troubleshooting previously failed task instances.
 Click a green square to display additional information about the related task instance on the right side of the Airflow UI. The task instance view includes tabs with additional information for the task instance, such as its logs and historic runs. This is one of many available views that show details about your DAG.
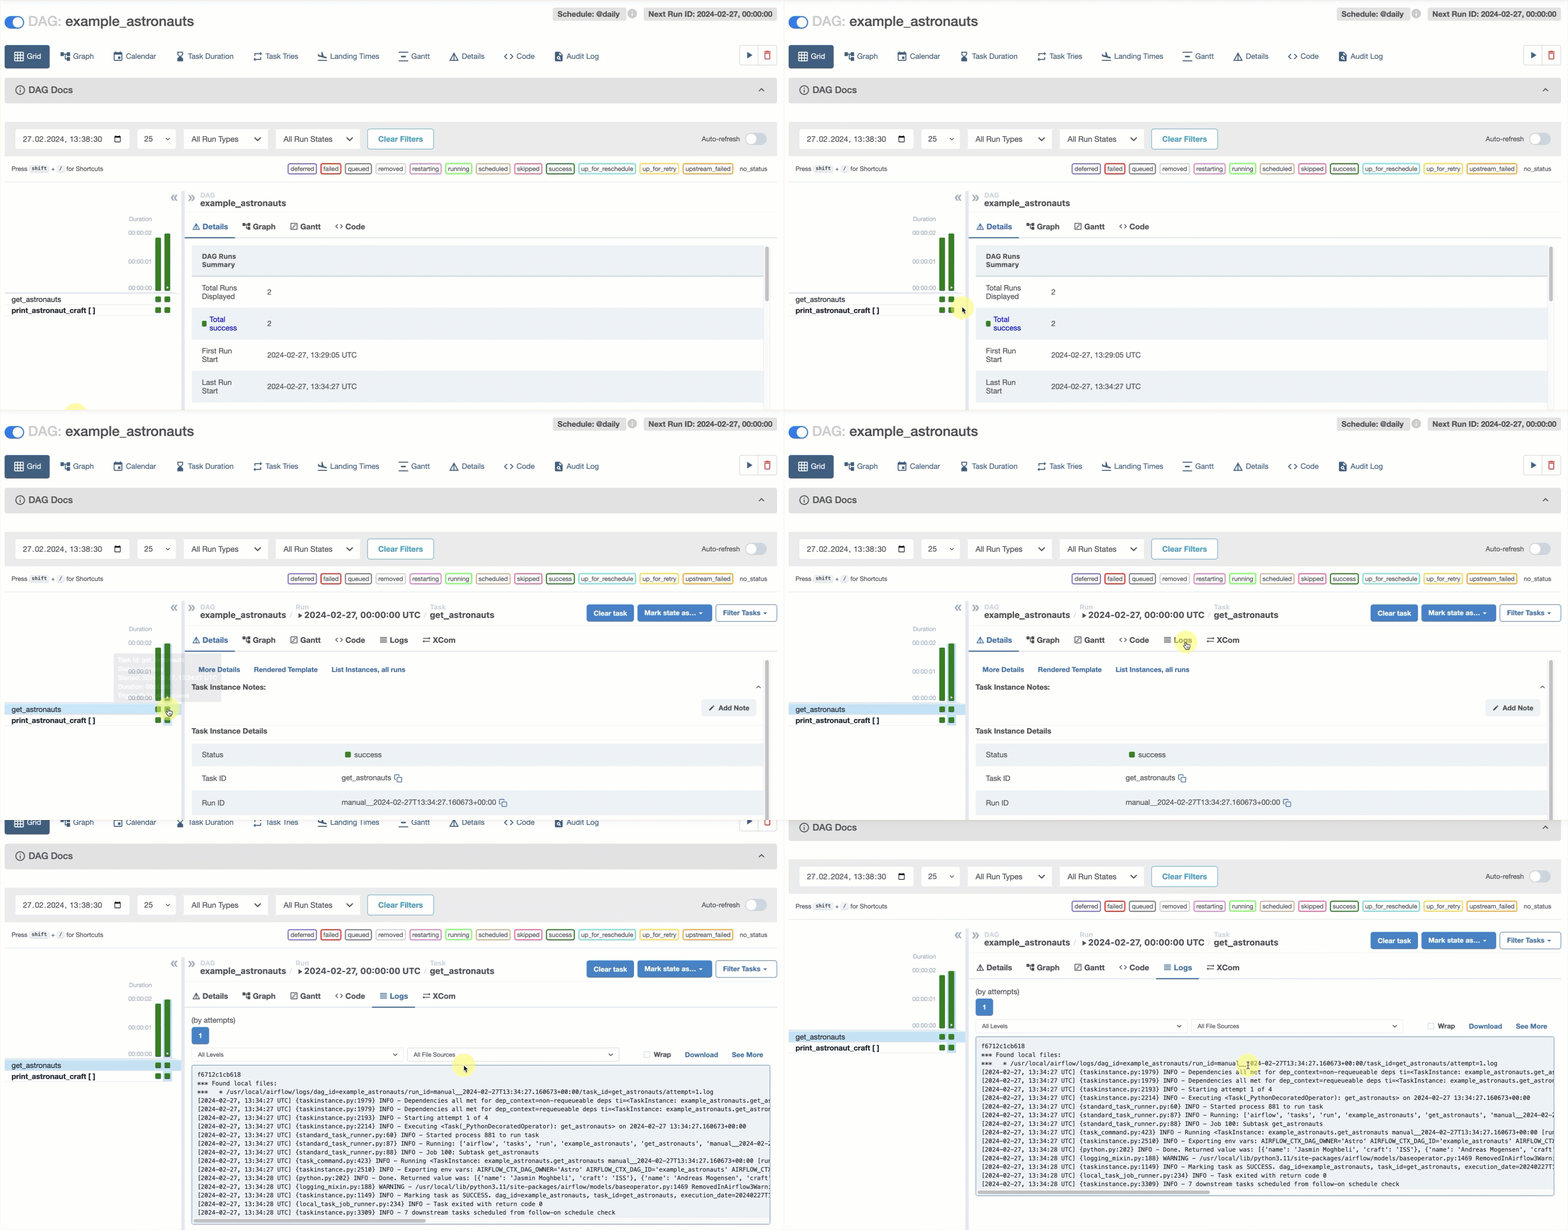 To access information about mapped task instances of a dynamically mapped task, click the green square of the mapping task instance and then click **\[] Mapped task** to view a list of all dynamically mapped task instances. Click any entry in the list to access information about the dynamically mapped task instance.
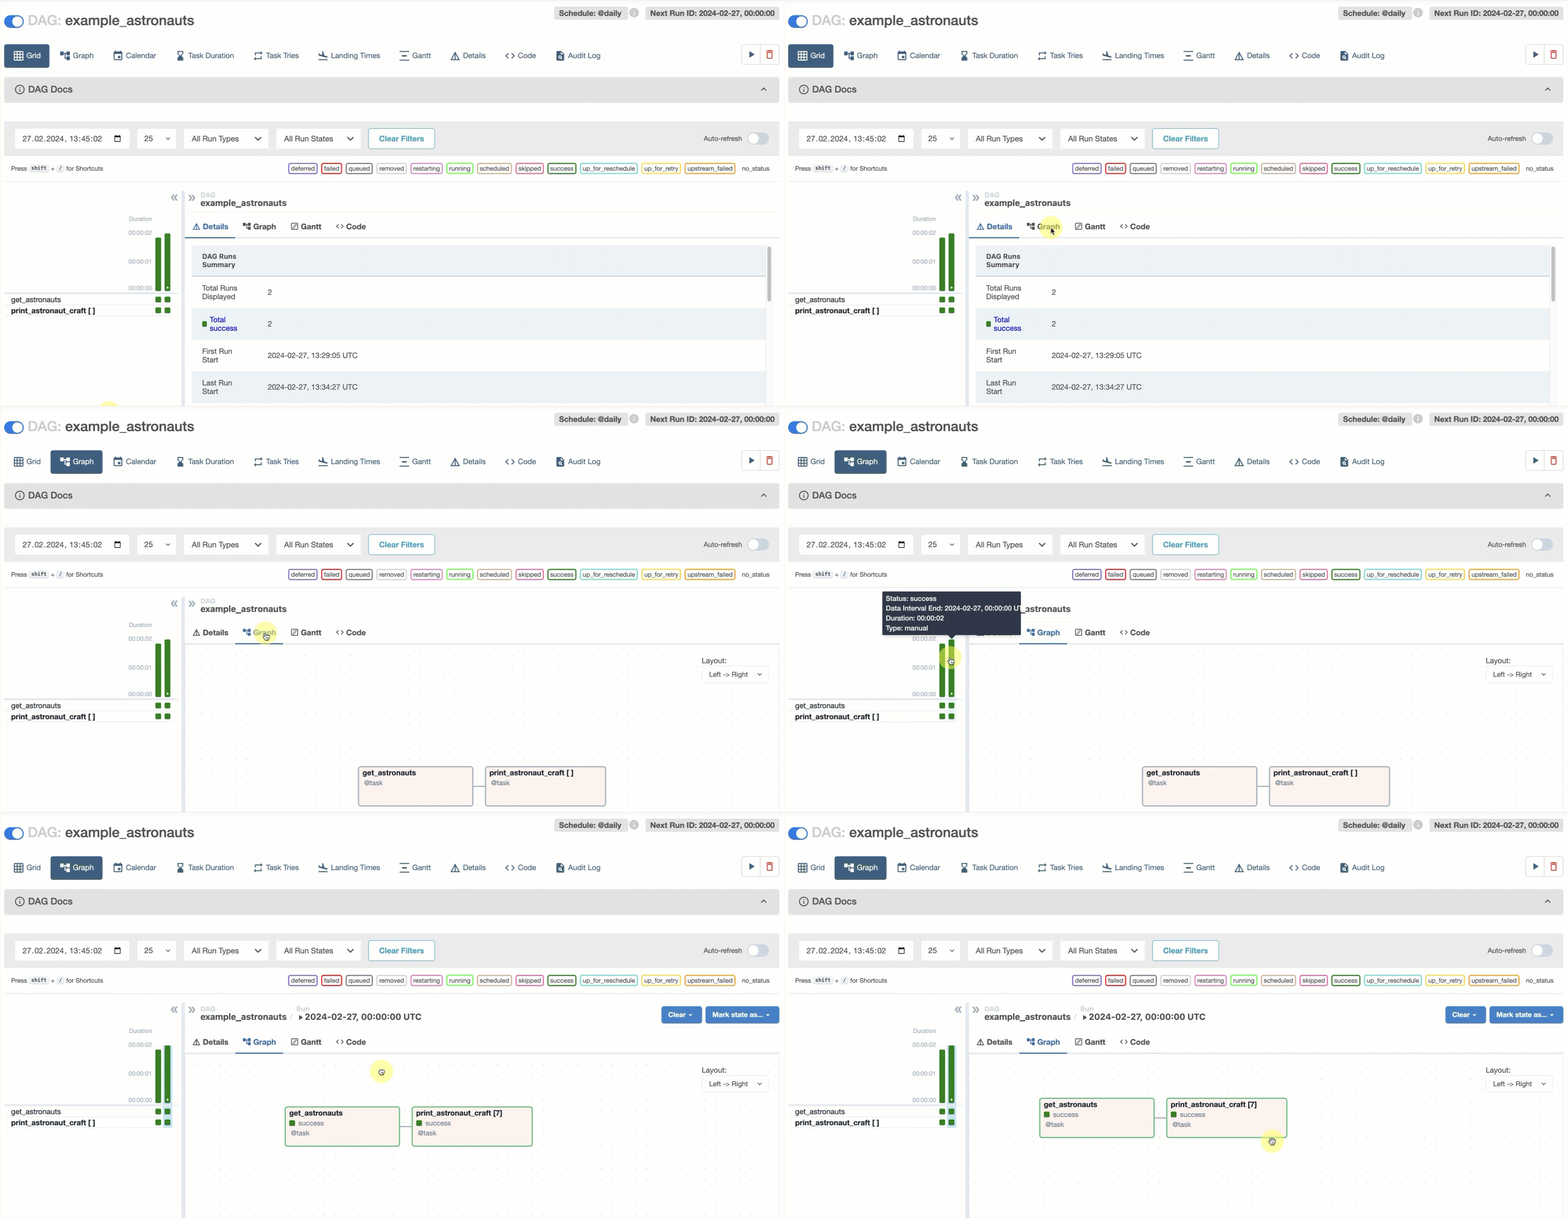
 2. In the **Grid** view, click the **Graph** tab. This view shows task dependencies and relationships and can help you troubleshoot dependency issues. When you select a DAG run in the Grid view, the Graph tab shows the last state of each task instance in this DAG run.
 3. In the **Grid** view, click the **Code** tab to display your DAG source code. Viewing code in the Airflow UI helps you confirm which version of your code is currently running on Airflow.
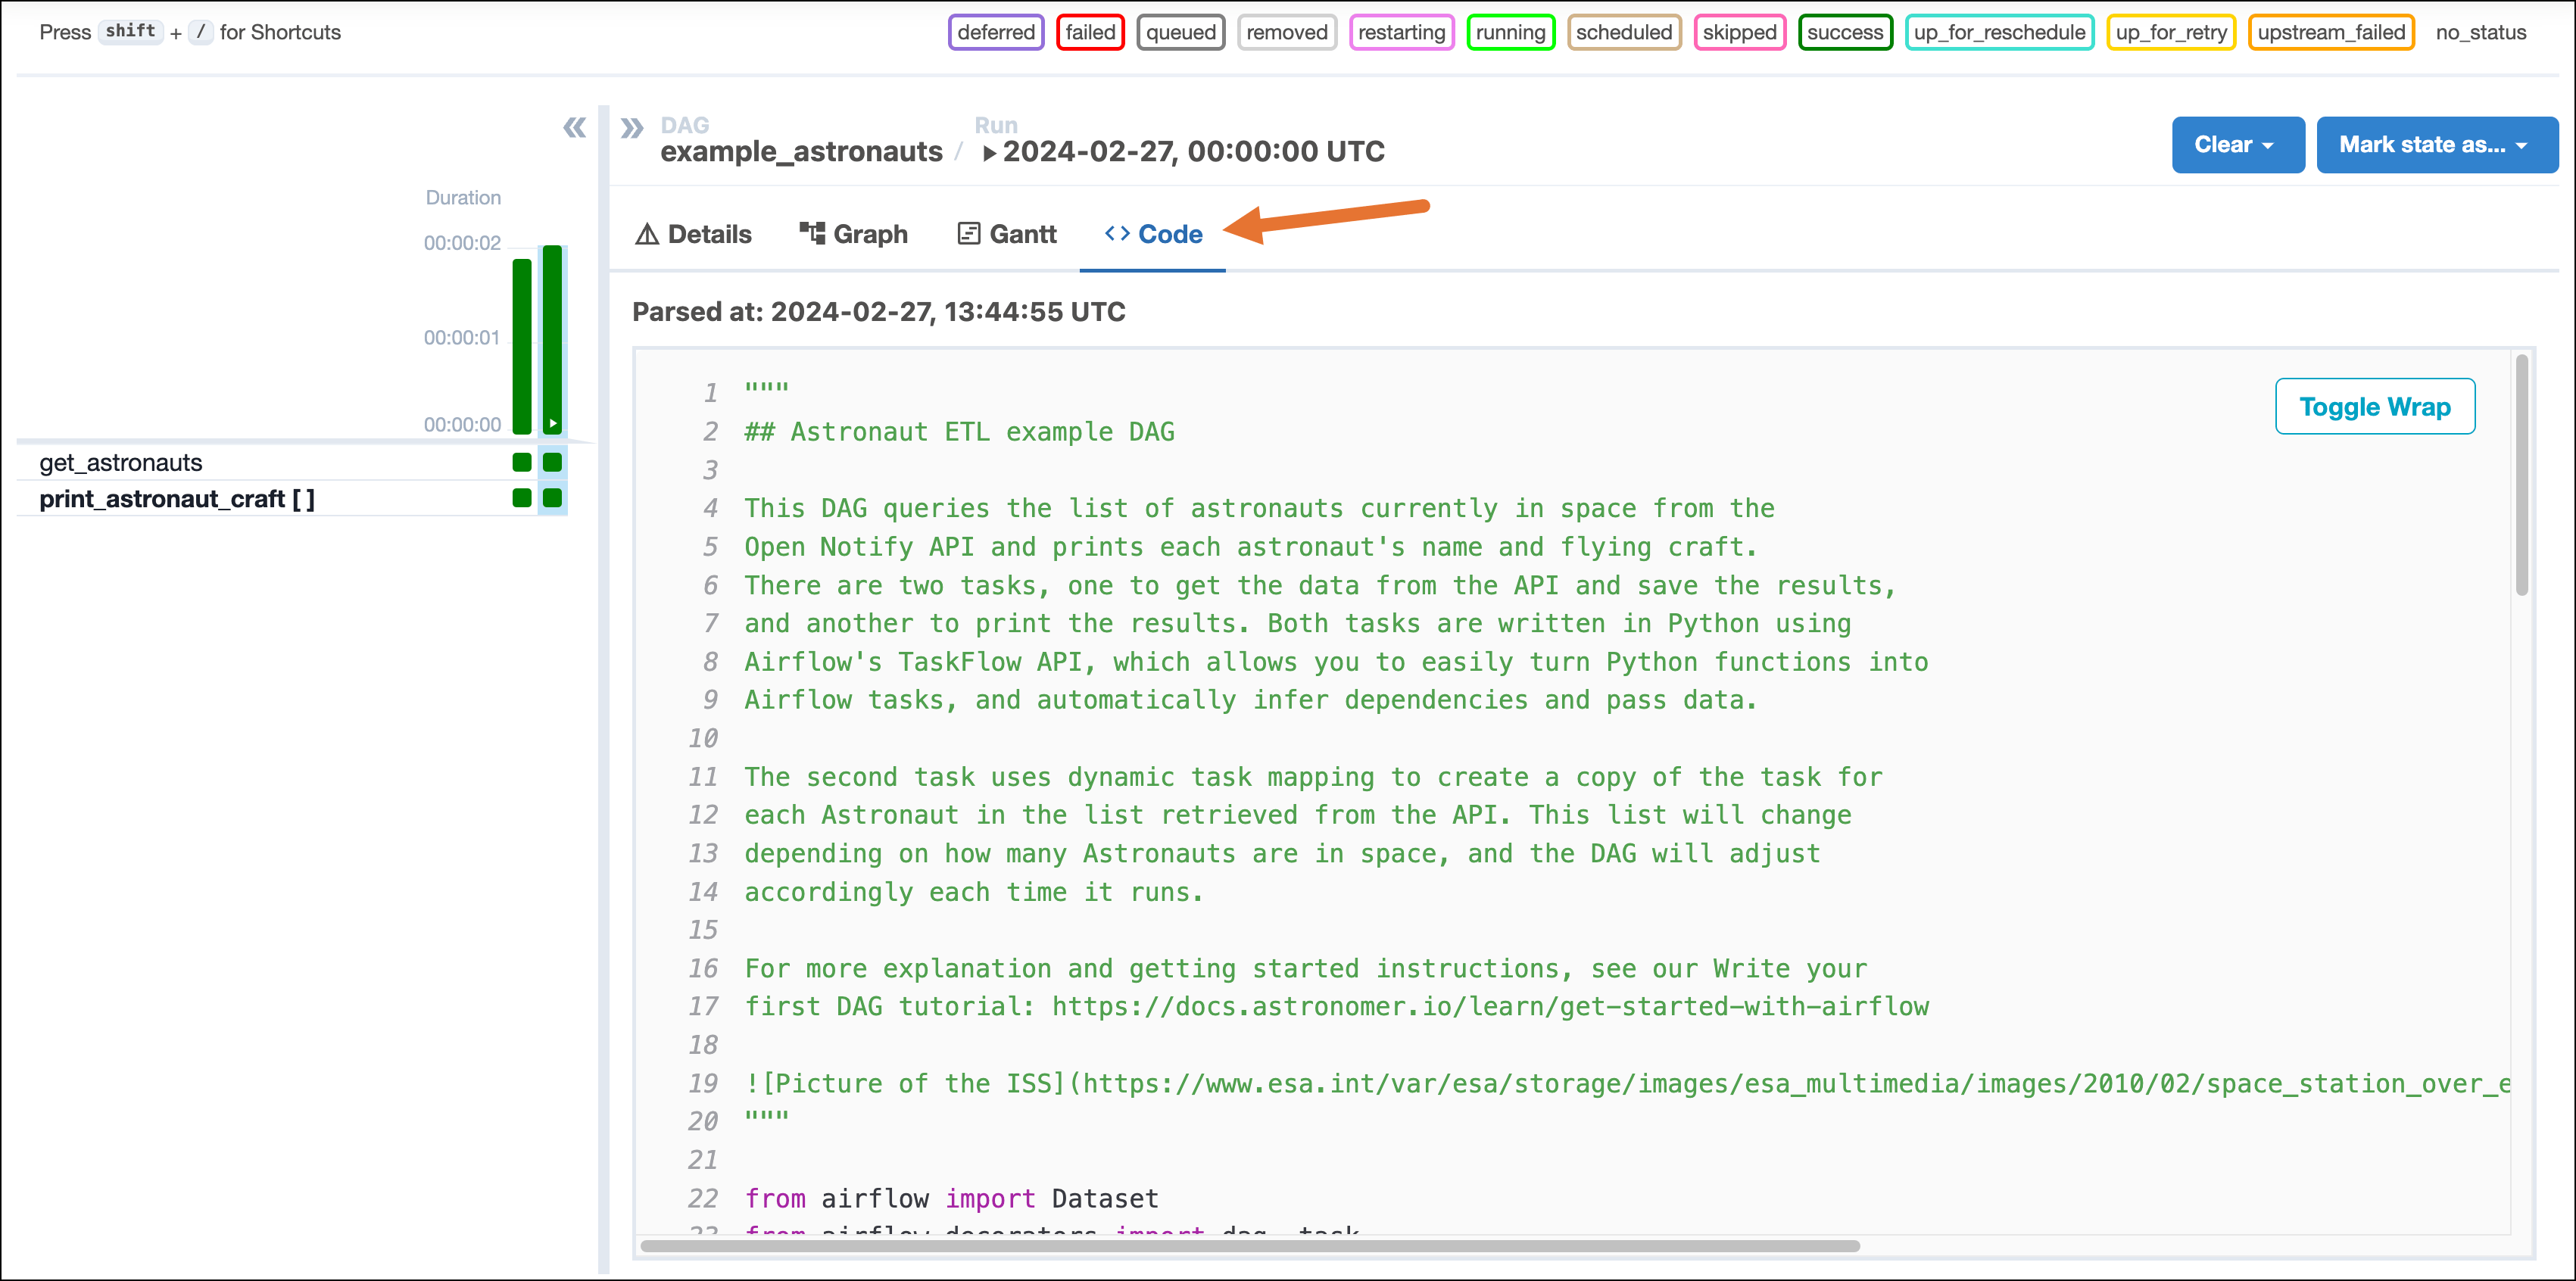 While you can view DAG code within the Airflow UI, code edits must be completed in the Python file within the `/dags` folder. The displayed code updates every 30 seconds.
## Step 6: Write a new DAG
Now that we can run DAGs and navigate the UI, let's write our own DAG and run it.
In this step, you'll write a DAG that:
* Retrieves the number of people currently in space from the Airflow XCom table. This table is part of the Airflow metadata database and is used to pass data between tasks and DAGs. The `example_astronauts` DAG already pushed the number of astronauts to XCom when you ran it in [Step 4](#step-4-trigger-a-dag-run).
* Prints the number of people currently in space to logs.
* Runs a bash statement reacting to the number of people in space.
You'll copy most of the code, trigger the DAG, and then confirm the expected output is returned.
1. Create a new Python file in the `/dags` folder named `my_astronauts_dag.py`.
2. Open `my_astronauts_dag.py` in your IDE. Add the docstring explaining what this DAG does at the top of the file:
```python wrap theme={null}
"""
## Print the number of people currently in space
This DAG pulls the number of people currently in space. The number is pulled
from XCom and was pushed by the `get_astronauts` task in the `example_astronauts` DAG.
"""
```
Adding a docstring to your DAG is highly recommended. It helps you and others understand what the DAG does and how it works. It can also be converted to a [DAG Doc](/docs/learn/2.x/custom-airflow-ui-docs-tutorial) by setting `doc_md=__doc__` in the DAG definition.
3. After the docstring, add the import statements of your Python packages:
```python wrap theme={null}
from airflow.decorators import dag, task
from airflow.operators.bash import BashOperator
from airflow import Dataset
from airflow.models.baseoperator import chain
from pendulum import datetime
```
4. Instantiate a DAG using the `@dag` decorator on top of a Python function:
```python wrap theme={null}
@dag(
dag_id="my_astronauts_dag",
start_date=datetime(2024, 1, 1),
schedule=[Dataset("current_astronauts")],
catchup=False,
doc_md=__doc__,
default_args={"owner": "Astro", "retries": 3},
tags=["My First DAG!"],
)
def my_astronauts_dag():
```
`@dag` instantiates a DAG context in which tasks can be defined and given dependencies. The instantiation includes several important arguments:
* `dag_id`: The name of the DAG that appears in the Airflow UI. If no `dag_id` is specified, the name of the Python function is used as the DAG ID. Each DAG must have a unique name, and Astronomer recommends using the same name for the DAG file and the `dag_id`.
* `start_date`: The date and time when the DAG is scheduled to start running, given as a datetime object. In this example, the DAG is triggered on its schedule as long as the current time is 0:00 UTC on January 1st, 2024 or later.
* `schedule`: The frequency at which the DAG runs. If you don't set this value, the DAG runs every 24 hours after the `start_date`. In this example, the DAG is scheduled to run whenever the `example_astronauts` DAG's `get_astronauts` task completes successfully using an Airflow dataset. There are many options to define the schedule of a DAG. For more information, see [DAG scheduling and time tables in Airflow](/docs/learn/scheduling-in-airflow).
* `catchup`: Defines whether the DAG reruns all DAG runs that were scheduled before today's date. The default value is `True`, but it is recommended that you set this argument to `False` unless you are explicitly running your DAG to backfill runs.
* `default_args`: A dictionary of arguments to be passed to every task in the DAG. In this example, the `default_args` change the owner of the DAG and set the default number of retries in case of a failure for all tasks in the DAG to 3. You can pass any arguments to all your tasks by setting them in `default_args` and override them for specific tasks by setting them in the task definition.
* `tags`: Defines the **Tags** that appear in the **DAGs** page of the Airflow UI. These can help you organize DAGs in more complex projects.
5. Add a task to your DAG:
```python wrap theme={null}
@task
def print_num_people_in_space(**context) -> None:
"""
This task pulls the number of people currently in space from XCom. The number is
pushed by the `get_astronauts` task in the `example_astronauts` DAG.
"""
num_people_in_space = context["ti"].xcom_pull(
dag_id="example_astronauts",
task_ids="get_astronauts",
key="number_of_people_in_space",
include_prior_dates=True,
)
print(f"There are currently {num_people_in_space} people in space.")
```
The `@task` decorator lets you define Python functions with very little boilerplate code. This is the syntax of the TaskFlow API, which is Airflow's lightweight framework for defining tasks. This `print_num_people_in_space` task pulls the number of people in space from XCom and prints it to the logs. Learn more about XCom in the [Pass data between tasks](/docs/learn/2.x/airflow-passing-data-between-tasks) guide.
You can put this decorator on top of any Python function to turn your code into an Airflow task. This is one of the features that makes Airflow so powerful: Any action that can be defined in Python, no matter how complex, can be orchestrated using Airflow.
Each task in an Airflow DAG requires a unique `task_id`. Here we can see why that's important: the `num_people_in_space` task can call the unique `get_astronauts` task to pull the data it generated from XCom.
6. Add a second task to your DAG:
```python wrap theme={null}
print_reaction = BashOperator(
task_id="print_reaction",
bash_command="echo This is awesome!",
)
```
For common operations, you can use pre-built [operators](/docs/learn/2.x/what-is-an-operator) instead of writing your own function. An operator is a Python class containing the logic to define the work to be completed by a single task. `print_reaction` uses the [`BashOperator`](https://airflow.apache.org/registry/providers/standard#standard-bash-BashOperator) to run a bash command.
7. Define the dependencies between the two tasks using the `chain` function:
```python wrap theme={null}
chain(print_num_people_in_space(), print_reaction)
```
The `chain` function is used to define task dependencies. In this example, `print_num_people_in_space` is **upstream** of `print_reaction`, meaning that `print_num_people_in_space` must finish before `print_reaction` can start. For more information on how to define task dependencies, see [Managing Dependencies in Apache Airflow](/docs/learn/2.x/managing-dependencies).
Alternatively you can use bitshift operators to define the dependencies between the two tasks:
```python wrap theme={null}
print_num_people_in_space >> print_reaction
```
This notation is unique to Airflow and is functionally equivalent to the `chain` function shown earlier in this guide.
8. Lastly, call the DAG function:
```python wrap theme={null}
my_astronauts_dag()
```
9. Save your code. Your completed DAG should look like this:
While you can view DAG code within the Airflow UI, code edits must be completed in the Python file within the `/dags` folder. The displayed code updates every 30 seconds.
## Step 6: Write a new DAG
Now that we can run DAGs and navigate the UI, let's write our own DAG and run it.
In this step, you'll write a DAG that:
* Retrieves the number of people currently in space from the Airflow XCom table. This table is part of the Airflow metadata database and is used to pass data between tasks and DAGs. The `example_astronauts` DAG already pushed the number of astronauts to XCom when you ran it in [Step 4](#step-4-trigger-a-dag-run).
* Prints the number of people currently in space to logs.
* Runs a bash statement reacting to the number of people in space.
You'll copy most of the code, trigger the DAG, and then confirm the expected output is returned.
1. Create a new Python file in the `/dags` folder named `my_astronauts_dag.py`.
2. Open `my_astronauts_dag.py` in your IDE. Add the docstring explaining what this DAG does at the top of the file:
```python wrap theme={null}
"""
## Print the number of people currently in space
This DAG pulls the number of people currently in space. The number is pulled
from XCom and was pushed by the `get_astronauts` task in the `example_astronauts` DAG.
"""
```
Adding a docstring to your DAG is highly recommended. It helps you and others understand what the DAG does and how it works. It can also be converted to a [DAG Doc](/docs/learn/2.x/custom-airflow-ui-docs-tutorial) by setting `doc_md=__doc__` in the DAG definition.
3. After the docstring, add the import statements of your Python packages:
```python wrap theme={null}
from airflow.decorators import dag, task
from airflow.operators.bash import BashOperator
from airflow import Dataset
from airflow.models.baseoperator import chain
from pendulum import datetime
```
4. Instantiate a DAG using the `@dag` decorator on top of a Python function:
```python wrap theme={null}
@dag(
dag_id="my_astronauts_dag",
start_date=datetime(2024, 1, 1),
schedule=[Dataset("current_astronauts")],
catchup=False,
doc_md=__doc__,
default_args={"owner": "Astro", "retries": 3},
tags=["My First DAG!"],
)
def my_astronauts_dag():
```
`@dag` instantiates a DAG context in which tasks can be defined and given dependencies. The instantiation includes several important arguments:
* `dag_id`: The name of the DAG that appears in the Airflow UI. If no `dag_id` is specified, the name of the Python function is used as the DAG ID. Each DAG must have a unique name, and Astronomer recommends using the same name for the DAG file and the `dag_id`.
* `start_date`: The date and time when the DAG is scheduled to start running, given as a datetime object. In this example, the DAG is triggered on its schedule as long as the current time is 0:00 UTC on January 1st, 2024 or later.
* `schedule`: The frequency at which the DAG runs. If you don't set this value, the DAG runs every 24 hours after the `start_date`. In this example, the DAG is scheduled to run whenever the `example_astronauts` DAG's `get_astronauts` task completes successfully using an Airflow dataset. There are many options to define the schedule of a DAG. For more information, see [DAG scheduling and time tables in Airflow](/docs/learn/scheduling-in-airflow).
* `catchup`: Defines whether the DAG reruns all DAG runs that were scheduled before today's date. The default value is `True`, but it is recommended that you set this argument to `False` unless you are explicitly running your DAG to backfill runs.
* `default_args`: A dictionary of arguments to be passed to every task in the DAG. In this example, the `default_args` change the owner of the DAG and set the default number of retries in case of a failure for all tasks in the DAG to 3. You can pass any arguments to all your tasks by setting them in `default_args` and override them for specific tasks by setting them in the task definition.
* `tags`: Defines the **Tags** that appear in the **DAGs** page of the Airflow UI. These can help you organize DAGs in more complex projects.
5. Add a task to your DAG:
```python wrap theme={null}
@task
def print_num_people_in_space(**context) -> None:
"""
This task pulls the number of people currently in space from XCom. The number is
pushed by the `get_astronauts` task in the `example_astronauts` DAG.
"""
num_people_in_space = context["ti"].xcom_pull(
dag_id="example_astronauts",
task_ids="get_astronauts",
key="number_of_people_in_space",
include_prior_dates=True,
)
print(f"There are currently {num_people_in_space} people in space.")
```
The `@task` decorator lets you define Python functions with very little boilerplate code. This is the syntax of the TaskFlow API, which is Airflow's lightweight framework for defining tasks. This `print_num_people_in_space` task pulls the number of people in space from XCom and prints it to the logs. Learn more about XCom in the [Pass data between tasks](/docs/learn/2.x/airflow-passing-data-between-tasks) guide.
You can put this decorator on top of any Python function to turn your code into an Airflow task. This is one of the features that makes Airflow so powerful: Any action that can be defined in Python, no matter how complex, can be orchestrated using Airflow.
Each task in an Airflow DAG requires a unique `task_id`. Here we can see why that's important: the `num_people_in_space` task can call the unique `get_astronauts` task to pull the data it generated from XCom.
6. Add a second task to your DAG:
```python wrap theme={null}
print_reaction = BashOperator(
task_id="print_reaction",
bash_command="echo This is awesome!",
)
```
For common operations, you can use pre-built [operators](/docs/learn/2.x/what-is-an-operator) instead of writing your own function. An operator is a Python class containing the logic to define the work to be completed by a single task. `print_reaction` uses the [`BashOperator`](https://airflow.apache.org/registry/providers/standard#standard-bash-BashOperator) to run a bash command.
7. Define the dependencies between the two tasks using the `chain` function:
```python wrap theme={null}
chain(print_num_people_in_space(), print_reaction)
```
The `chain` function is used to define task dependencies. In this example, `print_num_people_in_space` is **upstream** of `print_reaction`, meaning that `print_num_people_in_space` must finish before `print_reaction` can start. For more information on how to define task dependencies, see [Managing Dependencies in Apache Airflow](/docs/learn/2.x/managing-dependencies).
Alternatively you can use bitshift operators to define the dependencies between the two tasks:
```python wrap theme={null}
print_num_people_in_space >> print_reaction
```
This notation is unique to Airflow and is functionally equivalent to the `chain` function shown earlier in this guide.
8. Lastly, call the DAG function:
```python wrap theme={null}
my_astronauts_dag()
```
9. Save your code. Your completed DAG should look like this:
Click to view the full DAG code
```python expandable wrap theme={null}
"""
## Print the number of people currently in space
This DAG will pull the number of people currently in space. The number is pulled
from XCom and was pushed by the `get_astronauts` task in the `example_astronauts` DAG.
"""
from airflow import Dataset
from airflow.decorators import dag, task
from airflow.operators.bash import BashOperator
from airflow.models.baseoperator import chain
from pendulum import datetime
@dag(
start_date=datetime(2023, 6, 1),
schedule=[Dataset("current_astronauts")],
catchup=False,
doc_md=__doc__,
default_args={"owner": "airflow", "retries": 3},
tags=["My First DAG!"],
)
def my_astronauts_dag():
@task
def print_num_people_in_space(**context) -> None:
"""
This task pulls the number of people currently in space from XCom. The number is
pushed by the `get_astronauts` task in the `example_astronauts` DAG.
"""
num_people_in_space = context["ti"].xcom_pull(
dag_id="example_astronauts",
task_ids="get_astronauts",
key="number_of_people_in_space",
include_prior_dates=True,
)
print(f"There are currently {num_people_in_space} people in space.")
print_reaction = BashOperator(
task_id="print_reaction",
bash_command="echo This is awesome!",
)
chain(print_num_people_in_space(), print_reaction)
# print_num_people_in_space() >> print_reaction
my_astronauts_dag()
```
## Step 7: Run the new DAG
Go back to the Airflow UI to view your new DAG. Airflow parses the `/dags` directory for changes to existing files every 30 seconds and new files every 5 minutes.
You can manually trigger a full parse of your DAGs by running the following command in your terminal:
```sh wrap theme={null}
astro dev run dags reserialize
```
When your new DAG appears in the Airflow UI, you can run it to test it.
1. Start the new DAG and trigger a run like you did in [Step 4](#step-4-trigger-a-dag-run).
2. Click the name of your new DAG and open the **Grid** view. After your DAG runs, there should be a green bar representing a successful run of the DAG.
 3. The `my_astronauts_dag` is scheduled to run whenever the `current_astronauts` dataset is updated by a successful run of the `get_astronauts` task in the `example_astronauts` DAG. Trigger another manual run of the `example_astronauts` DAG to see the `my_astronauts_dag` run again after the `get_astronauts` task completes.
## Step 8: View task logs
When one of your tasks prints something, the output appears in Airflow task logs. Task logs are an important feature for troubleshooting DAGs. If a task in your DAG fails, task logs are the best place to investigate why.
1. In the Airflow UI, open the **Grid** view.
2. Click the `print_num_people_in_space` task to access details of the task instance.
3. Click the **Logs** tab.
In the log output, you should see the statement telling you about the number of people currently in space. The log output should look similar to the following:
```text wrap theme={null}
[2024-02-27, 13:57:07 UTC] {logging_mixin.py:188} INFO - There are currently 7 people in space.
[2024-02-27, 13:57:07 UTC] {python.py:202} INFO - Done. Returned value was: None
[2024-02-27, 13:57:07 UTC] {taskinstance.py:1149} INFO - Marking task as SUCCESS. dag_id=my_astronauts_dag, task_id=print_num_people_in_space, execution_date=20240227T135707, start_date=20240227T135707, end_date=20240227T135707
```
Repeat steps 1-3 for the `print_reaction` task. The task logs should include the output of the `bash_command` given to the task and look similar to the text below:
```text wrap theme={null}
[2024-02-27, 13:57:08 UTC] {subprocess.py:63} INFO - Tmp dir root location: /tmp
[2024-02-27, 13:57:08 UTC] {subprocess.py:75} INFO - Running command: ['/bin/bash', '-c', 'echo This is awesome!']
[2024-02-27, 13:57:08 UTC] {subprocess.py:86} INFO - Output:
[2024-02-27, 13:57:08 UTC] {subprocess.py:93} INFO - This is awesome!
[2024-02-27, 13:57:08 UTC] {subprocess.py:97} INFO - Command exited with return code 0
```
## Next steps
Congratulations! You've written and run your first DAG in Airflow. You've also learned how to navigate the Airflow UI and view task logs. To continue learning about Airflow, see [Get started with Apache Airflow, Part 2: Providers, connections, and variables](/docs/learn/2.x/get-started-with-airflow-part-2).
## See also
* [An introduction to the Airflow UI](/docs/learn/2.x/airflow-ui)
* [Introduction to Airflow DAGs](/docs/learn/2.x/dags)
* [Airflow operators](/docs/learn/2.x/what-is-an-operator)
* [Introduction to the TaskFlow API and Airflow decorators](/docs/learn/2.x/airflow-decorators)
* [Datasets and data-aware scheduling in Airflow](/docs/learn/2.x/airflow-datasets)
* [Pass data between tasks](/docs/learn/2.x/airflow-passing-data-between-tasks)
* [Manage task and task group dependencies in Airflow](/docs/learn/2.x/managing-dependencies)
* [Create dynamic Airflow tasks](/docs/learn/2.x/dynamic-tasks)
3. The `my_astronauts_dag` is scheduled to run whenever the `current_astronauts` dataset is updated by a successful run of the `get_astronauts` task in the `example_astronauts` DAG. Trigger another manual run of the `example_astronauts` DAG to see the `my_astronauts_dag` run again after the `get_astronauts` task completes.
## Step 8: View task logs
When one of your tasks prints something, the output appears in Airflow task logs. Task logs are an important feature for troubleshooting DAGs. If a task in your DAG fails, task logs are the best place to investigate why.
1. In the Airflow UI, open the **Grid** view.
2. Click the `print_num_people_in_space` task to access details of the task instance.
3. Click the **Logs** tab.
In the log output, you should see the statement telling you about the number of people currently in space. The log output should look similar to the following:
```text wrap theme={null}
[2024-02-27, 13:57:07 UTC] {logging_mixin.py:188} INFO - There are currently 7 people in space.
[2024-02-27, 13:57:07 UTC] {python.py:202} INFO - Done. Returned value was: None
[2024-02-27, 13:57:07 UTC] {taskinstance.py:1149} INFO - Marking task as SUCCESS. dag_id=my_astronauts_dag, task_id=print_num_people_in_space, execution_date=20240227T135707, start_date=20240227T135707, end_date=20240227T135707
```
Repeat steps 1-3 for the `print_reaction` task. The task logs should include the output of the `bash_command` given to the task and look similar to the text below:
```text wrap theme={null}
[2024-02-27, 13:57:08 UTC] {subprocess.py:63} INFO - Tmp dir root location: /tmp
[2024-02-27, 13:57:08 UTC] {subprocess.py:75} INFO - Running command: ['/bin/bash', '-c', 'echo This is awesome!']
[2024-02-27, 13:57:08 UTC] {subprocess.py:86} INFO - Output:
[2024-02-27, 13:57:08 UTC] {subprocess.py:93} INFO - This is awesome!
[2024-02-27, 13:57:08 UTC] {subprocess.py:97} INFO - Command exited with return code 0
```
## Next steps
Congratulations! You've written and run your first DAG in Airflow. You've also learned how to navigate the Airflow UI and view task logs. To continue learning about Airflow, see [Get started with Apache Airflow, Part 2: Providers, connections, and variables](/docs/learn/2.x/get-started-with-airflow-part-2).
## See also
* [An introduction to the Airflow UI](/docs/learn/2.x/airflow-ui)
* [Introduction to Airflow DAGs](/docs/learn/2.x/dags)
* [Airflow operators](/docs/learn/2.x/what-is-an-operator)
* [Introduction to the TaskFlow API and Airflow decorators](/docs/learn/2.x/airflow-decorators)
* [Datasets and data-aware scheduling in Airflow](/docs/learn/2.x/airflow-datasets)
* [Pass data between tasks](/docs/learn/2.x/airflow-passing-data-between-tasks)
* [Manage task and task group dependencies in Airflow](/docs/learn/2.x/managing-dependencies)
* [Create dynamic Airflow tasks](/docs/learn/2.x/dynamic-tasks)