> ## Documentation Index
> Fetch the complete documentation index at: https://astronomer.io/docs/llms.txt
> Use this file to discover all available pages before exploring further.
# Dynamically generate DAGs in Airflow
In Airflow, [DAGs](https://airflow.apache.org/docs/apache-airflow/stable/core-concepts/dags.html) are defined as Python code. Airflow executes all Python code in the `dags_folder` and loads any `DAG` objects that appear in `globals()`. The simplest way to create a DAG is to write it as a static Python file.
Sometimes, manually writing DAGs isn't practical. Maybe you have hundreds or thousands of DAGs that do similar things with just a parameter changing between them. Or maybe you need a set of DAGs to load tables, but don't want to manually update DAGs every time the tables change. In these cases, and others, it makes more sense to dynamically generate DAGs.
Because everything in Airflow is code, you can dynamically generate DAGs using Python alone. As long as a `DAG` object in `globals()` is created by Python code that is stored in the `dags_folder`, Airflow will load it. In this guide, you'll learn how to dynamically generate DAGs. You'll learn when DAG generation is the preferred option and what pitfalls to avoid.
All code used in this guide is located in the [Astronomer Registry](https://github.com/astronomer/dynamic-dags-tutorial).
You can use [dynamic task mapping](/docs/learn/2.x/dynamic-tasks) to write DAGs that dynamically generate parallel tasks at runtime. Dynamic task mapping is a first-class Airflow feature, and suitable for many dynamic use cases. Due to its higher degree of support and stability, Astronomer recommends exploring dynamic task mapping for your use case before implementing the dynamic DAG generation methods described in this guide.
**Other ways to learn**
There are multiple resources for learning about this topic. See also:
* Astronomer Academy: [Airflow: Dynamic DAGs](https://academy.astronomer.io/astro-runtime-dynamic-dags).
## Assumed knowledge
To get the most out of this guide, you should have an understanding of:
* Airflow DAGs. See [Introduction to Airflow DAGs](/docs/learn/2.x/dags).
## Single-file methods
One method for dynamically generating DAGs is to have a single Python file which generates DAGs based on some input parameter(s). For example, a list of APIs or tables. A common use case for this is an ETL or ELT-type pipeline where there are many data sources or destinations. This requires creating many DAGs that all follow a similar pattern.
Some benefits of the single-file method:
* It's straightforward to implement.
* It can accommodate input parameters from many different sources.
* Adding DAGs is nearly instantaneous since it requires only changing the input parameters.
The single-file method has the following disadvantages:
* Your visibility into the code behind any specific DAG is limited because a DAG file isn't created.
* Generation code is executed every time the DAG is parsed because this method requires a Python file in the `dags_folder`. How frequently this occurs is controlled by the [`min_file_process_interval`](https://airflow.apache.org/docs/apache-airflow/stable/configurations-ref.html#min-file-process-interval) parameter. This can cause performance issues if the total number of DAGs is large, or if the code is connecting to an external system such as a database.
In the following examples, the single-file method is implemented differently based on which input parameters are used for generating DAGs.
### Example: Use a `create_dag` function
To dynamically create DAGs from a file, you need to define a Python function that will generate the DAGs based on an input parameter. In this case, you're going to define a DAG template within a `create_dag` function. The code here is very similar to what you would use when creating a single DAG, but it is wrapped in a function that allows for custom parameters to be passed in.
```python wrap theme={null}
from airflow.decorators import dag, task
def create_dag(dag_id, schedule, dag_number, default_args):
@dag(dag_id=dag_id, schedule=schedule, default_args=default_args, catchup=False)
def hello_world_dag():
@task()
def hello_world():
print("Hello World")
print("This is DAG: {}".format(str(dag_number)))
hello_world()
generated_dag = hello_world_dag()
return generated_dag
```
Traditional
```python wrap theme={null}
from airflow.models.dag import DAG
from airflow.operators.python import PythonOperator
def create_dag(dag_id, schedule, dag_number, default_args):
def hello_world_py(*args):
print("Hello World")
print("This is DAG: {}".format(str(dag_number)))
generated_dag = DAG(dag_id, schedule=schedule, default_args=default_args, catchup=False)
with generated_dag:
t1 = PythonOperator(
task_id="hello_world", python_callable=hello_world_py
)
return generated_dag
```
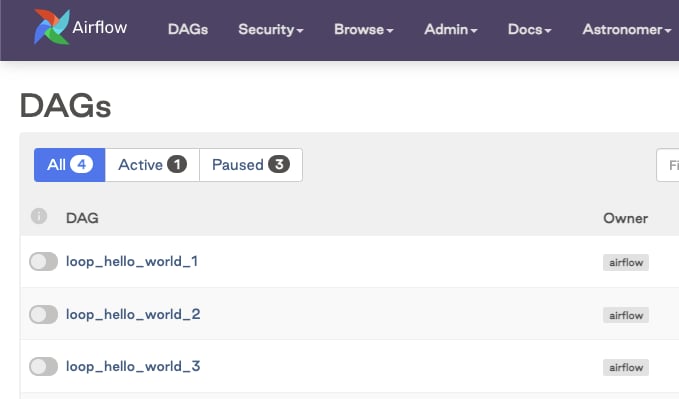
In this example, the input parameters can come from any source that the Python script can access. You can then set a simple loop (`range(1, 4)`) to generate these unique parameters and pass them to the global scope, thereby registering them as valid DAGs with the Airflow scheduler:
```python wrap theme={null}
from airflow.decorators import dag, task
from pendulum import datetime
def create_dag(dag_id, schedule, dag_number, default_args):
@dag(dag_id=dag_id, schedule=schedule, default_args=default_args, catchup=False)
def hello_world_dag():
@task()
def hello_world(*args):
print("Hello World")
print("This is DAG: {}".format(str(dag_number)))
hello_world()
generated_dag = hello_world_dag()
return generated_dag
# build a dag for each number in range(1, 4)
for n in range(1, 4):
dag_id = "loop_hello_world_{}".format(str(n))
default_args = {"owner": "airflow", "start_date": datetime(2023, 7, 1)}
schedule = "@daily"
dag_number = n
globals()[dag_id] = create_dag(dag_id, schedule, dag_number, default_args)
```
Traditional
```python wrap theme={null}
from pendulum import datetime
from airflow import DAG
from airflow.operators.python import PythonOperator
def create_dag(dag_id, schedule, dag_number, default_args):
def hello_world_py():
print("Hello World")
print("This is DAG: {}".format(str(dag_number)))
generated_dag = DAG(dag_id, schedule=schedule, default_args=default_args)
with generated_dag:
PythonOperator(task_id="hello_world", python_callable=hello_world_py)
return generated_dag
# build a dag for each number in range(1, 4)
for n in range(1, 4):
dag_id = "loop_hello_world_{}".format(str(n))
default_args = {"owner": "airflow", "start_date": datetime(2023, 7, 1)}
schedule = "@daily"
dag_number = n
globals()[dag_id] = create_dag(dag_id, schedule, dag_number, default_args)
```
The DAGs appear in the Airflow UI:
 ### Example: Generate DAGs from environment variables
As mentioned previously, the input parameters don't have to exist in the DAG file. Another common form of generating DAGs is by setting values using environment variables.
You can define environment variables locally in the `.env` file of your Astro project or in the [Astro UI](/docs/astro/manage-env-vars) for your Astro deployments.
```text wrap theme={null}
DYNAMIC_DAG_NUMBER=10
```
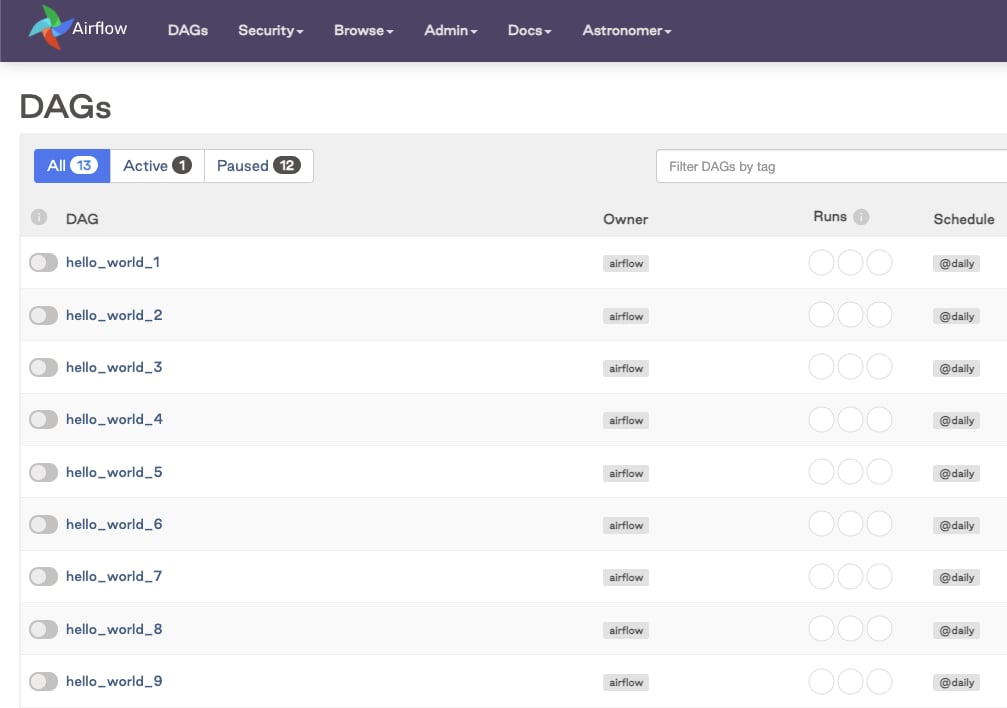
You can retrieve this value by fetching the environment variable and passing it into your `range`. The `default` is set to 3 because you want the interpreter to register this file as valid regardless of whether the variable exists.
```python expandable wrap theme={null}
from airflow.decorators import dag, task
from pendulum import datetime
import os
def create_dag(dag_id, schedule, dag_number, default_args):
@dag(dag_id=dag_id, schedule=schedule, default_args=default_args, catchup=False)
def hello_world_dag():
@task()
def hello_world(*args):
print("Hello World")
print("This is DAG: {}".format(str(dag_number)))
hello_world()
generated_dag = hello_world_dag()
return generated_dag
number_of_dags = os.getenv("DYNAMIC_DAG_NUMBER", default=3)
number_of_dags = int(number_of_dags)
for n in range(1, number_of_dags):
dag_id = "variable_hello_world_{}".format(str(n))
default_args = {"owner": "airflow", "start_date": datetime(2023, 7, 1)}
schedule = "@daily"
dag_number = n
globals()[dag_id] = create_dag(dag_id, schedule, dag_number, default_args)
```
### Example: Generate DAGs from environment variables
As mentioned previously, the input parameters don't have to exist in the DAG file. Another common form of generating DAGs is by setting values using environment variables.
You can define environment variables locally in the `.env` file of your Astro project or in the [Astro UI](/docs/astro/manage-env-vars) for your Astro deployments.
```text wrap theme={null}
DYNAMIC_DAG_NUMBER=10
```
You can retrieve this value by fetching the environment variable and passing it into your `range`. The `default` is set to 3 because you want the interpreter to register this file as valid regardless of whether the variable exists.
```python expandable wrap theme={null}
from airflow.decorators import dag, task
from pendulum import datetime
import os
def create_dag(dag_id, schedule, dag_number, default_args):
@dag(dag_id=dag_id, schedule=schedule, default_args=default_args, catchup=False)
def hello_world_dag():
@task()
def hello_world(*args):
print("Hello World")
print("This is DAG: {}".format(str(dag_number)))
hello_world()
generated_dag = hello_world_dag()
return generated_dag
number_of_dags = os.getenv("DYNAMIC_DAG_NUMBER", default=3)
number_of_dags = int(number_of_dags)
for n in range(1, number_of_dags):
dag_id = "variable_hello_world_{}".format(str(n))
default_args = {"owner": "airflow", "start_date": datetime(2023, 7, 1)}
schedule = "@daily"
dag_number = n
globals()[dag_id] = create_dag(dag_id, schedule, dag_number, default_args)
```
Traditional
```python wrap theme={null}
from airflow import DAG
from airflow.operators.python import PythonOperator
from pendulum import datetime
import os
def create_dag(dag_id, schedule, dag_number, default_args):
def hello_world_py():
print("Hello World")
print("This is DAG: {}".format(str(dag_number)))
generated_dag = DAG(dag_id, schedule=schedule, default_args=default_args)
with generated_dag:
PythonOperator(task_id="hello_world", python_callable=hello_world_py)
return generated_dag
number_of_dags = os.getenv("DYNAMIC_DAG_NUMBER", default=3)
number_of_dags = int(number_of_dags)
for n in range(1, number_of_dags):
dag_id = "hello_world_{}".format(str(n))
default_args = {"owner": "airflow", "start_date": datetime(2023, 7, 1)}
schedule = "@daily"
dag_number = n
globals()[dag_id] = create_dag(dag_id, schedule, dag_number, default_args)
```
The DAGs appear in the Airflow UI:
 ## Multiple-file methods
Another method for dynamically generating DAGs is to use code to generate full Python files for each DAG. The end result of this method is having one Python file per generated DAG in your `dags_folder`.
One way of implementing this method in production is to have a Python script that generates DAG files when executed as part of a CI/CD workflow. The DAGs are generated during the CI/CD build and then deployed to Airflow. You could also have another DAG that runs the generation script periodically.
Some benefits of this method:
* It's more scalable than single-file methods. Because the DAG files aren't being generated by parsing code in the `dags_folder`, the DAG generation code isn't executed on every scheduler heartbeat.
* Since DAG files are being explicitly created before deploying to Airflow, you have full visibility into the DAG code, including from the **Code** button in the Airflow UI.
Some disadvantages of this method:
* It can be complex to set up.
* Changes to DAGs or additional DAGs won't be generated until the script is run, which in some cases requires a deployment.
### Example: Generate DAGs from JSON config files
One way of implementing the multiple-file method is by using a Python script to generate DAG files based on a set of JSON configuration files. For this example, you'll assume that all DAGs have a single task that uses the [`BashOperator`](https://airflow.apache.org/registry/providers/standard#standard-bash-BashOperator) to run a Bash command. This use case might be relevant for a team of analysts who need to schedule Bash commands, where the DAG is largely the same, but the command, an environment variable and the schedule change.
To start, you'll create a DAG 'template' file that defines the DAG's structure. This looks just like a regular DAG file, but specific variables have been added where information is going to be dynamically generated, namely `dag_id_to_replace`, `schedule_to_replace`, `bash_command_to_replace` and `env_var_to_replace`.
```python wrap theme={null}
from airflow.decorators import dag
from airflow.operators.bash import BashOperator
from pendulum import datetime
@dag(
dag_id=dag_id_to_replace,
start_date=datetime(2023, 7, 1),
schedule=schedule_to_replace,
catchup=False,
)
def dag_from_config():
BashOperator(
task_id="say_hello",
bash_command=bash_command_to_replace,
env={"ENVVAR": env_var_to_replace},
)
dag_from_config()
```
Next, you create a `dag-config` folder that will contain a JSON config file for each DAG. The config file should define the parameters discussed previously, the DAG ID, schedule, Bash command and environment variable to be used.
```json wrap theme={null}
{
"dag_id": "dag_file_1",
"schedule": "'@daily'",
"bash_command": "'echo $ENVVAR'",
"env_var": "'Hello! :)'"
}
```
Finally, you create a Python script that will create the DAG files based on the template and the config files. The script loops through every config file in the `dag-config` folder, makes a copy of the template in the `include` folder, and then overwrites the parameters in that file with the ones from the config file.
```python wrap theme={null}
config_filepath = "include/dag-config/"
dag_template_filename = "include/dag-template.py"
for filename in os.listdir(config_filepath):
f = open(config_filepath + filename)
config = json.load(f)
new_filename = "dags/" + config["dag_id"] + ".py"
shutil.copyfile(dag_template_filename, new_filename)
for line in fileinput.input(new_filename, inplace=True):
line = line.replace("dag_id_to_replace", "'" + config["dag_id"] + "'")
line = line.replace("schedule_to_replace", config["schedule"])
line = line.replace("bash_command_to_replace", config["bash_command"])
line = line.replace("env_var_to_replace", config["env_var"])
print(line, end="")
```
To generate your DAG files, you can either run this script on demand or as part of your CI/CD workflow. After running the script, your project structure will be similar to the example below, where the `include` directory contains the files from which the DAGs are generated, and the `dags` directory contains the two dynamically generated DAGs:
```text wrap theme={null}
.
├── dags
│ ├── dag_file_1.py
│ └── dag_file_2.py
└── include
├── dag-config
│ ├── dag1-config.json
│ └── dag2-config.json
├── dag-template.py
└── generate-dag-files.py
```
This is a straightforward example that works only if all of the DAGs follow the same pattern. However, it could be expanded to have dynamic inputs for tasks, dependencies, different operators, and so on.
## Tools for dynamically creating DAGs
### gusty
A popular tool for dynamically creating DAGs is [gusty](https://github.com/chriscardillo/gusty). gusty is an open source Python library for dynamically generating Airflow DAGs. Tasks can be created from YAML, Python, SQL, R Markdown, and Jupyter Notebooks.
You can install gusty in your Airflow environment by running `pip install gusty` from your command line. If you use the Astro CLI, you can alternatively add `gusty` to your Astro project `requirements.txt` file.
To use gusty, create a new directory in your `dags` folder that will contain all gusty DAGs. Subdirectories of this folder will define DAGs, while nested subdirectories will define task groups within their respective DAGs.
The following file structure will lead to the creation of 2 DAGs from the contents of the `my_gusty_dags` directory. `my_dag_1` contains two tasks each defined in their own YAML file. `my_dag_2` contains one task, `task_0`, defined from a YAML file, as well as the two task groups `my_task_group_1` and `my_task_group_2`, containing two tasks each. The latter task group contains two tasks defined from SQL files.
```text wrap theme={null}
.
└── dags
├── my_gusty_dags
│ ├── my_dag_1
│ │ ├── METADATA.yml
│ │ ├── task_1.yaml
│ │ └── task_2.yaml
│ └── my_dag_2
│ ├── METADATA.yml
│ ├── task_0.yaml
│ ├── my_taskgroup_1
│ │ ├── task_1.yaml
│ │ └── task_2.yaml
│ └── my_taskgroup_2
│ ├── task_3.sql
│ └── task_4.sql
├── creating_gusty_dags.py
└── my_regular_dag.py
```
To create DAGs from the `my_gusty_dags` directory, you need a Python script that calls gusty's `create_dags` function. In this example, a script called `creating_gusty_dags.py` in the project's `dags` directory contains the following code.
```python wrap theme={null}
from gusty import create_dags
dag = create_dags(
# provide the path to your gusty DAGs directory
'/usr/local/airflow/dags/my_gusty_dags',
# provide the namespace for gusty to use
globals(),
# By default, gusty places a LatestOnlyOperator at the root of the DAG.
# We can disable this behavior by setting latest_only=False
latest_only=False
)
```
DAG-level parameters can be defined in the `METADATA.yml` file:
```yaml wrap theme={null}
description: "An example of a DAG created using gusty!"
schedule_interval: "1 0 * * *"
default_args:
owner: airflow
depends_on_past: False
start_date: !days_ago 1
email: airflow@example.com
email_on_failure: False
email_on_retry: False
retries: 1
retry_delay: !timedelta 'minutes: 5'
```
Tasks can be defined in YAML for any standard and custom Airflow operator. The example below shows how to use gusty to define a `BashOperator` task in YAML. The `dependencies` parameter was set to make this task dependent on `task_1` having completed successfully.
```yaml wrap theme={null}
operator: airflow.operators.bash.BashOperator
bash_command: echo $MY_ENV_VAR
dependencies:
- task_1
env:
MY_ENV_VAR: "Hello!"
```
Note that to use gusty-generated DAGs and standard DAGs in the same Airflow environment, ensure that your standard DAGs are in your `dags` directory outside of the `my_gusty_dags` folder.
Learn more about gusty features in the [repository README](https://github.com/chriscardillo/gusty/blob/main/README). Additionally, you can explore two fully functional gusty environments: The [gusty-demo](https://github.com/chriscardillo/gusty-demo) and the [gusty-demo-lite](https://github.com/chriscardillo/gusty-demo-lite).
### dag-factory
Another open source tool for dynamic DAG generation is [dag-factory](/docs/learn/2.x/dag-factory). The [`dag-factory` package](https://github.com/astronomer/dag-factory) allows users to create DAGs from YAML files which contain both DAG and task-level parameters, removing the necessity to know about Airflow specific syntax.
## Scalability
Dynamically generating DAGs can cause performance issues when used at scale. Whether or not any particular method will cause problems is dependent on your total number of DAGs, your Airflow configuration, and your infrastructure. Keep the following considerations in mind when considering dynamically generating DAGs:
* Any code in the `dags_folder` is executed either every `min_file_processing_interval` or as fast as the DAG file processor can, whichever is less frequent. Methods where the code is dynamically generating DAGs, such as the single-file method, are more likely to cause performance issues at scale.
* If you are reaching out to a database to create your DAGs, you will be querying frequently. Be conscious of your database's ability to handle such frequent connections and any costs you may incur for each request from your data provider.
* To help with potential performance issues, you can increase the `min_file_processing_interval` to a higher value. Consider this option if you know that your DAGs aren't changing frequently and if you can tolerate some delay in the dynamic DAGs changing in response to the external source that generates them.
[Fine-tuning your scheduler](https://airflow.apache.org/docs/apache-airflow/stable/administration-and-deployment/scheduler.html#fine-tuning-your-scheduler-performance) helps resolve potential performance issues. There is no single right way to implement or scale dynamically generated DAGs, but the flexibility of Airflow means there are many ways to arrive at a solution that works for your organization.
## Multiple-file methods
Another method for dynamically generating DAGs is to use code to generate full Python files for each DAG. The end result of this method is having one Python file per generated DAG in your `dags_folder`.
One way of implementing this method in production is to have a Python script that generates DAG files when executed as part of a CI/CD workflow. The DAGs are generated during the CI/CD build and then deployed to Airflow. You could also have another DAG that runs the generation script periodically.
Some benefits of this method:
* It's more scalable than single-file methods. Because the DAG files aren't being generated by parsing code in the `dags_folder`, the DAG generation code isn't executed on every scheduler heartbeat.
* Since DAG files are being explicitly created before deploying to Airflow, you have full visibility into the DAG code, including from the **Code** button in the Airflow UI.
Some disadvantages of this method:
* It can be complex to set up.
* Changes to DAGs or additional DAGs won't be generated until the script is run, which in some cases requires a deployment.
### Example: Generate DAGs from JSON config files
One way of implementing the multiple-file method is by using a Python script to generate DAG files based on a set of JSON configuration files. For this example, you'll assume that all DAGs have a single task that uses the [`BashOperator`](https://airflow.apache.org/registry/providers/standard#standard-bash-BashOperator) to run a Bash command. This use case might be relevant for a team of analysts who need to schedule Bash commands, where the DAG is largely the same, but the command, an environment variable and the schedule change.
To start, you'll create a DAG 'template' file that defines the DAG's structure. This looks just like a regular DAG file, but specific variables have been added where information is going to be dynamically generated, namely `dag_id_to_replace`, `schedule_to_replace`, `bash_command_to_replace` and `env_var_to_replace`.
```python wrap theme={null}
from airflow.decorators import dag
from airflow.operators.bash import BashOperator
from pendulum import datetime
@dag(
dag_id=dag_id_to_replace,
start_date=datetime(2023, 7, 1),
schedule=schedule_to_replace,
catchup=False,
)
def dag_from_config():
BashOperator(
task_id="say_hello",
bash_command=bash_command_to_replace,
env={"ENVVAR": env_var_to_replace},
)
dag_from_config()
```
Next, you create a `dag-config` folder that will contain a JSON config file for each DAG. The config file should define the parameters discussed previously, the DAG ID, schedule, Bash command and environment variable to be used.
```json wrap theme={null}
{
"dag_id": "dag_file_1",
"schedule": "'@daily'",
"bash_command": "'echo $ENVVAR'",
"env_var": "'Hello! :)'"
}
```
Finally, you create a Python script that will create the DAG files based on the template and the config files. The script loops through every config file in the `dag-config` folder, makes a copy of the template in the `include` folder, and then overwrites the parameters in that file with the ones from the config file.
```python wrap theme={null}
config_filepath = "include/dag-config/"
dag_template_filename = "include/dag-template.py"
for filename in os.listdir(config_filepath):
f = open(config_filepath + filename)
config = json.load(f)
new_filename = "dags/" + config["dag_id"] + ".py"
shutil.copyfile(dag_template_filename, new_filename)
for line in fileinput.input(new_filename, inplace=True):
line = line.replace("dag_id_to_replace", "'" + config["dag_id"] + "'")
line = line.replace("schedule_to_replace", config["schedule"])
line = line.replace("bash_command_to_replace", config["bash_command"])
line = line.replace("env_var_to_replace", config["env_var"])
print(line, end="")
```
To generate your DAG files, you can either run this script on demand or as part of your CI/CD workflow. After running the script, your project structure will be similar to the example below, where the `include` directory contains the files from which the DAGs are generated, and the `dags` directory contains the two dynamically generated DAGs:
```text wrap theme={null}
.
├── dags
│ ├── dag_file_1.py
│ └── dag_file_2.py
└── include
├── dag-config
│ ├── dag1-config.json
│ └── dag2-config.json
├── dag-template.py
└── generate-dag-files.py
```
This is a straightforward example that works only if all of the DAGs follow the same pattern. However, it could be expanded to have dynamic inputs for tasks, dependencies, different operators, and so on.
## Tools for dynamically creating DAGs
### gusty
A popular tool for dynamically creating DAGs is [gusty](https://github.com/chriscardillo/gusty). gusty is an open source Python library for dynamically generating Airflow DAGs. Tasks can be created from YAML, Python, SQL, R Markdown, and Jupyter Notebooks.
You can install gusty in your Airflow environment by running `pip install gusty` from your command line. If you use the Astro CLI, you can alternatively add `gusty` to your Astro project `requirements.txt` file.
To use gusty, create a new directory in your `dags` folder that will contain all gusty DAGs. Subdirectories of this folder will define DAGs, while nested subdirectories will define task groups within their respective DAGs.
The following file structure will lead to the creation of 2 DAGs from the contents of the `my_gusty_dags` directory. `my_dag_1` contains two tasks each defined in their own YAML file. `my_dag_2` contains one task, `task_0`, defined from a YAML file, as well as the two task groups `my_task_group_1` and `my_task_group_2`, containing two tasks each. The latter task group contains two tasks defined from SQL files.
```text wrap theme={null}
.
└── dags
├── my_gusty_dags
│ ├── my_dag_1
│ │ ├── METADATA.yml
│ │ ├── task_1.yaml
│ │ └── task_2.yaml
│ └── my_dag_2
│ ├── METADATA.yml
│ ├── task_0.yaml
│ ├── my_taskgroup_1
│ │ ├── task_1.yaml
│ │ └── task_2.yaml
│ └── my_taskgroup_2
│ ├── task_3.sql
│ └── task_4.sql
├── creating_gusty_dags.py
└── my_regular_dag.py
```
To create DAGs from the `my_gusty_dags` directory, you need a Python script that calls gusty's `create_dags` function. In this example, a script called `creating_gusty_dags.py` in the project's `dags` directory contains the following code.
```python wrap theme={null}
from gusty import create_dags
dag = create_dags(
# provide the path to your gusty DAGs directory
'/usr/local/airflow/dags/my_gusty_dags',
# provide the namespace for gusty to use
globals(),
# By default, gusty places a LatestOnlyOperator at the root of the DAG.
# We can disable this behavior by setting latest_only=False
latest_only=False
)
```
DAG-level parameters can be defined in the `METADATA.yml` file:
```yaml wrap theme={null}
description: "An example of a DAG created using gusty!"
schedule_interval: "1 0 * * *"
default_args:
owner: airflow
depends_on_past: False
start_date: !days_ago 1
email: airflow@example.com
email_on_failure: False
email_on_retry: False
retries: 1
retry_delay: !timedelta 'minutes: 5'
```
Tasks can be defined in YAML for any standard and custom Airflow operator. The example below shows how to use gusty to define a `BashOperator` task in YAML. The `dependencies` parameter was set to make this task dependent on `task_1` having completed successfully.
```yaml wrap theme={null}
operator: airflow.operators.bash.BashOperator
bash_command: echo $MY_ENV_VAR
dependencies:
- task_1
env:
MY_ENV_VAR: "Hello!"
```
Note that to use gusty-generated DAGs and standard DAGs in the same Airflow environment, ensure that your standard DAGs are in your `dags` directory outside of the `my_gusty_dags` folder.
Learn more about gusty features in the [repository README](https://github.com/chriscardillo/gusty/blob/main/README). Additionally, you can explore two fully functional gusty environments: The [gusty-demo](https://github.com/chriscardillo/gusty-demo) and the [gusty-demo-lite](https://github.com/chriscardillo/gusty-demo-lite).
### dag-factory
Another open source tool for dynamic DAG generation is [dag-factory](/docs/learn/2.x/dag-factory). The [`dag-factory` package](https://github.com/astronomer/dag-factory) allows users to create DAGs from YAML files which contain both DAG and task-level parameters, removing the necessity to know about Airflow specific syntax.
## Scalability
Dynamically generating DAGs can cause performance issues when used at scale. Whether or not any particular method will cause problems is dependent on your total number of DAGs, your Airflow configuration, and your infrastructure. Keep the following considerations in mind when considering dynamically generating DAGs:
* Any code in the `dags_folder` is executed either every `min_file_processing_interval` or as fast as the DAG file processor can, whichever is less frequent. Methods where the code is dynamically generating DAGs, such as the single-file method, are more likely to cause performance issues at scale.
* If you are reaching out to a database to create your DAGs, you will be querying frequently. Be conscious of your database's ability to handle such frequent connections and any costs you may incur for each request from your data provider.
* To help with potential performance issues, you can increase the `min_file_processing_interval` to a higher value. Consider this option if you know that your DAGs aren't changing frequently and if you can tolerate some delay in the dynamic DAGs changing in response to the external source that generates them.
[Fine-tuning your scheduler](https://airflow.apache.org/docs/apache-airflow/stable/administration-and-deployment/scheduler.html#fine-tuning-your-scheduler-performance) helps resolve potential performance issues. There is no single right way to implement or scale dynamically generated DAGs, but the flexibility of Airflow means there are many ways to arrive at a solution that works for your organization.