> ## Documentation Index
> Fetch the complete documentation index at: https://astronomer.io/docs/llms.txt
> Use this file to discover all available pages before exploring further.
# Create a Snowflake Connection in Airflow
The key information from this and other Snowflake guides is available as an [Astronomer Cheat Sheet](https://www.astronomer.io/ebooks/airflow-snowflake-cheatsheet/?utm_source=website\&utm_medium=learn-guides\&utm_campaign=snowflake-tutorial).
[Snowflake](https://www.snowflake.com/en/) is a cloud data warehouse where you can store and analyze your data. Integrating Snowflake with Airflow allows you to do all of the following and more from a DAG:
* Run SQL
* Monitor the status of SQL queries
* Run a Snowpark Python function
* Load and export data to/from Snowflake
This guide provides the basic setup for creating a Snowflake connection. For a complete integration tutorial, see [Orchestrate Snowflake Queries with Airflow](/docs/learn/airflow-snowflake). To run Snowpark queries in Airflow, see [Orchestrate Snowpark Machine Learning Workflows with Apache Airflow](/docs/learn/2.x/airflow-snowpark).
The connection information in this guide is valid for the Snowflake provider version 6.2.2 and older. If you are using a newer version, refer to the [Airflow 3 version of this guide](/docs/learn/airflow-snowflake).
## Prerequisites
* The [Astro CLI](/docs/cli/v1.43/overview).
* A locally running [Astro project](/docs/cli/v1.43/get-started-cli).
* A [Snowflake account](https://trial.snowflake.com/?owner=SPN-PID-365384).
## Connection options
When creating a Snowflake connection in Airflow, you can choose from the following options:
* Private Key (recommended): Use key-pair authentication with Snowflake.
* Password: Use a username and password to authenticate with Snowflake. This method is only recommended for testing purposes.
## Private key authentication
A private key connection from Airflow to Snowflake requires the following information:
Base parameters:
* `conn_id`: A unique name for the connection.
* `conn_type`: `snowflake`. Note that you need to install the [`apache-airflow-providers-snowflake` provider package](https://airflow.apache.org/registry/providers/snowflake/) to use this connection type.
* `login`: The [user](https://docs.snowflake.com/en/sql-reference/sql/create-user) you authenticate with. Note that some operators require the user to be properly capitalized.
* `password`: The passphrase of the private key. If your private key isn't encrypted (not recommended), you can leave this field as an empty string.
* `schema`: The default [schema](https://docs.snowflake.com/en/sql-reference/sql/create-schema.html) for the connection, this can be overridden in the operator.
Parameters in the `extra` field:
* `account`: The [account identifier](https://docs.snowflake.com/en/user-guide/admin-account-identifier) from your Snowflake account URL in the format `abc12345`.
* `warehouse`: The default [warehouse](https://docs.snowflake.com/en/sql-reference/sql/create-warehouse) for this connection, this can be overridden in the operator.
* `database`: The default [database](https://docs.snowflake.com/en/sql-reference/sql/create-database) for the connection, this can be overridden in the operator.
* `region`: The region identifier from your Snowflake account URL in the format `us-west-2`. Note that for some regions, you might have to include the cloud provider identifier after the region name, see [the Snowflake documentation on account identifiers](https://docs.snowflake.com/en/user-guide/admin-account-identifier)
* `role`: The [role](https://docs.snowflake.com/en/sql-reference/sql/create-role) you want Airflow to have in Snowflake. Note that some operators require the user to be properly capitalized.
* `private_key_content`: The content of your private key file in the format `"-----BEGIN ENCRYPTED PRIVATE KEY-----\nABC...ABC\nABC...ABC=\n-----END ENCRYPTED PRIVATE KEY-----\n",`.
* `private_key_file`: alternatively to `private_key_content`, you can provide the path to your private key file.
Optional:
* `authenticator`: `snowflake` (default). To connect using OAuth, set this parameter to `oauth`.
* `refresh_token`: The refresh token for OAuth authentication.
* `session_parameters`: A dictionary of [session parameters](https://docs.snowflake.com/en/user-guide/python-connector-example.html#setting-session-parameters) to set for the connection.
* `insecure_mode`: `false` (default). Set to `true` to disable [OCSP certificate checks](https://community.snowflake.com/s/article/How-to-turn-off-OCSP-checking-in-Snowflake-client-drivers).
See the template below for a private key connection in JSON format:
```json wrap theme={null}
AIRFLOW_CONN_SNOWFLAKE_DEFAULT='{
"conn_type":"snowflake",
"login":"",
"password":"",
"schema":"DEMO_SCHEMA",
"extra":{
"account":"",
"database":"DEMO_DB",
"region":"",
"role":"",
"private_key_content":"-----BEGIN ENCRYPTED PRIVATE KEY-----\nABC...ABC\nABC...ABC=\n-----END ENCRYPTED PRIVATE KEY-----\n"
}
}'
```
### Get connection details
Complete the following steps to retrieve the needed connection values:
Snowsight
1. Open [Snowsight](https://docs.snowflake.com/en/user-guide/ui-snowsight). Follow the [Snowflake documentation](https://docs.snowflake.com/en/user-guide/ui-snowsight-gs#using-snowsight) to open the account selector at the end of the left nav. Hover over your account to see more details, then click the **Copy URL** icon to copy the account URL. The URL has a similar format to `https://..snowflakecomputing.com/`. Copy `` and `` from the URL.
 When you copy your `region`, you might have to additionally copy the cloud provider identifier after the region name for some GCP and some AWS regions. For example, if your account URL is `https://ZS86751.europe-west4.gcp.snowflakecomputing.com`, then your `region` will be `europe-west4.gcp`. See [Account identifiers](https://docs.snowflake.com/en/user-guide/admin-account-identifier) to learn more about Snowflake's account types and their identifiers.
2. Click the user menu at the beginning of the left sidebar and copy the role you want Airflow to have in Snowflake. You can click **Switch Role** to see all the available roles.
When you copy your `region`, you might have to additionally copy the cloud provider identifier after the region name for some GCP and some AWS regions. For example, if your account URL is `https://ZS86751.europe-west4.gcp.snowflakecomputing.com`, then your `region` will be `europe-west4.gcp`. See [Account identifiers](https://docs.snowflake.com/en/user-guide/admin-account-identifier) to learn more about Snowflake's account types and their identifiers.
2. Click the user menu at the beginning of the left sidebar and copy the role you want Airflow to have in Snowflake. You can click **Switch Role** to see all the available roles.
 3. Copy the name of your **Warehouse**. To see all available warehouses, open a new **Worksheet** and open the [context selector menu](https://docs.snowflake.com/en/user-guide/ui-snowsight-worksheets#change-the-session-context-for-a-worksheet) in the content pane.

Classic
1. Open the [Snowflake classic console](https://docs.snowflake.com/en/user-guide/ui-using) and locate the URL for the page. The URL should be in the format `https://..snowflakecomputing.com/`. Copy `` and `` from the URL.
When you copy your `region`, you might have to additionally copy the cloud provider identifier after the region name for some GCP and some AWS regions. For example, if your account URL is `https://ZS86751.europe-west4.gcp.snowflakecomputing.com`, then your `region` will be `europe-west4.gcp`. See [Account identifiers](https://docs.snowflake.com/en/user-guide/admin-account-identifier) to learn more about Snowflake's account types and their identifiers.
2. Click your account name in the top right corner and hover over **Switch Role** to see a list of all available roles. Copy your **Role**.
 3. Copy your **Warehouse** from the **Warehouses** tab.

4. Copy the names for your **Database** and **Schema**.
5. In your terminal run the following command to [generate a private RSA key using OpenSSL](https://docs.openssl.org/master/man1/openssl-genrsa/). Note that while there are other options to generate a key pair, Snowflake has [specific requirements for the key format](https://docs.snowflake.com/en/user-guide/key-pair-auth) and may not accept keys generated with other tools. Make sure to write down the key passphrase as you will need it later.
```bash wrap theme={null}
openssl genrsa 2048 | openssl pkcs8 -topk8 -inform PEM -out rsa_key.p8
```
6. Generate the associated public key using the following command:
```bash wrap theme={null}
openssl rsa -in rsa_key.p8 -pubout -out rsa_key.pub
```
7. In the Snowflake UI, [create a new user](https://docs.snowflake.com/en/sql-reference/sql/create-user) that Airflow can use to access Snowflake. Copy the username and password.
8. Add the **public key** to the user you created in Snowflake. In the Snowflake UI, run the following command. You can paste the **public** key directly from the `rsa_key.pub` file without needing to modify it.
```sql wrap theme={null}
ALTER USER SET RSA_PUBLIC_KEY='';
```
9. Run the following script to format the **private** key to replace all newlines with `\n`.
```python wrap theme={null}
def format_private_key(private_key_path):
with open(private_key_path, 'r') as key_file:
private_key = key_file.read()
return private_key.replace('\n', '\\n')
formatted_key = format_private_key('rsa_key.pem')
print(formatted_key)
```
## Password authentication
When using password instead of a private key authentication, all connection parameters stay the same with the following changes:
* `login`: Your Snowflake login username (typically your email address).
* `password`: Your Snowflake login password.
* `private_key_content`: Remove this field from the connection JSON.
Note that this method won't work when using 2FA or MFA with Snowflake or with the `SnowflakeSqlApiOperator`.
## Create your connection
Airflow connections can be created using multiple methods, such as environment variables, the Airflow UI or the Airflow CLI. The following example shows how to create a Snowflake connection using the Airflow UI.
Astro users can also create connections using the [Astro Environment Manager](/docs/astro/manage-connections-variables#astro-environment-manager), which stores connections in an Astro-managed secrets backend. These connections can be shared across multiple deployed and local Airflow environments. See [Create Airflow connections in the Astro UI](/docs/astro/create-and-link-connections). Note that when using the Astro Environment Manager for your Snowflake connection, you can directly paste the private key into the **Private Key Content** field in the UI without needing to modify it.
1. Open your Astro project and add the following line to your `requirements.txt` file:
```text wrap theme={null}
apache-airflow-providers-snowflake>=5.7.0
```
This will install the Snowflake provider package, which makes the Snowflake connection type available in Airflow.
2. Run `astro dev restart` to restart your local Airflow environment and apply your changes in `requirements.txt`.
3. In the Airflow UI for your local Airflow environment, go to **Admin** > **Connections**. Click **+** to add a new connection.
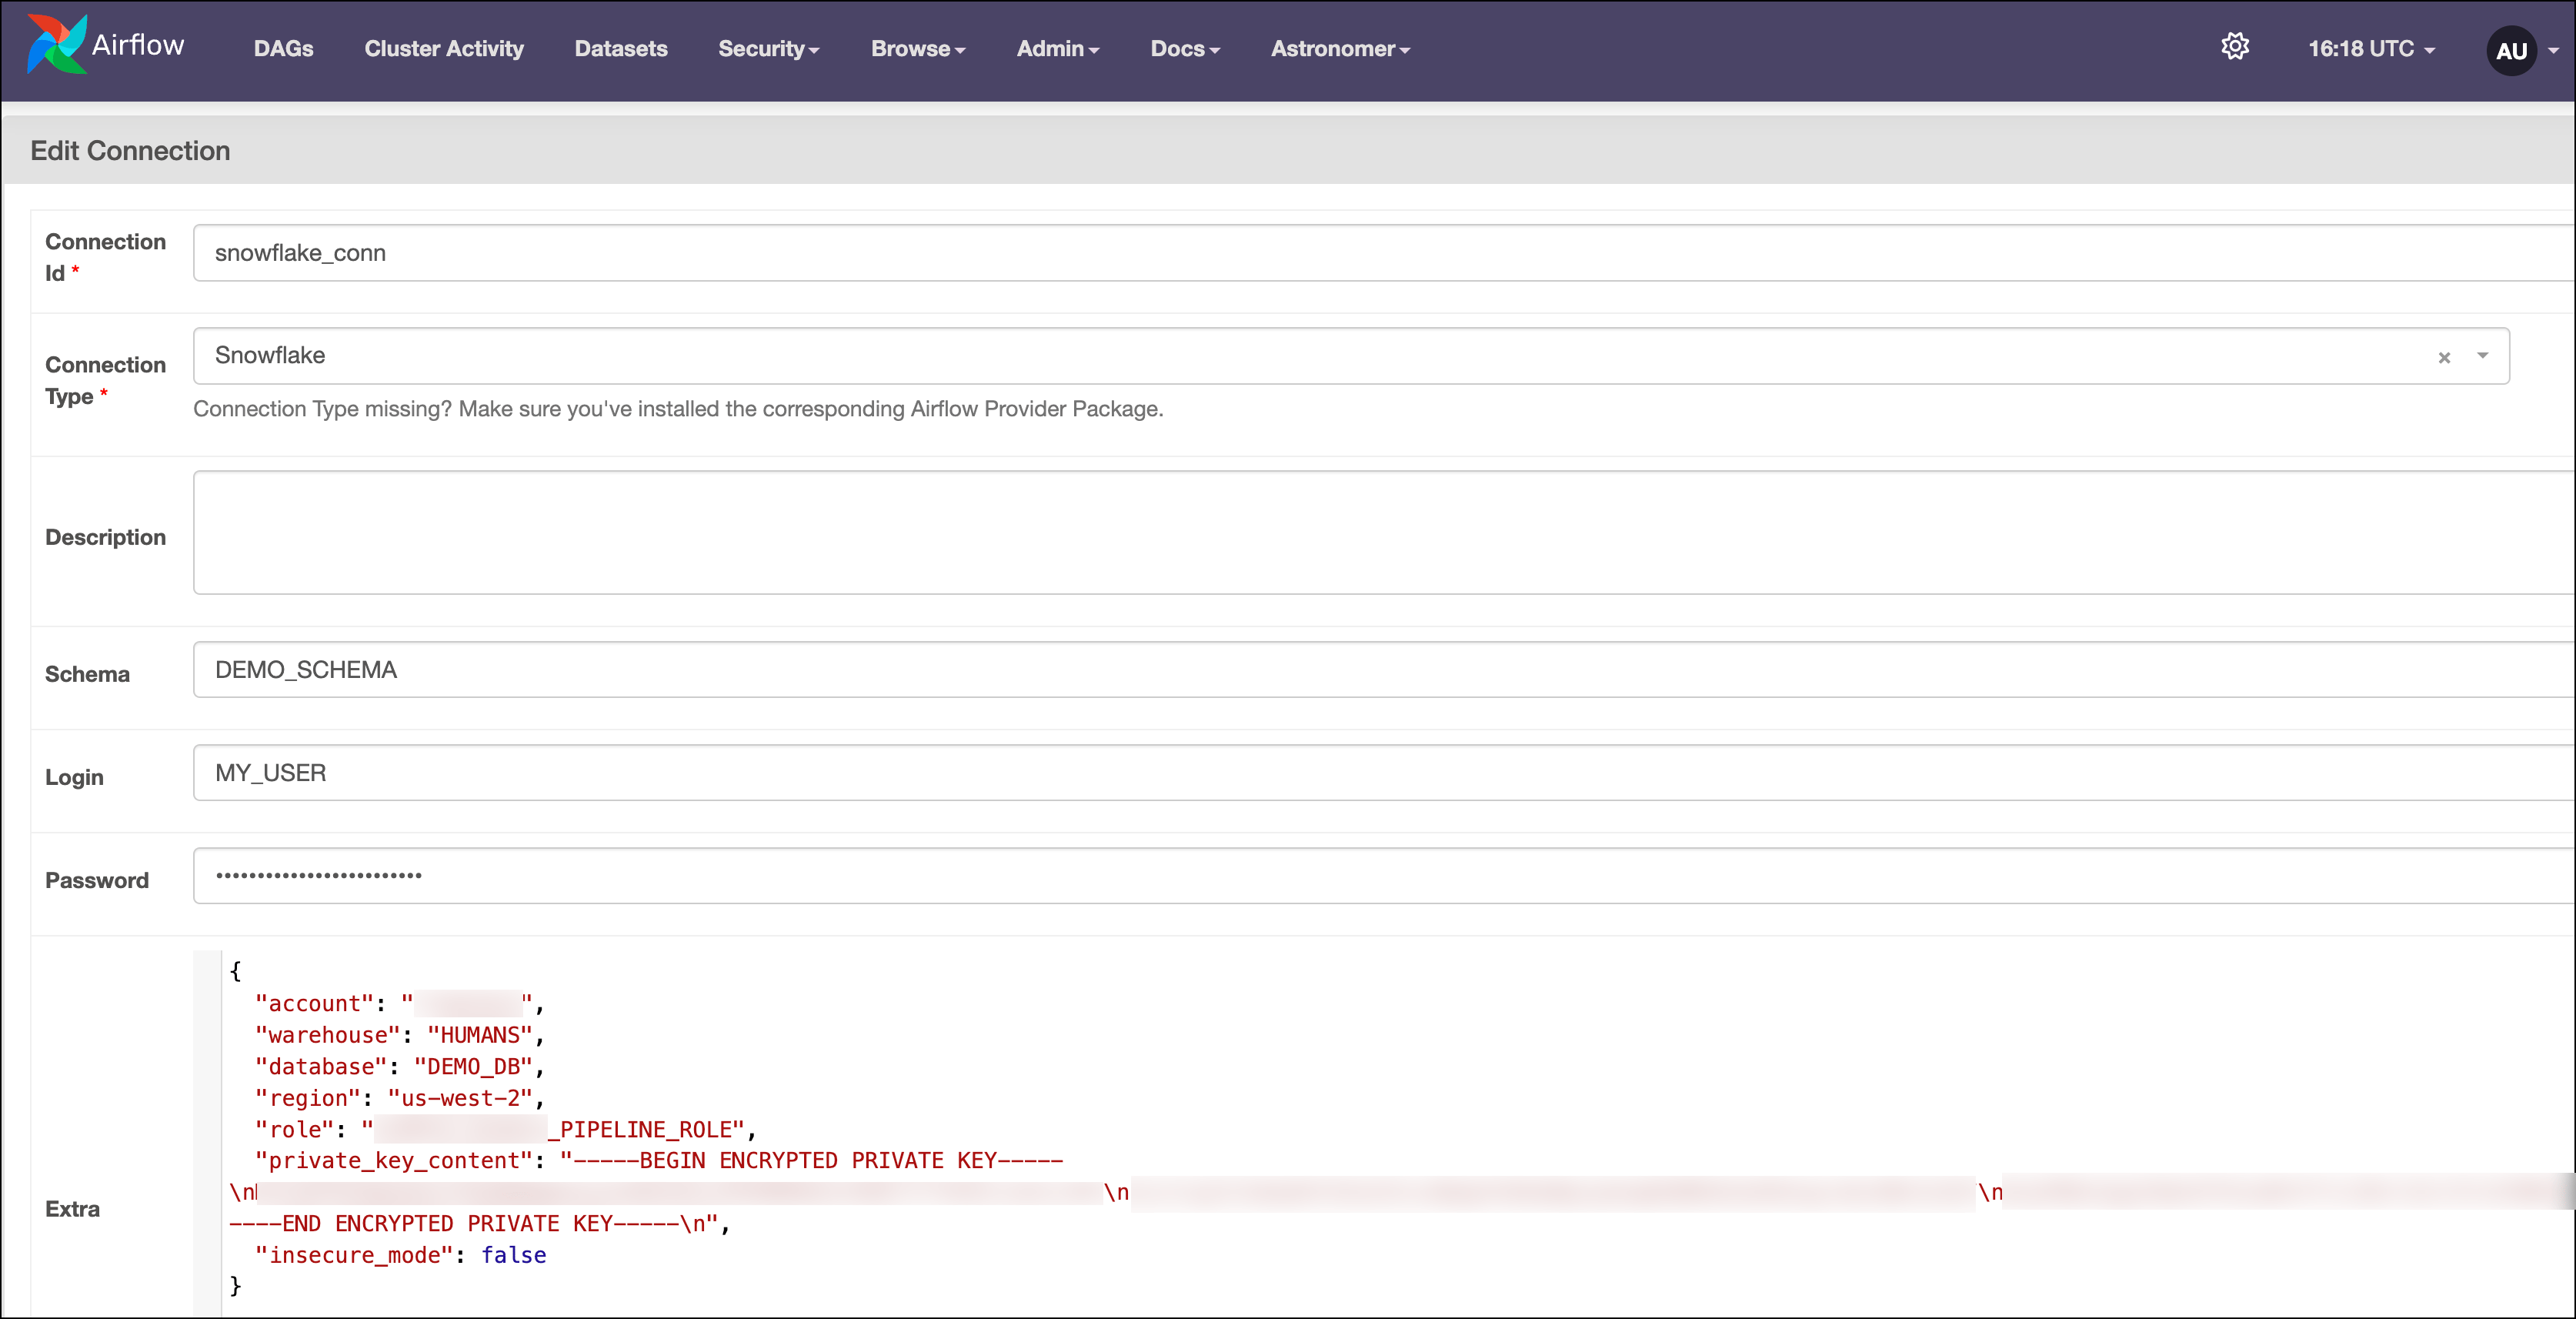
4. Fill out the following connection fields using the information you retrieved from [Get connection details](#get-connection-details):
* **Connection Id**: Enter a name for the connection.
* **Connection Type**: Select `Snowflake`. If you don't see this option, make sure you've added the `apache-airflow-providers-snowflake` provider package to your `requirements.txt` file.
* **Description**: (Optional) Enter a description for the connection.
* **Schema**: Enter your default schema.
* **Login**: Enter your user. Make sure it's properly capitalized.
* **Password**: Enter your private key passphrase.
* **Extra**: Enter the following JSON in the extra field and replace the values with your Snowflake connection details. Add any optional parameters as needed.
```json wrap theme={null}
{
"account": "",
"warehouse": "",
"database": "",
"region": "",
"role": "",
"private_key_content": "-----BEGIN ENCRYPTED PRIVATE KEY-----\nABC...ABC\nABC...ABC=\n-----END ENCRYPTED PRIVATE KEY-----\n"
}
```
Your connection should look something like the screenshot below.
 ## How it works
Airflow uses the [Snowflake connector](https://github.com/snowflakedb/snowflake-connector-python) Python package to connect to Snowflake through the [`SnowflakeHook`](https://airflow.apache.org/docs/apache-airflow-providers-snowflake/stable/_api/airflow/providers/snowflake/hooks/snowflake/index.html).
The [`SnowflakeSqlApiOperator`](https://airflow.apache.org/registry/providers/snowflake#snowflake-snowflake-SnowflakeSqlApiOperator) uses the [Snowflake SQL API](https://docs.snowflake.com/en/developer-guide/sql-api/index) via the [`SnowflakeSqlApiHook`](https://airflow.apache.org/registry/providers/snowflake#snowflake-snowflake_sql_api-SnowflakeSqlApiHook).
## See also
* [Snowflake Airflow provider](https://airflow.apache.org/registry/providers/snowflake/) and the [Snowflake Airflow provider package documentation](https://airflow.apache.org/docs/apache-airflow-providers-snowflake/stable/connections/snowflake.html)
* [Orchestrate Snowflake Queries with Airflow](/docs/learn/airflow-snowflake) tutorial
* [ELT with Snowflake and Apache Airflow® for eCommerce](/docs/learn/2.x/reference-architecture-elt-snowflake) reference architecture
* [Common SQL Airflow provider](https://airflow.apache.org/registry/providers/common-sql/) and the [Common SQL Airflow provider package documentation](https://airflow.apache.org/docs/apache-airflow-providers-common-sql/stable/index.html)
* [Import and export Airflow connections using Astro CLI](/docs/astro/import-export-connections-variables#using-the-astro-cli-local-environments-only)
* [See how Snowflake pipelines can run on Astro](https://www.astronomer.io/snowflake-demo/)
## How it works
Airflow uses the [Snowflake connector](https://github.com/snowflakedb/snowflake-connector-python) Python package to connect to Snowflake through the [`SnowflakeHook`](https://airflow.apache.org/docs/apache-airflow-providers-snowflake/stable/_api/airflow/providers/snowflake/hooks/snowflake/index.html).
The [`SnowflakeSqlApiOperator`](https://airflow.apache.org/registry/providers/snowflake#snowflake-snowflake-SnowflakeSqlApiOperator) uses the [Snowflake SQL API](https://docs.snowflake.com/en/developer-guide/sql-api/index) via the [`SnowflakeSqlApiHook`](https://airflow.apache.org/registry/providers/snowflake#snowflake-snowflake_sql_api-SnowflakeSqlApiHook).
## See also
* [Snowflake Airflow provider](https://airflow.apache.org/registry/providers/snowflake/) and the [Snowflake Airflow provider package documentation](https://airflow.apache.org/docs/apache-airflow-providers-snowflake/stable/connections/snowflake.html)
* [Orchestrate Snowflake Queries with Airflow](/docs/learn/airflow-snowflake) tutorial
* [ELT with Snowflake and Apache Airflow® for eCommerce](/docs/learn/2.x/reference-architecture-elt-snowflake) reference architecture
* [Common SQL Airflow provider](https://airflow.apache.org/registry/providers/common-sql/) and the [Common SQL Airflow provider package documentation](https://airflow.apache.org/docs/apache-airflow-providers-common-sql/stable/index.html)
* [Import and export Airflow connections using Astro CLI](/docs/astro/import-export-connections-variables#using-the-astro-cli-local-environments-only)
* [See how Snowflake pipelines can run on Astro](https://www.astronomer.io/snowflake-demo/)