> ## Documentation Index
> Fetch the complete documentation index at: https://astronomer.io/docs/llms.txt
> Use this file to discover all available pages before exploring further.
# ML pipelines with the Astro Cloud IDE
Stay tuned for a new DAG authoring experience!
Developing data pipelines has never been easier than when using the Astro Cloud IDE.
The Astro Cloud IDE automatically generates DAGs based on configurations you set in its notebook-style visual interface. Using the Astro Cloud IDE, you can create a complete data pipeline using Python, SQL, existing [Airflow operators](https://www.astronomer.io/docs/astro/cloud-ide/use-airflow-operators) from [over 100 providers](https://airflow.apache.org/registry/providers/), or [custom cells](https://www.astronomer.io/docs/astro/cloud-ide/custom-cell-reference) without setting dependencies or connections in code.
This tutorial is for Astro customers who want to create their first simple ML pipeline in the Astro Cloud IDE using Python and SQL. To explore Astro Cloud IDE functionality, you will create a pipeline that runs a random forest model to predict dog breed intelligence, then schedule and deploy the pipeline to Astro.
After you complete this tutorial, you'll be able to:
* Create an Astro Cloud IDE project with a pipeline.
* Configure connections and requirements in the Astro Cloud IDE.
* Run a query on a table in a database from the Astro Cloud IDE.
* Transform a table in a database from the Astro Cloud IDE.
* Train a simple ML model in the Astro Cloud IDE.
* Export a DAG from the Astro Cloud IDE to GitHub.
* Configure GitHub Secrets to deploy your DAG to Astro.
**Other ways to learn**
There are multiple resources for learning about this topic. See also:
* Astronomer Academy: [Astro: Cloud IDE](https://academy.astronomer.io/astro-runtime-cloud-ide) module.
* Webinar: [Develop ML Pipelines with the Astro Cloud IDE](https://www.astronomer.io/events/webinars/develop-ml-pipelines-with-the-astro-cloud-ide/).
## Time to complete
This tutorial takes approximately 1 hour to complete.
## Assumed knowledge
To get the most out of this tutorial, make sure you have an understanding of:
* Basic Airflow concepts. See [Introduction to Apache Airflow](/docs/learn/2.x/intro-to-airflow).
* Basic Python. See the [Python Documentation](https://docs.python.org/3/tutorial/index.html).
* Basic SQL. See the [W3 Schools SQL tutorial](https://www.w3schools.com/sql/).
* The Astro Cloud IDE. See [Astro Cloud IDE](https://www.astronomer.io/docs/astro/cloud-ide).
## Prerequisites
* An Astro account. If you don't already have an Astro account, [sign up for a free trial](https://www.astronomer.io/lp/signup/?utm_medium=docs\&utm_content=learn-cloud-ide-tutorial\&utm_source=body) and follow the onboarding flow to create your first Organization and Workspace.
(Optional) To complete steps [11](#step-11-optional-connect-your-github-to-the-astro-cloud-ide) - [14](#step-14-optional-run-your-dag-on-astro) at the end of this tutorial, you will also need:
* An Astro Deployment in your Workspace. See [Create a Deployment](/docs/cli/v1.43/develop-project#create-an-astro-project).
* A GitHub account with access to a private or public repository that contains an Airflow Project created by the [Astro CLI](/docs/cli/v1.43/install-cli).
* A Personal Access Token for your GitHub account. To create a personal access token, see the [official GitHub documentation](https://docs.github.com/en/authentication/keeping-your-account-and-data-secure/creating-a-personal-access-token).
* An account in one of the following database services, which are currently supported in the Astro Cloud IDE: [GCP BigQuery](https://cloud.google.com/bigquery/docs/quickstarts), [Postgres](https://www.postgresql.org/docs/current/tutorial-start.html), [Snowflake](https://docs.snowflake.com/en/user-guide-getting-started.html) or [AWS Redshift](https://docs.aws.amazon.com/redshift/latest/gsg/getting-started.html). Additionally you will need your login credentials to create the connection to your database. If you don't have a database account, you can still complete the main steps in this tutorial by using the in-memory database and skipping Steps [3](#step-3-optional-configure-a-connection) and [11](#step-11-optional-connect-your-github-to-the-astro-cloud-ide) - [14](#step-14-optional-run-your-dag-on-astro).
## Step 1: Create your Astro Cloud IDE project
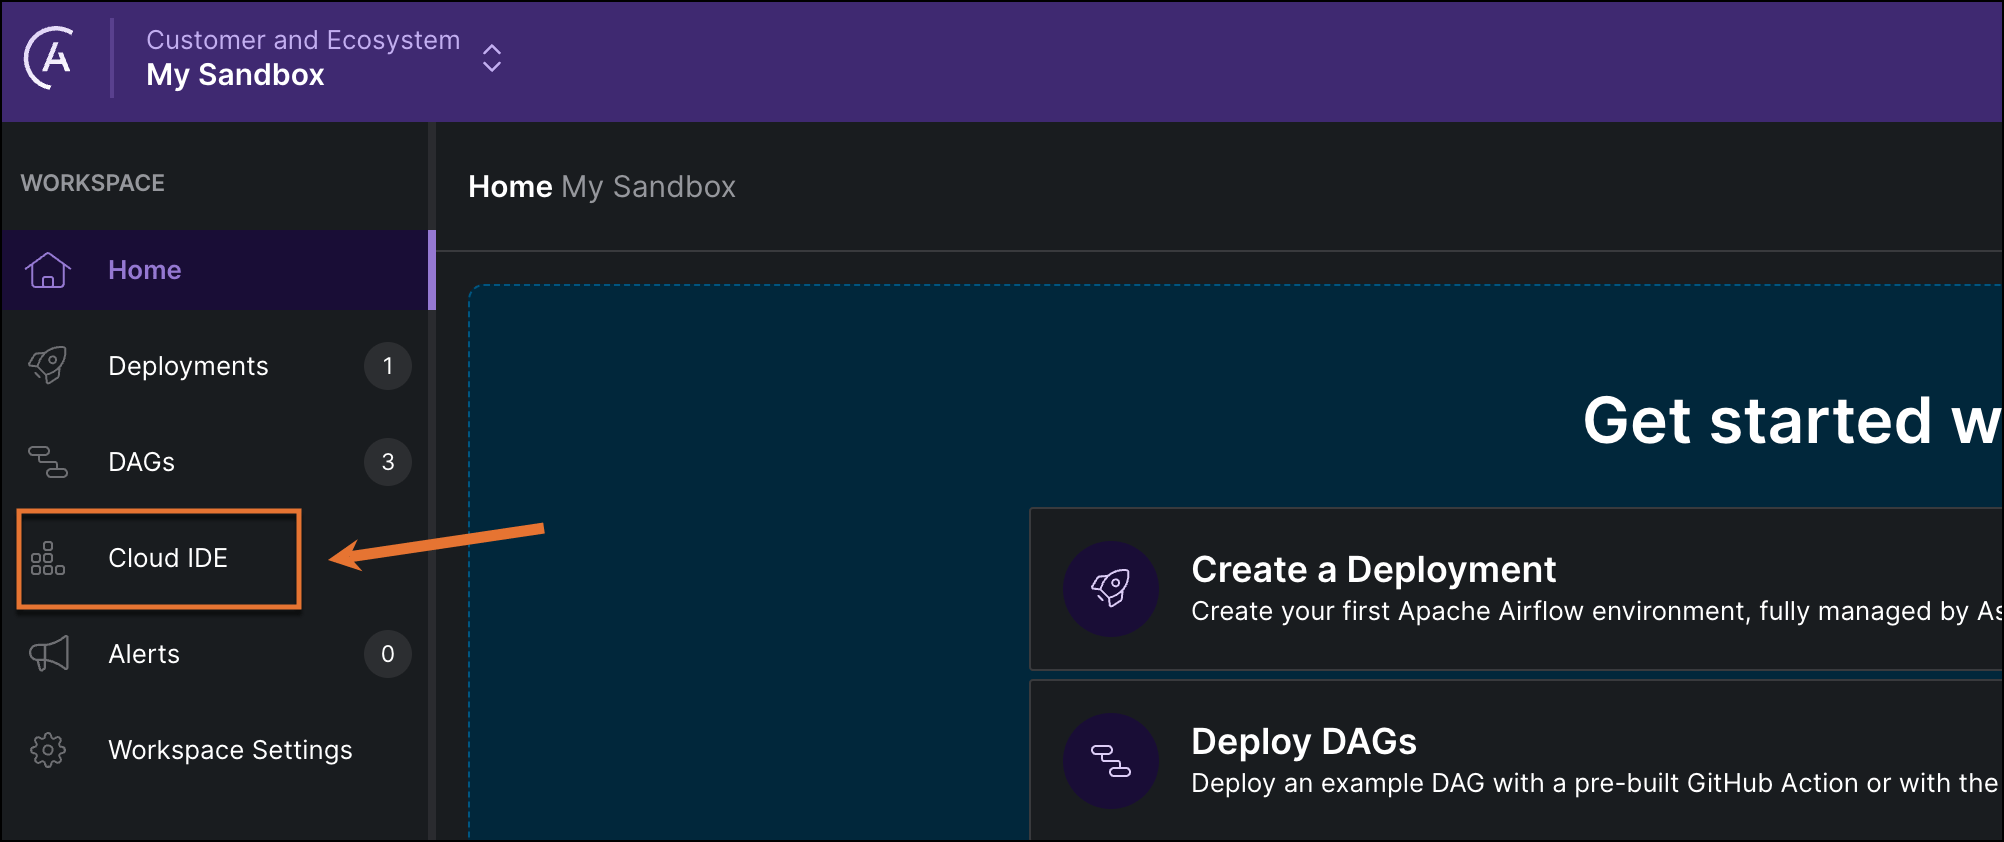
1. In the Astro UI, select a Workspace, and click **Cloud IDE** in the left menu.
 2. Click **+ Project** and give your Astro Cloud IDE project a name and a description.
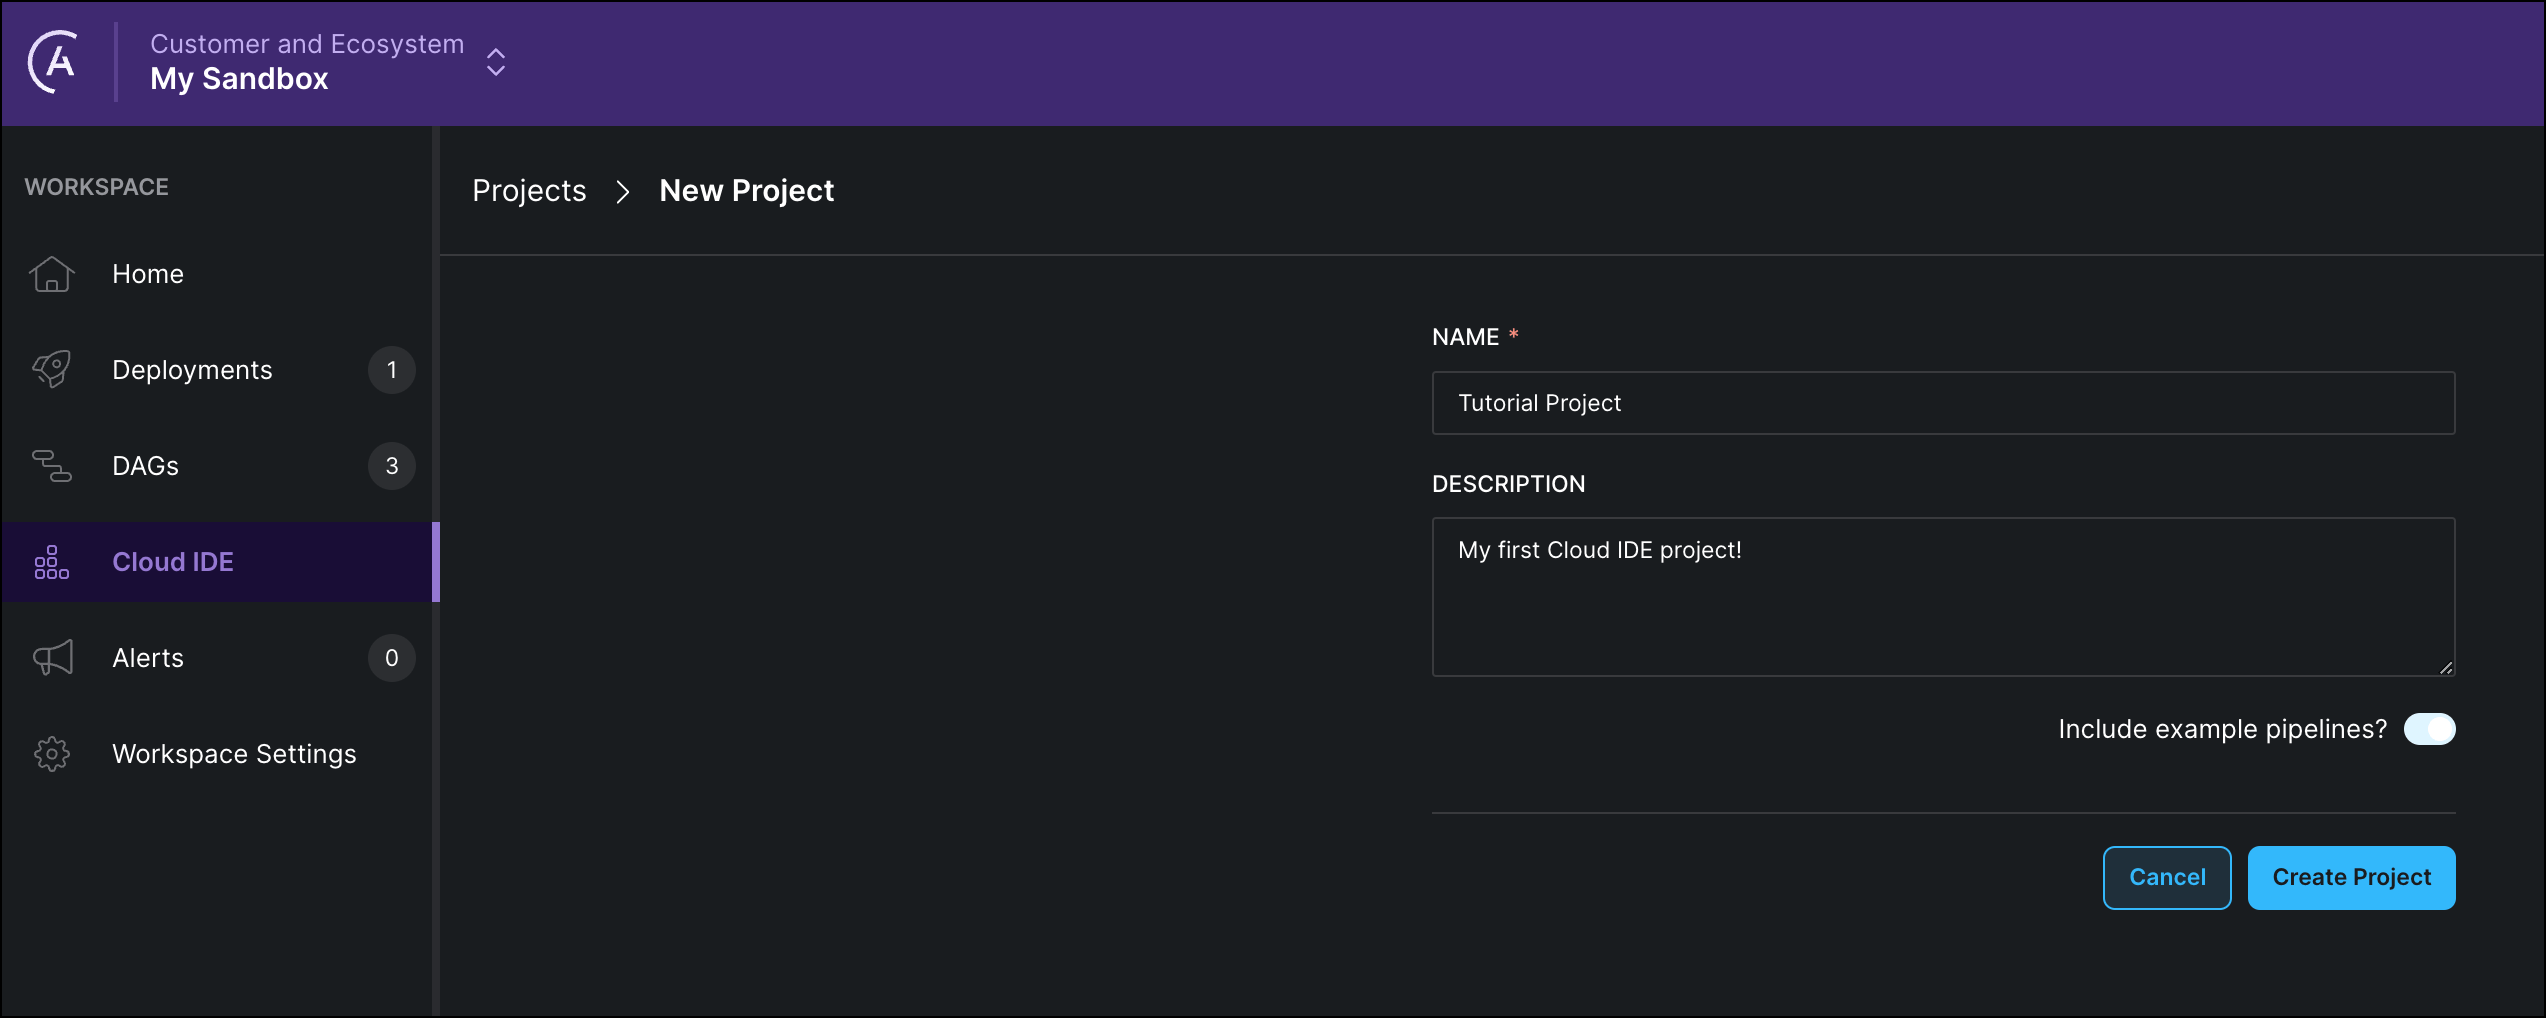 3. Click **Create Project**.
## Step 2: Create a new pipeline
1. Click **+ Pipeline** to create a new pipeline.
3. Click **Create Project**.
## Step 2: Create a new pipeline
1. Click **+ Pipeline** to create a new pipeline.
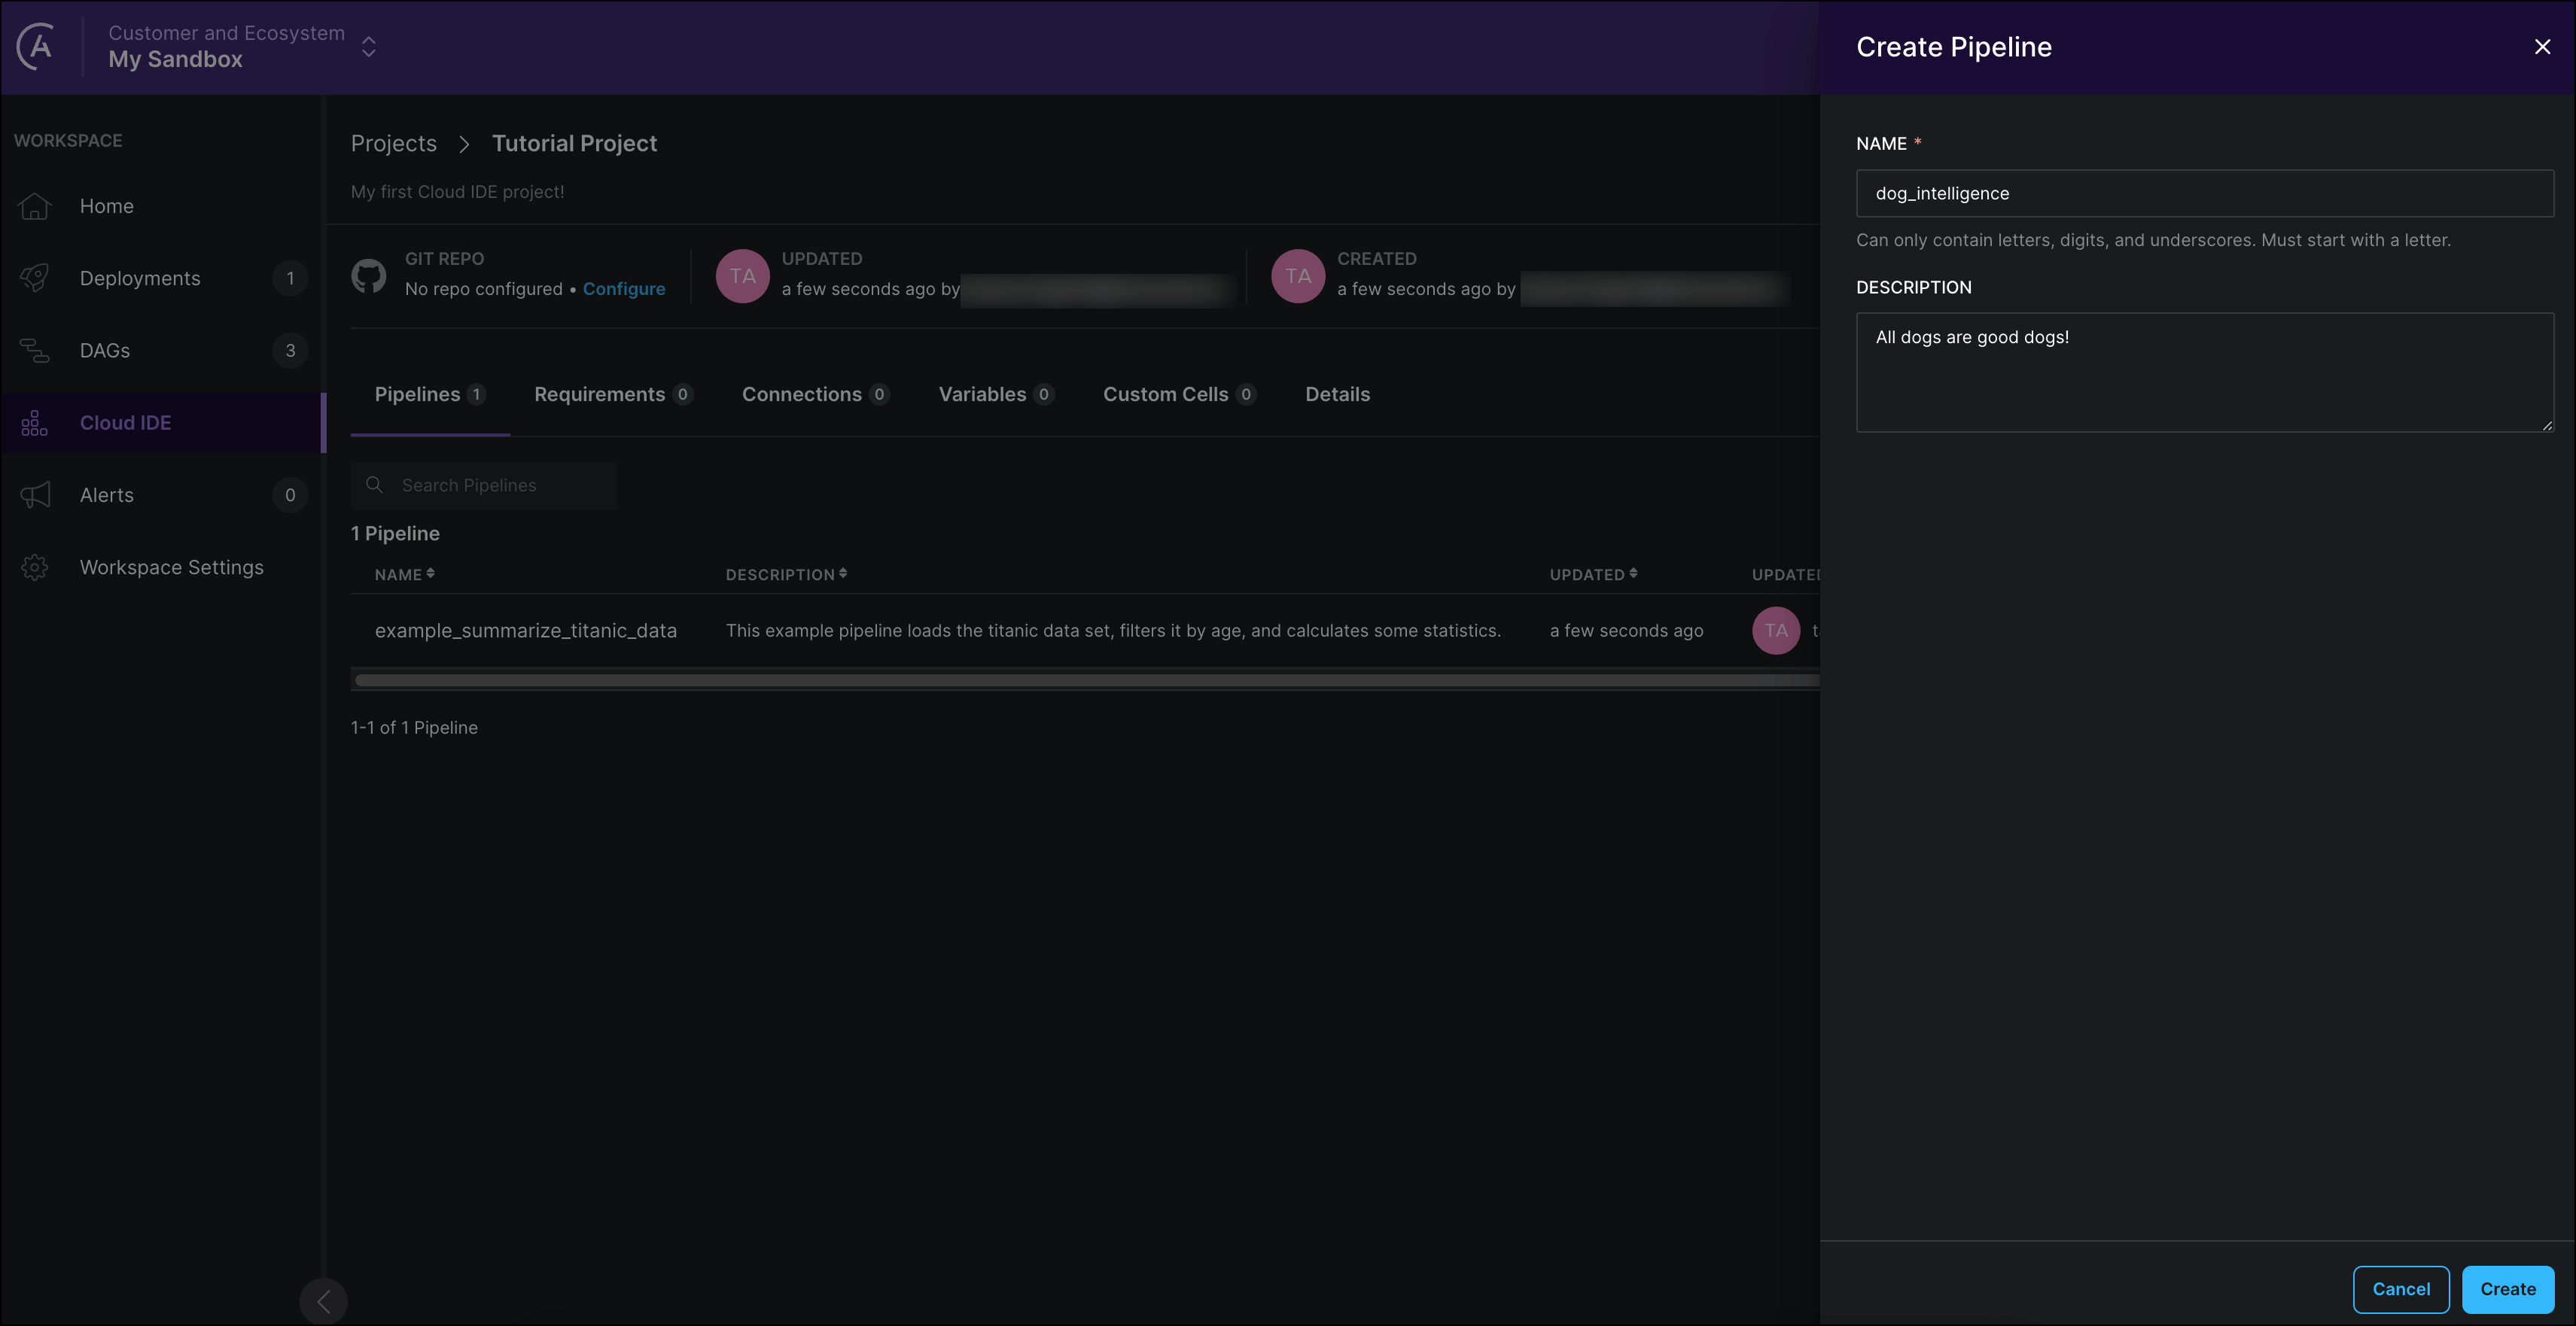 2. Give your pipeline a name and description and click **Create**. The pipeline editor for the new pipeline will open automatically.
The name you give your pipeline will be the name of the DAG which the Astro Cloud IDE will create from your input. Names of pipelines must be unique within a project and can't contain special characters.
## Step 3: (Optional) Configure a connection
To run your ML model on data, you need to connect to your database. Thankfully, the Astro Cloud IDE handles connection configuration for you! If you are using the in-memory database for developing purposes, you can skip this step.
1. Click **Environment** to add connections, variables, and dependencies to your Astro Cloud IDE project.
2. Give your pipeline a name and description and click **Create**. The pipeline editor for the new pipeline will open automatically.
The name you give your pipeline will be the name of the DAG which the Astro Cloud IDE will create from your input. Names of pipelines must be unique within a project and can't contain special characters.
## Step 3: (Optional) Configure a connection
To run your ML model on data, you need to connect to your database. Thankfully, the Astro Cloud IDE handles connection configuration for you! If you are using the in-memory database for developing purposes, you can skip this step.
1. Click **Environment** to add connections, variables, and dependencies to your Astro Cloud IDE project.
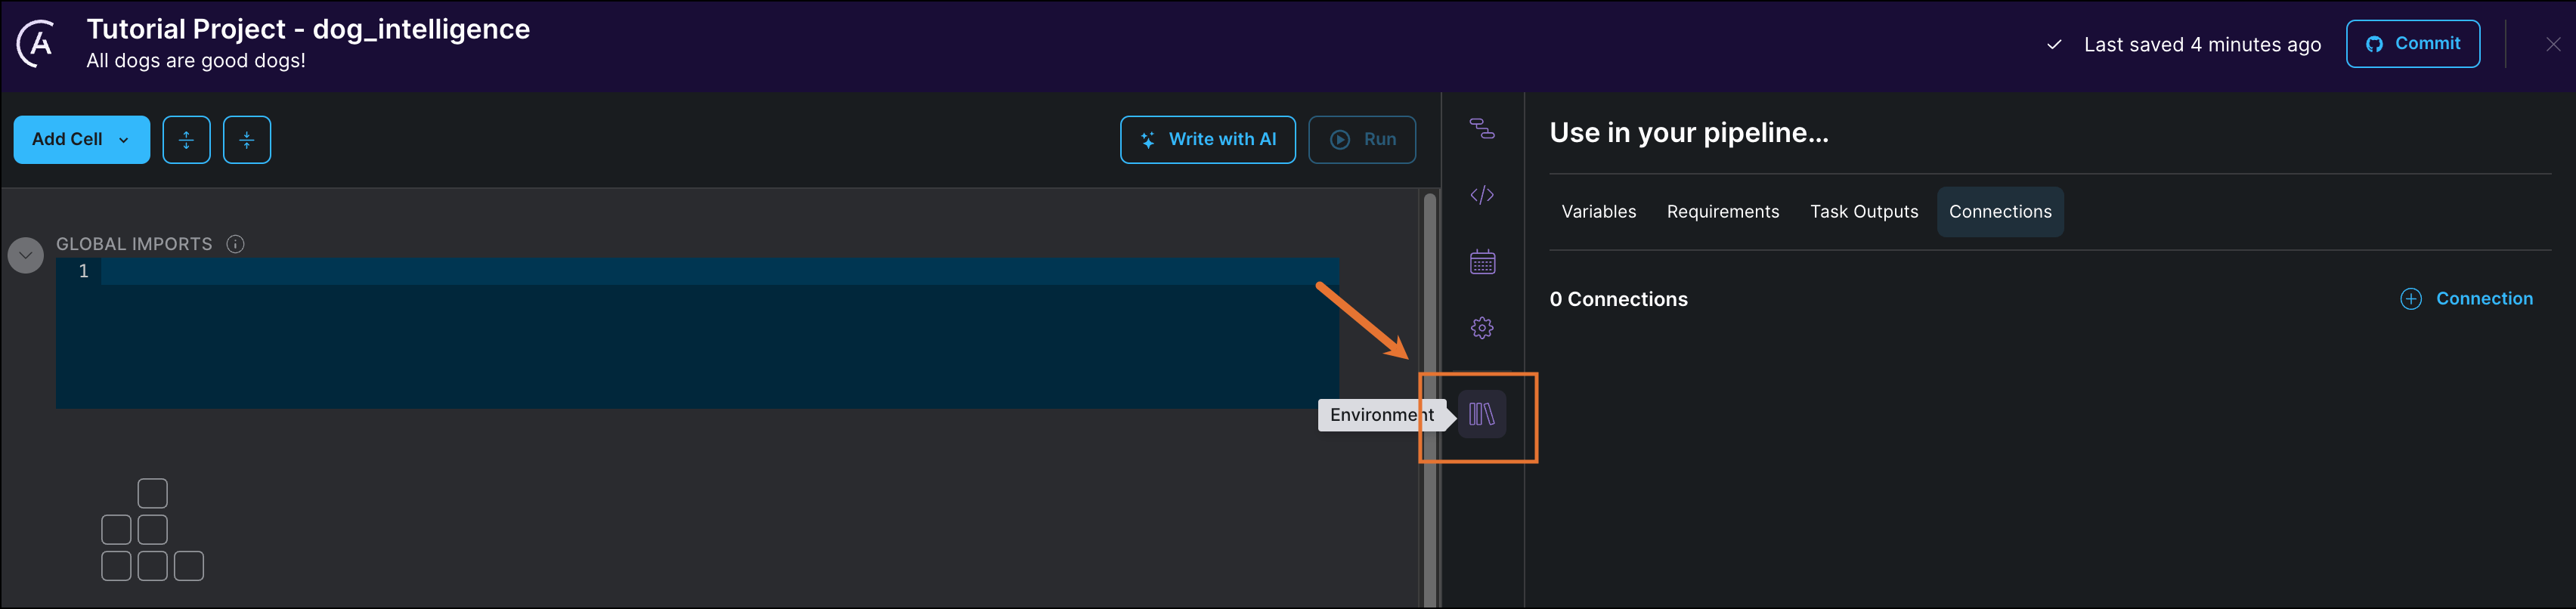 2. Click **+ Connection** to add a new connection. This tutorial uses Snowflake as an example, but you can also use Postgres, BigQuery, or Redshift.
Provide your connection credentials as shown in the following screenshots:
2. Click **+ Connection** to add a new connection. This tutorial uses Snowflake as an example, but you can also use Postgres, BigQuery, or Redshift.
Provide your connection credentials as shown in the following screenshots:
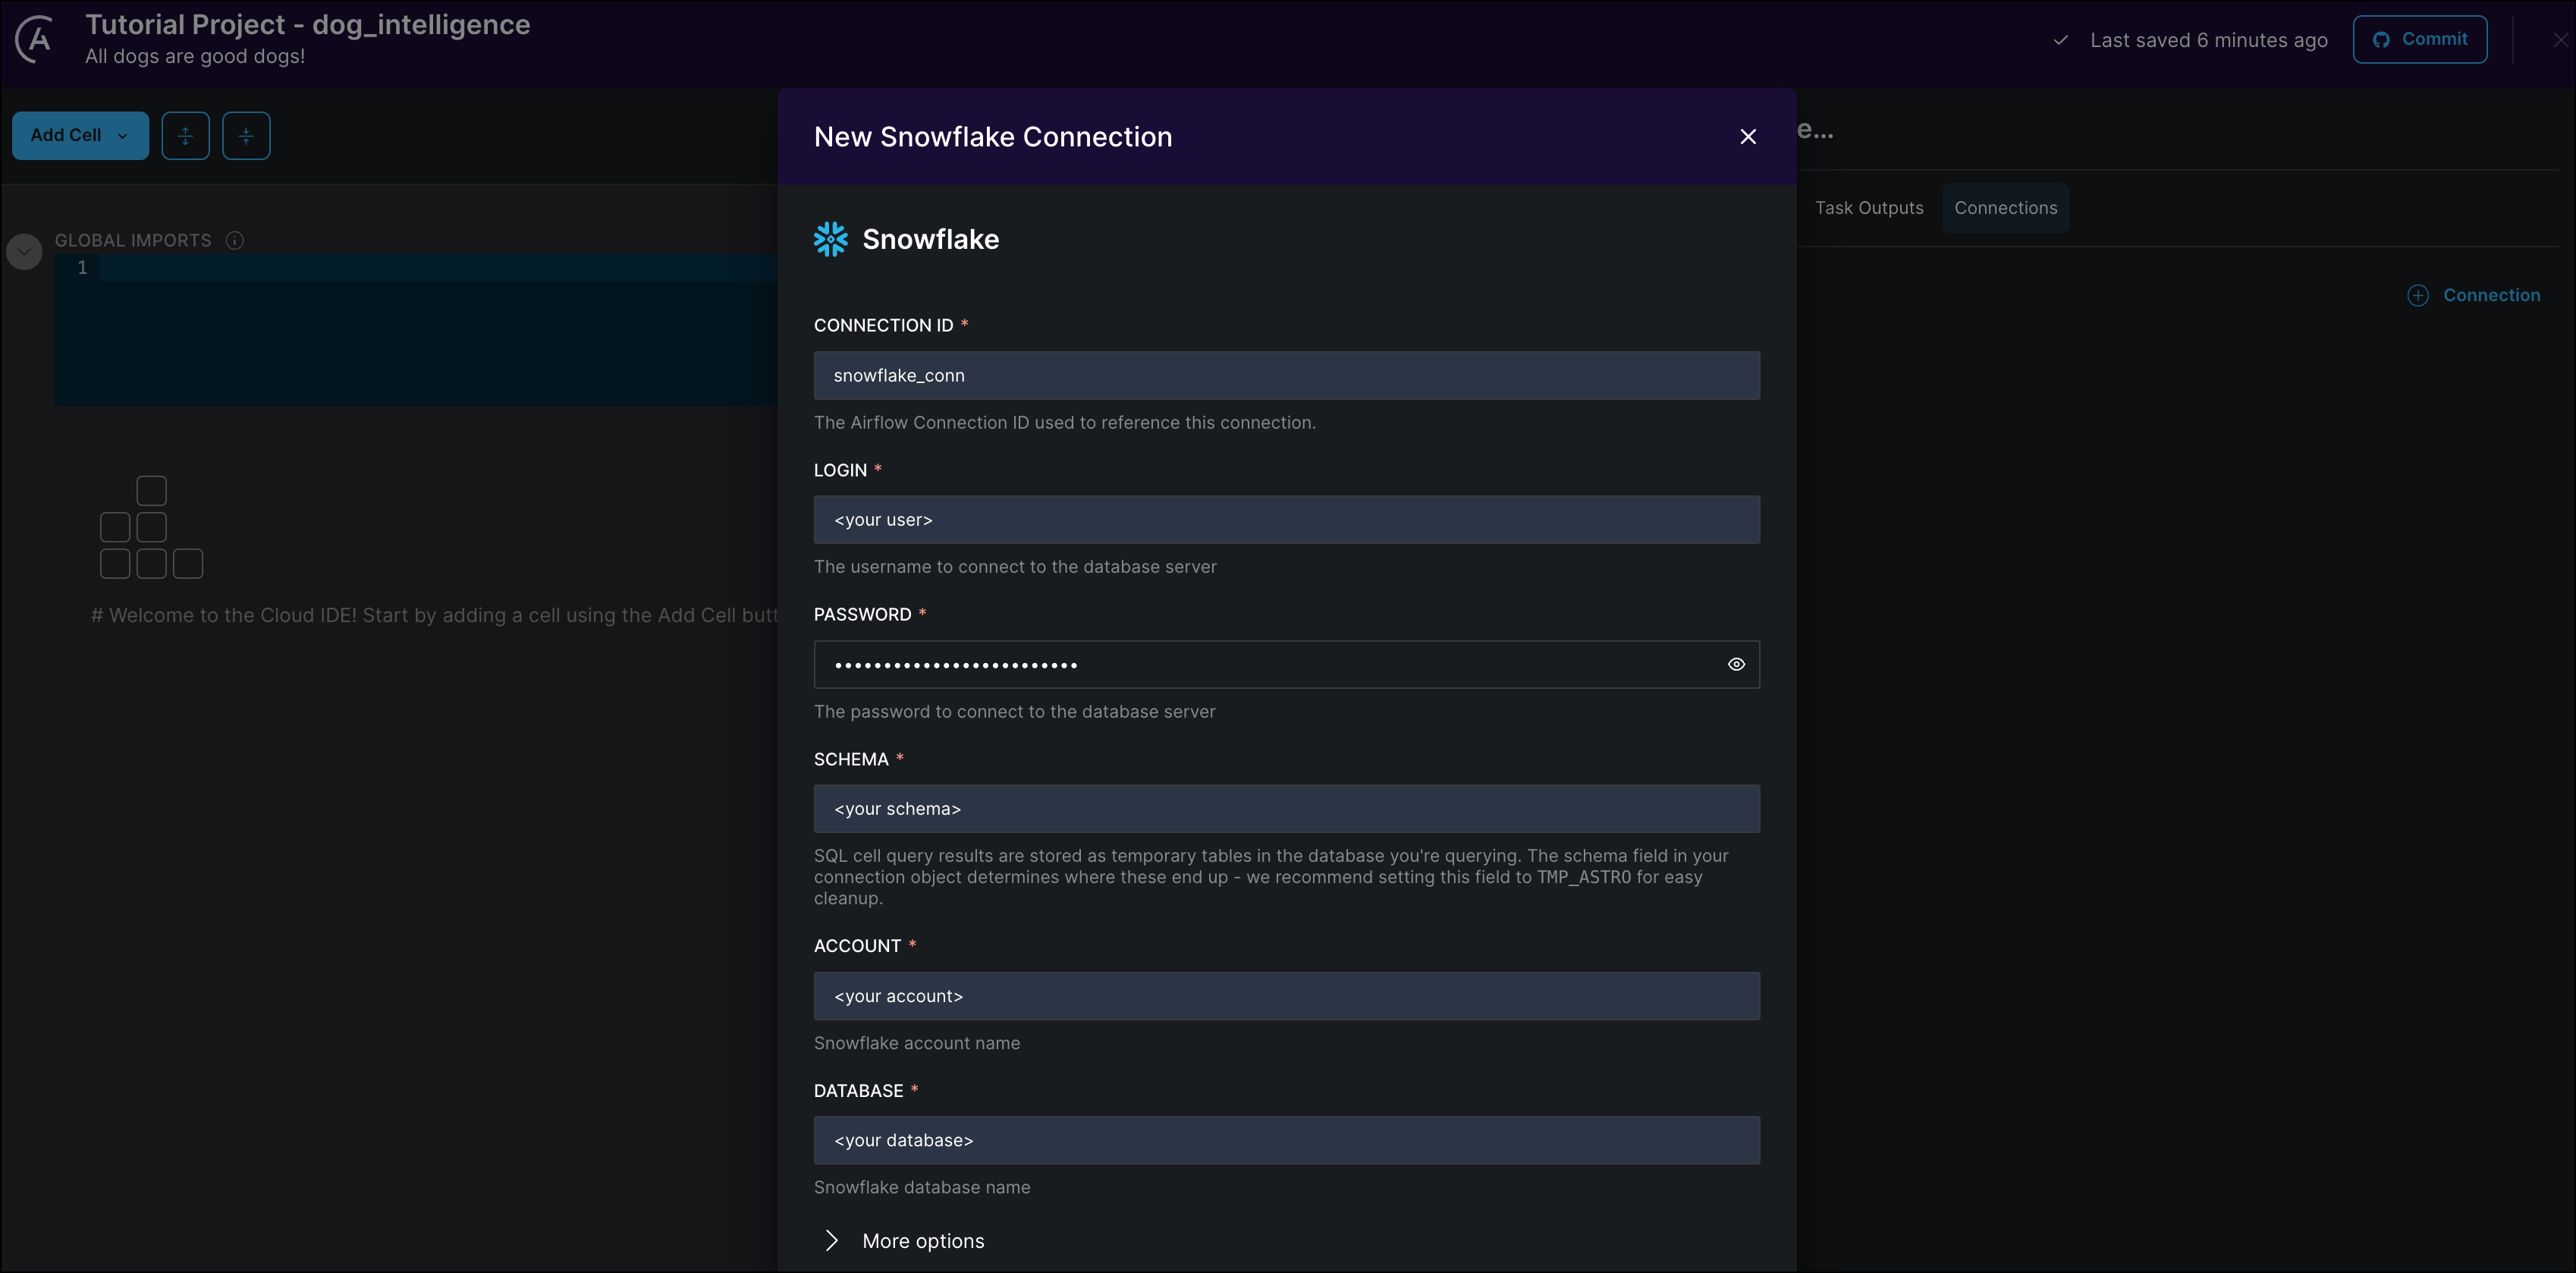
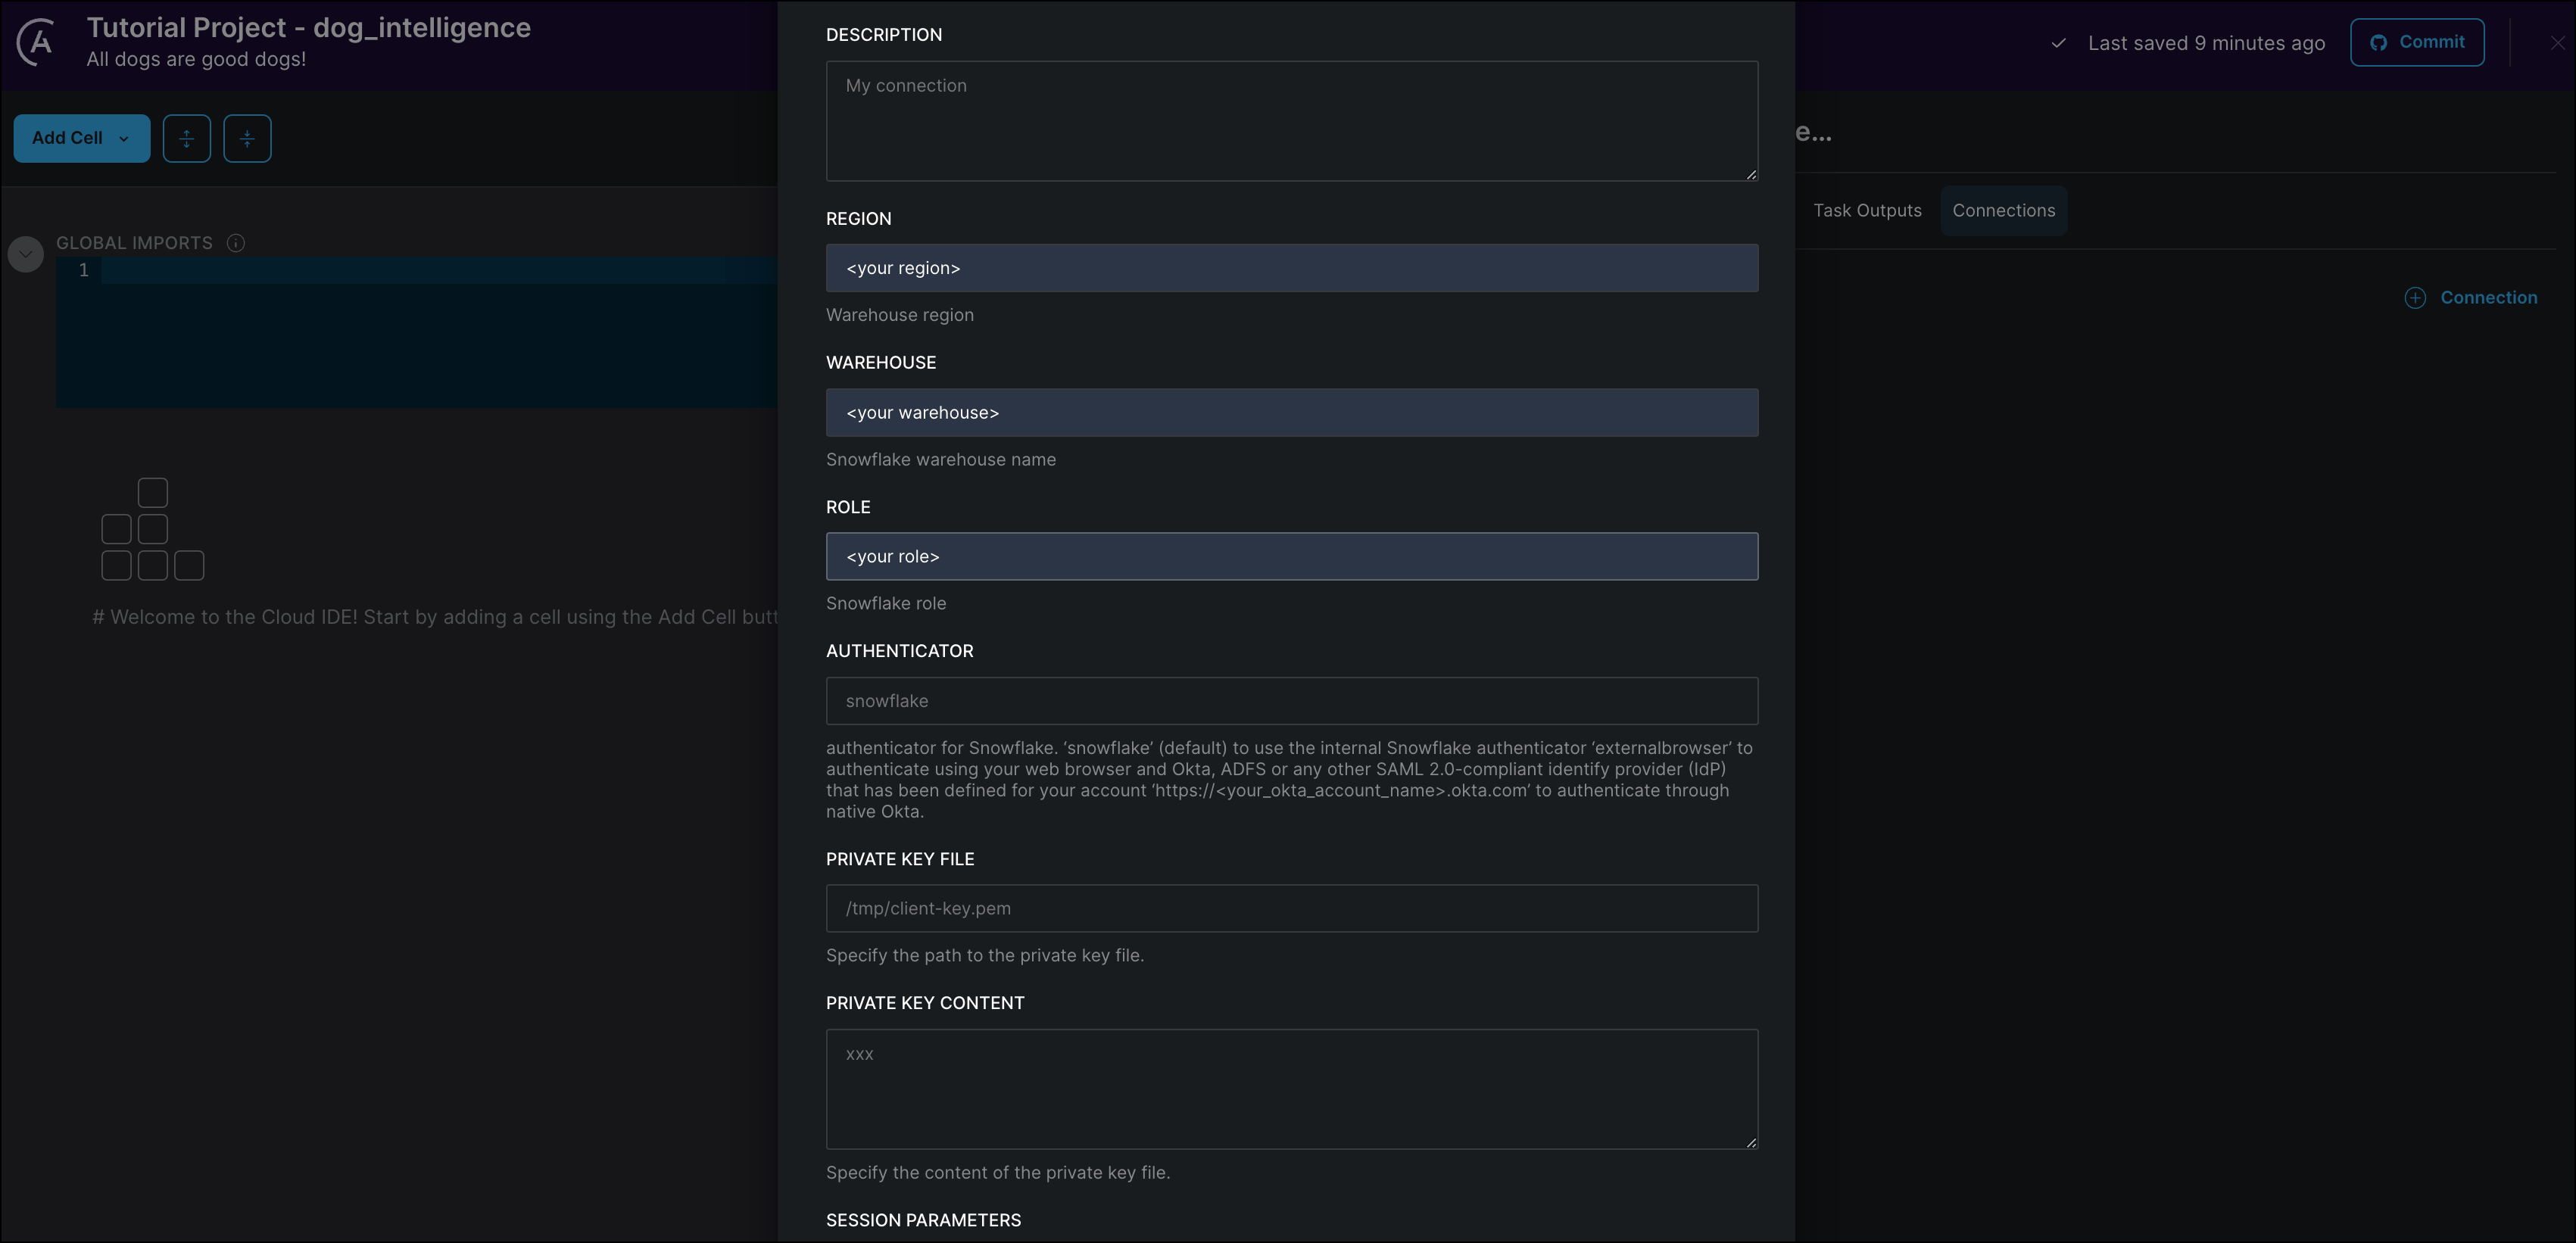 3. Click **Create Connection** to save your changes.
## Step 4: Add required Python packages
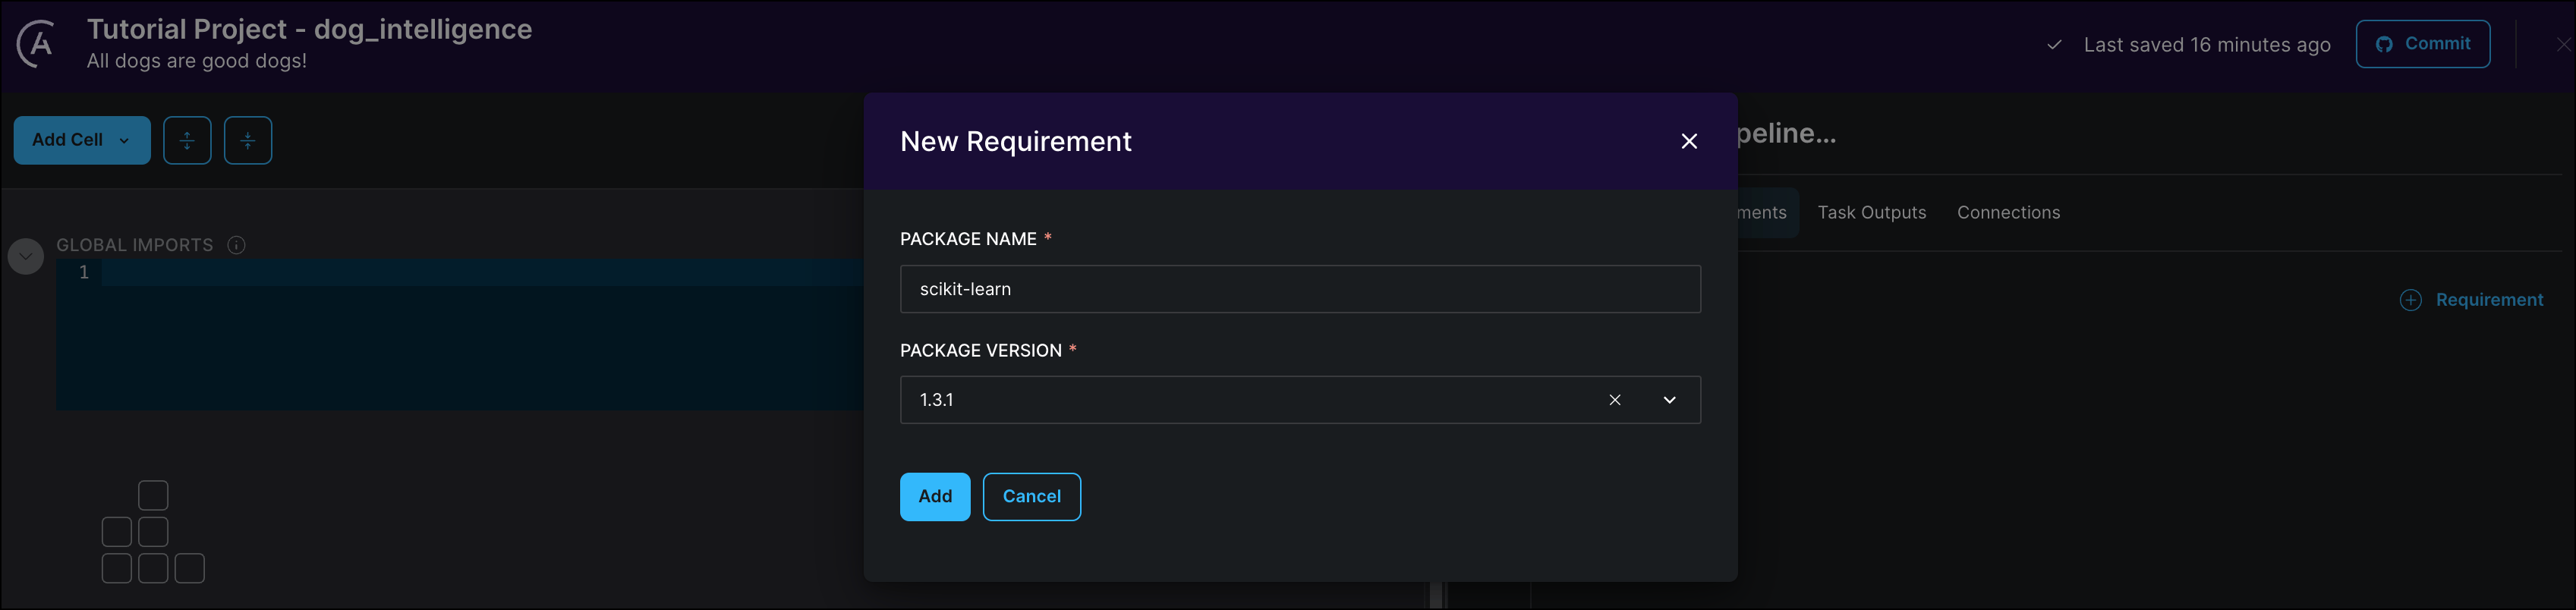
In the same section where you configured your database connection, open the **Requirements** tab. Here you can add any Python packages that you need for your project. To create the simple ML model, you need to add the `scikit-learn` package.
1. Click **+ Requirements**.
2. In the **PACKAGE NAME** field, type `scikit-learn`. The Astro Cloud IDE produces a list of packages to choose from.
3. Select the version `1.3.1` and click **Add**.
3. Click **Create Connection** to save your changes.
## Step 4: Add required Python packages
In the same section where you configured your database connection, open the **Requirements** tab. Here you can add any Python packages that you need for your project. To create the simple ML model, you need to add the `scikit-learn` package.
1. Click **+ Requirements**.
2. In the **PACKAGE NAME** field, type `scikit-learn`. The Astro Cloud IDE produces a list of packages to choose from.
3. Select the version `1.3.1` and click **Add**.
 ## Step 5: Import a dataset into your database
Now that you've set up the environment for your pipelines, you can create pipelines - starting with your source data! For this tutorial you will try to predict the intelligence of a dog breed based on their upper and lower limits for weight and height.
The dataset used in this tutorial is a slightly modified version of [this dataset on Kaggle](https://www.kaggle.com/datasets/jasleensondhi/dog-intelligence-comparison-based-on-size).
1. Download the [`dog_intelligence`.csv](https://github.com/astronomer/learn-tutorials-data/blob/main/dog_intelligence.csv) dataset.
2. Run the following SQL statement in a Snowflake worksheet to create the target table:
```sql wrap theme={null}
CREATE TABLE dog_intelligence (
BREED varchar(50),
HEIGHT_LOW_INCHES INT,
HEIGHT_HIGH_INCHES INT,
WEIGHT_LOW_LBS INT,
WEIGHT_HIGH_LBS INT,
REPS_LOWER INT,
REPS_UPPER INT
);
```
3. Run this SQL statement to create the file format `my_csv_format`:
```sql wrap theme={null}
CREATE FILE FORMAT my_csv_format
TYPE = csv
FIELD_DELIMITER = ','
SKIP_HEADER = 1
NULL_IF = ('NULL', 'null')
EMPTY_FIELD_AS_NULL = true;
```
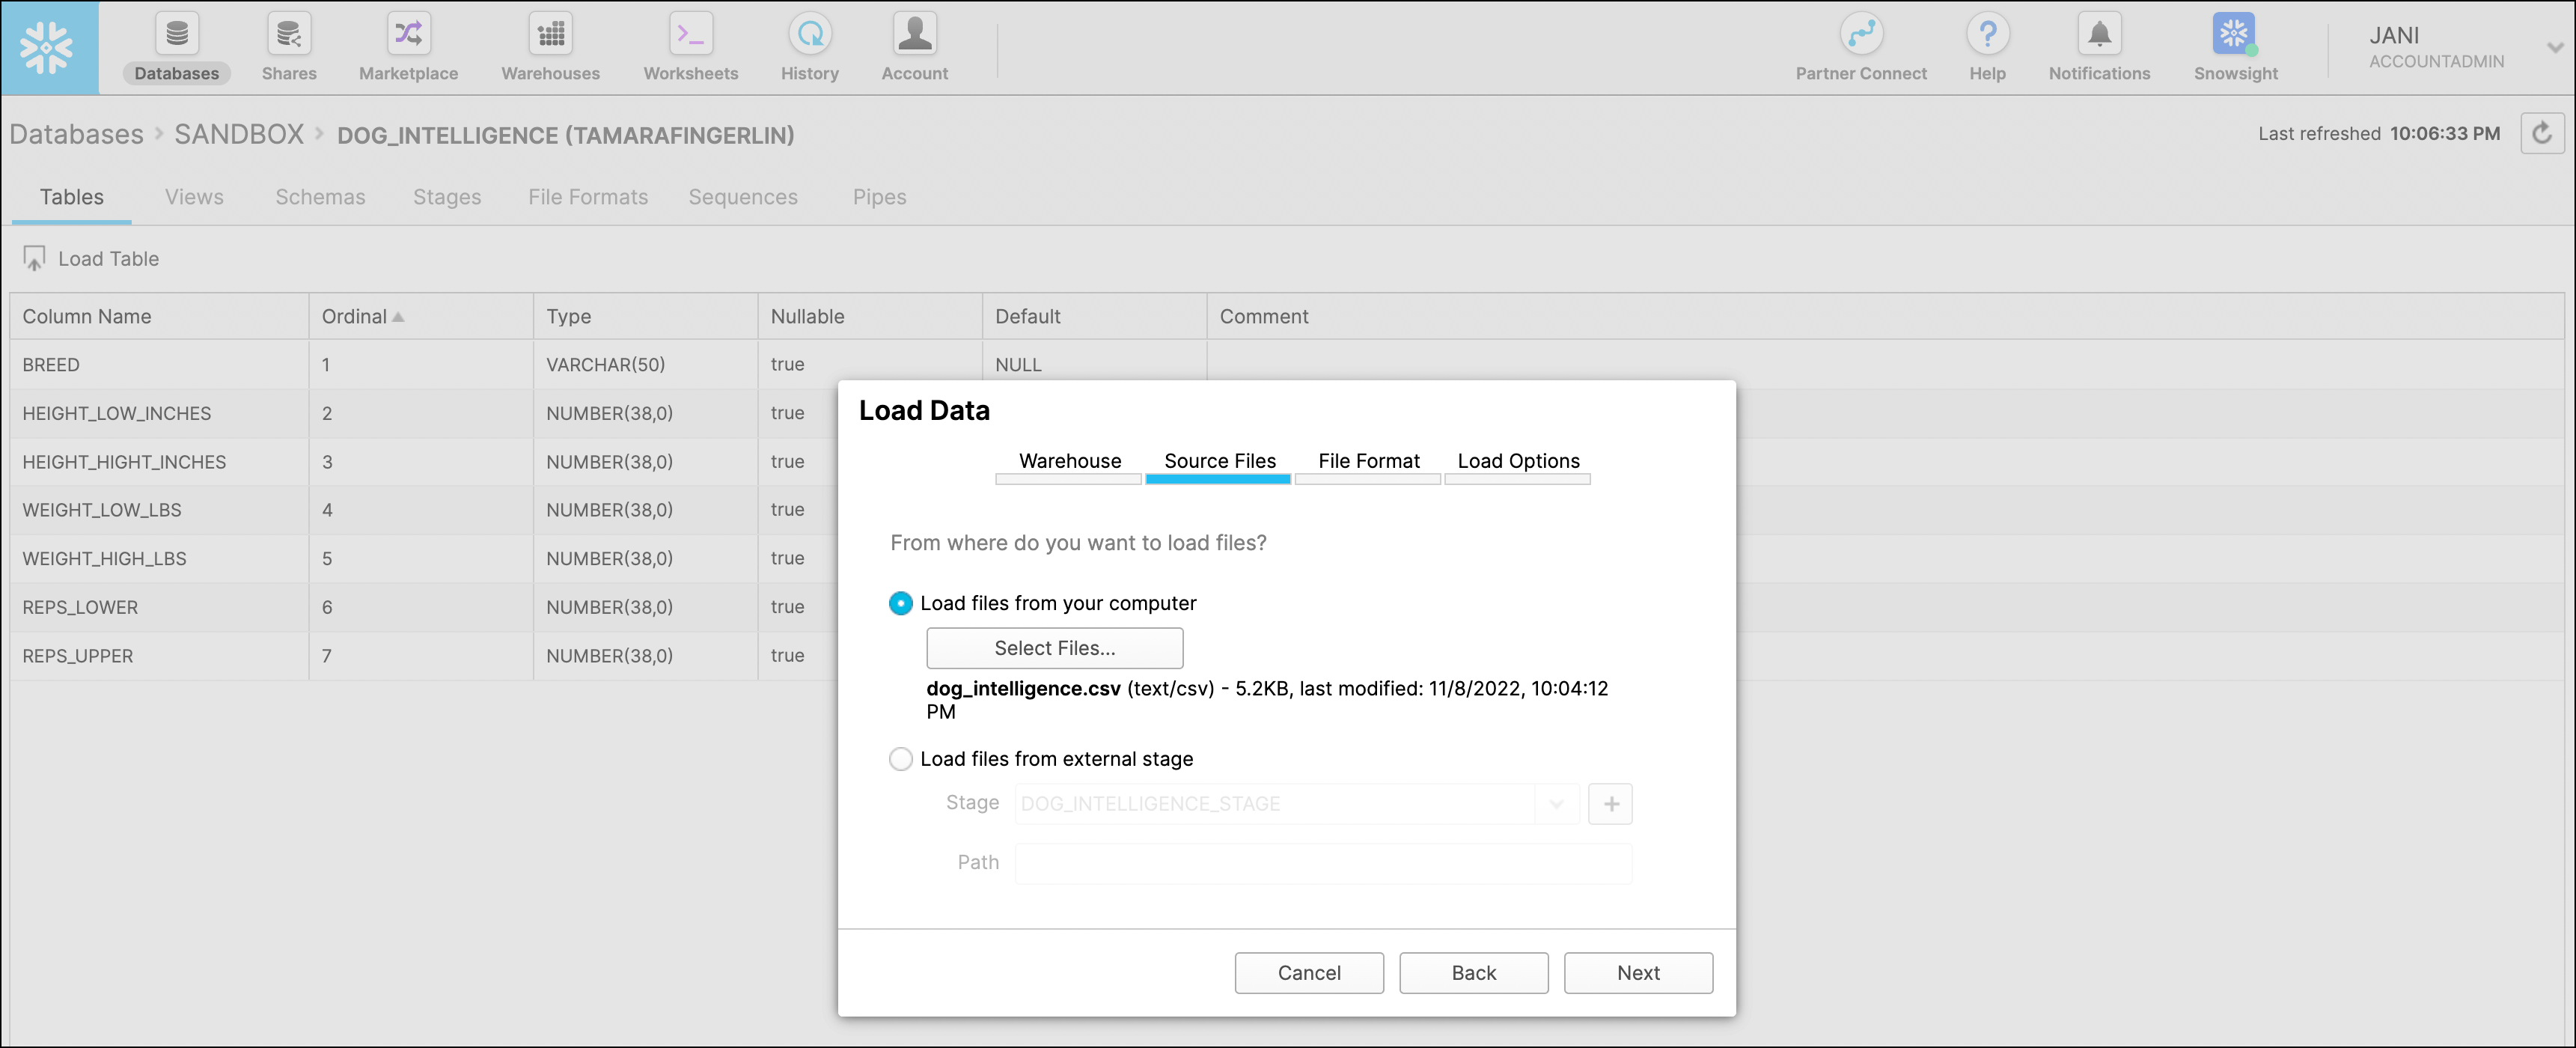
4. In the Snowflake UI, go to the `dog_intelligence` table in **Databases** and click **Load Table**.
5. Use the ["Loading Using the Web Interface" wizard](https://docs.snowflake.com/en/user-guide/data-load-web-ui.html). Select the `dog_intelligence.csv` file you downloaded as the **Source File** and `my_csv_format` as the **File Format**.
## Step 5: Import a dataset into your database
Now that you've set up the environment for your pipelines, you can create pipelines - starting with your source data! For this tutorial you will try to predict the intelligence of a dog breed based on their upper and lower limits for weight and height.
The dataset used in this tutorial is a slightly modified version of [this dataset on Kaggle](https://www.kaggle.com/datasets/jasleensondhi/dog-intelligence-comparison-based-on-size).
1. Download the [`dog_intelligence`.csv](https://github.com/astronomer/learn-tutorials-data/blob/main/dog_intelligence.csv) dataset.
2. Run the following SQL statement in a Snowflake worksheet to create the target table:
```sql wrap theme={null}
CREATE TABLE dog_intelligence (
BREED varchar(50),
HEIGHT_LOW_INCHES INT,
HEIGHT_HIGH_INCHES INT,
WEIGHT_LOW_LBS INT,
WEIGHT_HIGH_LBS INT,
REPS_LOWER INT,
REPS_UPPER INT
);
```
3. Run this SQL statement to create the file format `my_csv_format`:
```sql wrap theme={null}
CREATE FILE FORMAT my_csv_format
TYPE = csv
FIELD_DELIMITER = ','
SKIP_HEADER = 1
NULL_IF = ('NULL', 'null')
EMPTY_FIELD_AS_NULL = true;
```
4. In the Snowflake UI, go to the `dog_intelligence` table in **Databases** and click **Load Table**.
5. Use the ["Loading Using the Web Interface" wizard](https://docs.snowflake.com/en/user-guide/data-load-web-ui.html). Select the `dog_intelligence.csv` file you downloaded as the **Source File** and `my_csv_format` as the **File Format**.
 6. Verify that the data has been loaded into your Snowflake database by running the following query in a worksheet:
```sql wrap theme={null}
SELECT * FROM ..dog_intelligence
```
The steps above are specific to using Snowflake. If you are using a different database, refer to their documentation and upload the data from the provided CSV file into a table.
## Step 6: Query your table
Navigate back to your Astro Cloud IDE on Astro.
1. Create your first SQL cell by clicking **Add Cell** and selecting **SQL**. A cell is equivalent to an Airflow task. However, you don't have to know how to write an Airflow task to write a cell!
2. Rename your cell from `sql_1` to `query_table`.
3. Click **Dependency Graph** to view your cell as a data pipeline.
6. Verify that the data has been loaded into your Snowflake database by running the following query in a worksheet:
```sql wrap theme={null}
SELECT * FROM ..dog_intelligence
```
The steps above are specific to using Snowflake. If you are using a different database, refer to their documentation and upload the data from the provided CSV file into a table.
## Step 6: Query your table
Navigate back to your Astro Cloud IDE on Astro.
1. Create your first SQL cell by clicking **Add Cell** and selecting **SQL**. A cell is equivalent to an Airflow task. However, you don't have to know how to write an Airflow task to write a cell!
2. Rename your cell from `sql_1` to `query_table`.
3. Click **Dependency Graph** to view your cell as a data pipeline.
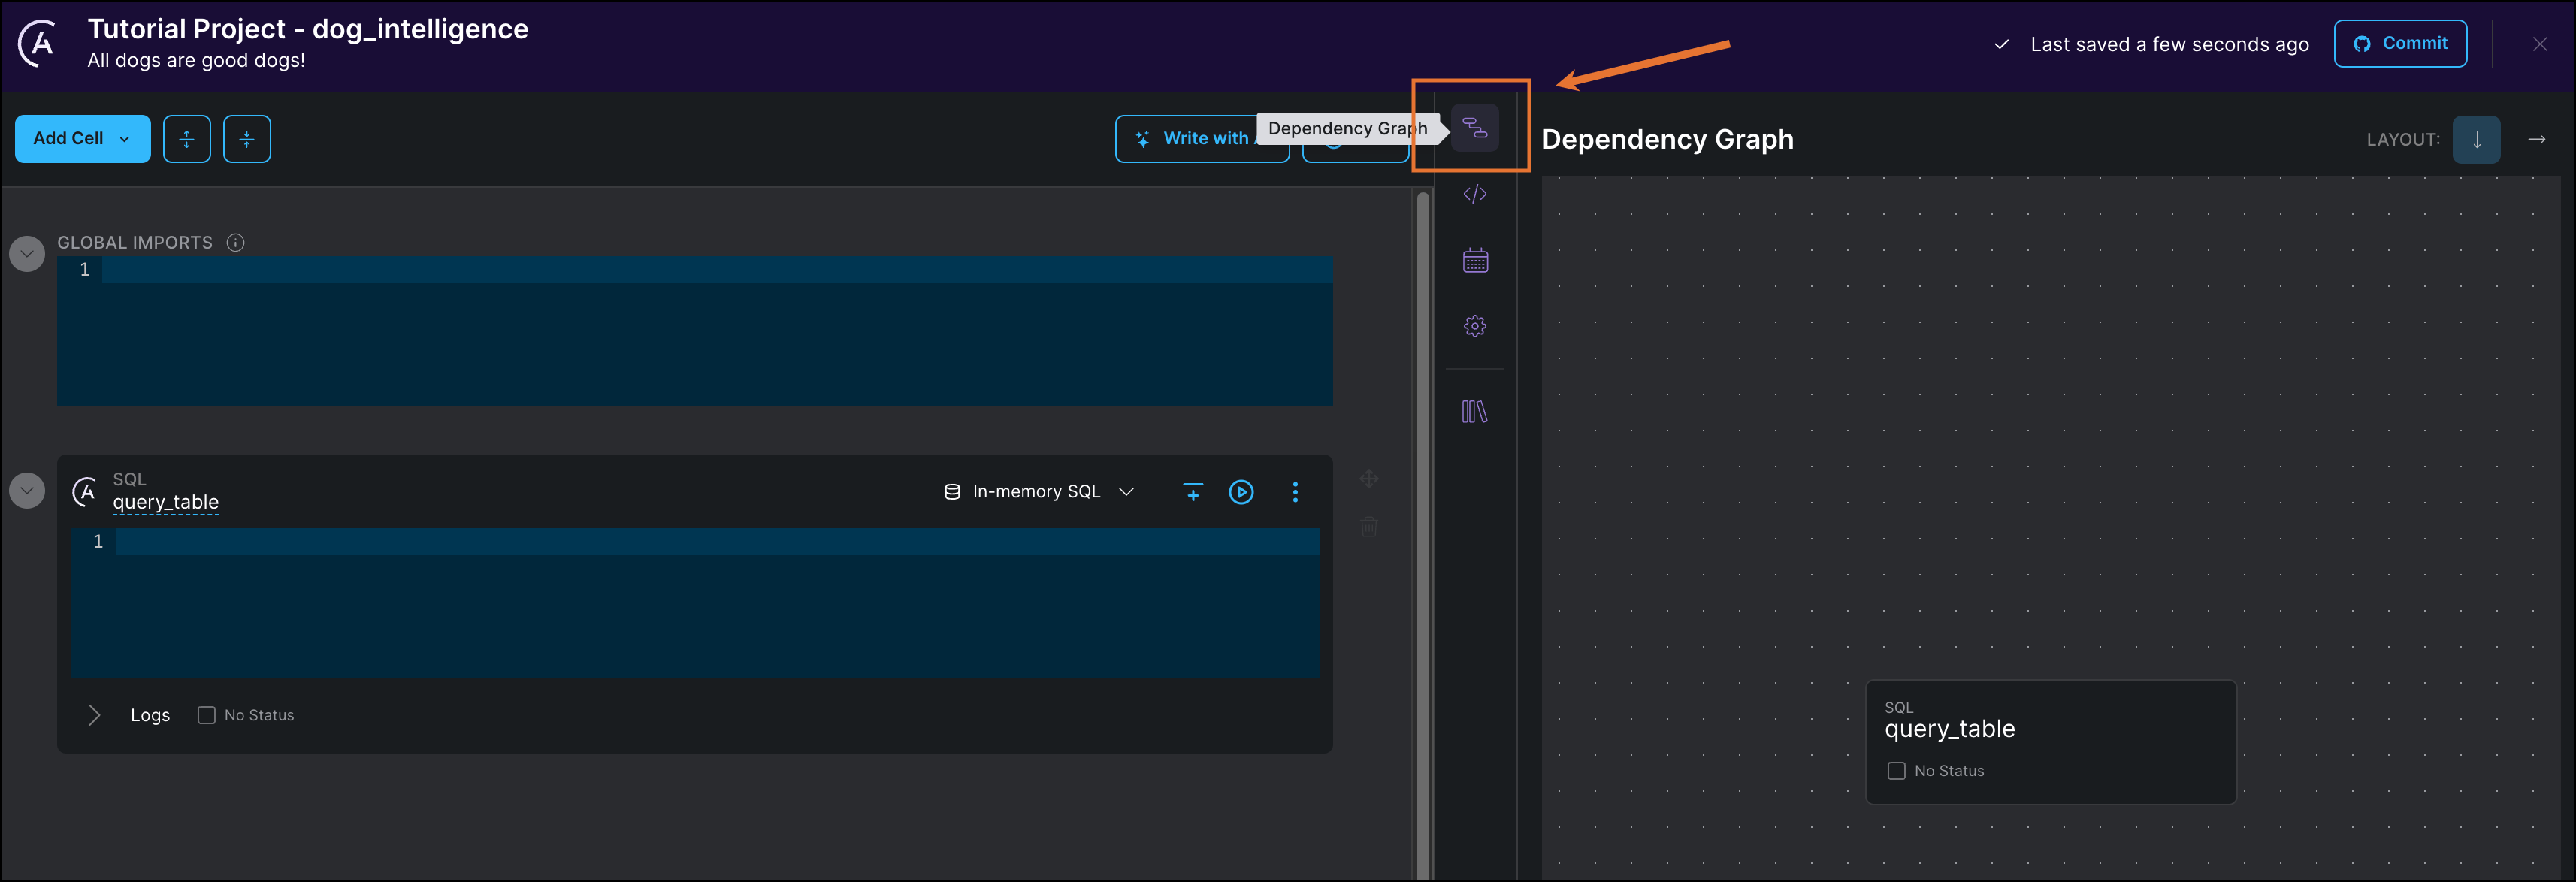 4. Paste the following SQL code into your cell. This query selects all records that don't contain any `NULL` values in any column. Make sure to update the query with your database and schema name.
```sql wrap theme={null}
SELECT * FROM ..DOG_INTELLIGENCE
WHERE CONCAT(BREED, HEIGHT_LOW_INCHES, HEIGHT_HIGH_INCHES, WEIGHT_LOW_LBS,
WEIGHT_HIGH_LBS, REPS_UPPER, REPS_LOWER) IS NOT NULL
```
5. (Optional) If you want to use your external database, add your connection to the cell as shown in the following screenshot. If you are using the in memory database, you can skip this step.
4. Paste the following SQL code into your cell. This query selects all records that don't contain any `NULL` values in any column. Make sure to update the query with your database and schema name.
```sql wrap theme={null}
SELECT * FROM ..DOG_INTELLIGENCE
WHERE CONCAT(BREED, HEIGHT_LOW_INCHES, HEIGHT_HIGH_INCHES, WEIGHT_LOW_LBS,
WEIGHT_HIGH_LBS, REPS_UPPER, REPS_LOWER) IS NOT NULL
```
5. (Optional) If you want to use your external database, add your connection to the cell as shown in the following screenshot. If you are using the in memory database, you can skip this step.
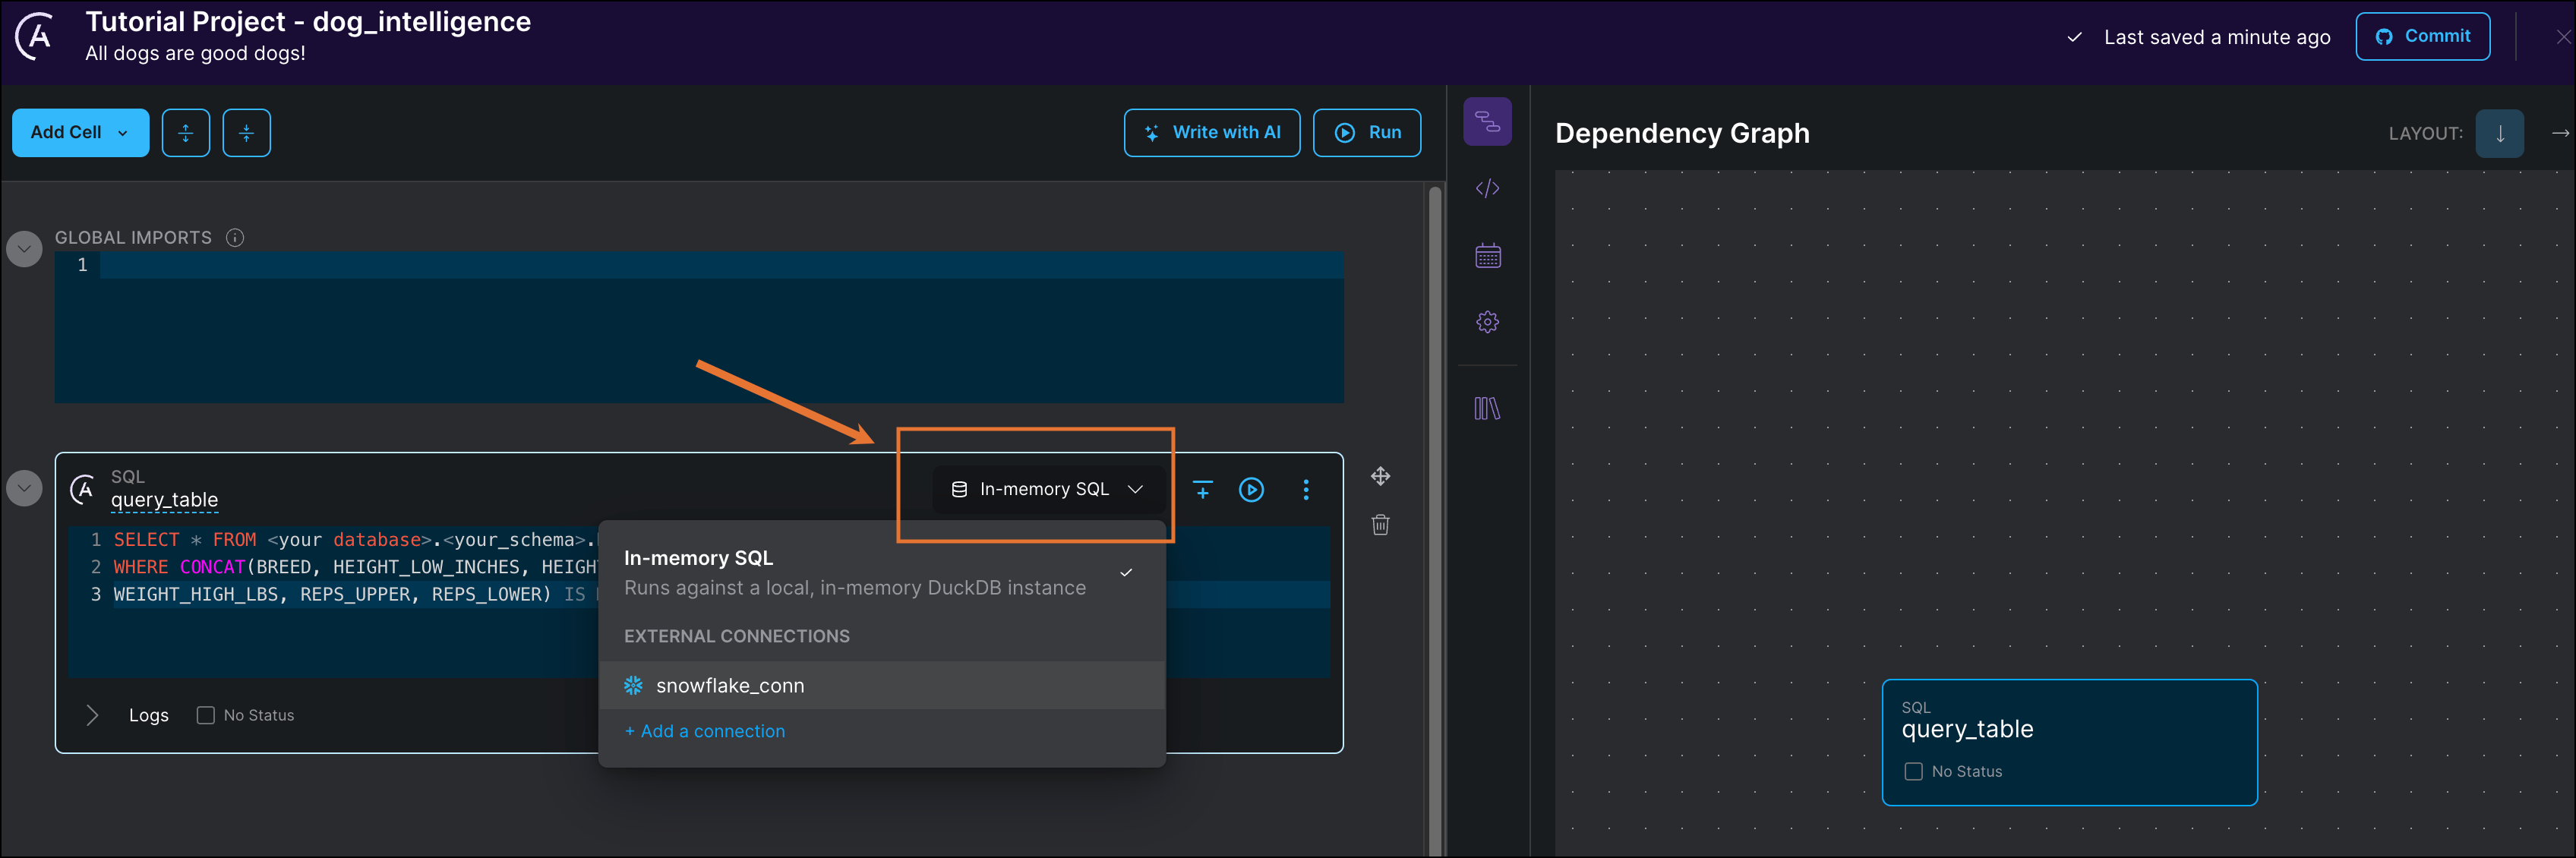 6. Run the cell by clicking the play button next to the connection.
7. Below the cell, you can see the first 10 rows of the output.
6. Run the cell by clicking the play button next to the connection.
7. Below the cell, you can see the first 10 rows of the output.
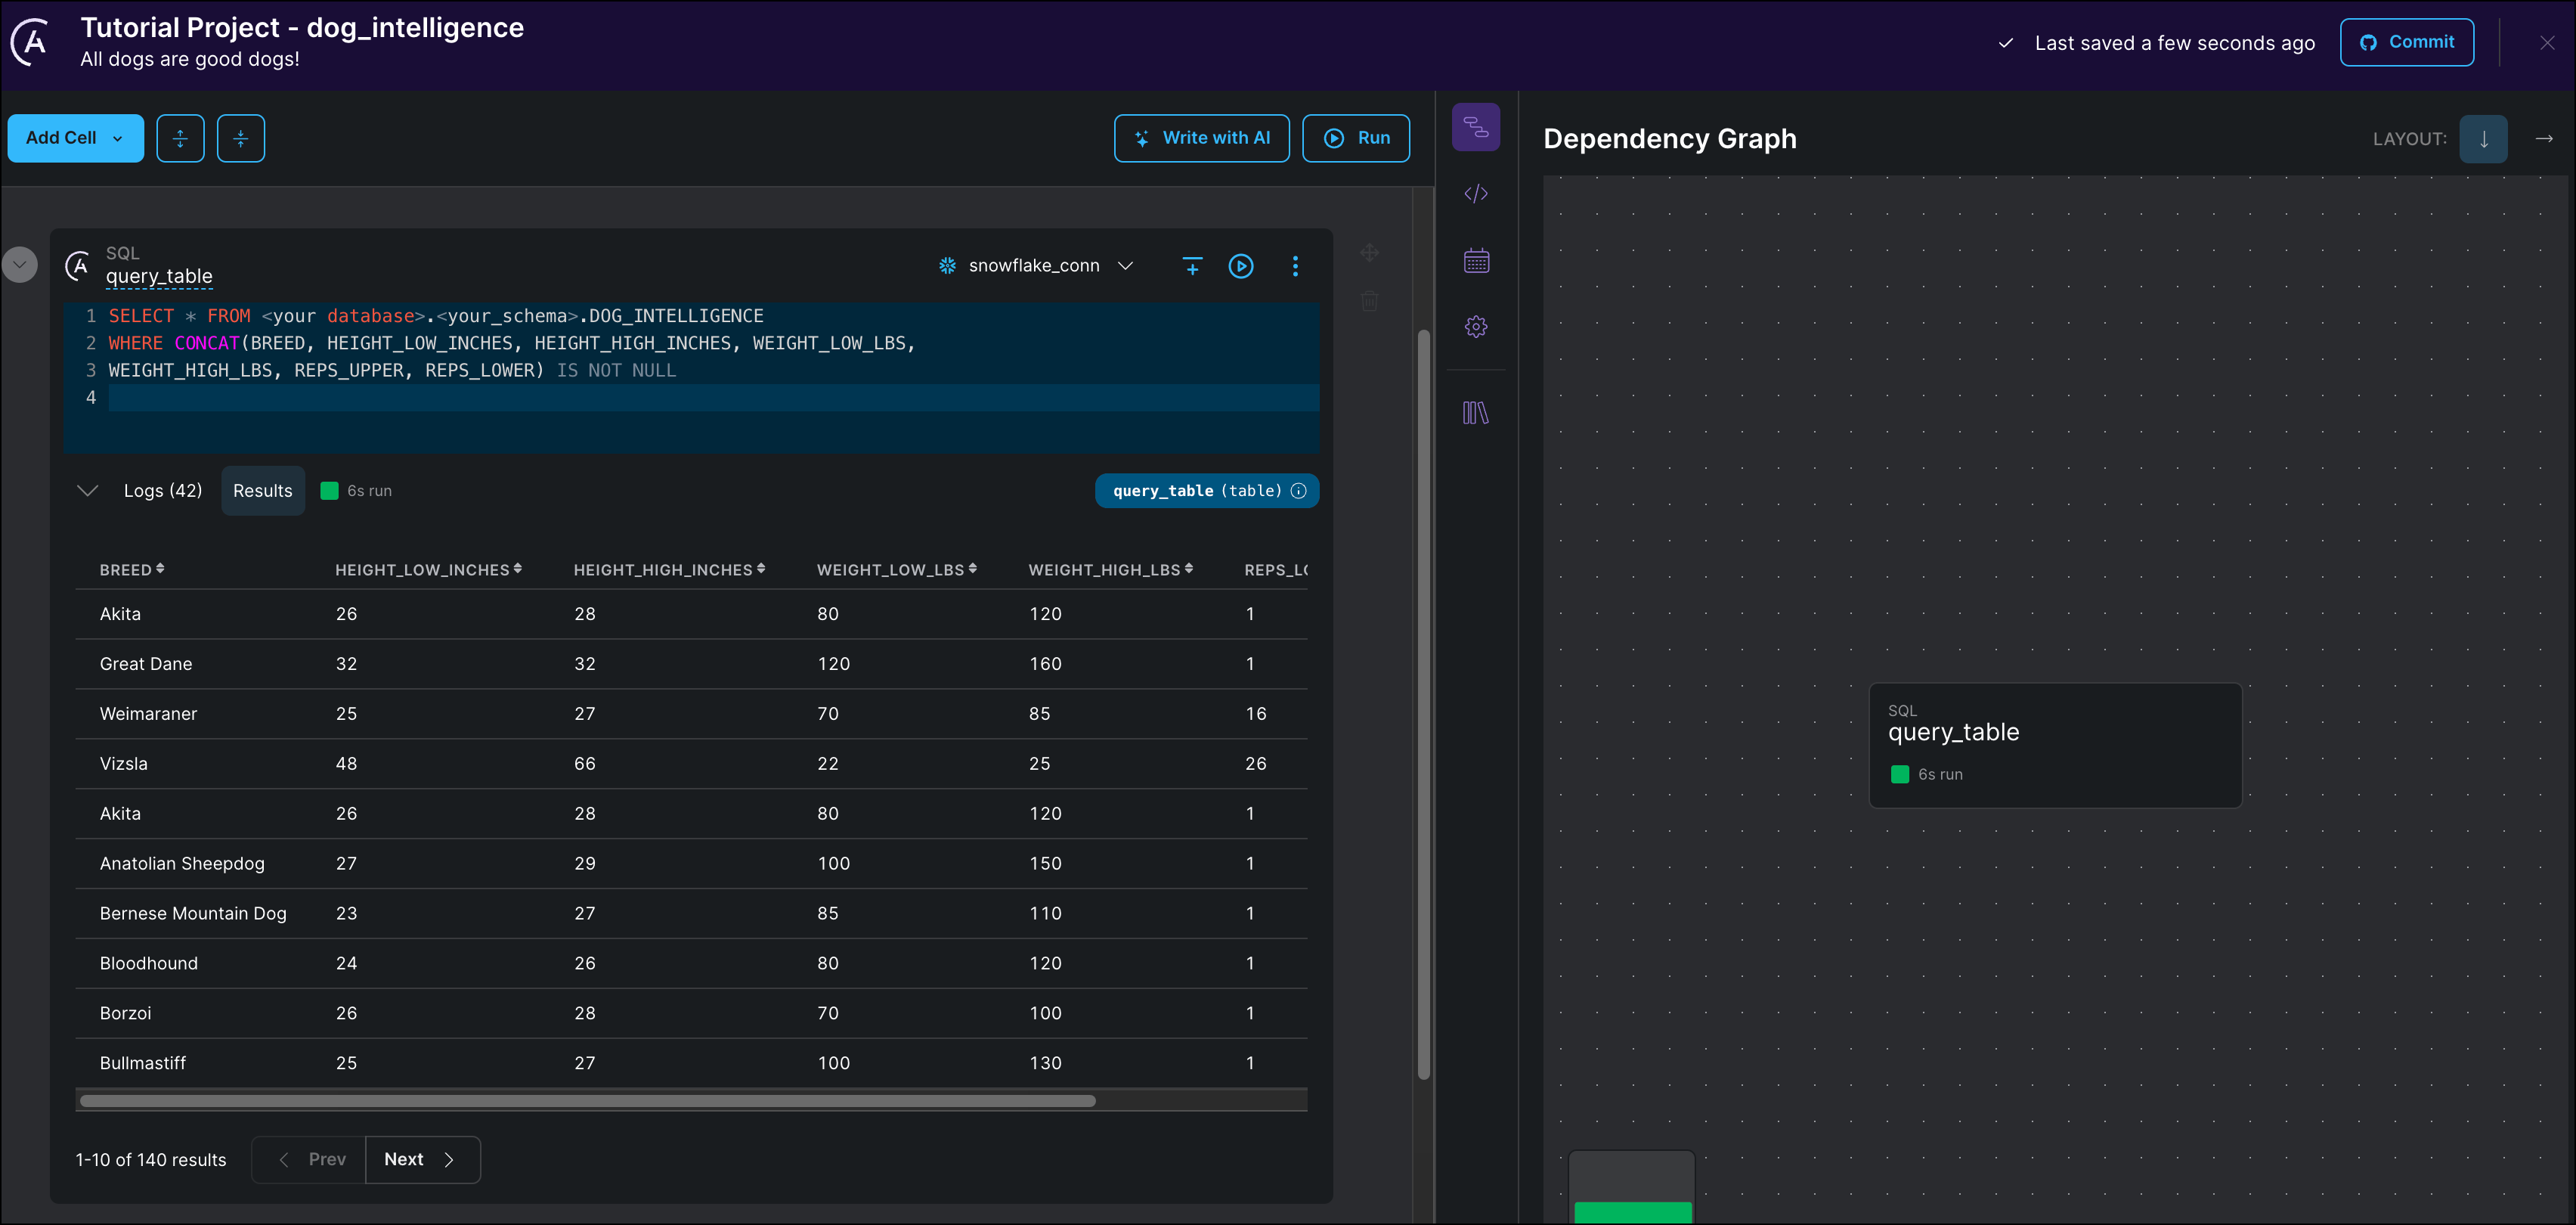 The dataset has 7 columns containing information about the height, weight, breed, and learning speed of different dogs. The `reps_lower` and `reps_higher` columns contain the lower and upper bounds of how many repetitions of a new command each breed of dog needed to learn it. This value is used to sort the dogs into two categories which will be the target of your classification model. The predictors will be the four columns containing height and weight information.
## Step 7: Transform your table
Before you can train the model, you first need to transform the data in your table to convert the command repetitions to a binary intelligence category.
1. Create a second SQL cell.
2. Rename the cell from `sql_1` to `transform_table`.
3. Select the same connection as in your `query_table` cell.
4. Copy the following SQL statement into the cell:
```sql wrap theme={null}
SELECT HEIGHT_LOW_INCHES, HEIGHT_HIGH_INCHES, WEIGHT_LOW_LBS, WEIGHT_HIGH_LBS,
CASE WHEN reps_upper <= 25 THEN 'very_smart_dog'
ELSE 'smart_dog'
END AS INTELLIGENCE_CATEGORY
FROM {{query_table}}
```
Notice that after you create this cell, the Astro Cloud IDE automatically creates a dependency between `query_table` and `transform_table` in the pipeline view. This happens because the SQL statement in `transform_table` references the temporary table created by the `query_table` task using the Jinja syntax `{{query_table}}`.
The dataset has 7 columns containing information about the height, weight, breed, and learning speed of different dogs. The `reps_lower` and `reps_higher` columns contain the lower and upper bounds of how many repetitions of a new command each breed of dog needed to learn it. This value is used to sort the dogs into two categories which will be the target of your classification model. The predictors will be the four columns containing height and weight information.
## Step 7: Transform your table
Before you can train the model, you first need to transform the data in your table to convert the command repetitions to a binary intelligence category.
1. Create a second SQL cell.
2. Rename the cell from `sql_1` to `transform_table`.
3. Select the same connection as in your `query_table` cell.
4. Copy the following SQL statement into the cell:
```sql wrap theme={null}
SELECT HEIGHT_LOW_INCHES, HEIGHT_HIGH_INCHES, WEIGHT_LOW_LBS, WEIGHT_HIGH_LBS,
CASE WHEN reps_upper <= 25 THEN 'very_smart_dog'
ELSE 'smart_dog'
END AS INTELLIGENCE_CATEGORY
FROM {{query_table}}
```
Notice that after you create this cell, the Astro Cloud IDE automatically creates a dependency between `query_table` and `transform_table` in the pipeline view. This happens because the SQL statement in `transform_table` references the temporary table created by the `query_table` task using the Jinja syntax `{{query_table}}`.
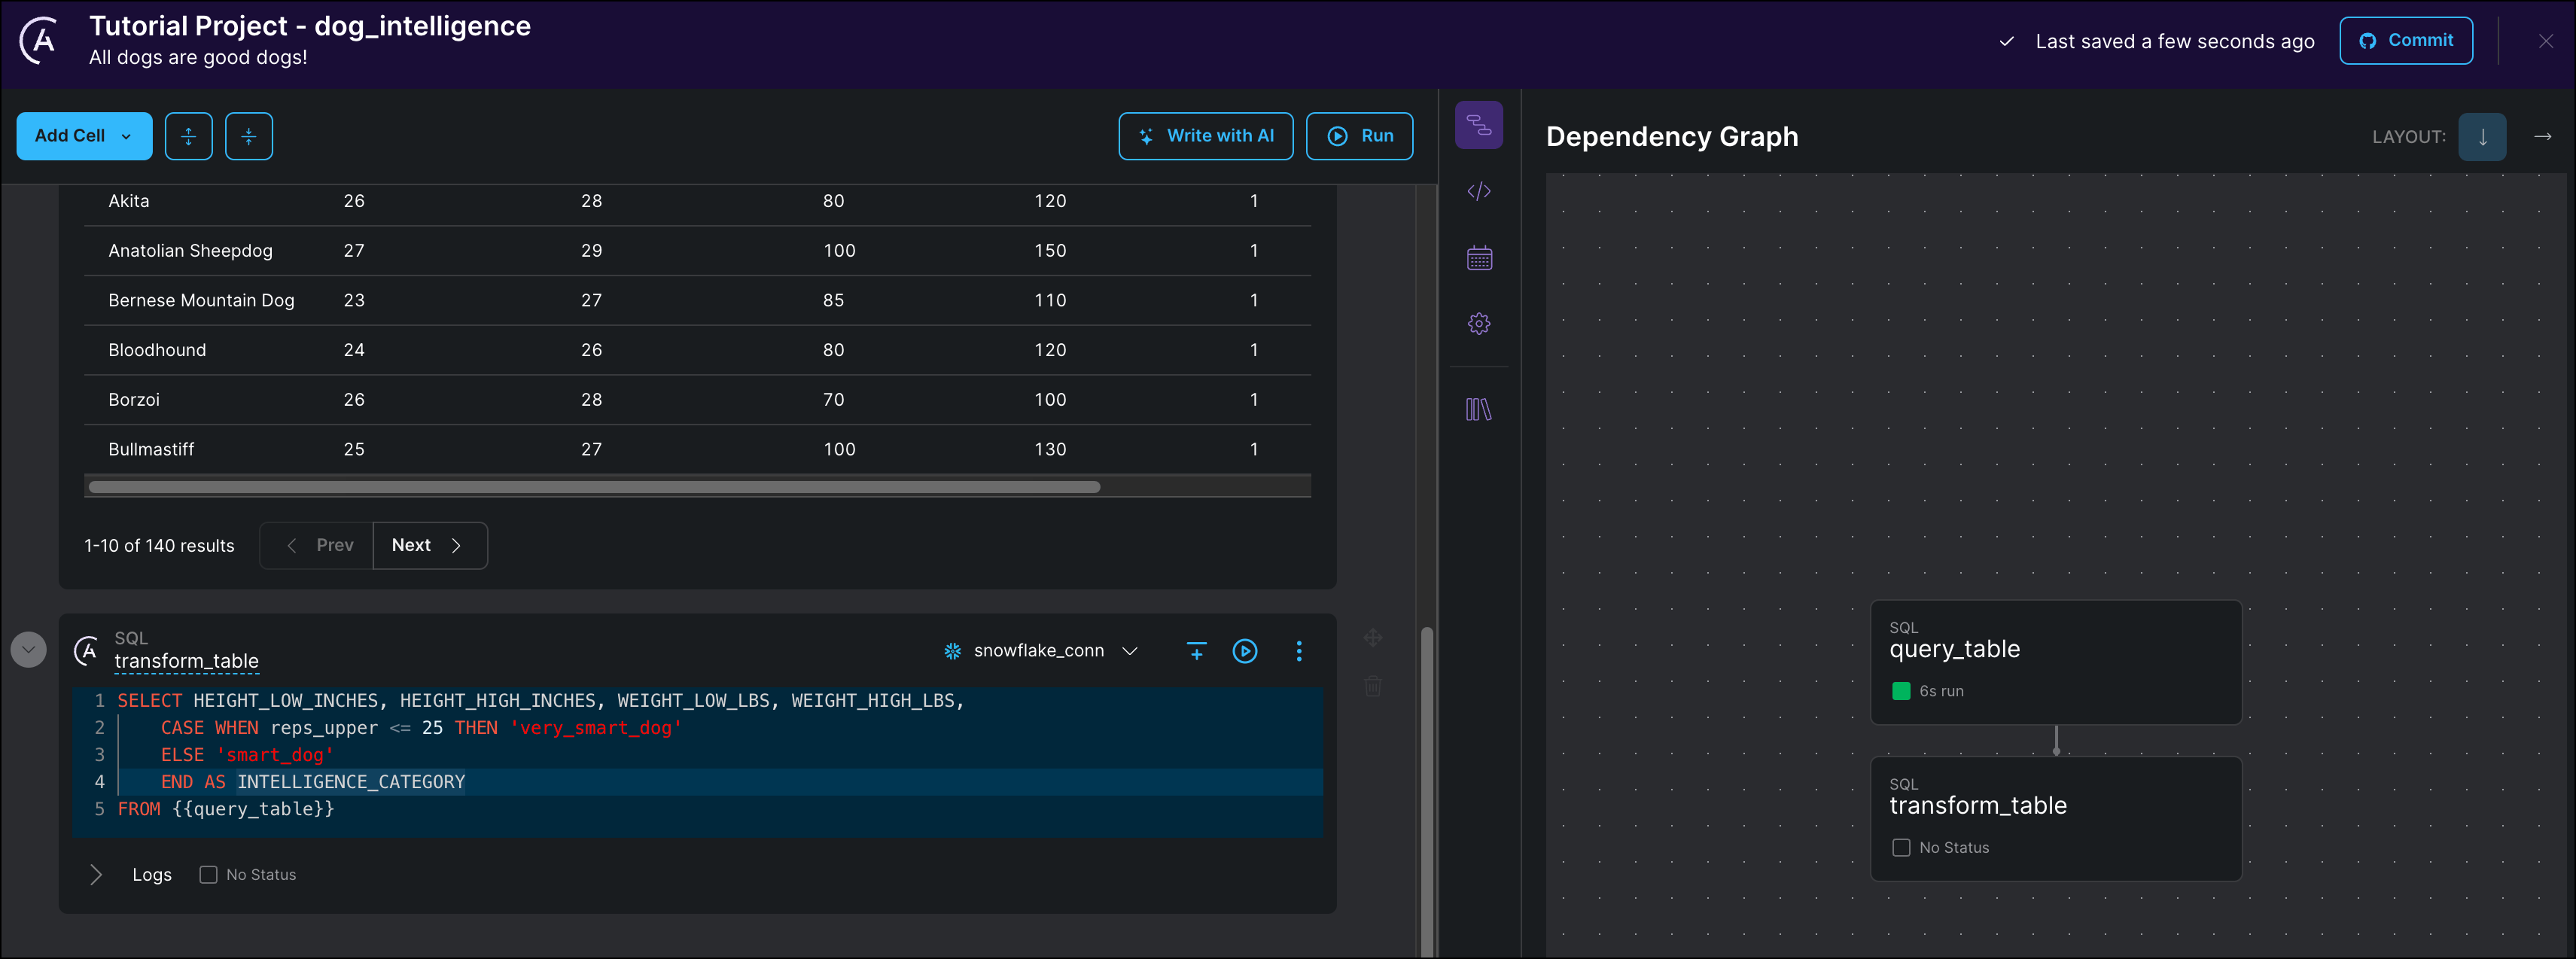 5. Run the cell.
The output table should contain a new binary `INTELLIGENCE_CATEGORY` column which will be used as a target for your classification model. All dogs who needed 25 or fewer repetitions to learn a new command are put in the `very_smart_dog` category. All other dogs are put in the `smart_dog` category (because, of course, all dogs are smart).
## Step 8: Train a model on your data
Train a random forest model to predict the dog intelligence category of a breed based on height and weight information.
1. Create a new Python cell by clicking **Add Cell** and selecting **Python**.
2. Rename the cell from `python_1` to `model_task`.
3. Copy the following Python code into your cell:
```python expandable wrap theme={null}
from sklearn.model_selection import train_test_split
from sklearn.preprocessing import StandardScaler
from sklearn.ensemble import RandomForestClassifier
# use the table returned from the transform_table cell
df = transform_table
# calculate baseline accuracy
baseline_accuracy = df.iloc[:,-1].value_counts(normalize=True)[0]
# selecting predictors (X) and the target (y)
X = df.iloc[:,:-1]
y = df.iloc[:,-1]
# split the data into training data (80%) and testing data (20%)
X_train, X_test, y_train, y_test = train_test_split(
X, y, test_size=0.20, random_state=23
)
# standardize features
scaler = StandardScaler()
X_train_s = scaler.fit_transform(X_train)
X_test_s = scaler.transform(X_test)
# train a RandomForestClassifier on the training data
model = RandomForestClassifier(max_depth=3, random_state=19)
model.fit(X_train_s, y_train)
# score the trained model on the testing data
score = model.score(X_test_s, y_test)
# get feature importances
feature_importances = list(zip(X_train.columns, model.feature_importances_))
return f"""
baseline accuracy: {baseline_accuracy},\n
model accuracy: {score},\n
feature importances: {feature_importances}
"""
```
You will notice again how the Astro Cloud IDE will automatically create a dependency between the `transform_table` task and the `model_task` task. The Python code above references the `transform_table` object returned from the `transform_table` cell directly (without Jinja syntax) on line 6.
The Python code completes the following steps:
* Import necessary functions and classes from the `scikit-learn` package.
* Calculate the baseline accuracy, which is the accuracy you would get if you always guessed the most common outcome (in our data `smart_dog`).
* Separate out predictors (height and weight information) and the target (the intelligence category).
* Split the data into a training and testing set.
* Standardize the predicting features.
* Train a [RandomForestClassifier model](https://scikit-learn.org/stable/modules/ensemble.html#forest) on the training data.
* Score the trained model on the testing data.
4. Run the cell.
The output of the cell shows you both the baseline and the model accuracy. With the model accuracy being higher than baseline, you can conclude that height and weight of dogs have a correlation (but not necessarily causation!) with how many repetitions they need to learn a new command.
5. Run the cell.
The output table should contain a new binary `INTELLIGENCE_CATEGORY` column which will be used as a target for your classification model. All dogs who needed 25 or fewer repetitions to learn a new command are put in the `very_smart_dog` category. All other dogs are put in the `smart_dog` category (because, of course, all dogs are smart).
## Step 8: Train a model on your data
Train a random forest model to predict the dog intelligence category of a breed based on height and weight information.
1. Create a new Python cell by clicking **Add Cell** and selecting **Python**.
2. Rename the cell from `python_1` to `model_task`.
3. Copy the following Python code into your cell:
```python expandable wrap theme={null}
from sklearn.model_selection import train_test_split
from sklearn.preprocessing import StandardScaler
from sklearn.ensemble import RandomForestClassifier
# use the table returned from the transform_table cell
df = transform_table
# calculate baseline accuracy
baseline_accuracy = df.iloc[:,-1].value_counts(normalize=True)[0]
# selecting predictors (X) and the target (y)
X = df.iloc[:,:-1]
y = df.iloc[:,-1]
# split the data into training data (80%) and testing data (20%)
X_train, X_test, y_train, y_test = train_test_split(
X, y, test_size=0.20, random_state=23
)
# standardize features
scaler = StandardScaler()
X_train_s = scaler.fit_transform(X_train)
X_test_s = scaler.transform(X_test)
# train a RandomForestClassifier on the training data
model = RandomForestClassifier(max_depth=3, random_state=19)
model.fit(X_train_s, y_train)
# score the trained model on the testing data
score = model.score(X_test_s, y_test)
# get feature importances
feature_importances = list(zip(X_train.columns, model.feature_importances_))
return f"""
baseline accuracy: {baseline_accuracy},\n
model accuracy: {score},\n
feature importances: {feature_importances}
"""
```
You will notice again how the Astro Cloud IDE will automatically create a dependency between the `transform_table` task and the `model_task` task. The Python code above references the `transform_table` object returned from the `transform_table` cell directly (without Jinja syntax) on line 6.
The Python code completes the following steps:
* Import necessary functions and classes from the `scikit-learn` package.
* Calculate the baseline accuracy, which is the accuracy you would get if you always guessed the most common outcome (in our data `smart_dog`).
* Separate out predictors (height and weight information) and the target (the intelligence category).
* Split the data into a training and testing set.
* Standardize the predicting features.
* Train a [RandomForestClassifier model](https://scikit-learn.org/stable/modules/ensemble.html#forest) on the training data.
* Score the trained model on the testing data.
4. Run the cell.
The output of the cell shows you both the baseline and the model accuracy. With the model accuracy being higher than baseline, you can conclude that height and weight of dogs have a correlation (but not necessarily causation!) with how many repetitions they need to learn a new command.
![Output of the train model task showing baseline accuracy: 0.54, model accuracy: 0.93, feature importances: [('height_low_inches', 0.11), ('height_high_inches', 0.23), ('weight_low_lbs', 0.32), ('weight_high_lbs', 0.34)]](https://mintcdn.com/astronomer/VJ8or-0DggGTeulp/images/img/tutorials/cloud-ide-tutorial_train_task_output.png?fit=max&auto=format&n=VJ8or-0DggGTeulp&q=85&s=bb2c9cb33f8afb04b9c5556e6e7884e4) The feature importances give you an idea which of the predictor columns were most important in the model to predict the intelligence category. The `weight_low_lbs`, the lower end of the weights of the dogs examined for a breed, gave the most information to the model for our small dataset.
To learn more about random forests check out this [MLU explain article](https://mlu-explain.github.io/random-forest/).
## Step 9: Pick a schedule for your pipeline
Setting a schedule for your pipeline will determine how this pipeline will be scheduled once it is deployed to Astro as a DAG. Within the Astro Cloud IDE a pipeline will only run if you start a run manually.
1. Click **Schedule** to see your DAG's current schedule.
2. Set **START DATE** to yesterday's date.
The feature importances give you an idea which of the predictor columns were most important in the model to predict the intelligence category. The `weight_low_lbs`, the lower end of the weights of the dogs examined for a breed, gave the most information to the model for our small dataset.
To learn more about random forests check out this [MLU explain article](https://mlu-explain.github.io/random-forest/).
## Step 9: Pick a schedule for your pipeline
Setting a schedule for your pipeline will determine how this pipeline will be scheduled once it is deployed to Astro as a DAG. Within the Astro Cloud IDE a pipeline will only run if you start a run manually.
1. Click **Schedule** to see your DAG's current schedule.
2. Set **START DATE** to yesterday's date.
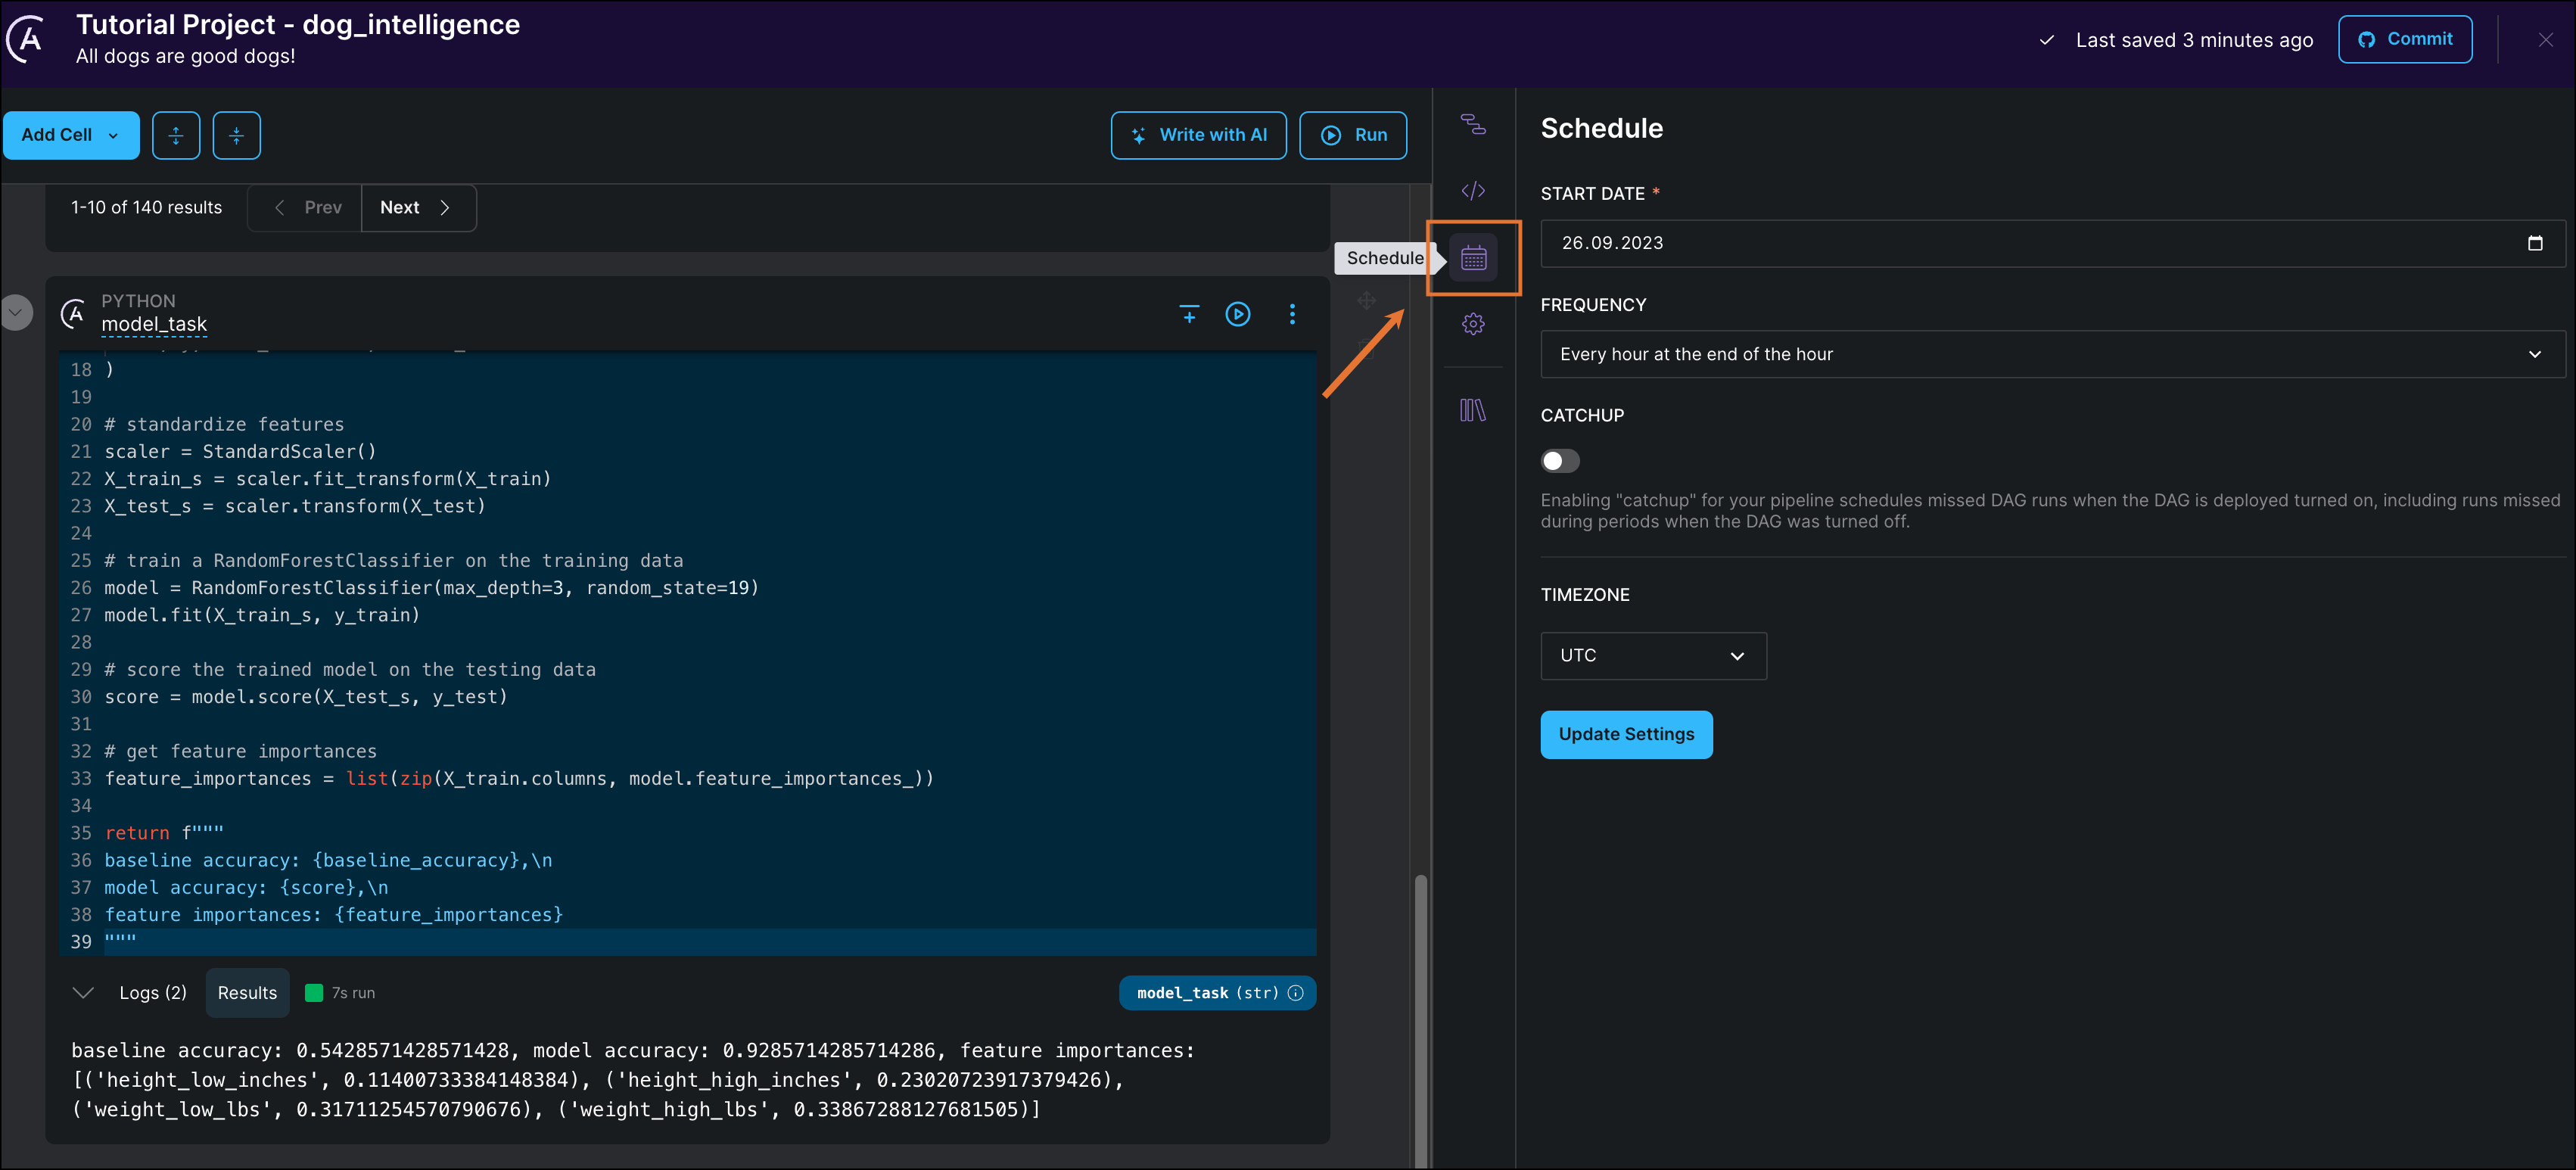 3. Edit **FREQUENCY** to schedule your DAG to run every day at midnight.
4. Click **Update Settings** to save your schedule.
## Step 10: View your DAG code
Through this tutorial, the Astro Cloud IDE was building a DAG based on the configurations you set in the Astro UI. Export your pipeline as DAG code to see the results of your work.
1. Click **Code**. You can see that your pipeline was automatically converted to DAG code using the [Astro SDK](https://astro-sdk-python.readthedocs.io/en/stable/).
3. Edit **FREQUENCY** to schedule your DAG to run every day at midnight.
4. Click **Update Settings** to save your schedule.
## Step 10: View your DAG code
Through this tutorial, the Astro Cloud IDE was building a DAG based on the configurations you set in the Astro UI. Export your pipeline as DAG code to see the results of your work.
1. Click **Code**. You can see that your pipeline was automatically converted to DAG code using the [Astro SDK](https://astro-sdk-python.readthedocs.io/en/stable/).
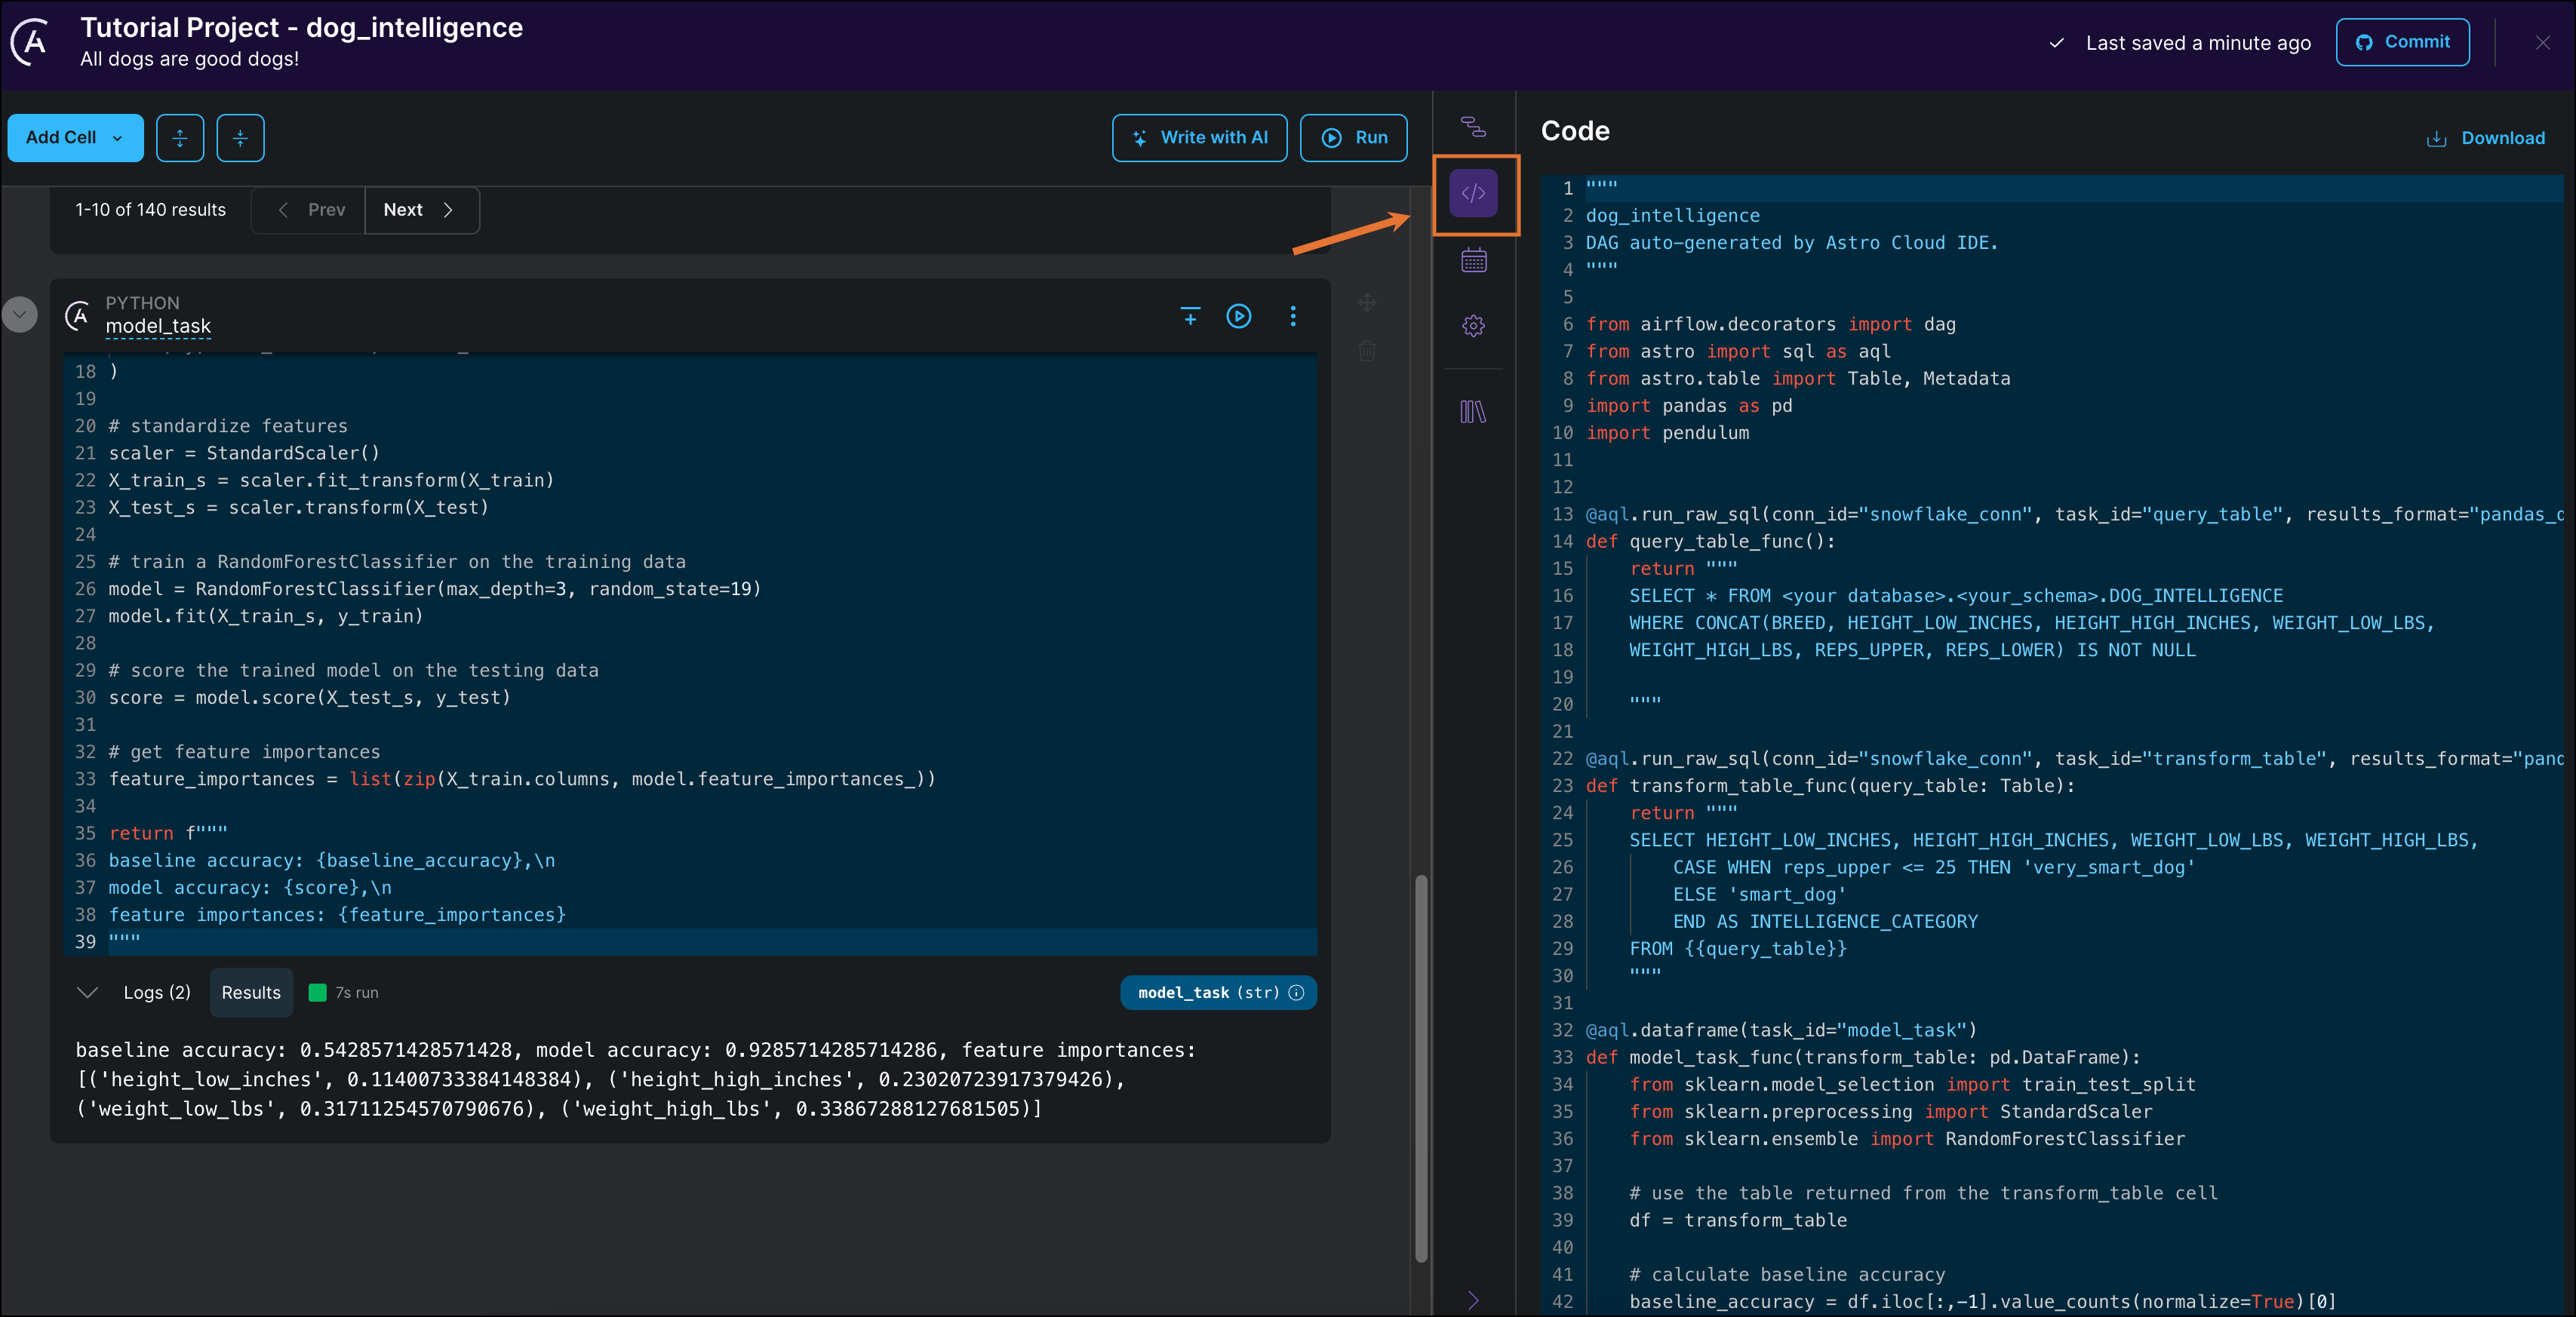 2. Click **Download** to download the DAG file.
## Step 11: (Optional) Connect your GitHub to the Astro Cloud IDE
Now that you have finished creating a pipeline, you can connect GitHub to the Astro Cloud IDE to deploy your DAG to any Airflow project.
1. Click **Commit** to connect your Astro Cloud IDE Project to your GitHub account. If this is your first time connecting this Cloud IDE project to GitHub you will be prompted to configure your GitHub connection. If you've already connected your Astro Cloud IDE project to GitHub, you can skip to [Step 12](#step-12-optional-commit-your-dag-to-github).
2. Click **Download** to download the DAG file.
## Step 11: (Optional) Connect your GitHub to the Astro Cloud IDE
Now that you have finished creating a pipeline, you can connect GitHub to the Astro Cloud IDE to deploy your DAG to any Airflow project.
1. Click **Commit** to connect your Astro Cloud IDE Project to your GitHub account. If this is your first time connecting this Cloud IDE project to GitHub you will be prompted to configure your GitHub connection. If you've already connected your Astro Cloud IDE project to GitHub, you can skip to [Step 12](#step-12-optional-commit-your-dag-to-github).
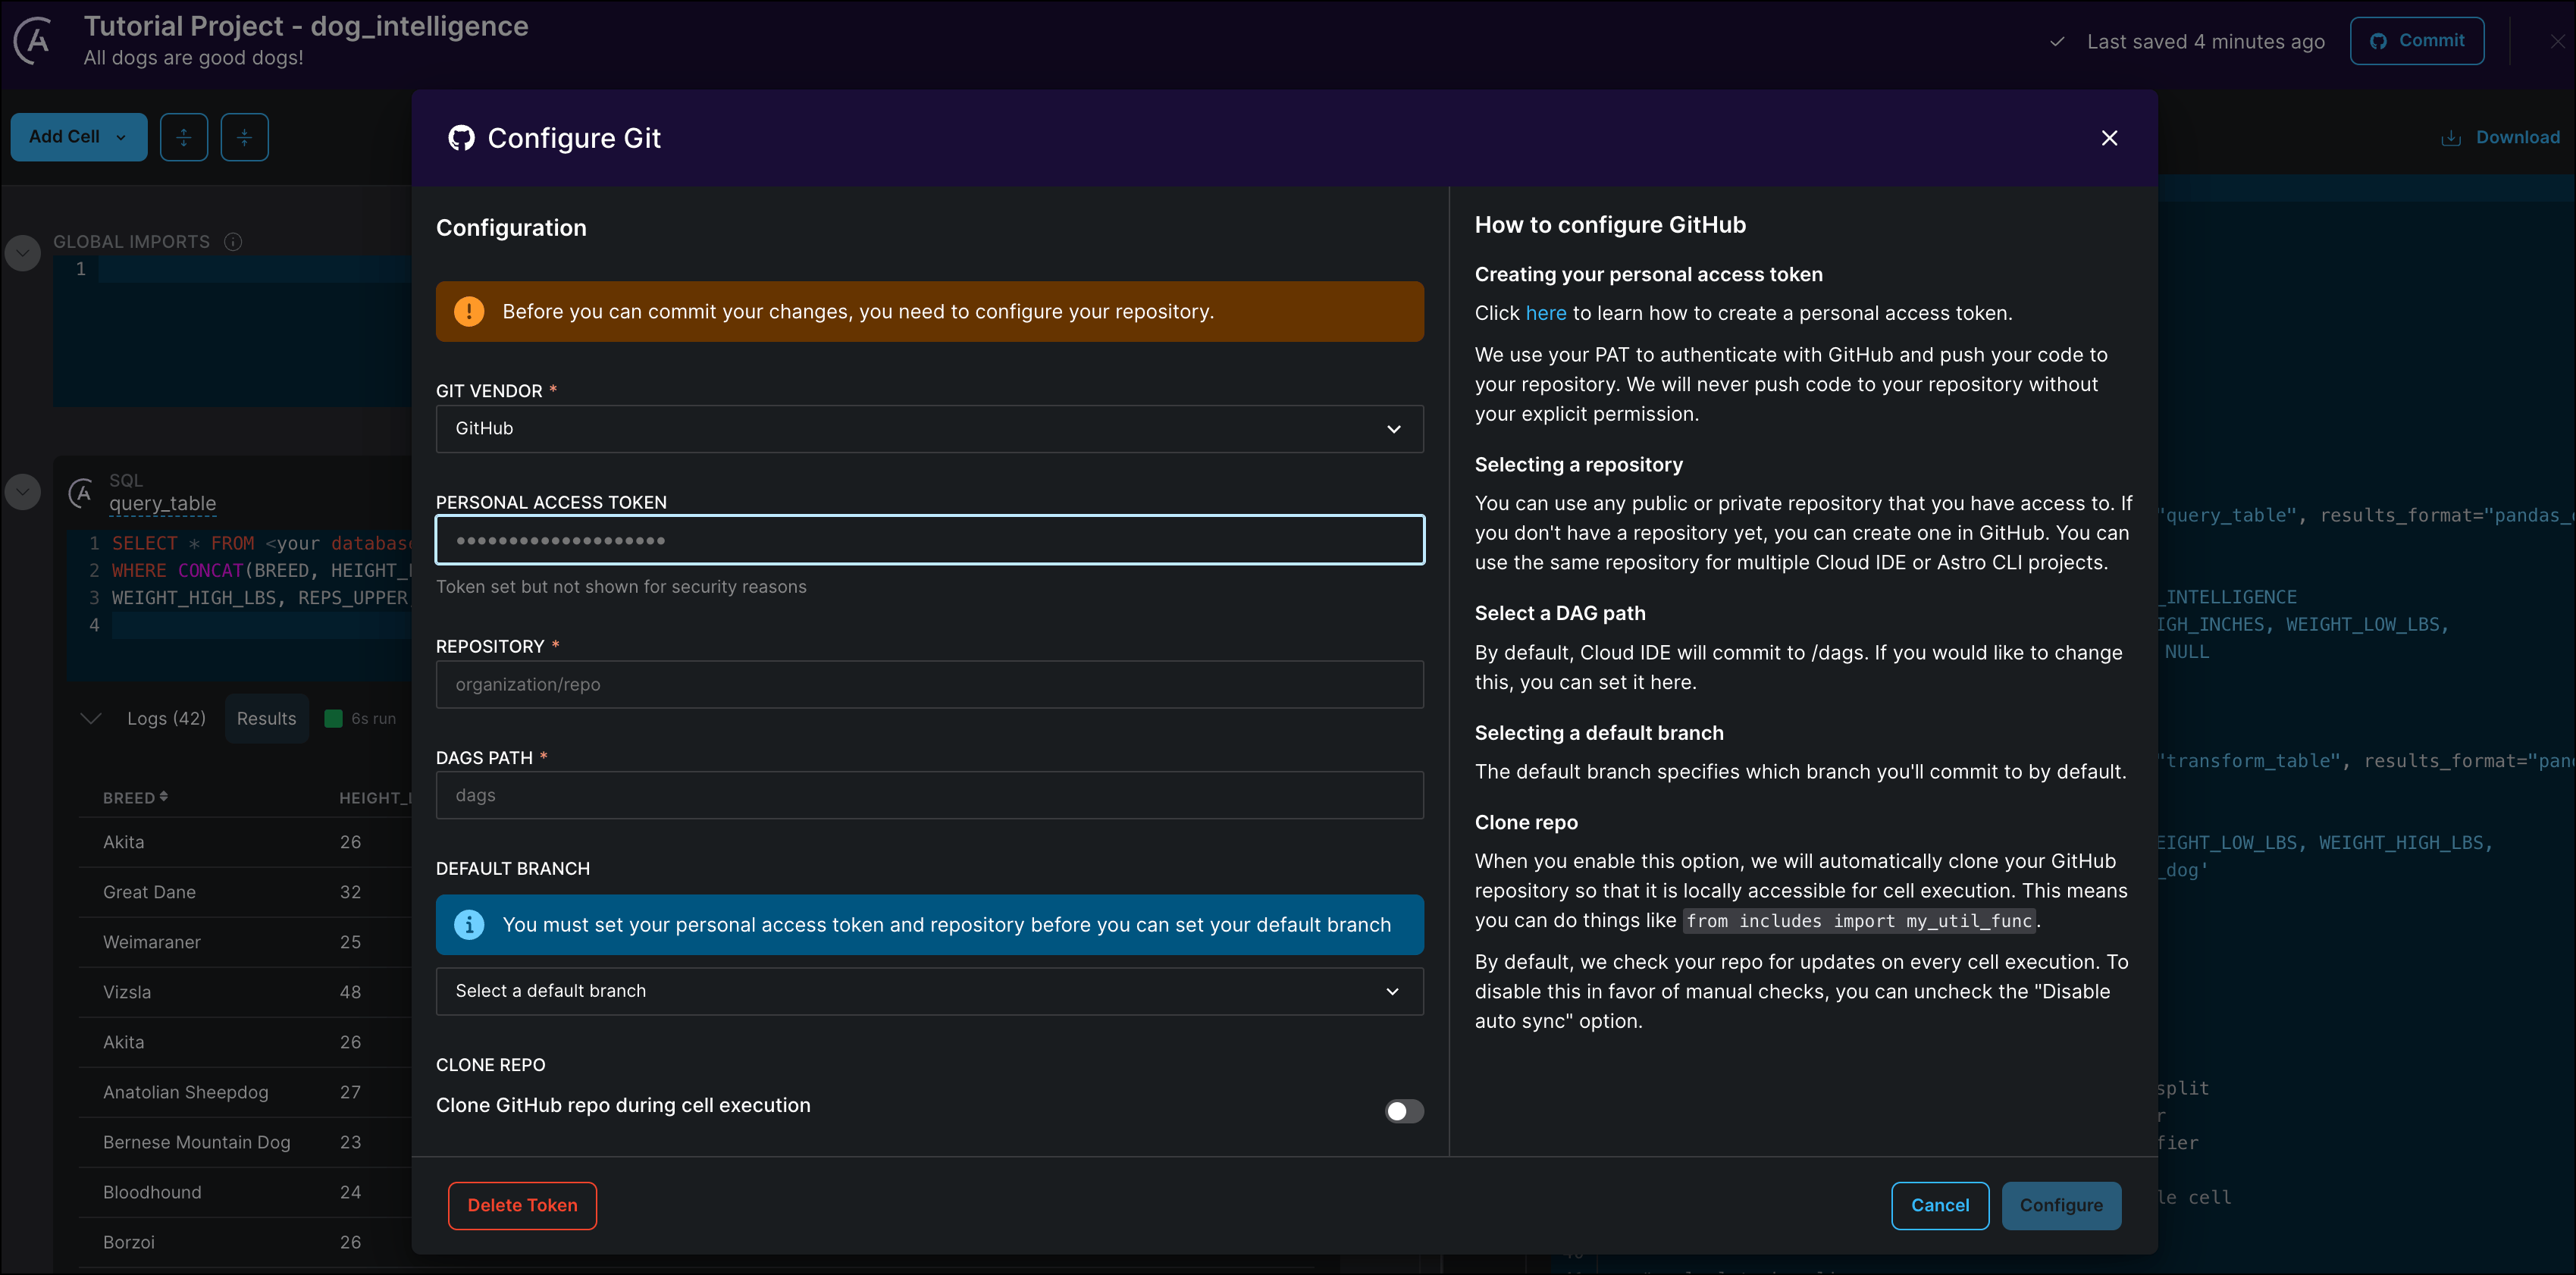 2. Enter your personal access token and the name of an existing GitHub repository that contains an Astro project.
3. Click **Configure** to save your connection details.
If you are writing pipelines that need access to additional files from your `include` directory in your GitHub repository, toggle `Clone GitHub repo during cell execution to` to `True`. See also the [Cloud IDE documentation](https://www.astronomer.io/docs/astro/cloud-ide/pass-data-between-cells#pass-external-data-to-cells).
## Step 12: (Optional) Commit your DAG to GitHub
Export your pipeline by committing it to your connected GitHub repository.
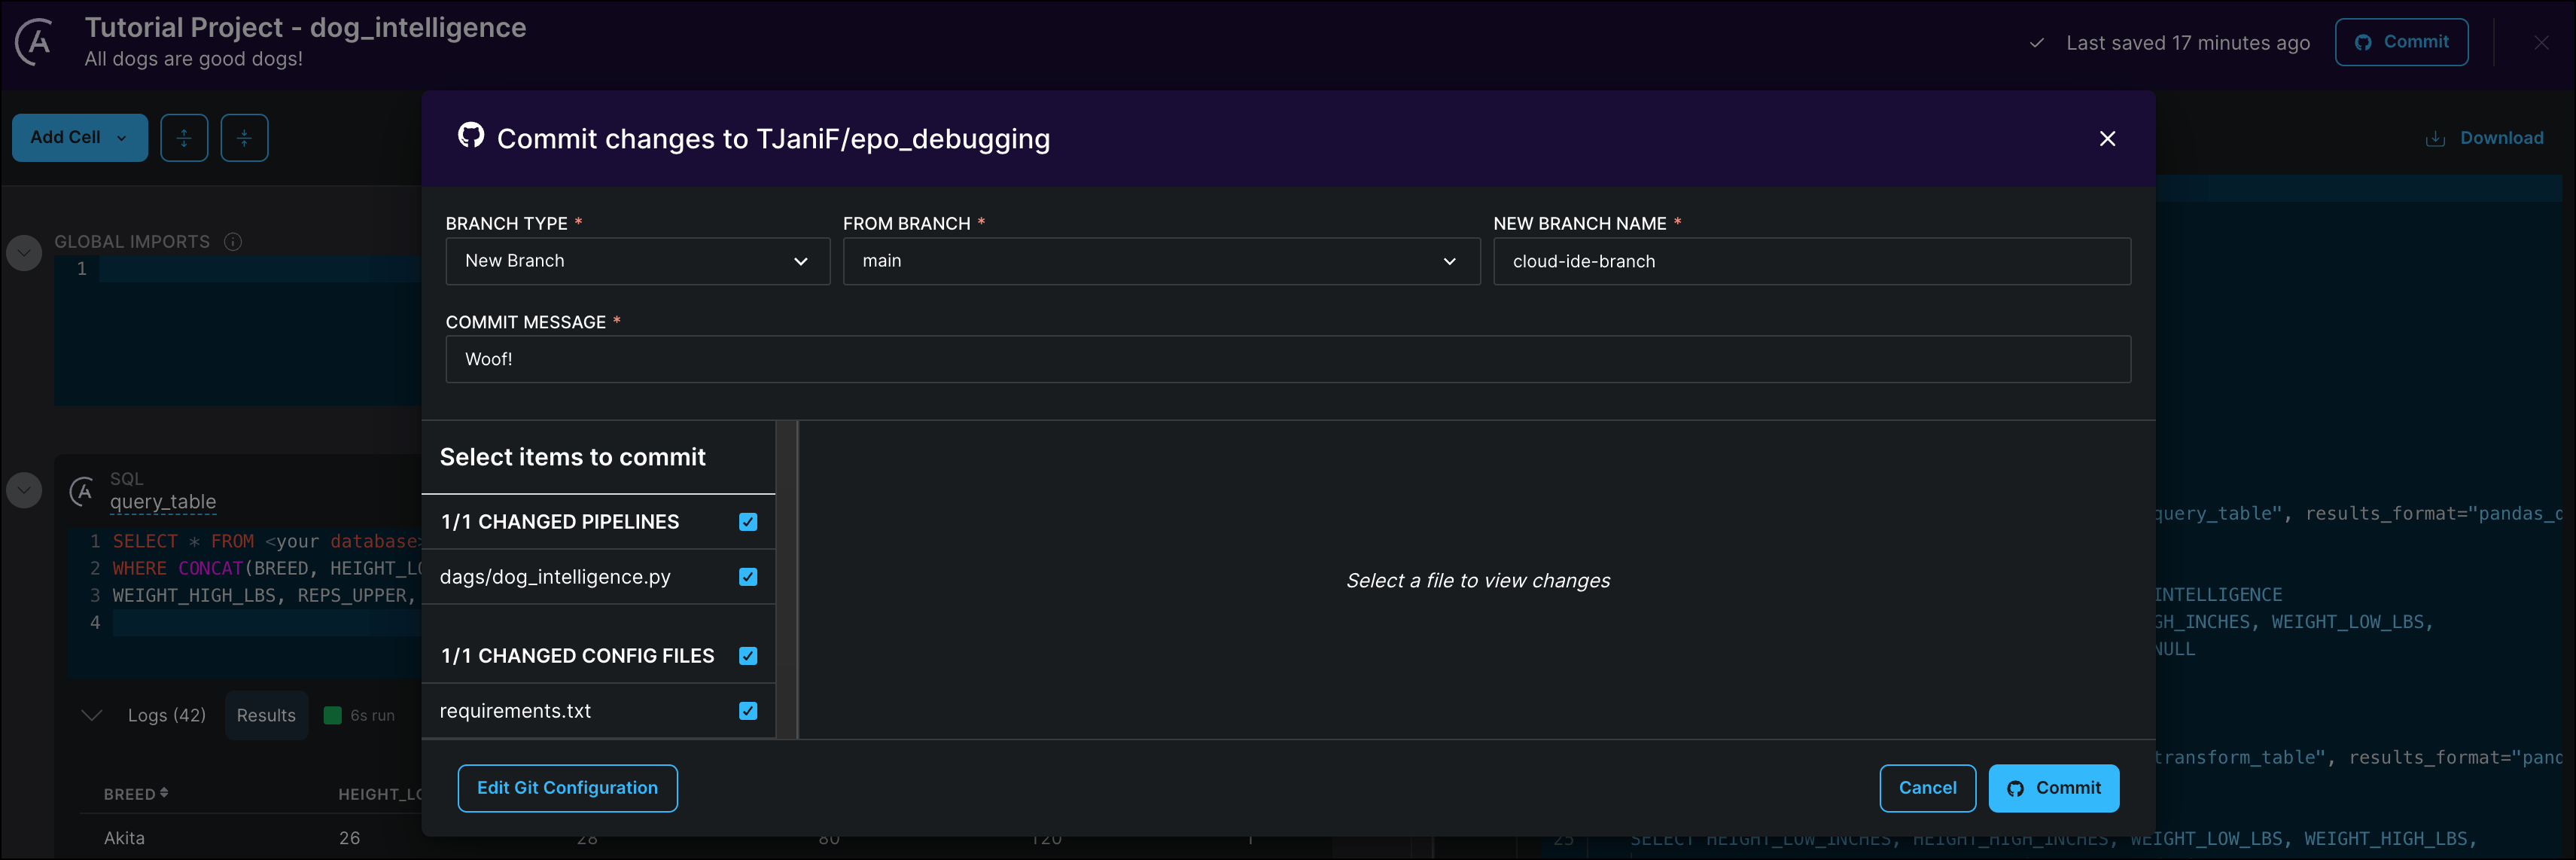
1. Click **Commit** to open the commit dialogue.
2. Select the **BRANCH TYPE** `New Branch` to create a new branch in your GitHub repository to commit the Cloud IDE DAG to. Specify which existing branch to branch off of in the **FROM BRANCH** field and give your new branch a name (for example, `cloud-ide-branch`).
2. Enter your personal access token and the name of an existing GitHub repository that contains an Astro project.
3. Click **Configure** to save your connection details.
If you are writing pipelines that need access to additional files from your `include` directory in your GitHub repository, toggle `Clone GitHub repo during cell execution to` to `True`. See also the [Cloud IDE documentation](https://www.astronomer.io/docs/astro/cloud-ide/pass-data-between-cells#pass-external-data-to-cells).
## Step 12: (Optional) Commit your DAG to GitHub
Export your pipeline by committing it to your connected GitHub repository.
1. Click **Commit** to open the commit dialogue.
2. Select the **BRANCH TYPE** `New Branch` to create a new branch in your GitHub repository to commit the Cloud IDE DAG to. Specify which existing branch to branch off of in the **FROM BRANCH** field and give your new branch a name (for example, `cloud-ide-branch`).
 If a file with the same name as your Astro Cloud IDE pipeline already exists in your GitHub repository, the Astro Cloud IDE overwrites the existing file. For this reason, Astronomer recommends using a separate branch for commits from your Astro Cloud IDE environment than for commits from other sources to the same repository.
2. Scroll through the list of changes and make sure that only changes are checked that you want to commit. The Astro Cloud IDE will offer to commit versions of Astro project configuration files if changes were made to them. Note that all pipeline changes in a given Astro Cloud IDE project will be listed to be selected for the commit, not only the changes to the pipeline you are currently editing.
Your DAG will be added to the `/dags` folder in your GitHub repository.
If a file with the same name as your Astro Cloud IDE pipeline already exists in your GitHub repository, the Astro Cloud IDE overwrites the existing file. For this reason, Astronomer recommends using a separate branch for commits from your Astro Cloud IDE environment than for commits from other sources to the same repository.
2. Scroll through the list of changes and make sure that only changes are checked that you want to commit. The Astro Cloud IDE will offer to commit versions of Astro project configuration files if changes were made to them. Note that all pipeline changes in a given Astro Cloud IDE project will be listed to be selected for the commit, not only the changes to the pipeline you are currently editing.
Your DAG will be added to the `/dags` folder in your GitHub repository.
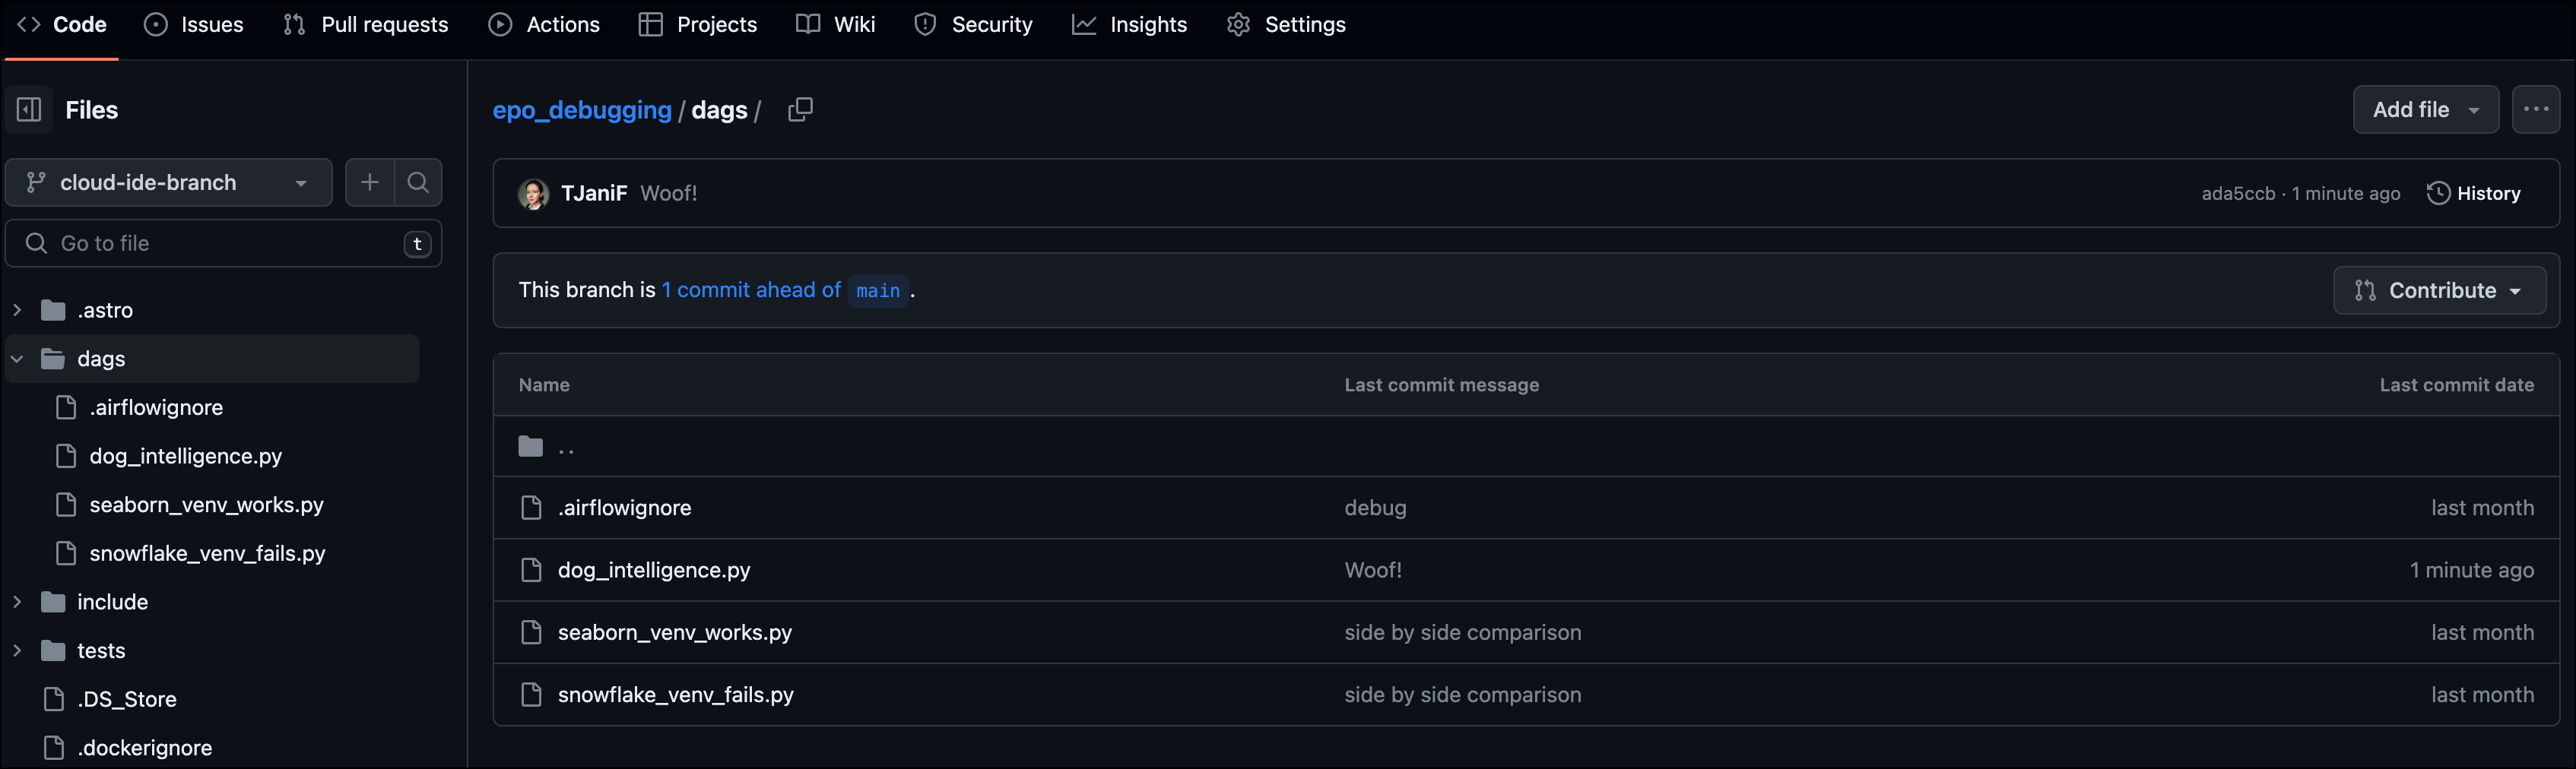 3. Create a pull request in GitHub from your dedicated Astro Cloud IDE branch to your development branch and merge the changes you want to add to your Astro Cloud environment.
## Step 13: (Optional) Deploy your DAG to Astro
Astro supports CI/CD with GitHub Actions. You can use GitHub Actions to deploy your DAG to Astro automatically when you commit changes to your DAG from within the Cloud IDE to a branch that is configured for CI/CD.
1. Follow the steps in the Astro documentation on setting up a [GitHub Actions workflow](/docs/astro/ci-cd-templates/github-actions-template) for your `cloud-ide-branch` branch.
2. Make a small change to your code, such as adding a comment in the `train_model` cell and commit the change. This second commit will trigger GitHub Actions again.
If GitHub Actions is already configured for your chosen branch and repository the new DAG will be deployed automatically with the first commit. Note that you might need to adjust your Astro Runtime version and the versions of your dependencies in your `requirements.txt` file to match the versions you are using in your Deployment, as well as adding the relevant [provider package](https://airflow.apache.org/registry/) for the database you chose.
Note that if you used the `In-memory SQL` connection in your Astro Cloud IDE project, you will have to change your pipeline to use a database connection in order to be able to run your DAG on Astro. See [Step 3](#step-3-optional-configure-a-connection) for instructions on how to configure a connection in the Astro Cloud IDE.
## Step 14: (Optional) Run your DAG on Astro
1. In the Astro UI, open your Deployment.
2. Click **Open Airflow**.
3. In the Airflow UI, configure a connection with the same values as your connection in the Astro Cloud IDE. See [Manage connections in Apache Airflow](/docs/learn/2.x/connections).
4. Go to **DAGs** and run your DAG by clicking the play button.
3. Create a pull request in GitHub from your dedicated Astro Cloud IDE branch to your development branch and merge the changes you want to add to your Astro Cloud environment.
## Step 13: (Optional) Deploy your DAG to Astro
Astro supports CI/CD with GitHub Actions. You can use GitHub Actions to deploy your DAG to Astro automatically when you commit changes to your DAG from within the Cloud IDE to a branch that is configured for CI/CD.
1. Follow the steps in the Astro documentation on setting up a [GitHub Actions workflow](/docs/astro/ci-cd-templates/github-actions-template) for your `cloud-ide-branch` branch.
2. Make a small change to your code, such as adding a comment in the `train_model` cell and commit the change. This second commit will trigger GitHub Actions again.
If GitHub Actions is already configured for your chosen branch and repository the new DAG will be deployed automatically with the first commit. Note that you might need to adjust your Astro Runtime version and the versions of your dependencies in your `requirements.txt` file to match the versions you are using in your Deployment, as well as adding the relevant [provider package](https://airflow.apache.org/registry/) for the database you chose.
Note that if you used the `In-memory SQL` connection in your Astro Cloud IDE project, you will have to change your pipeline to use a database connection in order to be able to run your DAG on Astro. See [Step 3](#step-3-optional-configure-a-connection) for instructions on how to configure a connection in the Astro Cloud IDE.
## Step 14: (Optional) Run your DAG on Astro
1. In the Astro UI, open your Deployment.
2. Click **Open Airflow**.
3. In the Airflow UI, configure a connection with the same values as your connection in the Astro Cloud IDE. See [Manage connections in Apache Airflow](/docs/learn/2.x/connections).
4. Go to **DAGs** and run your DAG by clicking the play button.
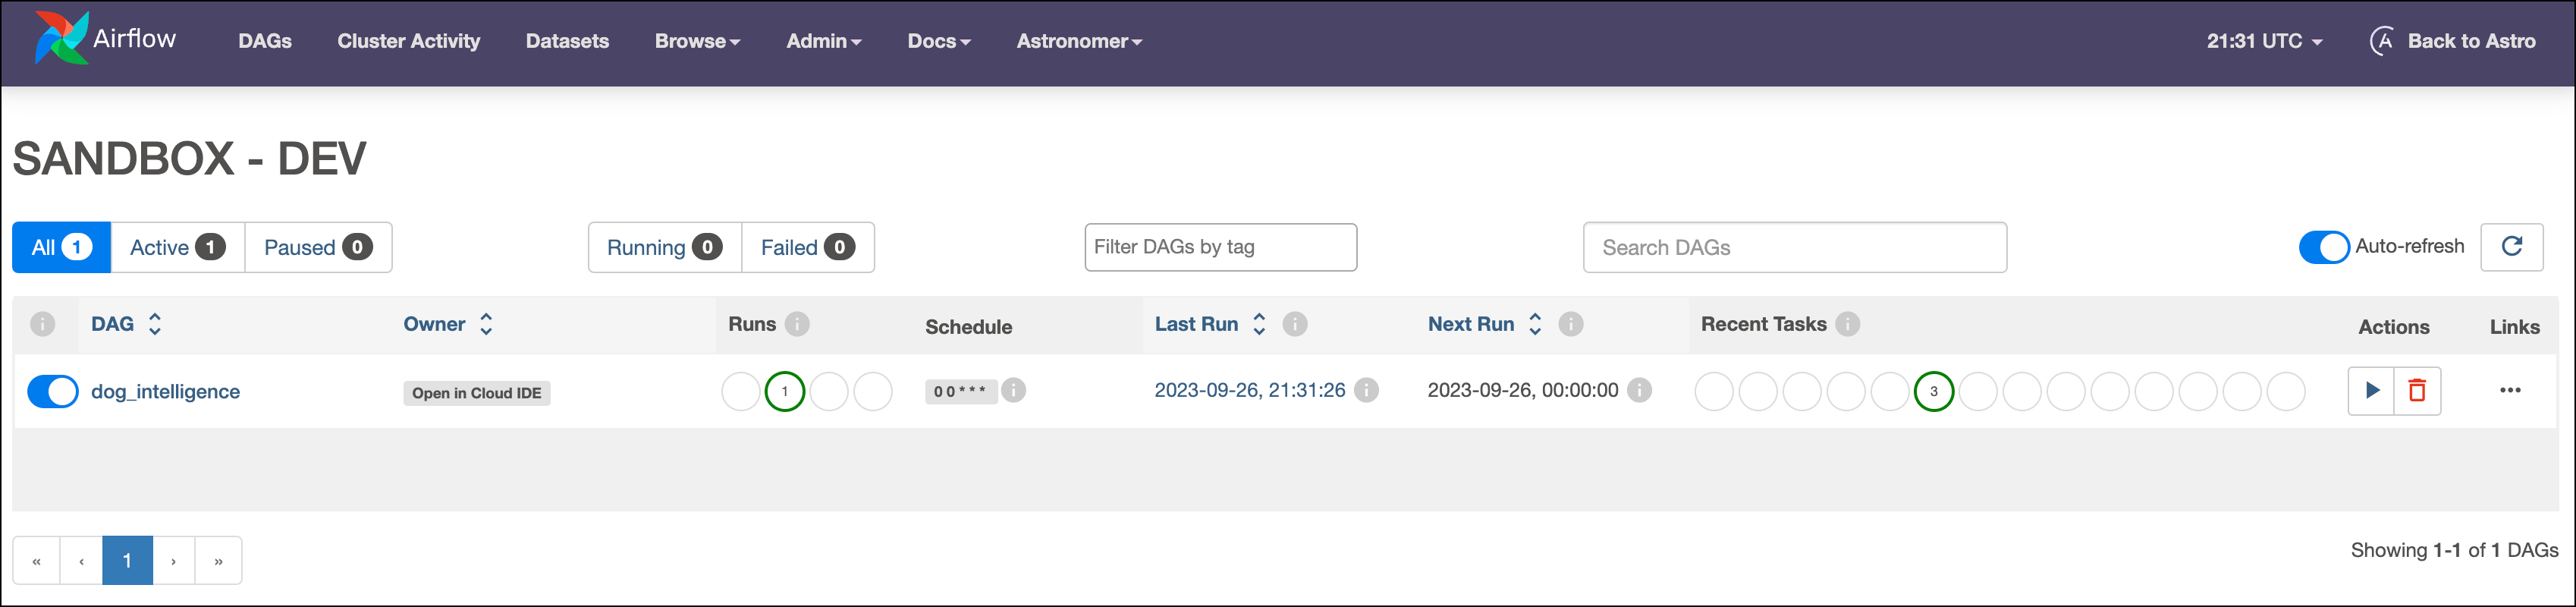 Click the `Open in Cloud IDE` Owner tag to open the DAG in the Astro Cloud IDE.
## Conclusion
You now know how to use the Astro Cloud IDE to write a simple ML pipeline! More specifically, you can now:
* Create a new Astro Cloud IDE project and pipeline.
* Use a SQL cell to query and transform tables in a database.
* Pass information between SQL and Python cells.
* Run a simple `RandomForestClassifier` on a dataset.
* Commit your pipeline to GitHub.
* Use GitHub Actions to deploy your new DAG to Astro.
See the [Astro Cloud IDE documentation](https://www.astronomer.io/docs/astro/cloud-ide) to learn more about this DAG writing environment.
Click the `Open in Cloud IDE` Owner tag to open the DAG in the Astro Cloud IDE.
## Conclusion
You now know how to use the Astro Cloud IDE to write a simple ML pipeline! More specifically, you can now:
* Create a new Astro Cloud IDE project and pipeline.
* Use a SQL cell to query and transform tables in a database.
* Pass information between SQL and Python cells.
* Run a simple `RandomForestClassifier` on a dataset.
* Commit your pipeline to GitHub.
* Use GitHub Actions to deploy your new DAG to Astro.
See the [Astro Cloud IDE documentation](https://www.astronomer.io/docs/astro/cloud-ide) to learn more about this DAG writing environment.