> ## Documentation Index
> Fetch the complete documentation index at: https://astronomer.io/docs/llms.txt
> Use this file to discover all available pages before exploring further.
# Use Apache Kafka with Apache Airflow
[Apache Kafka](https://kafka.apache.org/documentation/) is an open source tool for handling event streaming. Combining Kafka and Airflow allows you to build powerful pipelines that integrate streaming data with batch processing.
In this tutorial, you'll learn how to install and use the [Kafka Airflow provider](https://airflow.apache.org/registry/providers/apache-kafka/) to interact directly with Kafka topics.
While it is possible to manage a Kafka cluster with Airflow, be aware that Airflow itself shouldn't be used for streaming or low-latency processes. See the [Best practices](#best-practices) section for more information.
## Time to complete
This tutorial takes approximately 1 hour to complete.
## Assumed knowledge
To get the most out of this tutorial, make sure you have an understanding of:
* The basics of Apache Kafka. See the official [Introduction to Kafka](https://kafka.apache.org/intro).
* Airflow fundamentals, such as writing DAGs and defining tasks. See [Get started with Apache Airflow](/docs/learn/2.x/get-started-with-airflow).
* Airflow operators. See [Operators 101](/docs/learn/2.x/what-is-an-operator).
## Quickstart
If you have a GitHub account, you can use the [quickstart repository](https://github.com/astronomer/airflow-kafka-quickstart) for this tutorial, which automatically starts up Airflow, initiates a local Kafka cluster, and configures all necessary connections. Clone the quickstart repository and then skip to [Step 6: Run the DAGs](#step-6-run-the-dags).
## Prerequisites
* A Kafka cluster with a topic. This tutorial uses a cluster hosted by [Confluent Cloud](https://www.confluent.io/), which has a free trial option. See the [Confluent documentation](https://developer.confluent.io/quickstart/kafka-on-confluent-cloud/) for how to create a Kafka cluster and topic in Confluent Cloud.
* The [Astro CLI](/docs/cli/v1.43/get-started-cli).
To connect a [local Kafka cluster](https://kafka.apache.org/documentation/#quickstart) to an Airflow instance running in Docker, set the following properties in your Kafka cluster's `server.properties` file before starting your Kafka cluster:
```text wrap theme={null}
listeners=PLAINTEXT://:9092,DOCKER_HACK://:19092
advertised.listeners=PLAINTEXT://localhost:9092,DOCKER_HACK://host.docker.internal:19092
listener.security.protocol.map=PLAINTEXT:PLAINTEXT,DOCKER_HACK:PLAINTEXT
```
You can learn more about connecting to local Kafka from within a Docker container in [Confluent's Documentation](https://www.confluent.io/blog/kafka-client-cannot-connect-to-broker-on-aws-on-docker-etc/#scenario-5).
## Step 1: Configure your Astro project
1. Create a new Astro project:
```sh wrap theme={null}
$ mkdir astro-kafka-tutorial && cd astro-kafka-tutorial
$ astro dev init
```
2. Add the following packages to your `packages.txt` file:
```text wrap theme={null}
build-essential
librdkafka-dev
```
3. Add the following packages to your `requirements.txt` file:
```text wrap theme={null}
confluent-kafka==2.1.1
apache-airflow-providers-apache-kafka==1.0.0
```
4. Run the following command to start your project in a local environment:
```sh wrap theme={null}
astro dev start
```
## Step 2: Create two Kafka connections
The Kafka Airflow provider uses a Kafka connection assigned to the `kafka_conn_id` parameter of each operator to interact with a Kafka cluster. For this tutorial you define two Kafka connections, because two different consumers will be created.
1. In your web browser, go to `localhost:8080` to access the Airflow UI.
2. Click **Admin** > **Connections** > **+** to create a new connection.
3. Name your connection `kafka_default` and select the **Apache Kafka** connection type. Provide the details for the connection to your Kafka cluster as JSON in the **Extra** field.
If you connect to a local Kafka cluster created with the `server.properties` in the info box from the [Prerequisites](#prerequisites) section, use the following configuration:
```json wrap theme={null}
{
"bootstrap.servers": "kafka:19092",
"group.id": "group_1",
"security.protocol": "PLAINTEXT",
"auto.offset.reset": "beginning"
}
```
The key-value pairs for your connection depend on what kind of Kafka cluster you are connecting to. Most operators in the Kafka Airflow provider mandate that you define the `bootstrap.servers` key. You can find a full list of optional connection parameters in the [librdkafka documentation](https://github.com/confluentinc/librdkafka/blob/master/CONFIGURATION).
4. Click **Save**.
5. Create a second new connection.
6. Name your second connection `kafka_listener` and select the `Apache Kafka` connection type. Provide the same details as you did in Step 2, but set the `group.id` to `group_2`. You must have a second connection with a different `group.id` because the DAGs in this tutorial have two consuming tasks that consume messages from the same Kafka topic. Learn more in [Kafka's Consumer Configs documentation](https://kafka.apache.org/documentation/#consumerconfigs).
7. Click **Save**.
## Step 3: Create a DAG with a producer and a consumer task
The [Kafka Airflow provider package](https://airflow.apache.org/registry/providers/apache-kafka/) contains a `ProduceToTopicOperator`, which you can use to produce messages directly to a Kafka topic, and a `ConsumeFromTopicOperator`, which you can use to directly consume messages from a topic.
1. Create a new file in your `dags` folder called `produce_consume_treats.py`.
2. Copy and paste the following code into the `produce_consume_treats.py` file:
```python expandable wrap theme={null}
"""
### DAG which produces to and consumes from a Kafka cluster
This DAG will produce messages consisting of several elements to a Kafka cluster and consume
them.
"""
from airflow.decorators import dag, task
from pendulum import datetime
from airflow.providers.apache.kafka.operators.produce import ProduceToTopicOperator
from airflow.providers.apache.kafka.operators.consume import ConsumeFromTopicOperator
import json
import random
YOUR_NAME = ""
YOUR_PET_NAME = ""
NUMBER_OF_TREATS = 5
KAFKA_TOPIC = "my_topic"
def prod_function(num_treats, pet_name):
"""Produces `num_treats` messages containing the pet's name, a randomly picked
pet mood post treat and whether or not it was the last treat in a series."""
for i in range(num_treats):
final_treat = False
pet_mood_post_treat = random.choices(
["content", "happy", "zoomy", "bouncy"], weights=[2, 2, 1, 1], k=1
)[0]
if i + 1 == num_treats:
final_treat = True
yield (
json.dumps(i),
json.dumps(
{
"pet_name": pet_name,
"pet_mood_post_treat": pet_mood_post_treat,
"final_treat": final_treat,
}
),
)
def consume_function(message, name):
"Takes in consumed messages and prints its contents to the logs."
key = json.loads(message.key())
message_content = json.loads(message.value())
pet_name = message_content["pet_name"]
pet_mood_post_treat = message_content["pet_mood_post_treat"]
print(
f"Message #{key}: Hello {name}, your pet {pet_name} has consumed another treat and is now {pet_mood_post_treat}!"
)
@dag(
start_date=datetime(2023, 4, 1),
schedule=None,
catchup=False,
render_template_as_native_obj=True,
)
def produce_consume_treats():
@task
def get_your_pet_name(pet_name=None):
return pet_name
@task
def get_number_of_treats(num_treats=None):
return num_treats
@task
def get_pet_owner_name(your_name=None):
return your_name
produce_treats = ProduceToTopicOperator(
task_id="produce_treats",
kafka_config_id="kafka_default",
topic=KAFKA_TOPIC,
producer_function=prod_function,
producer_function_args=["{{ ti.xcom_pull(task_ids='get_number_of_treats')}}"],
producer_function_kwargs={
"pet_name": "{{ ti.xcom_pull(task_ids='get_your_pet_name')}}"
},
poll_timeout=10,
)
consume_treats = ConsumeFromTopicOperator(
task_id="consume_treats",
kafka_config_id="kafka_default",
topics=[KAFKA_TOPIC],
apply_function=consume_function,
apply_function_kwargs={
"name": "{{ ti.xcom_pull(task_ids='get_pet_owner_name')}}"
},
poll_timeout=20,
max_messages=20,
max_batch_size=20,
)
[
get_your_pet_name(YOUR_PET_NAME),
get_number_of_treats(NUMBER_OF_TREATS),
] >> produce_treats
get_pet_owner_name(YOUR_NAME) >> consume_treats
produce_treats >> consume_treats
produce_consume_treats()
```
This DAG produces messages to a Kafka topic (`KAFKA_TOPIC`) and consumes them.
* The `produce_treats` task retrieves the number of treats (`num_treats`) to give to your pet from the upstream `get_number_of_treats` task. Then, the task supplies the number of treats to the `producer_function` as a positional argument with the `producer_function_args` parameter.
In a similar process, the task also retrieves the name of your pet from the upstream `get_your_pet_name` task and provides it as a kwarg to `producer_function_kwargs`.
* Next, the `produce_treats` task writes one message for every treat to a Kafka topic. Each message contains the pet name, a randomly picked pet mood after the treat has been given, and whether or not a treat was the last one in a series. The `ProduceToTopicOperator` accomplishes this by using a function passed to its `producer_function` parameter, which returns a generator containing key-value pairs.
* The `consume_treats` task consumes messages from the same Kafka topic and modifies them to print a string to the logs using the callable provided to the `apply_function` parameter. This task also retrieves a value from an upstream task and supplies it as a kwarg to the `apply_function` with the `apply_function_kwargs` parameter.
3. Navigate to the Airflow UI (`localhost:8080` if you are running Airflow locally) and manually run your DAG.
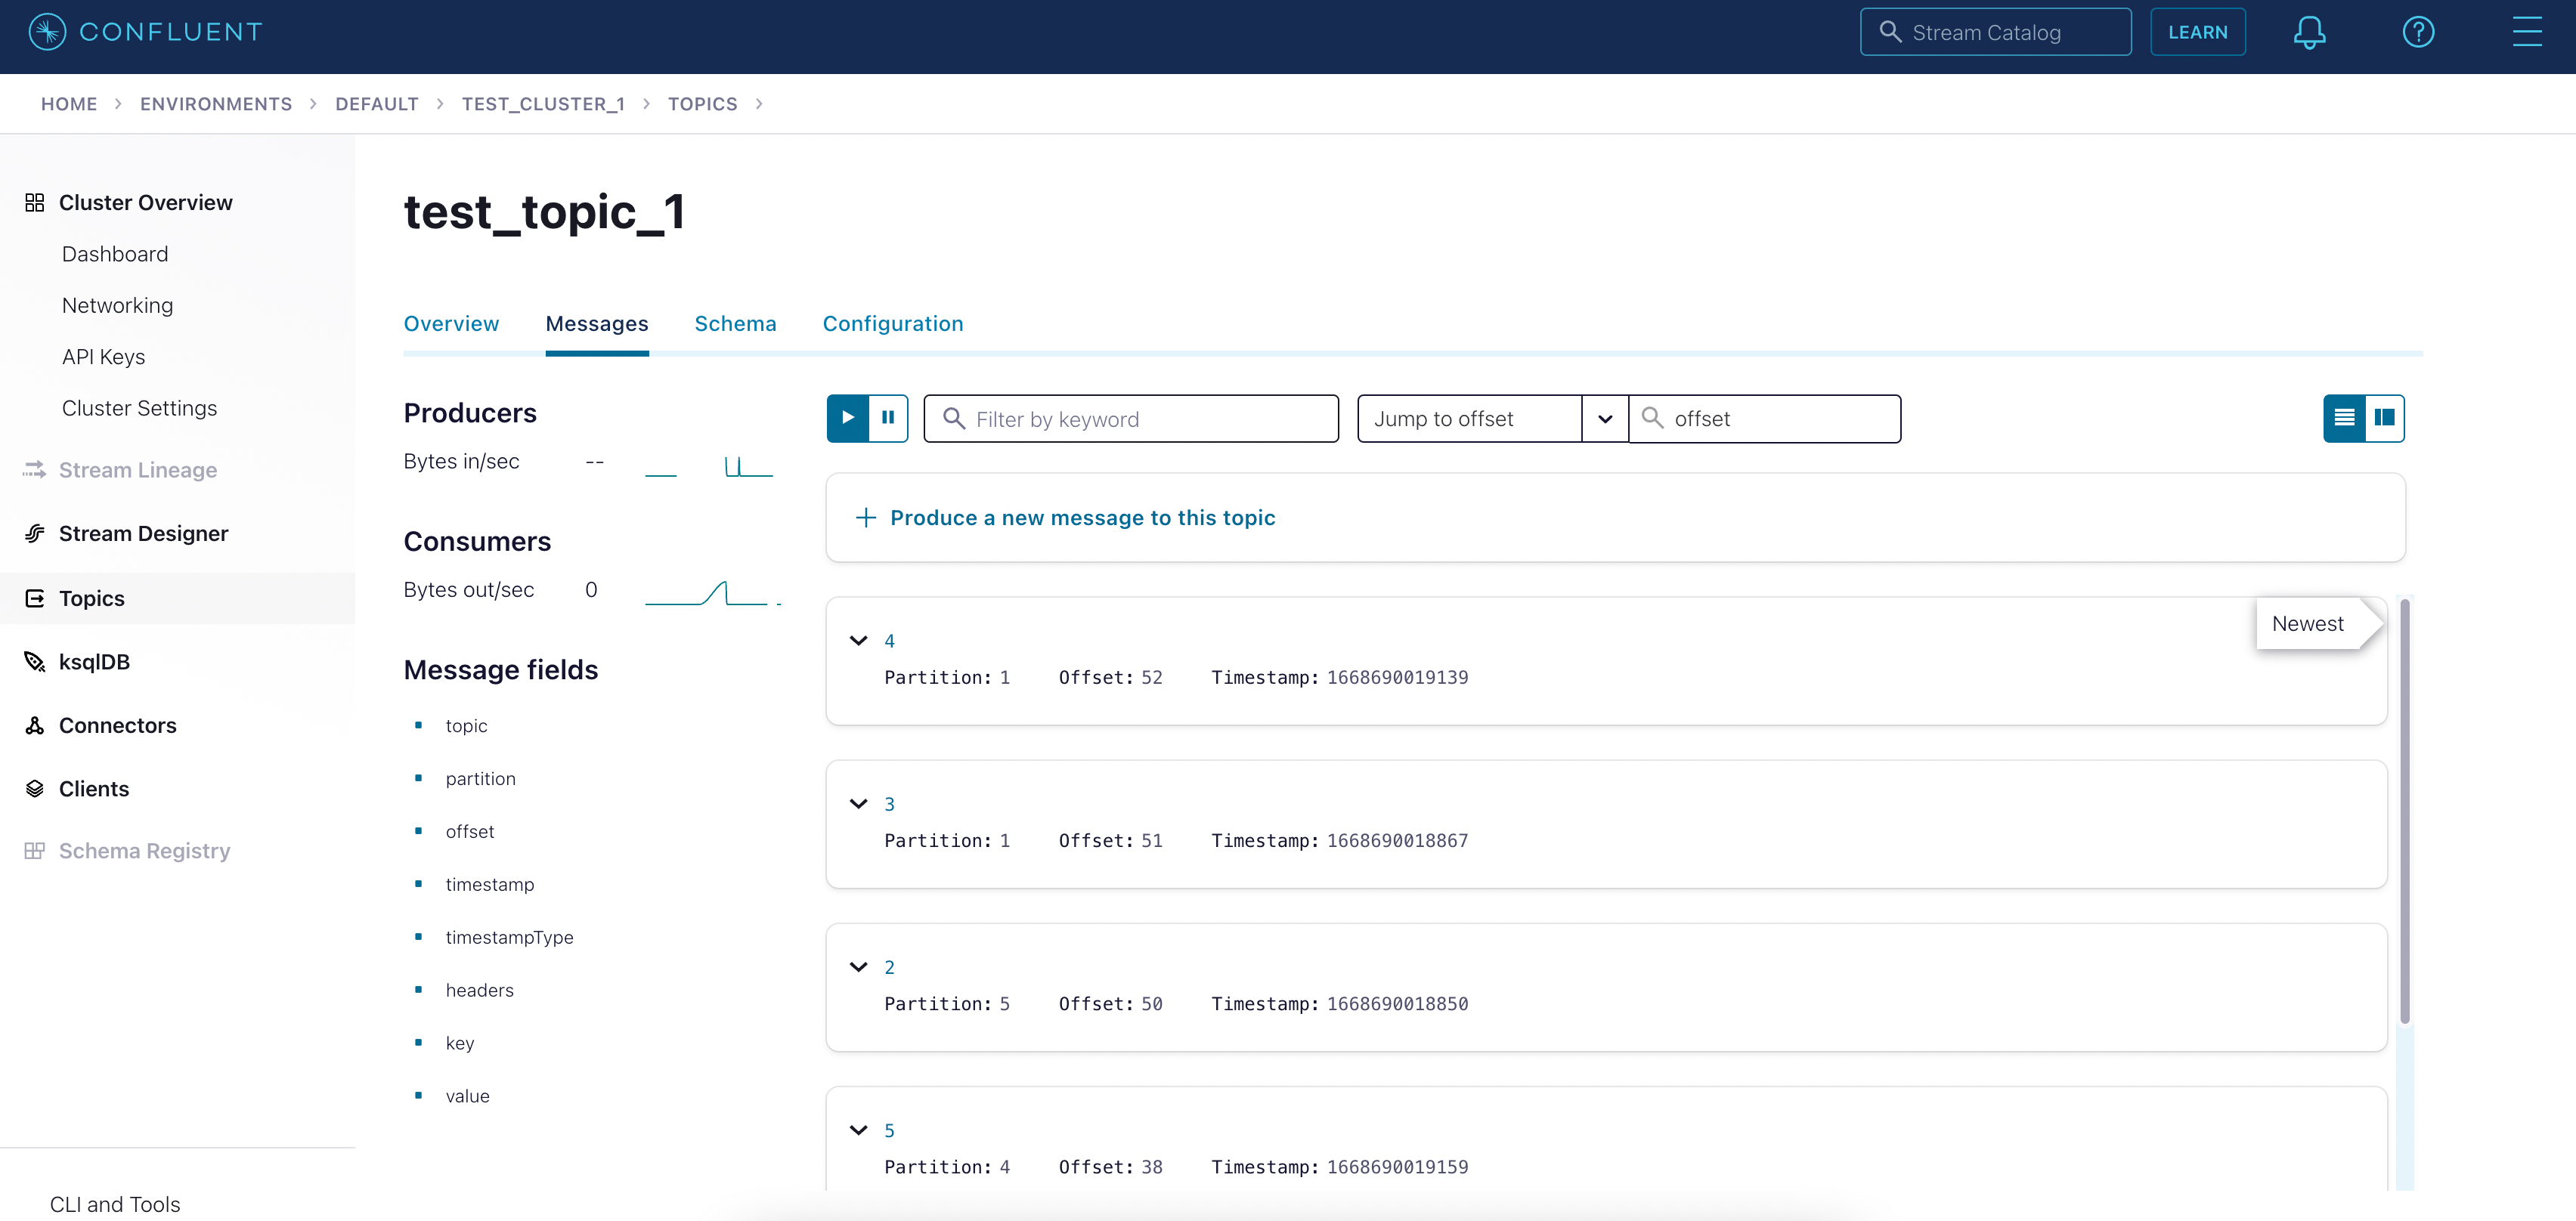
4. View the produced events in your Kafka cluster. The following example screenshot shows four messages that have been produced to a topic called `test_topic_1` in Confluent Cloud.
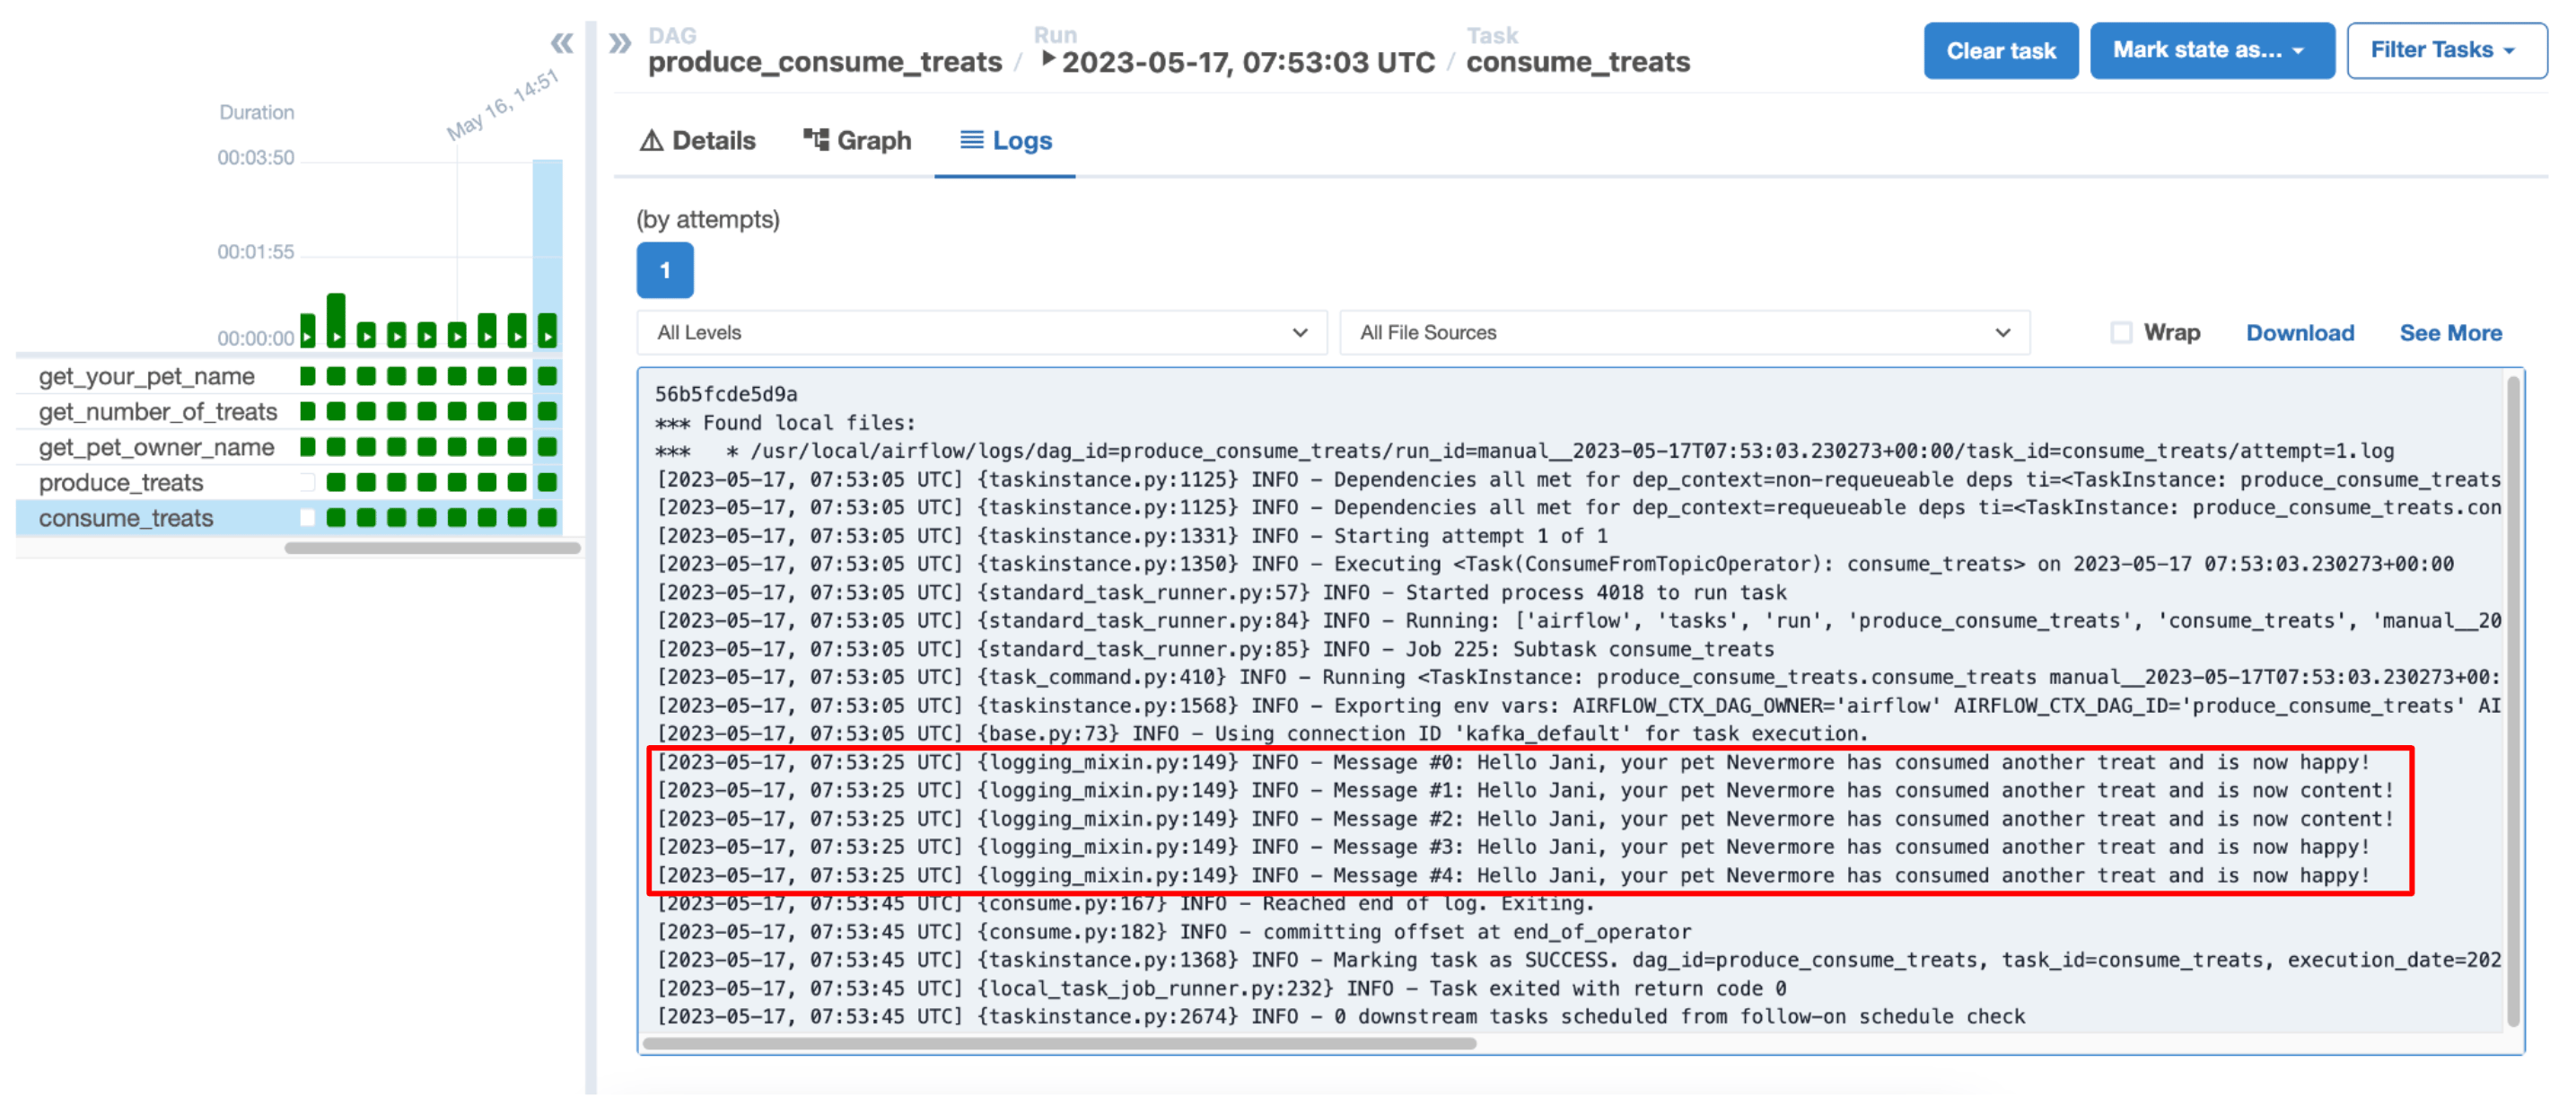
 5. View the logs of your `consume_treats` task, which shows a list of the consumed events.
 If you defined a schema for your Kafka topic, the generator needs to return compatible objects. In this example, the generator produces a JSON value.
The `ConsumeFromTopicOperator` can replace classical sinks by containing the logic to write messages to a storage destination in its `apply_function`. This gives you the advantage of being able to use Airflow to schedule message consumption from a Kafka topic based on complex logic embedded in your wider data ecosystem. For example, you can write messages to S3 using the [`S3CreateObjectOperator`](https://airflow.apache.org/registry/providers/amazon#amazon-s3-S3CreateObjectOperator), which depends on other upstream task having completed successfully, such as the creation of a specific S3 bucket.
## Step 4: Create a listener DAG
Airflow can run a function when a specific message appears in your Kafka topic. The `AwaitMessageTriggerFunctionSensor` is a [deferrable operator](/docs/learn/2.x/deferrable-operators) that listens to your Kafka topic for a message that fulfills specific criteria, which, when met, runs the callable provided to `event_triggered_function`. The `TriggerDagRunOperator` can be used within the `event_triggered_function` to initiate a run of a downstream DAG.
1. Create a new file in your `dags` folder called `listen_to_the_stream.py`.
2. Copy and paste the following code into the file:
```python expandable wrap theme={null}
"""
### DAG continuously listening to a Kafka topic for a specific message
This DAG will always run and asynchronously monitor a Kafka topic for a message
which causes the funtion supplied to the `apply_function` parameter to return a value.
If a value is returned by the `apply_function`, the `event_triggered_function` is
executed. Afterwards the task will go into a deferred state again.
"""
from airflow.decorators import dag
from pendulum import datetime
from airflow.providers.apache.kafka.sensors.kafka import (
AwaitMessageTriggerFunctionSensor,
)
from airflow.operators.trigger_dagrun import TriggerDagRunOperator
import json
import uuid
PET_MOODS_NEEDING_A_WALK = ["zoomy", "bouncy"]
KAFKA_TOPIC = "my_topic"
def listen_function(message, pet_moods_needing_a_walk=[]):
"""Checks if the message received indicates a pet is in
a mood listed in `pet_moods_needing_a_walk` when they received the last
treat of a treat-series."""
message_content = json.loads(message.value())
print(f"Full message: {message_content}")
pet_name = message_content["pet_name"]
pet_mood_post_treat = message_content["pet_mood_post_treat"]
final_treat = message_content["final_treat"]
if final_treat:
if pet_mood_post_treat in pet_moods_needing_a_walk:
return pet_name, pet_mood_post_treat
def event_triggered_function(event, **context):
"Kicks off a downstream DAG with conf and waits for its completion."
pet_name = event[0]
pet_mood_post_treat = event[1]
print(
f"Due to {pet_name} being in a {pet_mood_post_treat} mood, a walk is being initiated..."
)
# use the TriggerDagRunOperator (TDRO) to kick off a downstream DAG
TriggerDagRunOperator(
trigger_dag_id="walking_my_pet",
task_id=f"triggered_downstream_dag_{uuid.uuid4()}",
wait_for_completion=True, # wait for downstream DAG completion
conf={"pet_name": pet_name},
poke_interval=5,
).execute(context)
print(f"The walk has concluded and {pet_name} is now happily taking a nap!")
@dag(
start_date=datetime(2023, 4, 1),
schedule="@continuous",
max_active_runs=1,
catchup=False,
render_template_as_native_obj=True,
)
def listen_to_the_stream():
listen_for_mood = AwaitMessageTriggerFunctionSensor(
task_id="listen_for_mood",
kafka_config_id="kafka_listener",
topics=[KAFKA_TOPIC],
# the apply function will be used from within the triggerer, this is
# why it needs to be a dot notation string
apply_function="listen_to_the_stream.listen_function",
poll_interval=5,
poll_timeout=1,
apply_function_kwargs={"pet_moods_needing_a_walk": PET_MOODS_NEEDING_A_WALK},
event_triggered_function=event_triggered_function,
)
listen_to_the_stream()
```
This DAG has one task called `listen_for_mood` which uses the `AwaitMessageTriggerFunctionSensor` to listen to messages in all topics supplied to its `topics` parameters. For each message that is consumed, the following actions are performed:
* The `listen_function` supplied to the `apply_function` parameter of the `AwaitMessageTriggerFunctionSensor` consumes and processes the message. The `listen_function` is provided as a dot notation string, which is necessary because the Airflow triggerer component needs to access this function.
* If the message consumed causes the `listen_function` to return a value, a [TriggerEvent](https://airflow.apache.org/docs/apache-airflow/stable/authoring-and-scheduling/deferring.html) fires.
* After a TriggerEvent fires, the `AwaitMessageTriggerFunctionSensor` executes the function provided to the `event_triggered_function` parameter.
In this example, the `event_triggered_function` starts a downstream DAG using the `.execute()` method of the [`TriggerDagRunOperator`](/docs/learn/2.x/cross-dag-dependencies#triggerdagrunoperator).
* After the `event_triggered_function` completes, the `AwaitMessageTriggerFunctionSensor` returns to a deferred state.
The `AwaitMessageTriggerFunctionSensor` always runs and listens. If the task fails, like if a malformed message is consumed, the DAG completes as `failed` and automatically starts its next DAG run because of the [`@continuous` schedule](/docs/learn/2.x/scheduling-in-airflow#continuous-timetable).
When working locally, you need to restart your Airflow instance to apply changes to the `apply_function` of the `AwaitMessageTriggerFunctionSensor` because the function is imported into the [Triggerer](/docs/learn/deferrable-operators#terms-and-concepts), which doesn't periodically restart. To restart Airflow, run `astro dev restart` in your terminal. Changes to the `event_triggered_function` of the `AwaitMessageTriggerFunctionSensor` don't require a restart of your Airflow instance.
On Astro, the Triggerer is restarted automatically when a new image is deployed, but not on dag-only deploys, see [Deploy DAGs to Astro](/docs/astro/deploy-dags).
## Step 5: Create a downstream DAG
The `event_triggered_function` of the `AwaitMessageTriggerFunctionSensor` operator starts a downstream DAG. This example shows how to implement a dependency based on messages that appear in your Kafka topic.
1. Create a new file in your `dags` folder called `walking_my_pet.py`.
2. Copy and paste the following code into the file:
```python wrap theme={null}
"""
### Simple DAG that runs one task with params
This DAG uses one string type param and uses it in a python decorated task.
"""
from airflow.decorators import dag, task
from pendulum import datetime
from airflow.models.param import Param
import random
@dag(
start_date=datetime(2023, 4, 1),
schedule=None,
catchup=False,
render_template_as_native_obj=True,
params={"pet_name": Param("Undefined!", type="string")},
)
def walking_my_pet():
@task
def walking_your_pet(**context):
pet_name = context["params"]["pet_name"]
minutes = random.randint(2, 10)
print(f"{pet_name} has been on a {minutes} minute walk!")
walking_your_pet()
walking_my_pet()
```
This DAG acts as a downstream dependency to the `listen_to_the_stream` DAG. You can add any tasks to this DAG.
## Step 6: Run the DAGs
Now that all three DAGs are ready, run them to see how they work together.
1. Make sure you unpause all DAGs in the Airflow UI and that your Kafka cluster is running.
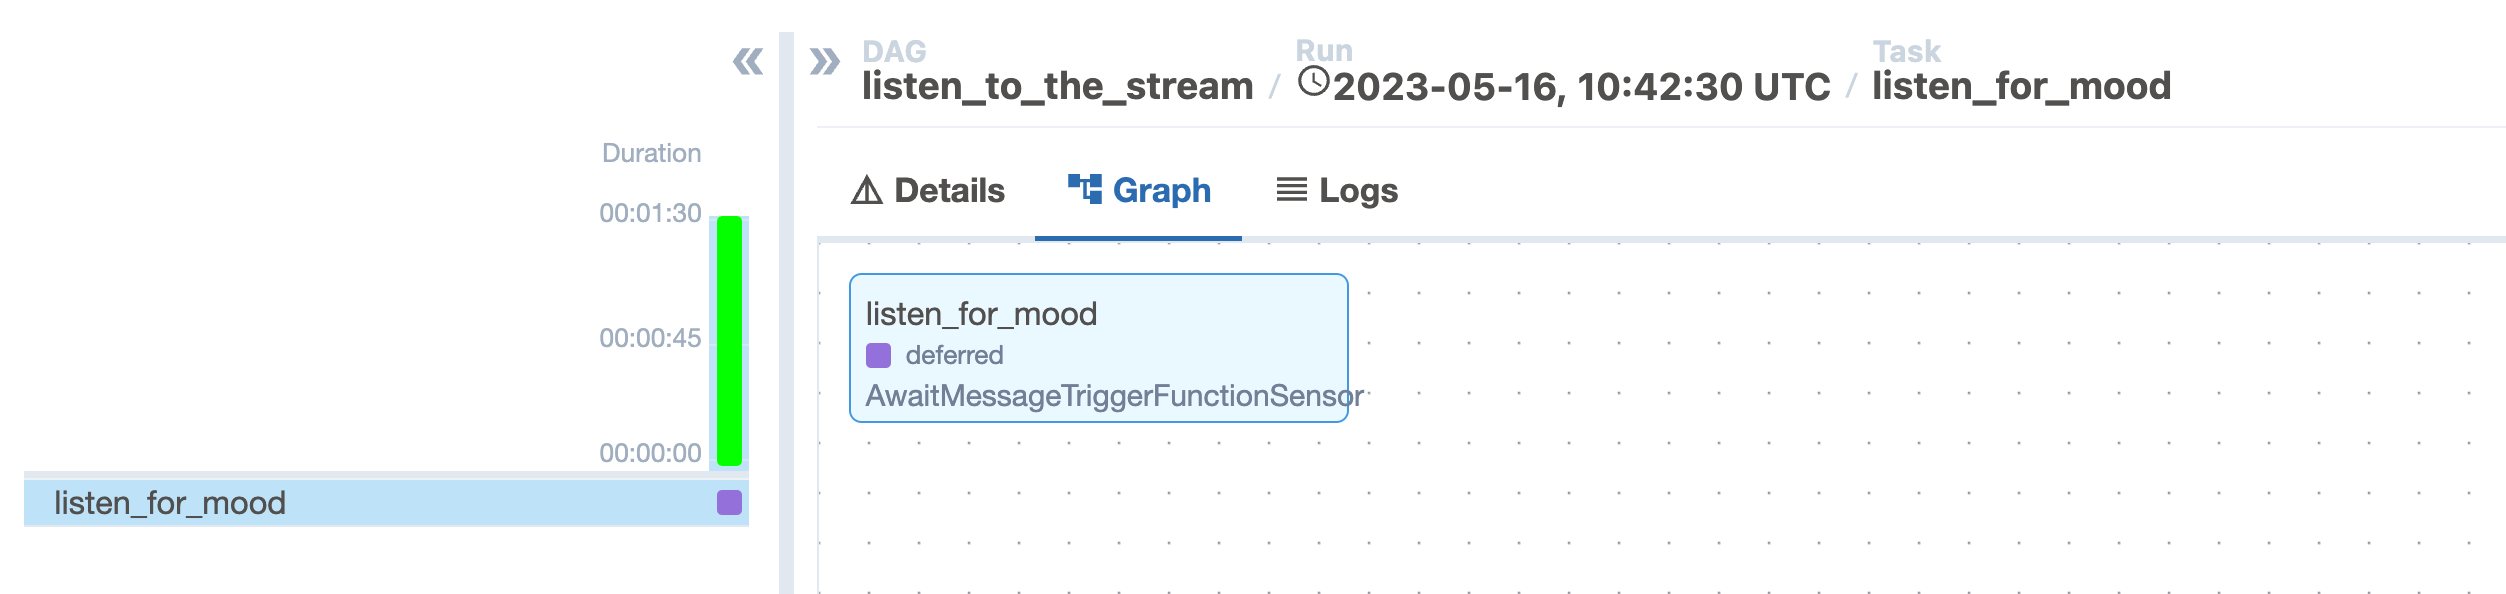
2. The `listen_to_the_stream` DAG immediately starts running after it unpauses and the `listen_for_mood` task goes into a **Deferred** state, which is indicated with a purple square in the Airflow UI.
If you defined a schema for your Kafka topic, the generator needs to return compatible objects. In this example, the generator produces a JSON value.
The `ConsumeFromTopicOperator` can replace classical sinks by containing the logic to write messages to a storage destination in its `apply_function`. This gives you the advantage of being able to use Airflow to schedule message consumption from a Kafka topic based on complex logic embedded in your wider data ecosystem. For example, you can write messages to S3 using the [`S3CreateObjectOperator`](https://airflow.apache.org/registry/providers/amazon#amazon-s3-S3CreateObjectOperator), which depends on other upstream task having completed successfully, such as the creation of a specific S3 bucket.
## Step 4: Create a listener DAG
Airflow can run a function when a specific message appears in your Kafka topic. The `AwaitMessageTriggerFunctionSensor` is a [deferrable operator](/docs/learn/2.x/deferrable-operators) that listens to your Kafka topic for a message that fulfills specific criteria, which, when met, runs the callable provided to `event_triggered_function`. The `TriggerDagRunOperator` can be used within the `event_triggered_function` to initiate a run of a downstream DAG.
1. Create a new file in your `dags` folder called `listen_to_the_stream.py`.
2. Copy and paste the following code into the file:
```python expandable wrap theme={null}
"""
### DAG continuously listening to a Kafka topic for a specific message
This DAG will always run and asynchronously monitor a Kafka topic for a message
which causes the funtion supplied to the `apply_function` parameter to return a value.
If a value is returned by the `apply_function`, the `event_triggered_function` is
executed. Afterwards the task will go into a deferred state again.
"""
from airflow.decorators import dag
from pendulum import datetime
from airflow.providers.apache.kafka.sensors.kafka import (
AwaitMessageTriggerFunctionSensor,
)
from airflow.operators.trigger_dagrun import TriggerDagRunOperator
import json
import uuid
PET_MOODS_NEEDING_A_WALK = ["zoomy", "bouncy"]
KAFKA_TOPIC = "my_topic"
def listen_function(message, pet_moods_needing_a_walk=[]):
"""Checks if the message received indicates a pet is in
a mood listed in `pet_moods_needing_a_walk` when they received the last
treat of a treat-series."""
message_content = json.loads(message.value())
print(f"Full message: {message_content}")
pet_name = message_content["pet_name"]
pet_mood_post_treat = message_content["pet_mood_post_treat"]
final_treat = message_content["final_treat"]
if final_treat:
if pet_mood_post_treat in pet_moods_needing_a_walk:
return pet_name, pet_mood_post_treat
def event_triggered_function(event, **context):
"Kicks off a downstream DAG with conf and waits for its completion."
pet_name = event[0]
pet_mood_post_treat = event[1]
print(
f"Due to {pet_name} being in a {pet_mood_post_treat} mood, a walk is being initiated..."
)
# use the TriggerDagRunOperator (TDRO) to kick off a downstream DAG
TriggerDagRunOperator(
trigger_dag_id="walking_my_pet",
task_id=f"triggered_downstream_dag_{uuid.uuid4()}",
wait_for_completion=True, # wait for downstream DAG completion
conf={"pet_name": pet_name},
poke_interval=5,
).execute(context)
print(f"The walk has concluded and {pet_name} is now happily taking a nap!")
@dag(
start_date=datetime(2023, 4, 1),
schedule="@continuous",
max_active_runs=1,
catchup=False,
render_template_as_native_obj=True,
)
def listen_to_the_stream():
listen_for_mood = AwaitMessageTriggerFunctionSensor(
task_id="listen_for_mood",
kafka_config_id="kafka_listener",
topics=[KAFKA_TOPIC],
# the apply function will be used from within the triggerer, this is
# why it needs to be a dot notation string
apply_function="listen_to_the_stream.listen_function",
poll_interval=5,
poll_timeout=1,
apply_function_kwargs={"pet_moods_needing_a_walk": PET_MOODS_NEEDING_A_WALK},
event_triggered_function=event_triggered_function,
)
listen_to_the_stream()
```
This DAG has one task called `listen_for_mood` which uses the `AwaitMessageTriggerFunctionSensor` to listen to messages in all topics supplied to its `topics` parameters. For each message that is consumed, the following actions are performed:
* The `listen_function` supplied to the `apply_function` parameter of the `AwaitMessageTriggerFunctionSensor` consumes and processes the message. The `listen_function` is provided as a dot notation string, which is necessary because the Airflow triggerer component needs to access this function.
* If the message consumed causes the `listen_function` to return a value, a [TriggerEvent](https://airflow.apache.org/docs/apache-airflow/stable/authoring-and-scheduling/deferring.html) fires.
* After a TriggerEvent fires, the `AwaitMessageTriggerFunctionSensor` executes the function provided to the `event_triggered_function` parameter.
In this example, the `event_triggered_function` starts a downstream DAG using the `.execute()` method of the [`TriggerDagRunOperator`](/docs/learn/2.x/cross-dag-dependencies#triggerdagrunoperator).
* After the `event_triggered_function` completes, the `AwaitMessageTriggerFunctionSensor` returns to a deferred state.
The `AwaitMessageTriggerFunctionSensor` always runs and listens. If the task fails, like if a malformed message is consumed, the DAG completes as `failed` and automatically starts its next DAG run because of the [`@continuous` schedule](/docs/learn/2.x/scheduling-in-airflow#continuous-timetable).
When working locally, you need to restart your Airflow instance to apply changes to the `apply_function` of the `AwaitMessageTriggerFunctionSensor` because the function is imported into the [Triggerer](/docs/learn/deferrable-operators#terms-and-concepts), which doesn't periodically restart. To restart Airflow, run `astro dev restart` in your terminal. Changes to the `event_triggered_function` of the `AwaitMessageTriggerFunctionSensor` don't require a restart of your Airflow instance.
On Astro, the Triggerer is restarted automatically when a new image is deployed, but not on dag-only deploys, see [Deploy DAGs to Astro](/docs/astro/deploy-dags).
## Step 5: Create a downstream DAG
The `event_triggered_function` of the `AwaitMessageTriggerFunctionSensor` operator starts a downstream DAG. This example shows how to implement a dependency based on messages that appear in your Kafka topic.
1. Create a new file in your `dags` folder called `walking_my_pet.py`.
2. Copy and paste the following code into the file:
```python wrap theme={null}
"""
### Simple DAG that runs one task with params
This DAG uses one string type param and uses it in a python decorated task.
"""
from airflow.decorators import dag, task
from pendulum import datetime
from airflow.models.param import Param
import random
@dag(
start_date=datetime(2023, 4, 1),
schedule=None,
catchup=False,
render_template_as_native_obj=True,
params={"pet_name": Param("Undefined!", type="string")},
)
def walking_my_pet():
@task
def walking_your_pet(**context):
pet_name = context["params"]["pet_name"]
minutes = random.randint(2, 10)
print(f"{pet_name} has been on a {minutes} minute walk!")
walking_your_pet()
walking_my_pet()
```
This DAG acts as a downstream dependency to the `listen_to_the_stream` DAG. You can add any tasks to this DAG.
## Step 6: Run the DAGs
Now that all three DAGs are ready, run them to see how they work together.
1. Make sure you unpause all DAGs in the Airflow UI and that your Kafka cluster is running.
2. The `listen_to_the_stream` DAG immediately starts running after it unpauses and the `listen_for_mood` task goes into a **Deferred** state, which is indicated with a purple square in the Airflow UI.
 3. Manually run the `produce_consume_treats` DAG to give your pet some treats and produce a few messages to the Kafka cluster.
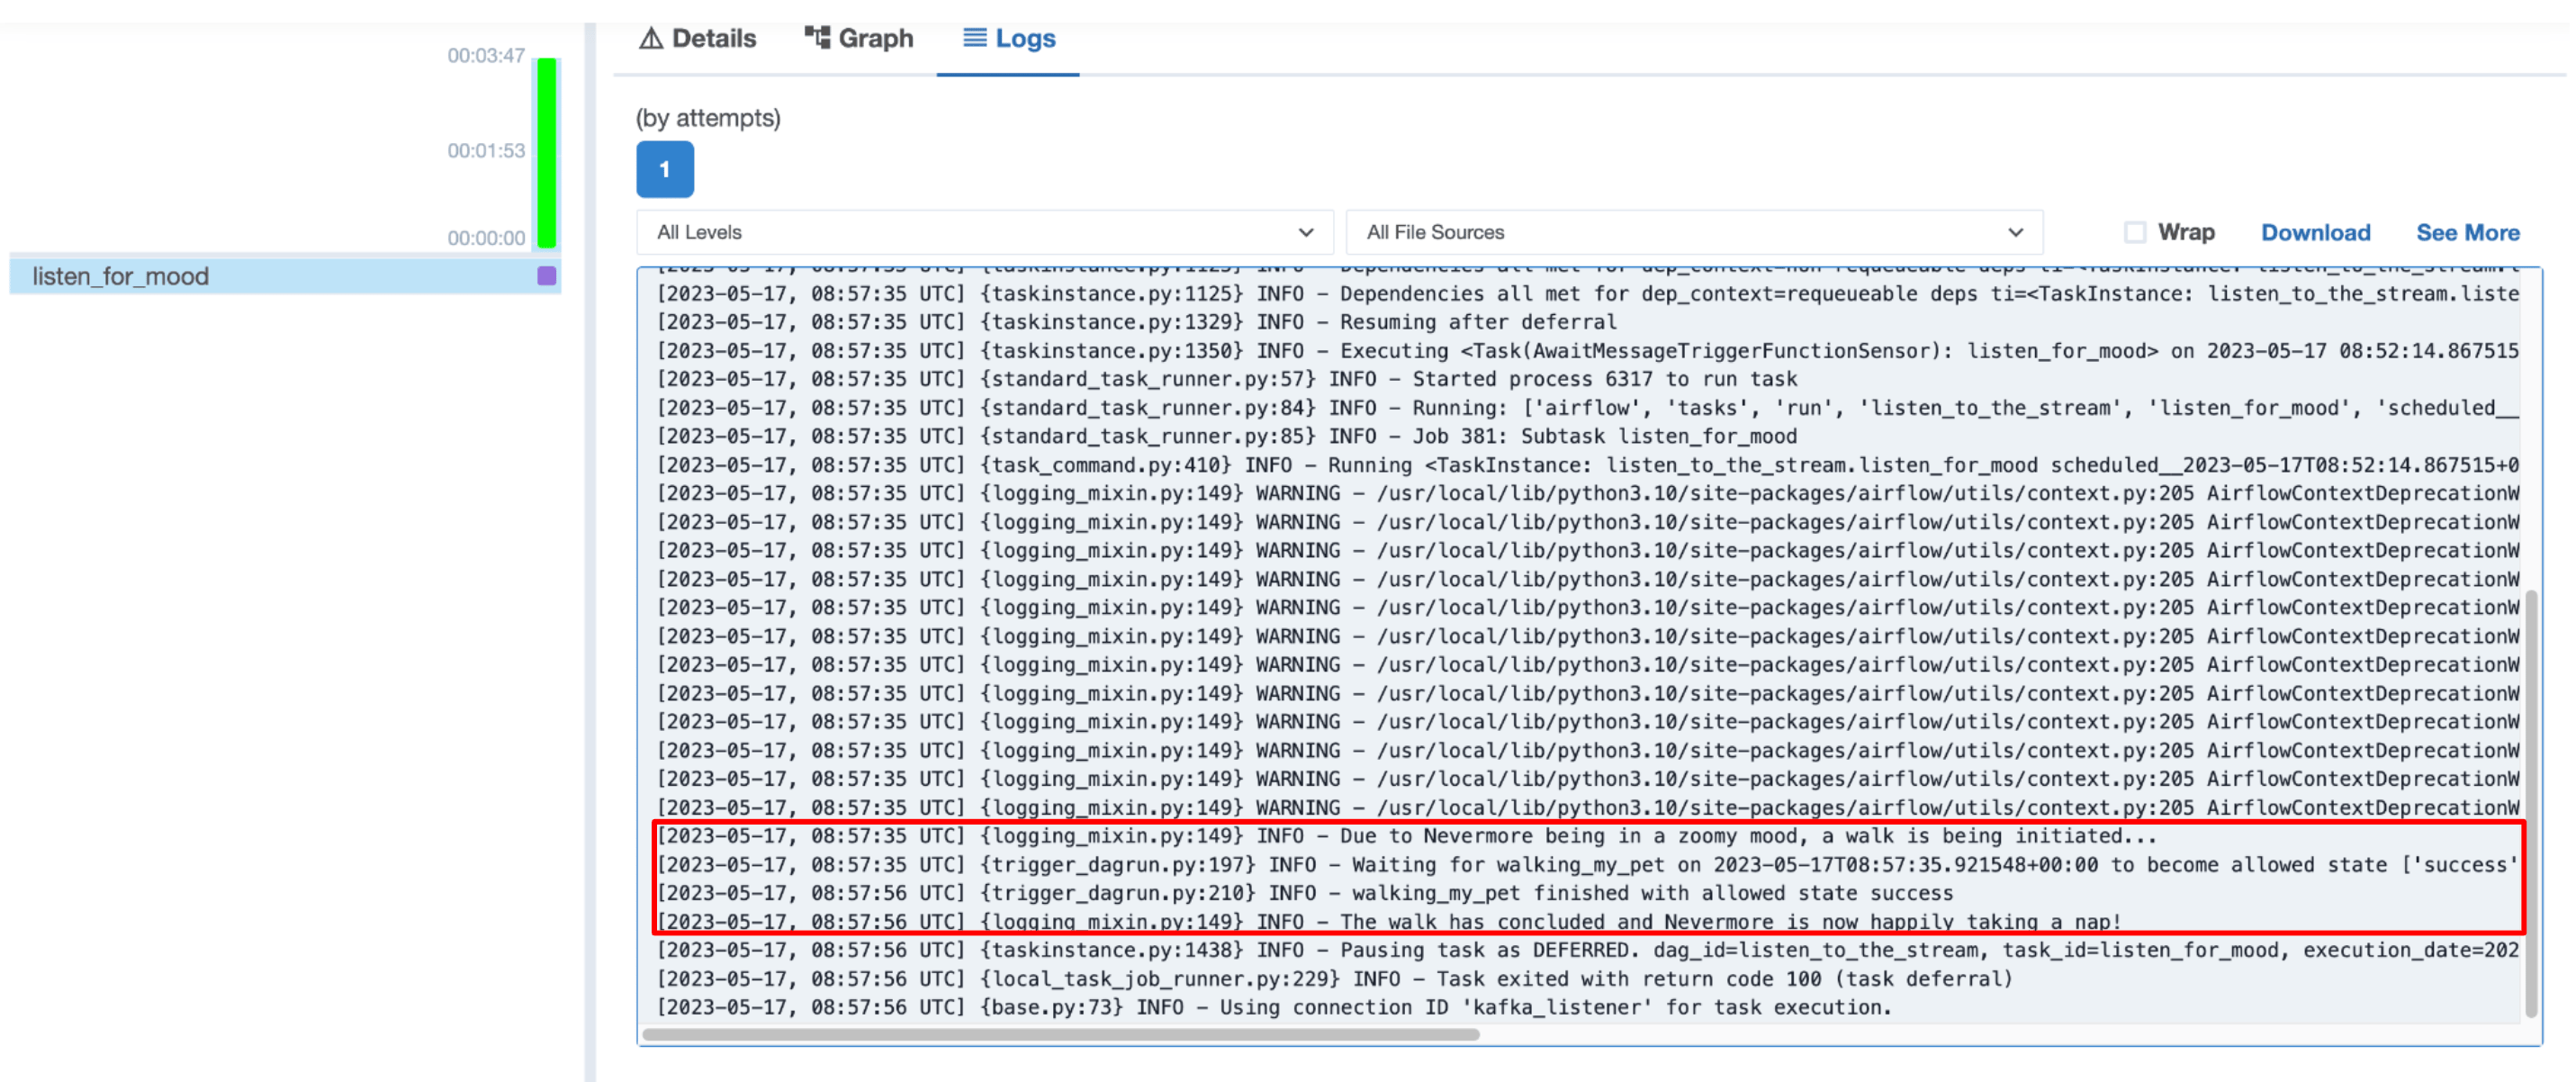
4. Check the logs of the `listen_for_mood` task in the `listen_to_the_stream` DAG to see if a message fitting the criteria defined by the `listen_function` has been detected. You might need to run the `produce_consume_treats` DAG a couple of times for a message to appear.
If the TriggerEvent of the `listen_for_mood` task fires, the `listen_for_mood` task logs show the `walking_my_pet` DAG initiating.
3. Manually run the `produce_consume_treats` DAG to give your pet some treats and produce a few messages to the Kafka cluster.
4. Check the logs of the `listen_for_mood` task in the `listen_to_the_stream` DAG to see if a message fitting the criteria defined by the `listen_function` has been detected. You might need to run the `produce_consume_treats` DAG a couple of times for a message to appear.
If the TriggerEvent of the `listen_for_mood` task fires, the `listen_for_mood` task logs show the `walking_my_pet` DAG initiating.
 5. Finally, check the logs of the `walking_my_pet` task to see how long your pet enjoyed their walk!
## Best practices
Apache Kafka is a tool optimized for streaming messages at high frequencies, for example in an IoT application. Airflow is designed to handle orchestration of data pipelines in batches.
Astronomer recommends to combine these two open source tools by handling low-latency processes with Kafka and data orchestration with Airflow.
Common patterns include:
* Configuring a Kafka cluster with a blob storage like S3 as a sink. Batch process data from S3 at regular intervals.
* Using the `ProduceToTopicOperator` in Airflow to produce messages to a Kafka cluster as one of several producers.
* Consuming data from a Kafka cluster through the `ConsumeFromTopicOperator` in batches using the apply function to extract and load information to a blob storage or data warehouse.
* Listening for specific messages in a data stream running through a Kafka cluster using the `AwaitMessageTriggerFunctionSensor` to trigger downstream tasks after the message appears.
## Conclusion
Congratulations! You used the Kafka Airflow provider to directly interact with a Kafka topic from within Apache Airflow.
5. Finally, check the logs of the `walking_my_pet` task to see how long your pet enjoyed their walk!
## Best practices
Apache Kafka is a tool optimized for streaming messages at high frequencies, for example in an IoT application. Airflow is designed to handle orchestration of data pipelines in batches.
Astronomer recommends to combine these two open source tools by handling low-latency processes with Kafka and data orchestration with Airflow.
Common patterns include:
* Configuring a Kafka cluster with a blob storage like S3 as a sink. Batch process data from S3 at regular intervals.
* Using the `ProduceToTopicOperator` in Airflow to produce messages to a Kafka cluster as one of several producers.
* Consuming data from a Kafka cluster through the `ConsumeFromTopicOperator` in batches using the apply function to extract and load information to a blob storage or data warehouse.
* Listening for specific messages in a data stream running through a Kafka cluster using the `AwaitMessageTriggerFunctionSensor` to trigger downstream tasks after the message appears.
## Conclusion
Congratulations! You used the Kafka Airflow provider to directly interact with a Kafka topic from within Apache Airflow.