> ## Documentation Index
> Fetch the complete documentation index at: https://astronomer.io/docs/llms.txt
> Use this file to discover all available pages before exploring further.
# Use Fivetran with Apache Airflow
[Fivetran](https://www.fivetran.com/) is a popular ELT platform that automates ingesting data from a variety of sources into a database, offering pre-built integrations for many common data tools.
Using Airflow with Fivetran allows you to schedule your Fivetran syncs based on events in your larger data ecosystem, as well as trigger downstream actions after a sync has finished.
In this tutorial, you'll learn how to install and use the Airflow Fivetran provider to submit and monitor Fivetran syncs.
**Other ways to learn**
There are multiple resources for learning about this topic. See also:
* Webinar: [Hands-on Workshop: automate your data ingestion with Fivetran and Astronomer](https://www.astronomer.io/events/webinars/workshop-automate-data-ingestion-fivetran-astronomer/).
## Time to complete
This tutorial takes approximately 1 hour to complete.
## Assumed knowledge
To get the most out of this tutorial, make sure you have an understanding of:
* The basics of Fivetran. See Fivetran's [Getting started](https://fivetran.com/docs/getting-started) documentation.
* Airflow fundamentals, such as writing DAGs and defining tasks. See [Get started with Apache Airflow](/docs/learn/2.x/get-started-with-airflow).
* Airflow operators. See [Operators 101](/docs/learn/2.x/what-is-an-operator).
## Prerequisites
* A Fivetran account. Fivetran offers a [14-day free trial](https://fivetran.com/signup) for new customers.
* The [Astro CLI](/docs/cli/v1.43/overview).
* A [GitHub](https://github.com/) account with the permissions for the following GitHub scopes: `repo`, `read:org`, `admin:org_hook`, `admin:repo_hook`.
## Step 1: Configure your Astro project
An Astro project contains all of the files you need to run Airflow locally.
1. Create a new Astro project:
```sh wrap theme={null}
$ mkdir astro-fivetran-project && cd astro-fivetran-project
$ astro dev init
```
2. Add the [Fivetran provider package](https://airflow.apache.org/registry/providers/fivetran) to your `requirements.txt` file:
```text wrap theme={null}
airflow-provider-fivetran-async
```
3. Run the following command to start your project in a local environment:
```sh wrap theme={null}
astro dev start
```
## Step 2: Create a new private GitHub repository
For this tutorial you will use metadata from a GitHub repository as your data source. We recommend using a new repository to prevent unintentionally ingesting large amounts of data.
1. [Create a new private GitHub repository](https://docs.github.com/en/get-started/quickstart/create-a-repo) called `airflow-fivetran-tutorial`.
2. Commit at least one change to the repository. The content of your commit doesn't matter for this tutorial.
## Step 3: Connect Fivetran to a destination
Fivetran needs at least one destination to be configured in order to create syncs. A destination is a relational database where your ingested data will be loaded into.
1. Log in to your [Fivetran account](https://www.fivetran.com/).
2. Click **Destinations** in the left menu, then click **ADD DESTINATION** in the upper right corner.
3. Choose either **Connect your destination** or **I don't have one**. For this tutorial you can either connect to an existing data warehouse by following the [relevant Fivetran documentation](https://fivetran.com/docs/databases), or use a [Fivetran-managed BigQuery service](https://fivetran.com/docs/destinations/bigquery/managed-bigquery). In this tutorial we will use Fivetran's managed BigQuery service by selecting **I don't have one** and then clicking **CONTINUE SETUP**.
4. Configure your destination connection. You can choose any configuration. Astronomer recommends using UTC as your timezone in all data tools as a best practice. Click **SAVE & TEST** to save your destination.
5. Click **Continue** to get back to the list of your destinations.
## Step 4: Configure a Fivetran connector
Fivetran needs at least one [connector](https://fivetran.com/docs/getting-started/fivetran-dashboard/connectors) to be configured in order to create syncs. A Fivetran connector reaches out to a specific data source, receives data from it and writes it to your destination. View the Fivetran website for an [up-to-date list of connectors](https://www.fivetran.com/connectors).
1. In Fivetran, click **Connectors** in the left menu and then click **ADD CONNECTOR** in the upper right corner.
2. Select the GitHub Connector and click **CONTINUE SETUP**.
3. Configure the GitHub Connector:
* **Destination schema**: `in_github`
* **Authentication mode**: Either [OAuth or a Personal Access Token](https://fivetran.com/docs/applications/github/setup-guide), then click **AUTHORIZE**. In this tutorial, we use OAuth authentication.
4. Authenticate Fivetran to your GitHub account.
5. In **Sync Mode** select **Sync Specific Repositories**, then in **Repositories** select the `airflow-fivetran-tutorial` repository.
6. Click **SAVE & TEST**. After your connection has been tested click **CONTINUE**.
7. Click **Start Sync** to start your initial sync. This initial synchronization will load all historic metadata from your GitHub repository and has to be completed in Fivetran for the sync to become active. Once the Fivetran sync is active, you can set the sync frequency under the **Setup** tab or run the sync using the Fivetran API.
## Step 5: Generate a Fivetran API key
You have now created a Fivetran [sync](https://fivetran.com/docs/getting-started/syncoverview) that will extract new metadata from a GitHub repository and load it into a relational database on a time-based schedule. But to run the sync every time a specific event happens in your data ecosystem, you need to use Airflow for orchestration.
To connect Airflow to Fivetran, create a Fivetran API key.
1. In Fivetran, open your user account and click **API Key**.
2. Click **Generate API Key**. Copy the API key information to a secure place for later.
## Step 6: Create an Airflow connection to Fivetran
1. In a web browser, go to `localhost:8080` to access the Airflow UI.
2. Click **Admin** -> **Connections** -> **+** to create a new connection.
3. Name your connection `fivetran_conn` and select the **Fivetran** connection type. Provide your Fivetran API key and Fivetran API secret. If the Fivetran connection type isn't available, try restarting your Airflow instance with `astro dev restart` to ensure the contents of `requirements.txt` have been installed.
4. Click **Save**.
## Step 7: Create your Airflow DAG
For this tutorial you will create a DAG that triggers your Fivetran sync to ingest the GitHub repository metadata to your destination.
1. Open your `astro-fivetran-project` in a code-editor.
2. In your `dags` folder add a new Python file called `my_fivetran_dag.py`.
3. Copy and paste the following DAG code into the file:
```python wrap theme={null}
from airflow.decorators import dag, task
from pendulum import datetime
from fivetran_provider_async.operators import FivetranOperatorAsync
FIVETRAN_CONNECTOR_ID = ""
GITHUB_REPOSITORY = "/airflow-fivetran-tutorial"
TAG_NAME = "sync-metadata"
@dag(start_date=datetime(2023, 1, 1), schedule="@daily", catchup=False)
def my_fivetran_dag():
@task
def upstream():
return "Hello"
run_fivetran_sync = FivetranOperatorAsync(
task_id="run_fivetran_sync",
fivetran_conn_id="fivetran_conn",
connector_id=FIVETRAN_CONNECTOR_ID,
)
@task
def downstream():
return "Goodbye"
upstream() >> run_fivetran_sync >> downstream()
my_fivetran_dag()
```
This DAG contains three tasks:
* The `upstream` task runs before the Fivetran sync job is run. This task could contain a sensor or deferrable operator waiting for an action to be completed in another data tool.
* The `run_fivetran_sync` task uses the FivetranOperatorAsync to trigger the Fivetran connector specified as `FIVETRAN_CONNECTOR_ID` as soon as the `upstream` task has completed successfully.
* The `downstream` task runs after the Fivetran sync job has finished. Commonly, tasks containing data transformations on the data loaded into your Fivetran destination will be set as downstream tasks.
4. Update the `FIVETRAN_CONNECTOR_ID` variable with the ID of your connector. You can find the ID of your connector in the Fivetran UI under the **Setup** tab:
 5. Add your GitHub username to the `GITHUB_REPOSITORY` variable.
6. Save your DAG file with the changed variable names.
The FivetranOperatorAsync is one of many [deferrable operators](/docs/learn/2.x/deferrable-operators). Instead of taking up a worker slot, these operators will hand their task to the Airflow Triggerer component while waiting for a condition to be fulfilled. For longer running tasks, this can result in cost savings and greater scalability as more worker slots are available.
## Step 8: Run your DAG
1. In the Airflow UI, unpause your DAG to start its last scheduled DAG run with a logical date of yesterday.
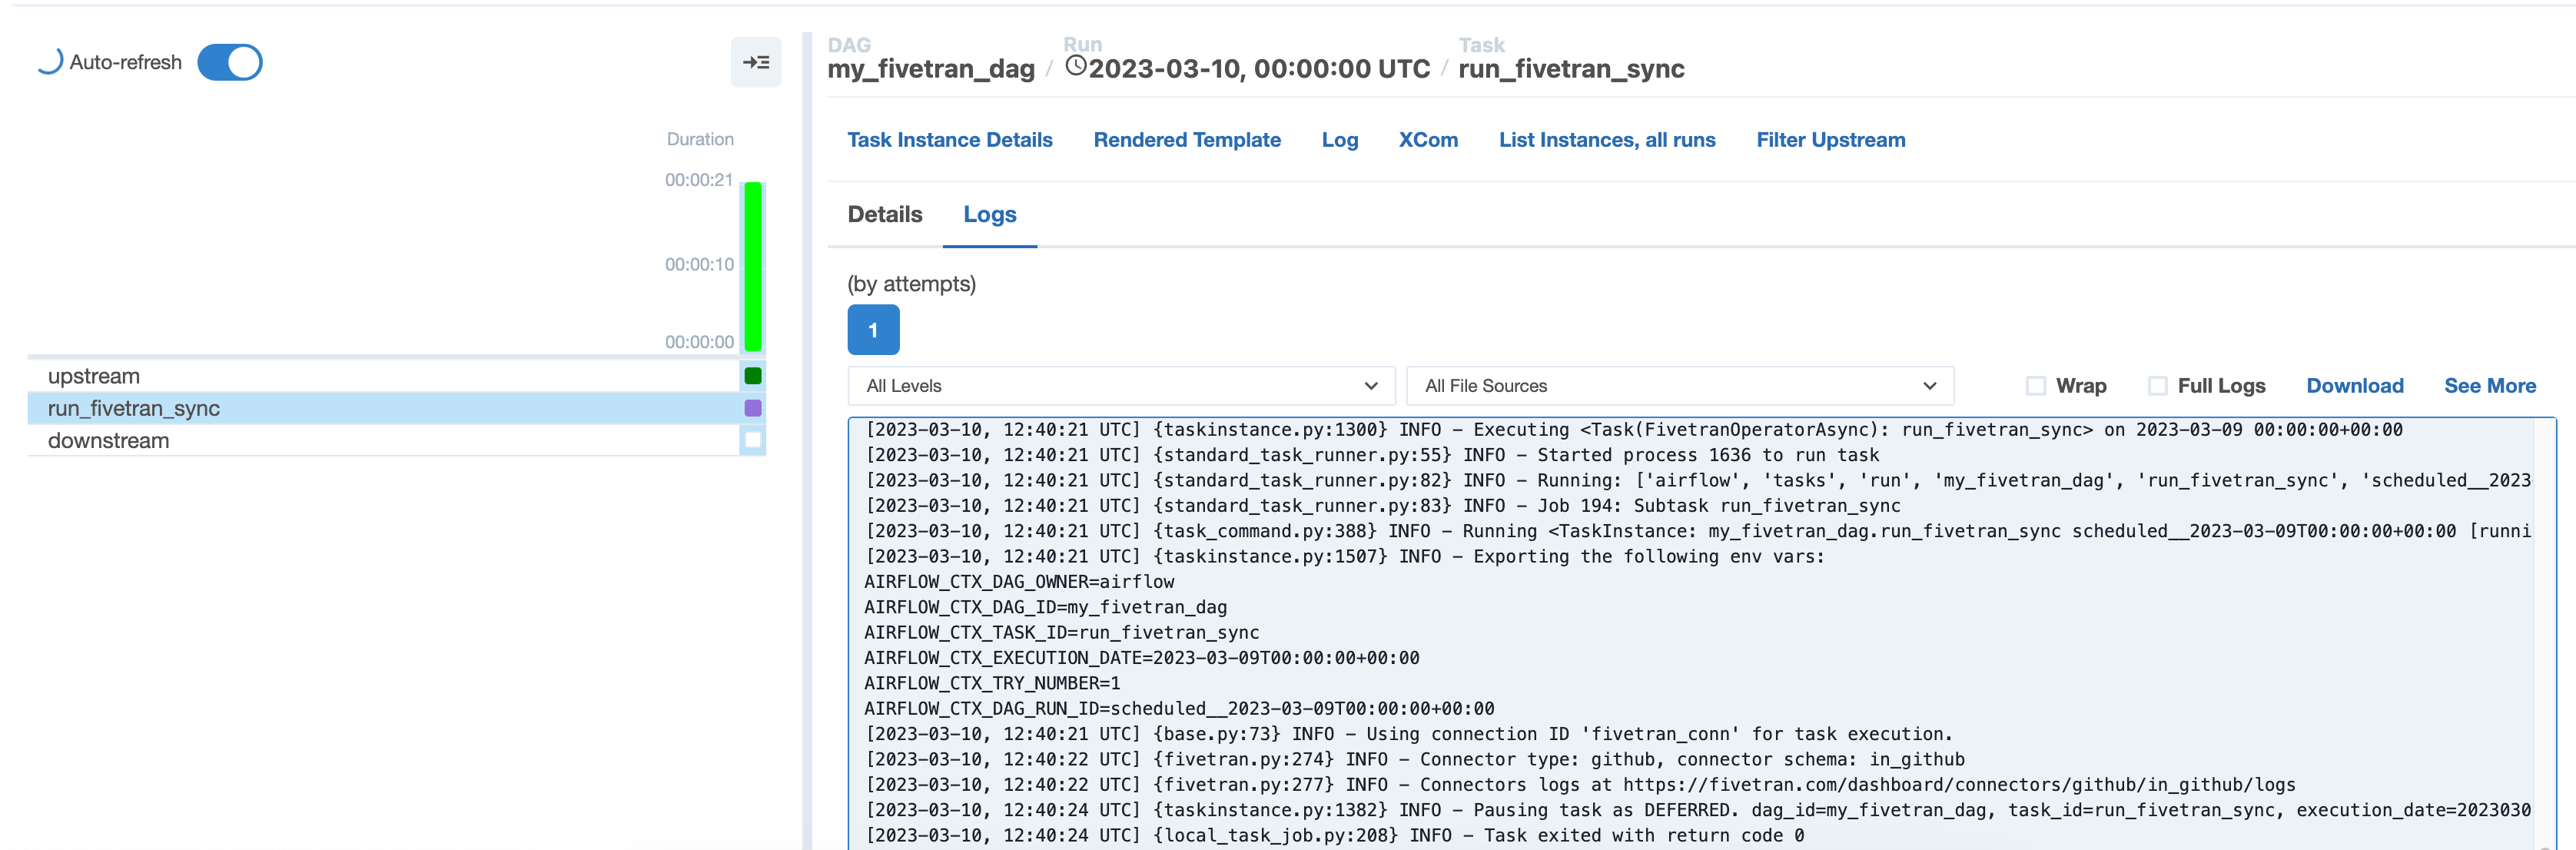
2. Click on the `run_fivetran_sync` task in the Airflow **Grid View**. This task will be in a deferred state (violet square) until the Fivetran sync is completed.
5. Add your GitHub username to the `GITHUB_REPOSITORY` variable.
6. Save your DAG file with the changed variable names.
The FivetranOperatorAsync is one of many [deferrable operators](/docs/learn/2.x/deferrable-operators). Instead of taking up a worker slot, these operators will hand their task to the Airflow Triggerer component while waiting for a condition to be fulfilled. For longer running tasks, this can result in cost savings and greater scalability as more worker slots are available.
## Step 8: Run your DAG
1. In the Airflow UI, unpause your DAG to start its last scheduled DAG run with a logical date of yesterday.
2. Click on the `run_fivetran_sync` task in the Airflow **Grid View**. This task will be in a deferred state (violet square) until the Fivetran sync is completed.
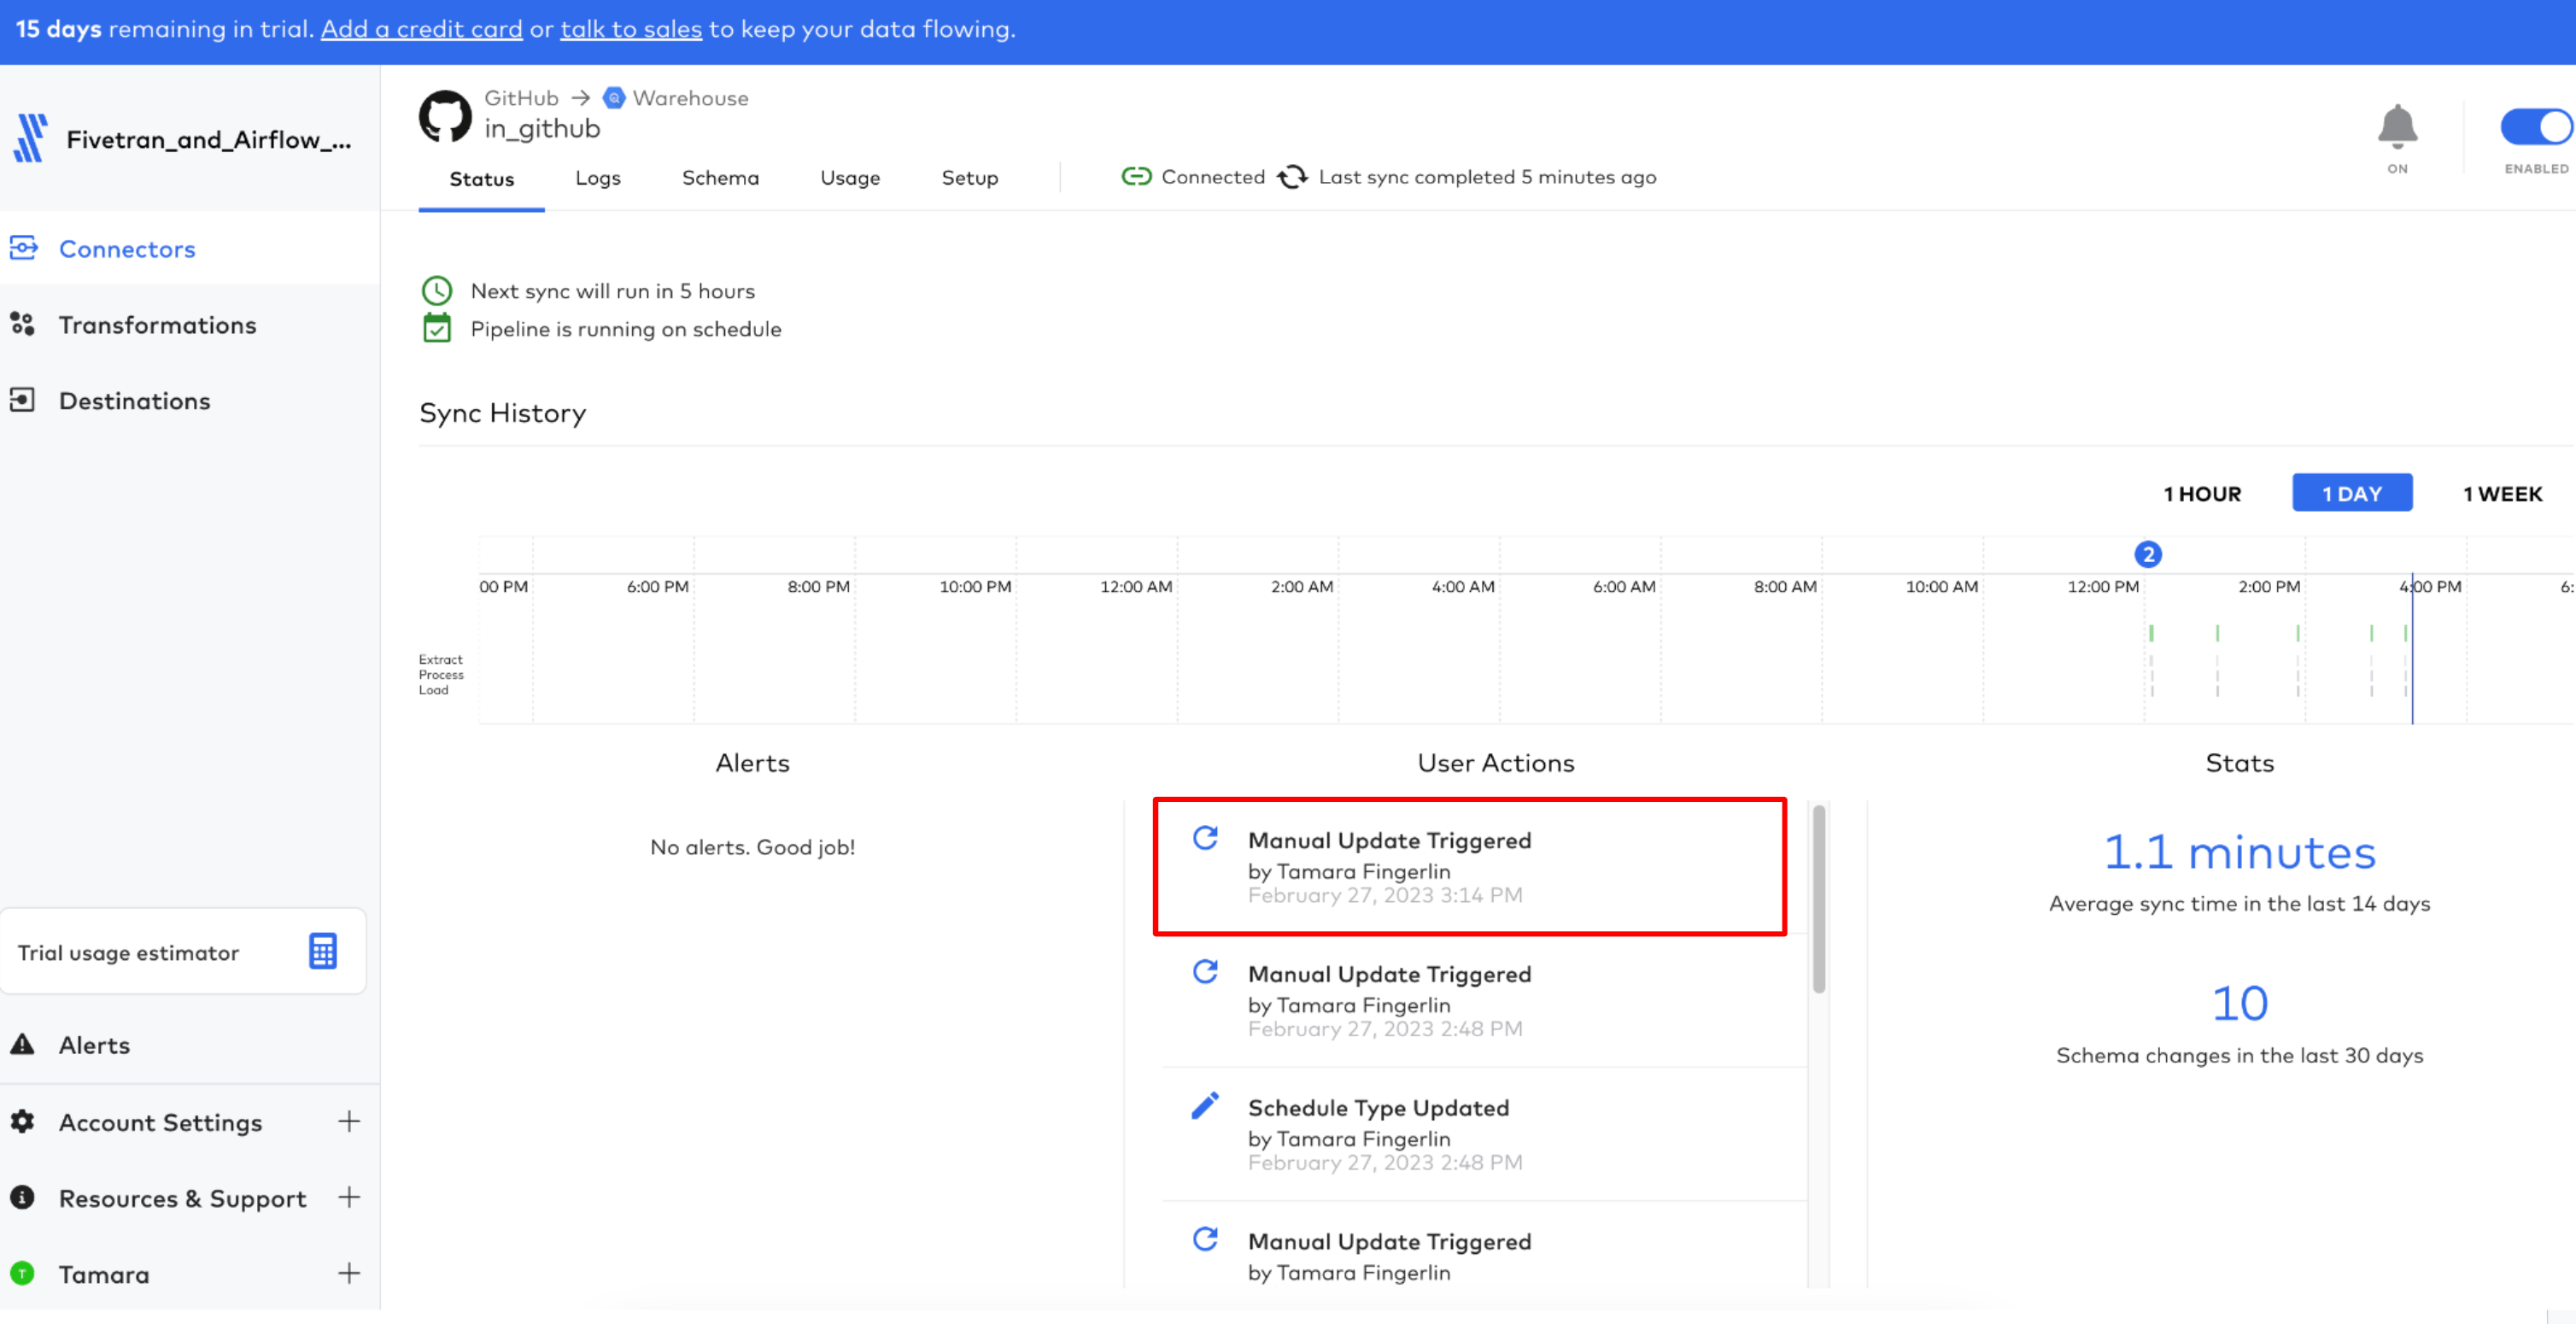
 3. After the DAG run has finished successfully, verify in your Fivetran UI that the sync shows an additional `Manual Update Triggered` entry in its `User Actions`.
 ## Step 9: (optional) Visualize your commits with Tableau
As a bonus, you can implement data observability into your data pipeline. If you are using a custom Fivetran destination, you can simply view your data directly and connect your favorite BI tool to it. If you followed this tutorial using Fivetran's managed BigQuery service, you can add a BI tool like Tableau to view your data.
1. In the Fivetran UI go to **Destinations** and select your warehouse, click the **BI tools** tab, and click **+ BI tool**.
2. Authenticate to Tableau. See [Fivetran documentation](https://fivetran.com/docs/destinations/bigquery/managed-bigquery/tableau-setup-guide). Note that you have to authorize the same Google user to Tableau as you authorized to the Fivetran managed BigQuery service.
3. [Create a new Tableau worksheet](https://help.tableau.com/current/pro/desktop/en-us/environment_workspace.htm) either in Tableau desktop or in Tableau Cloud.
4. Connect your Tableau worksheet to the BigQuery project created by the Fivetran managed service. Make sure you are using the same Google user you authorized in Fivetran. See [Tableau documentation](https://help.tableau.com/current/pro/desktop/en-us/examples_googlebigquery.htm).
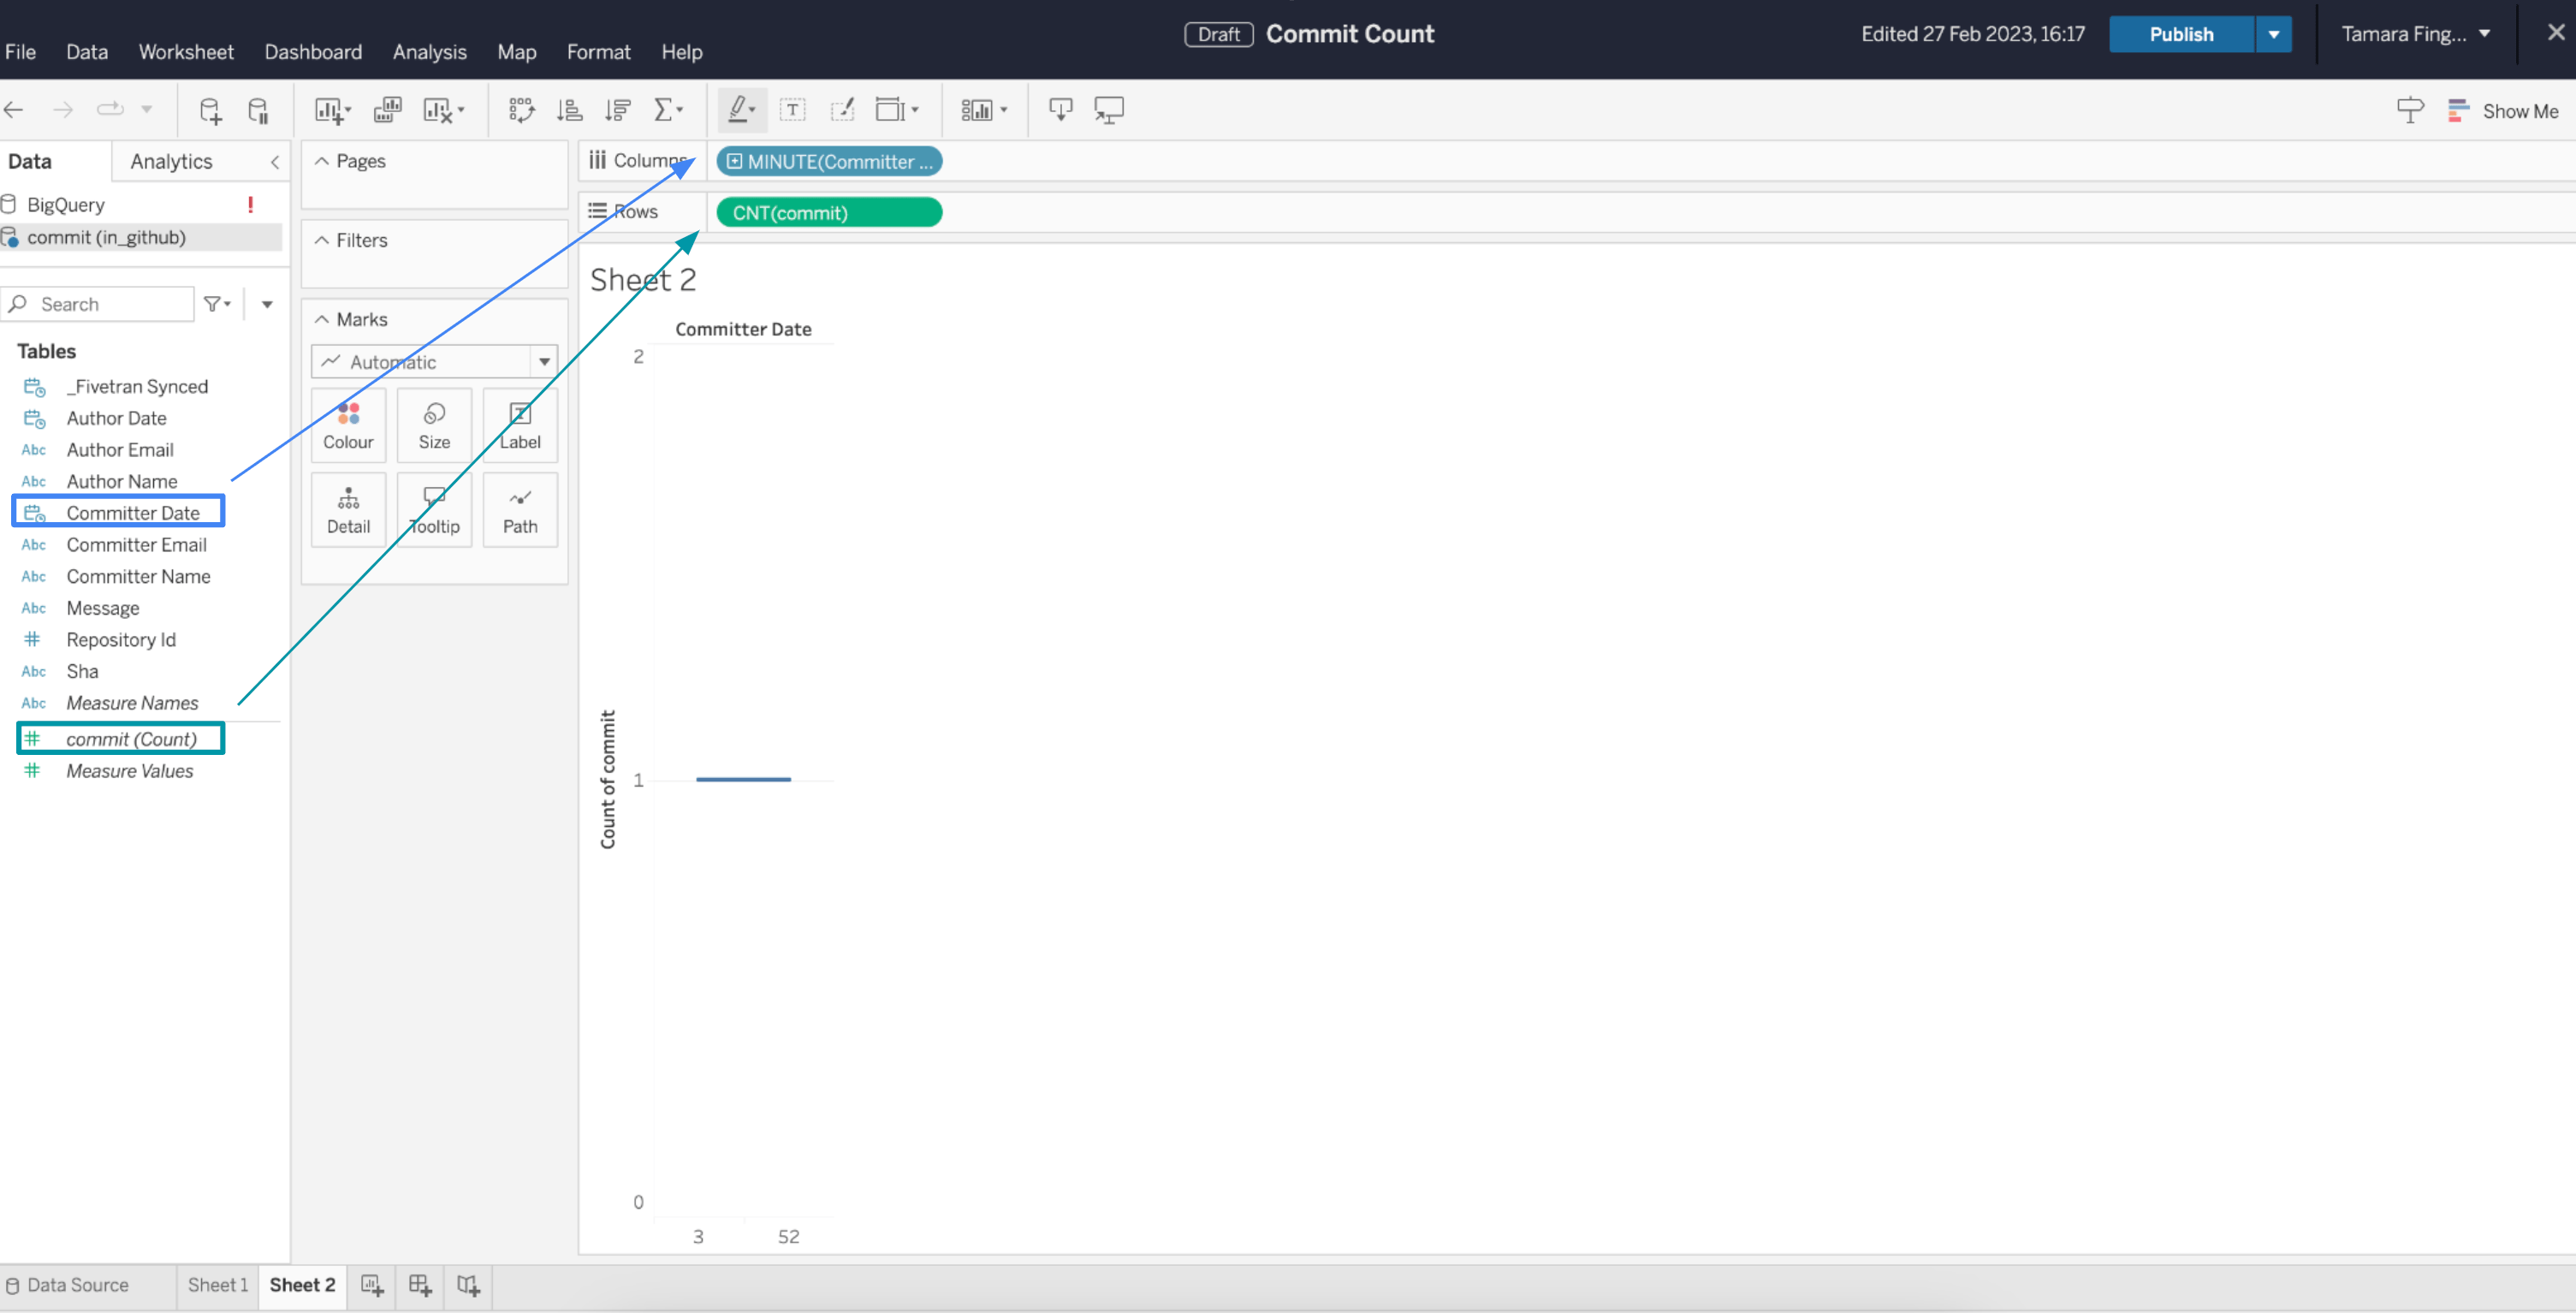
5. You can now visualize all elements of the GitHub repository metadata that has been loaded into BigQuery. Using the **commit** table, drag and drop the **commit(Count)** item from the Tables section to the `Rows` list and the **Committer Date** to the `Columns` list. Change the grain of **Committer Date** displayed to **Minute** by clicking on the right side of the element in the **Columns** list. This creates a line graph showing how many commits were made each minute in the `airflow-fivetran-tutorial` repository. The following screenshot shows that two commits were made in separate minutes:
## Step 9: (optional) Visualize your commits with Tableau
As a bonus, you can implement data observability into your data pipeline. If you are using a custom Fivetran destination, you can simply view your data directly and connect your favorite BI tool to it. If you followed this tutorial using Fivetran's managed BigQuery service, you can add a BI tool like Tableau to view your data.
1. In the Fivetran UI go to **Destinations** and select your warehouse, click the **BI tools** tab, and click **+ BI tool**.
2. Authenticate to Tableau. See [Fivetran documentation](https://fivetran.com/docs/destinations/bigquery/managed-bigquery/tableau-setup-guide). Note that you have to authorize the same Google user to Tableau as you authorized to the Fivetran managed BigQuery service.
3. [Create a new Tableau worksheet](https://help.tableau.com/current/pro/desktop/en-us/environment_workspace.htm) either in Tableau desktop or in Tableau Cloud.
4. Connect your Tableau worksheet to the BigQuery project created by the Fivetran managed service. Make sure you are using the same Google user you authorized in Fivetran. See [Tableau documentation](https://help.tableau.com/current/pro/desktop/en-us/examples_googlebigquery.htm).
5. You can now visualize all elements of the GitHub repository metadata that has been loaded into BigQuery. Using the **commit** table, drag and drop the **commit(Count)** item from the Tables section to the `Rows` list and the **Committer Date** to the `Columns` list. Change the grain of **Committer Date** displayed to **Minute** by clicking on the right side of the element in the **Columns** list. This creates a line graph showing how many commits were made each minute in the `airflow-fivetran-tutorial` repository. The following screenshot shows that two commits were made in separate minutes:
 6. Add a few commits to your `airflow-fivetran-tutorial` repository.
7. Rerun `my_fivetran_dag` manually by clicking on the play button in the Airflow UI.
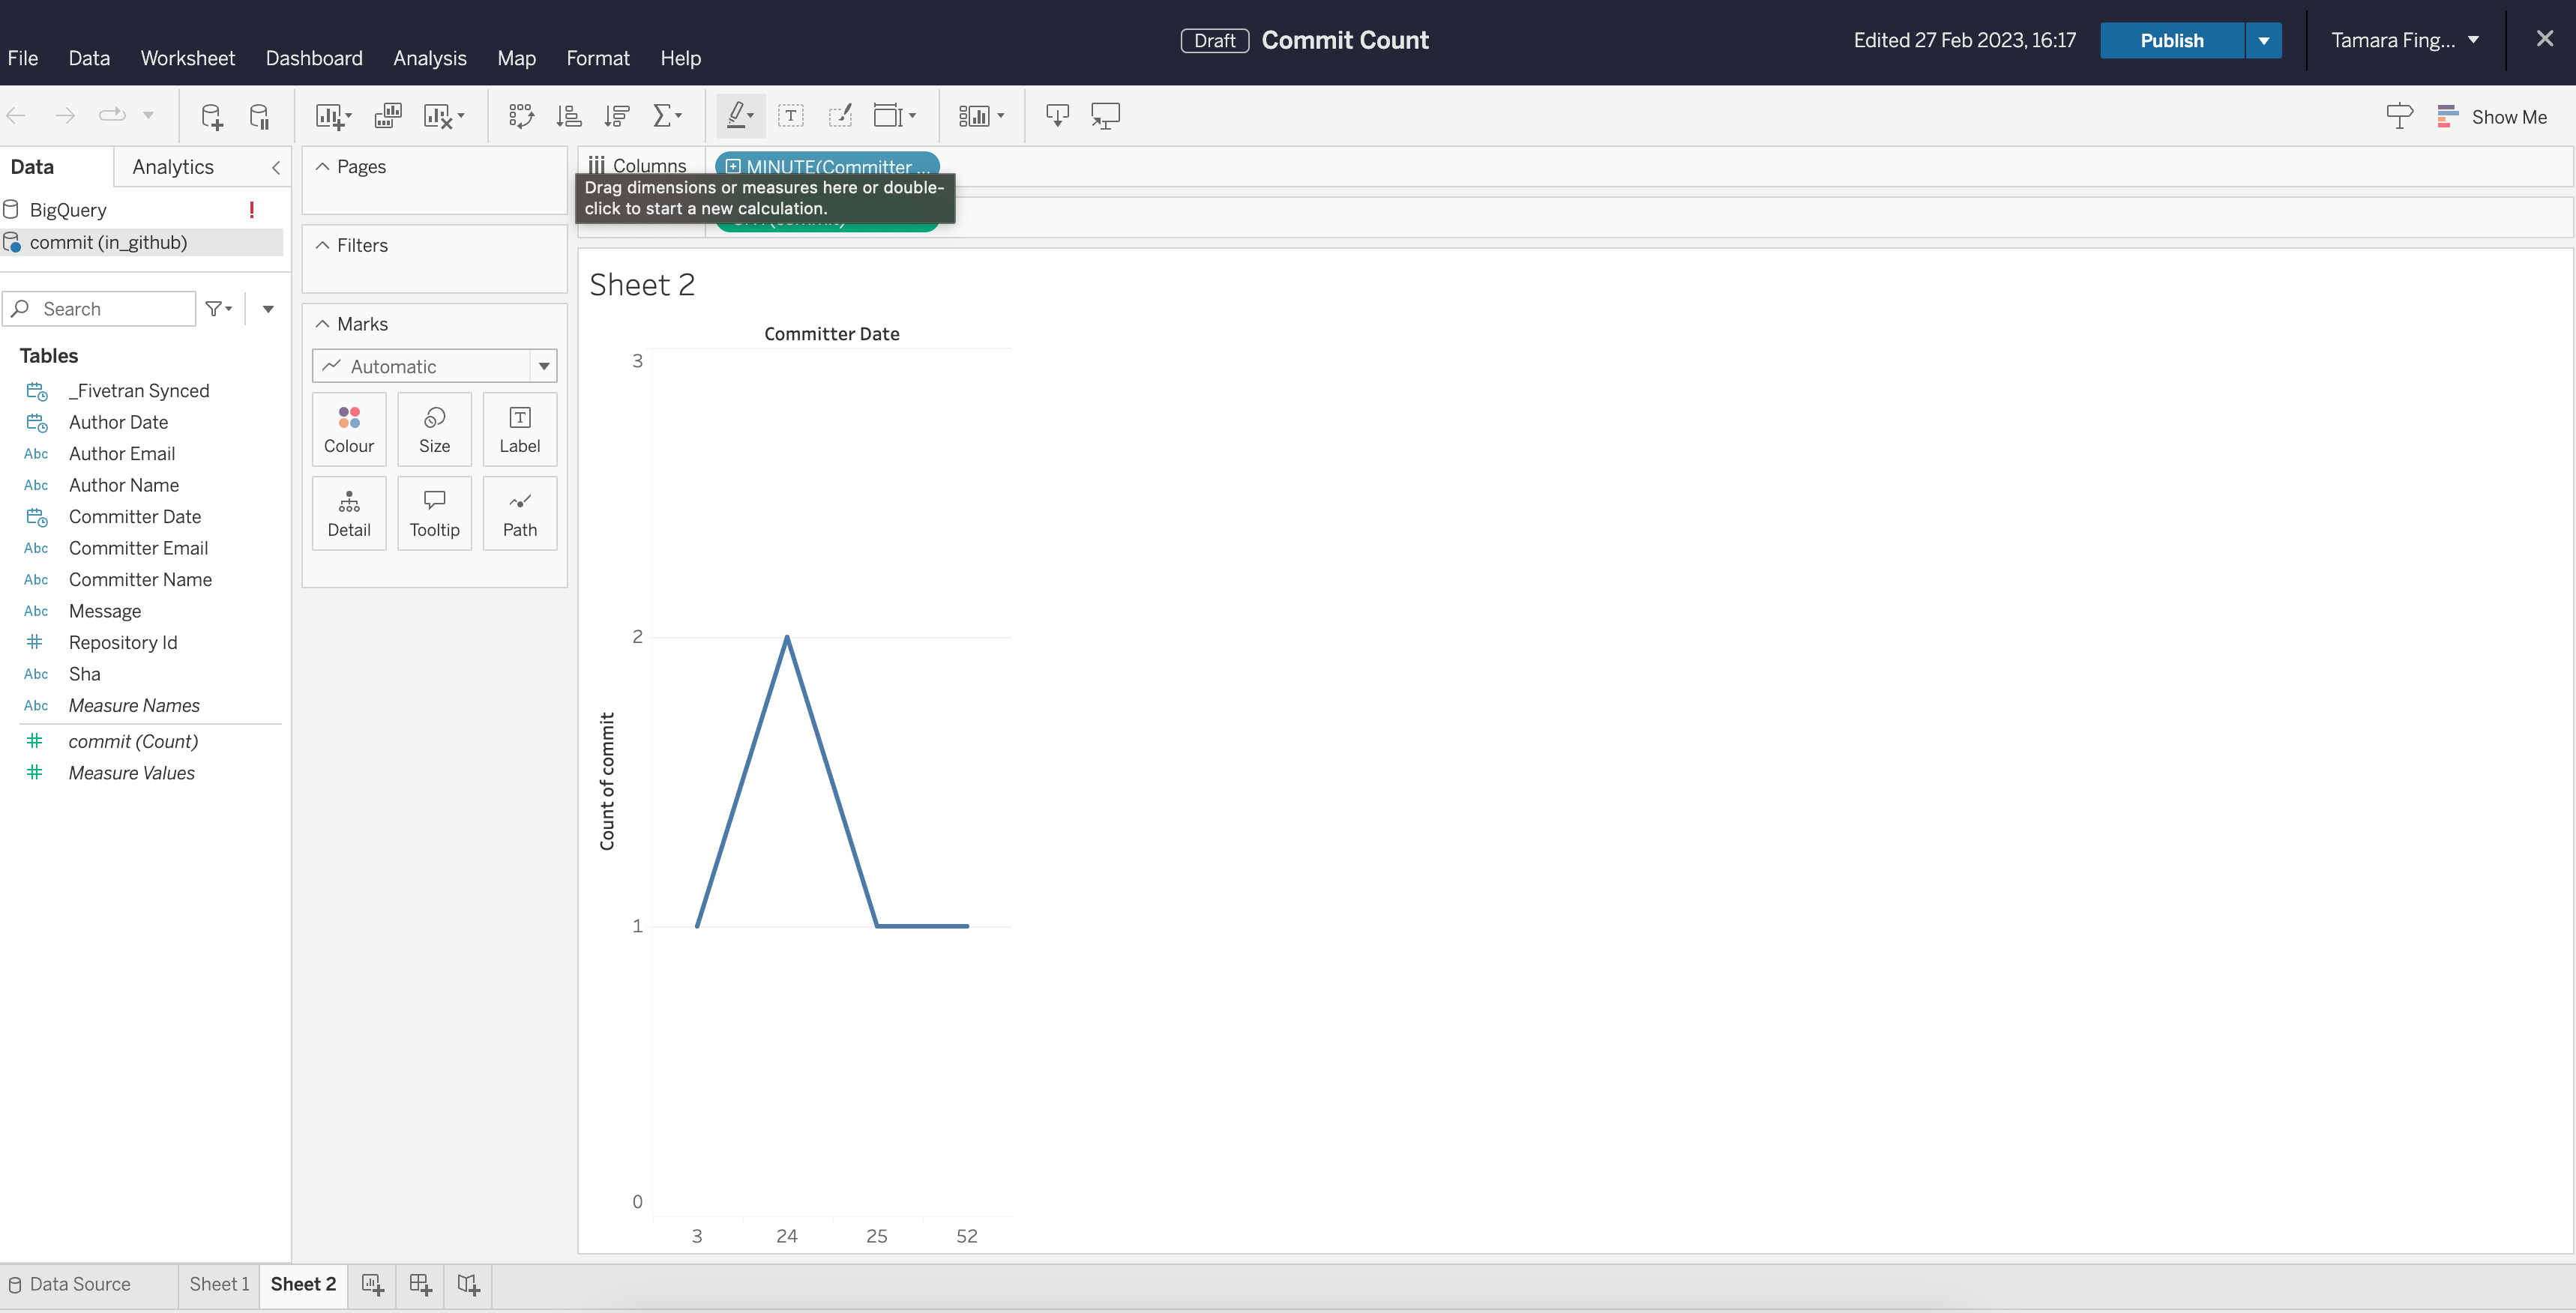
8. View your updated dashboard with commits per minute for the aggregated hour.
6. Add a few commits to your `airflow-fivetran-tutorial` repository.
7. Rerun `my_fivetran_dag` manually by clicking on the play button in the Airflow UI.
8. View your updated dashboard with commits per minute for the aggregated hour.
 ## Conclusion
Using Airflow with Fivetran allows you to embed your Fivetran syncs in your larger data ecosystem, making the scheduling of Fivetran syncs event- and data-driven. The [`airflow-provider-fivetran-async`](https://github.com/astronomer/airflow-provider-fivetran-async/) offers asynchronous capabilities to make your architecture more scalable and efficient.
## Conclusion
Using Airflow with Fivetran allows you to embed your Fivetran syncs in your larger data ecosystem, making the scheduling of Fivetran syncs event- and data-driven. The [`airflow-provider-fivetran-async`](https://github.com/astronomer/airflow-provider-fivetran-async/) offers asynchronous capabilities to make your architecture more scalable and efficient.