> ## Documentation Index
> Fetch the complete documentation index at: https://astronomer.io/docs/llms.txt
> Use this file to discover all available pages before exploring further.
# Run a task in Azure Container Instances with Airflow
[Azure Container Instances](https://azure.microsoft.com/en-us/services/container-instances/) (ACI) is one service that Azure users can leverage for working with containers. In this tutorial, you'll learn how to orchestrate ACI using Airflow and create a DAG that runs a task in an ACI container.
All code in this tutorial can be found on [the Astronomer Registry](https://registry.astronomer.io/dags/azure-container-instance).
## Time to complete
This tutorial takes approximately 30 minutes to complete.
## Assumed knowledge
To get the most out of this tutorial, make sure you have an understanding of:
* The basics of ACI. See [Getting started with Azure Container Instances](https://azure.microsoft.com/en-us/products/container-instances/#getting-started).
* Airflow fundamentals, such as writing DAGs and defining tasks. See [Get started with Apache Airflow](/docs/learn/2.x/get-started-with-airflow).
* Airflow operators. See [Operators 101](/docs/learn/2.x/what-is-an-operator).
* Airflow connections. See [Managing your Connections in Apache Airflow](/docs/learn/2.x/connections).
## Prerequisites
To complete this tutorial, you need:
* Access to ACI. See [Quickstart: Deploy a container instance in Azure using the Azure portal](https://learn.microsoft.com/en-us/azure/container-instances/container-instances-quickstart-portal) for instructions. If you don't already have ACI access, Azure offers a \$200 credit when you sign up for a free Azure account.
* The [Astro CLI](/docs/cli/v1.43/get-started-cli).
## Step 1: Create an Azure service principal
An Azure service principal is required for external tools like Airflow to connect to your Azure resources. Identify the Azure resource group you want to create your ACI in (or create a new one), then create service principal with write access over that resource group. For more information, see [Use the portal to create a Microsoft Entra ID application and service principal that can access resources](https://learn.microsoft.com/en-us/entra/identity-platform/howto-create-service-principal-portal).
## Step 2: Configure your Astro project
Now that you have your Azure resources configured, you can move on to setting up Airflow.
1. Create a new Astro project:
```sh wrap theme={null}
$ mkdir astro-aci-tutorial && cd astro-aci-tutorial
$ astro dev init
```
2. Add the following line to the `requirements.txt` file of your Astro project:
```text wrap theme={null}
apache-airflow-providers-microsoft-azure
```
This installs the Azure provider package that contains all of the relevant ACI modules.
3. Run the following command to start your project in a local environment:
```sh wrap theme={null}
astro dev start
```
## Step 3: Add an Airflow connection to ACI
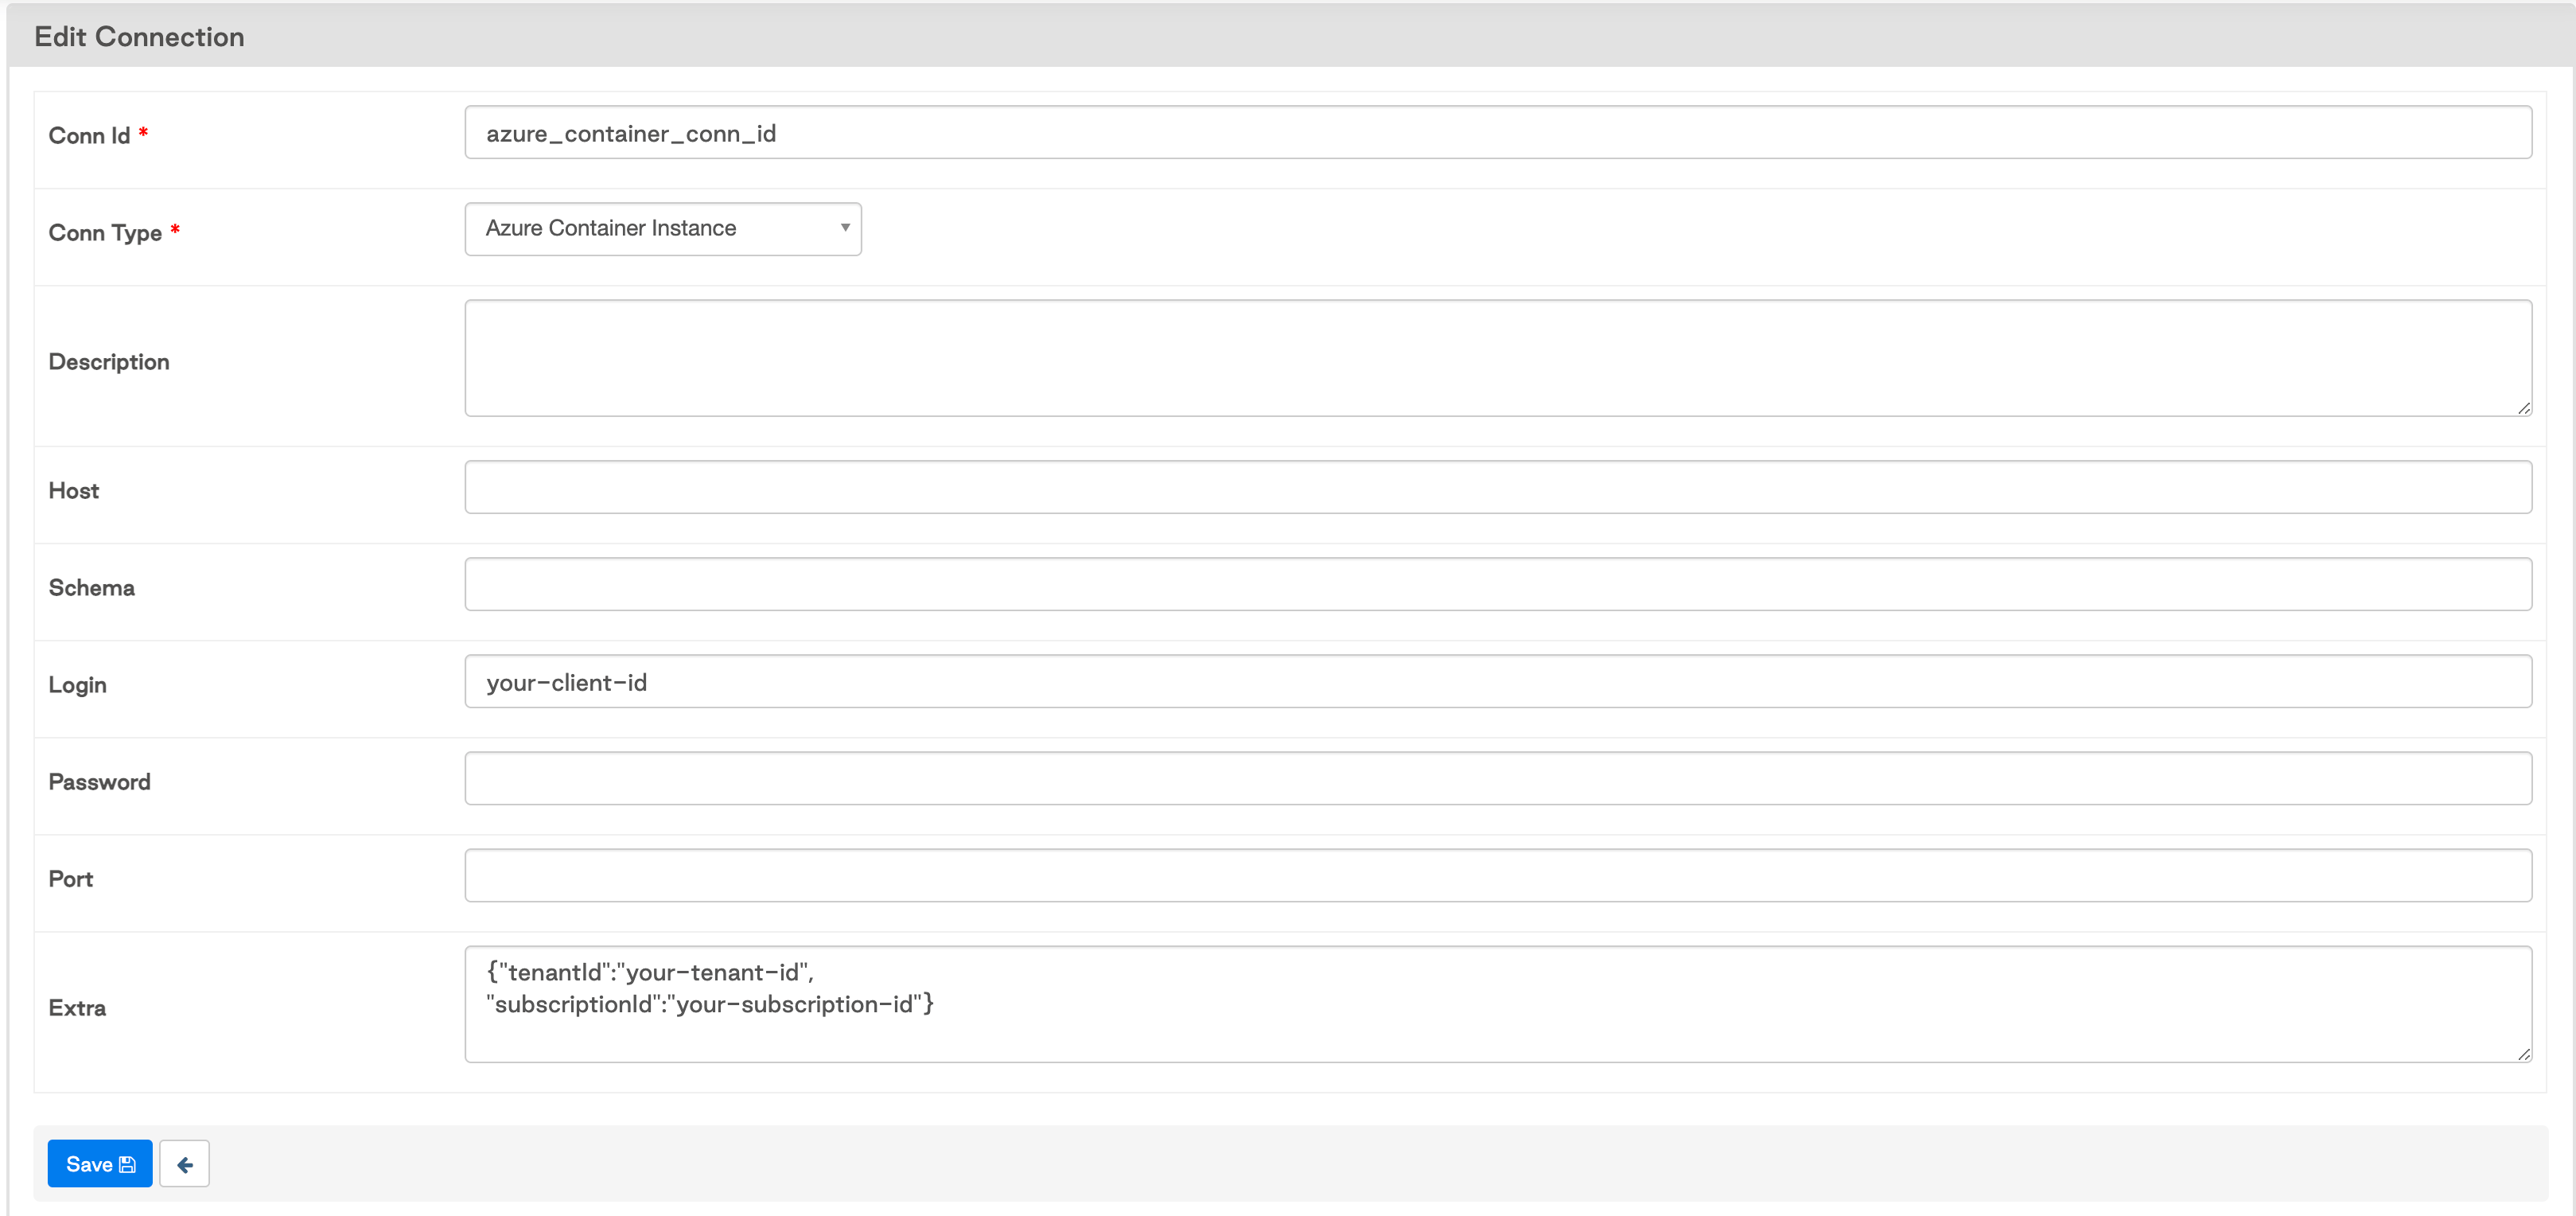
Add a connection that Airflow will use to connect to ACI. In the Airflow UI, go to **Admin** -> **Connections**.
Create a new connection named `azure_container_conn_id` and choose the **Azure Container Instance** connection type.
Specify your Client ID in the **Login** field, Client Secret in the **Password** field, and Tenant and Subscription IDs in the **Extras** field as JSON. It should look something like this:
 ## Step 4: Choose a Docker image
Choose a Docker image that you want to run. The `AzureContainerInstancesOperator` will run any Docker image in a container with your specifications. If you don't have an image, you can use a pre-built one such as Docker's `hello-world:latest` image. You can search for other available images in [Docker's container image repository](https://hub.docker.com/search?q=).
## Step 5: Create your DAG
In your Astro project `dags/` folder, create a new file called `aci-pipeline.py`. Paste the following code into the file:
```python wrap theme={null}
from airflow.models.dag import DAG
from airflow.providers.microsoft.azure.operators.container_instances import AzureContainerInstancesOperator
from datetime import datetime, timedelta
with DAG('azure_container_instances',
start_date=datetime(2020, 12, 1),
max_active_runs=1,
schedule='@daily',
default_args = {
'retries': 1,
'retry_delay': timedelta(minutes=1)
},
catchup=False
) as dag:
opr_run_container = AzureContainerInstancesOperator(
task_id='run_container',
ci_conn_id='azure_container_conn_id',
registry_conn_id=None,
resource_group='',
name='azure-tutorial-container',
image='hello-world:latest',
region='East US',
cpu=1,
memory_in_gb=1.5,
fail_if_exists=False
)
```
Update the `resource_group` parameter to the name of the resource group you created in Step 1. You may wish to update some of the other parameters in your operator, particularly the `image` and `registry_conn_id` if you chose a different Docker image. The following parameters are defined in this example:
* **`ci_conn_id`**: The connection ID for the Airflow connection you created in Step 3.
* **`registry_conn_id`**: The connection ID to connect to a registry. In this tutorial we use DockerHub, which is public and doesn't require credentials, so we pass in `None`.
* **`resource_group`**: The Azure resource group you created in Step 1.
* **`name`**: The name you want to give your ACI. Note that this must be unique within the resource group.
* **`image`**: The Docker image you chose in Step 4. In this case we use a simple Hello World example from Docker.
* **`region`**: The Azure region we want our ACI deployed to
* **`cpu`**: The number of CPUs to allocate to your container. In this example we use the default minimum. For more information on allocating CPUs and memory, refer to the [Azure documentation](https://docs.microsoft.com/en-us/azure/container-instances/container-instances-faq).
* **`memory_in_gb`**: The amount of memory to allocate to the container. In example we use the default minimum.
* **`fail_if_exists`**: Whether you want the operator to raise an exception if the container group already exists (default value is `True`). If it's set to False and the container group name already exists within the given resource group, the operator will attempt to update the container group based on the other parameters before running and terminating upon completion.
You can also provide the operator with other parameters such as environment variables, volumes, and a command as needed to run the container. For more information on the `AzureContainerInstancesOperator`, check out the [Airflow Registry](https://airflow.apache.org/registry/providers/microsoft-azure#microsoft-azure-container_instances-AzureContainerInstancesOperator).
This operator can also be used to run existing container instances and make certain updates, including the docker image, environment variables, or commands. Some updates to existing container groups aren't possible with the operator, including CPU, memory, and GPU; those updates require deleting the existing container group and recreating it, which can be accomplished using the [`AzureContainerInstanceHook`](https://airflow.apache.org/registry/providers/microsoft-azure#microsoft-azure-container_instance-AzureContainerInstanceHook).
## Step 6: Run the DAG and review the task logs
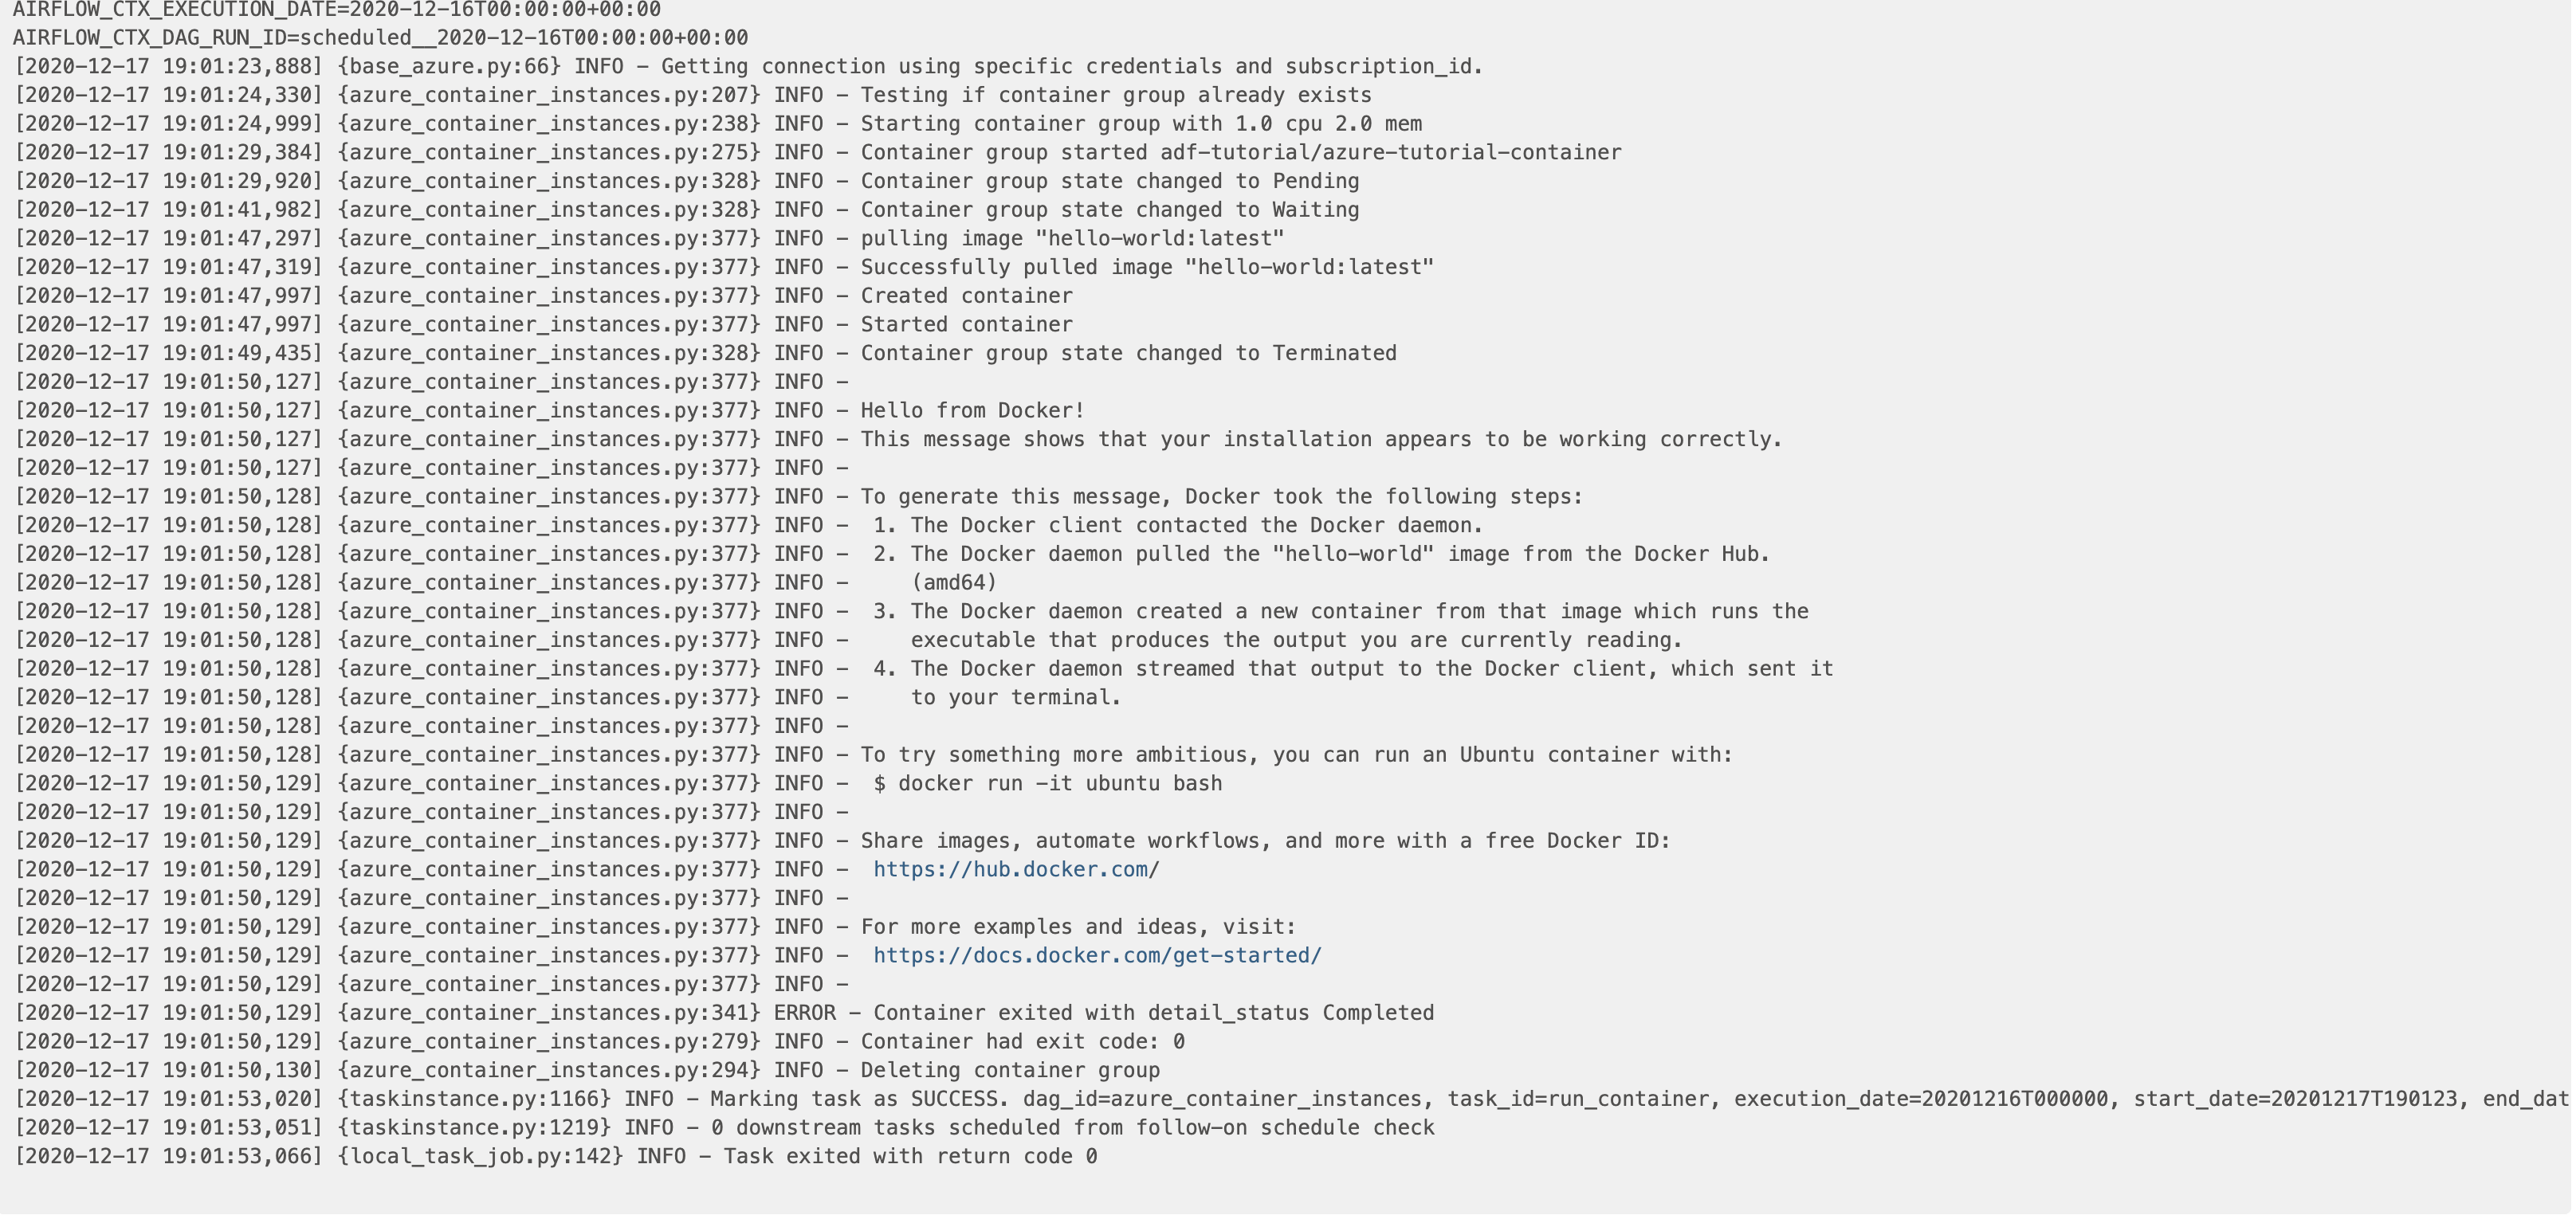
Go to the Airflow UI, unpause your `azure_container_instances` DAG, and trigger it to run the image in your ACI. An ACI will spin up, run the container with the Hello World image, and spin down. Go to the Airflow task log, and you should see the printout from the container has propagated to the logs:
## Step 4: Choose a Docker image
Choose a Docker image that you want to run. The `AzureContainerInstancesOperator` will run any Docker image in a container with your specifications. If you don't have an image, you can use a pre-built one such as Docker's `hello-world:latest` image. You can search for other available images in [Docker's container image repository](https://hub.docker.com/search?q=).
## Step 5: Create your DAG
In your Astro project `dags/` folder, create a new file called `aci-pipeline.py`. Paste the following code into the file:
```python wrap theme={null}
from airflow.models.dag import DAG
from airflow.providers.microsoft.azure.operators.container_instances import AzureContainerInstancesOperator
from datetime import datetime, timedelta
with DAG('azure_container_instances',
start_date=datetime(2020, 12, 1),
max_active_runs=1,
schedule='@daily',
default_args = {
'retries': 1,
'retry_delay': timedelta(minutes=1)
},
catchup=False
) as dag:
opr_run_container = AzureContainerInstancesOperator(
task_id='run_container',
ci_conn_id='azure_container_conn_id',
registry_conn_id=None,
resource_group='',
name='azure-tutorial-container',
image='hello-world:latest',
region='East US',
cpu=1,
memory_in_gb=1.5,
fail_if_exists=False
)
```
Update the `resource_group` parameter to the name of the resource group you created in Step 1. You may wish to update some of the other parameters in your operator, particularly the `image` and `registry_conn_id` if you chose a different Docker image. The following parameters are defined in this example:
* **`ci_conn_id`**: The connection ID for the Airflow connection you created in Step 3.
* **`registry_conn_id`**: The connection ID to connect to a registry. In this tutorial we use DockerHub, which is public and doesn't require credentials, so we pass in `None`.
* **`resource_group`**: The Azure resource group you created in Step 1.
* **`name`**: The name you want to give your ACI. Note that this must be unique within the resource group.
* **`image`**: The Docker image you chose in Step 4. In this case we use a simple Hello World example from Docker.
* **`region`**: The Azure region we want our ACI deployed to
* **`cpu`**: The number of CPUs to allocate to your container. In this example we use the default minimum. For more information on allocating CPUs and memory, refer to the [Azure documentation](https://docs.microsoft.com/en-us/azure/container-instances/container-instances-faq).
* **`memory_in_gb`**: The amount of memory to allocate to the container. In example we use the default minimum.
* **`fail_if_exists`**: Whether you want the operator to raise an exception if the container group already exists (default value is `True`). If it's set to False and the container group name already exists within the given resource group, the operator will attempt to update the container group based on the other parameters before running and terminating upon completion.
You can also provide the operator with other parameters such as environment variables, volumes, and a command as needed to run the container. For more information on the `AzureContainerInstancesOperator`, check out the [Airflow Registry](https://airflow.apache.org/registry/providers/microsoft-azure#microsoft-azure-container_instances-AzureContainerInstancesOperator).
This operator can also be used to run existing container instances and make certain updates, including the docker image, environment variables, or commands. Some updates to existing container groups aren't possible with the operator, including CPU, memory, and GPU; those updates require deleting the existing container group and recreating it, which can be accomplished using the [`AzureContainerInstanceHook`](https://airflow.apache.org/registry/providers/microsoft-azure#microsoft-azure-container_instance-AzureContainerInstanceHook).
## Step 6: Run the DAG and review the task logs
Go to the Airflow UI, unpause your `azure_container_instances` DAG, and trigger it to run the image in your ACI. An ACI will spin up, run the container with the Hello World image, and spin down. Go to the Airflow task log, and you should see the printout from the container has propagated to the logs:
 ## Additional considerations
There are multiple ways to manage containers with Airflow on Azure. The most flexible and scalable method is to use the [`KubernetesPodOperator`](/docs/learn/2.x/kubepod-operator). This lets you run any container as a Kubernetes pod, which means you can pass in resource requests and other native Kubernetes parameters. Using this operator requires an [AKS](https://azure.microsoft.com/en-us/services/kubernetes-service/) cluster (or a hand-rolled Kubernetes cluster).
If you aren't running on [AKS](https://azure.microsoft.com/en-us/services/kubernetes-service/), ACI can be a great choice:
* It's easy to use and requires little setup
* You can run containers in different regions
* It's typically the cheapest; since no virtual machines or higher-level services are required, **you only pay for the memory and CPU used by your container group while it is active**
* Unlike the [`DockerOperator`](https://airflow.apache.org/registry/providers/docker#docker-docker-DockerOperator), it doesn't require running a container on the host machine
With these points in mind, Astronomer recommends using ACI with the `AzureContainerInstancesOperator` for testing or lightweight tasks that don't require scaling. For heavy production workloads, you should use AKS and the `KubernetesPodOperator`.
## Additional considerations
There are multiple ways to manage containers with Airflow on Azure. The most flexible and scalable method is to use the [`KubernetesPodOperator`](/docs/learn/2.x/kubepod-operator). This lets you run any container as a Kubernetes pod, which means you can pass in resource requests and other native Kubernetes parameters. Using this operator requires an [AKS](https://azure.microsoft.com/en-us/services/kubernetes-service/) cluster (or a hand-rolled Kubernetes cluster).
If you aren't running on [AKS](https://azure.microsoft.com/en-us/services/kubernetes-service/), ACI can be a great choice:
* It's easy to use and requires little setup
* You can run containers in different regions
* It's typically the cheapest; since no virtual machines or higher-level services are required, **you only pay for the memory and CPU used by your container group while it is active**
* Unlike the [`DockerOperator`](https://airflow.apache.org/registry/providers/docker#docker-docker-DockerOperator), it doesn't require running a container on the host machine
With these points in mind, Astronomer recommends using ACI with the `AzureContainerInstancesOperator` for testing or lightweight tasks that don't require scaling. For heavy production workloads, you should use AKS and the `KubernetesPodOperator`.