> ## Documentation Index
> Fetch the complete documentation index at: https://astronomer.io/docs/llms.txt
> Use this file to discover all available pages before exploring further.
# Set up SCIM provisioning on Astro
This is feature is only available if you are on the **Enterprise** tier or above. See [Astro Plans and Pricing](https://www.astronomer.io/pricing/).
Astro supports integration with the open standard System for Cross-Domain Identity Management (SCIM). Using the SCIM protocol with Astro allows you to automatically provision and deprovision users and [Teams](/docs/astro/manage-teams) based on templates for access and permissions. It also provides better observability through your identity provider for when users and Teams are created or modified across your organization. Specifically, you can utilize SCIM provisioning to complete the following Astro actions from your identity provider platform:
* Create and remove users in your Organization.
* Update user profile information.
* Create and remove Astro Teams.
* Add and remove Team members.
* Retrieve user and Team information.
Some user management features on Astro behave differently after you set up SCIM provisioning. See [Manage Teams](/docs/astro/manage-teams#teams-and-scim-provisioning) for more information.
Astro doesn't support group nesting for SCIM provisioning. Access levels assigned to parent groups don't automatically propagate to child groups, so each group must be individually assigned the required access levels.
## Supported SSO identity providers
Astro supports SCIM provisioning with the following IdPs:
* [Microsoft Entra ID](https://www.microsoft.com/en-us/security/business/microsoft-entra)
* [Okta](https://www.okta.com/)
### Supported Okta features
Okta's Astro integration supports the following SCIM actions:
* Create users
* Update user attributes
* Deactivate users
* Group push
## Prerequisites
* A configured identity provider. See [Set up SSO](/docs/astro/configure-idp).
## Setup
**A new Astro UI is here**
Astronomer has redesigned the Astro UI. Try the new experience and switch your instructions using the **New Astro UI** and **Legacy UI** tabs on this page. Your selection is remembered across the docs.
1. Create an Organization API token with Organization Owner permissions. See [Organization API tokens](/docs/astro/organization-api-tokens). Copy the token to use later in this setup.
2. In the Astro UI, go to **Settings**.
3. Copy your **Organization ID** to use later in this setup.
4. Go to **Settings**, then in the **Security** section, click **Authentication**, then in the **Advanced Settings** section, click **Edit Settings** and turn on the **SCIM integration** toggle.
5. In the Okta admin dashboard, open your Astro app integration and click **Provisioning**.
6. Click **Configure API integration**, check **Enable API integration**, then configure the following values:
* **Organization ID**: Enter your **Organization ID**.
* **API token**: Enter your Organization API token.
7. Test your API credentials, then click **Save**.
8. In the **Provisioning** menu, click **To App** and configure the following:
* **Provisioning to App**: Select only **Create Users**, **Update User Attributes**, and **Deactivate Users**.
See [Okta documentation](https://developer.okta.com/docs/guides/scim-provisioning-integration-connect/main/#to-app) for more information on configuring these values.
9. Create user groups and push them to Astro. User groups pushed to Astro appear as [Teams](/docs/astro/manage-teams) in the Astro UI. See [Okta documentation](https://help.okta.com/en-us/Content/Topics/users-groups-profiles/usgp-enable-group-push.htm) for setup steps.
1. Create an Organization API token with Organization Owner permissions. See [Organization API tokens](/docs/astro/organization-api-tokens). Copy the token to use later in this setup.
2. In the Astro UI, click **Organization Settings**.
3. On the **General** page, copy your **Organization ID** to use later in this setup.
4. Go to **Settings > Authentication**. In the **Advanced Settings** menu, click **Edit Settings**, then click the **SCIM integration** toggle to on.
5. In the Okta admin dashboard, open your Astro app integration and click **Provisioning**.
6. Click **Configure API integration**, check **Enable API integration**, then configure the following values:
* **Organization ID**: Enter your **Organization ID**.
* **API token**: Enter your Organization API token.
7. Test your API credentials, then click **Save**.
8. In the **Provisioning** menu, click **To App** and configure the following:
* **Provisioning to App**: Select only **Create Users**, **Update User Attributes**, and **Deactivate Users**.
See [Okta documentation](https://developer.okta.com/docs/guides/scim-provisioning-integration-connect/main/#to-app) for more information on configuring these values.
9. Create user groups and push them to Astro. User groups pushed to Astro appear as [Teams](/docs/astro/manage-teams) in the Astro UI. See [Okta documentation](https://help.okta.com/en-us/Content/Topics/users-groups-profiles/usgp-enable-group-push.htm) for setup steps.
Complete the manual setup if you configured your existing Astro app without using the Okta app catalogue.
1. Create an Organization API token with Organization Owner permissions. See [Organization API tokens](/docs/astro/organization-api-tokens). Copy the token to use later in this setup.
2. In the Astro UI, go to **Settings**, then in the **Security** section, click **Authentication**.
3. In the **Advanced Settings** menu, click **Edit Settings**, then turn on the **SCIM integration** toggle.
4. Copy the **SCIM Integration URL** that appears.
5. In the Okta admin dashboard, add SCIM provisioning to your existing Astro app integration. Then, open your app in Okta and go to **Provisioning** > **Integration** to configure the following values:
* **Supported provisioning actions**: Select **Push New Users**, **Push Profile Updates**, and **Push Groups**.
* **SCIM connector base URL**: Enter the SCIM integration URL you copied from the Astro UI.
* **Unique identifier field for users**: `email`.
* **Authentication Mode**: Choose **HTTP Header** and paste your Organization API token in the **Bearer** field.
See [Okta documentation](https://help.okta.com/en-us/Content/Topics/Apps/Apps_App_Integration_Wizard_SCIM.htm) for more information about setting up SCIM provisioning.
6. In the **Provisioning** menu, click **To App** and configure the following:
* **Provisioning to App**: Select **Create Users**, **Update User Attributes**, and **Deactivate Users**.
* **Astro Attribute Mappings**: Configure the following mappings:
| Attribute | Attribute Type | Value | Apply On |
| ---------------------------- | -------------- | ------------------------------ | ----------------- |
| Username (`userName`) | Personal | Configured in sign-on settings | |
| Given name (`givenName`) | Personal | user.firstName | Create and update |
| Family name (`familyName`) | Personal | user.lastName | Create and update |
| Email (`email`) | Personal | `user.email` | Create and update |
| Display name (`displayName`) | Personal | user.displayName | Create and update |
| Profile Url (`profileUrl`) | Personal | user.profileUrl | Create and update |
See [Okta documentation](https://developer.okta.com/docs/guides/scim-provisioning-integration-connect/main/#to-app) for more information on configuring these values.
7. Create user groups and push them to Astro. User groups pushed to Astro appear as [Teams](/docs/astro/manage-teams) in the Astro UI. See [Okta documentation](https://help.okta.com/en-us/Content/Topics/users-groups-profiles/usgp-enable-group-push.htm) for setup steps.
1. Create an Organization API token with Organization Owner permissions. See [Organization API tokens](/docs/astro/organization-api-tokens). Copy the token to use later in this setup.
2. In the Astro UI, click **Organization Settings**, then click **Authentication**.
3. In the **Advanced Settings** menu, click **Edit Settings**, then click the **SCIM integration** toggle to on.
4. Copy the **SCIM Integration URL** that appears.
5. In the Okta admin dashboard, add SCIM provisioning to your existing Astro app integration. Then, open your app in Okta and go to **Provisioning** > **Integration** to configure the following values:
* **Supported provisioning actions**: Select **Push New Users**, **Push Profile Updates**, and **Push Groups**.
* **SCIM connector base URL**: Enter the SCIM integration URL you copied from the Astro UI.
* **Unique identifier field for users**: `email`.
* **Authentication Mode**: Choose **HTTP Header** and paste your Organization API token in the **Bearer** field.
See [Okta documentation](https://help.okta.com/en-us/Content/Topics/Apps/Apps_App_Integration_Wizard_SCIM.htm) for more information about setting up SCIM provisioning.
6. In the **Provisioning** menu, click **To App** and configure the following:
* **Provisioning to App**: Select **Create Users**, **Update User Attributes**, and **Deactivate Users**.
* **Astro Attribute Mappings**: Configure the following mappings:
| Attribute | Attribute Type | Value | Apply On |
| ---------------------------- | -------------- | ------------------------------ | ----------------- |
| Username (`userName`) | Personal | Configured in sign-on settings | |
| Given name (`givenName`) | Personal | user.firstName | Create and update |
| Family name (`familyName`) | Personal | user.lastName | Create and update |
| Email (`email`) | Personal | `user.email` | Create and update |
| Display name (`displayName`) | Personal | user.displayName | Create and update |
| Profile Url (`profileUrl`) | Personal | user.profileUrl | Create and update |
See [Okta documentation](https://developer.okta.com/docs/guides/scim-provisioning-integration-connect/main/#to-app) for more information on configuring these values.
7. Create user groups and push them to Astro. User groups pushed to Astro appear as [Teams](/docs/astro/manage-teams) in the Astro UI. See [Okta documentation](https://help.okta.com/en-us/Content/Topics/users-groups-profiles/usgp-enable-group-push.htm) for setup steps.
1. Create an Organization API token with Organization Owner permissions. See [Organization API tokens](/docs/astro/organization-api-tokens). Copy the token to use later in this setup.
2. In the Astro UI, go to **Settings**, then in the **Security** section, click **Authentication**.
3. In the **Advanced Settings** menu, click **Edit Settings**, then turn on the **SCIM integration** toggle.
4. Copy the **SCIM Integration URL** that appears.
5. Append the [Microsoft Entra ID feature flag parameter](https://learn.microsoft.com/en-us/azure/active-directory/app-provisioning/application-provisioning-config-problem-scim-compatibility#flags-to-alter-the-scim-behavior) `?aadOptscim062020` to your **SCIM Integration URL** and recopy it. For example, if your SCIM Integration URL is `https://api.astronomer.io/scim/v2/cknaqyipv05731evsry6cj4n0`, your final URL would be `https://api.astronomer.io/scim/v2/cknaqyipv05731evsry6cj4n0?aadOptscim062020`. The feature flag is required for fully compliant SCIM behavior in Microsoft Entra ID.
6. In the Microsoft Entra ID management dashboard, [create a new enterprise application](https://learn.microsoft.com/en-us/azure/active-directory/manage-apps/add-application-portal#add-an-enterprise-application) with the third option, **Integrate any other application you don't find in the gallery**.
7. In the menu for your new application, click **Provisioning** and configure the following values:
* **Provisioning mode**: Set to **Automatic**.
* **Admin Credentials** > **Tenant URL**: Enter the **SCIM integration URL** including the Microsoft Entra ID feature flag parameter.
* **Secret Token**: Enter your Organization API token.
* **Authentication Method**: Select **Bearer Authentication**.
**Only provision users**
If you prefer to only provision users with SCIM, and you don't want to provision Teams, skip Steps 8-10.
8. In **Mappings**, open the **Groups** mapping configuration.
9. In **Target Object Actions**, tick the checkboxes for **Create**, **Update**, and **Delete**.
10. In the **Attribute Mappings** table, add the following mappings:
| Microsoft Entra ID Attribute | Astro Attribute |
| ---------------------------- | --------------- |
| displayName | displayName |
| members | members |
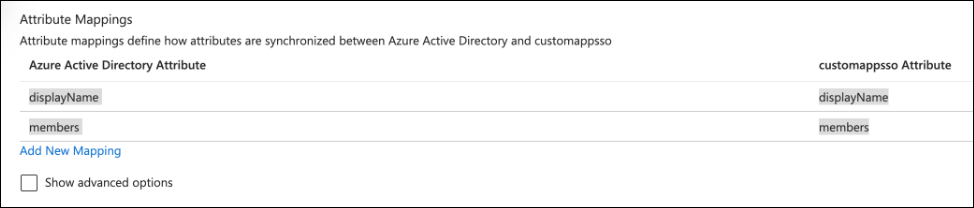
Delete any other group attributes not listed in the previous table. You should have exactly two attributes as shown in the following screenshot:
 11. Go back to the **Mappings** menu and open the **User** mapping configuration.
12. In **Target Object Actions**, tick the checkboxes for **Create**, **Update**, and **Delete**.
13. In the **Attribute Mappings** table, add the following mappings:
| Microsoft Entra ID Attribute | Astro Attribute |
| ------------------------------------------------------------- | --------------- |
| `mail` | `userName` |
| `Switch([IsSoftDeleted], , "False", "True", "True", "False")` | `active` |
| `displayName` | `displayName` |
To successfully configure the `active` mapping in the table, you must first complete these steps:
If not already present, create the `active` Attribute:
* Click **Show advanced options**.
* Select **Edit attribute list**.
* Add a new attribute:
* **Name**: `active`
* **Type**: Boolean
* Click **Save**.
Add the Attribute Mapping using an Expression:
* Go back to **Attribute Mappings**.
* Click **Add New Mapping**.
* Change the **Type** to **Expression**.
* In the **Entra ID Attribute** field, enter:
```text wrap theme={null}
Switch([IsSoftDeleted], , "False", "True", "True", "False")
```
* In the **Attribute** field, select `active`.
* Click **Save**.
This setup assumes that `mail` contains your users' email. If you use a field other than `mail` to define your user email, replace `mail` with the attribute you use.
Whether you choose to use `mail` or a different attribute like `userPrincipleName`, you must use the same Microsoft Entra ID Attribute for both your SSO and SCIM configurations.
Delete any other user attributes not listed in the previous table. You should have exactly three attributes as shown in the following screenshot:
11. Go back to the **Mappings** menu and open the **User** mapping configuration.
12. In **Target Object Actions**, tick the checkboxes for **Create**, **Update**, and **Delete**.
13. In the **Attribute Mappings** table, add the following mappings:
| Microsoft Entra ID Attribute | Astro Attribute |
| ------------------------------------------------------------- | --------------- |
| `mail` | `userName` |
| `Switch([IsSoftDeleted], , "False", "True", "True", "False")` | `active` |
| `displayName` | `displayName` |
To successfully configure the `active` mapping in the table, you must first complete these steps:
If not already present, create the `active` Attribute:
* Click **Show advanced options**.
* Select **Edit attribute list**.
* Add a new attribute:
* **Name**: `active`
* **Type**: Boolean
* Click **Save**.
Add the Attribute Mapping using an Expression:
* Go back to **Attribute Mappings**.
* Click **Add New Mapping**.
* Change the **Type** to **Expression**.
* In the **Entra ID Attribute** field, enter:
```text wrap theme={null}
Switch([IsSoftDeleted], , "False", "True", "True", "False")
```
* In the **Attribute** field, select `active`.
* Click **Save**.
This setup assumes that `mail` contains your users' email. If you use a field other than `mail` to define your user email, replace `mail` with the attribute you use.
Whether you choose to use `mail` or a different attribute like `userPrincipleName`, you must use the same Microsoft Entra ID Attribute for both your SSO and SCIM configurations.
Delete any other user attributes not listed in the previous table. You should have exactly three attributes as shown in the following screenshot:
 14. Click **Test connection** in the Microsoft Entra ID application management menu to confirm your connection to the SCIM endpoint.
1. Create an Organization API token with Organization Owner permissions. See [Organization API tokens](/docs/astro/organization-api-tokens). Copy the token to use later in this setup.
2. In the Astro UI, click **Organization Settings**, then click **Authentication**.
3. In the **Advanced Settings** menu, click **Edit Settings**, then click the **SCIM integration** toggle to on.
4. Copy the **SCIM Integration URL** that appears.
5. Append the [Microsoft Entra ID feature flag parameter](https://learn.microsoft.com/en-us/azure/active-directory/app-provisioning/application-provisioning-config-problem-scim-compatibility#flags-to-alter-the-scim-behavior) `?aadOptscim062020` to your **SCIM Integration URL** and recopy it. For example, if your SCIM Integration URL is `https://api.astronomer.io/scim/v2/cknaqyipv05731evsry6cj4n0`, your final URL would be `https://api.astronomer.io/scim/v2/cknaqyipv05731evsry6cj4n0?aadOptscim062020`. The feature flag is required for fully compliant SCIM behavior in Microsoft Entra ID.
6. In the Microsoft Entra ID management dashboard, [create a new enterprise application](https://learn.microsoft.com/en-us/azure/active-directory/manage-apps/add-application-portal#add-an-enterprise-application) with the third option, **Integrate any other application you don't find in the gallery**.
7. In the menu for your new application, click **Provisioning** and configure the following values:
* **Provisioning mode**: Set to **Automatic**.
* **Admin Credentials** > **Tenant URL**: Enter the **SCIM integration URL** including the Microsoft Entra ID feature flag parameter.
* **Secret Token**: Enter your Organization API token.
* **Authentication Method**: Select **Bearer Authentication**.
**Only provision users**
If you prefer to only provision users with SCIM, and you don't want to provision Teams, skip Steps 8-10.
8. In **Mappings**, open the **Groups** mapping configuration.
9. In **Target Object Actions**, tick the checkboxes for **Create**, **Update**, and **Delete**.
10. In the **Attribute Mappings** table, add the following mappings:
| Microsoft Entra ID Attribute | Astro Attribute |
| ---------------------------- | --------------- |
| displayName | displayName |
| members | members |
Delete any other group attributes not listed in the previous table. You should have exactly two attributes as shown in the following screenshot:
11. Go back to the **Mappings** menu and open the **User** mapping configuration.
12. In **Target Object Actions**, tick the checkboxes for **Create**, **Update**, and **Delete**.
13. In the **Attribute Mappings** table, add the following mappings:
| Microsoft Entra ID Attribute | Astro Attribute |
| ------------------------------------------------------------- | --------------- |
| `mail` | `userName` |
| `Switch([IsSoftDeleted], , "False", "True", "True", "False")` | `active` |
| `displayName` | `displayName` |
To successfully configure the `active` mapping in the table, you must first complete these steps:
If not already present, create the `active` Attribute:
* Click **Show advanced options**.
* Select **Edit attribute list**.
* Add a new attribute:
* **Name**: `active`
* **Type**: Boolean
* Click **Save**.
Add the Attribute Mapping using an Expression:
* Go back to **Attribute Mappings**.
* Click **Add New Mapping**.
* Change the **Type** to **Expression**.
* In the **Entra ID Attribute** field, enter:
```text wrap theme={null}
Switch([IsSoftDeleted], , "False", "True", "True", "False")
```
* In the **Attribute** field, select `active`.
* Click **Save**.
This setup assumes that `mail` contains your users' email. If you use a field other than `mail` to define your user email, replace `mail` with the attribute you use.
Whether you choose to use `mail` or a different attribute like `userPrincipleName`, you must use the same Microsoft Entra ID Attribute for both your SSO and SCIM configurations.
Delete any other user attributes not listed in the previous table. You should have exactly three attributes as shown in the following screenshot:
14. Click **Test connection** in the Microsoft Entra ID application management menu to confirm your connection to the SCIM endpoint.
## Frequently asked questions
1. In the Okta dashboard, open the Astro application and click **Push Groups**.
2. Click the value in **Push Status** for the group that's out of sync, then click **Push now**.
If you removed an Okta user but their Astro account remains, [delete the account from Astro](/docs/astro/manage-organization-users#update-or-remove-an-organization-user).
If an Astro user isn't appearing for an Okta user as expected, remove and re-assign the user in Okta.
14. Click **Test connection** in the Microsoft Entra ID application management menu to confirm your connection to the SCIM endpoint.
1. Create an Organization API token with Organization Owner permissions. See [Organization API tokens](/docs/astro/organization-api-tokens). Copy the token to use later in this setup.
2. In the Astro UI, click **Organization Settings**, then click **Authentication**.
3. In the **Advanced Settings** menu, click **Edit Settings**, then click the **SCIM integration** toggle to on.
4. Copy the **SCIM Integration URL** that appears.
5. Append the [Microsoft Entra ID feature flag parameter](https://learn.microsoft.com/en-us/azure/active-directory/app-provisioning/application-provisioning-config-problem-scim-compatibility#flags-to-alter-the-scim-behavior) `?aadOptscim062020` to your **SCIM Integration URL** and recopy it. For example, if your SCIM Integration URL is `https://api.astronomer.io/scim/v2/cknaqyipv05731evsry6cj4n0`, your final URL would be `https://api.astronomer.io/scim/v2/cknaqyipv05731evsry6cj4n0?aadOptscim062020`. The feature flag is required for fully compliant SCIM behavior in Microsoft Entra ID.
6. In the Microsoft Entra ID management dashboard, [create a new enterprise application](https://learn.microsoft.com/en-us/azure/active-directory/manage-apps/add-application-portal#add-an-enterprise-application) with the third option, **Integrate any other application you don't find in the gallery**.
7. In the menu for your new application, click **Provisioning** and configure the following values:
* **Provisioning mode**: Set to **Automatic**.
* **Admin Credentials** > **Tenant URL**: Enter the **SCIM integration URL** including the Microsoft Entra ID feature flag parameter.
* **Secret Token**: Enter your Organization API token.
* **Authentication Method**: Select **Bearer Authentication**.
**Only provision users**
If you prefer to only provision users with SCIM, and you don't want to provision Teams, skip Steps 8-10.
8. In **Mappings**, open the **Groups** mapping configuration.
9. In **Target Object Actions**, tick the checkboxes for **Create**, **Update**, and **Delete**.
10. In the **Attribute Mappings** table, add the following mappings:
| Microsoft Entra ID Attribute | Astro Attribute |
| ---------------------------- | --------------- |
| displayName | displayName |
| members | members |
Delete any other group attributes not listed in the previous table. You should have exactly two attributes as shown in the following screenshot:
11. Go back to the **Mappings** menu and open the **User** mapping configuration.
12. In **Target Object Actions**, tick the checkboxes for **Create**, **Update**, and **Delete**.
13. In the **Attribute Mappings** table, add the following mappings:
| Microsoft Entra ID Attribute | Astro Attribute |
| ------------------------------------------------------------- | --------------- |
| `mail` | `userName` |
| `Switch([IsSoftDeleted], , "False", "True", "True", "False")` | `active` |
| `displayName` | `displayName` |
To successfully configure the `active` mapping in the table, you must first complete these steps:
If not already present, create the `active` Attribute:
* Click **Show advanced options**.
* Select **Edit attribute list**.
* Add a new attribute:
* **Name**: `active`
* **Type**: Boolean
* Click **Save**.
Add the Attribute Mapping using an Expression:
* Go back to **Attribute Mappings**.
* Click **Add New Mapping**.
* Change the **Type** to **Expression**.
* In the **Entra ID Attribute** field, enter:
```text wrap theme={null}
Switch([IsSoftDeleted], , "False", "True", "True", "False")
```
* In the **Attribute** field, select `active`.
* Click **Save**.
This setup assumes that `mail` contains your users' email. If you use a field other than `mail` to define your user email, replace `mail` with the attribute you use.
Whether you choose to use `mail` or a different attribute like `userPrincipleName`, you must use the same Microsoft Entra ID Attribute for both your SSO and SCIM configurations.
Delete any other user attributes not listed in the previous table. You should have exactly three attributes as shown in the following screenshot:
14. Click **Test connection** in the Microsoft Entra ID application management menu to confirm your connection to the SCIM endpoint.
## Frequently asked questions
1. In the Okta dashboard, open the Astro application and click **Push Groups**.
2. Click the value in **Push Status** for the group that's out of sync, then click **Push now**.
If you removed an Okta user but their Astro account remains, [delete the account from Astro](/docs/astro/manage-organization-users#update-or-remove-an-organization-user).
If an Astro user isn't appearing for an Okta user as expected, remove and re-assign the user in Okta.