> ## Documentation Index
> Fetch the complete documentation index at: https://astronomer.io/docs/llms.txt
> Use this file to discover all available pages before exploring further.
# Configure Workspaces on Astro
Workspaces are collections of Deployments that can be accessed by a specific group of users. You can use Workspaces to group Deployments that share a business use case or trait.
Some common ways to implement Workspaces are:
* Using a **single Workspace** for an entire Organization, with all development and production pipelines hosted together.
* Using a **Workspace per team**. For example, you might have a Workspace for your Data Science team and a separate Workspace for your Data Engineer team, with each team's Workspace hosting both production and development pipelines.
* Using a **Workspace per project**. For example, you might have a Workspace called "Sales Analytics Project" that hosts both production and development pipelines.
This document explains how to configure Workspace details. To manage Workspace users, see [Manage Workspace users](/docs/astro/manage-workspace-users).
**A new Astro UI is here**
Astronomer has redesigned the Astro UI. Try the new experience and switch your instructions using the **New Astro UI** and **Legacy UI** tabs on this page. Your selection is remembered across the docs.
## Create a Workspace
To create a Workspace, you must have an [Organization-level](/docs/astro/user-permissions#organization-roles) role.
1. In the Astro UI, go to **Settings** > **Workspaces**.
2. Click **+ New Workspace**.
1. In the Astro UI, open the Workspace selection menu, then select **Manage Workspaces**.
2. Click **Add Workspace**.
During this initial setup, you can configure the Workspace's name and description. You can update all other Workspace settings later from the Workspace's settings.
## Navigate your Workspace
The new Astro UI doesn't have a separate Workspace view. To scope to a specific Workspace, use the Workspace dropdown in the **Deployments**, **DAGs**, and **Environment** sections. To manage a Workspace's settings, go to **Settings** > **Workspaces**, then select the Workspace.
To enter your Workspace, click the Workspace in the **Overview** tab. When you click into a Workspace and see a list of that Workspace's Deployments, you are in the **Workspace view** of the Astro UI. The Workspace view contains several pages for managing your Workspace which are accessible from a sidebar on the left of the screen:
* **Home**: View the status of your Deployments and select recently accessed Deployments.
* **Deployments:** Create new Deployments and see key metrics about existing Deployments in the Workspace. For more information, see [Create a Deployment](/docs/astro/create-deployment).
* **Dags:** View metrics about individual dags across your Workspace. For more information, see [Deployment metrics](/docs/astro/deployment-metrics#dag-and-task-runs).
* **Workspace Settings:** Update Workspace details, including Workspace user permissions, the Workspace name, and the Workspace description.
## Update general Workspace settings
1. In the Astro UI, go to **Settings** > **Workspaces**, then select your Workspace.
2. In the **General** section, click **Edit**, update the **Name** and **Description** as needed, then click **Save**.
3. To set the CI/CD enforcement default, toggle **CI/CD Enforcement** in the **Deployment Defaults** section. This determines whether new Deployments in the Workspace enforce CI/CD deploys by default, and can be overridden at the Deployment level. See [Enforce CI/CD deploys](/docs/astro/deployment-details#enforce-ci/cd-deploys).
1. In the Astro UI, select a Workspace.
2. Click **Workspace Settings** and then click the **Details** tab.
3. Click **Edit Details**, then update the following settings as needed:
* **Name**: The name of your Workspace
* **Description**: The description of your Workspace
* **CI/CD Enforcement Default**: Determines whether new Deployments in the Workspace enforce CI/CD deploys by default. This default can be overridden at the Deployment level. See [Enforce CI/CD deploys](/docs/astro/deployment-details#enforce-ci/cd-deploys).
## Configure Otto investigation guidance
Otto investigation guidance is custom text you provide to tailor [Otto investigations](/docs/astro/otto-investigate) to your environment. For example, you can instruct Otto to treat tasks that begin with `validate` as non-blocking data quality tests, or to interpret a specific log pattern in a particular way. Guidance set at the Workspace level applies to every Deployment in the Workspace. Individual Deployments can override it. See [Configure Otto investigation guidance for a Deployment](/docs/astro/deployment-settings#configure-otto-investigation-guidance).
1. In the Astro UI, go to **Settings** > **Workspaces**, then select your Workspace.
2. In the **AI Agents** section, click the **Edit** icon next to **Otto Investigation Guidance**.
3. Enter up to 10,000 characters of markdown guidance, then save your changes.
1. In the Astro UI, select a Workspace.
2. Click **Workspace Settings** and then click the **AI Agents** tab.
3. Enter up to 10,000 characters of markdown guidance, then save your changes.
## Delete a Workspace
1. In the Astro UI, go to **Settings** > **Workspaces**, then select your Workspace.
2. Scroll to the **Danger Zone** section, then click **Delete Workspace**. This option isn't available when there are active Deployments in the Workspace.
3. In the confirmation dialog, enter `delete` and then click **Yes, Continue**.
1. In the Astro UI, select a Workspace.
2. Click **Workspace Settings**.
3. Click the option menu at the top of the page and select **Delete Workspace**. This option isn't available when there are active Deployments in the Workspace.
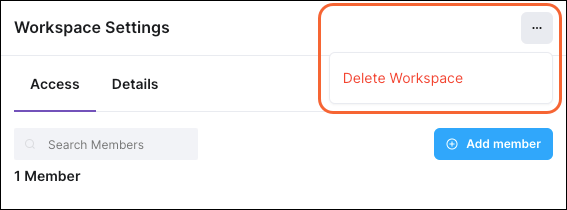 4. In the confirmation dialog, enter `delete` and then click **Yes, Continue**.