> ## Documentation Index
> Fetch the complete documentation index at: https://astronomer.io/docs/llms.txt
> Use this file to discover all available pages before exploring further.
# Manage Hybrid clusters
> Learn what you can configure on an Astro cluster.
This document applies only to [Astro Hybrid](/docs/astro/hybrid-overview).
To create a cluster on Astro Hosted, see [Create a dedicated cluster](/docs/astro/create-dedicated-cluster).
An Astro Hybrid cluster runs your Astro Deployments in isolated namespaces on your cloud. Your organization might choose to have one or multiple clusters to meet certain networking, governance, or use case requirements. You can always start with one cluster and [create additional clusters](#create-a-cluster) later. New clusters on Astro typically have default configurations that are suitable for standard use cases. You can request [Astronomer support](https://support.astronomer.io) to edit the configuration of an existing cluster. For example, you might need to:
* Add a [worker type](#manage-worker-types), which creates a new [worker node pool](#about-worker-node-pools) in your cluster and allows your team to select that worker type in a Deployment.
* Increase or decrease the maximum number of worker nodes for a given worker type that your cluster can scale up to.
* Create a VPC connection or a transit gateway connection between your Astro cluster and a target VPC.
Cluster modifications typically take only a few minutes to complete and don't require downtime. In these cases, the Astro UI and Airflow UI continue to be available and your Airflow tasks are not interrupted.
## Create a cluster
The Astro installation typically starts with one cluster for each Organization. However, your organization can choose to configure multiple Astro clusters. This could enable a few benefits, including:
* Clusters in different regions
* Different clusters for development and production environments
Within a single Workspace, you can host Deployments across multiple clusters. For example, you might have a production Deployment running in a production cluster and a development Deployment running in a development cluster. Both of those Deployments can be in the same Workspace.
This guide provides instructions for provisioning additional clusters within your Astro Organization.
### Prerequisites
To create an Astro cluster on AWS, Microsoft Azure, or Google Cloud Platform (GCP), you'll need the following:
* An activated data plane.
* Permissions to configure IAM in the dedicated account for Astro on your cloud.
### AWS
To create a new Astro cluster on AWS for your Organization, submit a request to [Astronomer support](/docs/astro/astro-support). In your request, provide the following information for every new cluster that you want to provision:
* Your Astro AWS Account ID.
* Your preferred Astro cluster name.
* The AWS region that you want to host your cluster in.
* Your preferred node instance type.
* Your preferred max node count.
* Your preferred VPC CIDR.
If you don't specify configuration preferences, Astronomer support creates a cluster with a VPC CIDR of `172.20.0.0/20`, `m5.xlarge` nodes, and a maximum node count of 20 in `us-east-1`. For information about supported regions, configurations, and defaults, see [Resources required for Astro on AWS](/docs/astro/resource-reference-aws-hybrid).
#### Additional setup for AWS regions that are disabled by default
Some AWS regions that Astronomer supports are [disabled by default on AWS](https://docs.aws.amazon.com/general/latest/gr/rande-manage.html#rande-manage-enable). These regions are:
* `af-south-1` - Africa (Cape Town)
* `ap-east-1` - Asia Pacific (Hong Kong)
* `me-south-1` - Middle East (Bahrain)
To create a cluster in one of these regions, complete the following additional setup in your AWS account:
In the AWS IAM console, update the `astronomer-remote-management` trust relationship to include permissions for enabling and disabling your desired region as described in the [AWS documentation](https://docs.aws.amazon.com/IAM/latest/UserGuide/reference_policies_examples_aws-enable-disable-regions.html):
```json expandable wrap theme={null}
{
"Version": "2012-10-17",
"Statement": [
{
"Effect": "Allow",
"Principal": {
"AWS": "arn:aws:iam::406882777402:root"
},
"Action": "sts:AssumeRole",
"Condition": {
"StringEquals": {
"sts:ExternalId": ""
}
}
},
{
"Sid": "EnableDisableRegion",
"Effect": "Allow",
"Action": [
"account:EnableRegion",
"account:DisableRegion"
],
"Resource": "*",
"Condition": {
"StringEquals": {"account:TargetRegion": ""}
}
},
{
"Sid": "ViewConsole",
"Effect": "Allow",
"Action": [
"aws-portal:ViewAccount",
"account:ListRegions"
],
"Resource": "*"
}
]
}
```
In the AWS Management Console, enable the desired region as described in [AWS documentation](https://docs.aws.amazon.com/general/latest/gr/rande-manage.html#rande-manage-enable).
Upgrade your [global endpoint session token](https://docs.aws.amazon.com/IAM/latest/UserGuide/id_credentials_temp_enable-regions.html#sts-regions-manage-tokens) to version 2, which is valid in all AWS regions, by running the following command in the [AWS CLI](https://aws.amazon.com/cli/):
```sh wrap theme={null}
aws iam set-security-token-service-preferences --global-endpoint-token-version v2Token
```
### Azure
To create a new Astro cluster on Azure for your Organization, submit a request to [Astronomer support](/docs/astro/astro-support). In your request, provide the following information for every new cluster that you want to provision:
* Your Azure Tenant ID and Subscription ID
* Your preferred Astro cluster name
* The Azure region that you want to host your cluster in
* Your preferred node instance type. See [Azure Hybrid cluster resource reference](/docs/astro/resource-reference-azure-hybrid#supported-worker-node-pool-instance-types).
* Your preferred maximum node count
If you don't specify configuration preferences, Astronomer support creates a cluster with `Standard_D4d_v5` nodes, one PostgreSQL Flexible Server instance (`D4ds_v4`), and a maximum node count of 20 in `centralus`. If you're using Virtual Network (VNet) peering, a CIDR block (RFC 1918 IP Space) with the default CIDR range `172.20.0.0/19` is implemented.
For information on all supported regions and configurations, see [Resources required for Astro on Azure](/docs/astro/resource-reference-azure-hybrid).
### GCP
To create a new Astro cluster on Google Cloud Platform (GCP) for your Organization, submit a request to [Astronomer support](/docs/astro/astro-support). In your request, provide the following information for every new cluster that you want to provision:
* Your preferred Astro cluster name.
* The GCP region that you want to host your cluster in.
* Your preferred node instance type.
* Your preferred CloudSQL instance type.
* Your preferred maximum node count.
* Your preferred VPC CIDR.
If you don't specify configuration preferences, Astronomer support creates a cluster with a VPC CIDR of `172.20.0.0/22`, `e2-standard-4` nodes, one Small General Purpose Cloud SQL instance (2vCPU, 8 GB), and a maximum node count of 20 in `us-central1`. For information on all supported regions and configurations, see [Resources required for Astro on GCP](/docs/astro/resource-reference-gcp-hybrid).
**Configure cluster maintenance windows**
All GCP dedicated clusters are subscribed to the [GKE regular release channel](https://cloud.google.com/kubernetes-engine/docs/concepts/release-channels), meaning that Google automatically upgrades the cluster and its nodes whenever an upgrade is available.
After you create a GCP cluster, you can control when these upgrades happen by requesting a [maintenance window](https://cloud.google.com/kubernetes-engine/docs/how-to/maintenance-windows-and-exclusions#maintenance-window) for the cluster. Maintenance windows determine when and how Google updates your cluster. You can use maintenance windows to ensure that upgrades don't happen while critical Dags are running on your cluster.
To set a maintenance window, first choose a maintenance window time and read through the [maintenance window considerations](https://cloud.google.com/kubernetes-engine/docs/how-to/maintenance-windows-and-exclusions#considerations) to make sure that the time is optimized for your cluster. Then, contact [Astronomer support](https://cloud.astronomer.io/open-support-request) and provide your cluster ID and desired maintenance window.
### Confirm cluster creation
Astronomer support sends you a notification when your cluster is created. After your cluster is created, you can create a new Deployment in the cluster and start deploying pipelines. See [Create a Deployment](/docs/astro/create-deployment).
## View Hybrid clusters
In the Astro UI, click **Organization Settings**.
Click **Clusters** to view a list of the clusters that are available to your Organization.
Click a cluster to view its information. See the following table for more information about each available information page.
| Tab name | Description |
| ----------------------- | ------------------------------------------------------------------------------------------------------------------------------------------------------ |
| Details | General permanent configurations, including cluster name, IDs, and connectivity options |
| Worker Types | The available worker types for configuring worker queues on your cluster. See [Manage worker types](#manage-worker-types). |
| Workspace Authorization | The list of Workspaces that can create Deployments on this cluster. See [Authorize Workspaces to a cluster](/docs/astro/authorize-workspaces-to-a-cluster). |
## Manage worker types
On Astro, *worker nodes* are the nodes that are used to run Airflow workers, which are responsible for executing Airflow tasks in your Deployments. A *worker type* is one of your cloud provider's available node instance types. This determines how much CPU and memory your workers have for running tasks. Workers are organized using [worker node pools](#about-worker-node-pools) that group together nodes of a specific instance type.
To have a Deployment run Airflow tasks with a specific worker type, you can configure a worker queue in your Deployment to use that worker type. If the worker type isn't available to your cluster, you can contact [Astronomer support](https://support.astronomer.io) and ask to have a worker type enabled for your cluster.
After you make a change to your available worker types, you can [check your cluster settings](#view-hybrid-clusters) to confirm that the change was applied.
### About worker node pools
A Kubernetes *node pool* is a group of nodes within a cluster that share the same configuration. On Astro, a *worker node pool* is a Kubernetes node pool that's used to run Airflow workers, which are responsible for executing Airflow tasks in your Deployments. Each worker node pool has:
* A *worker type*, which is one of your cloud provider's available node instance types.
* A *maximum node count*, which is the maximum number of nodes that can run concurrently in the worker node pool across all Deployments.
During the Astro cluster creation process, you provide Astronomer with a default worker type and a maximum node count to configure a default worker node pool. This node pool is used for the default worker queues for all of your Deployments. When you request Astronomer support to add a [new worker type](#configure-node-instance-type) to your cluster, a new worker node pool of that type is created on the cluster. You can then configure [worker queues](/docs/astro/configure-worker-queues) that use the new worker type.
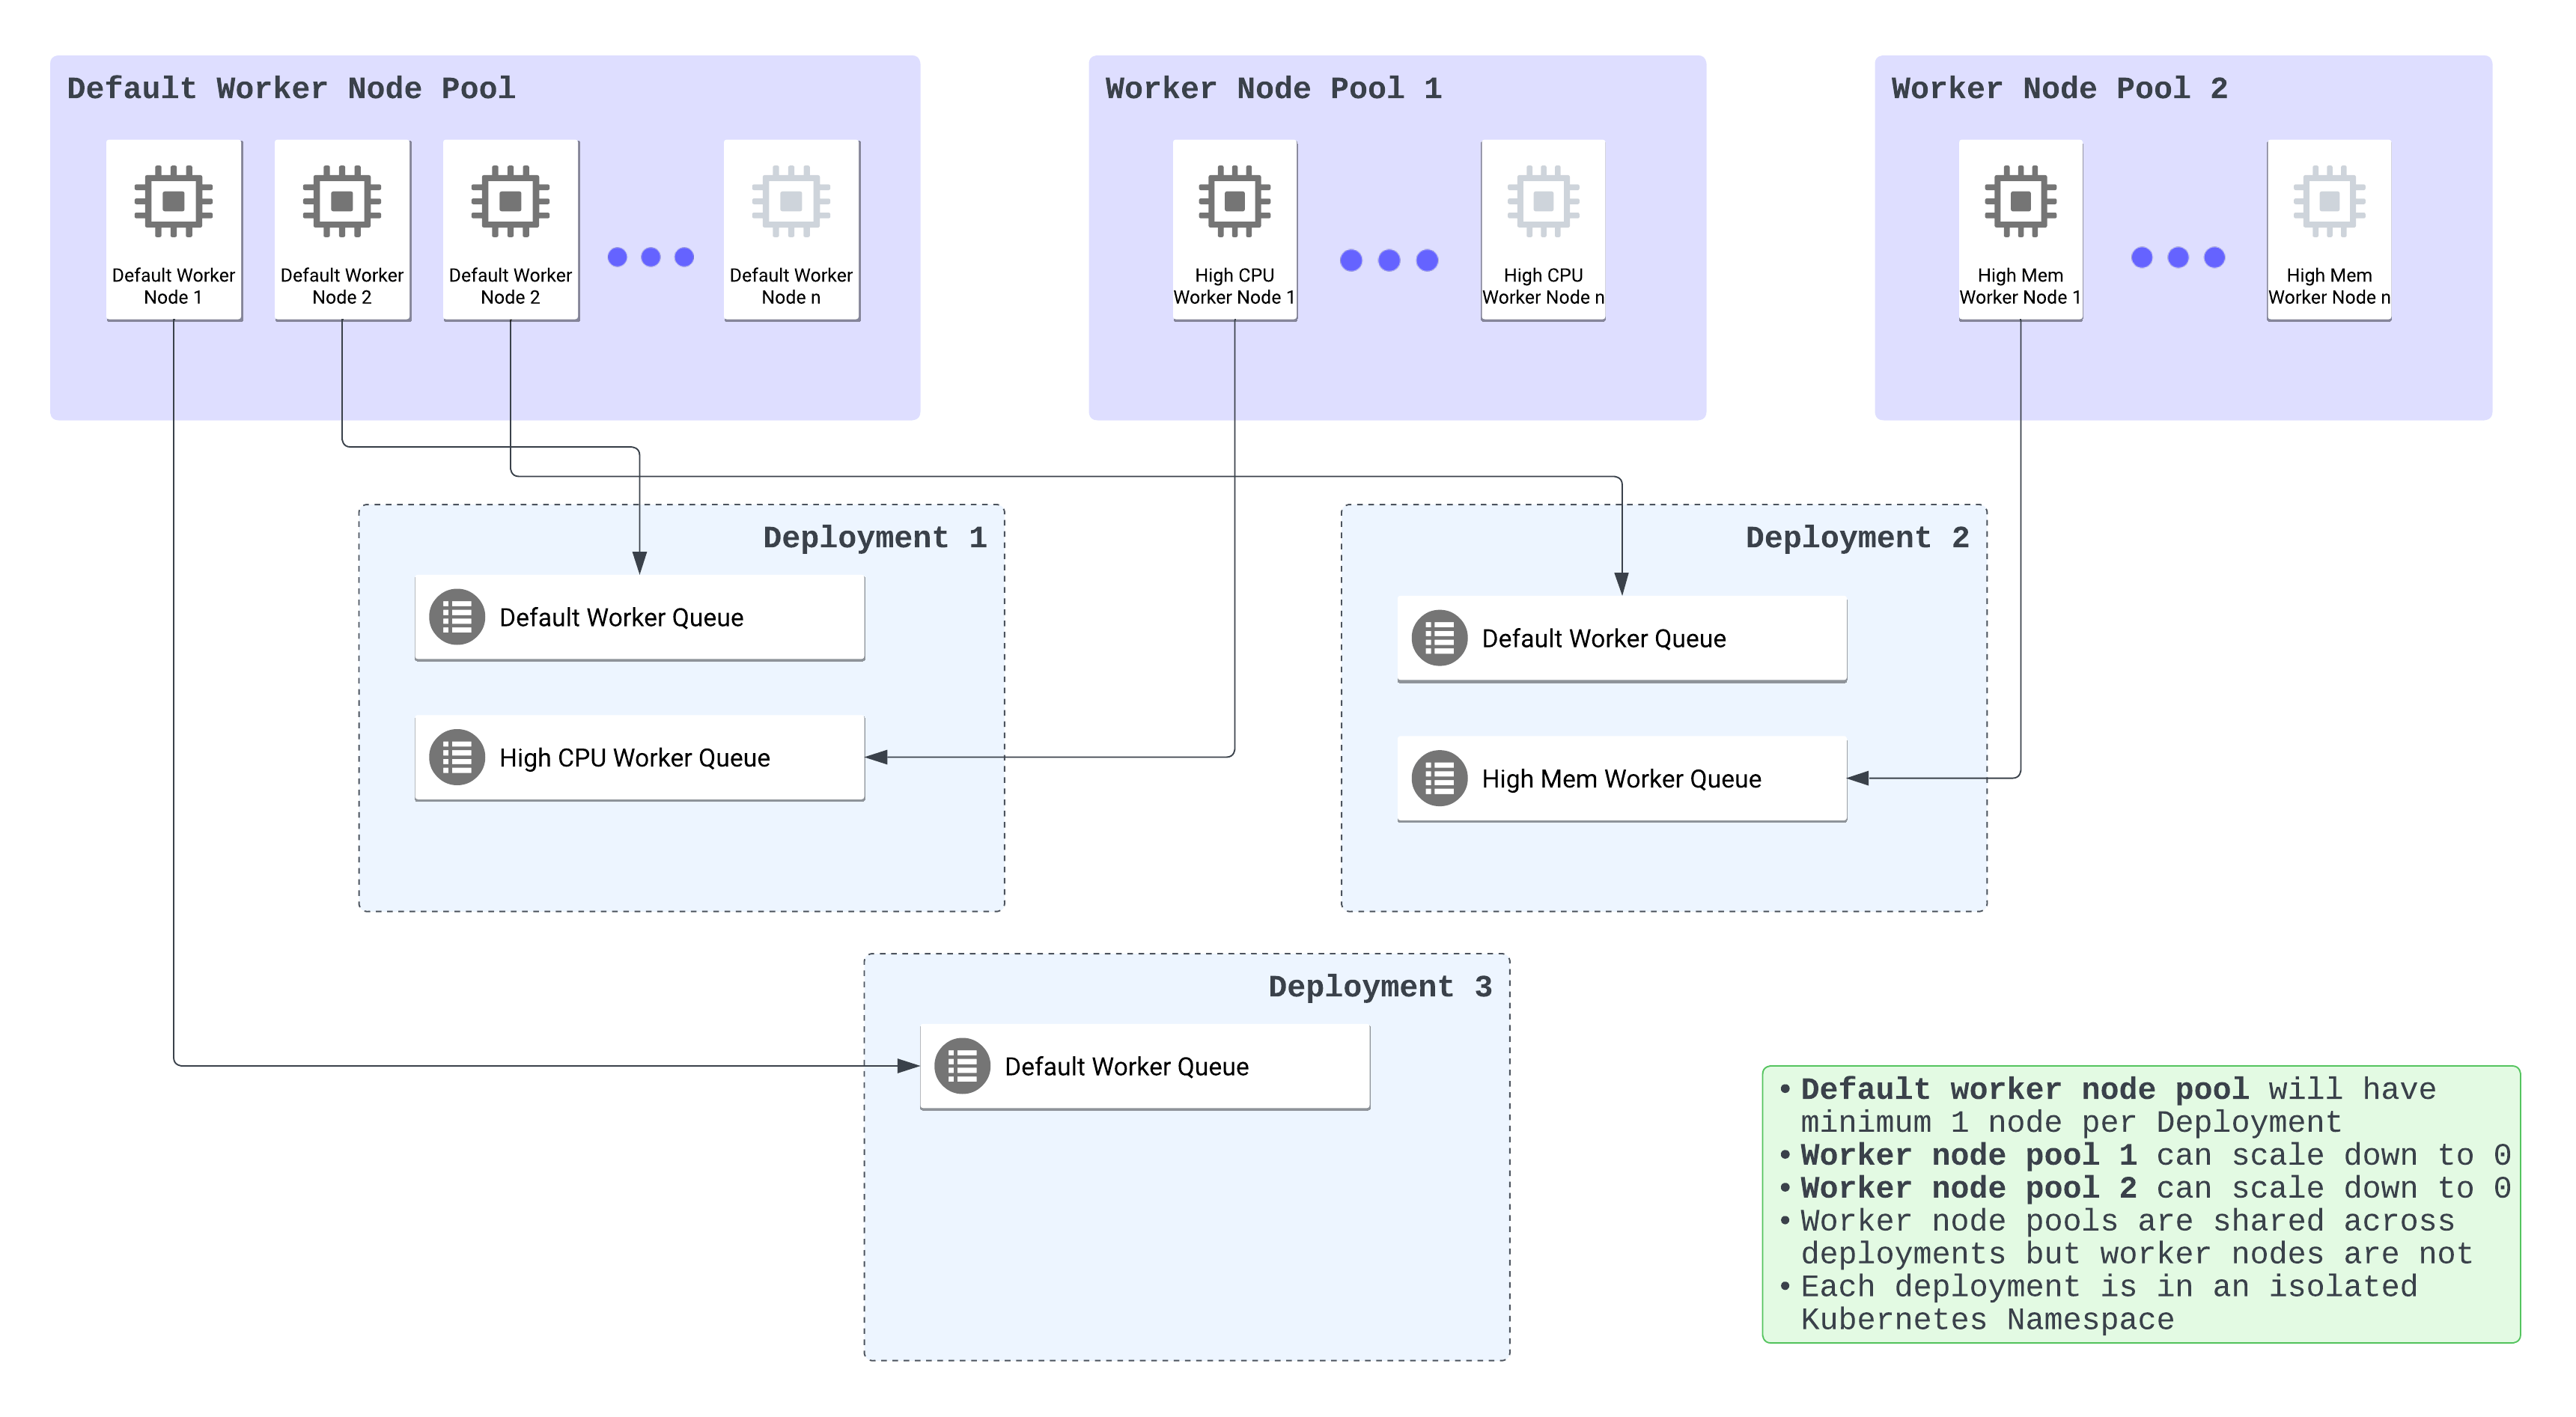
Your default worker node pool always runs a minimum of one node, while additional worker node pools can scale to zero. Additional nodes spin up as required based on the auto-scaling logic of your Deployment Airflow executor and your worker queues.
A worker node pool can be shared across multiple Deployments, but each node runs only the work of a single Deployment. A worker node pool's maximum node count applies across all Deployments where the node pool is used. For example, consider two Deployments that share a worker node pool with a maximum node count of 30. If one Deployment is using all 30 of the available worker nodes, the other Deployment can't use any additional nodes and therefore can't run tasks that rely on that worker type.
In the following diagram, you can see the relationship between worker node pools, Deployments, and worker queues. The worker node pools can be assigned to multiple Deployments, but each node in a given worker pool is used in only one Deployment worker queue.
 ### Configure node instance type
Each worker type on Astro is configured with a node instance type that is defined by your cloud provider. For example, `m5.2xlarge` on AWS, `Standard_D8_v5` on Azure, or `e2-standard-8` on GCP. Node instance types consist of varying combinations of CPU, memory, storage, and networking capacity. By choosing a node instance type for your worker, you can provide the appropriate balance of resources for your Airflow tasks.
How your Airflow tasks use the capacity of a worker node depends on which executor is selected for your Deployment. With the Celery executor, each worker node runs a single worker Pod. A worker Pod's actual available size is equivalent to the total capacity of the instance type minus the system overhead reserved by Astro. With the Kubernetes executor, each worker node can run an unlimited number of Pods (one Pod per Airflow task) as long as the sum of all requests from each Pod doesn't exceed the total capacity of the node minus the system overhead reserved by Astro.
To add a new node instance type, contact [Astronomer support](https://cloud.astronomer.io/open-support-request). For the list of worker node pool instance types available on Astro, see [AWS supported worker node pool instance types](/docs/astro/resource-reference-aws-hybrid#supported-worker-node-pool-instance-types), [Azure supported worker node pool instance types](/docs/astro/resource-reference-azure-hybrid#supported-worker-node-pool-instance-types), or [GCP supported worker node pool instance types](/docs/astro/resource-reference-gcp-hybrid#supported-worker-node-pool-instance-types).
### Configure maximum node count
Each worker node pool on Astro has a **Maximum Node Count**, which represents the maximum total number of nodes that a worker node pool can have at any given time across Deployments. The default maximum node count for each worker node pool is 20. When this limit is reached, the worker node pool can't auto-scale and worker Pods may fail to schedule. A cluster's node count is most affected by the number of tasks that are running at the same time across your cluster, and the number of worker Pods that are executing those tasks. See Worker autoscaling logic for [Celery executor](/docs/astro/celery-executor#celery-worker-autoscaling-logic) and for [Kubernetes executor](/docs/astro/kubernetes-executor).
Maximum node count is different than **Maximum Worker Count**, which is configured within the Astro UI for each worker queue and determines the maximum total number of nodes that the worker queue can scale to. Maximum node count for a node pool must always be equal to or greater than the sum of all maximum possible workers across all worker queues that are configured with that worker node type.
For example, consider the following configurations within a cluster:
* You have 3 Deployments that each have 1 worker queue configured with the `m5.2xlarge` worker type for a total of 3 worker queues.
* 1 of the 3 worker queues has a maximum worker count of 10.
* 2 of the 3 worker queues have a maximum worker count of 5.
In this scenario, the maximum node count for the `m5.2xlarge` node pool in your cluster would need to be more than 20 to make sure that each worker queue can scale to its limit. However, you can also decrease the setting to less than 20 if you don't expect your worker queues to reach their maximum worker counts and want to limit resource usage.
Astronomer regularly monitors your usage and the number of nodes deployed in your cluster. As your usage of Airflow increases, Astronomer support might contact you and recommend that you increase or decrease your maximum node count to limit infrastructure cost or ensure that you can support a growing number of tasks and Deployments. If your maximum node count is reached, you will be contacted.
To change the maximum node count for a node pool, contact [Astronomer support](https://cloud.astronomer.io/open-support-request).
## Configure a database instance type
Every Astro cluster is created with and requires a managed PostgreSQL database. This database serves as a primary relational database for the data plane and powers the metadata database of each Astro Deployment within a single cluster.
During the cluster creation process, you are asked to specify a **DB Instance Type** according to your use case and expected workload, but it can be modified at any time. Each database instance type costs a different amount of money and consists of varying combinations of CPU, memory, and network performance.
Astro uses the following databases:
| Cloud | Database | Instance Types |
| ----- | --------------------------------------------------------------------------------------- | ------------------------------------------------------------------------------------------------------------------------------------------------------- |
| AWS | [Amazon RDS](https://aws.amazon.com/rds/) | [Supported RDS instance types](/docs/astro/resource-reference-aws-hybrid#supported-rds-instance-types) |
| GCP | [Cloud SQL](https://cloud.google.com/sql) | [Supported Cloud SQL instance types](/docs/astro/resource-reference-gcp-hybrid#supported-cloud-sql-instance-types) |
| Azure | [Azure Database for PostgreSQL](https://azure.microsoft.com/en-us/products/postgresql/) | [Supported Azure Database for PostgreSQL instance types](/docs/astro/resource-reference-azure-hybrid#supported-azure-database-for-postgresql-instance-types) |
To request support for a different database instance type or to modify the database instance type after cluster creation, contact [Astronomer support](https://cloud.astronomer.io/open-support-request).
### Configure node instance type
Each worker type on Astro is configured with a node instance type that is defined by your cloud provider. For example, `m5.2xlarge` on AWS, `Standard_D8_v5` on Azure, or `e2-standard-8` on GCP. Node instance types consist of varying combinations of CPU, memory, storage, and networking capacity. By choosing a node instance type for your worker, you can provide the appropriate balance of resources for your Airflow tasks.
How your Airflow tasks use the capacity of a worker node depends on which executor is selected for your Deployment. With the Celery executor, each worker node runs a single worker Pod. A worker Pod's actual available size is equivalent to the total capacity of the instance type minus the system overhead reserved by Astro. With the Kubernetes executor, each worker node can run an unlimited number of Pods (one Pod per Airflow task) as long as the sum of all requests from each Pod doesn't exceed the total capacity of the node minus the system overhead reserved by Astro.
To add a new node instance type, contact [Astronomer support](https://cloud.astronomer.io/open-support-request). For the list of worker node pool instance types available on Astro, see [AWS supported worker node pool instance types](/docs/astro/resource-reference-aws-hybrid#supported-worker-node-pool-instance-types), [Azure supported worker node pool instance types](/docs/astro/resource-reference-azure-hybrid#supported-worker-node-pool-instance-types), or [GCP supported worker node pool instance types](/docs/astro/resource-reference-gcp-hybrid#supported-worker-node-pool-instance-types).
### Configure maximum node count
Each worker node pool on Astro has a **Maximum Node Count**, which represents the maximum total number of nodes that a worker node pool can have at any given time across Deployments. The default maximum node count for each worker node pool is 20. When this limit is reached, the worker node pool can't auto-scale and worker Pods may fail to schedule. A cluster's node count is most affected by the number of tasks that are running at the same time across your cluster, and the number of worker Pods that are executing those tasks. See Worker autoscaling logic for [Celery executor](/docs/astro/celery-executor#celery-worker-autoscaling-logic) and for [Kubernetes executor](/docs/astro/kubernetes-executor).
Maximum node count is different than **Maximum Worker Count**, which is configured within the Astro UI for each worker queue and determines the maximum total number of nodes that the worker queue can scale to. Maximum node count for a node pool must always be equal to or greater than the sum of all maximum possible workers across all worker queues that are configured with that worker node type.
For example, consider the following configurations within a cluster:
* You have 3 Deployments that each have 1 worker queue configured with the `m5.2xlarge` worker type for a total of 3 worker queues.
* 1 of the 3 worker queues has a maximum worker count of 10.
* 2 of the 3 worker queues have a maximum worker count of 5.
In this scenario, the maximum node count for the `m5.2xlarge` node pool in your cluster would need to be more than 20 to make sure that each worker queue can scale to its limit. However, you can also decrease the setting to less than 20 if you don't expect your worker queues to reach their maximum worker counts and want to limit resource usage.
Astronomer regularly monitors your usage and the number of nodes deployed in your cluster. As your usage of Airflow increases, Astronomer support might contact you and recommend that you increase or decrease your maximum node count to limit infrastructure cost or ensure that you can support a growing number of tasks and Deployments. If your maximum node count is reached, you will be contacted.
To change the maximum node count for a node pool, contact [Astronomer support](https://cloud.astronomer.io/open-support-request).
## Configure a database instance type
Every Astro cluster is created with and requires a managed PostgreSQL database. This database serves as a primary relational database for the data plane and powers the metadata database of each Astro Deployment within a single cluster.
During the cluster creation process, you are asked to specify a **DB Instance Type** according to your use case and expected workload, but it can be modified at any time. Each database instance type costs a different amount of money and consists of varying combinations of CPU, memory, and network performance.
Astro uses the following databases:
| Cloud | Database | Instance Types |
| ----- | --------------------------------------------------------------------------------------- | ------------------------------------------------------------------------------------------------------------------------------------------------------- |
| AWS | [Amazon RDS](https://aws.amazon.com/rds/) | [Supported RDS instance types](/docs/astro/resource-reference-aws-hybrid#supported-rds-instance-types) |
| GCP | [Cloud SQL](https://cloud.google.com/sql) | [Supported Cloud SQL instance types](/docs/astro/resource-reference-gcp-hybrid#supported-cloud-sql-instance-types) |
| Azure | [Azure Database for PostgreSQL](https://azure.microsoft.com/en-us/products/postgresql/) | [Supported Azure Database for PostgreSQL instance types](/docs/astro/resource-reference-azure-hybrid#supported-azure-database-for-postgresql-instance-types) |
To request support for a different database instance type or to modify the database instance type after cluster creation, contact [Astronomer support](https://cloud.astronomer.io/open-support-request).