> ## Documentation Index
> Fetch the complete documentation index at: https://astronomer.io/docs/llms.txt
> Use this file to discover all available pages before exploring further.
# Manage environment variables on Astro
This document covers how to manage **Deployment-level environment variables** on Astro. For information about creating **Workspace-level environment variables** that can be shared across multiple Deployments, see [Create environment variables in Astro](/docs/astro/create-and-link-environment-variables).
On Astro, you can create, update, or delete Deployment-level environment variables in the following ways:
* Using the Deployment's **Environment Variables** tab in your Deployment's **Environment** settings.
* Using your Astro project `Dockerfile`.
The way you manage environment variables can affect security and access for your variable data. See [Choose a strategy](/docs/astro/environment-variables#choose-a-strategy) to determine which management strategy is right for your use case.
Additionally, you can test environment variables from your local Astro environment and export them to the Astro UI. See [Manage environment variables locally](#manage-environment-variables-locally).
**A new Astro UI is here**
Astronomer has redesigned the Astro UI. Try the new experience and switch your instructions using the **New Astro UI** and **Legacy UI** tabs on this page. Your selection is remembered across the docs.
## Use the Astro UI
Setting environment variables using the Astro UI is the quickest and easiest way to manage Deployment-level environment variables on Astro.
When you view the **Environment Variables** page for a Deployment, you'll see both Deployment-level environment variables (which you can edit on this page) and Workspace-level environment variables (which are managed through the [Workspace Environment Manager](/docs/astro/create-and-link-environment-variables)). Deployment-level environment variables take precedence over Workspace-level environment variables with the same key.
1. In the Astro UI, click **Deployments**, then select a Deployment.
2. Click the **Environment** tab.
3. Click **Environment variables**.
4. Click **Edit Deployment Variables** (or **+ New Environment Variable** if you have no variables configured yet).
5. Enter an environment variable key and value. For sensitive credentials that should be treated with an additional layer of security, select the **Secret** checkbox. This permanently hides the variable's value from all users in your Workspace.
6. Click **Update Environment Variables** to save your changes. Your Airflow scheduler, webserver, and workers restart. After saving, it can take up to two minutes for new variables to be applied to your Deployment.
1. In the Astro UI, select a Workspace, click **Deployments**, and then select a Deployment.
2. Click the **Environment** tab.
3. Click **Environment variables**.
4. Click **Edit Deployment Variables** (or **+ New Environment Variable** if you have no variables configured yet).
5. Enter an environment variable key and value. For sensitive credentials that should be treated with an additional layer of security, select the **Secret** checkbox. This permanently hides the variable's value from all users in your Workspace.
6. Click **Update Environment Variables** to save your changes. Your Airflow scheduler, webserver, and workers restart. After saving, it can take up to two minutes for new variables to be applied to your Deployment.
### Edit or delete existing values
After you set an environment variable key, only the environment variable value can be modified. You can modify environment variables that are set as **Secret**, but the existing secret variable value is never shown. When you modify a secret environment variable, the existing value is erased and you are prompted to enter a new value.
1. In the Astro UI, click **Deployments**, then select a Deployment.
2. Click the **Environment** tab.
3. Click the **Environment Variables** tab.
4. Click **Edit Deployment Variables**.
5. Modify the value of the variable you want to edit.
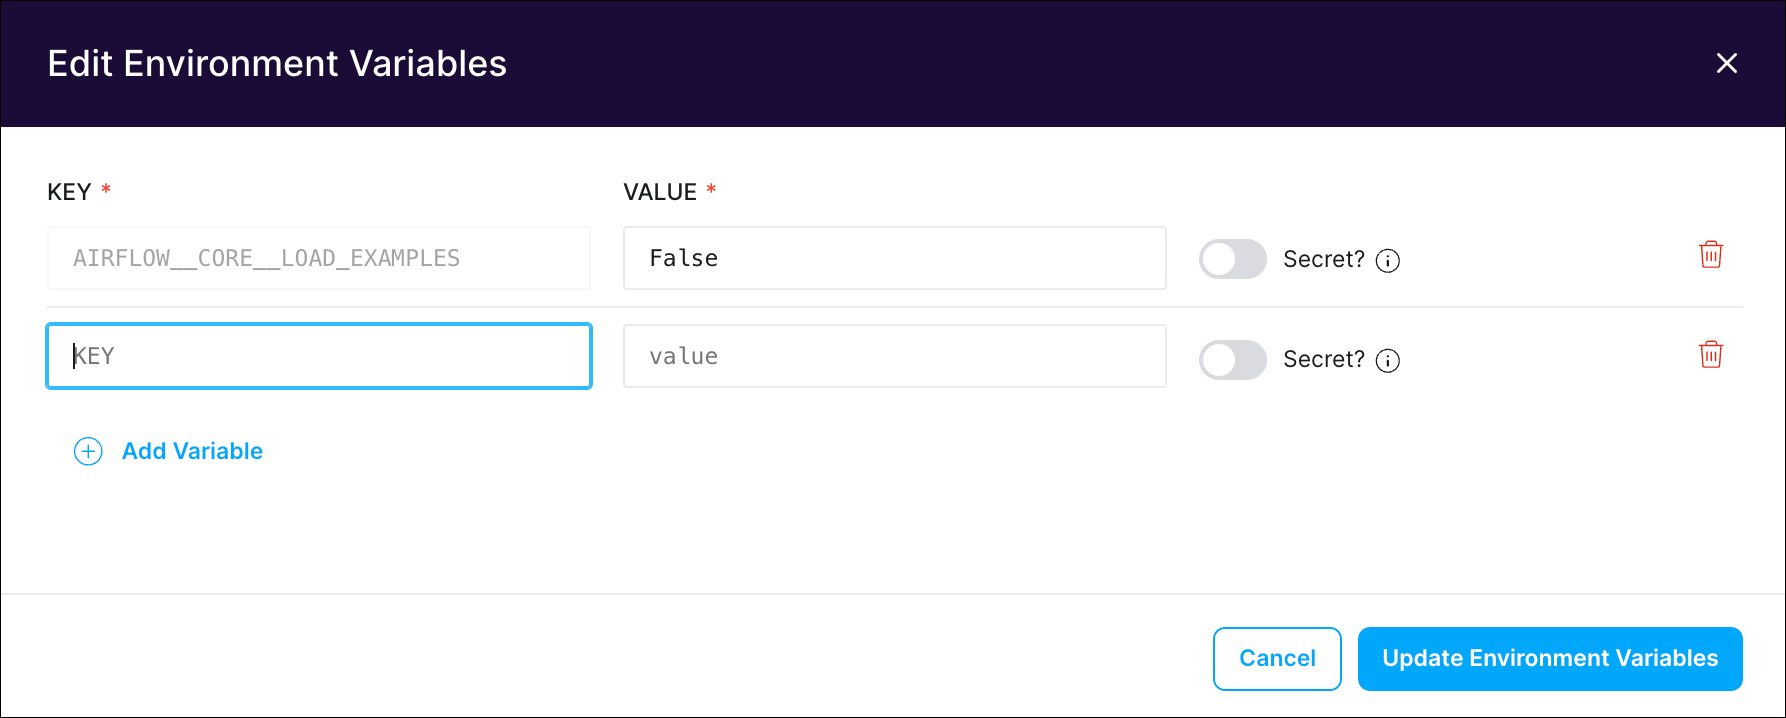 6. Click **Update Environment Variables** to save your changes. Your Airflow scheduler, webserver, and workers restart. After saving, it can take up to two minutes for updated variables to be applied to your Deployment.
1. In the Astro UI, select a Workspace, click **Deployments**, and then select a Deployment.
2. Click the **Environment** tab.
3. Click the **Environment Variables** tab.
4. Click **Edit Deployment Variables**.
5. Modify the value of the variable you want to edit.
6. Click **Update Environment Variables** to save your changes. Your Airflow scheduler, webserver, and workers restart. After saving, it can take up to two minutes for updated variables to be applied to your Deployment.
## Using your Dockerfile
If you want to store environment variables with an external version control tool, Astronomer recommends setting them in your `Dockerfile`. This file is automatically created when you first initialize an Astro project using `astro dev init`.
Environment variables set in your `Dockerfile` are stored in plain text. For this reason, Astronomer recommends storing sensitive environment variables using the Astro UI or a third-party secrets backend. For more information, see [Configure a secrets backend](/docs/astro/secrets-backend).
1. Open your Astro project `Dockerfile`.
2. To add the environment variables, declare an ENV command with the environment variable key and value. For example, the following `Dockerfile` sets two environment variables:
```dockerfile title="Dockerfile" wrap theme={null}
FROM astrocrpublic.azurecr.io/runtime:3.1-5
ENV AIRFLOW__CORE__MAX_ACTIVE_RUNS_PER_DAG=1
ENV AIRFLOW_VAR_MY_VAR=25
```
3. Save your Dockerfile and run `astro deploy` to deploy your variables to an Astro Deployment. To apply your changes locally, use `astro dev restart` to rebuild your image.
4. (Optional) To verify if the environment variables are applied correctly to Astro Deployment or your local Airflow environment, you can use `os.getenv("AIRFLOW_VAR_MY_VAR")` inside of Airflow Dags and tasks.
To delete an environment variable from your Astro Runtime image, remove or comment the line in your `Dockerfile` that defines it.
Environment variables set in your Dockerfile aren't visible in the Astro UI.
## Manage environment variables locally
You can use the Astro CLI to set environment variables on Astro and your local Airflow environment. If you're developing locally, the best way to manage environment variables is using your Astro project `.env` file.
1. Open your Astro project `.env` file.
2. Use the following format to set your environment variables in the `.env` file:
```text wrap theme={null}
KEY=VALUE
```
Environment variables should be in all-caps and not include spaces.
Alternatively, you can run `astro deployment variable list --save` to copy environment variables from an existing Deployment to a file.
3. Restart your local environment using `astro dev restart`.
To confirm that your environment variables were applied:
1. Run `astro dev bash --scheduler` to sign in to the scheduler container.
2. Run `printenv | grep ` in the container to print all environment variables that are applied to your environment.
3. Run `exit` to exit the container.
To export the contents of your `.env` file to an Astro Deployment, run the following command:
```sh wrap theme={null}
astro deployment variable update --deployment-id --load .env
```
When you use the `.env` file to add or update environment variables on Astro, it will overwrite all existing variables in your Astro Deployment. To update only select environment variables, run `astro deployment variable create` without the `--load` option. For example, the following command creates two new environment variables without affecting existing Deployment environment variables:
```sh wrap theme={null}
astro deployment variable create AIRFLOW__CORE__DAGBAG_IMPORT_TIMEOUT=60 ENVIRONMENT_TYPE=dev --deployment-id cl03oiq7d80402nwn7fsl3dmv
```
After you deploy environment variables, your Deployment automatically restarts and applies the variables. To verify if the environment variables were applied correctly, go to **Environment** > **Environment Variables** of your Deployment settings in the Astro UI.
### Use multiple .env files
The Astro CLI looks for `.env` by default, but if you want to specify multiple files, make `.env` a top-level directory and create sub-files within that folder, as shown in the example directory below. If you make `.env` a top-level directory, make sure to specify the specific filepath(s) with the `--env` flag. For example, to specify `dev.env` as your environment variable file with the `astro dev start` command:
```sh wrap theme={null}
astro dev start --env .env/dev.env
```
```text wrap theme={null}
my_project
├── Dockerfile
├── dags
│ └── my_dag
├── include
│ └── my_operators
├── airflow_settings.yaml
└── .env
├── dev.env
└── prod.env
```
## See also
* [Set Airflow connections](/docs/learn/connections#define-connections-with-environment-variables) using environment variables.
* [Set Airflow variables](/docs/learn/airflow-variables#using-environment-variables) using environment variables.
* [Import and export environment variables](/docs/astro/import-export-connections-variables#from-environment-variables)
6. Click **Update Environment Variables** to save your changes. Your Airflow scheduler, webserver, and workers restart. After saving, it can take up to two minutes for updated variables to be applied to your Deployment.
1. In the Astro UI, select a Workspace, click **Deployments**, and then select a Deployment.
2. Click the **Environment** tab.
3. Click the **Environment Variables** tab.
4. Click **Edit Deployment Variables**.
5. Modify the value of the variable you want to edit.
6. Click **Update Environment Variables** to save your changes. Your Airflow scheduler, webserver, and workers restart. After saving, it can take up to two minutes for updated variables to be applied to your Deployment.
## Using your Dockerfile
If you want to store environment variables with an external version control tool, Astronomer recommends setting them in your `Dockerfile`. This file is automatically created when you first initialize an Astro project using `astro dev init`.
Environment variables set in your `Dockerfile` are stored in plain text. For this reason, Astronomer recommends storing sensitive environment variables using the Astro UI or a third-party secrets backend. For more information, see [Configure a secrets backend](/docs/astro/secrets-backend).
1. Open your Astro project `Dockerfile`.
2. To add the environment variables, declare an ENV command with the environment variable key and value. For example, the following `Dockerfile` sets two environment variables:
```dockerfile title="Dockerfile" wrap theme={null}
FROM astrocrpublic.azurecr.io/runtime:3.1-5
ENV AIRFLOW__CORE__MAX_ACTIVE_RUNS_PER_DAG=1
ENV AIRFLOW_VAR_MY_VAR=25
```
3. Save your Dockerfile and run `astro deploy` to deploy your variables to an Astro Deployment. To apply your changes locally, use `astro dev restart` to rebuild your image.
4. (Optional) To verify if the environment variables are applied correctly to Astro Deployment or your local Airflow environment, you can use `os.getenv("AIRFLOW_VAR_MY_VAR")` inside of Airflow Dags and tasks.
To delete an environment variable from your Astro Runtime image, remove or comment the line in your `Dockerfile` that defines it.
Environment variables set in your Dockerfile aren't visible in the Astro UI.
## Manage environment variables locally
You can use the Astro CLI to set environment variables on Astro and your local Airflow environment. If you're developing locally, the best way to manage environment variables is using your Astro project `.env` file.
1. Open your Astro project `.env` file.
2. Use the following format to set your environment variables in the `.env` file:
```text wrap theme={null}
KEY=VALUE
```
Environment variables should be in all-caps and not include spaces.
Alternatively, you can run `astro deployment variable list --save` to copy environment variables from an existing Deployment to a file.
3. Restart your local environment using `astro dev restart`.
To confirm that your environment variables were applied:
1. Run `astro dev bash --scheduler` to sign in to the scheduler container.
2. Run `printenv | grep ` in the container to print all environment variables that are applied to your environment.
3. Run `exit` to exit the container.
To export the contents of your `.env` file to an Astro Deployment, run the following command:
```sh wrap theme={null}
astro deployment variable update --deployment-id --load .env
```
When you use the `.env` file to add or update environment variables on Astro, it will overwrite all existing variables in your Astro Deployment. To update only select environment variables, run `astro deployment variable create` without the `--load` option. For example, the following command creates two new environment variables without affecting existing Deployment environment variables:
```sh wrap theme={null}
astro deployment variable create AIRFLOW__CORE__DAGBAG_IMPORT_TIMEOUT=60 ENVIRONMENT_TYPE=dev --deployment-id cl03oiq7d80402nwn7fsl3dmv
```
After you deploy environment variables, your Deployment automatically restarts and applies the variables. To verify if the environment variables were applied correctly, go to **Environment** > **Environment Variables** of your Deployment settings in the Astro UI.
### Use multiple .env files
The Astro CLI looks for `.env` by default, but if you want to specify multiple files, make `.env` a top-level directory and create sub-files within that folder, as shown in the example directory below. If you make `.env` a top-level directory, make sure to specify the specific filepath(s) with the `--env` flag. For example, to specify `dev.env` as your environment variable file with the `astro dev start` command:
```sh wrap theme={null}
astro dev start --env .env/dev.env
```
```text wrap theme={null}
my_project
├── Dockerfile
├── dags
│ └── my_dag
├── include
│ └── my_operators
├── airflow_settings.yaml
└── .env
├── dev.env
└── prod.env
```
## See also
* [Set Airflow connections](/docs/learn/connections#define-connections-with-environment-variables) using environment variables.
* [Set Airflow variables](/docs/learn/airflow-variables#using-environment-variables) using environment variables.
* [Import and export environment variables](/docs/astro/import-export-connections-variables#from-environment-variables)