> ## Documentation Index
> Fetch the complete documentation index at: https://astronomer.io/docs/llms.txt
> Use this file to discover all available pages before exploring further.
# Set up authentication and single sign-on for Astro
This guide provides the steps for integrating identity providers on Astro to enable single sign-on (SSO) for your users. After you complete the integration for your organization:
* Users will automatically be authenticated to Astro if they're already logged in to your identity provider (IdP).
* You no longer have to repeatedly sign in and remember credentials for your account.
* You will have complete ownership over credential configuration and management on Astro.
* You can require multi-factor authentication (MFA) by enforcing SSO and configuring MFA in your IdP.
* You can use services such as [Adaptive Authentication](https://www.okta.com/identity-101/adaptive-authentication/) and [Conditional Access](https://learn.microsoft.com/en-us/azure/active-directory/conditional-access/overview) to create advanced access policies that enforce trusted IP ranges or limit access to authorized devices.
To manage Organization users after you have configured SSO, see [Manage Organization users](/docs/astro/manage-organization-users).
In addition to SSO, users can authenticate to Astro in three ways:
* Basic authentication (username and password)
* Google social login
* GitHub social login
To require users to sign in through your IdP and disable the other methods, see [SSO enforcement](#sso-enforcement).
## Supported SSO identity providers
Single sign-on (SSO) allows users to sign in using their company credentials, managed through an IdP. This provides a streamlined login experience for your Astro users, as they are able to use the same credentials across multiple applications. In addition, this provides improved security and control for organizations to manage access from a single source. Astro supports integrations with the following IdPs:
* [Microsoft Entra ID](https://www.microsoft.com/en-us/security/business/microsoft-entra-pricing)
* [Okta](https://www.okta.com/)
* [OneLogin](https://www.onelogin.com/)
* [Ping Identity](https://www.pingidentity.com/en.html)
You can configure multiple SSO connections for a single Organization. This requires having a unique [verified domain](/docs/astro/manage-domains) for each new SSO connection.
## Configure your SSO identity provider
At a high level, to configure an SSO identity provider (IdP) you will:
1. Create a connection between Astro and your IdP.
2. Map a managed domain to your SSO connection.
3. Invite users to Astro through your IdP.
**A new Astro UI is here**
Astronomer has redesigned the Astro UI. Try the new experience and switch your instructions using the **New Astro UI** and **Legacy UI** tabs on this page. Your selection is remembered across the docs.
This section provides setup steps for setting up Okta as your IdP on Astro. After completing this setup, all users in your organization can use Okta to sign in to Astro.
### Supported Okta features
The Astro integration with Okta supports the following authentication options:
* IdP-initiated SSO
* Service provider (SP)-initiated SSO
* Just-In-Time provisioning
#### Prerequisites
* [Organization Owner](/docs/astro/user-permissions) privileges in the Organization you're configuring.
* An [Okta account](https://www.okta.com/) with administrative access.
* At least one [verified domain](/docs/astro/manage-domains).
To set up Okta as your IdP, you will create a Security Assertion Markup Language (SAML) connection to Okta.
1. In the Astro UI, go to **Settings**, then in the **Security** section, click **Authentication**.
2. Click **+ New SSO Configuration**.
3. Configure the following values for your connection:
* **Connection type**: Select **SAML**.
* **Verified Domains**: Enter the verified domain(s) that you want to map to Okta.
* **Automatic Membership**: Set the default role for users who join your Organization through Okta without an explicit invite from Astro.
4. Copy the **Connection Name** from the pop-out.
5. Open a new tab and go to Okta. In the Okta Admin Console, go to **[Applications](https://help.okta.com/en-us/content/topics/apps/apps_apps_page.htm)** and click **Browse App Catalogue**. Then, search the catalogue, select the **Astro** app integration, and click **Add Integration**. After configuring a label for the integration, the application appears in **Applications**.
When you create your application, Okta automatically maps the following attributes to Astro user account values:
| Attribute | Value |
| --------- | ---------------- |
| email | `user.email` |
| firstName | user.firstName |
| lastName | user.lastName |
| name | user.displayName |
6. Open the Astro application you just configured, click **Sign On**, then click **Edit**. Configure the following values:
* **Connection Name**: Enter the **Connection Name** you copied from the Astro UI.
* **Application username format**: **Email**.
* **Update application username on**: `Create and update`.
7. Copy the values for **Sign-on URL**, **Sign out URL**, and **X.509 Certificate** from the **Metadata Details** section.
8. Assign yourself to the Astro app integration from Okta. See [Assign an app integration to a user](https://help.okta.com/en-us/Content/Topics/Provisioning/lcm/lcm-assign-app-user.htm).
9. Return to the Astro UI. In the configuration screen for your SAML connection, configure the following values:
* **Identity Provider Single Sign-on URL**: Enter your **Single Sign-on URL**.
* **Identity Provider Sign-out URL**: Enter your **Single Sign-out URL**.
* **X.509 Certificate**: Enter your **X.509 Certificate**.
10. Click **Create**. Your Okta integration appears as an entry in **SSO Configuration**.
11. In **SSO Configuration**, click **Activate**. You are redirected to Okta to test your configuration. After you have successfully authenticated, you are redirected to Astro.
12. Click **Activate SSO**.
1. In the Astro UI, click **Organization Settings**, then click **Authentication**.
2. In the **SSO Configuration** menu, click **Configure SSO**.
3. Configure the following values for your connection:
* **Connection type**: Select **SAML**.
* **SSO Domain(s)**: Enter the verified domain(s) that you want to map to Okta.
* **Automatic Membership**: Set the default role for users who join your Organization through Okta without an explicit invite from Astro.
4. Copy the **Connection Name**.
5. Open a new tab and go to Okta. In the Okta Admin Console, go to **[Applications](https://help.okta.com/en-us/content/topics/apps/apps_apps_page.htm)** and click **Browse App Catalogue**. Then, search the catalogue, select the **Astro** app integration, and click **Add Integration**. After configuring a label for the integration, the application appears in **Applications**.
When you create your application, Okta automatically maps the following attributes to Astro user account values:
| Attribute | Value |
| --------- | ---------------- |
| email | `user.email` |
| firstName | user.firstName |
| lastName | user.lastName |
| name | user.displayName |
6. Open the Astro application you just configured, click **Sign On**, then click **Edit**. Configure the following values:
* **Connection Name**: Enter the **Connection Name** you copied from the Astro UI.
* **Application username format**: **Email**.
* **Update application username on**: `Create and update`.
7. Copy the values for **Sign-on URL**, **Sign out URL**, and **X.509 Certificate** from the **Metadata Details** section.
8. Assign yourself to the Astro app integration from Okta. See [Assign an app integration to a user](https://help.okta.com/en-us/Content/Topics/Provisioning/lcm/lcm-assign-app-user.htm).
9. Return to the Astro UI. In the configuration screen for your SAML connection, configure the following values:
* **Identity Provider Single Sign-on URL**: Enter your **Single Sign-on URL**.
* **Identity Provider Sign-out URL**: Enter your **Single Sign-out URL**.
* **X.509 Certificate**: Enter your **X.509 Certificate**.
10. Click **Create**. Your Okta integration appears as an entry in **SSO Configuration**.
11. In **SSO Configuration**, click **Activate**. You are redirected to Okta to test your configuration. After you have successfully authenticated, you are redirected to Astro.
12. Click **Activate SSO**.
Don't share your single sign-on (SSO) bypass link. With an SSO bypass link, anyone with an email and a password can sign in to Astro. Astronomer recommends periodically regenerating the link from the **Settings** tab in the Astro UI.
An SSO bypass link allows you to authenticate to your Organization without using SSO. This link should be used to access your Organization only when you can't access Astro due to an issue with your identity provider.
1. In the Astro UI, go to **Settings**, then in the **Security** section, click **Authentication**.
2. In the **Advanced Settings** section, click **Edit Settings**, turn on **SSO Bypass Link**, then click **Copy**. Save this link for when you need to sign in to Astro without using SSO.
To remove the bypass link, turn off **SSO Bypass Link**.
1. In the Astro UI, click **Organization Settings**, then click **Authentication**.
2. In the **SSO Bypass Link** field, click **Copy**. Save this link for when you need to sign in to Astro without using SSO.
If you don't want to maintain an SSO bypass link, click **Delete**. You can always regenerate a link if you need one in the future.
On the page for your Okta app integration, open the **Assignments** tab. Ensure that all users who will use Astro are assigned to the integration. For more information, see [Assign applications to users](https://help.okta.com/en/prod/Content/Topics/users-groups-profiles/usgp-assign-apps.htm).
SCIM provisioning allows you to manage Astro users from your identity provider platform. See [Set up SCIM provisioning](/docs/astro/set-up-scim-provisioning) for setup steps.
This section provides setup steps for setting up Microsoft Entra ID as your IdP on Astro. After completing this setup, your organization's users can use Microsoft Entra ID to sign in to Astro.
#### Prerequisites
To integrate Azure as your IdP for Astro you must have:
* An Azure subscription.
* [Cloud Application Administrator](https://learn.microsoft.com/en-us/entra/identity/role-based-access-control/permissions-reference#cloud-application-administrator) permissions on Microsoft Entra ID.
* [Organization Owner](/docs/astro/user-permissions) permissions in the Organization you're configuring.
* At least one [verified domain](/docs/astro/manage-domains).
Follow the [Microsoft documentation](https://learn.microsoft.com/en-us/entra/identity/saas-apps/astro-tutorial#add-astro-from-the-gallery) to add Astro from the gallery to your list of managed SaaS applications.
1. In the Astro UI, go to **Settings**, then in the **Security** section, click **Authentication**.
2. Click **+ New SSO Configuration**.
3. Configure the following values for your connection:
* **Connection Type**: Select **SAML**. Astro also supports **Azure AD** as a connection type for Microsoft Entra ID. Astronomer recommends **SAML** because Microsoft's [Astro tutorial](https://learn.microsoft.com/en-us/entra/identity/saas-apps/astro-tutorial) only documents the SAML setup path. If you prefer to use the **Azure AD** connection type instead, see [Alternative: Configure SSO using the Azure AD connection type](#alternative-configure-sso-using-the-azure-ad-connection-type).
* **Verified Domains**: Enter the verified domain(s) that you want to map to Microsoft Entra ID.
* **Automatic Membership**: Set the default role for users who join your Organization through Microsoft Entra ID without an explicit invite from Astro.
4. Copy the **Single Sign-On URL** and **Audience URI (SP Entity ID)** for the next step.
5. Keep this configuration window open. You'll return to it later in this procedure.
1. In the Astro UI, click **Organization Settings**, then click **Authentication**.
2. In the **SSO Configuration** menu, click **Configure SSO**.
3. Configure the following values for your connection:
* **Connection Type**: Select **SAML**. Astro also supports **Azure AD** as a connection type for Microsoft Entra ID. Astronomer recommends **SAML** because Microsoft's [Astro tutorial](https://learn.microsoft.com/en-us/entra/identity/saas-apps/astro-tutorial) only documents the SAML setup path. If you prefer to use the **Azure AD** connection type instead, see [Alternative: Configure SSO using the Azure AD connection type](#alternative-configure-sso-using-the-azure-ad-connection-type).
* **SSO Domain(s)**: Enter the verified domain(s) that you want to map to Microsoft Entra ID.
* **Automatic Membership**: Set the default role for users who join your Organization through Microsoft Entra ID without an explicit invite from Astro.
4. Copy the **Single Sign-On URL** and **Audience URI (SP Entity ID)** for the next step.
5. Keep this configuration window open. You'll return to it later in this procedure.
In a new tab, open the [Microsoft Entra admin center](https://entra.microsoft.com/) and follow the steps in [Microsoft documentation](https://learn.microsoft.com/en-us/entra/identity/saas-apps/astro-tutorial#configure-microsoft-entra-sso) to configure Microsoft Entra SSO for Astro. In the **Basic SAML Configuration** section of your configuration, set the following values:
* **Identifier (Entity ID)**: Enter the value for **Audience URI (SP Entity ID)** you copied in the previous step.
* **Reply URL (Assertion Consumer Service URL)**: Enter the value for **Single Sign-On URL** you copied in the previous step.
After you complete the configuration, download the PEM certificate from the **SAML Signing Certificate** section for the next step.
1. Return to the Astro UI. In the configuration screen for your SSO connection, configure the following values:
* **X.509 Certificate**: Enter the PEM certificate you downloaded in the previous step.
* **Identity Provider Single Sign-on URL**: Enter the URL you copied in the previous step.
2. Click **Create**. Your Entra ID integration appears as an entry in **SSO Configuration**.
Don't share your single sign-on (SSO) bypass link. With an SSO bypass link, anyone with an email and a password can sign in to Astro. Astronomer recommends periodically regenerating the link from the **Settings** tab in the Astro UI.
An SSO bypass link allows you to authenticate to your Organization without using SSO. This link should be used to access your Organization only when you can't access Astro due to an issue with your identity provider.
1. In the Astro UI, go to **Settings**, then in the **Security** section, click **Authentication**.
2. In the **Advanced Settings** section, click **Edit Settings**, turn on **SSO Bypass Link**, then click **Copy**. Save this link for when you need to sign in to Astro without using SSO.
To remove the bypass link, turn off **SSO Bypass Link**.
1. In the Astro UI, click **Organization Settings**, then click **Authentication**.
2. In the **SSO Bypass Link** field, click **Copy**. Save this link for when you need to sign in to Astro without using SSO.
If you don't want to maintain an SSO bypass link, click **Delete**. You can always regenerate a link if you need one in the future.
Follow [Microsoft documentation](https://learn.microsoft.com/en-us/entra/identity/enterprise-apps/assign-user-or-group-access-portal?pivots=portal) to assign users from your organization to your new application.
When a user assigned to the application accesses Astro, they will be brought automatically to Microsoft Entra ID after entering their email in the Astro UI.
#### Alternative: Configure SSO using the Azure AD connection type
Instead of SAML, you can connect Microsoft Entra ID to Astro using the **Azure AD** connection type, which uses OAuth 2.0 / OpenID Connect with an Azure AD app registration. Use this path if your organization prefers OIDC-based SSO over SAML.
1. Sign in to the [Microsoft Entra admin center](https://entra.microsoft.com/) as a Cloud Application Administrator.
2. Follow [Microsoft documentation](https://learn.microsoft.com/en-us/entra/identity-platform/quickstart-register-app) to register a new application. When prompted, set the **Redirect URI** type to **Web** and the value to:
```text wrap theme={null}
https://auth.astronomer.io/login/callback
```
3. After the app is created, from the app's **Overview** page, copy the following values for the next step:
* **Application (client) ID**
* **Directory (tenant) ID** (your primary Microsoft Azure AD domain, for example `your-org.onmicrosoft.com`, is also available on the tenant's overview page)
4. In the app, open **Certificates & secrets**, click **New client secret**, and create a secret. Copy the secret **Value** immediately — it's only shown once. Save it for the next step.
5. In the app, open **API permissions** and ensure the default `Microsoft Graph > User.Read` delegated permission is present so users can sign in and read their profile. Grant admin consent if your tenant requires it.
1. In the Astro UI, go to **Settings**, then in the **Security** section, click **Authentication**.
2. Click **+ New SSO Configuration**.
3. Configure the following values for your connection:
* **Connection Type**: Select **Azure AD**.
* **Verified Domain(s)**: Select the verified domain(s) that you want to map to Microsoft Entra ID. Users with a matching email domain can sign in through SSO.
* **Automatic Membership**: Set the default Organization role for users who sign in through SSO without an explicit invite from Astro.
4. Confirm that the **Redirect URI** shown in the Astro UI matches the redirect URI you configured on the Azure app registration in the previous step:
```text wrap theme={null}
https://auth.astronomer.io/login/callback
```
1. In the Astro UI, click **Organization Settings**, then click **Authentication**.
2. In the **SSO Configuration** menu, click **Configure SSO**.
3. Configure the following values for your connection:
* **Connection Type**: Select **Azure AD**.
* **Verified Domain(s)**: Select the verified domain(s) that you want to map to Microsoft Entra ID. Users with a matching email domain can sign in through SSO.
* **Automatic Membership**: Set the default Organization role for users who sign in through SSO without an explicit invite from Astro.
4. Confirm that the **Redirect URI** shown in the Astro UI matches the redirect URI you configured on the Azure app registration in the previous step:
```text wrap theme={null}
https://auth.astronomer.io/login/callback
```
In the same Astro configuration screen, under **Get the following values from your IdP and input them here**, enter the values you copied from your Azure app registration:
* **Microsoft Azure AD Domain**: Your tenant's primary domain (for example, `your-org.onmicrosoft.com`).
* **Client ID**: The **Application (client) ID** from the app's **Overview** page.
* **Client Secret**: The client secret **Value** you created under **Certificates & secrets**.
Click **Create**. Your Azure AD integration appears as an entry in **SSO Configuration**.
1. In the Microsoft Entra admin center, follow [Microsoft documentation](https://learn.microsoft.com/en-us/entra/identity/enterprise-apps/assign-user-or-group-access-portal?pivots=portal) to assign users or groups from your organization to the Astro app registration.
2. In the Astro UI, activate the new SSO connection and complete the test sign-in flow.
3. Copy your SSO bypass link from the Astro UI **Authentication** page and store it securely in case you ever need to sign in without SSO.
When a user with an email in a verified domain signs in to Astro, they're redirected to Microsoft Entra ID to authenticate.
This section provides setup steps for setting up OneLogin as your IdP on Astro. After completing this setup, your organization's users can use OneLogin to sign in to Astro.
#### Prerequisites
* A [OneLogin account](https://www.onelogin.com/) with administrative access.
* [Organization Owner](/docs/astro/user-permissions) privileges in the Organization you're configuring.
* At least one [verified domain](/docs/astro/manage-domains).
To set up OneLogin as your IdP, you will create a Security Assertion Markup Language (SAML) connection to OneLogin.
1. In the Astro UI, go to **Settings**, then in the **Security** section, click **Authentication**.
2. Click **+ New SSO Configuration**.
3. Configure the following values for your connection:
* **Connection Type**: Select **SAML**.
* **Verified Domains**: Enter the verified domain(s) that you want to map to OneLogin.
* **Automatic Membership**: Set the default role for users who join your Organization through OneLogin without an explicit invite from Astro.
4. Copy the **Single Sign-On URL** and **Audience URI (SP ENTITY ID)** for use later in this procedure.
5. Open a new tab and go to OneLogin. In the OneLogin administrator dashboard, click **Applications** > **Applications** and then click **Add App**.
6. In the **Search** field, enter **SAML Custom**, and then select **SAML Custom Connector (Advanced)**.
7. In the **Display Name** field, enter **Astro** and then click **Save**.
8. Click **Configuration** in the left menu and complete the following fields:
* **Audience (EntityID)**: ``
* **ACS (Consumer) URL Validator**: ``
* **ACS (Consumer) URL**: ``
9. Select the **Sign SLO Request** and **Sign SLO Response** checkboxes. Then, click **Save**.
10. Click **Parameters** in the left menu, and add the following four parameters, using the same capitalization shown in the **Value** column:
| Field name | Value |
| ---------- | ---------- |
| email | Email |
| firstName | First Name |
| lastName | Last Name |
| name | Name |
Select the **Include in SAML assertion** checkbox for every parameter that you add and then click **Save**.
11. Click **SSO** in the left menu, click **View Details** below the **X.509 Certificate** field and then click **Download**.
12. Select **SHA-256** in the **SAML Signature Algorithm** list.
13. Copy and save the value displayed in the **SAML 2.0 Endpoint (HTTP)** field.
14. Assign yourself to the Astro app integration from OneLogin. See [Assigning apps to users](https://onelogin.service-now.com/kb_view_customer.do?sysparm_article=KB0010387).
15. Return to the Astro UI. In the configuration screen for your SAML connection, configure the following values:
* **Identity Provider Single Sign-on URL**: Enter the value you copied from **SAML 2.0 Endpoint (HTTP)**.
* **X.509 Certificate**: Enter the **X.509 Certificate** that you downloaded.
16. Click **Create**. Your OneLogin integration appears as an entry in **SSO Configuration**.
17. In **SSO Configuration**, click **Activate**. You are redirected to OneLogin to test your configuration. After you have successfully authenticated, you are redirected to Astro. Then, click **Activate SSO**.
1. In the Astro UI, click **Organization Settings**, then click **Authentication**.
2. In the **SSO Configuration** menu, click **Configure SSO**.
3. Configure the following values for your connection:
* **Connection Type**: Select **SAML**.
* **SSO Domain(s)**: Enter the verified domain(s) that you want to map to OneLogin.
* **Automatic Membership**: Set the default role for users who join your Organization through OneLogin without an explicit invite from Astro.
4. Copy the **Single Sign-On URL** and **Audience URI (SP ENTITY ID)** for use later in this procedure.
5. Open a new tab and go to OneLogin. In the OneLogin administrator dashboard, click **Applications** > **Applications** and then click **Add App**.
6. In the **Search** field, enter **SAML Custom**, and then select **SAML Custom Connector (Advanced)**.
7. In the **Display Name** field, enter **Astro** and then click **Save**.
8. Click **Configuration** in the left menu and complete the following fields:
* **Audience (EntityID)**: ``
* **ACS (Consumer) URL Validator**: ``
* **ACS (Consumer) URL**: ``
9. Select the **Sign SLO Request** and **Sign SLO Response** checkboxes. Then, click **Save**.
10. Click **Parameters** in the left menu, and add the following four parameters, using the same capitalization shown in the **Value** column:
| Field name | Value |
| ---------- | ---------- |
| email | Email |
| firstName | First Name |
| lastName | Last Name |
| name | Name |
Select the **Include in SAML assertion** checkbox for every parameter that you add and then click **Save**.
11. Click **SSO** in the left menu, click **View Details** below the **X.509 Certificate** field and then click **Download**.
12. Select **SHA-256** in the **SAML Signature Algorithm** list.
13. Copy and save the value displayed in the **SAML 2.0 Endpoint (HTTP)** field.
14. Assign yourself to the Astro app integration from OneLogin. See [Assigning apps to users](https://onelogin.service-now.com/kb_view_customer.do?sysparm_article=KB0010387).
15. Return to the Astro UI. In the configuration screen for your SAML connection, configure the following values:
* **Identity Provider Single Sign-on URL**: Enter the value you copied from **SAML 2.0 Endpoint (HTTP)**.
* **X.509 Certificate**: Enter the **X.509 Certificate** that you downloaded.
16. Click **Create**. Your OneLogin integration appears as an entry in **SSO Configuration**.
17. In **SSO Configuration**, click **Activate**. You are redirected to OneLogin to test your configuration. After you have successfully authenticated, you are redirected to Astro. Then, click **Activate SSO**.
Don't share your single sign-on (SSO) bypass link. With an SSO bypass link, anyone with an email and a password can sign in to Astro. Astronomer recommends periodically regenerating the link from the **Settings** tab in the Astro UI.
An SSO bypass link allows you to authenticate to your Organization without using SSO. This link should be used to access your Organization only when you can't access Astro due to an issue with your identity provider.
1. In the Astro UI, go to **Settings**, then in the **Security** section, click **Authentication**.
2. In the **Advanced Settings** section, click **Edit Settings**, turn on **SSO Bypass Link**, then click **Copy**. Save this link for when you need to sign in to Astro without using SSO.
To remove the bypass link, turn off **SSO Bypass Link**.
1. In the Astro UI, click **Organization Settings**, then click **Authentication**.
2. In the **SSO Bypass Link** field, click **Copy**. Save this link for when you need to sign in to Astro without using SSO.
If you don't want to maintain an SSO bypass link, click **Delete**. You can always regenerate a link if you need one in the future.
1. In the OneLogin administrator dashboard, click **Applications** > **Applications** and then click **Astro**.
2. Click **Users** in the left menu.
3. Make sure that all users who need to use Astro are assigned to the Astronomer application.
This section provides setup steps for setting up Ping Identity as your IdP on Astro. After completing this setup, your organization's users can use Ping Identity to sign in to Astro.
#### Prerequisites
* A [Ping Identity account](https://www.pingidentity.com/) with administrative access.
* [Organization Owner](/docs/astro/user-permissions) privileges in the Organization you're configuring.
* At least one [verified domain](/docs/astro/manage-domains).
1. In the Astro UI, go to **Settings**, then in the **Security** section, click **Authentication**.
2. Click **+ New SSO Configuration**.
3. Configure the following values for your connection:
* **Connection type**: Select **SAML**.
* **Verified Domains**: Enter the verified domain(s) that you want to map to Ping Identity.
* **Automatic Membership**: Set the default role for users who join your Organization through Ping Identity without an explicit invite from Astro.
4. Copy the **Single Sign-On URL** and **Audience URI (SP ENTITY ID)** for use later in this procedure.
5. Open a new tab and go to PingIdentity. In the PingIdentity Administrator Console, click **Connections** in the left pane, and then click the **+** icon next to **Applications**.
6. In the **Application Name** field, enter `Astro`. Optionally, add a description and an icon.
7. Click **SAML Application**, and then click **Configure**.
8. Click **Manually Enter** and then complete the following fields:
* **ACS URLs**: ``
* **Entity ID**: ``
9. Click **Save**.
10. Click **Edit** on the **Overview** page, and then enter `` in the **Sign on URL** field. Then, click **Save**.
11. Click the **Configuration** tab, and then click **Edit**.
12. Select **Sign Assertion & Response** and confirm `RSA_SHA256` is selected in the **Signing Algorithm** list. Then, click **Save**.
13. On the **Configuration** page, click **Download Signing Certificate** and select `X509 PEM (.crt)` to download the X.509 certificate for your application.
14. Copy and save the URL in the **Single Sign-on Service** field.
15. Click the **Attribute Mappings** tab, click **Edit**, and add the following attributes, using the capitalization shown in both columns:
| Astronomer | PingOne |
| -------------- | ------------- |
| `saml_subject` | User ID |
| email | Email Address |
| firstName | Given Name |
| lastName | Family Name |
| name | Formatted |
16. Click **Save**.
17. (Optional) If you configured your application on a PingFederate server, enable the **Include the certificate in the signature `` element** setting for your server. See [Ping documentation](https://docs.pingidentity.com/pingfederate/latest/administrators_reference_guide/pf_certificate_key_management.html).
18. Click the toggle in the top right to enable the application.
19. Assign yourself to Astro from Ping Identity. See [Editing a user](https://docs.pingidentity.com/pingone/directory/p1_edituser.html).
20. Return to the Astro UI. In the configuration screen for your SAML connection, configure the following values:
* **Identity Provider Single Sign-on URL**: Enter the value you copied from the **Single Sign-on Service** field.
* **X.509 Certificate**: Enter the X.509 Certificate that you downloaded.
21. Click **Create**. Your Ping Identity integration appears as an entry in **SSO Configuration**.
22. In **SSO Configuration**, click **Activate**. You are redirected to Ping Identity to test your configuration. After you have successfully authenticated, you are redirected to Astro.
23. Click **Activate SSO**.
1. In the Astro UI, click **Organization Settings**, then click **Authentication**.
2. In the **SSO Configuration** menu, click **Configure SSO**.
3. Configure the following values for your connection:
* **Connection type**: Select **SAML**.
* **SSO Domain(s)**: Enter the verified domain(s) that you want to map to Ping Identity.
* **Automatic Membership**: Set the default role for users who join your Organization through Ping Identity without an explicit invite from Astro.
4. Copy the **Single Sign-On URL** and **Audience URI (SP ENTITY ID)** for use later in this procedure.
5. Open a new tab and go to PingIdentity. In the PingIdentity Administrator Console, click **Connections** in the left pane, and then click the **+** icon next to **Applications**.
6. In the **Application Name** field, enter `Astro`. Optionally, add a description and an icon.
7. Click **SAML Application**, and then click **Configure**.
8. Click **Manually Enter** and then complete the following fields:
* **ACS URLs**: ``
* **Entity ID**: ``
9. Click **Save**.
10. Click **Edit** on the **Overview** page, and then enter `` in the **Sign on URL** field. Then, click **Save**.
11. Click the **Configuration** tab, and then click **Edit**.
12. Select **Sign Assertion & Response** and confirm `RSA_SHA256` is selected in the **Signing Algorithm** list. Then, click **Save**.
13. On the **Configuration** page, click **Download Signing Certificate** and select `X509 PEM (.crt)` to download the X.509 certificate for your application.
14. Copy and save the URL in the **Single Sign-on Service** field.
15. Click the **Attribute Mappings** tab, click **Edit**, and add the following attributes, using the capitalization shown in both columns:
| Astronomer | PingOne |
| -------------- | ------------- |
| `saml_subject` | User ID |
| email | Email Address |
| firstName | Given Name |
| lastName | Family Name |
| name | Formatted |
16. Click **Save**.
17. (Optional) If you configured your application on a PingFederate server, enable the **Include the certificate in the signature `` element** setting for your server. See [Ping documentation](https://docs.pingidentity.com/pingfederate/latest/administrators_reference_guide/pf_certificate_key_management.html).
18. Click the toggle in the top right to enable the application.
19. Assign yourself to Astro from Ping Identity. See [Editing a user](https://docs.pingidentity.com/pingone/directory/p1_edituser.html).
20. Return to the Astro UI. In the configuration screen for your SAML connection, configure the following values:
* **Identity Provider Single Sign-on URL**: Enter the value you copied from the **Single Sign-on Service** field.
* **X.509 Certificate**: Enter the X.509 Certificate that you downloaded.
21. Click **Create**. Your Ping Identity integration appears as an entry in **SSO Configuration**.
22. In **SSO Configuration**, click **Activate**. You are redirected to Ping Identity to test your configuration. After you have successfully authenticated, you are redirected to Astro.
23. Click **Activate SSO**.
Don't share your single sign-on (SSO) bypass link. With an SSO bypass link, anyone with an email and a password can sign in to Astro. Astronomer recommends periodically regenerating the link from the **Settings** tab in the Astro UI.
An SSO bypass link allows you to authenticate to your Organization without using SSO. This link should be used to access your Organization only when you can't access Astro due to an issue with your identity provider.
1. In the Astro UI, go to **Settings**, then in the **Security** section, click **Authentication**.
2. In the **Advanced Settings** section, click **Edit Settings**, turn on **SSO Bypass Link**, then click **Copy**. Save this link for when you need to sign in to Astro without using SSO.
To remove the bypass link, turn off **SSO Bypass Link**.
1. In the Astro UI, click **Organization Settings**, then click **Authentication**.
2. In the **SSO Bypass Link** field, click **Copy**. Save this link for when you need to sign in to Astro without using SSO.
If you don't want to maintain an SSO bypass link, click **Delete**. You can always regenerate a link if you need one in the future.
Assign users from your organization to your new application. See [Managing user groups](https://docs.pingidentity.com/pingone/directory/p1_managing_groups.html).
When a user assigned to the application accesses Astro, they are automatically signed in to Ping Identity after entering their email in the Astro UI.
## SSO enforcement
This is feature is only available if you are on the **Business** tier or above. See [Astro Plans and Pricing](https://www.astronomer.io/pricing/).
Configuring an SSO connection lets your users sign in through your IdP, but doesn't require them to. By default, users in your verified domains can still sign in with basic authentication, Google, or GitHub. To require them to sign in through your IdP, enforce SSO.
Enforcement:
* Limits sign-in to SSO for users in your verified domains.
* Disables basic authentication, Google, and GitHub for those users.
* Is available on Business plans or higher.
Astro doesn't provide native MFA for basic or social logins. To require MFA for all users, enforce SSO on a Business plan or higher and configure MFA in your IdP — for example, with [Okta Adaptive Authentication](https://www.okta.com/identity-101/adaptive-authentication/) or [Microsoft Conditional Access](https://learn.microsoft.com/en-us/azure/active-directory/conditional-access/overview).
To enforce SSO:
1. In the Astro UI, go to **Settings**, then in the **Security** section, click **Authentication**.
2. In the **Advanced Settings** section, click **Edit Settings**, then select **Allow only Single Sign-On (SSO)** from the **Login Method** list.
You can also restrict sign-in to only Google or only GitHub from the same list.
1. In the Astro UI, click **Organization Settings**, then click **Authentication**.
2. In the **Advanced Settings** menu, select **Allow only Single Sign-On (SSO)** from the **Login Methods** list.
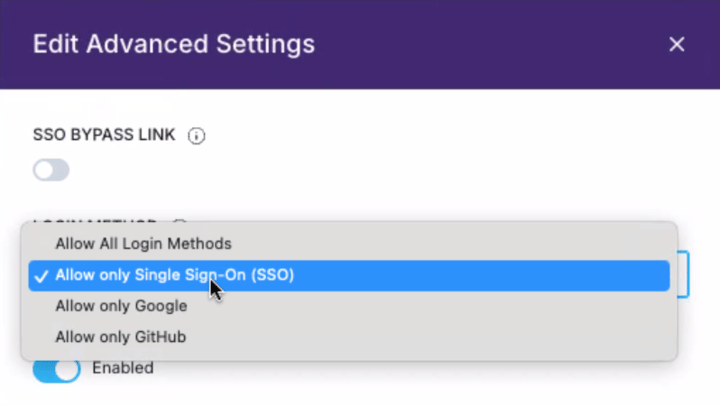 You can also restrict sign-in to only Google or only GitHub from the same list.
## Reconfigure SSO to a new identity provider
If your organization needs to switch from one SSO identity provider to another, you can remove the existing SSO connection and configure a new one. This process requires a brief period of downtime during which users can't sign in through the old IdP.
After you delete the old SSO connection, users can't sign in using the old IdP. Schedule this change during a maintenance window to minimize disruption.
### Prerequisites
* [Organization Owner](/docs/astro/user-permissions) permissions in the Organization you're reconfiguring.
* A new IdP account with administrative access.
* At least one [verified domain](/docs/astro/manage-domains).
Before you remove the old SSO connection, complete the initial registration step for your new IdP. This ensures that your new IdP is ready to connect to Astro as soon as the old SSO connection is removed.
Follow the instructions in the relevant tab under [Configure your SSO identity provider](#configure-your-sso-identity-provider) and complete only the first step for your new IdP. For example, if you're switching to Microsoft Entra ID, complete the **Register Astro as an application on Azure** step.
1. In the Astro UI, go to **Settings**, then in the **Security** section, click **Authentication**.
2. Delete the SSO connection.
3. Confirm the deletion.
1. In the Astro UI, click **Organization Settings**, then click **Authentication**.
2. In the **SSO Configuration** menu, click **Delete SSO Connection**.
3. Confirm the deletion.
After you delete the old connection, users can only sign in through an SSO bypass link or other enabled authentication methods until you activate the new SSO connection.
Return to the instructions for your new IdP under [Configure your SSO identity provider](#configure-your-sso-identity-provider) and complete the remaining steps, starting from the step where you configure SSO on Astro.
## Advanced setup
### Configure just-in-time provisioning
Astro supports just-in-time provisioning by default for all single sign-on (SSO) integrations. This means that if someone without an Astro account tries logging into Astro with an email address from a domain that you manage, they are automatically granted a default role in your Organization without needing an invite. Users with emails outside of this domain need to be invited to your Organization to access it.
To enable or disable just-in-time provisioning:
1. In the Astro UI, go to **Settings**, then in the **Security** section, click **Authentication**.
2. Edit your SSO connection.
3. In **Automatic Membership**, select the default Organization role for users who sign in to Astro for the first time through your identity provider. To disable just-in-time provisioning, select **Disabled**.
1. In the Astro UI, click **Organization Settings**, then click **Authentication**.
2. In the **SSO Configuration** menu, click the pencil icon to edit your SSO connection.
3. In **Automatic Membership**, select the default Organization role for users who sign in to Astro for the first time through your identity provider. To disable just-in-time provisioning, select **Disabled**.
### Regenerate an SSO bypass link
Regenerating your SSO bypass link voids your existing SSO bypass link so that any former users with the existing link can't sign in to Astro.
1. In the Astro UI, go to **Settings**, then in the **Security** section, click **Authentication**, then in the **Advanced Settings** section, click **Edit Settings**.
2. Click **Regenerate** to create a new bypass link and void the old one.
1. In the Astro UI, click the **Settings** tab.
2. Click **Regenerate** to create a new bypass link and void the old one.
You can also restrict sign-in to only Google or only GitHub from the same list.
## Reconfigure SSO to a new identity provider
If your organization needs to switch from one SSO identity provider to another, you can remove the existing SSO connection and configure a new one. This process requires a brief period of downtime during which users can't sign in through the old IdP.
After you delete the old SSO connection, users can't sign in using the old IdP. Schedule this change during a maintenance window to minimize disruption.
### Prerequisites
* [Organization Owner](/docs/astro/user-permissions) permissions in the Organization you're reconfiguring.
* A new IdP account with administrative access.
* At least one [verified domain](/docs/astro/manage-domains).
Before you remove the old SSO connection, complete the initial registration step for your new IdP. This ensures that your new IdP is ready to connect to Astro as soon as the old SSO connection is removed.
Follow the instructions in the relevant tab under [Configure your SSO identity provider](#configure-your-sso-identity-provider) and complete only the first step for your new IdP. For example, if you're switching to Microsoft Entra ID, complete the **Register Astro as an application on Azure** step.
1. In the Astro UI, go to **Settings**, then in the **Security** section, click **Authentication**.
2. Delete the SSO connection.
3. Confirm the deletion.
1. In the Astro UI, click **Organization Settings**, then click **Authentication**.
2. In the **SSO Configuration** menu, click **Delete SSO Connection**.
3. Confirm the deletion.
After you delete the old connection, users can only sign in through an SSO bypass link or other enabled authentication methods until you activate the new SSO connection.
Return to the instructions for your new IdP under [Configure your SSO identity provider](#configure-your-sso-identity-provider) and complete the remaining steps, starting from the step where you configure SSO on Astro.
## Advanced setup
### Configure just-in-time provisioning
Astro supports just-in-time provisioning by default for all single sign-on (SSO) integrations. This means that if someone without an Astro account tries logging into Astro with an email address from a domain that you manage, they are automatically granted a default role in your Organization without needing an invite. Users with emails outside of this domain need to be invited to your Organization to access it.
To enable or disable just-in-time provisioning:
1. In the Astro UI, go to **Settings**, then in the **Security** section, click **Authentication**.
2. Edit your SSO connection.
3. In **Automatic Membership**, select the default Organization role for users who sign in to Astro for the first time through your identity provider. To disable just-in-time provisioning, select **Disabled**.
1. In the Astro UI, click **Organization Settings**, then click **Authentication**.
2. In the **SSO Configuration** menu, click the pencil icon to edit your SSO connection.
3. In **Automatic Membership**, select the default Organization role for users who sign in to Astro for the first time through your identity provider. To disable just-in-time provisioning, select **Disabled**.
### Regenerate an SSO bypass link
Regenerating your SSO bypass link voids your existing SSO bypass link so that any former users with the existing link can't sign in to Astro.
1. In the Astro UI, go to **Settings**, then in the **Security** section, click **Authentication**, then in the **Advanced Settings** section, click **Edit Settings**.
2. Click **Regenerate** to create a new bypass link and void the old one.
1. In the Astro UI, click the **Settings** tab.
2. Click **Regenerate** to create a new bypass link and void the old one.