> ## Documentation Index
> Fetch the complete documentation index at: https://astronomer.io/docs/llms.txt
> Use this file to discover all available pages before exploring further.
# Set up Astro alerts
Astro alerts provide an additional level of observability to Airflow's notification systems. You can configure an alert to notify you in Slack, PagerDuty, or through email when a Dag completes, if you have a Dag run failure, or if a task duration exceeds a specified time. You can also define whether alerts apply to a specific Deployment or across an entire Workspace or Organization.
Unlike Airflow callbacks and SLAs, Astro alerts don't require changes to Dag code. Follow this guide to set up your Slack, PagerDuty, or email to receive alerts from Astro and then configure your Deployment to send alerts.
For configuring Airflow notifications, see [Airflow email notifications](/docs/astro/airflow-email-notifications) and [Manage Airflow Dag notifications](/docs/learn/error-notifications-in-airflow).
## Alert types
Each Astro alert has a notification channel and a trigger type. The notification channel determines the format and destination of an alert and the trigger type defines what triggers the alert.
### Dag and task alerts
You can trigger an alert to a notification channel using one of the following trigger types:
* **DAG Failure**: The alert triggers whenever the specified Dag fails. From the alert notification, you can open the failed Dag run in the Astro UI to start an Otto investigation. To investigate Dag failures automatically when this alert fires, send it to a **Dag Trigger** notification channel that calls the Otto investigation API. See [Investigate with Otto](/docs/astro/otto-investigate).
* **DAG Success**: The alert triggers whenever the specified Dag completes.
* **DAG Timeliness**: The alert triggers whenever the specified Dag doesn't produce a successful Dag run by the given **Verification Time** including the **Look Back Period**.
* **DAG Duration**: The alert triggers whenever the specified Dag doesn't produce a successful Dag run within the given **Duration**. If the Dag fails before the specified duration is exceeded, the alert is triggered.
* **Task Failure**: The alert triggers whenever the specified task fails.
* **Task Duration**: The alert triggers when a specified task takes longer than expected to complete successfully. If the task fails, the alert is triggered even if it fails before the specified duration is exceeded.
You can only set a task duration alert for an individual task. Alerting on task group duration isn't supported.
Timeliness alerts only support Standard Time, as opposed to Daylight Saving Time. If you want Local Time support (for example, for [time zone aware Dags](https://airflow.apache.org/docs/apache-airflow/stable/authoring-and-scheduling/timezone.html#time-zone-aware-dags)), you must adjust the alert's UTC time when the time changes from Standard Time to Daylight Saving Time or from Daylight Saving Time to Standard Time.
### Deployment health alerts
**Preview**
This feature is in [Preview](/docs/astro/feature-previews).
Deployment health alerts are customizable Astro Alerts that notify you about [Deployment health incidents](/docs/astro/deployment-health-incidents#deployment-incidents) and suggest specific remediation actions. You can use these alerts to proactively monitor when Deployment health issues arise. For example, you can create an alert for when the Airflow metadata database storage is unusually high. All available Deployment health alerts are enabled by default for new Deployments and can be individually created, deleted, and edited in the **Alerts** tab of existing Deployments. If you don't want Deployment health alerts for a new Deployment, deselect **Deployment Health Alerts** in the **Advanced** section of the Deployment creation page.
Astro enables the following Deployment health alerts by default for new Deployments. You can individually create and customize these alerts for any Deployment:
* **Airflow DB Storage Unusually High**: The alert triggers when the metadata database has tables that are larger than 50GiB (Info) or 75GiB (Warning).
* **Deprecated Runtime Version**: The alert triggers when your Deployment is using a deprecated Astro Runtime version.
* **Job Scheduling Disabled**: The alert triggers when the Airflow scheduler is configured to prevent automatic scheduling of new tasks using Dag schedules.
* **Worker Queue at Capacity**: The alert triggers when at least one worker queue in this Deployment is running the maximum number of tasks and workers.
### Deployment health alert notifications
**Preview**
This feature is in [Preview](/docs/astro/feature-previews).
For new Deployments, Astro creates the default [Deployment health alerts](#deployment-health-alerts) with **Email** as the notification channel **Type**. By default, these alerts notify the **Contact Emails** of the Deployment, specified in the **Advanced** section of the Deployment creation page.
If **Contact Emails** is empty, Astro displays the [fallback email(s)](/docs/astro/deployment-details#fallback-emails) that receives alert notifications for the Deployment in the **Advanced** section of Deployment configuration. To change this notification channel, ensure the **Contact Emails** field of your Deployment isn't blank by editing **Deployment Details.**
## Create an alert in the Astro UI
**A new Astro UI is here**
Astronomer has redesigned the Astro UI. Try the new experience and switch your instructions using the **New Astro UI** and **Legacy UI** tabs on this page. Your selection is remembered across the docs.
### Prerequisites
* An [Astro project](/docs/cli/v1.43/develop-project).
* An [Astro Deployment](/docs/astro/create-deployment). Your Deployment must run Astro Runtime 7.1.0 or later to configure Astro alerts and it must have [OpenLineage enabled](/docs/astro/observe-openlineage).
* A configured [notification channel](#configure-and-add-alert-notification-channels).
You can also work with Astro alerts and their notification channels with the [Astro API](/docs/astro/api/v-1-beta-1/platform/alerts/create-an-alert).
Astro alerts requires OpenLineage. By default, every Astro Deployment using Hosted Execution has OpenLineage enabled. If you disabled OpenLineage in your Astro Deployment, you need to enable it to use Astro alerts. See [Disable OpenLineage](/docs/astro/observe-openlineage#disable-openlineage-completely) to find how to disable and re-enable OpenLineage.
If you use [Remote Execution](/docs/astro/execution-mode#remote-execution), you must [enable OpenLineage for Remote Execution Agents](/docs/astro/remote-execution-configure-openlineage) to use Astro Alerts or Observe.
### Step 1: Create your alert
1. In the Astro UI, click **Alerting** > **Alerts**.
If you don't have permissions to add a notification channel or alert at your Workspace or Organization-level, you can add one in the **Alerts** form through the **Deployment settings** page.
1. In the Astro UI, click **Deployments** then select your Deployment.
2. Click the **Alerts** tab.
2. Click **New Alert**.
3. Choose the **Alert Type**.
* **Duration**: Enter the **Duration** for how long a Dag or task should take to run before you send an alert to your notification channels.
* **Timeliness**: Select the **Days of Week** that the alert should observe, the **Verification Time** when it should look for a Dag success, and the **Lookback Period** for how long it should look back for a verification time. For example, if an alert has a **Verification Time** of 3:00 PM UTC and a **Lookback Period** of 60 minutes, it will trigger whenever the given Dag doesn't produce a successful Dag run from 2:00 to 3:00 PM UTC.
**Initial evaluation behavior**
Alerts only evaluate runs that occur after the alert’s creation. If a Dag ran successfully within the **Look Back Period** of a timeliness alert, the alert will still trigger on initial evaluation, since that run occurred before the alert was created.
Timeliness alerts only support Standard Time, as opposed to Daylight Saving Time. If you want Local Time support (for example, for [time zone aware Dags](https://airflow.apache.org/docs/apache-airflow/stable/authoring-and-scheduling/timezone.html#time-zone-aware-dags)), you must adjust the alert's UTC time when the time changes from Standard Time to Daylight Saving Time or from Daylight Saving Time to Standard Time.
4. Choose the alert **Severity**, either **Info**, **Warning**, or **Critical**.
1. In the Astro UI, click **Alerting** > **Alerts**.
If you don't have permissions to add a notification channel or alert at your Workspace or Organization-level, you can add one in the **Alerts** form through the **Deployment settings** page.
1. In the Astro UI, click **Deployments** then select your Deployment.
2. Click the **Alerts** tab.
2. Click **+ New Alert**.
3. Choose the **Alert Type**
* **Duration**: Enter the **Duration** for how long a Dag or task should take to run before you send an alert to your notification channels.
* **Timeliness**: Select the **Days of Week** that the alert should observe, the **Verification Time** when it should look for a Dag success, and the **Lookback Period** for how long it should look back for a verification time. For example, if an alert has a **Verification Time** of 3:00 PM UTC and a **Lookback Period** of 60 minutes, it will trigger whenever the given Dag doesn't produce a successful Dag run from 2:00 to 3:00 PM UTC.
**Initial evaluation behavior**
Alerts only evaluate runs that occur after the alert’s creation. If a Dag ran successfully within the **Look Back Period** of a timeliness alert, the alert will still trigger on initial evaluation, since that run occurred before the alert was created.
Timeliness alerts only support Standard Time, as opposed to Daylight Saving Time. If you want Local Time support (for example, for [time zone aware Dags](https://airflow.apache.org/docs/apache-airflow/stable/authoring-and-scheduling/timezone.html#time-zone-aware-dags)), you must adjust the alert's UTC time when the time changes from Standard Time to Daylight Saving Time or from Daylight Saving Time to Standard Time.
4. Choose the alert **Severity**, either **Info**, **Warning**, or **Critical**.
### Step 2: Add alert rules
1. Define the **Workspace** and **Deployment**
The following alert types must be defined at the Deployment level:
* Dag alerts (Dag Duration, Dag Failure, Dag Success, Dag Timeliness)
* Deployment health alerts
* Task alerts (Task Duration, Task Failure)
2. For Dag and Task Alerts, you can further customize the circumstances in which the alert is triggered by defining:
* **Attribute**
* For Dag-level alerts: **DAG ID**
* For Task-level alerts: You can define rules for both the **DAG ID** and **Task ID** attributes.
* **Operator**
* **is one of**: Select specific Dags or tasks the alert should apply to. You can also choose **All dags** to apply the alert to all Dags in the Deployment and **All Tasks** to apply the alert to all tasks in the Dag.
* **contains**: Define a substring that is in the **DAG ID** and/or **Task ID** for the Dags and/or tasks that the alert should apply to.
* **Values**/**Substring**
The following example is a task-level alert for all tasks with a **Task ID** that contains the substring `prod` in all Dags within a Deployment:
 ### Step 3: Add notification channels for the alert
Select the Notification Channels for the Alert. You can also create a new notification channel by clicking **+Notification Channel**. See [Notification Channels](#configure-and-add-alert-notification-channels) for information on configuring and adding Notification Channels.
### Step 4: (Optional) Change an alert name
After you select a Dag that you want to apply an alert to, Astro automatically generates a name for your alert. However, you can choose to change the name of your alert.
1. Expand the **Change alert names...** section.
2. Edit the **Alert Name**.
3. Click **Create Alert** to save your changes.
### Step 5: (Optional) Test your Dag failure alert
Astro alerts work whether your Dag run is manual or scheduled, so you can test your configured Astro alerts by failing your Dag manually.
1. In the Astro UI, click **DAGs**.
2. Choose the Dag that has your alert configured.
3. Trigger a Dag run.
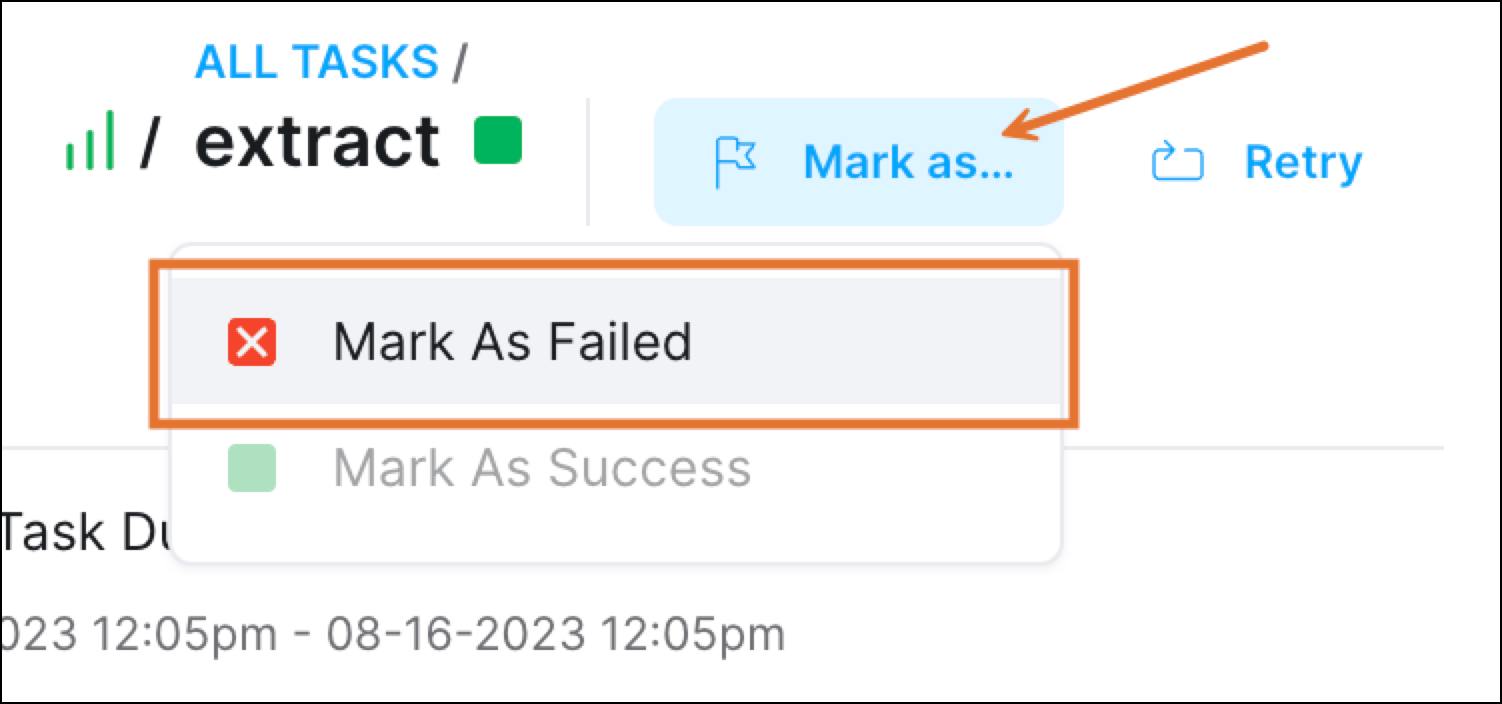
4. Select **Mark as** and choose **Failed** to trigger an alert for a Dag failure.
### Step 3: Add notification channels for the alert
Select the Notification Channels for the Alert. You can also create a new notification channel by clicking **+Notification Channel**. See [Notification Channels](#configure-and-add-alert-notification-channels) for information on configuring and adding Notification Channels.
### Step 4: (Optional) Change an alert name
After you select a Dag that you want to apply an alert to, Astro automatically generates a name for your alert. However, you can choose to change the name of your alert.
1. Expand the **Change alert names...** section.
2. Edit the **Alert Name**.
3. Click **Create Alert** to save your changes.
### Step 5: (Optional) Test your Dag failure alert
Astro alerts work whether your Dag run is manual or scheduled, so you can test your configured Astro alerts by failing your Dag manually.
1. In the Astro UI, click **DAGs**.
2. Choose the Dag that has your alert configured.
3. Trigger a Dag run.
4. Select **Mark as** and choose **Failed** to trigger an alert for a Dag failure.
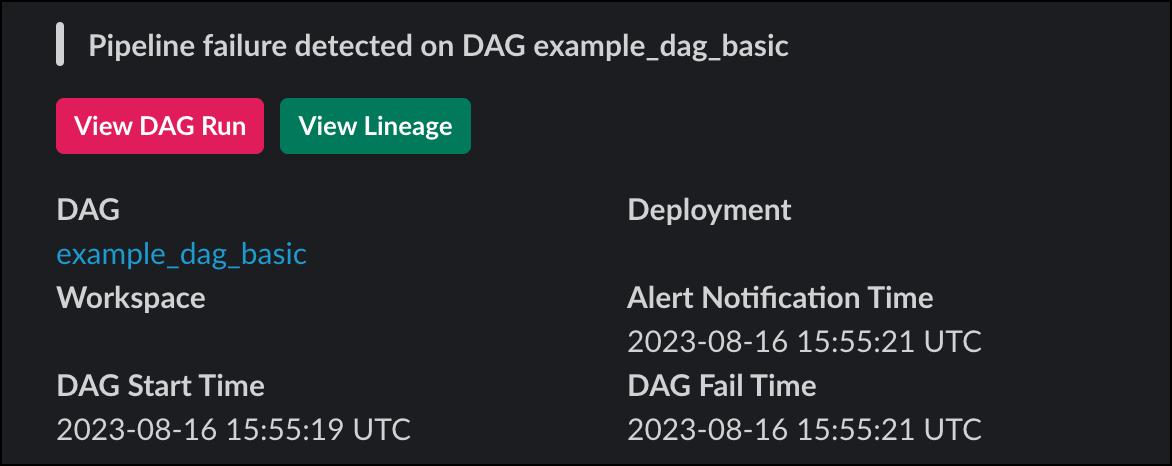
 5. Check your Slack, PagerDuty, or Email alerts for your Dag failure alert. The alert includes information about the Dag, Workspace, Deployment, and data lineage associated with the failure as well as direct links to the Astro UI.
 ## Configure and add alert notification channels
You can send Astro alerts, including Deployment Health Alerts, to the following notification channels
* Slack
* PagerDuty
* Email
* Dag trigger
* Opsgenie
For alerts triggered by a specific Dag run, Slack and email notifications include the Airflow Dag run ID. Use it to find the run in the Airflow UI.
The **Dag Trigger** notification channel works differently from other notification channel types. Instead of sending a pre-formatted alert message, Astro makes a generic request through the Airflow REST API to trigger a Dag on Astro. You can configure the triggered Dag to complete any action, such as sending a message to your own incident management system or writing data about an incident to a table.
### Notification channels scope
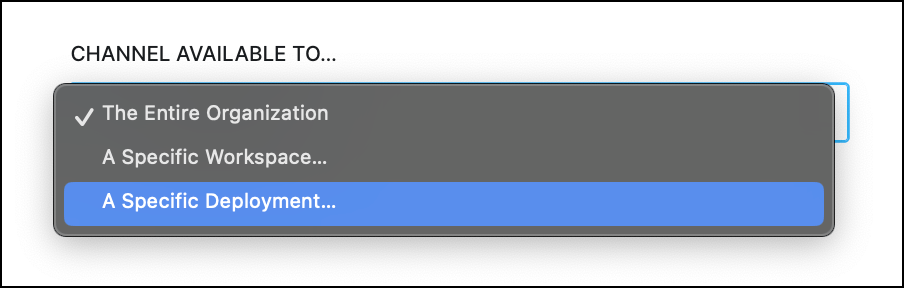
When you create a notification channel, you can define whether it is available to a specific Deployment or available to an entire Workspace or Organization. The type of scope you can use for your notification channels depends on your [user permissions](/docs/astro/user-permissions).
## Configure and add alert notification channels
You can send Astro alerts, including Deployment Health Alerts, to the following notification channels
* Slack
* PagerDuty
* Email
* Dag trigger
* Opsgenie
For alerts triggered by a specific Dag run, Slack and email notifications include the Airflow Dag run ID. Use it to find the run in the Airflow UI.
The **Dag Trigger** notification channel works differently from other notification channel types. Instead of sending a pre-formatted alert message, Astro makes a generic request through the Airflow REST API to trigger a Dag on Astro. You can configure the triggered Dag to complete any action, such as sending a message to your own incident management system or writing data about an incident to a table.
### Notification channels scope
When you create a notification channel, you can define whether it is available to a specific Deployment or available to an entire Workspace or Organization. The type of scope you can use for your notification channels depends on your [user permissions](/docs/astro/user-permissions).
 You can view, create, and manage notification channels for your Workspace or Organization in the **Notification Channels** page or when creating a Deployment alert.
### Step 1: Configure your notification channel
To set up alerts in Slack, you need to create a Slack app in your Slack workspace. After you've created your app, you can generate a webhook URL in Slack where Astro will send alerts.
1. Go to [Slack API: Applications](https://api.slack.com/apps/new) to create a new app in your organization's Slack workspace.
2. Click **From scratch** when prompted to choose how you want to create your app.
3. Enter a name for your app, like `astro-alerts`, choose the Slack workspace where you want Astro to send your alerts, and then click **Create App**.
If you don't have permission to install apps into your Slack workspace, you can still create the app, but you will need to request that an administrator from your team completes the installation.
4. Select **Incoming webhooks**.
5. On the **Incoming webhooks** page, click the toggle to turn on **Activate Incoming Webhooks**. See [Sending messages using Incoming Webhooks](https://api.slack.com/messaging/webhooks).
6. In the **Webhook URLs for your Workspace** section, click **Add new Webhook to Workspace**.
If you don't have permission to install apps in your Slack workspace, click **Request to Add New Webhook** to send a request to your organization administrator.
7. Choose the channel where you want to send your Astro alerts and click **Allow**.
8. After your webhook is created, copy the webhook URL from the new entry in the **Webhook URLs for your Workspace** table.
To set up an alert integration with PagerDuty, you need access to your organization's PagerDuty Service. PagerDuty uses the [Events API v2](https://developer.pagerduty.com/docs/ZG9jOjExMDI5NTgw-events-api-v2-overview#getting-started) to create a new integration that connects your Service with Astro.
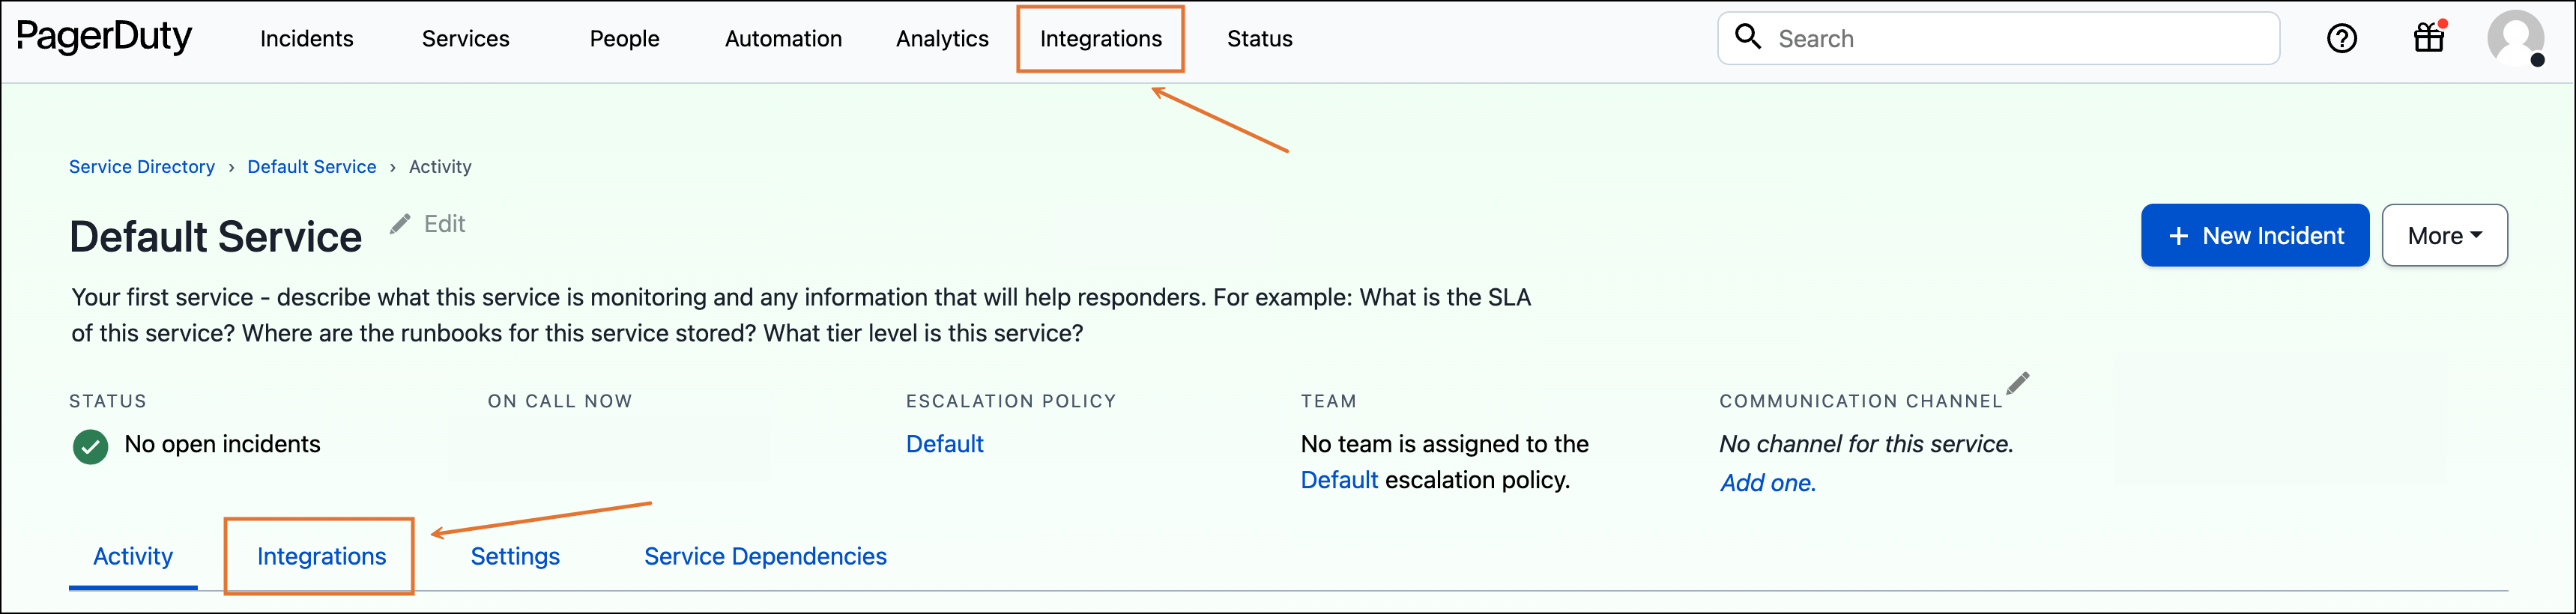
1. Open your PagerDuty service and click the **Integrations** tab.
You can view, create, and manage notification channels for your Workspace or Organization in the **Notification Channels** page or when creating a Deployment alert.
### Step 1: Configure your notification channel
To set up alerts in Slack, you need to create a Slack app in your Slack workspace. After you've created your app, you can generate a webhook URL in Slack where Astro will send alerts.
1. Go to [Slack API: Applications](https://api.slack.com/apps/new) to create a new app in your organization's Slack workspace.
2. Click **From scratch** when prompted to choose how you want to create your app.
3. Enter a name for your app, like `astro-alerts`, choose the Slack workspace where you want Astro to send your alerts, and then click **Create App**.
If you don't have permission to install apps into your Slack workspace, you can still create the app, but you will need to request that an administrator from your team completes the installation.
4. Select **Incoming webhooks**.
5. On the **Incoming webhooks** page, click the toggle to turn on **Activate Incoming Webhooks**. See [Sending messages using Incoming Webhooks](https://api.slack.com/messaging/webhooks).
6. In the **Webhook URLs for your Workspace** section, click **Add new Webhook to Workspace**.
If you don't have permission to install apps in your Slack workspace, click **Request to Add New Webhook** to send a request to your organization administrator.
7. Choose the channel where you want to send your Astro alerts and click **Allow**.
8. After your webhook is created, copy the webhook URL from the new entry in the **Webhook URLs for your Workspace** table.
To set up an alert integration with PagerDuty, you need access to your organization's PagerDuty Service. PagerDuty uses the [Events API v2](https://developer.pagerduty.com/docs/ZG9jOjExMDI5NTgw-events-api-v2-overview#getting-started) to create a new integration that connects your Service with Astro.
1. Open your PagerDuty service and click the **Integrations** tab.
 2. Click **Add an integration**.
3. Select **Events API v2** as the **Integration Type**.
4. On your **Integrations** page, open your new integration and enter an **Integration Name**.
5. Copy the **Integration Key** for your new Astro alert integration.
No external configuration is required for the email integration. Astronomer recommends allowlisting `astronomer.io` with your email provider to ensure that no alerts go to your spam folder. Alerts are sent from `postmaster@astronomer.io`.
The **Dag Trigger** notification channel works differently from other notification channel types. Instead of sending a pre-formatted alert message, Astro makes a generic request through the `DagRuns` endpoint of the [Airflow REST API](https://airflow.apache.org/docs/apache-airflow/stable/stable-rest-api-ref.html#operation/post_dag_run) to trigger any Dag in your Workspace. You can configure the triggered Dag to complete any action, such as sending a message to your own incident management system or writing data about an incident to a table.
The alert payload includes the following parameters:
* `conf`: This parameter holds the alert payload:
* `alertId`: A unique alert ID.
* `alertType`: The type of alert triggered.
* `dagName`: The name of the Dag that the alert condition triggers.
* `message`: The detailed message with the cause of the alert.
* `airflowDagRunId`: The Airflow run ID of the Dag run that caused the alert. For example, `scheduled__2023-11-17T17:30:00+00:00`. This parameter is omitted when no Dag run is associated with the alert.
* `note`: By default, this is `Triggering dag on Airflow `.
The following is an example alert payload that would be passed through the API to trigger the `alert_dag` if `fail_dag` fails:
```json wrap theme={null}
{
"dagName": "alert_dag",
"alertType": "PIPELINE_FAILURE",
"alertId": "d75e7517-88cc-4bab-b40f-660dd79df216",
"airflowDagRunId": "scheduled__2023-11-17T17:30:00+00:00",
"message": "[Astro Alerts] Pipeline failure detected on dag fail_dag. \\nStart time: 2023-11-17 17:32:54 UTC. \\nFailed at: 2023-11-17 17:40:10 UTC. \\nAlert notification time: 2023-11-17 17:40:10 UTC. \\nClick link to investigate in Astro UI: https://cloud.astronomer.io/clkya6zgv000401k8zafabcde/dags/clncyz42l6957401bvfuxn8zyxw/fail_dag/c6fbe201-a3f1-39ad-9c5c-817cbf99d123?utm_source=alert\"\\n"
}
```
These parameters are accessible in the triggered Dag using [Dag params](/docs/learn/airflow-params).
1. Create a Dag that you want to run when the alert is triggered. For example, you can use the following Dag to run arbitrary Python code when the alert is triggered:
```python wrap theme={null}
from datetime import datetime
from typing import Any
from airflow.models.dag import DAG
from airflow.operators.python import PythonOperator
with DAG(
dag_id="register_incident",
start_date=datetime(2023, 1, 1),
schedule=None,
):
def _register_incident(params: dict[str, Any]):
failed_dag = params["dagName"]
print(f"Register an incident in my system for DAG {failed_dag}.")
PythonOperator(task_id="register_incident", python_callable=_register_incident)
```
2. Deploy the Dag to any Deployment in the Workspace where you want to create the alert. The Dag that triggers the alert and the Dag that the alert runs can be in different Deployments, but they must be deployed in the same Workspace.
3. Create a [Deployment API token](/docs/astro/deployment-api-tokens) for the Deployment where you deployed the Dag that the alert will run. Copy the token to use in the next step.
### Step 2: Add a notification channel in the Astro UI
You can add notification channels in the Astro UI.
1. In the Astro UI, click **Alerting** > **Notification Channels**.
2. Click **New Notification Channel**.
3. Enter a name for your notification channel.
4. Choose the Channel Type.
5. Add the notification channel information.
Paste the Webhook URL from your Slack workspace app. If you need to find a URL for an app you've already created, go to your [Slack Apps](https://api.slack.com/apps) page, select your app, and then choose the **Incoming Webhooks** page.
Paste the Integration Key from your PagerDuty Integration and select the **Severity** of the alert.
Enter the email addresses that should receive the alert.
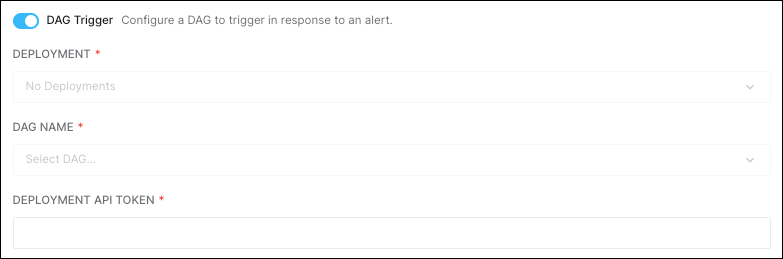
Select the Deployment where your Dag is deployed, then select the Dag. Enter the Deployment API token that you created in Step 1.
2. Click **Add an integration**.
3. Select **Events API v2** as the **Integration Type**.
4. On your **Integrations** page, open your new integration and enter an **Integration Name**.
5. Copy the **Integration Key** for your new Astro alert integration.
No external configuration is required for the email integration. Astronomer recommends allowlisting `astronomer.io` with your email provider to ensure that no alerts go to your spam folder. Alerts are sent from `postmaster@astronomer.io`.
The **Dag Trigger** notification channel works differently from other notification channel types. Instead of sending a pre-formatted alert message, Astro makes a generic request through the `DagRuns` endpoint of the [Airflow REST API](https://airflow.apache.org/docs/apache-airflow/stable/stable-rest-api-ref.html#operation/post_dag_run) to trigger any Dag in your Workspace. You can configure the triggered Dag to complete any action, such as sending a message to your own incident management system or writing data about an incident to a table.
The alert payload includes the following parameters:
* `conf`: This parameter holds the alert payload:
* `alertId`: A unique alert ID.
* `alertType`: The type of alert triggered.
* `dagName`: The name of the Dag that the alert condition triggers.
* `message`: The detailed message with the cause of the alert.
* `airflowDagRunId`: The Airflow run ID of the Dag run that caused the alert. For example, `scheduled__2023-11-17T17:30:00+00:00`. This parameter is omitted when no Dag run is associated with the alert.
* `note`: By default, this is `Triggering dag on Airflow `.
The following is an example alert payload that would be passed through the API to trigger the `alert_dag` if `fail_dag` fails:
```json wrap theme={null}
{
"dagName": "alert_dag",
"alertType": "PIPELINE_FAILURE",
"alertId": "d75e7517-88cc-4bab-b40f-660dd79df216",
"airflowDagRunId": "scheduled__2023-11-17T17:30:00+00:00",
"message": "[Astro Alerts] Pipeline failure detected on dag fail_dag. \\nStart time: 2023-11-17 17:32:54 UTC. \\nFailed at: 2023-11-17 17:40:10 UTC. \\nAlert notification time: 2023-11-17 17:40:10 UTC. \\nClick link to investigate in Astro UI: https://cloud.astronomer.io/clkya6zgv000401k8zafabcde/dags/clncyz42l6957401bvfuxn8zyxw/fail_dag/c6fbe201-a3f1-39ad-9c5c-817cbf99d123?utm_source=alert\"\\n"
}
```
These parameters are accessible in the triggered Dag using [Dag params](/docs/learn/airflow-params).
1. Create a Dag that you want to run when the alert is triggered. For example, you can use the following Dag to run arbitrary Python code when the alert is triggered:
```python wrap theme={null}
from datetime import datetime
from typing import Any
from airflow.models.dag import DAG
from airflow.operators.python import PythonOperator
with DAG(
dag_id="register_incident",
start_date=datetime(2023, 1, 1),
schedule=None,
):
def _register_incident(params: dict[str, Any]):
failed_dag = params["dagName"]
print(f"Register an incident in my system for DAG {failed_dag}.")
PythonOperator(task_id="register_incident", python_callable=_register_incident)
```
2. Deploy the Dag to any Deployment in the Workspace where you want to create the alert. The Dag that triggers the alert and the Dag that the alert runs can be in different Deployments, but they must be deployed in the same Workspace.
3. Create a [Deployment API token](/docs/astro/deployment-api-tokens) for the Deployment where you deployed the Dag that the alert will run. Copy the token to use in the next step.
### Step 2: Add a notification channel in the Astro UI
You can add notification channels in the Astro UI.
1. In the Astro UI, click **Alerting** > **Notification Channels**.
2. Click **New Notification Channel**.
3. Enter a name for your notification channel.
4. Choose the Channel Type.
5. Add the notification channel information.
Paste the Webhook URL from your Slack workspace app. If you need to find a URL for an app you've already created, go to your [Slack Apps](https://api.slack.com/apps) page, select your app, and then choose the **Incoming Webhooks** page.
Paste the Integration Key from your PagerDuty Integration and select the **Severity** of the alert.
Enter the email addresses that should receive the alert.
Select the Deployment where your Dag is deployed, then select the Dag. Enter the Deployment API token that you created in Step 1.
 6. Choose the scope by defining what you want to make **Notification channel available to:**
7. Click **Create notification channel**.
## Notification History
To view a historical log of all previously triggered Alerts for your Organization, click **Notification History** under the **Alerting** section of the navigation. You can filter the notification log based on:
* **Alert**: Which Alert triggered the notification
* **Time Range**: The time range the notification was triggered in
* **Notification Channel**: The notification channel that is defined for the Alert
* **Status**: Whether the notification was successfully **sent** or **failed**
To view the notification history for a particular Alert, click **Alerts** in the **Alerting** section of the navigation. Here, you can see the number of times an Alert sent a notification (in the "Sent" column) or failed to send a notification (in the "Failed" column). Click the number in the **Sent** column to see notification history for that Alert.
6. Choose the scope by defining what you want to make **Notification channel available to:**
7. Click **Create notification channel**.
## Notification History
To view a historical log of all previously triggered Alerts for your Organization, click **Notification History** under the **Alerting** section of the navigation. You can filter the notification log based on:
* **Alert**: Which Alert triggered the notification
* **Time Range**: The time range the notification was triggered in
* **Notification Channel**: The notification channel that is defined for the Alert
* **Status**: Whether the notification was successfully **sent** or **failed**
To view the notification history for a particular Alert, click **Alerts** in the **Alerting** section of the navigation. Here, you can see the number of times an Alert sent a notification (in the "Sent" column) or failed to send a notification (in the "Failed" column). Click the number in the **Sent** column to see notification history for that Alert.