> ## Documentation Index
> Fetch the complete documentation index at: https://astronomer.io/docs/llms.txt
> Use this file to discover all available pages before exploring further.
# Configure task log collection and exporting to ElasticSearch
Airflow task logs are stored in a logging backend to ensure you can access them after your Pods terminate. By default, Astronomer uses [Fluentd](https://www.fluentd.org/) to collect task logs and export them to an ElasticSearch instance.
You can configure how Astronomer collects Deployment task logs and exports them to ElasticSearch. The following are the supported methods for exporting task logs to ElasticSearch:
* Using a Fluentd Daemonset pod on each Kubernetes node in your cluster.
* Using container sidecars for Deployment components.
## Export task logs using a Fluentd DaemonSet
By default, Astronomer Software uses a Fluentd DaemonSet to aggregate task logs. The is the workflow for the default implementation:
* Deployments write task logs to stdout.
* Kubernetes takes the output from stdout and writes it to the Deployment’s node.
* A Fluentd pod reads logs from the node and forwards them to ElasticSearch.
This implementation is recommended for organizations that:
* Run longer tasks using Celery executor.
* Run Astronomer Software in a dedicated cluster.
* Run privileged containers in a cluster with a ClusterRole.
This approach is not suited for organizations that run many small tasks using the Kubernetes executor. Because task logs exist only for the lifetime of the pod, your pods running small tasks might complete before Fluentd can collect their task logs.
## Export logs using container sidecars
You can use a logging sidecar container to collect and export logs. In this implementation:
* Each container running an Airflow component for a Deployment receives its own [Vector](https://vector.dev/) sidecar.
* Task logs are written to a shared directory.
* The Vector sidecar reads logs from the shared directory and writes them to ElasticSearch.
This implementation is recommended for organizations that:
* Run Astronomer Software in a multi-tenant cluster, where security is a concern.
* Use the KubernetesExecutor to run many short-lived tasks, which requires improved reliability.
With this implementation, the Vector sidecars each use 100m cpu and 384Mi memory. More compute and memory resources are used for exporting logs with sidecars than when using a Fluentd Daemonset. This implementation also requires horizontal scaling of Houston in proportion to the number of parallel tasks, as the system introduces increased load on Houston to authorize sidecars for each KubernetesExecutor task Pod.
### Configure logging sidecars
1. Retrieve your `values.yaml` file. See [Apply a config change](/docs/astro-private-cloud/v-0-37/apply-platform-config).
2. Add the following entry to your `values.yaml` file:
```yaml wrap theme={null}
global:
fluentdEnabled: false
loggingSidecar:
enabled: true
name: sidecar-log-consumer
```
If you're migrating from Fluentd, additionally set the following configuration so that Astronomer Software can retain logs:
```yaml wrap theme={null}
global:
logging:
indexNamePrefix:
```
3. Push the configuration change. See [Apply a config change](/docs/astro-private-cloud/v-0-37/apply-platform-config).
To revert to the default behavior and export task logs using a Fluentd Daemonset, remove this configuration from your `values.yaml` file and reapply it.
#### Customize Vector logging sidecars
You can customize the default Astronomer Vector logging sidecar to have different transformations and sinks based on your team's requirements. This is useful if you want to annotate, otherwise customize, or filter your logs before sending them to your logging platform.
1. Add the following line to your `values.yaml` file:
```yaml {5} wrap theme={null}
global:
loggingSidecar:
enabled: true
name: sidecar-log-consumer
customConfig: true
```
2. Push the configuration change to your cluster. See [Apply a config change](/docs/astro-private-cloud/v-0-37/apply-platform-config).
3. Create a custom [vector configuration `yaml` file](https://vector.dev/docs/reference/configuration/) to change how and where sidecars forward your logs. The following examples are template configurations for each commonly used external logging service. For the complete default logging sidecar configmap, see the [Astronomer GitHub](https://github.com/astronomer/airflow-chart/blob/master/templates/logging-sidecar-configmap.yaml).
```yaml expandable wrap theme={null}
log_schema:
timestamp_key : "@timestamp"
data_dir: "${SIDECAR_LOGS}"
sources:
airflow_log_files:
type: file
include:
- "${SIDECAR_LOGS}/*.log"
read_from: beginning
transforms:
transform_airflow_logs:
type: remap
inputs:
- airflow_log_files
source: |
.component = "${COMPONENT:--}"
.workspace = "${WORKSPACE:--}"
.release = "${RELEASE:--}"
.date_nano = parse_timestamp!(.@timestamp, format: "%Y-%m-%dT%H:%M:%S.%f%Z")
filter_common_logs:
type: filter
inputs:
- transform_airflow_logs
condition:
type: "vrl"
source: '!includes(["worker","scheduler"], .component)'
filter_scheduler_logs:
type: filter
inputs:
- transform_airflow_logs
condition:
type: "vrl"
source: 'includes(["scheduler"], .component)'
filter_worker_logs:
type: filter
inputs:
- transform_airflow_logs
condition:
type: "vrl"
source: 'includes(["worker"], .component)'
filter_gitsyncrelay_logs:
type: filter
inputs:
- transform_airflow_logs
condition:
type: "vrl"
source: 'includes(["git-sync-relay"], .component)'
transform_task_log:
type: remap
inputs:
- filter_worker_logs
- filter_scheduler_logs
source: |-
. = parse_json(.message) ?? .
.@timestamp = parse_timestamp(.timestamp, "%Y-%m-%dT%H:%M:%S%Z") ?? now()
.check_log_id = exists(.log_id)
if .check_log_id != true {
.log_id = join!([to_string!(.dag_id), to_string!(.task_id), to_string!(.execution_date), to_string!(.try_number)], "_")
}
.offset = to_int(now()) * 1000000000 + to_unix_timestamp(now()) * 1000000
final_task_log:
type: remap
inputs:
- transform_task_log
source: |
.component = "${COMPONENT:--}"
.workspace = "${WORKSPACE:--}"
.release = "${RELEASE:--}"
.date_nano = parse_timestamp!(.@timestamp, format: "%Y-%m-%dT%H:%M:%S.%f%Z")
transform_remove_fields:
type: remap
inputs:
- final_task_log
- filter_common_logs
- filter_gitsyncrelay_logs
source: |
del(.host)
del(.file)
# Configuration for ElasticSearch sink.
sinks:
out:
type: elasticsearch
# Specify the transforms you want to run before your logs are exported.
inputs:
- transform_remove_fields
mode: bulk
compression: none
endpoint: "http://example-host:"
auth:
strategy: "basic"
user: "example-user"
password : "example-pass"
bulk:
index: "vector.${RELEASE:--}.%Y.%m.%d"
action: create
```
```yaml expandable wrap theme={null}
log_schema:
timestamp_key : "@timestamp"
data_dir: "${SIDECAR_LOGS}"
sources:
airflow_log_files:
type: file
include:
- "${SIDECAR_LOGS}/*.log"
read_from: beginning
transforms:
transform_syslog:
type: add_fields
inputs:
- generate_syslog
fields:
component: "${COMPONENT:--}"
workspace: "${WORKSPACE:--}"
release: "${RELEASE:--}"
transform_task_log:
type: remap
inputs:
- transform_syslog
source: |-
# Parse Syslog input. The "!" means that the script should abort on error.
. = parse_json!(.message)
.@timestamp = parse_timestamp(.timestamp, "%Y-%m-%dT%H:%M:%S%Z") ?? now()
.check_log_id = exists(.log_id)
if .check_log_id != true {
.log_id = join!([.dag_id, .task_id, .execution_date, .try_number], "_")
}
.offset = to_int(now()) * 1000000000 + to_unix_timestamp(now()) * 1000000
# Configuration for Datadog sinks
sinks:
my_sink_id:
type: datadog_logs
# Specify the transforms you want to run before your logs are exported.
inputs:
- transform_task_log
site: us1.datadoghq.com
default_api_key:
encoding:
codec: json
```
```yaml wrap theme={null}
log_schema:
timestamp_key : "@timestamp"
data_dir: "${SIDECAR_LOGS}"
sources:
airflow_log_files:
type: file
include:
- "${SIDECAR_LOGS}/*.log"
read_from: beginning
transforms:
transform_syslog:
type: add_fields
inputs:
- generate_syslog
fields:
component: "${COMPONENT:--}"
workspace: "${WORKSPACE:--}"
release: "${RELEASE:--}"
# Configuration for Honeycomb sinks
sinks:
my_sink_id:
type: honeycomb
# Specify the transforms you want to run before your logs are exported.
inputs:
- transform_syslog
api_key:
dataset: my-honeycomb-dataset
```
4. Run the following command to add the configuration file to your cluster as a Kubernetes secret:
```sh wrap theme={null}
kubectl create secret generic sidecar-config --from-file=vector-values.yaml=vector-values.yaml -n
```
5. Run the following command to annotate the secret so that it's automatically applied to all new Deployments:
```sh wrap theme={null}
kubectl annotate secret sidecar-config astronomer.io/commander-sync="platform-release=astronomer" -n
```
6. Run the following command to sync existing Deployments with the new configuration:
```sh wrap theme={null}
kubectl create job --from=cronjob/astronomer-config-syncer sync-secrets -n
```
## Use an external Elasticsearch instance for Airflow task log management
Add Airflow task logs from your Astronomer Deployment to an existing Elasticsearch instance on [Elastic Cloud](https://www.elastic.co/cloud/) to centralize log management and analysis. Centralized log management allows you to quickly identify, troubleshoot, and resolve task failure issues. Although these examples use Elastic Cloud, you can also use AWS Managed OpenSearch Service or any other elastic service (managed or hosted). With an external Elasticsearch instance configured for Astronomer Software, you can see the logs in your Elasticsearch instance and browse the logs from the Software UI.
If you use an existing Elasticsearch instance, make sure that the index template is configured to enable auto creation of new indices.
### Create an Elastic Deployment and endpoint
1. In your browser, go to `https://cloud.elastic.co/` and create a new Elastic Cloud deployment. See [Create a deployment](https://www.elastic.co/guide/en/cloud/current/ec-create-deployment.html#ec-create-deployment).
2. Copy and save your Elastic Cloud deployment credentials when the **Save the deployment credentials** screen appears.
3. On the Elastic dashboard, click the **Gear** icon for your Deployment.
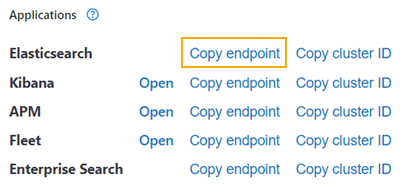
 4. Click **Copy endpoint** next to **Elasticsearch**.
 5. Optional. Test the Elastic Cloud deployment endpoint:
* Open a new browser window, paste the endpoint you copied in step 4 in the **Address** bar, and then press **Enter**.
* Enter the username and password you copied in step 2 and click **Sign in**. Output similar to the following appears:
```text wrap theme={null}
name "instance-0000000000"
cluster_name ""
cluster_uuid ""
version
number "8.3.2"
build_type "docker"
build_hash "8b0b1f23fbebecc3c88e4464319dea8989f374fd"
build_date "2022-07-06T15:15:15.901688194Z"
build_snapshot false
lucene_version "9.2.0"
minimum_wire_compatibility_version "7.17.0"
minimum_index_compatibility_version "7.0.0"
tagline "You Know, for Search"
```
### Save your Elastic Cloud deployment credentials
After you've created an Elastic deployment and endpoint, you have two options to store your Elastic deployment credentials. You can store the credentials in your Astronomer Software helm values, or for greater security, as a secret in your Astronomer Software Kubernetes cluster. For additional information about adding an Astronomer Software configuration change, see [Apply a config change](/docs/astro-private-cloud/v-0-37/apply-platform-config).
1. Run the following command to base64 encode your Elastic Cloud deployment credentials:
```bash wrap theme={null}
echo -n ":" | base64
```
2. Add the following entry to your `values.yaml` file:
```yaml wrap theme={null}
global:
fluentdEnabled: true
customLogging:
enabled: true
scheme: https
# host endpoint copied from elasticsearch console with https
# and port number removed.
host: ""
port: "9243"
# encoded credentials from above step 1
secret: ""
```
3. Add the following entry to your `values.yaml` file to disable internal logging:
```yaml wrap theme={null}
tags:
logging: false
```
4. Run the following command to upgrade the Astronomer Software release version in the `values.yaml` file:
```bash wrap theme={null}
helm upgrade -f values.yaml --version=0.37 --namespace= astronomer/astronomer
```
1. Run the following command to create a secret for your Elastic Cloud Deployment credentials in the Kubernetes cluster:
```bash wrap theme={null}
kubectl create secret generic elasticcreds --from-literal elastic=: --namespace=
```
2. Add the following entry to your `values.yaml` file:
```yaml wrap theme={null}
global:
fluentdEnabled: true
customLogging:
enabled: true
scheme: https
# host endpoint copied from elasticsearch console with https
# and port number removed.
host: ""
port: "9243"
# kubernetes secret containing credentials
secretName: elasticcreds
```
3. Add the following entry to your `values.yaml` file to disable internal logging:
```yaml wrap theme={null}
tags:
logging: false
```
4. Run the following command to upgrade the Astronomer Software release version in the `values.yaml` file:
```bash wrap theme={null}
helm upgrade -f values.yaml --version=0.37 --namespace= astronomer/astronomer
```
### View Airflow task logs in Elastic
1. On the Elastic dashboard in the **Elasticsearch Service** area, click the Deployment name.
5. Optional. Test the Elastic Cloud deployment endpoint:
* Open a new browser window, paste the endpoint you copied in step 4 in the **Address** bar, and then press **Enter**.
* Enter the username and password you copied in step 2 and click **Sign in**. Output similar to the following appears:
```text wrap theme={null}
name "instance-0000000000"
cluster_name ""
cluster_uuid ""
version
number "8.3.2"
build_type "docker"
build_hash "8b0b1f23fbebecc3c88e4464319dea8989f374fd"
build_date "2022-07-06T15:15:15.901688194Z"
build_snapshot false
lucene_version "9.2.0"
minimum_wire_compatibility_version "7.17.0"
minimum_index_compatibility_version "7.0.0"
tagline "You Know, for Search"
```
### Save your Elastic Cloud deployment credentials
After you've created an Elastic deployment and endpoint, you have two options to store your Elastic deployment credentials. You can store the credentials in your Astronomer Software helm values, or for greater security, as a secret in your Astronomer Software Kubernetes cluster. For additional information about adding an Astronomer Software configuration change, see [Apply a config change](/docs/astro-private-cloud/v-0-37/apply-platform-config).
1. Run the following command to base64 encode your Elastic Cloud deployment credentials:
```bash wrap theme={null}
echo -n ":" | base64
```
2. Add the following entry to your `values.yaml` file:
```yaml wrap theme={null}
global:
fluentdEnabled: true
customLogging:
enabled: true
scheme: https
# host endpoint copied from elasticsearch console with https
# and port number removed.
host: ""
port: "9243"
# encoded credentials from above step 1
secret: ""
```
3. Add the following entry to your `values.yaml` file to disable internal logging:
```yaml wrap theme={null}
tags:
logging: false
```
4. Run the following command to upgrade the Astronomer Software release version in the `values.yaml` file:
```bash wrap theme={null}
helm upgrade -f values.yaml --version=0.37 --namespace= astronomer/astronomer
```
1. Run the following command to create a secret for your Elastic Cloud Deployment credentials in the Kubernetes cluster:
```bash wrap theme={null}
kubectl create secret generic elasticcreds --from-literal elastic=: --namespace=
```
2. Add the following entry to your `values.yaml` file:
```yaml wrap theme={null}
global:
fluentdEnabled: true
customLogging:
enabled: true
scheme: https
# host endpoint copied from elasticsearch console with https
# and port number removed.
host: ""
port: "9243"
# kubernetes secret containing credentials
secretName: elasticcreds
```
3. Add the following entry to your `values.yaml` file to disable internal logging:
```yaml wrap theme={null}
tags:
logging: false
```
4. Run the following command to upgrade the Astronomer Software release version in the `values.yaml` file:
```bash wrap theme={null}
helm upgrade -f values.yaml --version=0.37 --namespace= astronomer/astronomer
```
### View Airflow task logs in Elastic
1. On the Elastic dashboard in the **Elasticsearch Service** area, click the Deployment name.
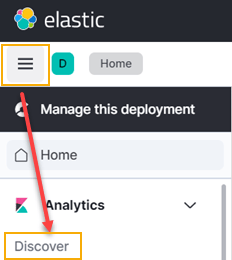
 2. Click **Menu** > **Discover**. The **Create index pattern** screen appears.
 3. Enter `fluentd.*`, or `vector.*` if you use Vector Sidecar Logging. In the **Name** field, enter `@timestamp` in the **Timestamp field**, and then click **Create index pattern**.
4. Click **Menu** > **Dashboard** to view all of the Airflow task logs for your Deployment on Astronomer.
3. Enter `fluentd.*`, or `vector.*` if you use Vector Sidecar Logging. In the **Name** field, enter `@timestamp` in the **Timestamp field**, and then click **Create index pattern**.
4. Click **Menu** > **Dashboard** to view all of the Airflow task logs for your Deployment on Astronomer.