> ## Documentation Index
> Fetch the complete documentation index at: https://astronomer.io/docs/llms.txt
> Use this file to discover all available pages before exploring further.
# Access the Airflow database
On Astronomer, each Airflow deployment is equipped with a PostgreSQL database that serves as Airflow's underlying metadata database and the scheduler's source of truth.
On Astronomer Software, a Postgres metadata database will be created for each individual Airflow Deployment and hosted within your wider platform database.
This guide will cover guidelines for the following:
* Risks associated with and use cases for database Access
* Access to Airflow's database in local development
* Decode Astronomer's metadata Secret
* Access to Airflow's database on Astronomer
* Example DAG that incorporates a query to the database
Airflow's "Ad-Hoc Query" feature used to be a common way to test DB connections and query the Airflow metadata database via the Airflow UI but was deprecated in 1.10 for security reasons.
### Risk associated with database access
As noted above, every Airflow Deployment's metadata database on Astronomer is hosted within the Platform database your team initiated during the install process for Astronomer Software. Given its importance to the scheduler's performance, it's worth noting the risks associated with accessing Airflow's database.
We strongly recommend users do not write to the database directly as it can compromise both the integrity of your Airflow Deployment and both of our team's ability to support a user in the case of an issue.
### Use cases
Keeping the above risk in mind, pulling from and reading the database safely can be a great way to gather metadata from your Airflow Deployment that isn't otherwise exposed on Astronomer and Airflow (yet).
A few examples of what you can query for:
* Completed Task Count
* Tasks started per hour, per week
* Task duration
Read below for DB access guidelines both locally and on Astronomer.
## Local access to the Airflow database
To successfully query from your Airflow Deployment's database, you'll need to set up your local Postgres connection.
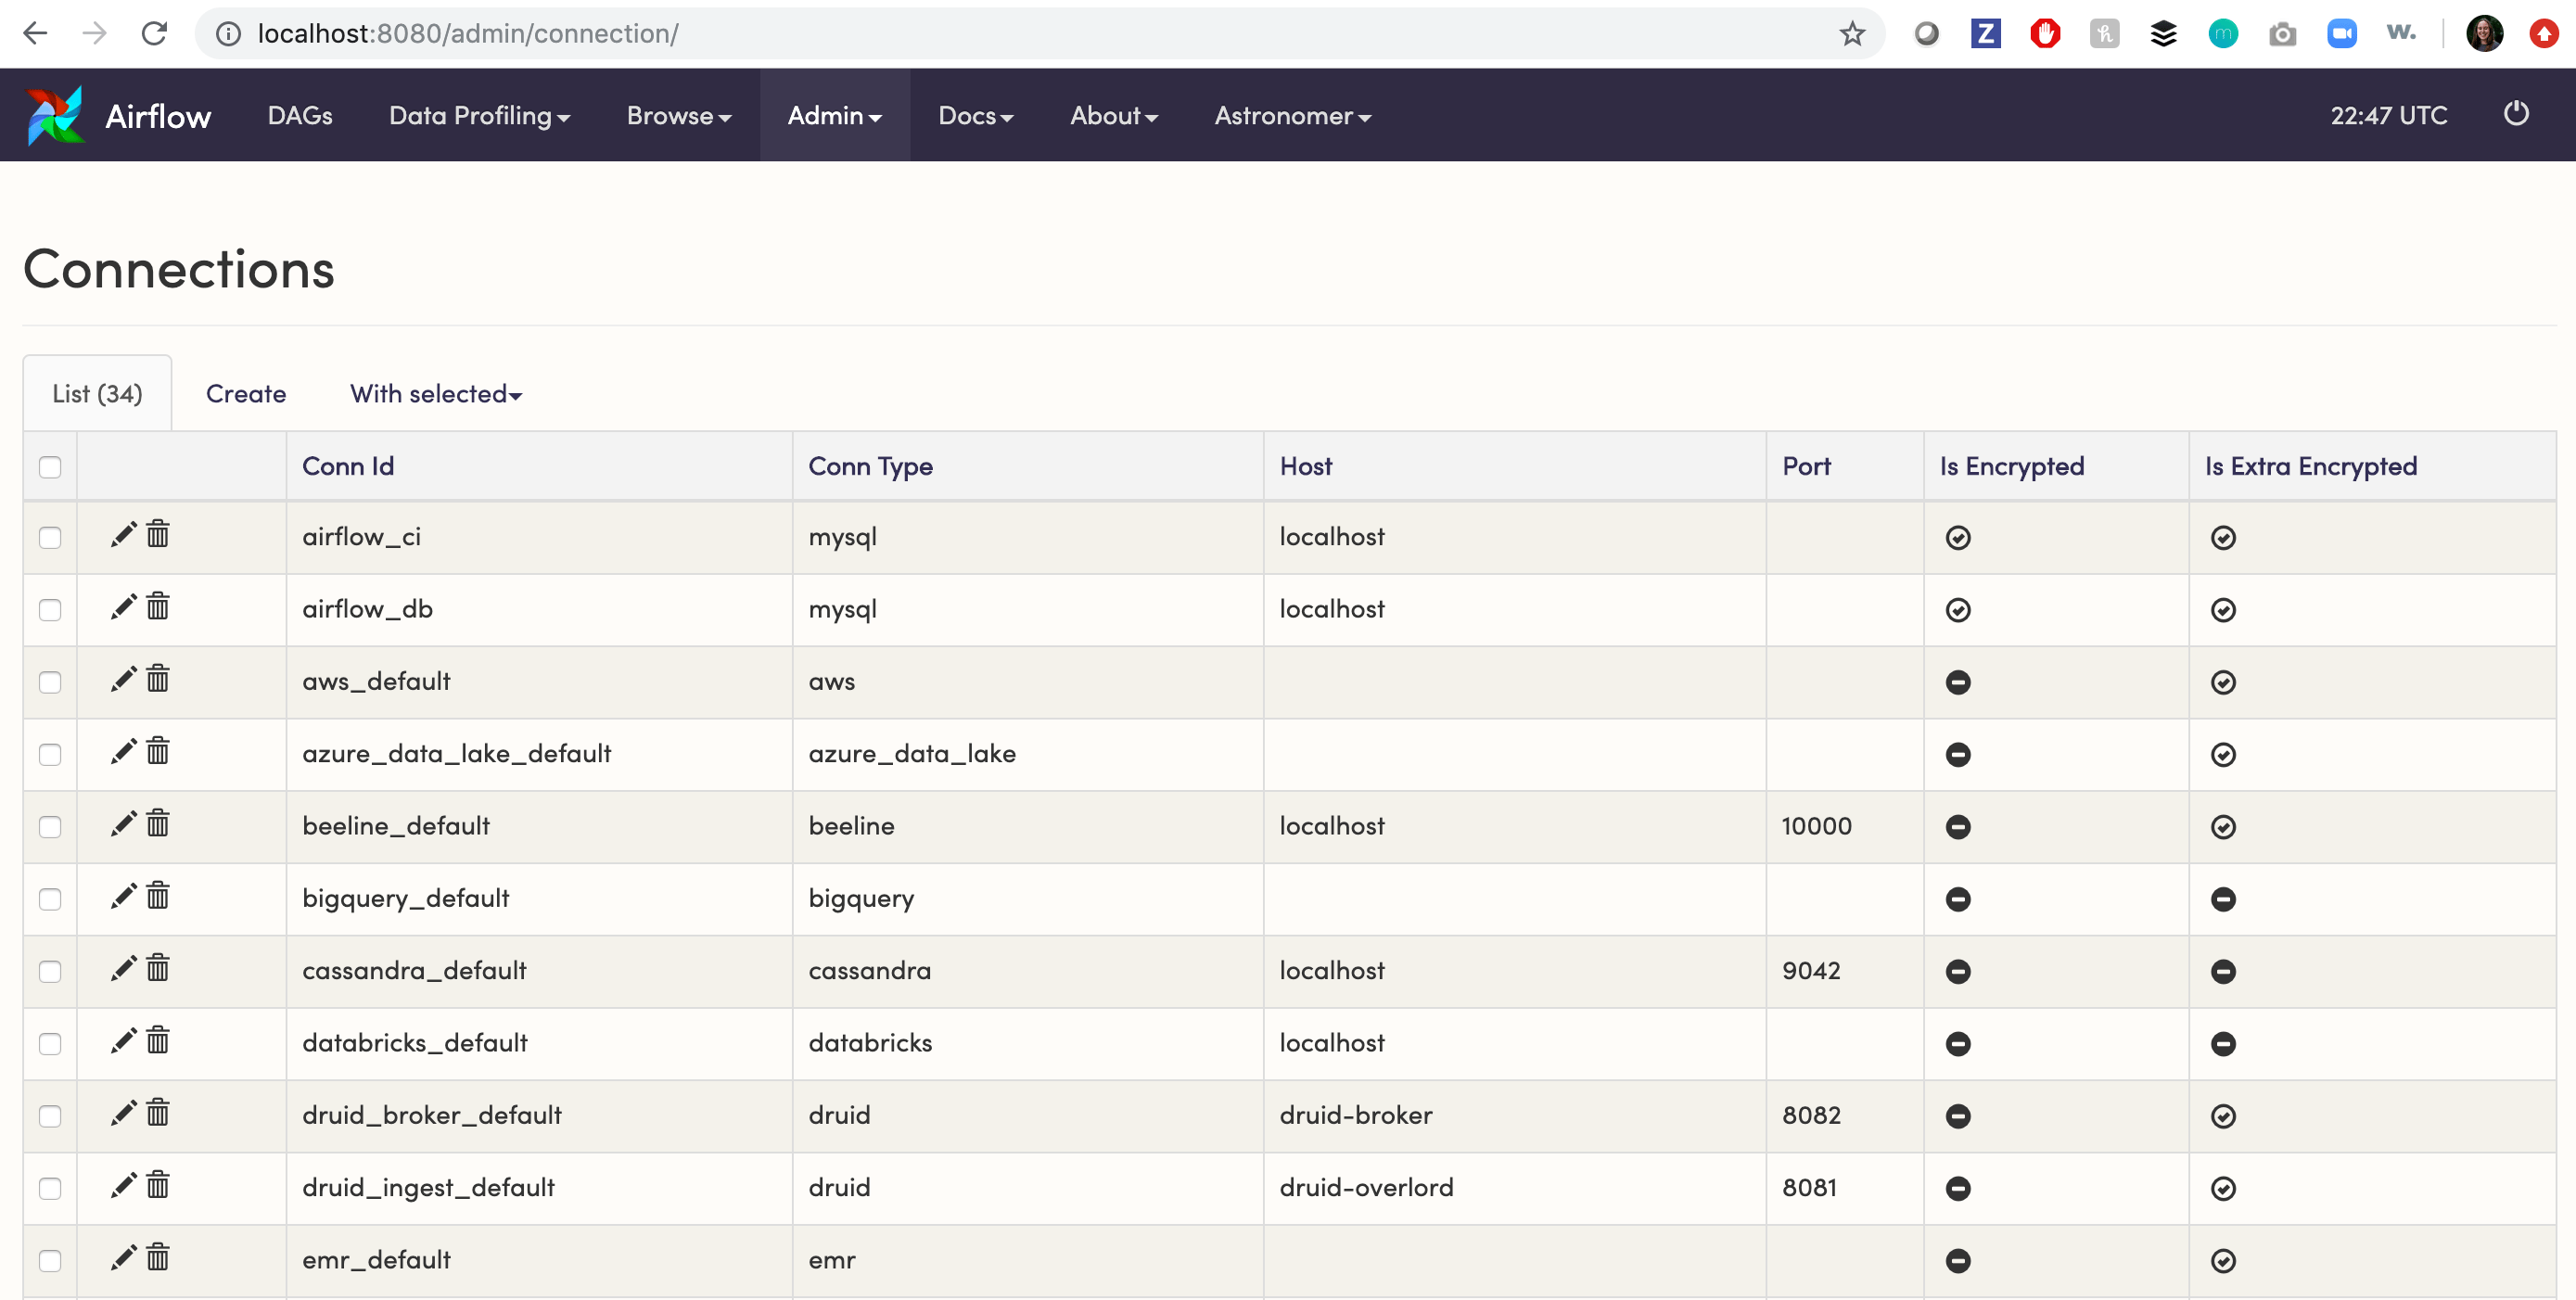
**1. Find the `airflow_db` connection Object**
On the Airflow UI, navigate over to `Admin` > `Connections`.
The `airflow_db` connection is generated by default.
 **2. Edit the connection**
In the `airflow_db` connection object:
* Change the `Conn Type` to `Postgres`
* Add the following connection information:
```text wrap theme={null}
host: postgres
schema: postgres
login: postgres
password: postgres
port (optional): 5432
```
Your connection should look something like:
**2. Edit the connection**
In the `airflow_db` connection object:
* Change the `Conn Type` to `Postgres`
* Add the following connection information:
```text wrap theme={null}
host: postgres
schema: postgres
login: postgres
password: postgres
port (optional): 5432
```
Your connection should look something like:
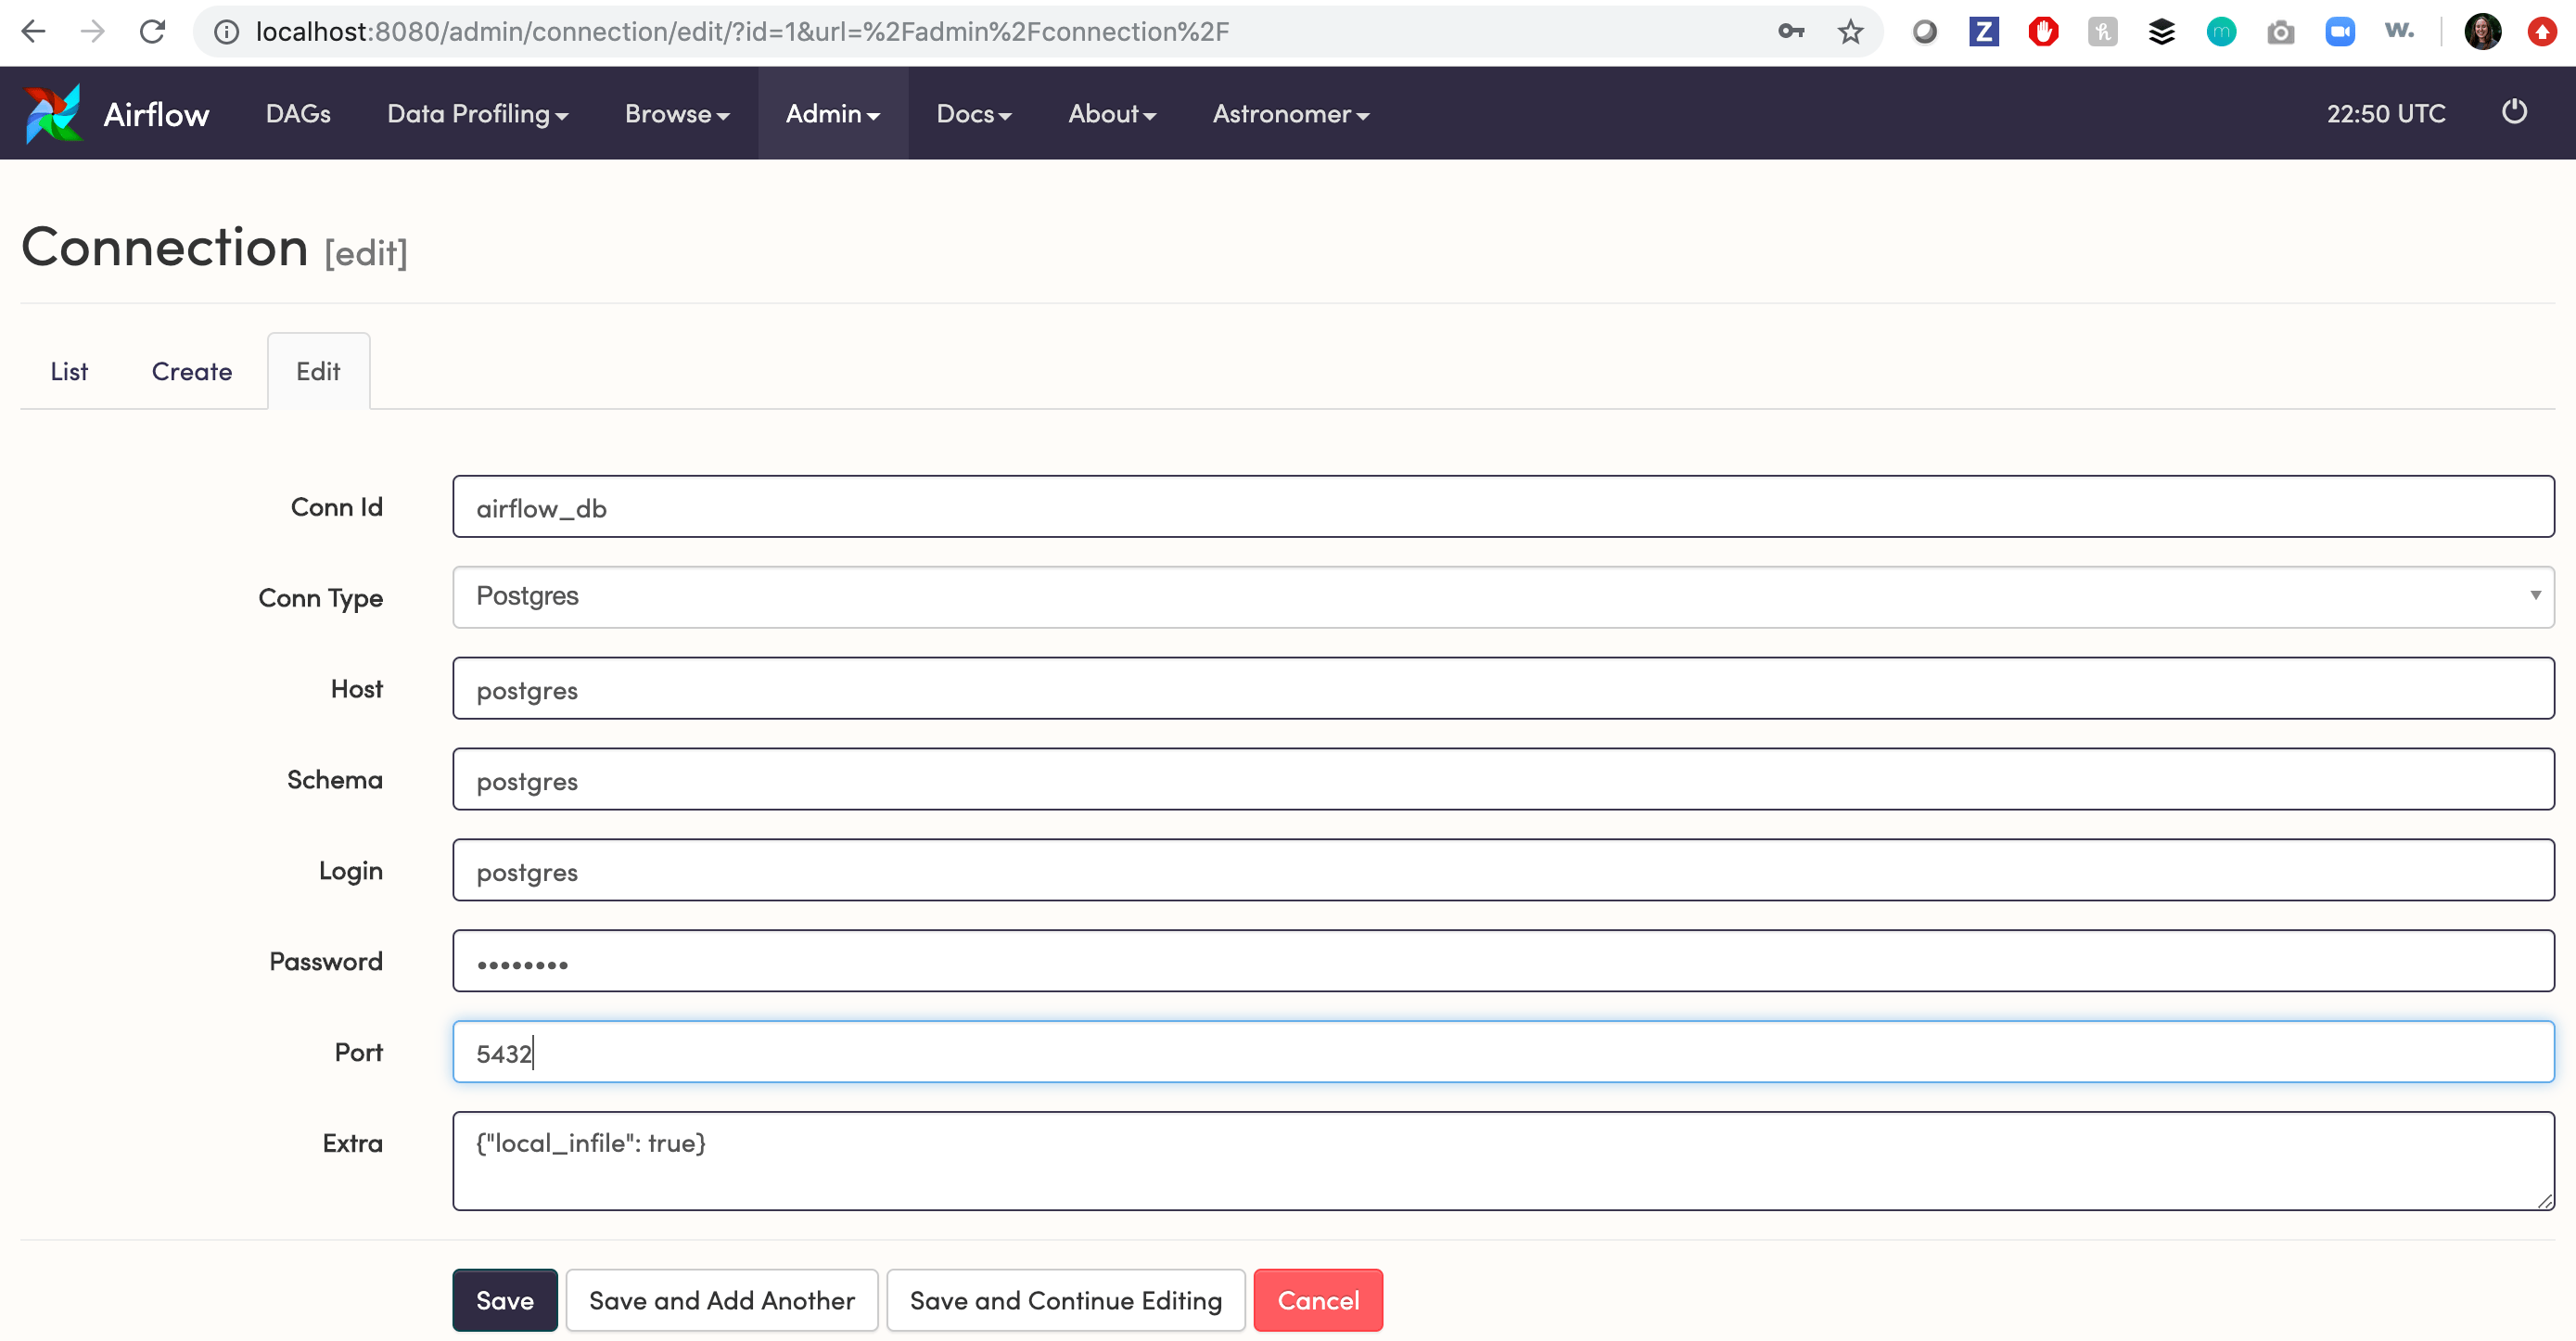 The port will be set to 5432 by default but if you’ve set a custom port, you’ll need to update that here as well.
**3. Connect to `airflow_db` in your DAG**
Here's an example DAG, where `postgres_conn_id` is set to `airflow_db`:
```python wrap theme={null}
from airflow import DAG
from airflow.operators.python import PythonOperator
from airflow.providers.postgres.hooks.postgres import PostgresHook
from datetime import datetime, timedelta
def get_dag_ids():
postgres_hook = PostgresHook(postgres_conn_id="airflow_db")
records = postgres_hook.get_records(sql="select dag_id from dag")
print(records)
with DAG(
"connect_dag",
start_date=datetime(2019, 1, 1),
max_active_runs=1,
schedule=None,
# catchup=False # enable if you don't want historical dag runs to run
) as dag:
t1 = PythonOperator(
task_id="get_dag_nums",
python_callable=get_dag_ids,
)
```
Here, the task above grabs all `dag_ids` stored inside `dag` table within Airflow's metadata database.
### Connect to the DB using a PostgreSQL client
With the connection information above, you should also be able to connect to the Airflow database from any PostgreSQL client.
Using [`psql`](https://www.postgresql.org/docs/9.3/app-psql.html), a terminal-based front-end to PostgreSQL, run:
```text wrap theme={null}
psql -h localhost -U postgres -p 5432 -W
```
When prompted, enter the password from the Connection Object above to access the database.
Alternatively, you can also connect to the DB via the Postgres container itself by exec-ing into it and executing the `psql` command.
To do so, run:
```text wrap theme={null}
docker exec -it /bin/bash
psql -U postgres
```
## Access to the Airflow database on Astronomer
The easiest way to pull from Airflow's metadata database on Astronomer is to leverage the `AIRFLOW_CONN_AIRFLOW_DB` environment variable, which we set [here](https://github.com/astronomer/airflow-chart/blob/78739edd46/templates/_helpers.yaml#L36-L40).
This environment variable, which we set by default, silently enables users to leverage the `airflow_db` connection. It's worth noting that the connection itself in the Airflow UI will NOT reflect the correct credentials (Conn Type, Host, Schema, Login, Password, Port).
To pull from the Airflow database, follow the steps below. Note that you do *not* have to set this Environment Variable yourself and you do *not* have to populate the `airflow_db` connection in the Airflow UI.
**1. Leave your `airflow_db` Connection as is**
Your `airflow_db` connection by default will look like the following:
```text wrap theme={null}
Conn Id: airflow_db
Conn Type: MySQL
Host: mysql
Schema: airflow
Login: root
```
While this information is incorrect in the Airflow UI, the underlying connection will still succeed, as connections set by an environment variable take precedence over connection details in the Software UI and in the metadata database itself.
For clarity, we intend to make sure this connection is properly populated in upcoming versions of Astronomer.
**2. Call `airflow_db` in your DAG**
You can use the same example DAG outlined above where `postgres_conn_id` is set to `airflow_db`.
**3. Verify the connection in your task logs**
To verify a successful connection, you can inspect the corresponding task log -
```text wrap theme={null}
Dependencies all met for
--------------------------------------------------------------------------------
Starting attempt 1 of 1
--------------------------------------------------------------------------------
Executing on 2020-05-07T19:02:38.022685+00:00
Started process 429 to run task
Running %s on host %s desolate-spectrum-3088-worker-866745d995-rn576
[2020-05-07 19:02:54,033] {base_hook.py:87} INFO - Using connection to: id: airflow_db. Host: desolate-spectrum-3088-pgbouncer.astronomer-desolate-spectrum-3088.svc.cluster.local, Port: 6543, Schema: desolate-spectrum-3088-metadata, Login: desolate_spectrum_3088_airflow, Password: XXXXXXXX, extra: XXXXXXXX
[('example_dag',)]
Done. Returned value was: None
```
In these logs, you can see that the connection info is properly passed:
```text wrap theme={null}
Conn Id: airflow_db
Host: desolate-spectrum-3088-pgbouncer
Schema: desolate-spectrum-3088-metadata
Login: desolate_spectrum_3088_airflow
Password: XXXXXXXX
Port: 6543
```
## Decode the Airflow metadata Secret on Astronomer
On Astronomer, your Deployment's database credentials are also stored as a [Kubernetes Secret](https://kubernetes.io/docs/concepts/configuration/secret/#overview-of-secrets) (`airflow-metadata`) in your deployment's [Kubernetes namespace](https://kubernetes.io/docs/concepts/overview/working-with-objects/namespaces/). For users with `kubectl` access to the cluster who want to properly populate the `airflow_db` connection in the Airflow UI with the proper credentials, follow our instructions below.
This is entirely optional and is not required, as the `AIRFLOW_CONN_AIRFLOW_DB` Environment Variable is pre-set on Astronomer and will allow users to reference the `airflow_db` connection in a DAG even though the connection itself isn't populated in the Airflow UI.
### Prerequisites
* Access to your Kubernetes cluster with permissions to:
* List Namespaces
* List Pods
* List Kubernetes Secrets
* [Kubectl](https://kubernetes.io/docs/tasks/tools/install-kubectl/)
* [kubectx](https://github.com/ahmetb/kubectx) (*optional*)
### Pull Credentials via Kubectl
**1. Switch into your Kubernetes Cluster**
The rest of this guide will assume the use of [kubectx](https://github.com/ahmetb/kubectx) - a command line tool that allows you to easily switch between Kubernetes clusters and Namespaces.
To start, switch into the Kubernetes cluster that hosts Astronomer Software.
```text wrap theme={null}
kubectx
```
**2. List the namespaces in your cluster**
To list the namespaces on your Kubernetes cluster, run:
```text wrap theme={null}
kubens
```
**3. Confirm your Deployment's corresponding namespace**
Find the Kubernetes namespace that corresponds to the Airflow deployment whose database you'd like credentials to and run:
```text wrap theme={null}
kubens
```
Then, run:
```text wrap theme={null}
kubectl get pods
```
You should see something like:
```text wrap theme={null}
$ kubectl get pods
NAME READY STATUS RESTARTS AGE
quasaric-sun-9051-flower-7bbdf98d94-zxxjd 1/1 Running 0 93d
quasaric-sun-9051-2346-pgbouncer-c997bbd9d-dgsjr 2/2 Running 0 2d
quasaric-sun-9051-2346-redis-0 1/1 Running 0 93d
quasaric-sun-9051-2346-scheduler-59f856bd5-d7gl4 1/1 Running 0 3h
quasaric-sun-9051-2346-statsd-5c7d7b6777-x7v4x 1/1 Running 0 93d
quasaric-sun-9051-2346-webserver-56fb447559-gjg8n 1/1 Running 0 3h
quasaric-sun-9051-2346-worker-0 2/2 Running 0 3h
```
On every Astronomer Deployment, you'll see a Kubernetes Pod for each component - the combination of which depends on the Airflow executor running in that deployment.
The example above assumes the Celery executor and so includes an additional component for a Celery Worker, a [Redis](https://redis.io/) queue and [Flower](https://flower.readthedocs.io/en/latest/) dashboard.
**4. Get Secret**
As a next step, you need to extract the airflow connection string from the airflow-metadata Kubernetes Secret in the Kubernetes namespace where your Airflow Deployment lives.
To list those Secrets, run:
```text wrap theme={null}
kubectl get secret
```
Which prints out something like the following:
```text wrap theme={null}
$ kubectl get secret
NAME TYPE DATA AGE
default-token-fk86l kubernetes.io/service-account-token 3 93d
geocentric-instrument-2346-airflow-metadata Opaque 1 93d
geocentric-instrument-2346-airflow-result-backend Opaque 1 93d
geocentric-instrument-2346-broker-url Opaque 1 93d
geocentric-instrument-2346-env Opaque 0 92d
geocentric-instrument-2346-fernet-key Opaque 1 93d
geocentric-instrument-2346-pgbouncer-config Opaque 2 93d
geocentric-instrument-2346-pgbouncer-stats Opaque 1 93d
geocentric-instrument-2346-redis-password Opaque 1 93d
geocentric-instrument-2346-registry kubernetes.io/dockerconfigjson 1 93d
geocentric-instrument-2346-scheduler-serviceaccount-token-w29bn kubernetes.io/service-account-token 3 93d
geocentric-instrument-2346-airflow-worker-token-gqr4w kubernetes.io/service-account-token 3 93d
```
The data we need is in the `airflow-metadata` Secret.
Now, run:
```text wrap theme={null}
kubectl get secret
```
Next, run:
```text wrap theme={null}
kubectl get secret -o yaml
```
This will pull some metadata on the Secret itself, including an encoded `connection` string.
```yaml wrap theme={null}
apiVersion: v1
data:
connection: cG9zdGdyZXNxbDovL2dlb2NlbnRyaWNfaW5zdHJ1bWVudF8yMzQ2X2FpcmZsb3c6VTJvN3F2VnVsWnZ5cXl2V1hXbTBSSGh1UHlqdk1IT3BAZ2VvY2VudHJpYy1pbnN0cnVtZW50LTIzNDYtcGdib3VuY2VyOjY1NDMvZ2VvY2VudHJpYy1pbnN0cnVtZW50LTIzNDYtbWV0YWRhdGE=
kind: Secret
metadata:
creationTimestamp: "2019-05-02T09:06:11Z"
labels:
chart: airflow
release: geocentric-instrument-2346
workspace: 484c967e-4ec1-4b36-8536-1525813028e1
name: geocentric-instrument-2346-airflow-metadata
namespace: astronomer-cloud-geocentric-instrument-2346
resourceVersion: "47818384"
selfLink: /api/v1/namespaces/astronomer-cloud-geocentric-instrument-2346/secrets/geocentric-instrument-2346-airflow-metadata
uid: a84029d3-0e6d-12e8-b31a-42010a96009f
type: Opaque
```
**6. Decode the Secret**
Now, use the `connection` string from the beginning of that output and decode it:
```text wrap theme={null}
echo "" | base64 --decode
```
You'll get something like the following:
```text wrap theme={null}
postgresql://quasaric_sun_9051_airflow:U2o7qvVulGvyqyvAXWm0RPhuPvjvlHOp@quasaric-sun-9051-pgbouncer:6543echo /quasaric-sun-9051-metadata
```
**7. Save your credentials**
Based on the output above, you can find the connection credentials you're looking for in the following format: `login:password@host:port/schema`
In this example, that'd be:
```text wrap theme={null}
- Host: quasaric-sun-9051-pgbouncer
- Schema: quasaric-sun-9051-metadata
- Login: quasaric_sun_9051_airflow
- Password: U2o7qvVulGvyqyvAXWm0RPhuPvjvlHOp
- Port: 6543
```
**8. Update and confirm your connection**
To finish creating and confirming your connection, enter the credentials from Step 7 into the `airflow_db` connection in the Airflow UI.
If you want to store this connection and access it programmatically, you're also free to store it in a [secret backend](/docs/astro-private-cloud/v-0-36/secrets-backend).
The port will be set to 5432 by default but if you’ve set a custom port, you’ll need to update that here as well.
**3. Connect to `airflow_db` in your DAG**
Here's an example DAG, where `postgres_conn_id` is set to `airflow_db`:
```python wrap theme={null}
from airflow import DAG
from airflow.operators.python import PythonOperator
from airflow.providers.postgres.hooks.postgres import PostgresHook
from datetime import datetime, timedelta
def get_dag_ids():
postgres_hook = PostgresHook(postgres_conn_id="airflow_db")
records = postgres_hook.get_records(sql="select dag_id from dag")
print(records)
with DAG(
"connect_dag",
start_date=datetime(2019, 1, 1),
max_active_runs=1,
schedule=None,
# catchup=False # enable if you don't want historical dag runs to run
) as dag:
t1 = PythonOperator(
task_id="get_dag_nums",
python_callable=get_dag_ids,
)
```
Here, the task above grabs all `dag_ids` stored inside `dag` table within Airflow's metadata database.
### Connect to the DB using a PostgreSQL client
With the connection information above, you should also be able to connect to the Airflow database from any PostgreSQL client.
Using [`psql`](https://www.postgresql.org/docs/9.3/app-psql.html), a terminal-based front-end to PostgreSQL, run:
```text wrap theme={null}
psql -h localhost -U postgres -p 5432 -W
```
When prompted, enter the password from the Connection Object above to access the database.
Alternatively, you can also connect to the DB via the Postgres container itself by exec-ing into it and executing the `psql` command.
To do so, run:
```text wrap theme={null}
docker exec -it /bin/bash
psql -U postgres
```
## Access to the Airflow database on Astronomer
The easiest way to pull from Airflow's metadata database on Astronomer is to leverage the `AIRFLOW_CONN_AIRFLOW_DB` environment variable, which we set [here](https://github.com/astronomer/airflow-chart/blob/78739edd46/templates/_helpers.yaml#L36-L40).
This environment variable, which we set by default, silently enables users to leverage the `airflow_db` connection. It's worth noting that the connection itself in the Airflow UI will NOT reflect the correct credentials (Conn Type, Host, Schema, Login, Password, Port).
To pull from the Airflow database, follow the steps below. Note that you do *not* have to set this Environment Variable yourself and you do *not* have to populate the `airflow_db` connection in the Airflow UI.
**1. Leave your `airflow_db` Connection as is**
Your `airflow_db` connection by default will look like the following:
```text wrap theme={null}
Conn Id: airflow_db
Conn Type: MySQL
Host: mysql
Schema: airflow
Login: root
```
While this information is incorrect in the Airflow UI, the underlying connection will still succeed, as connections set by an environment variable take precedence over connection details in the Software UI and in the metadata database itself.
For clarity, we intend to make sure this connection is properly populated in upcoming versions of Astronomer.
**2. Call `airflow_db` in your DAG**
You can use the same example DAG outlined above where `postgres_conn_id` is set to `airflow_db`.
**3. Verify the connection in your task logs**
To verify a successful connection, you can inspect the corresponding task log -
```text wrap theme={null}
Dependencies all met for
--------------------------------------------------------------------------------
Starting attempt 1 of 1
--------------------------------------------------------------------------------
Executing on 2020-05-07T19:02:38.022685+00:00
Started process 429 to run task
Running %s on host %s desolate-spectrum-3088-worker-866745d995-rn576
[2020-05-07 19:02:54,033] {base_hook.py:87} INFO - Using connection to: id: airflow_db. Host: desolate-spectrum-3088-pgbouncer.astronomer-desolate-spectrum-3088.svc.cluster.local, Port: 6543, Schema: desolate-spectrum-3088-metadata, Login: desolate_spectrum_3088_airflow, Password: XXXXXXXX, extra: XXXXXXXX
[('example_dag',)]
Done. Returned value was: None
```
In these logs, you can see that the connection info is properly passed:
```text wrap theme={null}
Conn Id: airflow_db
Host: desolate-spectrum-3088-pgbouncer
Schema: desolate-spectrum-3088-metadata
Login: desolate_spectrum_3088_airflow
Password: XXXXXXXX
Port: 6543
```
## Decode the Airflow metadata Secret on Astronomer
On Astronomer, your Deployment's database credentials are also stored as a [Kubernetes Secret](https://kubernetes.io/docs/concepts/configuration/secret/#overview-of-secrets) (`airflow-metadata`) in your deployment's [Kubernetes namespace](https://kubernetes.io/docs/concepts/overview/working-with-objects/namespaces/). For users with `kubectl` access to the cluster who want to properly populate the `airflow_db` connection in the Airflow UI with the proper credentials, follow our instructions below.
This is entirely optional and is not required, as the `AIRFLOW_CONN_AIRFLOW_DB` Environment Variable is pre-set on Astronomer and will allow users to reference the `airflow_db` connection in a DAG even though the connection itself isn't populated in the Airflow UI.
### Prerequisites
* Access to your Kubernetes cluster with permissions to:
* List Namespaces
* List Pods
* List Kubernetes Secrets
* [Kubectl](https://kubernetes.io/docs/tasks/tools/install-kubectl/)
* [kubectx](https://github.com/ahmetb/kubectx) (*optional*)
### Pull Credentials via Kubectl
**1. Switch into your Kubernetes Cluster**
The rest of this guide will assume the use of [kubectx](https://github.com/ahmetb/kubectx) - a command line tool that allows you to easily switch between Kubernetes clusters and Namespaces.
To start, switch into the Kubernetes cluster that hosts Astronomer Software.
```text wrap theme={null}
kubectx
```
**2. List the namespaces in your cluster**
To list the namespaces on your Kubernetes cluster, run:
```text wrap theme={null}
kubens
```
**3. Confirm your Deployment's corresponding namespace**
Find the Kubernetes namespace that corresponds to the Airflow deployment whose database you'd like credentials to and run:
```text wrap theme={null}
kubens
```
Then, run:
```text wrap theme={null}
kubectl get pods
```
You should see something like:
```text wrap theme={null}
$ kubectl get pods
NAME READY STATUS RESTARTS AGE
quasaric-sun-9051-flower-7bbdf98d94-zxxjd 1/1 Running 0 93d
quasaric-sun-9051-2346-pgbouncer-c997bbd9d-dgsjr 2/2 Running 0 2d
quasaric-sun-9051-2346-redis-0 1/1 Running 0 93d
quasaric-sun-9051-2346-scheduler-59f856bd5-d7gl4 1/1 Running 0 3h
quasaric-sun-9051-2346-statsd-5c7d7b6777-x7v4x 1/1 Running 0 93d
quasaric-sun-9051-2346-webserver-56fb447559-gjg8n 1/1 Running 0 3h
quasaric-sun-9051-2346-worker-0 2/2 Running 0 3h
```
On every Astronomer Deployment, you'll see a Kubernetes Pod for each component - the combination of which depends on the Airflow executor running in that deployment.
The example above assumes the Celery executor and so includes an additional component for a Celery Worker, a [Redis](https://redis.io/) queue and [Flower](https://flower.readthedocs.io/en/latest/) dashboard.
**4. Get Secret**
As a next step, you need to extract the airflow connection string from the airflow-metadata Kubernetes Secret in the Kubernetes namespace where your Airflow Deployment lives.
To list those Secrets, run:
```text wrap theme={null}
kubectl get secret
```
Which prints out something like the following:
```text wrap theme={null}
$ kubectl get secret
NAME TYPE DATA AGE
default-token-fk86l kubernetes.io/service-account-token 3 93d
geocentric-instrument-2346-airflow-metadata Opaque 1 93d
geocentric-instrument-2346-airflow-result-backend Opaque 1 93d
geocentric-instrument-2346-broker-url Opaque 1 93d
geocentric-instrument-2346-env Opaque 0 92d
geocentric-instrument-2346-fernet-key Opaque 1 93d
geocentric-instrument-2346-pgbouncer-config Opaque 2 93d
geocentric-instrument-2346-pgbouncer-stats Opaque 1 93d
geocentric-instrument-2346-redis-password Opaque 1 93d
geocentric-instrument-2346-registry kubernetes.io/dockerconfigjson 1 93d
geocentric-instrument-2346-scheduler-serviceaccount-token-w29bn kubernetes.io/service-account-token 3 93d
geocentric-instrument-2346-airflow-worker-token-gqr4w kubernetes.io/service-account-token 3 93d
```
The data we need is in the `airflow-metadata` Secret.
Now, run:
```text wrap theme={null}
kubectl get secret
```
Next, run:
```text wrap theme={null}
kubectl get secret -o yaml
```
This will pull some metadata on the Secret itself, including an encoded `connection` string.
```yaml wrap theme={null}
apiVersion: v1
data:
connection: cG9zdGdyZXNxbDovL2dlb2NlbnRyaWNfaW5zdHJ1bWVudF8yMzQ2X2FpcmZsb3c6VTJvN3F2VnVsWnZ5cXl2V1hXbTBSSGh1UHlqdk1IT3BAZ2VvY2VudHJpYy1pbnN0cnVtZW50LTIzNDYtcGdib3VuY2VyOjY1NDMvZ2VvY2VudHJpYy1pbnN0cnVtZW50LTIzNDYtbWV0YWRhdGE=
kind: Secret
metadata:
creationTimestamp: "2019-05-02T09:06:11Z"
labels:
chart: airflow
release: geocentric-instrument-2346
workspace: 484c967e-4ec1-4b36-8536-1525813028e1
name: geocentric-instrument-2346-airflow-metadata
namespace: astronomer-cloud-geocentric-instrument-2346
resourceVersion: "47818384"
selfLink: /api/v1/namespaces/astronomer-cloud-geocentric-instrument-2346/secrets/geocentric-instrument-2346-airflow-metadata
uid: a84029d3-0e6d-12e8-b31a-42010a96009f
type: Opaque
```
**6. Decode the Secret**
Now, use the `connection` string from the beginning of that output and decode it:
```text wrap theme={null}
echo "" | base64 --decode
```
You'll get something like the following:
```text wrap theme={null}
postgresql://quasaric_sun_9051_airflow:U2o7qvVulGvyqyvAXWm0RPhuPvjvlHOp@quasaric-sun-9051-pgbouncer:6543echo /quasaric-sun-9051-metadata
```
**7. Save your credentials**
Based on the output above, you can find the connection credentials you're looking for in the following format: `login:password@host:port/schema`
In this example, that'd be:
```text wrap theme={null}
- Host: quasaric-sun-9051-pgbouncer
- Schema: quasaric-sun-9051-metadata
- Login: quasaric_sun_9051_airflow
- Password: U2o7qvVulGvyqyvAXWm0RPhuPvjvlHOp
- Port: 6543
```
**8. Update and confirm your connection**
To finish creating and confirming your connection, enter the credentials from Step 7 into the `airflow_db` connection in the Airflow UI.
If you want to store this connection and access it programmatically, you're also free to store it in a [secret backend](/docs/astro-private-cloud/v-0-36/secrets-backend).